Techtonic Posted April 27, 2021 Author Share #31 Posted April 27, 2021 6 hours ago, Pete D said: Just an observation. If you could change MT47 and MT52 through 180 degrees , should that not correct the issue . I had already glued the thread to attach the yards to the mast. It really just needed the yards to be removed from the mast, flipped around and refitted. But that would removing and redoing the glued thread. When I finished up last night and noticed the problem I wasn't in the mood to backtrack like that. But today with a fresh mind I decided to go ahead and do it. Robp1025 1 Quote Complete: OcCre HMS Beagle 1:60 Amati Victory Models HMS Pegasus 1:64 In Progress: Amati Victory Models HMS Vanguard 1:72 Link to comment Share on other sites More sharing options...
Robp1025 Posted April 27, 2021 Share #32 Posted April 27, 2021 9 minutes ago, Techtonic said: I had already glued the thread to attach the yards to the mast. It really just needed the yards to be removed from the mast, flipped around and refitted. But that would removing and redoing the glued thread. When I finished up last night and noticed the problem I wasn't in the mood to backtrack like that. But today with a fresh mind I decided to go ahead and do it. Good I'm glad you fixed it so it was rigged right. Quote Link to comment Share on other sites More sharing options...
Techtonic Posted April 27, 2021 Author Share #33 Posted April 27, 2021 6 hours ago, Pete D said: There are in fact 2 sets of blocks . One that hang down on the 0.5mm thread about an inch long , and then 2 at the top mage from siezing a single block and attaching it so that it point up , and will be used when you attach running rigging on all the yards. If you look at my build there is a picture that shows that set of rigging Ah yes, your correct, I see it now. I believe this is the bit that shows the connections to the blocks on the brown 0.5mm thread. So rather than just hang straight down they actually should be oriented to aft on the foremast and towards the bow on the main mast. Foremast: Mainmast: Quote Complete: OcCre HMS Beagle 1:60 Amati Victory Models HMS Pegasus 1:64 In Progress: Amati Victory Models HMS Vanguard 1:72 Link to comment Share on other sites More sharing options...
Techtonic Posted April 27, 2021 Author Share #34 Posted April 27, 2021 6 hours ago, Maliba1025 said: That's some good advice I didn't know if CA dried in the air if its puddle since I never tried it. What do you do just dip the tool in then apply it to spot or is there a chamber that's filled? Yeah, that CA glue is funny old stuff. I've actually accidentally left two or three drops in a bottle cap overnight and it was only slightly thicker in the morning. I usually dispense 4 or 5 drops into the cap at a time - that's enough for fixing 20 or 30 knots. Any unused at the end of the session I just suck back up into the bottle. For the Glue Looper you just dip it in the glue and it immediately sucks up a controlled amount of glue by capillary action. It's not really a chamber, just a little loop and a channel. Then when you touch the tool against anything absorbent like thread it sucks the glue back out. It only works with the very low viscosity CA, like the super thin. You can clean the tool periodically with a cigarette lighter, just takes a couple of seconds. Robp1025 1 Quote Complete: OcCre HMS Beagle 1:60 Amati Victory Models HMS Pegasus 1:64 In Progress: Amati Victory Models HMS Vanguard 1:72 Link to comment Share on other sites More sharing options...
DonSangria Posted April 27, 2021 Share #35 Posted April 27, 2021 I'm building the Beagle too. I finished the foremast and all the yards. I will be attaching the yards shortly. I have one question about that: Is it necessary to glue the yards in place? I would rather just tie them around the mast and let them be free to swing, because I will probably brace the yards at an angle... Quote Current build: HMS Sphinx 1:64 (Vanguard Models) Finished: HMS Beagle 1:60 (Occre) Link to comment Share on other sites More sharing options...
Techtonic Posted April 27, 2021 Author Share #36 Posted April 27, 2021 10 minutes ago, DonSangria said: I'm building the Beagle too. I finished the foremast and all the yards. I will be attaching the yards shortly. I have one question about that: Is it necessary to glue the yards in place? I would rather just tie them around the mast and let them be free to swing, because I will probably brace the yards at an angle... No, you don't glue the yards directly to the masts. They are tied on with thread and will flop around quite a bit until they are secured in place later by the rigging. Quote Complete: OcCre HMS Beagle 1:60 Amati Victory Models HMS Pegasus 1:64 In Progress: Amati Victory Models HMS Vanguard 1:72 Link to comment Share on other sites More sharing options...
Techtonic Posted May 2, 2021 Author Share #37 Posted May 2, 2021 I finished all the yards and booms. Reading Mastini's book it recommends fitting the topmast shrouds and ratlines before fitting the yards to the masts so that the yards don't get in the way. I figured this made sense, it was too late for the foremast as I had already fitted the yards, but I switched the order for the mainmast. The other thing I noticed is that in the videos the futtock shrouds are rigged with 0.5mm thread, but in the rigging diagrams and on OcCre's promo pics they are rigged with chain. Since I had already bought a reel of antique bronze fine chain due to my kit not coming with enough chain I figured I'd use that. I also used it for the topgallant futtock shrouds which may be technically incorrect but I'd already done it by the time I realized the rigging diagrams used thread for those. For the shrouds for increased realism I seized them around the deadeyes rather than using the double overhand knot that they use in the video. For the ratlines I made a 6.5mm spacer out of wood to keep them even (6.5mm x 60 = 16" which is the spacing to use according to Mastini). I used a clove hitch for each knot. I've just done the ratlines on one side so far. I was very pleased with the result for my first go. usedtosail, Cathead, DonSangria and 1 other 4 Quote Complete: OcCre HMS Beagle 1:60 Amati Victory Models HMS Pegasus 1:64 In Progress: Amati Victory Models HMS Vanguard 1:72 Link to comment Share on other sites More sharing options...
Techtonic Posted May 8, 2021 Author Share #38 Posted May 8, 2021 Still working my way through the shrouds and ratlines. Have now completed the whole foremast and the topmast of the main mast. After completing the first set of ratlines that I pictured in my last post, I happened to glance the backside of them and noticed that it looked neater than the front side. The knots are neater and the ratlines kind of go behind the shrouds in a visually appealing way. So I decided that for all the remaining ratlines I would tie them differently - that is to begin each clove hitch by going behind the shroud rather than in front of it. Here's a pic again of the first one I did beginning each clove hitch in front of the shroud: Compare with the next one I did with each clove hitch beginning behind the shroud: Hopefully you can see from the pic that it is neater. It is definitely neater IRL. Here's the foremast lower shroud/ratlines: A closer look at the chain futtock shrouds.: This is finer chain than what comes with the kit, specifically the 1.5mm antique bronze here https://www.amazon.com/gp/product/B01B1FG83K. This looks great for the futtock shrouds but is too fine for the anchor chain so I ended up getting some thicker chain for them. The main and fore masts showing where I'm at right now: I definitely recommend one of these https://www.amazon.com/gp/product/B08R361B5Y for threading the deadeyes: I needed to squeeze the tip with some pliers so that it would go through the holes more easily. They are straight when you buy them, but as you can see in the pic I made one where I curved it around quite sharply. This makes it much easier to thread through the back of the deadeyes, particularly the lower ones that are mounted to the wales of the ship. Cathead and usedtosail 2 Quote Complete: OcCre HMS Beagle 1:60 Amati Victory Models HMS Pegasus 1:64 In Progress: Amati Victory Models HMS Vanguard 1:72 Link to comment Share on other sites More sharing options...
Techtonic Posted May 12, 2021 Author Share #39 Posted May 12, 2021 (edited) So 504 clove hitches later and the shrouds and ratlines are now complete. Before doing the main mast shrouds I took a bit of time to correct the issue mentioned in my April 12th post with the mistake in the instructions with part H20 being mounted upside down. To fix it I pulled out the center deadeye on that wale after unfurling the hook underneath. Then I drilled a new hole in the wale about half inch fore of the existing hole. Then I pulled out the top pin of the chain and rotated it to line up with the new hole. Then refitted the deadeye into the new hole. So this is what it looks like now: You can see a slight bit of damage where I pulled out the top pin as it was glued in. I've given it one coat of paint so far - it should be less noticeable after I give it a second coat. But I'm now much happier with the way it looks as the chains now all line up nicely with the shrouds. A reminder of what it looked like before the fix: Here's some pics of the completed shrouds/ratlines: Next up I'll probably go back and add the anchors. I figured I would fit all the shrouds first as the anchors might get in the way. Edited May 12, 2021 by Techtonic usedtosail, AJohnson, Dean77 and 4 others 7 Quote Complete: OcCre HMS Beagle 1:60 Amati Victory Models HMS Pegasus 1:64 In Progress: Amati Victory Models HMS Vanguard 1:72 Link to comment Share on other sites More sharing options...
Cathead Posted May 13, 2021 Share #40 Posted May 13, 2021 Great fix, looks so much better. Techtonic 1 Quote Eric Current builds: scratchbuilt Missouri River steamboat Peerless (1893); 1:1 scale timber-framed outdoor kitchen Nautical builds (kits): USS Cairo; NRG capstan project; NRG half-hull; Viking longship; US revenue cutter; 18th century longboat; Bounty launch Missouri River craft (scratchbuilt): 1853 Missouri River steamboat Arabia; 1865 steamboat Bertrand; Lewis & Clark barge; keelboat; 1876 steamboat Far West Link to comment Share on other sites More sharing options...
Pete D Posted May 13, 2021 Share #41 Posted May 13, 2021 7 hours ago, Techtonic said: So 504 clove hitches later and the shrouds and ratlines are now complete. Before doing the main mast shrouds I took a bit of time to correct the issue mentioned in my April 12th post with the mistake in the instructions with part H20 being mounted upside down. To fix it I pulled out the center deadeye on that wale after unfurling the hook underneath. Then I drilled a new hole in the wale about half inch fore of the existing hole. Then I pulled out the top pin of the chain and rotated it to line up with the new hole. Then refitted the deadeye into the new hole. So this is what it looks like now: You can see a slight bit of damage where I pulled out the top pin as it was glued in. I've given it one coat of paint so far - it should be less noticeable after I give it a second coat. But I'm now much happier with the way it looks as the chains now all line up nicely with the shrouds. A reminder of what it looked like before the fix: Here's some pics of the completed shrouds/ratlines: Next up I'll probably go back and add the anchors. I figured I would fit all the shrouds first as the anchors might get in the way. Looking great... Techtonic 1 Quote Link to comment Share on other sites More sharing options...
Dean77 Posted May 13, 2021 Share #42 Posted May 13, 2021 Brilliant fix, I have made this same error think I will now correct it the way you have done. Techtonic 1 Quote Link to comment Share on other sites More sharing options...
Techtonic Posted May 16, 2021 Author Share #43 Posted May 16, 2021 (edited) Finished the anchors and most of the stays, just got a couple left to do on the main and mizzen masts. So here's a cautionary tale... About 5 weeks ago I came down with a cold, but one that just wouldn't go away. Each day it got a little better or a little worse, but always there. Every day a congested runny nose, sometimes a cough. Had a COVID test - not that. After 5 weeks of suffering it finally clicked that this all started when I got to the build steps that used more CA glue. After some googling I found that CA glue fumes can cause exactly these symptoms in some people! What made the problem worse is that some days I felt so bad I took the day off work - so what did I do when stuck at home - work on the boat of coarse! So now I've installed a small desk fan that I'll use when I'm gluing - hopefully that'll fix the problem. To give my nose a rest today I switched to task that didn't involve any gluing. I recently ordered these guys to crew my ship: I thought they might add a bit of life to the ship and also add a sense of scale. These are Amati 25mm figures which are about the right size for 1:60 scale. works out to 1.5m or 5 feet, which given people were generally shorter back then is not too far out. I bought them here https://www.agesofsail.com/ecommerce/figures/25mm-sailors.html Today after about 4 hours of experimentation with acrylic paints these got transformed to this: This was my first ever attempt at painting miniature figures. They're not perfect but I'm pretty happy with how they came out. We have of course Charles Darwin and Captain Robert Fitzroy in the middle, surrounded by various grunts. This shot shows them placed in the ship. I won't glue them in till the very end but this gives a good idea of what they might look like. Edited June 4, 2021 by Techtonic Typo Cathead, ccoyle, Dean77 and 2 others 5 Quote Complete: OcCre HMS Beagle 1:60 Amati Victory Models HMS Pegasus 1:64 In Progress: Amati Victory Models HMS Vanguard 1:72 Link to comment Share on other sites More sharing options...
LucienL Posted May 16, 2021 Share #44 Posted May 16, 2021 2 hours ago, Techtonic said: Finished the anchors and most of the says, just got the a couple left to do on the main and mizzen masts. So here's a cautionary tale... About 5 weeks ago I came down with a cold, but one that just wouldn't go away. Each day it got a little better or a little worse, but always there. Every day a congested runny nose, sometimes a cough. Had a COVID test - not that. After 5 weeks of suffering it finally clicked that this all started when I got to the build steps that used more CA glue. After some googling I found that CA glue fumes can cause exactly these symptoms in some people! What made the problem worse is that some days I felt so bad I took the day off work - so what did I do when stuck at home - work on the boat of coarse! So now I've installed a small desk fan that I'll use when I'm gluing - hopefully that'll fix the problem. To give my nose a rest today I switched to task that didn't involve any gluing. I recently ordered these guys to crew my ship: I thought they might add a bit of life to the ship and also add a sense of scale. These are Amati 25mm figures which are about the right size for 1:60 scale. works out to 1.5m or 5 feet, which given people were generally shorter back then is not too far out. I bought them here https://www.agesofsail.com/ecommerce/figures/25mm-sailors.html Today after about 4 hours of experimentation with acrylic paints these got transformed to this: This was my first ever attempt at painting miniature figures. They're not perfect but I'm pretty happy with how they came out. We have of course Charles Darwin and Captain Robert Fitzroy in the middle, surrounded by various grunts. This shot shows them placed in the ship. I won't glue them in till the very end but this gives a good idea of what they might look like. They look great! The ship is very nice to look at now Techtonic 1 Quote Previous builds: HMS Bounty's Launch (Model Shipways), USS Albatros (OcCre) Current build: HMS Beagle (OcCre) Future builds: HMB Endeavour (Caldercraft), De Zeven Provinciën (Kolderstok), HMS Victory (Caldercraft/De Agostini/Artesania Latina/Corel) Link to comment Share on other sites More sharing options...
Robp1025 Posted May 16, 2021 Share #45 Posted May 16, 2021 8 hours ago, Techtonic said: Finished the anchors and most of the says, just got the a couple left to do on the main and mizzen masts. So here's a cautionary tale... About 5 weeks ago I came down with a cold, but one that just wouldn't go away. Each day it got a little better or a little worse, but always there. Every day a congested runny nose, sometimes a cough. Had a COVID test - not that. After 5 weeks of suffering it finally clicked that this all started when I got to the build steps that used more CA glue. After some googling I found that CA glue fumes can cause exactly these symptoms in some people! What made the problem worse is that some days I felt so bad I took the day off work - so what did I do when stuck at home - work on the boat of coarse! So now I've installed a small desk fan that I'll use when I'm gluing - hopefully that'll fix the problem. To give my nose a rest today I switched to task that didn't involve any gluing. I recently ordered these guys to crew my ship: I thought they might add a bit of life to the ship and also add a sense of scale. These are Amati 25mm figures which are about the right size for 1:60 scale. works out to 1.5m or 5 feet, which given people were generally shorter back then is not too far out. I bought them here https://www.agesofsail.com/ecommerce/figures/25mm-sailors.html Today after about 4 hours of experimentation with acrylic paints these got transformed to this: This was my first ever attempt at painting miniature figures. They're not perfect but I'm pretty happy with how they came out. We have of course Charles Darwin and Captain Robert Fitzroy in the middle, surrounded by various grunts. This shot shows them placed in the ship. I won't glue them in till the very end but this gives a good idea of what they might look like. I will for sure keep that in mind about the cold symptoms. That's crazy that it can do that to you with something so simple as CA. Also I love the addition of the little men. It really brings the ship to life. Like its telling a tale and not just existing. Techtonic 1 Quote Link to comment Share on other sites More sharing options...
Cathead Posted May 16, 2021 Share #46 Posted May 16, 2021 CA is nasty stuff. The bottles specifically warn against skin contact or fume breathing. I'm pretty sensitive to most chemical fumes (even things like bug spray and perfume set me off), so use CA as little as possible and only for short periods. Otherwise it gives me a headache very quickly. I find paint to be the same way; I've kept my focus on acrylic paints with little odor because some of the other ones destroy my health and comfort in short order. One of the things I really love about wooden modeling (as opposed to the plastic modeling I did much of my life) is how relatively benign wood glue is compared to most plastic cements and other adhesives. Your figures look great and do add a lot of life. I started painting figures for the first time during my current project and found that I really enjoy both the project itself, and the results. Techtonic 1 Quote Eric Current builds: scratchbuilt Missouri River steamboat Peerless (1893); 1:1 scale timber-framed outdoor kitchen Nautical builds (kits): USS Cairo; NRG capstan project; NRG half-hull; Viking longship; US revenue cutter; 18th century longboat; Bounty launch Missouri River craft (scratchbuilt): 1853 Missouri River steamboat Arabia; 1865 steamboat Bertrand; Lewis & Clark barge; keelboat; 1876 steamboat Far West Link to comment Share on other sites More sharing options...
Pete D Posted May 16, 2021 Share #47 Posted May 16, 2021 19 hours ago, Techtonic said: Finished the anchors and most of the says, just got the a couple left to do on the main and mizzen masts. So here's a cautionary tale... About 5 weeks ago I came down with a cold, but one that just wouldn't go away. Each day it got a little better or a little worse, but always there. Every day a congested runny nose, sometimes a cough. Had a COVID test - not that. After 5 weeks of suffering it finally clicked that this all started when I got to the build steps that used more CA glue. After some googling I found that CA glue fumes can cause exactly these symptoms in some people! What made the problem worse is that some days I felt so bad I took the day off work - so what did I do when stuck at home - work on the boat of coarse! So now I've installed a small desk fan that I'll use when I'm gluing - hopefully that'll fix the problem. To give my nose a rest today I switched to task that didn't involve any gluing. I recently ordered these guys to crew my ship: I thought they might add a bit of life to the ship and also add a sense of scale. These are Amati 25mm figures which are about the right size for 1:60 scale. works out to 1.5m or 5 feet, which given people were generally shorter back then is not too far out. I bought them here https://www.agesofsail.com/ecommerce/figures/25mm-sailors.html Today after about 4 hours of experimentation with acrylic paints these got transformed to this: This was my first ever attempt at painting miniature figures. They're not perfect but I'm pretty happy with how they came out. We have of course Charles Darwin and Captain Robert Fitzroy in the middle, surrounded by various grunts. This shot shows them placed in the ship. I won't glue them in till the very end but this gives a good idea of what they might look like. Ship looks great , the addition of the figures makes it look more "alive". Might be a thought to add to my build Techtonic 1 Quote Link to comment Share on other sites More sharing options...
Techtonic Posted May 17, 2021 Author Share #48 Posted May 17, 2021 On 5/16/2021 at 7:50 AM, Cathead said: CA is nasty stuff. The bottles specifically warn against skin contact or fume breathing. I'm pretty sensitive to most chemical fumes (even things like bug spray and perfume set me off), so use CA as little as possible and only for short periods. Otherwise it gives me a headache very quickly. I find paint to be the same way; I've kept my focus on acrylic paints with little odor because some of the other ones destroy my health and comfort in short order. One of the things I really love about wooden modeling (as opposed to the plastic modeling I did much of my life) is how relatively benign wood glue is compared to most plastic cements and other adhesives. Your figures look great and do add a lot of life. I started painting figures for the first time during my current project and found that I really enjoy both the project itself, and the results. I had seen the warnings but assumed that when it said to "avoid breathing fumes" it meant don't stick the nozzle up your nose and try glue sniffing with it. I was using it in a reasonable sized room with the door open so assumed I'd be OK. Well I know better now! I looked up the figures in your Viking longboat log. Your model and the figures look excellent! I'm assuming your figures were significantly larger than mine which allows for a lot more detail. The 25mm figures I was using are tiny which makes adding any kind of detail a significant challenge. Cathead 1 Quote Complete: OcCre HMS Beagle 1:60 Amati Victory Models HMS Pegasus 1:64 In Progress: Amati Victory Models HMS Vanguard 1:72 Link to comment Share on other sites More sharing options...
usedtosail Posted May 21, 2021 Share #49 Posted May 21, 2021 Your Beagle looks great and the figures really add to that look. I too have reactions to CA but more allergy than cold symptoms. Claritin-D clears it up though. Techtonic 1 Quote - Tom - Current Build: Vanguard Speedy Completed: Vanguard Duchess of Kingston, Stove Project, Ships Wheel Project, NRG Capstan Project, Billings Half Moon, Dumas Chris Craft 1938 27' Triple Cockpit Barrel Back, Panart Santa Lucia , Model Shipways Constitution , MS Bounty Launch , HMS Beagle Member: Nautical Research Guild Link to comment Share on other sites More sharing options...
Techtonic Posted May 22, 2021 Author Share #50 Posted May 22, 2021 16 hours ago, usedtosail said: Your Beagle looks great and the figures really add to that look. I too have reactions to CA but more allergy than cold symptoms. Claritin-D clears it up though. My symptoms are similar to allergy symptoms but I don't get itchy eyes which I usually get with allergies. I did try Claritin but it didn't help at all with me. I did read somewhere that the reaction to CA in some people is not an allergic reaction but rather an irritation of the mucous membranes, so antihistamines would not help. But I guess everyone is different so it may help some people like yourself. Quote Complete: OcCre HMS Beagle 1:60 Amati Victory Models HMS Pegasus 1:64 In Progress: Amati Victory Models HMS Vanguard 1:72 Link to comment Share on other sites More sharing options...
Techtonic Posted May 23, 2021 Author Share #51 Posted May 23, 2021 Yard lifts and halyards now done, as well as the front set of sails. Here's the first sail I did, this sail is pretty much symmetrical so be sure to rig it with the stripes vertical so that it will match the other sails. Now with all the front sails complete, you can also see the lifts and halyards running rigging for the main and foremast: Close up of the sails - you can see I put more of the small metal rings on each than the instructions show as I thought this would look better. The front belaying rack: Some of these were really hard to do properly. The belaying pins are too long for this location so earlier in the build the instructions tell you to cut off the bottom of each pin before installing it. Some of the pins I had cut off more than others. For some pins this meant there wasn't enough sticking down below to be able to catch the thread on. I admit that on a few of these I cheated and didn't do a proper belaying and instead just glued it in a way that looked somewhat like it is supposed to. I'd recommend anyone reading that that is yet to install these pins to take care and trim the pins to a length that allows them to fit but still leaves enough protruding to be able to thread around. The foremast belaying pin rack: This rack is has the pins so dense, with several of the pins having multiple ropes belayed to it, and in a difficult to access space, that again I cheated on a couple of the ropes and just glued them in place. The front sails had a flat appearance like there was no wind. I'd read about using dilute PVA glue to stiffen them into shape but figured this would not help much in this case it really needs something to push the sail outwards. I had the idea to create some little 'rods' out of the 0.15mm thread by applying CA glue to a straightened length of thread. I then placed and glued these 'rods' in between each of the sails to push the sail outwards in a way that made it look like there was some wind. For the closest sail to the foremast this cant be done as there is no inner sail to push against, so for this one I glued the sail to one of the JT105 threads. In this first pic you can see the 'rods': They are kind of hard to see, which is the idea, because they are made out of rigging thread they blend in well and don't look out of place. They are of course a little delicate so I'll have to be careful with the front sails now. Here are some other angles to show the effect: Here you can see a slight dark spot where each rod is glued - but it's not too bad I think. Robp1025, Cathead and Dean77 3 Quote Complete: OcCre HMS Beagle 1:60 Amati Victory Models HMS Pegasus 1:64 In Progress: Amati Victory Models HMS Vanguard 1:72 Link to comment Share on other sites More sharing options...
Techtonic Posted May 27, 2021 Author Share #52 Posted May 27, 2021 Work is progressing on the sails. The Mizzen Mast sails: You can see I've opted for the overlapped method of threading the top of each sail rather than the spiral method that the instruction videos show. The OcCre promo images of the ship show the overlapped method and I thought it looked better. Next I did the lowest sail on the main and foremasts. The YouTube videos show the gaff sails being done first, but reading Pete D's log he said he had to remove one of the gaff sailsas it got too much in the way to access the belaying pins. I would definitely agree with this and will leave the gaff sails until last. You'll see in these pics that I furled these lower sails to give a better view of the deck. The promo pics have the sails furled like this but the instructions do not show you how to do it. I wove three of the 0.15mm raw threads through each sail and tied them off at the bottom of each sail. Then once the sail was mounted I pulled the top of each thread to concertina the sail up as shown. Dean77, Robp1025, DonSangria and 1 other 4 Quote Complete: OcCre HMS Beagle 1:60 Amati Victory Models HMS Pegasus 1:64 In Progress: Amati Victory Models HMS Vanguard 1:72 Link to comment Share on other sites More sharing options...
Cathead Posted May 27, 2021 Share #53 Posted May 27, 2021 If you feel like studying up on rigging and sail management, you can learn how that was really done. Your method certainly achieves the desired visual effect. I agree that it opens up some nice sightlines. Techtonic 1 Quote Eric Current builds: scratchbuilt Missouri River steamboat Peerless (1893); 1:1 scale timber-framed outdoor kitchen Nautical builds (kits): USS Cairo; NRG capstan project; NRG half-hull; Viking longship; US revenue cutter; 18th century longboat; Bounty launch Missouri River craft (scratchbuilt): 1853 Missouri River steamboat Arabia; 1865 steamboat Bertrand; Lewis & Clark barge; keelboat; 1876 steamboat Far West Link to comment Share on other sites More sharing options...
Pete D Posted May 29, 2021 Share #54 Posted May 29, 2021 On 5/27/2021 at 1:46 AM, Techtonic said: Work is progressing on the sails. The Mizzen Mast sails: You can see I've opted for the overlapped method of threading the top of each sail rather than the spiral method that the instruction videos show. The OcCre promo images of the ship show the overlapped method and I thought it looked better. Next I did the lowest sail on the main and foremasts. The YouTube videos show the gaff sails being done first, but reading Pete D's log he said he had to remove one of the gaff sailsas it got too much in the way to access the belaying pins. I would definitely agree with this and will leave the gaff sails until last. You'll see in these pics that I furled these lower sails to give a better view of the deck. The promo pics have the sails furled like this but the instructions do not show you how to do it. I wove three of the 0.15mm raw threads through each sail and tied them off at the bottom of each sail. Then once the sail was mounted I pulled the top of each thread to concertina the sail up as shown. Really great work . This build is coming together nicely Techtonic 1 Quote Link to comment Share on other sites More sharing options...
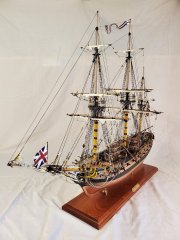
Techtonic Posted May 31, 2021 Author Share #55 Posted May 31, 2021 (edited) Well today is a very exciting day - after about 3 1/2 months and easily over 300 hours of work - she's finished! (well I may still dabble a bit, but as far as OcCre's instructions go she is finished). To keep the dust (and my cat!) off the ship I have the Old Modern Handicrafts P006 display case on order. Once I have it I'll post some pics of the ship in the case. Final jobs were installing all the upper sails along with their running rigging. Installing the gaff sails Installing the braces Installing the flags Installing the boats Then I added a few of my own flourishes Installed my figures that I painted earlier Carved some oars out of the 2x5 and installed them on the center boat Created rope coils to go in the boats. Created rope coils to hang on the belaying pins. For the securing rope for the boats I used a 4 strand braid rather than the method the instruction videos show. Takes a while longer but looks more realistic: Boats installed: Now some pics of the completed model: Here you can see the oars I made. Once I installed the figure it dawned on me the the shafts were way to thick for his hands. But too late to fix it as I'd already glued the oars in place. The rope coils for most of the ship were made around a 9mm dowel. I used the method described in Mastini's Ship Modeling Simplified, but added my own modification to create a small loop at the top to hang it with. The rope coils for the bow pin-rail were made around a 6mm dowel as there is less ground clearance Back of mainmast Back of foremast Edited June 4, 2021 by Techtonic DonSangria, LucienL, clearway and 5 others 8 Quote Complete: OcCre HMS Beagle 1:60 Amati Victory Models HMS Pegasus 1:64 In Progress: Amati Victory Models HMS Vanguard 1:72 Link to comment Share on other sites More sharing options...
Techtonic Posted May 31, 2021 Author Share #56 Posted May 31, 2021 (edited) I see one of the frequent questions asked by beginners is "What extra do I need to build the ship?". Well anyone reading this who is about to tackle this boat here is what I recommend: Tools: In roughly left to right, top to bottom order: Hobby knives, one large one small Micrometer, either analog or digital. Optional but will make it easier to work out which piece of wood/wire to use 'surgical clamp' optional but makes some of the later rigging easier where access is extremely limited due to other rigging being in the way Thin tip flush cutters, amongst other things - great for cutting the photo etch items off the sheet. Small pointed pliers (optional but useful in some cases) Small Round nosed pliers (optional bit useful for bending wire into curves and making hooks) Needle nosed pliers Razor saw Lighter (for cleaning Glue Looper V2) Glue looper V2 - excellent for applying glue to rigging. Various needle files. A small rasp file is optional but useful where lots of wood needs to be removed. Plank bender Various paint brushes Center punch, optional but useful for drilling holes more accurately in the right place Sewing needle Needle threaders Belaying tool set e.g. https://www.amazon.com/gp/product/B083GTLZL1 Two needle point tweezers Surgical scissors Pin vise (small hand drill) + 3mm, 1mm, 0.8mm, 0.5mm drills Electric drill (not shown) plus 1/4" drill Small (1") hand plane for whittling masts/yards Various clamps Pin pusher 6" ruler For consumables I'd recommend the following (other brands may be substituted): Contact cement for second hull planking and deck planking Gap filling CA glue Low viscosity CA glue Wood glue Dark stain of your choice Light stain of your choice Modelling paste for smoothing first planking (wood filler would probably work just as well) Gold or bronze metallic paint for cannons and figurehead Good quality white and black acrylic paint Satin finish acrylic varnish Good quality masking tape Acrylic paint set Course/medium and fine sandpaper e.g. 120, 220 and 320 grits 0000 steel wool Sanding block Glue accessory set (e.g. https://www.amazon.com/gp/product/B0823R994B) (Not pictured) Edited May 31, 2021 by Techtonic Dean77, DonSangria, Snug Harbor Johnny and 2 others 4 1 Quote Complete: OcCre HMS Beagle 1:60 Amati Victory Models HMS Pegasus 1:64 In Progress: Amati Victory Models HMS Vanguard 1:72 Link to comment Share on other sites More sharing options...
Cathead Posted May 31, 2021 Share #57 Posted May 31, 2021 You've got a nice display & conversation piece there! Congrats on finishing. I also like your tool display photo, a nice idea for others. Techtonic 1 Quote Eric Current builds: scratchbuilt Missouri River steamboat Peerless (1893); 1:1 scale timber-framed outdoor kitchen Nautical builds (kits): USS Cairo; NRG capstan project; NRG half-hull; Viking longship; US revenue cutter; 18th century longboat; Bounty launch Missouri River craft (scratchbuilt): 1853 Missouri River steamboat Arabia; 1865 steamboat Bertrand; Lewis & Clark barge; keelboat; 1876 steamboat Far West Link to comment Share on other sites More sharing options...
Robp1025 Posted May 31, 2021 Share #58 Posted May 31, 2021 It's an amazing build and would love to be able to get close to there with mine in due time!! Cant wait to see what you build next. Any ideas on that front? Techtonic 1 Quote Link to comment Share on other sites More sharing options...
ccoyle Posted May 31, 2021 Share #59 Posted May 31, 2021 Nice work -- congratulations! Techtonic 1 Quote Chris Coyle Greer, South Carolina When you have to shoot, shoot. Don't talk. - Tuco Current builds: Brigantine Phoenix, Hawker Hurricane Link to comment Share on other sites More sharing options...
Techtonic Posted May 31, 2021 Author Share #60 Posted May 31, 2021 7 hours ago, Robp1025 said: It's an amazing build and would love to be able to get close to there with mine in due time!! Cant wait to see what you build next. Any ideas on that front? Thanks! You'll get there soon enough with your build too. I was where you are about 6 weeks ago and you seem to be going at a similar pace to me. Summer is coming and the room where I work will be getting too hot to work in. So I'll need to wait until Fall before starting another ship. Will give me plenty of time to choose the next model. I also need to figure out a way to work without being affected by the CA glue. The last couple of weeks since I figured out the cause I've increased the ventilation, it has helped to some extent but I still get affected. Still, the finished product and the great enjoyment of the build experience has certainly been worth the suffering. Robp1025 1 Quote Complete: OcCre HMS Beagle 1:60 Amati Victory Models HMS Pegasus 1:64 In Progress: Amati Victory Models HMS Vanguard 1:72 Link to comment Share on other sites More sharing options...

Recommended Posts
Join the conversation
You can post now and register later. If you have an account, sign in now to post with your account.