xodar461 Posted March 15, 2023 #1 Posted March 15, 2023 Greetings, After completion of the Revenge 1577, I thought I/d turn to something a bit different - 2 HO scale models by Sierra West that I've had on the shelf for several years... Foss Landing and the Shipyard at Foss landing... There is a current build log for the Shipyard in this section and I will be following along with great interest, however, I am starting Foss landing first. he sierra West website has a great forum with many helpful tips on weathering, painting the various casting etc., however there are no logs on Foss landing so I hope to not screw things up too badly. So off we go... The instruction manuals are quite extensive and offer many tips on construction. Foss landing is 67 pages. A list of kit components required tools, paints and other supplies are all supplied After getting said supplies, first steps are to give a base coat of paint to both the metal casting (black) and the resin ones. I decided to try my hand at finishing some of the resin casting by following a tutorial on the SW forum. After the base layer is applied, the various items are painted, then highlight and weathering / rust is applied with a variety of soft pastel chalks (Rembrandt is the brand recommended). Here is a before and after... Here are a few others... There are many wooden barrels, steel drums and metal castings yet to be done. Some advance prep before starting work on the building include painting the roofing tar paper and shingles and window frames... And adding texture and stain to the strip wood (which seems to be basswood). This will be used for edging on the first building and window / door framing. The wood is give "texture" by running a steel wire brush along its length to add grain, then stained with paint which has been thinned (this is an earlier kit compared to the Shipyard where staining is done with the rembrandt chalks and alcohol. More work on the wood strips comes later (adding knots, more weathering...). I think you can get the idea in this photo... Once these steps are complete, its on to the clapboard walls of the first structure, "Foss Clam and Oyster Company". The walls are pre-cut clapboard style. The need the be textured to give some grain, small nail holes are placed along the wall to simulate the nailing to the underlying studs, some boards are divide d with an 11 blade to simulate a seam and finally details are added to simulate weathering (loose boards, chips). I also added a few random knots in a few strips. The walls are then braced with 1/8 inch sq wood on the back to prevent warping then given a light coat of paint (off white) as a base layer. the final layer will be a brown/red. here's one wall with the base layer. This is highly magnified but it does demonstrate a loose board toward the top, some chipped boards, scratches as so forth. The first layer of paint pretty much covered the nail holes I made. Not sure I will do much about it as at this scale they should be pretty much invisible anyway. There Jeff wefalck, Canute, Egilman and 8 others 11
popeye2sea Posted March 16, 2023 #2 Posted March 16, 2023 Check out the build log by GJDale. You will find some excellent hints and tips. Regards, Henry Old Collingwood, mtaylor, Canute and 2 others 5 Henry Laissez le bon temps rouler ! Current Build: Le Soleil Royal Completed Build: Amerigo Vespucci
Canute Posted March 16, 2023 #3 Posted March 16, 2023 Jeff, I think you've got a fine start with the weathering and detailing. I'll be following along. mtaylor, Egilman and Old Collingwood 3 Ken Started: MS Bounty Longboat, On Hold: Heinkel USS Choctaw paper Down the road: Shipyard HMC Alert 1/96 paper, Mamoli Constitution Cross, MS USN Picket Boat #1 Scratchbuild: Echo Cross Section Member Nautical Research Guild
Egilman Posted March 16, 2023 #4 Posted March 16, 2023 Building the other half? I'm down for this.... Old Collingwood, mtaylor and Canute 3 Current Build: F-86F-30 Sabre by Egilman - Kinetic - 1/32nd scale In the Garage: East Bound & Down, Building a Smokey & the Bandit Kenworth Rig in 1/25th scale Completed: M8A1 HST 1930 Packard Boattail Speedster M1A1 75mm Pack Howitzer F-4J Phantom II Bell H-13's P-51B/C Temporary Suspension: USS Gwin DD-433 F-104C Starfighter "Blue Jay Four" 1/32nd Scale Terminated Build: F-104C Starfighter ---------------------------------------------------------------------------------------------------------------------------------------------------------------------------- Quote: "Relish Today, Ketchup Tomorrow"
gjdale Posted March 16, 2023 #5 Posted March 16, 2023 Great start Jeff. As it happens, I also have the Foss’s Landing kit in my stash but decided on doing the Shipyard first. Perhaps we can learn from each other as we go. Canute, king derelict, mtaylor and 3 others 6 Grant ____________________________________________________ Current builds: African Queen - Radio Control / Live Steam Previous builds: The Shipyard at Foss' Landing (Diorama), Hannah - Ship in a Bottle, NRG Capstan Project, 1869 Allerton Steam Pumper, Medway Longboat , Alfa Romeo Spider Gran Touring (Pocher) , Da Vinci Flying Machine, 1949 Chris Craft 19' Racing Runabout - Dumas - Radio, Bomb Vessel Granado, 1742 - Cross Section - Scratchbuild, HMS Victory (Mamoli 1:90), Cutty Sark, Armed Pinnace, Bounty, Santa Maria At another place: Stephenson's Rocket (OcCre 1:24) (click the title to follow the link) In the Gallery: Lancia Armata 1803, Bomb Vessel Granada, 1742 Cross Section, 1949 Chris Craft 19' Racing Runabout
xodar461 Posted March 24, 2023 Author #6 Posted March 24, 2023 Greetings, Work continues on the Oyster Co. Once the detailing on the walls is complete, they are braced with 1/8" sq wood to prevent warping when painting. Unlike the shipyard, there seems to more painting with this kit. I will probably use chalk to do some of the weathering rather that the paints. Floquil grime is called for the base layer on the walls - I used Vallejo antique white. I noticed that the wood is quite porous so I had to be very light with the brush. before I put on the next layer and after the paint had cured for 48 hours, I used a light coat of satin polyurethane to act as a sealer (here is the ship modeler rearing its head). The next layer is Boxcar Red (50/50 mix of Vallejo {VMA} 71.038, 71.105). once dry, a light sanding with very fine sandpaper was called for followed by wall streaking with more paints. This last part I will leave until the roof and windows are on to get a better idea of where I want the streaks to be (and I may use chalks). Here are the walls to this point... It's kind of hard to see some of the details (I even added in a few random knots) given the low resolution. After the walls were painted I grunged them up a bit with some grey chalk. I may use some black at the bottom when the structure is complete to represent more dirt and grime. And finally, while waiting for the walls to dry, work was begun on the windows and the clam and oyster sign. Each window has multiple parts including the inside frame, outside frame, lower sash, and mylar windows. These can be seen in one of the earlier photos. first, they were treated with white paint to simulate peeling. I tried the terrycloth method as described in the manual but was not really happy with it. So I went with a stiff bristle brush (I think I read about that on the shipyard build). The frames are supplied with a sticky backing. Once painted, the mylar "glass" (which comes cut to size) is is stuck to the upper part of the inside frame. The outside frame is then stuck on top of the inside frame, which then fits into the window openings in the walls. I made holes in some of the window, took one pane out completely and took out just one corner in another. The clam and oyster sign was fairly straight forward - 3 pieces of strip wood were weathered (thanks Dr Grunge!) and painted white with the bristle brush. They are then glued together and some nail holes added at each end. The dry transfer decal is now placed on the wood. I had no idea how this would work given the age of the kit (at least 7 years since I bought it. Brett has great instructions on how to do this. Not all of the deal transferred however I think this add the ages look. The decal was rubbed with the end of a paintbrush to burnish it into the wood (you can actually see the wood grain through some of the decal). The a few very light swipes with the steel brush and it was done. Here is a pic of a few windows and the sign... Jeff Canute, gjdale, Old Collingwood and 9 others 12
yvesvidal Posted March 24, 2023 #7 Posted March 24, 2023 Another beautiful diorama in perspective. Yves Canute, mtaylor, Egilman and 1 other 4
xodar461 Posted March 27, 2023 Author #8 Posted March 27, 2023 Greetings! Work continues on the Oyster Co. After the windows come the doors. 4 are cast and one is constructed in layers like the windows. The 4 freight doors were done in layers with the white applied to he wood painted a variety of shades with a hint of red as this was the original color before weathering. Similar process for the wooden door. rust added at hinges and doorknobs. Next several of the walls were trimmed, again using stippled white to simulate peeling paint. The bill of goods dry rub decal was placed at this stage. I did not know what to expect given the age of the decal however it turned out OK except for some missing letters at the top. Turns out dry rub decals don't last for years, a problem that became more pronounced for some of the smaller decals. The bill of good sign was then covered with a light coat of satin polyurethane to keep the letters in place (hopefully) and then dulled down a bit with grey chalk. Photo below shows the lettering before the grey chalk was added. Tthe walls are completed by adding the windows with the lower panes and some signs to the back wall. One of the signs was a red coke button that required a Coca Cola decal. Needless to say this did not work as the dry rub decal did not separate from the paper. I tried a few methods after doing some research but nothing seemed to work. So for the coke button, I found a similar sign on the internet and shrunk it to size and glued it over the button. Here is the result... I think it looks passable. Next a few more signs were placed. The sign are on a paper sheet. The sheet was scuffed up a bit with fine sandpaper, cut out, glued and weathered with some chalk. Here are some photos. Note the installed windows: some propped open with a small wood board, others with wooden slats to cover holes and another with several boards through which a stovepipe will be placed. The boards were completed with some rusty nail holes at their ends. The clapboard below several of the sign were weathered to simulate paint and rust running down the wall. And finally I think I may have found a way to use the old dry rub deals. Double sided Scotch tape was placed on a wood board and a single decal was cut out and stuck to the tape. When the decal paper was removed, the tape was then trimmed with #11 blade very close to the decal. I ended up with this... Although the tape is slightly visible in the photo, this is highly magnified and it is pretty much invisible and regular scale. I think this may allow me to salvage the rest of the decals in this kit although some have been ruined in my attempts to find a workable solution. I'll post a few pics with some decals applied this way with less magnification to give you a better idea of what they look like at scale jeff Egilman, yvesvidal, Edwardkenway and 8 others 10 1
gjdale Posted March 27, 2023 #9 Posted March 27, 2023 Looks great Jeff. I like your solution to the deteriorating decals - I'll need to keep that in mind when I get around to this kit myself. king derelict, Old Collingwood, Canute and 3 others 6 Grant ____________________________________________________ Current builds: African Queen - Radio Control / Live Steam Previous builds: The Shipyard at Foss' Landing (Diorama), Hannah - Ship in a Bottle, NRG Capstan Project, 1869 Allerton Steam Pumper, Medway Longboat , Alfa Romeo Spider Gran Touring (Pocher) , Da Vinci Flying Machine, 1949 Chris Craft 19' Racing Runabout - Dumas - Radio, Bomb Vessel Granado, 1742 - Cross Section - Scratchbuild, HMS Victory (Mamoli 1:90), Cutty Sark, Armed Pinnace, Bounty, Santa Maria At another place: Stephenson's Rocket (OcCre 1:24) (click the title to follow the link) In the Gallery: Lancia Armata 1803, Bomb Vessel Granada, 1742 Cross Section, 1949 Chris Craft 19' Racing Runabout
Canute Posted March 28, 2023 #10 Posted March 28, 2023 For the signs on paper sheets, your techniques are great. One more is to carefully sand the backsides of the signs to get them very thin, like tissue. Then glue them in place with thinned white glue. The signs should adhere to your wood surfaces, like the clapboards. Seal in place. Egilman, Edwardkenway, mtaylor and 4 others 7 Ken Started: MS Bounty Longboat, On Hold: Heinkel USS Choctaw paper Down the road: Shipyard HMC Alert 1/96 paper, Mamoli Constitution Cross, MS USN Picket Boat #1 Scratchbuild: Echo Cross Section Member Nautical Research Guild
FriedClams Posted March 28, 2023 #11 Posted March 28, 2023 A really nice start on this kit Jeff. Your weathering/coloration looks great, and I especially like the wear and tear on the wooden "clams and oyster co." sign. Very convincing. Gary king derelict, Canute, Jack12477 and 3 others 6 Current Build Pelican Eastern-Rig Dragger Completed Scratch Builds Rangeley Guide Boat New England Stonington Dragger 1940 Auto Repair Shop Mack FK Shadowbox
xodar461 Posted April 3, 2023 Author #12 Posted April 3, 2023 (edited) Greetings! Thanks for all the kind comments. Once the windows and walls are complete it's time for some window treatments - shades and curtains. Shades are simply black paper glued to the inside of the window. One window has curtains with part of it hanging out the open window. Much of this is unseen (though will stand out better if i decide to add some light to the structures). Next, the second story door and first floor wharf door are added. The previously prepared clam and oyster sign is glued and finally the walls are glued together. Much of this can be seen in some of the following photos. A simple L square was used to keep things squared up. The left wall awning over the freight doors is now installed. This was painted earlier. Instructions called for some testors Dull Coat and then bush with some rubbing alcohol to fade it. However, I did not want to buy any more supplies at this time so I decided to try what i had on hand - matte finish polyurethane. I then painted some alcohol on it after the polyurethane had dried and this was the result... Before: After: I think it is acceptable. The awning is made by cutting strips and gluing them onto a thick template with some overhang on all sides. I left a bit more on the back side as this would be against the structure. The awning was weathered with a variety of chalks (grey, black, white, rust) then glued at an angle against the building. Two wires are added to simulate support. I mixed some black grey paint with glue and put it around the areas the wire contacts the building and awning to simulated caulk or tar that might be found at the ends and some black chalk to stain the canvas below the points of attachment. Before starting on the stairway and landing to second floor, I added some supports to in inside tall wall that will give more support to the roof when attached (red arrow). The other red arrows at the corners of the first floor of the building demonstrate where I added wood the side walls so that they would have more surface for glue when attaching them to the front and middle wall. Now for the landing and stairway. Construction was straightforward. All the wood used was to be treated with white paint to simulate peeling however I left the landing floor and steps in the natural faded wood condition. I figured one would not paint the steps and landing as they may end up slick. Templates are provided to make the construction pretty full proof. Here is the landing: However, one caveat: The landing has 2 supports. A template gives the dimensions and angles to cut however the if you follow the template, the supports, which should attach to the building just above the window, will end up a good distance below. See next photo: In this photo, A should equal B but B was at ~3.5 mm longer. I was an easy fix and here is the final staircase and landing. I added some nail holes and rust to the landing boards but not the steps. That whole structure is much too delicate and I did not want to mess things up for a relatively minor addition. I also used some black / grey chalk on the stairs and landing to simulate dirt where steps would be taken. Next up is the roof jeff Edited April 3, 2023 by xodar461 Old Collingwood, yvesvidal, Canute and 9 others 12
Mark P Posted April 3, 2023 #13 Posted April 3, 2023 Good Evening Jeff; That is some lovely work you have done. Using sandpaper for a felt roof is a great idea; I would not have thought of that one in years! All the best, Mark P FriedClams, Egilman, Old Collingwood and 3 others 6 Previously built models (long ago, aged 18-25ish) POB construction. 32 gun frigate, scratch-built sailing model, Underhill plans. 2 masted topsail schooner, Underhill plans. Started at around that time, but unfinished: 74 gun ship 'Bellona' NMM plans. POB On the drawing board: POF model of Royal Caroline 1749, part-planked with interior details. My own plans, based on Admiralty draughts and archival research. Always on the go: Research into Royal Navy sailing warship design, construction and use, from Tudor times to 1790. Member of NRG, SNR, NRS, SMS
xodar461 Posted April 4, 2023 Author #14 Posted April 4, 2023 Mark, The canvas awning is just regular paper treated as described above. I think the photo makes it look like sandpaper. It is an interesting idea though Jeff Mark P, mtaylor, Old Collingwood and 3 others 6
wefalck Posted April 4, 2023 #15 Posted April 4, 2023 (edited) The rocky coasts around the North America, Scandinavia, the UK, France etc. give the opportunity for some nice condensed scenic settings (I avoid the term 'diorama', as in most cases people do not install a background and viewing frame). In my home-country, coasts are mostly flat and quite open with buildings spread out, so that such condensed sceneries are rarely seen. Looking forward to the progress of this project. Edited April 4, 2023 by wefalck king derelict, Egilman, mtaylor and 4 others 7 wefalck panta rhei - Everything is in flux
xodar461 Posted April 9, 2023 Author #16 Posted April 9, 2023 Onto the roof. The simulated tiles / shingles were painted earlier and now are repainted with black and grey to produce a variety of shades. Here is one example: Next, the edges of the template and some of the bottom was painted green. The individual rows of shingles are cut from the sheet and applied to the thick cardboard template. Lines are drawn on the template to keep the rows lines up. Here are a few rows already glued... And here is one roof complete except for the cap shingles: The hole is for the chimney. Rather than just glue the chimney to the angled rood, I drilled a 1 mm hole in the chimney (metal was fairly soft) and stuck a 1 mm brass wire in it. on the opposite site of the roof, I glued a small 1.5 mm plank to give more purchase for the brass wire... The capping shingles are made from the unused perimeter of the shingle sheet. Instructions said to use one large sheet but I cut them down to size and applied them in an overlapping fashion. Here are a few pics of the 2 finished roofs. Also added are the stove pipe coming out of the window and the chimney. The chimney was first painted with VMA aged white ( 71.132)and then dry brushed in several layers to paint the bricks using VMA 71.105 (this is listed as brown but look more like brick red) . Support wires were added to both. Some soot was added around the chimney and streaks added to roof. The "tar" around the base of the chimney is glue mixed with some VMA black green (71.021) and black. I also used some aged white to add some bird dropping to the roof. hard to see in the photos however. After hanging the 4 freight doors this structure will be done. Jeff wefalck, gjdale, Jack12477 and 10 others 11 2
gjdale Posted April 10, 2023 #17 Posted April 10, 2023 Great job on the shingles and the chimney Jeff. Adding the brass wire pin and support block for the chimney was a wise move. mtaylor, Old Collingwood, Canute and 4 others 7 Grant ____________________________________________________ Current builds: African Queen - Radio Control / Live Steam Previous builds: The Shipyard at Foss' Landing (Diorama), Hannah - Ship in a Bottle, NRG Capstan Project, 1869 Allerton Steam Pumper, Medway Longboat , Alfa Romeo Spider Gran Touring (Pocher) , Da Vinci Flying Machine, 1949 Chris Craft 19' Racing Runabout - Dumas - Radio, Bomb Vessel Granado, 1742 - Cross Section - Scratchbuild, HMS Victory (Mamoli 1:90), Cutty Sark, Armed Pinnace, Bounty, Santa Maria At another place: Stephenson's Rocket (OcCre 1:24) (click the title to follow the link) In the Gallery: Lancia Armata 1803, Bomb Vessel Granada, 1742 Cross Section, 1949 Chris Craft 19' Racing Runabout
xodar461 Posted May 16, 2023 Author #18 Posted May 16, 2023 Greetings! Constructions resumes after a 2-week trip to Japan. After the Clam and Oyster Co building is complete, the basic wharf deck it sits on is constructed. The wharf is a single piece that is laser cut to simulate planks. two different sized planks are used to trim the edges (wire brushed and stained first). A template is provided to locate the center lines of the future pilings and the wharf braces. once the braces are glued, the underside is painted green and the topside is weathered. Instructions called for Floquil concrete - i used a variety of chalks and some AI. Here is a photo of the Clam and Oyster Co on the dock. Next is the diorama base. As I am combining 2 kits this will be left for later as I plan to complete all the buildings and other structures first. So onto the Foss Launch Co. First up is some advance prep such as was described with the previous building. No need to repeat that. The siding on this building is vertical vs horizontal as on the Oyster Co. These were detailed in a similar fashion. One interesting note is that no internal bracing was described for these walls so I decided to make some with leftover strip wood from prior ship models. These must be carefully placed so the wall will go together seamlessly when the trim is added to the edges of several of the walls. Here is the final result of the bracing: The walls are then weathered and I added some random knots. Again, rather than using paint, I used a variety of chalks and AI followed by a very light amount of white to simulate old white paint mostly weathered away to get to this: Some trim can be seen lining the freight doors. After the walls are trimmed, the signing is done more dry rub decals. I was worried about this given the age of the decals and difficulty with some of them on the Oyster Co. After doing some research, I decided to give Elmer’s spray adhesive a try as I was not entirely satisfied with the double-sided tape described earlier. I think with larger signs the tape would be quite visible. I first tried this on a small "posted Keep Out" decal. These small decals from the Oyster Co building did not work with a variety of methods I tried earlier and there are plenty more of these small decals. Here is the result: Pretty good so far. Time to try it on a bigger sign: The "Foss Launch Co" and the "Tugs & Barges" sign. Each required several pieces of strip wood to be glued together then some stippled white. The area where the spray adhesive was to be applied was taped off. A light coat of the adhesive is all that is needed. The decal was then burnished onto the wood and ... A slight amount of yellowing on the Launch Co sign, I believe, is from the decal paper. I was able to tone it down with a light brushing and some chalk. So how does this method work if the signs are placed directly on the building? The "fast boats for hire" sign goes to the left of the freight door. the entire wall was taped off except for the amount needed for the sign. And the result: Wish I had this figured out before I ruined the Coke and Pepsi signs (sigh). One other sign goes on this wall, placed onto several boards glued together. Here is the completed left wall of the Launch Co: Two more decal are placed directly on the walls. These can be seen on the photos below. The windows have also been placed. Construction is similar to the Oyster Co building. Some holes and cracks were placed and the windows dirtied up a bit. Next up were the doors - one regular door and six freight doors. The regular door has 2 pieces that come on the same sheet as the window. After prep, they are stuck together. I drilled a small hole and used a tiny nail to simulate a doorknob. It’s still a bit bright so I need to weather it a bit. The freight doors had a base tan color and then finished with a variety of chalks - raw umber, grey, black, brown, rust. Curiously, all the right doors were missing the lower hinge. This was easily rectified with a small bit of wire. The doors were glued in place with 2 life preservers and the walls were then glued together, squaring them up as described before. Although not called for in the instructions, I decided to add some blinds to the windows. Rather than black I decided to go with a lighter color - the end result was a slightly dirty, streaky tan. Here are all 4 sides of the Foss launch Co. One issue is the subtle shading on the white Boat-House sign that is a remnant of the spray adhesive. More noticeable in the photos than real life. I am not quite sure how to tone that down without causing damage to the sign or even it it needs it. I think it turned out OK. Any comments / suggestions are, as always, appreciated. Next up, the roof. Jeff Jack12477, Canute, mtaylor and 8 others 9 2
Old Collingwood Posted May 16, 2023 #19 Posted May 16, 2023 Excellent weathering. OC. Jack12477, mtaylor, Egilman and 2 others 5 Current builds 28mm Battle of Waterloo attack on La Haye Saint Diorama. 1/700 HMS Hood Flyhawk with PE, Resin and Wood Decking. Completed works. Dragon 1/700 HMS Edinburgh type 42 batch 3 Destroyer plastic. HMS Warspite Academy 1/350 plastic kit and wem parts. HMS Trafalgar Airfix 1/350 submarine plastic. Black Pearl 1/72 Revell with pirate crew. Revell 1/48 Mosquito B IV Eduard 1/48 Spitfire IX ICM 1/48 Seafire Mk.III Special Conversion 1/48 Kinetic Sea Harrier FRS1
xodar461 Posted May 31, 2023 Author #20 Posted May 31, 2023 (edited) Greetings! Time to do the roof for the Launch Co. The shingles are similar to those of the Oyster Co thought they are given a green base and black, grey, off white are used to give the variation. The roof comes in 2 parts: the main section has the peak running the length of the building and is glued to the middle and right walls; there are 2 "wings" that are glued to the front and back walls. The process of laying the shingles down is the same as the Oyster Co except there are areas on the main roof that are left bare as they will be covered by the wings. Here is the roof with all sections shingled and glued on. Next, the shingles need to be placed on the valleys. Instructions call for a single long strip that comes from the sheet the shingles were on. I chose to cut small shingles and apply individually. I think it gives a better look. The peaks were done in the same fashion. Final result: The flat roof comes next. This will be covered in tarpaper. A problem I noted was the width was too short. This was an easy fix - 1.5 mm wood plank was glued to each side to make up the difference. The "tarpaper" is applied much like the canvas awning on the Oyster Co. I went with a more traditional tarred roof that has been significantly faded by the sun. I also added a few patches to cover "leaks." Once the roof is glued on, a small stove pipe is added to the rear low wall and a finial is added to the peak of the green roof. A few more finishing touches of dirt and grime were added to the roof as well as some rundown from the stovepipe and finial to complete the structure. A few white blotches of "bird poop" were added to the green roof as well. The large dock for the Launch Co is next. Jeff Edited May 31, 2023 by xodar461 FriedClams, gjdale, popeye2sea and 9 others 12
wefalck Posted May 31, 2023 #21 Posted May 31, 2023 Seems something went wrong with inserting the pictures ... Canute and Old Collingwood 2 wefalck panta rhei - Everything is in flux
gjdale Posted May 31, 2023 #22 Posted May 31, 2023 Great work Jeff - it’s coming together very nicely. Egilman, mtaylor, Old Collingwood and 2 others 5 Grant ____________________________________________________ Current builds: African Queen - Radio Control / Live Steam Previous builds: The Shipyard at Foss' Landing (Diorama), Hannah - Ship in a Bottle, NRG Capstan Project, 1869 Allerton Steam Pumper, Medway Longboat , Alfa Romeo Spider Gran Touring (Pocher) , Da Vinci Flying Machine, 1949 Chris Craft 19' Racing Runabout - Dumas - Radio, Bomb Vessel Granado, 1742 - Cross Section - Scratchbuild, HMS Victory (Mamoli 1:90), Cutty Sark, Armed Pinnace, Bounty, Santa Maria At another place: Stephenson's Rocket (OcCre 1:24) (click the title to follow the link) In the Gallery: Lancia Armata 1803, Bomb Vessel Granada, 1742 Cross Section, 1949 Chris Craft 19' Racing Runabout
FriedClams Posted June 1, 2023 #23 Posted June 1, 2023 Nice work Jeff! I particularly like the finial rust staining running down the roof valleys and the subtle rust coloration below the stove smoke jack. The roof patches are a convincing addition also. It’s the details that keeps a viewer looking. Gary mtaylor, Old Collingwood, Jack12477 and 2 others 5 Current Build Pelican Eastern-Rig Dragger Completed Scratch Builds Rangeley Guide Boat New England Stonington Dragger 1940 Auto Repair Shop Mack FK Shadowbox
Brucealanevans Posted June 1, 2023 #24 Posted June 1, 2023 So glad to see this! I have both of these at home awaiting my return from Massachusetts (where I am finishing the Amati 1/32 Fifie) in the early fall. I am undecided which to do first but with your log I’m gifted with tips and experience whichever way I go! I have planked my last full ship model (out of room as well as patience) following closely. Old Collingwood, Canute, Egilman and 3 others 6 Bruce Evans Completed: Picket Boat #1 MS, New Bedford Whaleboat MS, CW Morgan MS 1/64 (Gallery) , Gunboat Philadelphia MS Chaperon Steam Packet MS (Gallery), USF Confederacy MS 1/64, Fifie Fishing Vessel Amati 1/32 (Gallery)
xodar461 Posted June 9, 2023 Author #25 Posted June 9, 2023 Greetings! Thanks for all the wonderful comments. This has been an enjoyable kit thus far. Now onto the large dock. This is similar to the dock that the Oyster Co. sits on thought it is much bigger and comes in 2 parts. The 2 sections were glued together and then square stripwood was glued along the perimeter and the same was used for the cross beams. After I applied some chalk followed by AI, (similar to what I did with the other dock), this one developed some serious warping. I used gorilla glue and instructions called for epoxy. The problem likely came about from the alcohol leaching through the dock and loosening the glue on the beams. This was the result: The same method was used to build the smaller dock for the Oyster Co building without issues. And having built multiple ships, I am always reluctant to use epoxy on wood-to-wood bonds - never know when you have to de-bond something. But lesson learned - use what is recommended in the kit instructions! I thought there was no point in trying to salvage that, so, time to make a dock. Using leftover wood from prior ship models, the underside of the dock was made with 3x2 mm walnut. The template was a big help. The boards are made from 1/16 x 3/32 basswood and weathered following techniques described on the Sierra West Forum. Here are photos of work in progress: The boards are not yet completely finished with the weathering process. This will be done when all are in place. If I like the result, I may do the Oyster Co dock in a similar fashion. Here's what The Oyster Co building and dock look like now. Concurrent with building the dock, I have been working on the rowboat shed. I'll post those pictures in my next update as well as the completed Launch Co dock. Jeff Canute, gjdale, FriedClams and 3 others 6
xodar461 Posted June 21, 2023 Author #26 Posted June 21, 2023 (edited) Greetings! As I complete the new dock, here is work on the rowboat shed. It is a rather delicate structure. The templates supplied with the kit were essential in construction. The template was fixed to my cutting mat with double sided tape and was then covered with wax paper to allow the wood to be glued without messing up the template. First photo shows the start of the 3 roof trusses and the walls. Scrap wood used to keep the wall studs lined up. A little further along the side boards for the walls have been aged and applied. The front wall was to only have the rowboat brace, but I added a few boards at the bottom. Spacers used for ladder to keep distance between the side rails constant. The floorboards were then weathered and glued together. Small slots were cut to accommodate the wall studs and 2 cross braces were added to connect the walls. The trusses at each end sit on these braces with the third one midway. This photo shows most of that. Here is a close up of the rear wall: Beams to support the tarpaper roof are added next. I used a slightly wider beam for the lower and upper most beams. The tarpaper is prepared as described for the roof of the Launch Co. A few hooks are fashioned from the small brass rod supplied and glued to the studs. Some scrap boards are glued to the end trusses for support. Final result: The new dock for the Launch Co will soon be completed. I've also decided to redo the Oyster Co dock and will show this as well. Jeff Edited June 21, 2023 by xodar461 Canute, Jack12477, popeye2sea and 7 others 10
Old Collingwood Posted June 21, 2023 #27 Posted June 21, 2023 That is looking So nice. OC. mtaylor, Egilman, Jack12477 and 2 others 5 Current builds 28mm Battle of Waterloo attack on La Haye Saint Diorama. 1/700 HMS Hood Flyhawk with PE, Resin and Wood Decking. Completed works. Dragon 1/700 HMS Edinburgh type 42 batch 3 Destroyer plastic. HMS Warspite Academy 1/350 plastic kit and wem parts. HMS Trafalgar Airfix 1/350 submarine plastic. Black Pearl 1/72 Revell with pirate crew. Revell 1/48 Mosquito B IV Eduard 1/48 Spitfire IX ICM 1/48 Seafire Mk.III Special Conversion 1/48 Kinetic Sea Harrier FRS1
Canute Posted June 22, 2023 #28 Posted June 22, 2023 Jeff, it looks like it'll fall down in a strong wind. That shed is beat. Well done. Old Collingwood, FriedClams, mtaylor and 2 others 5 Ken Started: MS Bounty Longboat, On Hold: Heinkel USS Choctaw paper Down the road: Shipyard HMC Alert 1/96 paper, Mamoli Constitution Cross, MS USN Picket Boat #1 Scratchbuild: Echo Cross Section Member Nautical Research Guild
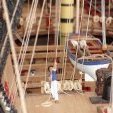
xodar461 Posted June 28, 2023 Author #29 Posted June 28, 2023 Greetings! Thanks for the kind comments. The new docks are complete. I decided to make a new Oyster Co dock so it would be a closer match the the re-done Launch Co dock. The templates were used for both. Here is the Lauch Co dock, re-done and kit supplied. And here are a few photos of the docks and their respective buildings. Next up is the fishing boat. This comes in 2 parts that have to be glued together. The deck is slightly larger than the lower hull. I decided to glue a small board here to simulate trim after the painting of the boat - below the waterline is red, above is stippled white. The trim was then painted red. I plan to use some chalk to tone down the bright red, maybe add some barnacles as well. The boat cabin and roof are made using template. The wood is glued onto the template to give the cabin a firm backing. The cabin sections were cut out with a new blade (very important to use a new one as the instructions state). The sections above the cabin windows were pretty flimsy even with the paper backing. Once the cabin was glued in place, a 0.5 x 2 mm board was glued to the upper edge of the cabin (arrows in photo below) The cabin roof was modified somewhat by adding planking. Rather than using the original template sheet for the roof, I made a copy and used that, just in case I did not like the finished roof. Once it was finished, I did a test fit and found out my copy was not exactly 1:1 - the roof was too small by 1-2 mm. Rather than fiddle with my copier, I just used the template supplied. The spare roof was used to make the counter in the cabin as can be seen in the photos below. A few "benches" were added to the cabin walls. As this boat is undergoing a refit and refinishing, loose wires were added to the cabin counter as of course any electronics were pulled prior to the refit. A few support beams were added to the structure and this is where I am currently. One interesting note. The instructions call for a mast to be placed in a hole located between the cabin and the hatch. As you can see in the photos above, there is no opening for the mast. It would be simple enough to drill one but not sure if I want to. The ladder and sawhorses will be made next. I may then start on the 2 boats that complement the kit, Jewel and Addison. Jeff mtaylor, king derelict, Egilman and 8 others 11
xodar461 Posted July 4, 2023 Author #30 Posted July 4, 2023 Greetings! here are some photos of the last main item of Foss landing, the boat and its accompanying items, the saw horse(s) and ladder. These items were constructed using the template supplied. The plans call for one sawhorse but I had enough planks to build 2. They are quite delicate so spare wood was used to provide support. I decided to install the mast however I took things a bit further and added a gaff and associated rigging. Normally these would likely lead to a cleat on the mast. not having any of the correct scale, I used a small eye bolt fashioned into a hook and coiled the rope onto the hook. A stay was added leading from the mast to the bow, secured to an eye bolt on the deck. A 3mm double block was used for the gaff lift. A single sheaved block was used for the line on the underside of the gaff, secured to the deck with a hook, again fashioned from an eye bolt. I was able to work out this simplified rigging from some photos of similar boats found on the internet. I also added red and green running lights to the roof. I may add some more details such as a smoke stack, but for now, this is enough. Here's a few photos: And finally, Foss Landing, "on the shelf." Next up, the Jewel and Addison, 2 waterline kits that will be at the dock in the completed diorama. I plan to modify the rigging for this boat too, using blocks and rope. Jeff Old Collingwood, mtaylor, FriedClams and 6 others 6 3

Recommended Posts
Create an account or sign in to comment
You need to be a member in order to leave a comment
Create an account
Sign up for a new account in our community. It's easy!
Register a new accountSign in
Already have an account? Sign in here.
Sign In Now