gil middleton Posted October 28, 2015 Share #91 Posted October 28, 2015 Heinz, Thanks for the link. I thoroughly enjoyed reading through your log. Your approach with natural wood is beautiful and much more difficult than painting the model. While my goal was to simulate a miniature of the real ship, painting allows one to cover blemishes. I lack your woodworking skills, and look forward to following your beautiful work. Cheers, Gil Heinz6672 1 Quote http://modelshipworld.com/index.php?/topic/485-hmsHMS Victory by Gil Middleton - JoTika - 1:72 Link to comment Share on other sites More sharing options...
NMBROOK Posted October 30, 2015 Share #92 Posted October 30, 2015 Hello Nigel, Shame about me. I did not know Dimitry Shevelev so far. I found some pictures of his work at shipsofscale and have to say that I am more than just impressed about it. Also I took a fast view to your build of the Sovereign of the seas. I don´t think that I can compare myself with you and Mr. Shevelev. These work is amazing! It´s an incentive to me and shows me what is possible to do. Thank you very much! - Heinz - I don't think I belong in the same category as Mr Shevelev,but thank you anyway Heinz Kind Regards Nigel Quote Currently working on Royal Caroline Link to comment Share on other sites More sharing options...
Dimitris71 Posted October 30, 2015 Share #93 Posted October 30, 2015 (edited) Hello Heinz, just came through your build log, ι had never thought until now to build the victory. Now I think about it seriously. Your work is outstanding , clean and precise. I think that the choice not to use colors or copper is excellent.My build is all painted as the real Vespucci is . Now for one more time I say that you have great skills doing such a beautiful work. I like the choice of different wood also....I will definitely follow along!! All the best Dimitris Edited October 30, 2015 by Dimitris71 NMBROOK 1 Quote Current Build: Amerigo Vespucci -Mantua- 1:100 scale Completed Build logs: Bluenose II AL 1:75 scale Gallery: Bluenose II AL 1:75 scale Future Build: Royal Caroline -Panart- 1:47 scale Link to comment Share on other sites More sharing options...
Heinz6672 Posted November 8, 2015 Author Share #94 Posted November 8, 2015 Hello friends, another update from me. This is the first time I am not totally happy and satisfied with the result. As I told you before I found out, that all the ornaments does not fit. So I had to build them on my own. I knew that this would be a big problem, cause I am not a sculptor. I ordered some new and bigger strips of wood. Unfortunately they were notably brighter than all of my older strips. But the main problem was, that I had to find out that elderberry wood is not good for carving. Every time I tried to build smaller bows it breaks. You can see on the lower ornaments that I have to glue this parts. It doesn't look very clean. I tried it several time, but the result was always the same. I came to the point to accept it and tried to build the upper ornaments in a different way. I made 2 big "S". They were too big to brake. Unfortunately they were too big to look good and to decorate them with leaves as you can see it on the real Victory. I tried to file a slit along the "S" to make them look smaller. Hmmm, it looks better but not good. I hoped that the look will change with the upper bows and the top ornament. And yes, I think I keep it as it is. It does not look like an exact copy of the real Victory. Otherwise it´s not so bad at all... What do you think? Please give me your honest opinions! At least one thing: the top ornament is the one from the kit. I filed a little bit and painted it. I love it :-))) Have a nice weekend! - Heinz - NMBROOK, mort stoll, Captain Poison and 7 others 10 Quote HMS Victory by Heinz746 Link to comment Share on other sites More sharing options...
Dimitris71 Posted November 8, 2015 Share #95 Posted November 8, 2015 Hello again Heinz, in my humble opinion (due to lack of experience) i think they look perfect... I see also that they are cut perfectly and they are very neat and clean. Cheers Dimitris mort stoll 1 Quote Current Build: Amerigo Vespucci -Mantua- 1:100 scale Completed Build logs: Bluenose II AL 1:75 scale Gallery: Bluenose II AL 1:75 scale Future Build: Royal Caroline -Panart- 1:47 scale Link to comment Share on other sites More sharing options...
Heinz6672 Posted November 8, 2015 Author Share #96 Posted November 8, 2015 another little update... I finished the first window...oh my God... these parts are sooooo small.... @Dimitris: thank you for your compliment :-))) - Heinz - Captain Poison, NMBROOK, oscarmate and 7 others 10 Quote HMS Victory by Heinz746 Link to comment Share on other sites More sharing options...
shihawk Posted November 8, 2015 Share #97 Posted November 8, 2015 Great work . Have you considered a jig or frame to make up your windows ,I,m assuming they are all a similiar size ? Dimitris71 1 Quote HMS Victory by Shihawk. Billing 1-75 wood finish Link to comment Share on other sites More sharing options...
teloo Posted November 8, 2015 Share #98 Posted November 8, 2015 awesome looking stern so far heinz! Heinz6672 and Dimitris71 2 Quote best regards Ludger current build: occre corsair http://modelshipworld.com/index.php/topic/7793-corsair-by-teloo-occre-scale-180-first-build/?p=231036 Link to comment Share on other sites More sharing options...
Heinz6672 Posted November 8, 2015 Author Share #99 Posted November 8, 2015 Great work . Have you considered a jig or frame to make up your windows ,I,m assuming they are all a similiar size ? Thank you :-) no, I have no jig and no frame; every window has different size. And the windows are placed in a bow, that means that the grids have to follow that bow. Every window is different. I took my 05x4 mm elderberry strips and cut them in 2 longer and 6 smaller parts with 1mm width. It´s a fiddling work... Shipyard sid, shihawk and Dimitris71 3 Quote HMS Victory by Heinz746 Link to comment Share on other sites More sharing options...
Jparsley Posted November 8, 2015 Share #100 Posted November 8, 2015 I don't see anything wrong with your s's To me it is superb Dimitris71 and Heinz6672 2 Quote USF Constellation 1/85 AL Jparsley Link to comment Share on other sites More sharing options...
Heinz6672 Posted November 8, 2015 Author Share #101 Posted November 8, 2015 thank you much! that was a good statement for the 100th post to my topic :-) :-) Dimitris71 1 Quote HMS Victory by Heinz746 Link to comment Share on other sites More sharing options...
NMBROOK Posted November 8, 2015 Share #102 Posted November 8, 2015 Hi Heinz I think you are possibly reaching the limits of the timber.Other than trying to glue the pieces to a backer whilst carving,boxwood wood have probably been the only answer.This wouldn't have matched the other timber. The scrolls look good and as you say only the purist will know the difference Your first window is great,not an easy job especially in 1/72!!!!!!!!! Kind Regards Nigel Dimitris71 and Heinz6672 2 Quote Currently working on Royal Caroline Link to comment Share on other sites More sharing options...
Seventynet Posted November 8, 2015 Share #103 Posted November 8, 2015 Hi Heinz, In my humble, inexperienced opinion the carvings look just great. I don't think you should regret leaving them as they are if you decide to go that way. If you don't mind me switching gears for a moment, can I ask if you carved in a rabbet or groove into your keel and stern post for your second planking? I'm just about to start my keel batten. I see merit going with a flush planking to the keel (as I did at the stem but through lack of planning) because I might get better sanding access but might get a better fit if I install a rabbet. Just curious what you decided. Sorry to hijack your thread. Ian Quote Builds in progress - Hayling Hoy Builds completed - Naval Cutter Cheerful - by Syren Ship Model Company - Cape Cod Catboat - by Bluejacket - Gokstad - by Dusek - Ship's Boat - by Dusek - Brazzera - by MarisStella Link to comment Share on other sites More sharing options...
shihawk Posted November 8, 2015 Share #104 Posted November 8, 2015 I only asked as i did mine in a similiar way ,one at a time and it does get boring . Was hoping you had come up with an easy solution . I tried the carvings but gave up and bought brass ones . I think yours look good ,no need to change them . Seventynet 1 Quote HMS Victory by Shihawk. Billing 1-75 wood finish Link to comment Share on other sites More sharing options...
Heinz6672 Posted November 8, 2015 Author Share #105 Posted November 8, 2015 If you don't mind me switching gears for a moment, can I ask if you carved in a rabbet or groove into your keel and stern post for your second planking? I'm just about to start my keel batten. I see merit going with a flush planking to the keel (as I did at the stem but through lack of planning) because I might get better sanding access but might get a better fit if I install a rabbet. Just curious what you decided. Sorry to hijack your thread. Ian Hi Ian, no problem. Feel free to ask me. I am proud that someone wants my advice here :-) Concerning the keel, please take a look at post no. 39 on my topic. There you can see 2 pictures showing you that I started planking from both sides. First I started at the keel going up for 5 or 6 planking lines. And then I started from the waterline going down till I reached the lines below. I did not groove into the keel or do something like that. I have to say that I did not follow the instructions of the kit. And the only reason for it, was the fact, that I did not read them carefully enough. The instruction tells you to first (double-)plank your ship and put the keel on it at last. I put the keel on it before I start my first (!) planking (look at post no. 4). I had to work very carefully to not damage or dirty the keel. On the other hand it helps me with my second planking, cause I had a kind of border to push my planks on it. It works like a stop for the planks and hold them on position. Maybe the same effect like a groove. The same happened on the area below the stern (I mean the area with the 2 gun ports). I planked this area, although the instructions from the kit don´t tell me to do this. As a result I have my border for the up-coming planks (last picture on post no. 36). Ian, I hope I could answer your questions well. :-))) - Heinz - Seventynet and Dimitris71 2 Quote HMS Victory by Heinz746 Link to comment Share on other sites More sharing options...
Seventynet Posted November 8, 2015 Share #106 Posted November 8, 2015 Thanks for that answer Heinz. Then I will temporarily lay my keel to have something to butt up against and get a flush fit. I guess I will be then able to remove the keel to get a uniform sanding. Anyway thanks for the advice. I have 11 plank layers left on the starboard side and hence am just going to start from the keel to meet the rest of the planks. I think all of your solutions worked very well in spite of being out of sync with the instructions. I only wish I had your skills! Best, Ian Dimitris71 1 Quote Builds in progress - Hayling Hoy Builds completed - Naval Cutter Cheerful - by Syren Ship Model Company - Cape Cod Catboat - by Bluejacket - Gokstad - by Dusek - Ship's Boat - by Dusek - Brazzera - by MarisStella Link to comment Share on other sites More sharing options...
Heinz6672 Posted November 29, 2015 Author Share #107 Posted November 29, 2015 Hello friends! I finished the windows. Oh God, these little parts... But now it´s done :-) As I told you before, I was not really happy with the ornaments. The color of the new wood is a brighter than all the other strips of my elderberry wood. And it always breaks when I tried to build little details. NMBROOK gave me some advices how to resolve this problem. (Thanks again, Nigel :-) ). But I had another idea to try it with my old and small elderberry strips. First I glue some strips parallel to get a smooth surface, for example 3 x 4 cm. In the second step I glue a second ply on the back in a 90 degree angel. The wood fibers run transversely to each other. This gives the piece of wood much more hardness to work out small details. Look at the last 2 pictures. I have made the new ornaments on the right side in this way. There are no color differences and no broken and repaired places anymore. The ornaments look much more like the original ones. Don´t you think so? I hope I can manage the left side in the same way... Have a nice weekend and greetings to all of you - Heinz - Captain Poison, cristikc, Dimitris71 and 5 others 8 Quote HMS Victory by Heinz746 Link to comment Share on other sites More sharing options...
Dimitris71 Posted November 29, 2015 Share #108 Posted November 29, 2015 Hello Heinz, fantastic work on the new ornaments on the stern... I love it!! Kind Regards Dimitris Heinz6672 1 Quote Current Build: Amerigo Vespucci -Mantua- 1:100 scale Completed Build logs: Bluenose II AL 1:75 scale Gallery: Bluenose II AL 1:75 scale Future Build: Royal Caroline -Panart- 1:47 scale Link to comment Share on other sites More sharing options...
shihawk Posted November 29, 2015 Share #109 Posted November 29, 2015 Great work . I found this stage one of the most satisfing but like you glad to see it finished .!!! Dimitris71 and Heinz6672 2 Quote HMS Victory by Shihawk. Billing 1-75 wood finish Link to comment Share on other sites More sharing options...
Mirabell61 Posted November 29, 2015 Share #110 Posted November 29, 2015 beautiful work Heinz Nils mort stoll, Dimitris71, Heinz6672 and 1 other 4 Quote Current builds -Lightship Elbe 1 Completed - Steamship Ergenstrasse ex Laker Corsicana 1918- scale 1:87 scratchbuild - "Zeesboot" heritage wooden fishing small craft around 1870, POB clinker scratch build scale 1:24 - Pilot Schooner # 5 ELBE ex Wanderbird, scale 1:50 scratchbuild - Mississippi Sterwheelsteamer built as christmapresent for grandson modified kit build - Chebec "Eagle of Algier" 1753--scale 1:48-POB-(scratchbuild) "SS Kaiser Wilhelm der Grosse" four stacker passenger liner of 1897, blue ribbond awarded, 1:144 (scratchbuild) "HMS Pegasus" , 16 gun sloop, Swan-Class 1776-1777 scale 1:64 from Amati plan -"Pamir" 4-mast barque, P-liner, 1:96 (scratchbuild) -"Gorch Fock 2" German Navy cadet training 3-mast barque, 1:95 (scratchbuild) "Heinrich Kayser" heritage Merchant Steamship, 1:96 (scratchbuild) original was my grandfathers ship -"Bohuslän" , heritage ,live Swedish museum passenger steamer (Billings kit), 1:50 "Lorbas", river tug, steam driven for RC, fictive design (scratchbuild), scale appr. 1:32 under restoration / restoration finished "Hjejlen" steam paddlewheeler, 1861, Billings Boats rare old kit, scale 1:50 Link to comment Share on other sites More sharing options...
NMBROOK Posted November 29, 2015 Share #111 Posted November 29, 2015 Truly wonderful work Heinz Your Elderberry plywood is a nice bit of thinking 'out of the box'.The results speak volumes.Those windows blew my mind .They look spectacular,not easy to do in any scale,let alone 1/72!!!!!!!!!!!. Kind Regards Nigel Seventynet, Heinz6672, Dimitris71 and 1 other 4 Quote Currently working on Royal Caroline Link to comment Share on other sites More sharing options...
Seventynet Posted November 29, 2015 Share #112 Posted November 29, 2015 Absolutly gorgeous detail. Wow. Heinz6672 and Dimitris71 2 Quote Builds in progress - Hayling Hoy Builds completed - Naval Cutter Cheerful - by Syren Ship Model Company - Cape Cod Catboat - by Bluejacket - Gokstad - by Dusek - Ship's Boat - by Dusek - Brazzera - by MarisStella Link to comment Share on other sites More sharing options...
foxy Posted November 29, 2015 Share #113 Posted November 29, 2015 'Yep'. That detail is a cracker. Love the work on these wood ships. So much goes into them. Frank. Dimitris71 and Heinz6672 2 Quote Link to comment Share on other sites More sharing options...
waspy Posted November 29, 2015 Share #114 Posted November 29, 2015 That stern is looking fantastic! If I can get my Victory to look half as good as yours I'll be over the moon! Dimitris71, Heinz6672 and foxy 3 Quote Current build: HMS Victory - Constructo - First wooden model Link to comment Share on other sites More sharing options...
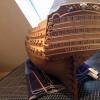
Heinz6672 Posted December 19, 2015 Author Share #115 Posted December 19, 2015 Hello modellers ! shortly before Christmas , I would like to post a little update . As you can see on the picture I finished the stern. I really like the result with the new ornaments.Have you noticed that the right man has become a little thinner ? I had to rework him a little. I wish it would be so easy for us to lose a few pounds :-))) . The next step I took was the rudder. Unfortunately I could not find any good drawings in my plans and books. So I looked here in some postings. I found some very interesting pictures. Without you, I would not be able to build a raft... not thinking about a Victory... I used that piece from the kit. I wanted it to look as if it would be made up of several pieces. That´s why I applied my technique with the slits. And I use the black wood filler to make them more visible. I hope you can see it on my pictures. They seem to be a little dark this time. I wish you all a merry christmas and good luck with your models! All the best - Heinz - P.S.: Dec. 9. was the 2 birthday of my Victory. To celebrate this day a friend wanted to hit a bottle of champagne on its hull...he is no longer my friend...lol To celebrate the day a friend wanted to hit a bottle of champagne on its hull . To celebrate the day a friend wanted to hit a bottle of champagne on its hull . That's why I applied my technique with the slits in the wood .√v That's why I applied my technique with the slits in the wood . That's why I applied my technique with the slits in the wood . That's why I applied my technique with the slits in the wood . That's why I applied my technique with the slits in the wood . mort stoll, Captain Poison, SimonV and 4 others 7 Quote HMS Victory by Heinz746 Link to comment Share on other sites More sharing options...
Jparsley Posted December 19, 2015 Share #116 Posted December 19, 2015 She looks a beauty for two years old great craftsmanship hope you and your loved ones have a very merry Christmas Seventynet, Dimitris71 and Heinz6672 3 Quote USF Constellation 1/85 AL Jparsley Link to comment Share on other sites More sharing options...
Seventynet Posted December 19, 2015 Share #117 Posted December 19, 2015 Great work as usual Heinz. I can't help being drawn to that beautiful planking and those perfectly cut wales. A merry Christmas to you and your family. Best, Ian Dimitris71 and Heinz6672 2 Quote Builds in progress - Hayling Hoy Builds completed - Naval Cutter Cheerful - by Syren Ship Model Company - Cape Cod Catboat - by Bluejacket - Gokstad - by Dusek - Ship's Boat - by Dusek - Brazzera - by MarisStella Link to comment Share on other sites More sharing options...
NMBROOK Posted December 19, 2015 Share #118 Posted December 19, 2015 Fabulous work as usual Heinz A merry Christmas to you Nigel Dimitris71 and Heinz6672 2 Quote Currently working on Royal Caroline Link to comment Share on other sites More sharing options...
Dimitris71 Posted December 19, 2015 Share #119 Posted December 19, 2015 Precise and clean work as always Heinz... :) A Merry Christmas to you!! All the best Dimitris Heinz6672 1 Quote Current Build: Amerigo Vespucci -Mantua- 1:100 scale Completed Build logs: Bluenose II AL 1:75 scale Gallery: Bluenose II AL 1:75 scale Future Build: Royal Caroline -Panart- 1:47 scale Link to comment Share on other sites More sharing options...
SimonV Posted December 20, 2015 Share #120 Posted December 20, 2015 Clean and beautiful work Heinz. I really like precision of your work . Keep on the good work and A merry Christmas to you and your family. Dimitris71 and Heinz6672 2 Quote Simon Current build: Royal Yacht, Duchess of Kingston by Vanguard Models Mercury by Victory Models - scale 1:64 - (99% scratchbuild) - on hold Finished: Bluenose by Amati - scale 1:100 Link to comment Share on other sites More sharing options...

Recommended Posts
Join the conversation
You can post now and register later. If you have an account, sign in now to post with your account.