Thunder
-
Posts
537 -
Joined
-
Last visited


-
 Scottish Guy reacted to a post in a topic:
Cutty Sark by rkre88 - Academy - 1:150 - PLASTIC
Scottish Guy reacted to a post in a topic:
Cutty Sark by rkre88 - Academy - 1:150 - PLASTIC
-
looks like you were making a great job and looks saveable to me.
- 9 replies
-
- 1
-
-
- Cutty Sark
- clipper
- (and 2 more)
-
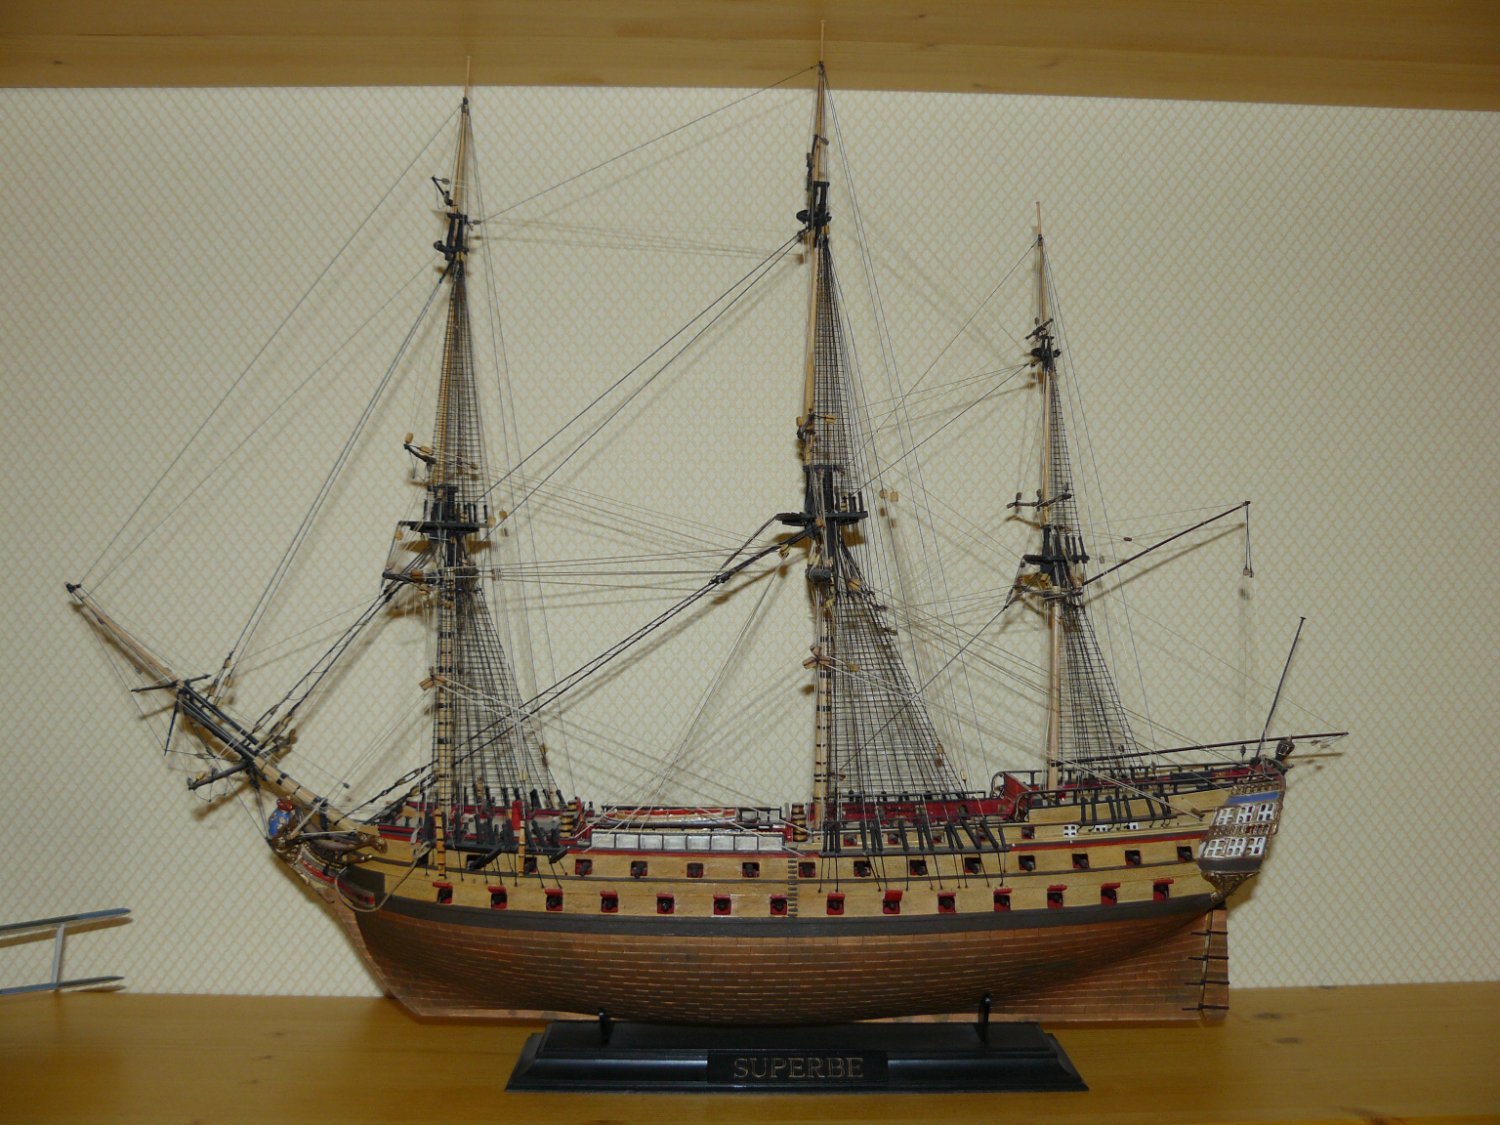
Hi, when the masts are tending to bend i would rig temporary stays, pulling forwards to the correct tension to stop the mast pulling backwards as you progress with the shrouds. Below is my Superbe, she has suffered a little with thread shrinkage over the years but is still on show after 25 years.

-
This is a delightful little model that does not get the attention it deserves. I built this and was one of the most enjoyable builds i have completed. Hope you enjoy as much as i did.
-
ccoyle reacted to a post in a topic:
HMS Cruiser by Thunder - FINISHED - Caldercraft - 1:64 Scale
-
GrandpaPhil reacted to a post in a topic:
What are the best detailed plastic models?
-
shipman reacted to a post in a topic:
What are the best detailed plastic models?
-
mtaylor reacted to a post in a topic:
HM Cutter Speedy 1828 by oakheart - from plans drawn by Bill Shoulders in 1972
-
mtaylor reacted to a post in a topic:
OcCre HMS Victory Limited edition
-
mtaylor reacted to a post in a topic:
OcCre HMS Victory Limited edition
-
allanyed reacted to a post in a topic:
OcCre HMS Victory Limited edition
-
allanyed reacted to a post in a topic:
OcCre HMS Victory Limited edition
-
Canute reacted to a post in a topic:
OcCre HMS Victory Limited edition
-
Always concerns me, with regards to attention to detail, when the kit company does not realise what way the flags would be pointing when under sail!
-
If you are going to do frames at least make it look something like. Those frame spacings would probably be ok for a merchant man but no ship of war had spacing like that.
-
Hi Tim, Mine had the leading edge angled for a third then the centre portion rounded if that makes sense. Rudder slightly tapers aft but only the lower, wider section. The top section is the same thickness through out. As shown, the rudder does not reach all the way down to the bottom of the keel, believe to try to prevent being unhinged if the ship touched the ground. sorry for slow reply. Adrian
-
I have kept this class of vessel in mind since 2003 when model boats magazine issued free plans of 'Blazer' drawn by Peter Danks. Looks like a great kit
-
I think that will look better than the regular spaced shrouds and have seen exactly like that in some sources. I would always try to get the straps down to the wale if possible. I would still say that this is a good representation of speedy. Items of rig would change through a ships life as captains changed things to try and get a better trim and improve sailing quality.
-
Remember the shrouds do not have to be equally spaced, the first one should be in line with the mast but the others would be spaced tosuit the gunport so can make that gap larger if necessary if would interfere with the gunport lid.
-
Thanks all, great information. I have the same issue on my Proxxon FET and assumed it was a fault of the saw. However, practice cuts with lime and oak were fine. When started to cut the boxwood, brought specially for my build, had horrible issues. I did make a blade change which helped a little but am limited with choice of blades with the Proxxon.
-
Hi, I am thinking that could possibly get away with just moving the belaying racks and then making sure you space the shrouds / deadeyes so they do not end up in front of the gun port. Looking at mine those belaying racks look a little forward anyway. The cutter is a nice rig to complete just worth noting that Bill Shoulder got the bowsprit rigging incorrect, i think i mentioned it in my log.
-
Hi Tim, Finally caught up with your build, and it is looking great. However, just wanted to jump in to avoid a potential issue regarding the gunport positions. Are you going to make the deck layout match the gunports? My concern is that the position of the belaying pins is arranged either side of the gunport. You will have to move these aft to match. If you have to do the same with the chain plates, external to the hull, then this will effect the shrouds. You will then have to move the mast back to match. It does then mean the bits and gratings at the base of the mast will need to move. Just wanted to make sure you considered this now rather than find it when you get to the rigging stage.
-
Proxxon --- as far as I know don't offer a sliding table. I made one and the slot is the width of the blade so no tear out, no backer board needed. I would love to see your sliding table, can you do a feature on it please?
-
Perhaps we should take into account one or two critical factors. Where you live, where kits have come from and where stored. If you consider i have not been able to cut the lawns since September due to it being wet then you could imagine that the atmosphere is damp and wood unlikely to dry out.
-
Hi, i have a thing for buying old kits, if you check out my Speedy build this was a kit from the early 70's. It was actually the best strip wood I have worked with so far. The bulkheads were awful, but not due to bad wood, they were poorly cut. On the other hand i have many new kits. Caldercraft's Chatham's wood was excellent, Caldercraft's Pickle was awful. They replaced the deck planking but the hull planking was brittle and did not hold an edge. To be fair to them, their advice was not to store in a central heated home and have an open source of water in the room for humidity if room is heated. Not sure yet if this helps but had no issues so far with kits since putting an open water bottle in my store. Of the old kits that i thought the planking was awful, I have looked in the new versions and found not much better. Therefore agree, the choice of wood species is the main issue.