


glbarlow
-
Posts
3,809 -
Joined
-
Last visited
8 Followers


About glbarlow

- Birthday October 30
Recent Profile Visitors
8,014 profile views


-
 mtaylor reacted to a post in a topic:
Upload of pictures fails all the time
mtaylor reacted to a post in a topic:
Upload of pictures fails all the time
-
 It will do that if you try to upload a large number of photos at once, like 20 or more though it may be size dependent also. Try a smaller number. Slow speed must be local, not so here.
 -
Scottish Guy reacted to a post in a topic:
Type of glue to use planking a hull
-
Scottish Guy reacted to a post in a topic:
Type of glue to use planking a hull
-
Scottish Guy reacted to a post in a topic:
Type of glue to use planking a hull
-
Scottish Guy reacted to a post in a topic:
Type of glue to use planking a hull
-
ferretmary1 reacted to a post in a topic:
Are you an NRG Member???
-
Matt D reacted to a post in a topic:
HMS Sphinx 1775 by mugje - Vanguard Models - 1:64
-
chris watton reacted to a post in a topic:
HMS Sphinx 1775 by mugje - Vanguard Models - 1:64
-
Old Collingwood reacted to a post in a topic:
HM Sloop Echo 1781 by VTHokiEE - 1:48 - Cross-Section
-
FrankWouts reacted to a post in a topic:
Sloop Speedwell by Chuck - Ketch Rigged Sloop, 1752 - POF
-
It looks like a very old kit, the wheel especially. Amazing how far ship model design has advanced either Chris and Chuck at the forefront.
-
The stem looks so cool on Syren models.
-
glbarlow reacted to a post in a topic:
Sloop Speedwell 1752 by Rustyj - Syren Ship Model Company - 1:32 Scale - POF Sloop
-
glbarlow reacted to a post in a topic:
HM Cutter Cheerful 1806 by Erik W - 1:48 scale
-
glbarlow reacted to a post in a topic:
HM Cutter Cheerful 1806 by niwotwill - Syren Ship Model Company - scale 1:48
-
glbarlow reacted to a post in a topic:
HM Cutter Cheerful 1806 by niwotwill - Syren Ship Model Company - scale 1:48
-
Nice looking planking, well done. Looks link you’ve got lining well under control. I bend all my planks with steam and heat from a travel iron. Once I converted to Chuck’s planking technique I never looked back.
-
glbarlow reacted to a post in a topic:
HMS Portland 1770 by scrubbyj427 - 1:48 - 4th rate 50 gun ship
-
Thanks, lining them up is a sticky challenge but worked out ok.
-
glbarlow reacted to a post in a topic:
HMS Winchelsea 1764 by glbarlow - 1:48
-
glbarlow reacted to a post in a topic:
HMS Winchelsea 1764 by glbarlow - 1:48
-
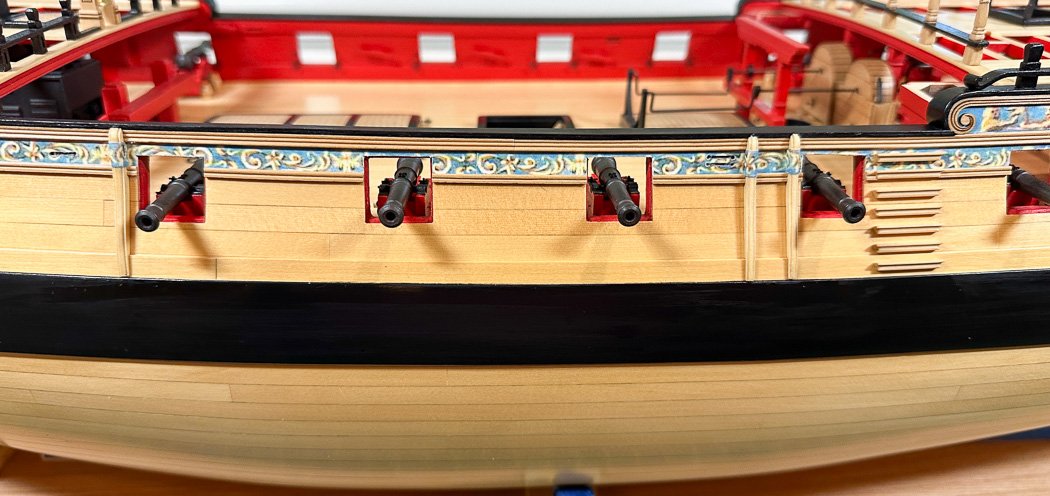
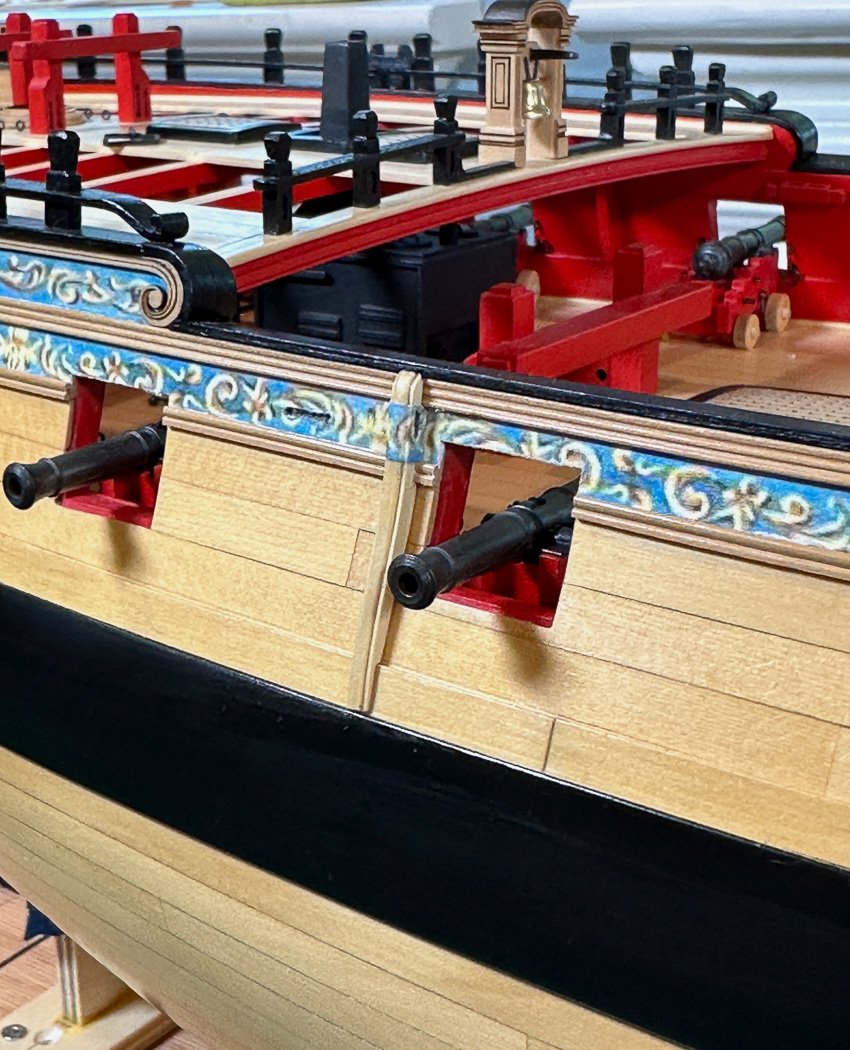
Fenders and Chesstrees Keeping with shorter posts: Added the fenders and chesstrees to the hull. Each consist of a center and two outer layers glued together providing a nice dimensional look. After removing char the center piece is tapered from top to bottom and the outer edge slightly rounded before the two very thin are added (amazing to have layered wood on this thin a sheet of wood). With great trepidation I removed the center moulding. Then came a lot of careful shaping to conform these to my particular hull - both patience and time are required following the firm rule of while you can remove wood, you can’t put it back. I tried printing the frieze on tissue paper, really I tried. While successful the color and texture just weren’t a good match for me, probably the wrong tissue paper or I need more practice doing it. I was however successful using the original paper printed frieze. Ample use of the same glue stick used for the hull softens the paper and allowed me to get a match. With Chuck’s suggested tooth pick approach I was able to guide the paper into the groove created by the three pieces. I also rounded out the sheave on the chess tree before applying the outer pieces along with a little 7mm lead pencil. I’ve still not mounted the waist cannon, but set them for the photo. The addition of the fenders, chess tree, and ladder really bring the hull alive. My one regret is while the boxwood for the ladder match, the AYC for the fenders are way whiter than the hull despited several coats of WOP. I kinda wish they had been boxwood as well to match the moulding. I note however, at this point the hull planking is near three years old. I am confident in time the fenders and chess tree, like the hull, will mellow and blend in. I’m moving onto the waists platforms and will finish chapter 11 with the channels. Thanks for stopping by.

-
glbarlow reacted to a post in a topic:
Sloop Speedwell 1752 by Rustyj - Syren Ship Model Company - 1:32 Scale - POF Sloop
-
Just found this. Once again I’ll live vicariously through your work. Off to another great start Rusty!
-
Surely there’s a way to model the deck without hiding all this amazing below deck detail.
- 796 replies
-
- 3
-
-
- speedwell
- syren speedwell
- (and 1 more)
-
Nice coils and rope work. Your effort and skills on the details really makes your model stand out.
- 479 replies
-
- 4
-
-

-
- vanguard models
- alert
- (and 1 more)
-
I pin the backside of the yard to the mast with a little CA - completely invisible and holds it in place. The gentle torque of the appropriate lines keeps it squared up beyond that. Your servings look great, well done.
- 479 replies
-
- 1
-
-
- vanguard models
- alert
- (and 1 more)
-
Are you an NRG Member???
glbarlow replied to Chuck's topic in How to use the MSW forum - **NO MODELING CONTENT**
Just click on your profile, its right there. -
Are you an NRG Member???
glbarlow replied to Chuck's topic in How to use the MSW forum - **NO MODELING CONTENT**
Plus it looks cool 😄 -
Are you an NRG Member???
glbarlow replied to Chuck's topic in How to use the MSW forum - **NO MODELING CONTENT**
Because you're supporting this site. True you can free load and never contribute through NRG or the Donations tag at the top, but if enough did that they MSW wouldn't have the funds to operate. Shell out the very nominal membership fee, you can display or not the avatar once you do. -
Those are some nice looking gratings Frank. I considered not painting as well but in the end decided to do so. I’d suggest you consider your entire deck plan for paint colors and/or natural. My thought was if the gratings were natural so would have to be other furniture/fittings and that I liked the contrast the black provided to the red and yellow cedar. It is you ship, whatever you decide it will turn out great.
