usedtosail
-
Posts
2,421 -
Joined
-
Last visited
Content Type
Profiles
Forums
Gallery
Events
Everything posted by usedtosail
-
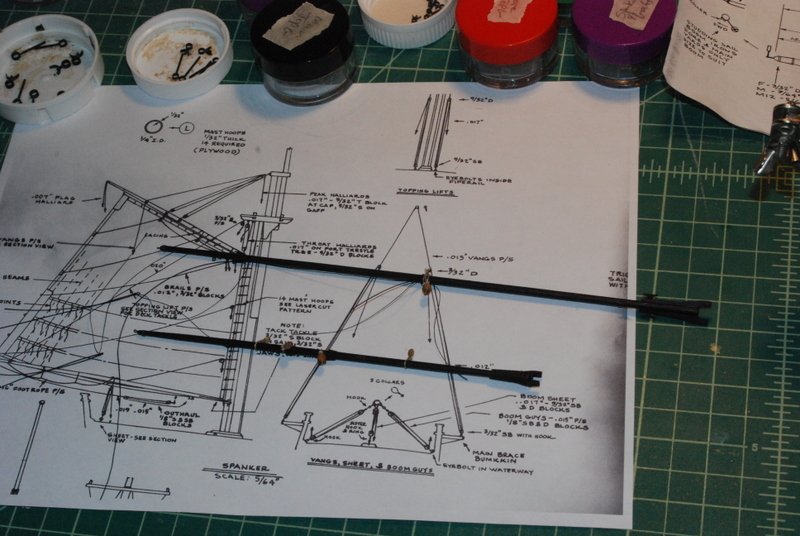
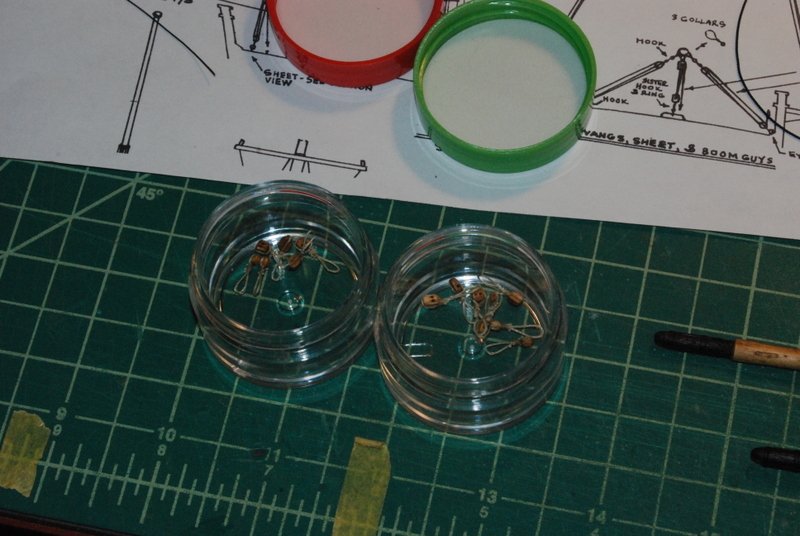
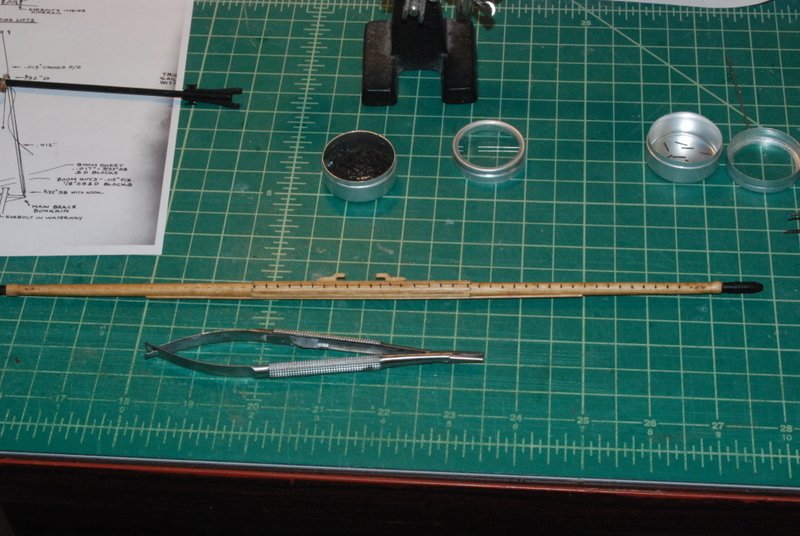
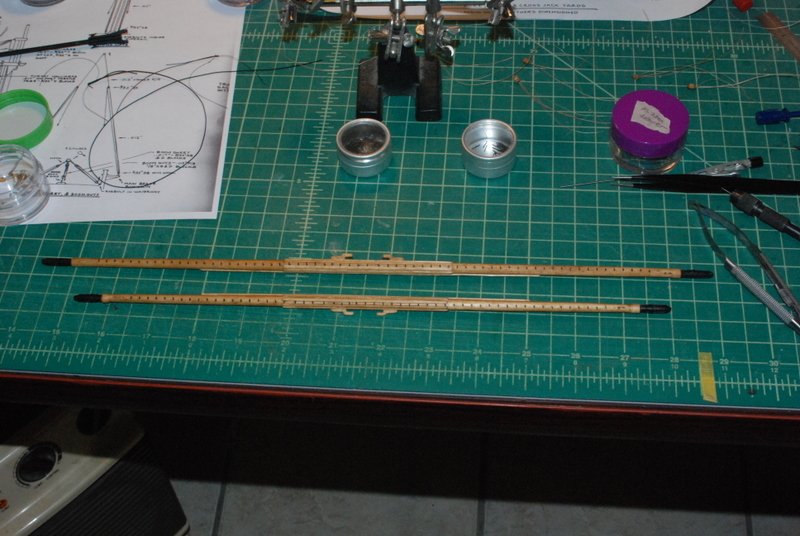
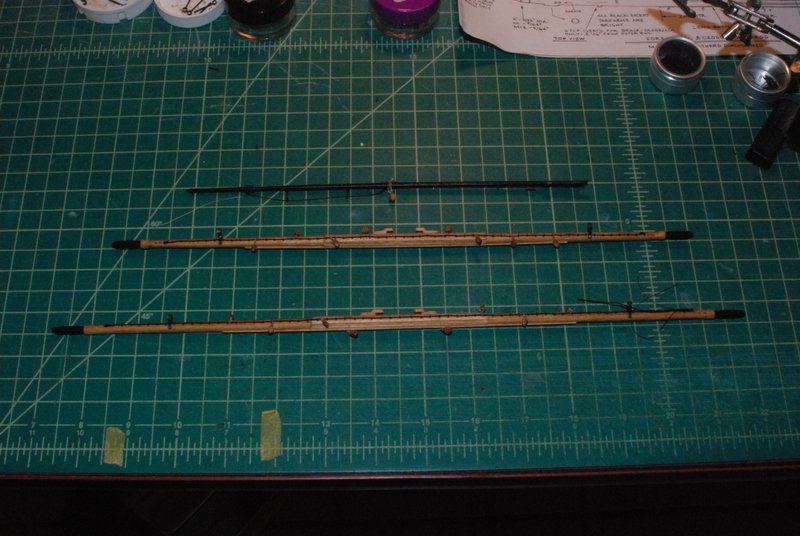
 I agree Popeye, a model this size with all the studding sails up would be very impressive. For me, a few sails is all I am going to add, though. I leave it as an exercise for future modelers to tackle that one. It has been a while since my last update. With the holidays and the extremely cold weather we have been having here I didn't get as much time in the work shop that I would have liked, but there has been some progress. I blackened the studding sail boom brackets with Birchwood Casey blackening solution, which did a great job even on the solder joints. Then I tackled the stropping of all the blocks I need for the yards, spanker boom, and gaff, which was a lot. It seems like I have been tying seizings for weeks, which I have been. These little jars contain between 6 to 10 jars, one jar for each yard. I then started adding the details to the spanker boom and gaff. This included the various blocks, some bands and eye bolts at the ends, and the stirrups and foot ropes on the boom. I also started adding details to the lower yards, starting with fore and main yards. I glued in all of the eyebolts for the jack stays, except for the eye bolts at each end. This was a little tedious but once I got into a rhythm it went pretty smoothly. I did have to clean out each hole with a drill in a pin vice, as the finishing process closed up the holes somewhat. The tool shown is a needle holder, which I have to say is the BEST tool I have used by a lot for working with these tiny eyebolts. They can be used like tweezers to grip them without them flying off around the room, but they also have a locking mechanism when you squeeze the handles together which holds them very tightly, so they don't want to twist when inserting into a hole, like they do with tweezers. This tool that I bought was one of the inexpensive versions you can get on Amazon or eBay (I forget where I got this one), which works great, but I may invest in a more expensive professional version since I like it so much. I have also used it for its intended purpose, when pushing needles through things like glue hardened strops on blocks. It works great for that too. Once all the eyebolts were in place, I seized a piece of line into another eyebolt and glued it into one of the end holes. I then threaded the jack stay line through each eyebolt. For the small blocks that fit on top of the yard, I had stropped them with small loops, which I threaded the jack stay line through at the right locations as I got to those points. When all the jack stay eyebolts were filled and all the blocks in place, I seized another eyebolt to the end of the line and glued that eyebolt into the other end hole. I left the seizing loose, and pulled the jack stay tight when the glue on the eyebolt was dry, then fixed the seizing in place. The two larger blocks on each yard were seized around the yard, as they hang underneath. You can see the inner studding sail boom brackets have also been added, so the next step is to line up the outer brackets, bend them so the booms will be at the right height, then glue them into the ends of the yards. Then the stirrups and foot ropes will be added, and I will move onto the crossjack and topsail yards.
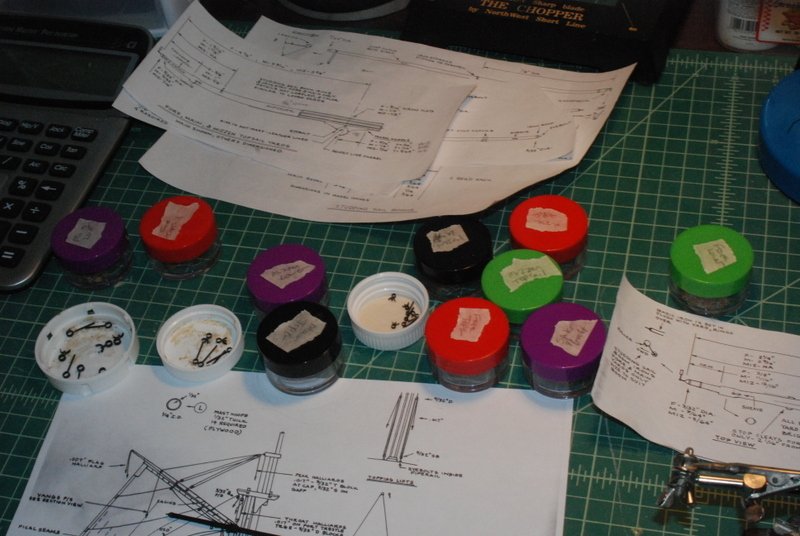

- 1,354 replies
-
- 8
-

-
- constitution
- model shipways
- (and 1 more)
-
Like Jon I just discovered your log. You are off to a great start.
-
Screw up club? See my build log. The good news is that by the second or third time I do something I am usually pretty happy with it.
- 742 replies
-
- 4
-
-
- constitution
- frigate
- (and 1 more)
-
Thanks Dan. Another term I was confused about. And thank you Geoff. I am enjoying working along side you as you rig your Conne too.
- 1,354 replies
-
- 1
-
-
- constitution
- model shipways
- (and 1 more)
-
Sure Geoff, that's what I love about this site too. I am glad you were already thinking ahead. For the main stays, I didn't have trouble running them along side the fore mast since the pin rails are mostly behind the mast. I used some large eyebolts that I glued into the bulwarks on each side of the bow sprit using medium CA. I didn't have to put much tension on the stays so I don't fear that the eyebolts will pull out, unless of course I inadvertently hit them hard while rigging something else. The plans show a more elaborate fixture at the bows for these stays, but they are hard to see when the stays are in place. Whoops - I think you are asking about the main topmast stays. I also glued eyebolts into the deck at the bottom of the fore and main masts. They also seem to hold well in the deck. Threading the lanyards between the bulls eyes on the stays and the eyebolts was not as hard as I thought it would be.
-
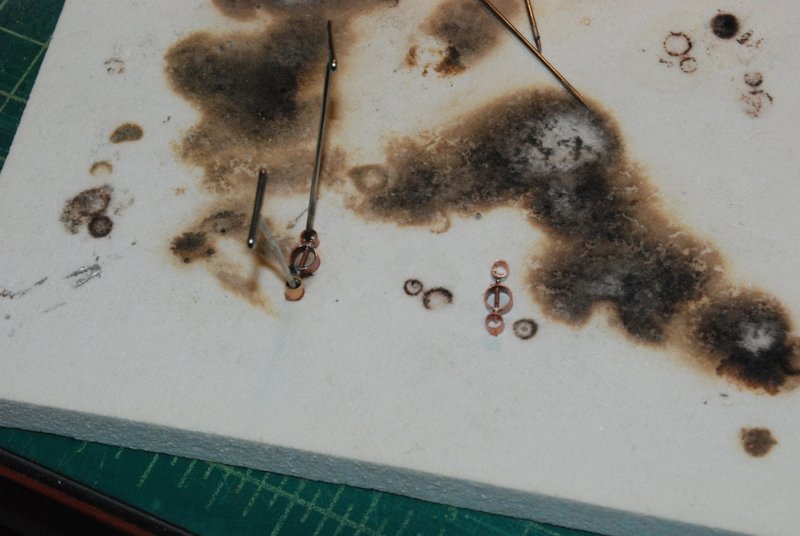
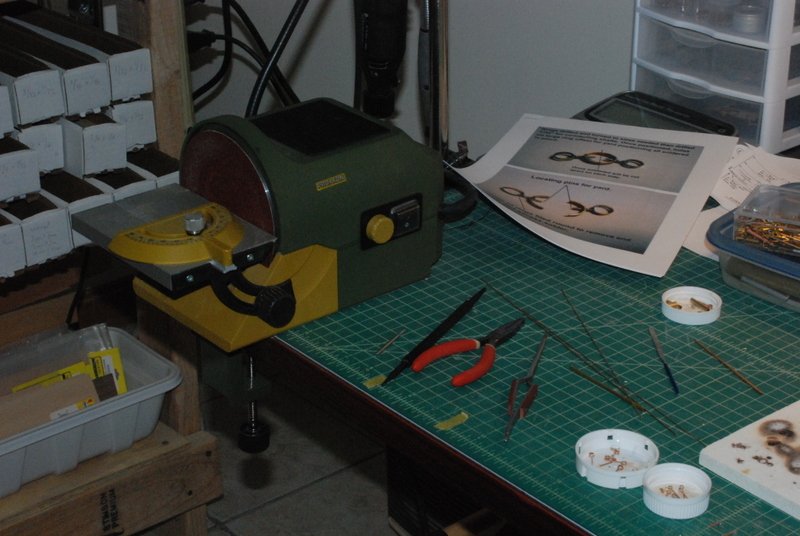
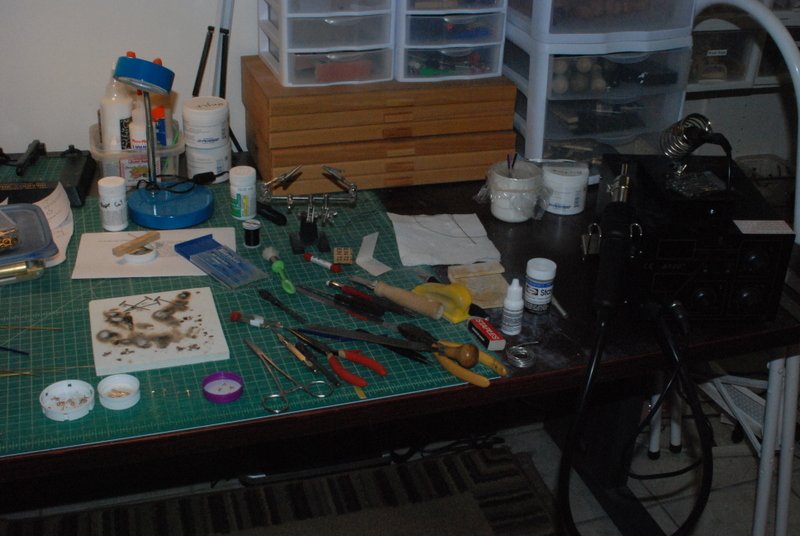
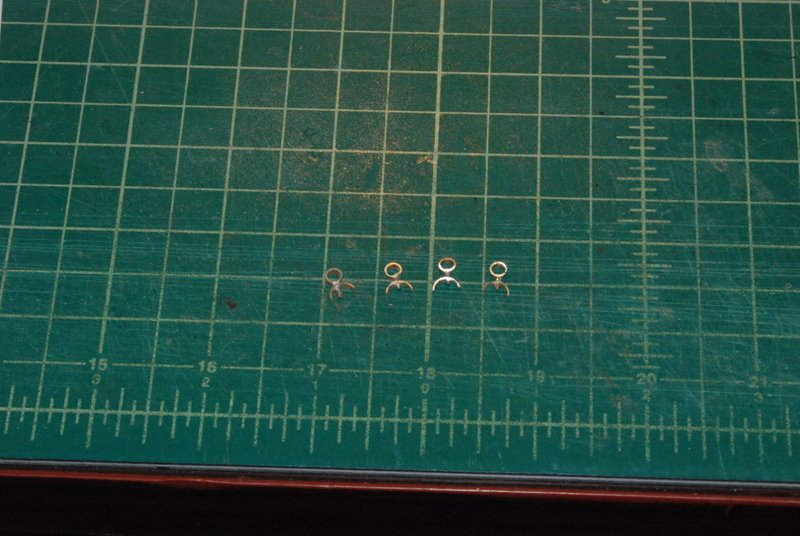
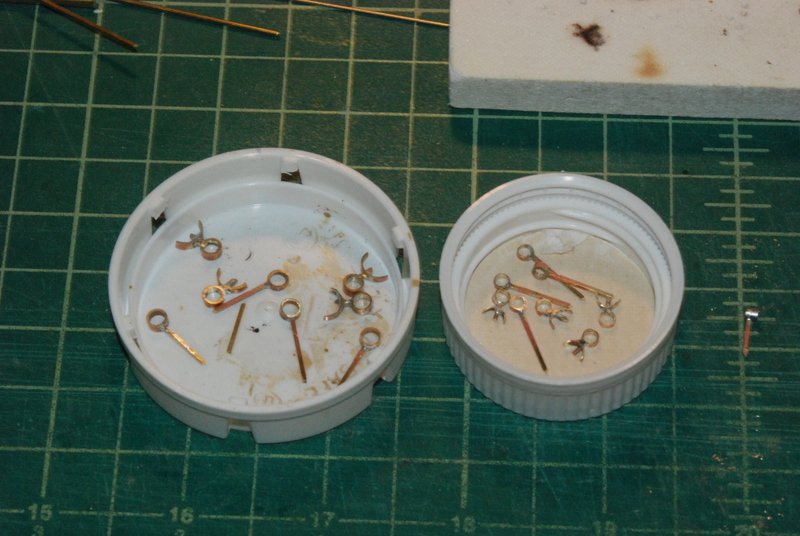
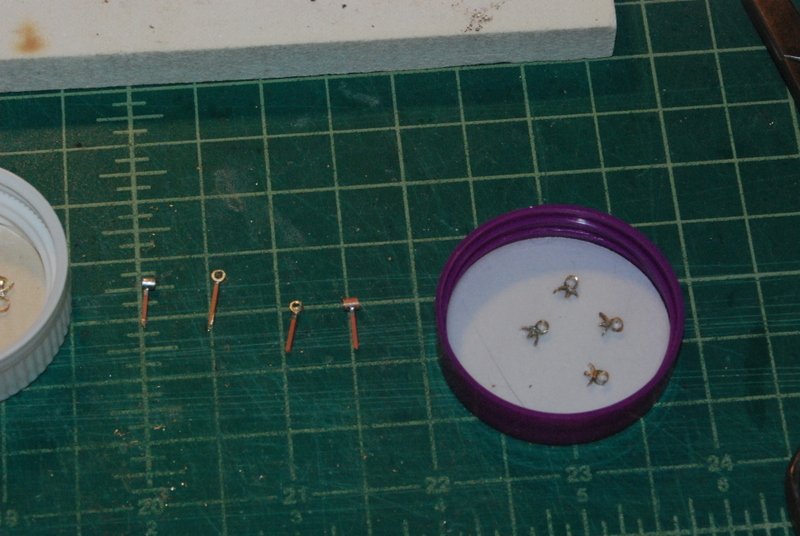
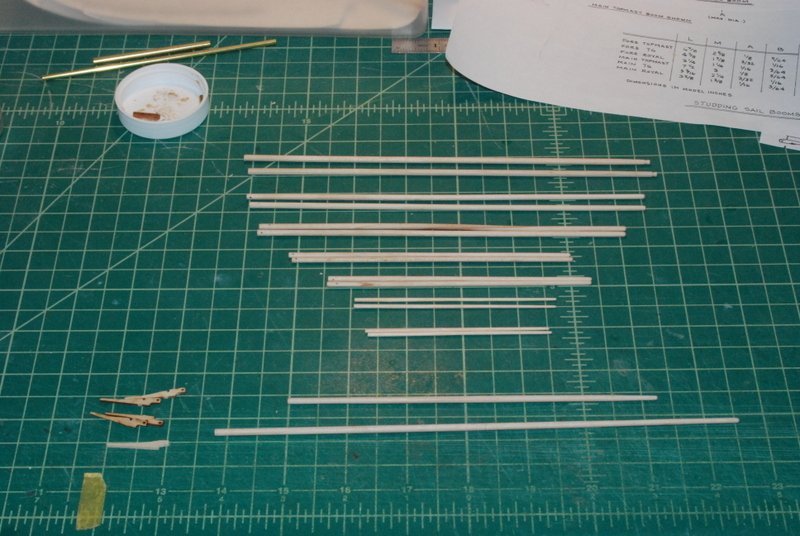
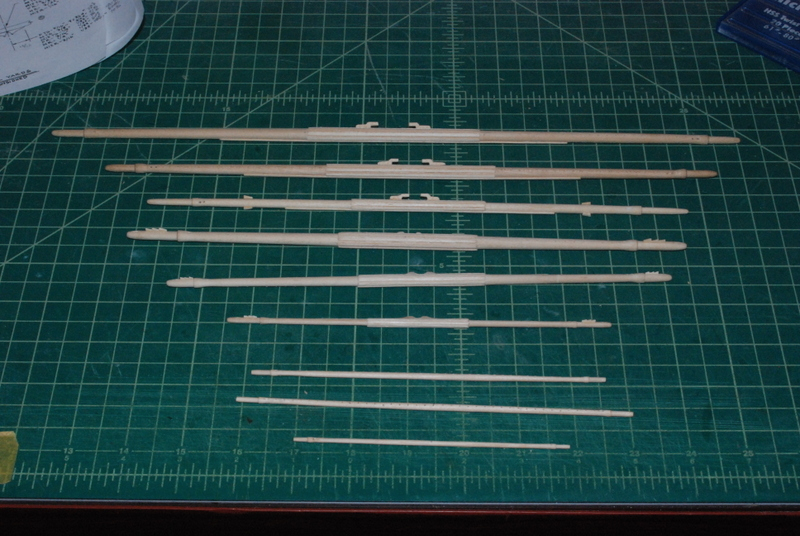
Thanks for the likes, guys. I have stained all of the yards and stunning sail booms with oak stain, except for the yard arms, which will be painted black. The spanker gaff and driver boom will also be painted all black. While waiting for those to dry, which seems to take a few days, especially for the parts made from dowels, I have been making the stunning sail boom brackets that go on the fore and main lower, topsail, and topgallant yards. I am making these from brass tubing and round and square brass rod, and in the past I would have CA glued these together. But this time I was determined to make them correctly by soldering the parts together. Now, I have never been able to solder very well, so this was going to be quite a departure for me. What was different this time is that I had xKen's excellent instructions from his build log on how he made these, and I have been reading his Modeling in Brass book, which also has some great instructions for these kinds of parts. In the course of building these parts, I ended up using many different power and hand tools, so I will try to describe the process and tools that I used. The first task was to drill holes in the tubing for the rod, which I used the mill and sensitive drilling attachment with a very small center drill bit to do. I found that the mechanics vise on the mill was the perfect vise to hold the tubing without crushing it, and I used it for other operations too, like cutting the slices from the tube. After drilling the starter holes, I used a pin vise to enlarge the holes to fit the rod I was using, which was round for the inner brackets and square for the outer brackets. I then put the tube back into the vise and sliced off individual pieces using the jewelers saw shown in the above picture. This saw was fantastic for this operation, which I have always had trouble doing in the past. I have tried rolling the tubing under an X-Acto knife, but could never get it to stay in a single line all the way around the tubing. I have tried other saws too, without too much success. Also, in the past I never had a good way to hold the tubing steady while cutting, like I can in the mechanics vise. The next step was to assemble the pieces for the brackets and hold them down for soldering. The inner brackets were made with one larger piece of tubing in the center and two smaller pieces on the rods, then cut in half after soldering. Here is one of the ready for soldering (left) and the one on the right has already been soldered. . The soldering board is a piece of something that is very light but fire proof (although not burn proof as you can see from the burn marks from previous soldering efforts using silver solder and a butane torch). It is soft enough that those push pins go into it easily. I bought it from Micro Mark a while ago. For a soldering iron, I have tried to use cheap or old ones in the past that I had laying around, but then I bought this soldering station which I am coming to really like. It has both a soldering iron and a hot air blower, and you can set the temperature of each. I am using Stay Bright solder and flux, which I can't recommend enough. It melts at about 200 degrees C, so I set the soldering iron to 350. The flux is a liquid so one drop on each joint gets the job done, and once the part is hot, a light touch of the solder flows nicely into the joints. I have been trying to use other soft and hard solder that I had with very little success, until I tried the Stay Bright and flux. I still had some issues with too much solder getting into the small tubing, but I was able to drill these out with a pin vise, then ream them out with a pointed grinding bit in the Dremel tool. When I sliced off the tubing pieces, I made them oversize on each side of the hole. So, the next step was to thin the brackets to the correct thickness. To do that, I used this disk sander which I keep permanently on the work bench, mostly to square up wood parts before gluing. It worked great on the brass though too. You can see some of xKen's pictures from his build log that I am using as instructions in this picture too. To sand the parts thinner, I held them in a heliostat and carefully touched them to the sanding disk. The first few times I was leaving them on the disk too long and they would get hot enough to melt the solder. So I learned to use quick light touches and let the part cool between touches. Once thinned, I cleaned up the rest of the parts with files and they are now ready for blackening. The pieces with the square brass rod on the single loop are the end brackets. The ones in the last picture had not been thinned yet. These will be bent and inserted into holes in the ends of the yards later. I won't bend these until I have the inner brackets in place and I can gauge the height of these end brackets so the booms will be straight on the yards. There are metal strips on the yard arms that hold these end brackets, but because the yard arms will be painted black, I am going to use the same technique I used for the mast bands and wrap paper strips around the yard arms before painting them to simulate these metal bands. I could have tried making these out of brass strips, but I think I will quit while I am ahead. That is actually the next step after giving the yards and stunning sail booms a coat of wipe on poly, now that the stain is dry.
- 1,354 replies
-
- 9
-
-
- constitution
- model shipways
- (and 1 more)
-
That is a nice spacer Geoff. Just be careful at the deadeyes towards the rear of the channels as they have a pretty severe angle to the mast, so the spacer may be a little short for those deadeyes.
-
Nice work on the bow filler and framing. I found this area to be very challenging, and you did a great job.
-
Jay, I'm glad you find my build log useful. Don't get too hung up on what I did, I was pretty much flying blind at that point. You can't go wrong following along with xKen's and other's logs here too. I am currently building the stunning sail boom brackets following xKen's excellent instructions. No Legos? Well, PM me your address and I'll send you some. We have a big tub that the kids don't want (they are too young to have their own kids yet).
-
Great start on the gun deck. That is always a big step to take, but you will not regret the decision.
-
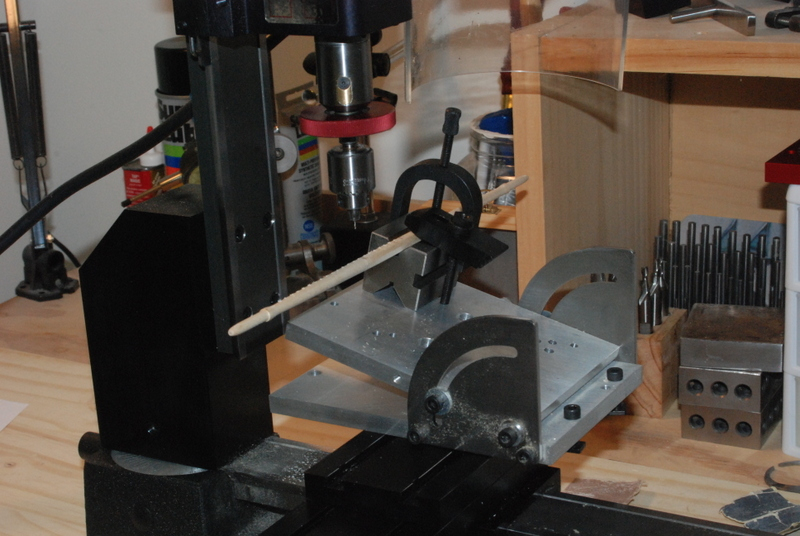
Thanks for the info Jon. Not sure how they would be used for reefing, but they look like they would be used to keep ropes maybe being used for leverage from sliding along the yard? Art, there are some great Connie builders and build logs on this site, which is the only way I could be where I am. Feel free to use any ideas and ask questions if you need to. I will definitely follow along with your build once you get started. After the yards were turned, I turned the stunning sail booms. These were pretty simple lathe turned with just files and sandpaper to shape them. I also turned the two fore lower booms that sit on the channels. These still need some wooden parts, like chokes, added. I also turned the spanker gaff and boom. The kit supplies laser cut pieces for the jaws, but the holes are too large and too near the edges. They do match the plans pretty well, s I am using them as templates for the outside shape of these and making my own from strip wood. You can see the supplied jaws and the first one I made in this picture on the left. Here is (a pretty lousy picture of) the setup I used in the mill to drill the two holes in the inboard end of each stunning sail boom. I indexed off the edge of the V block so for each boom, I just lined up the end with the edge of the V block and drilled the hole. I just have to finish up the jaws and glue them to the gaff and driver, and add the other wood parts to the lower booms, then I am going to add the finish to all the yards and booms. I am going with an oak stain for all of them, with an overcoat of wipe on poly, and the yard arms will be painted black.
- 1,354 replies
-
- 5
-
-
- constitution
- model shipways
- (and 1 more)
-
Nice work Dan. Those railings look very tricky to do and you did a great job.
- 287 replies
-
- 2
-
-
- michelangelo
- ocean liner
- (and 1 more)
-
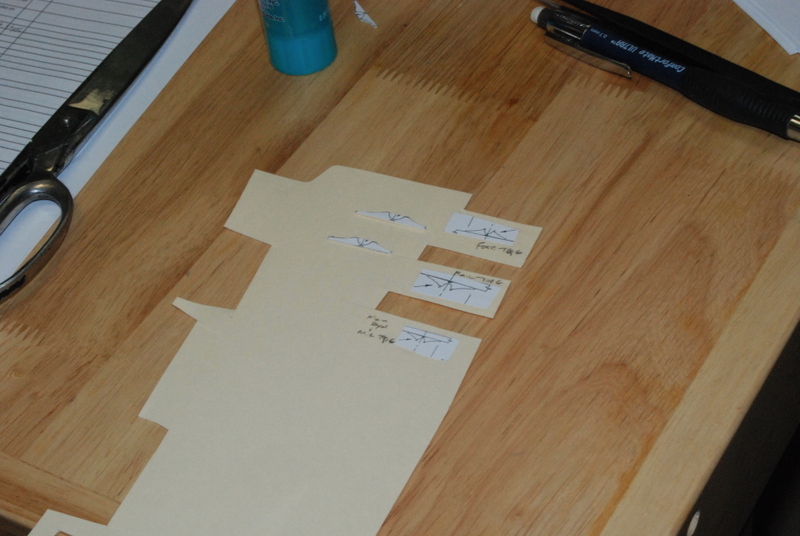
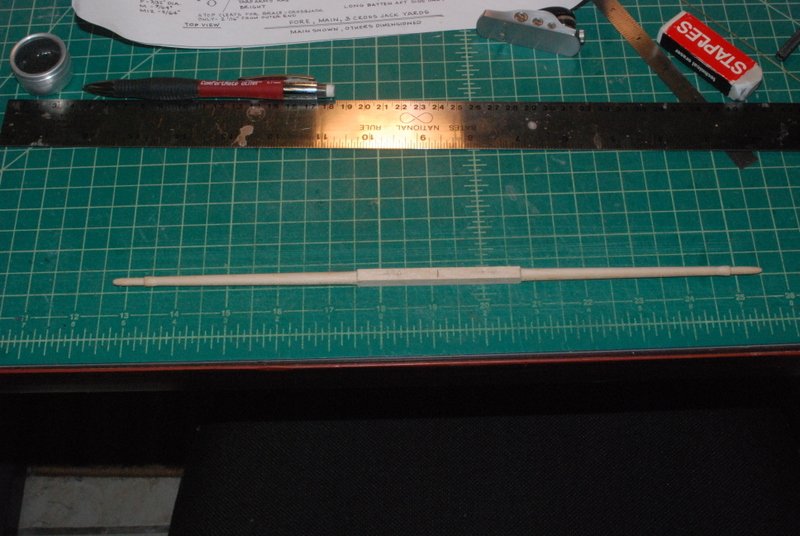
I continue to work on the yards. As I mentioned before, I continue to refine the process as I have been going along. One big improvement I found was these V Blocks that I had in my father's stuff. They are a much better way to hold round or octagon stock on the tilting table, as shown here. I clamp one block down tot he table, then slide the other block along the yard as I drilled the holes for the jackstays, so I could support them under where I was drilling. This worked really well. After each yard is turned and drilled on the lathe/mill, I then added the other wooden features so they would be in place when I put the finish on the yards. Once that is done, then I will add the other items like blocks, stirrups, etc. I added battens on the lower and topsail yards, as shown in the last post, and the sling cleats, which I made from strip stock using a file to remove material. The mizzen or crossjack yard also had stop cleats, which I added. These are small pieces so I cut them larger, glued them on, then finished them on the yard with files. The topsail yards have coxcombs on the yard arms, and I have no idea what they were used for. If anybody knows, please let me know. I made them from very thin strip stock using a razor blade to cut the "spikes". The topsail, topG, and royal yards have parrel saddles, which are all a different size, but the plan that came with the kit only show one yard and then give the dimensions of the others. so to make the saddles I first copied the plans for the one yard and then re-copied it at the scale for each of the other yards. I cut these out and glued them to some folder material, then cut them out as templates that I traced to a piece of wood, cut them out roughly and then did the finish shaping with files. Here are the lower and topsail yards ready for finishing, and the topG yards that just need the parrel saddles added. I still need to turn the royal yards, stunning sail booms, driver boom, and gaff. Getting there, though.
- 1,354 replies
-
- 9
-
-
- constitution
- model shipways
- (and 1 more)
-
Thanks Dave. No problem at all. I have trouble keeping track of what I have done on my own model, let alone what others I have seen. Now its your turn to take up the challenge, no?
- 742 replies
-
- 5
-
-
- constitution
- frigate
- (and 1 more)
-
You want carronades with screw posts, see my build here: https://modelshipworld.com/index.php?/topic/5003-uss-constitution-by-usedtosail-model-shipways-scale-176/&do=findComment&comment=384050. Have fun with those.
- 742 replies
-
- 5
-
-
- constitution
- frigate
- (and 1 more)
-
Nice job on the frames. I like your struts. Those filler pieces took me a lot of time and I ended up doing the same as you - making the top part as a separate piece.
-
She looks great Anthony. Don't know when I'll get to this kit, but I hope it comes out half as good as yours.
- 32 replies
-
- 2
-
-
- santa lucia
- panart
- (and 1 more)
-
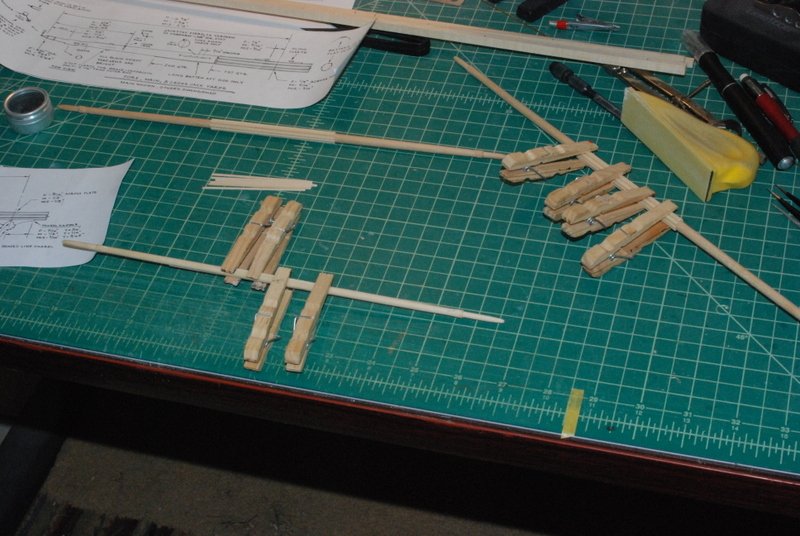
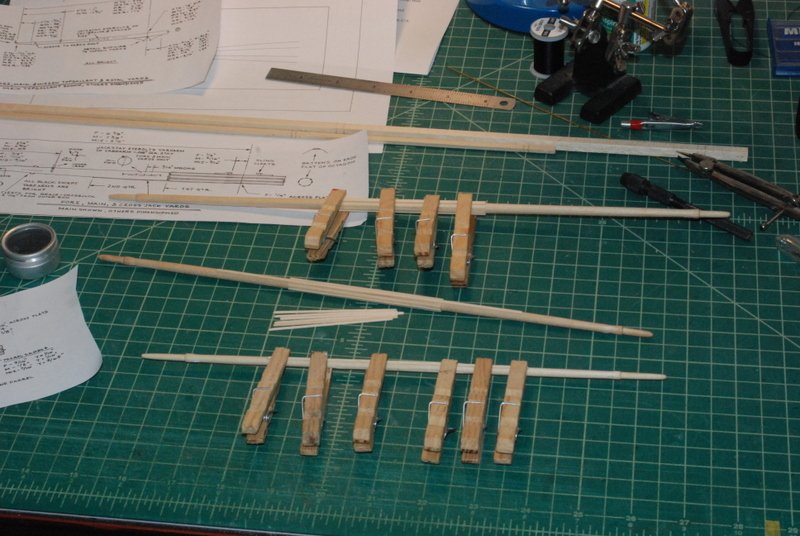
Thanks Shane. It is always a crap shoot ordering stuff like this. Picking out the wood locally and making it myself is the way I should do it, and probably will in the future when I have more time. Work on the yards continues. I have the three lower yards shaped and am adding the battens to the octagon section, two at a time opposite each other so I can clamp them at the same time. For the mizzen/crossjack yard, the 1/16" wide battens I used for the other two were too wide, they needed to be closer to 3/64". To reduce the width of the 1/16" strips that I have, I made a jig from some plywood and two strips of 1/4" x 1/16" wood, which I glued to the plywood with a 1/32" gap between, and another strip over the top of the other two to act as a stop. I then ran this through the thickness sander a few times to reduce the height of the guide strips to 3/64". I can now put a batten strip in on edge and hand sand it down to 3/64" I made up the battens for the mizzen yard with it, and will also use it for the topsail yard battens. I have the three square pieces of stock for the topsail yards measured out and ready to turn in the lathe. I drilled holes in these while they are square for the two sets of sieves in each end, which I will shape into sieves after the yard arms are turned, either by hand or on the mill. You can see these above the other yards in this image. I keep modifying the procedure I am using for the yards, but overall it seems to be working well.
- 1,354 replies
-
- 3
-
-
- constitution
- model shipways
- (and 1 more)
-
Whoops my math was a little wrong on the number of yards to do. There are 12 yards plus the gaff and driver boom, so 14 total. So, 2 down and 12 more to go (original post edited).
- 1,354 replies
-
- 1
-
-
- constitution
- model shipways
- (and 1 more)
-
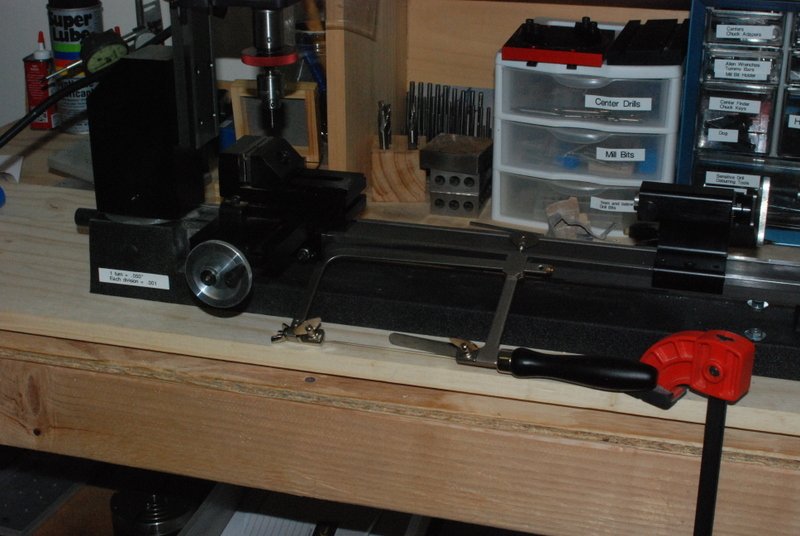
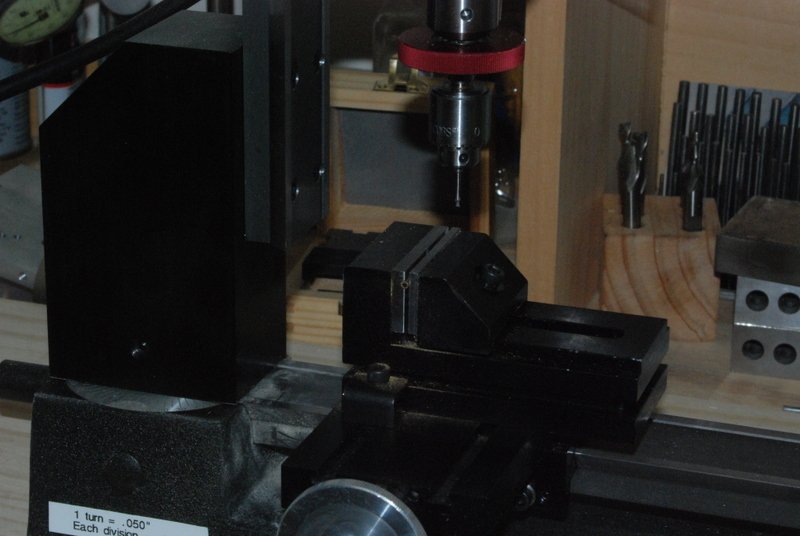
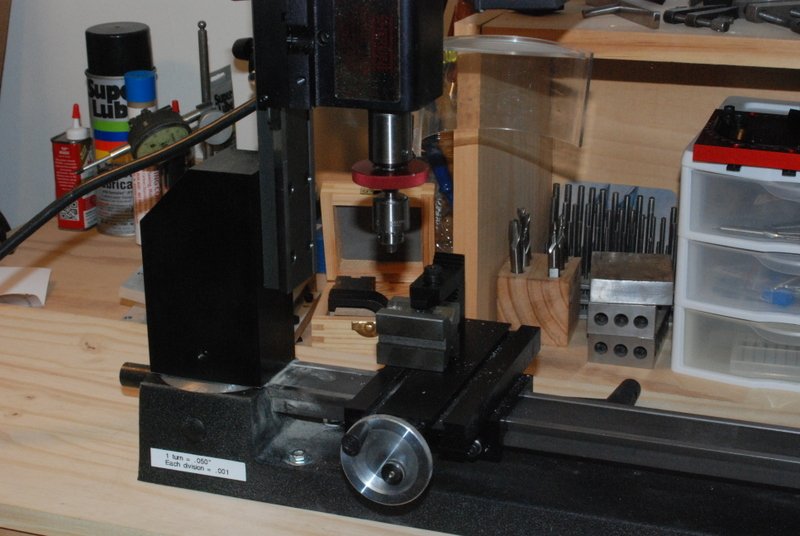
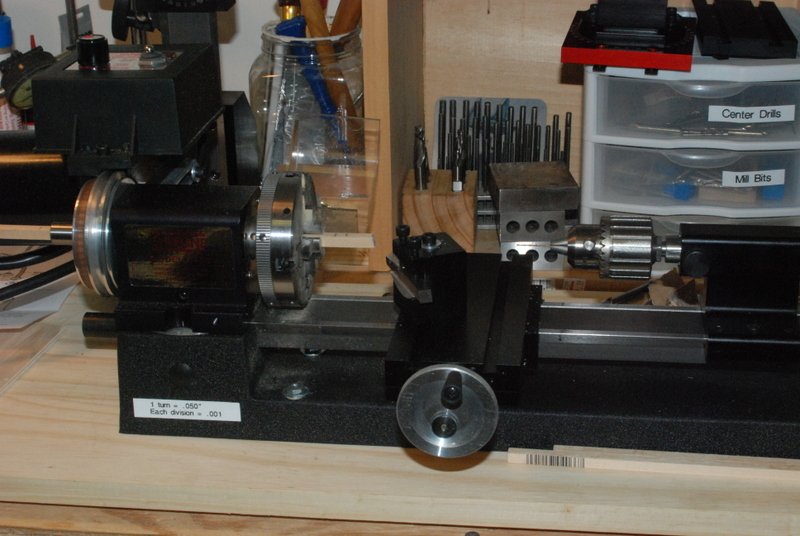
Thanks for the questions, Jon. I don't mind answering them here. The stock does indeed pass through the lathe head, which allowed me to make the yard in one piece. When working the yard arm, there was a lot sticking out the other end, so it did whip a bit as it rotated. I wouldn't do this with a metal bar, but with wood it was fine. I bought the lathe with what they call the "B" accessory package. This included the 3 jaw chuck, drill chuck, steady rest, live center, cutoff tool, and three additional cutting tools (the base lathe comes with a face plate, one cutting tool and a tool holder). I went with the larger lathe bed as it was not much more than the short bed. Of these accessories, I use them a lot except for the live center and steady rest. Then I bought a bunch of accessories at the same time. The mill column was one, and in the future I can buy a base for it. I use it a lot. Changing from the lathe to the mill is very quick. I bought a 4 jaw self centering chuck, which is what I used to hold the square stock. I find that very useful. I also bought a used independent 4 jaw chuck for holding odd shape things, which I have also had occasion to use. The sensitive drilling attachment I use a lot and really like it for drilling small holes. I also bought a mill vise, that I use a lot, and a rotating base for it, which I haven't used much. I already had the tilting table that I bought to use with my old Proxxon mill. I find it useful. I bought some mill bits and a mill bit holder, but my nephew is a machinist so he gave me a bunch of bits. One thing I bought that I don't use much is the rotary table. I think it will be useful in the future, but I would hold off buying it again right away. Sherline sells a cross slide accessory plate, which really comes in handy because the travel on the lathe cross slide is limited when milling. You can offset it to give you more room to mill long lengths, like when drilling the holes for the jack stays. There were two reasons I bought everything at once. One, I had received a bonus at work, so I had the funds, and two I got a 15% "senior" discount from Sherline, even though I am only 62. I have since ordered other accessories and they continued to provide the 15% discount. Call them and ask for Kat and see what she can do for you when you are ready to buy. I have to admit that I was not sure how much use I would get out of the tool, but since I bought it I have used it for various other projects around the house, not just modeling. It is almost as much fun as modeling itself.
- 1,354 replies
-
- 2
-
-
- constitution
- model shipways
- (and 1 more)
-
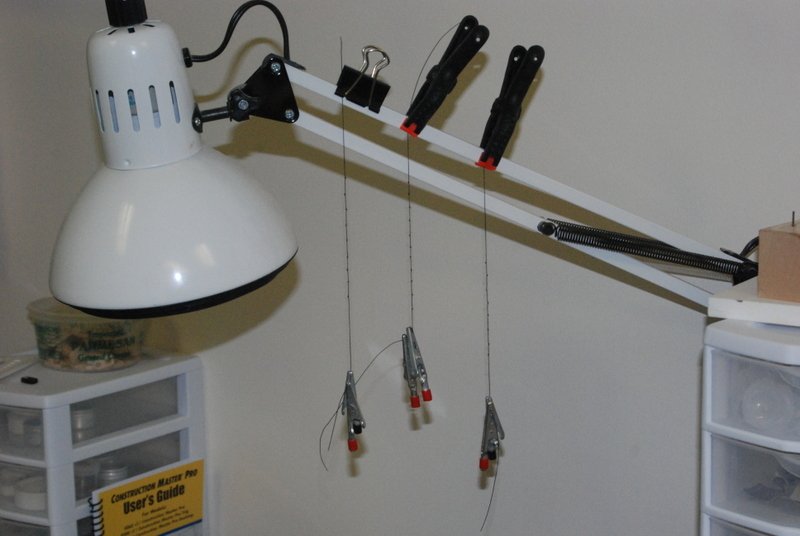
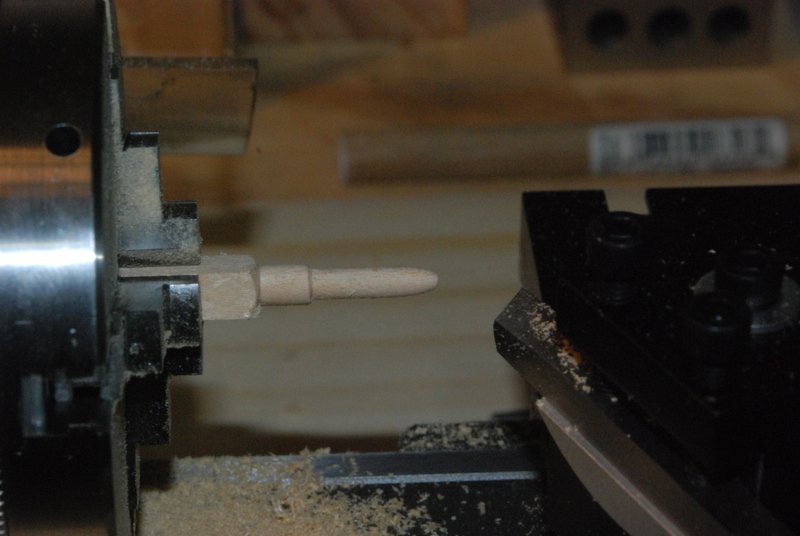
Before we get to the yards, I found this picture on the camera, which shows how I made the man ropes that are on the royal masts. I tied knots in some line, then hung them and coated them with diluted white glue to straighten them. When they dried, I seized one end to the topG top crosstree and the other end around the royal mast. For the yards, I am making heavy use of the Sherline lathe and mill combo that bought over the summer. I am learning a lot using them for these and the results are soooo much more precise than I have ever done by hand. I started out by using a steady rest with chisels to turn the yard arms, but I am using basswood for these and had a few tries where the chisel would dig into the wood and break off the ends. It took me a few tries to realize that I shouldn't cut the wood to length until after one end is done, and that hand chisels were not the best approach. So, I ended up using a right hand cutting tool to cut the round sections. I first drilled a hole into one end of a square piece of wood, using the tail stock, for the stunning sail boom bracket. This is a lot easier to do when the wood is still square. The size of the square stock is equal to the size across the octagon section of the finished yard. After the hole was drilled, I cut the circular section of the yard arm, then the smaller section at the end. I used a file to give it a very slight taper and round the end. I then cut the wood to length and did the same on the other end. One of the nice features of the Sherline lathe is that you can take the key out from under the head stock and rotate it to cut tapers. I did this to turn the round section between the octagon in the middle to the yard arms. The head was turned about 0.5 degrees - the width of the index line from 0 - and the taper cut. I left it a bit full, then did the final shaping using a file and sandpaper, to get the curved taper needed. I finished up with medium and fine sandpaper, then turned the yard around in the chuck and tapered the other side. This is what the yard looked like at this stage. It was now time to cut the octagon section in the middle. I could have used the mill for this, but I had such good results planing this on the masts, I decided to stick with that approach. I marked the 7-10-7 lines on the square part of the yard, using a compass and a 7-10-7 fan, then put the yard in a V-groove jig I made for the masts. I planed down to the lines, using the small plane shown in the second image. This plane works really well for this task. After planing, I put the yard back into the lathe and cleaned up the transition area from octagon to round with some light sanding. The next task was to drill the holes for the jack stays. These are on the top face of the yard, but offset from the center. For this I put the mill attachment on the lathe, and put the yard in the tilting table with the top facing up. The tilt was set at 15 degrees, so the holes would go in toward the center of the yard. I used a #77 drill bit with the sensitive drilling attachment, which is another absolute dream tool to use for this kind of work. I then drilled a series of holes 3/32" apart, or as I have stuck in my head, three full turns (.150"), three increments of 10 (.030"), and one increment of 5 - 0.385". I already know that I will be buying the DRO kit in the future. I also used the mill to make the sieves in the ends of the yards, but that was done after I took these pictures. That completes the fore yard (for now), and I am drilling the jack stay holes in the main yard today, so that one is almost done. Two down and 12 more to go.
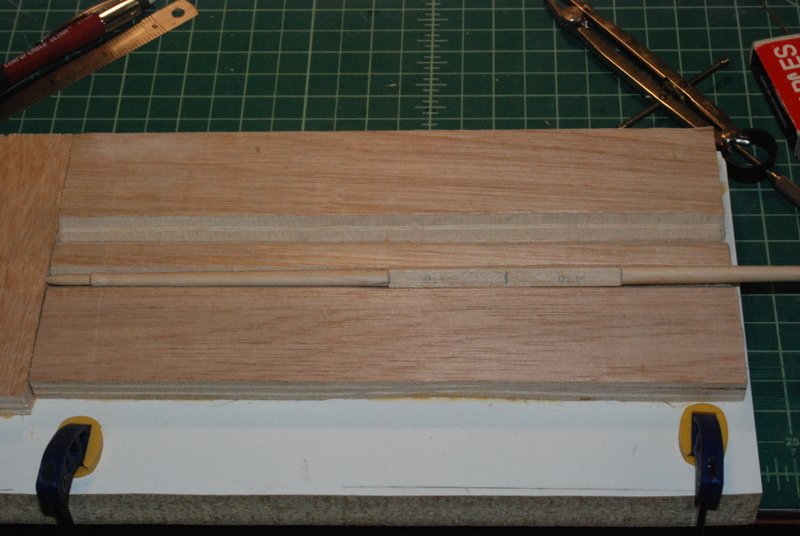
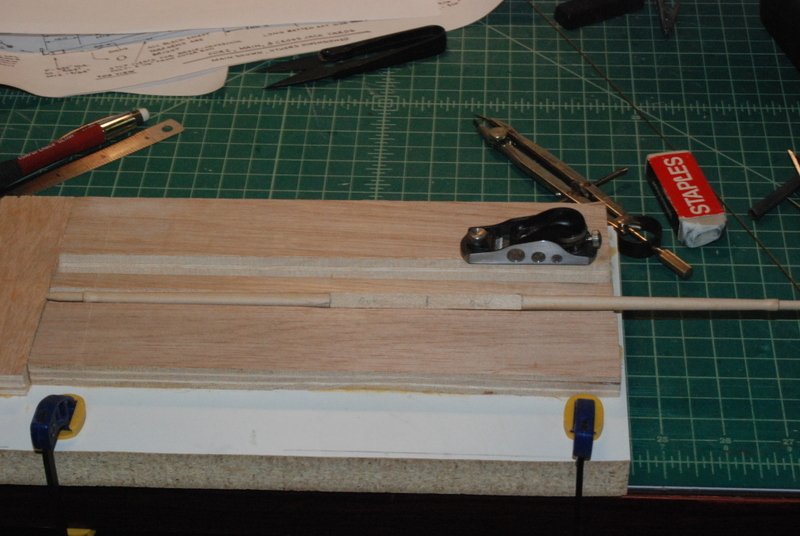
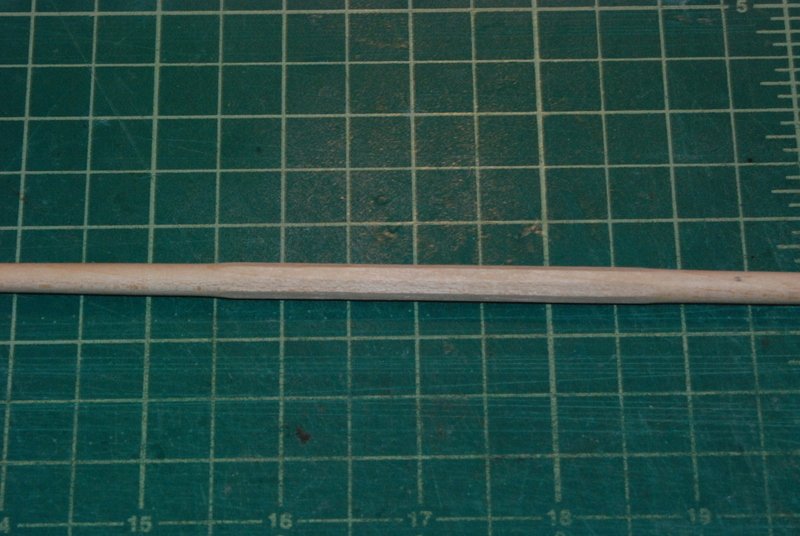
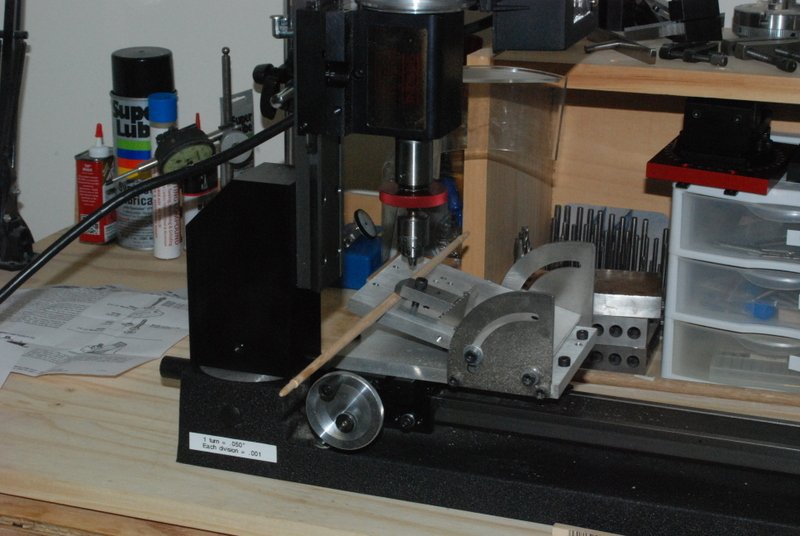
- 1,354 replies
-
- 3
-
-
- constitution
- model shipways
- (and 1 more)
-
Wow, thank you all for the very nice comments and the likes. Shane, I have been holding the ship in an ugly but effective working cradle as I outfit it, and it is back in the cradle now. I made that stand a couple of years ago and this is the first time I used it since it was built. The base is indeed walnut. I bought it from Model Expo many years ago for a different model, then went with a different approach for it. I made the supports from walnut sheet, and it is finished with hand applied wipe on polyurethane. Popeye, I was uncertain about the closed gun ports too, thinking that if the ship is going into a fight why would they limit the guns that could be brought to bear. But, I really didn't like the looks of the dummy gun barrels with the port lids open, so made the decision to keep them closed. Maybe those gun crews were just a little slower to get ready then the others, and they are about to open. Yeah, that's it. I'll go with that. Now, as Ken says, there's yard work to do...(the best kind in my opinion)...
- 1,354 replies
-
- 2
-
-
- constitution
- model shipways
- (and 1 more)
-
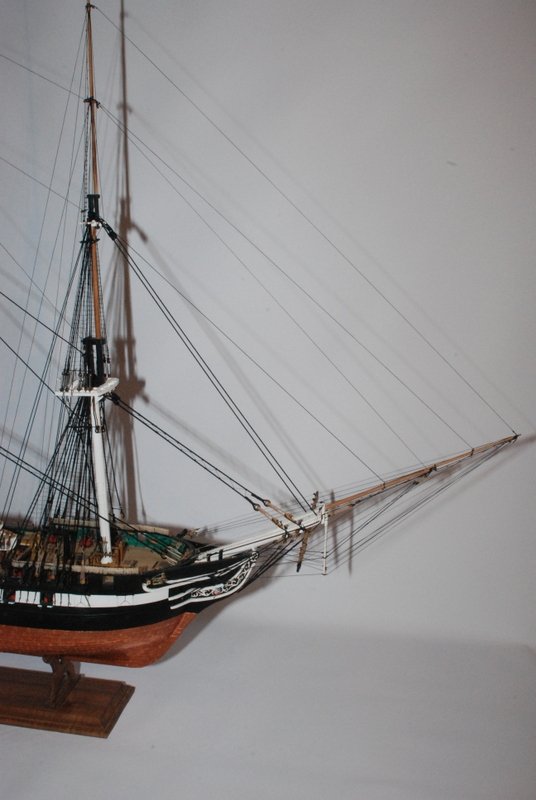
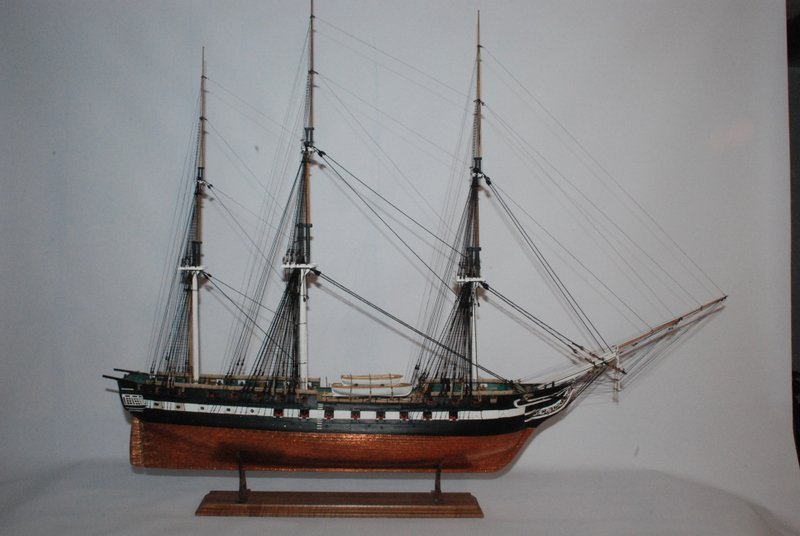
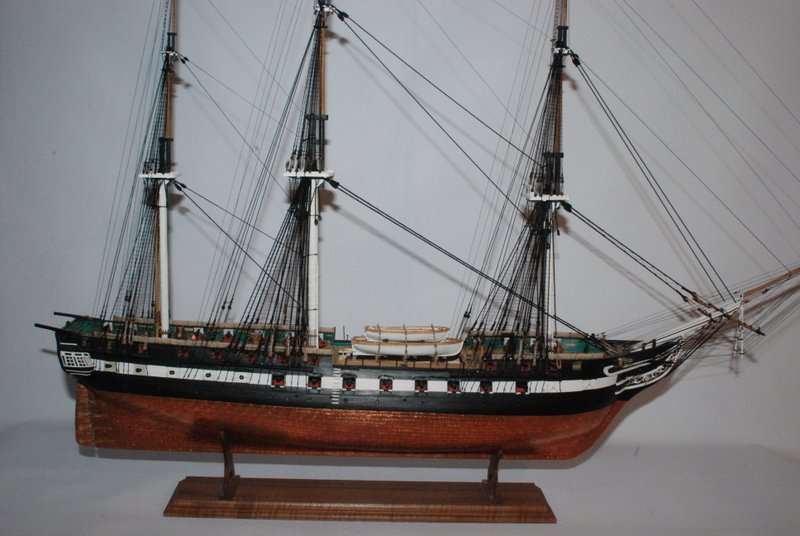
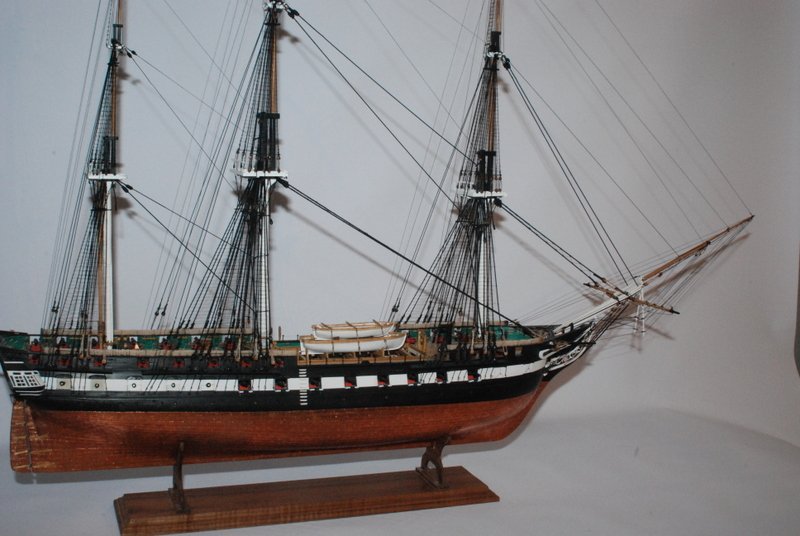
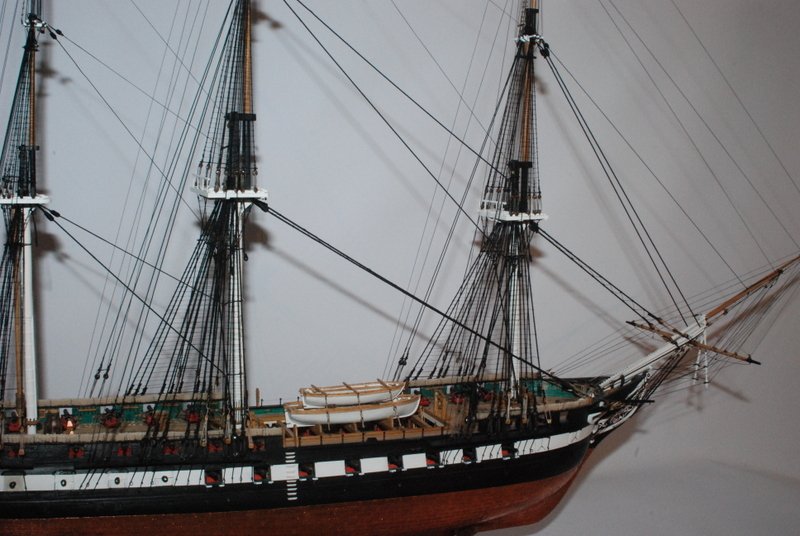
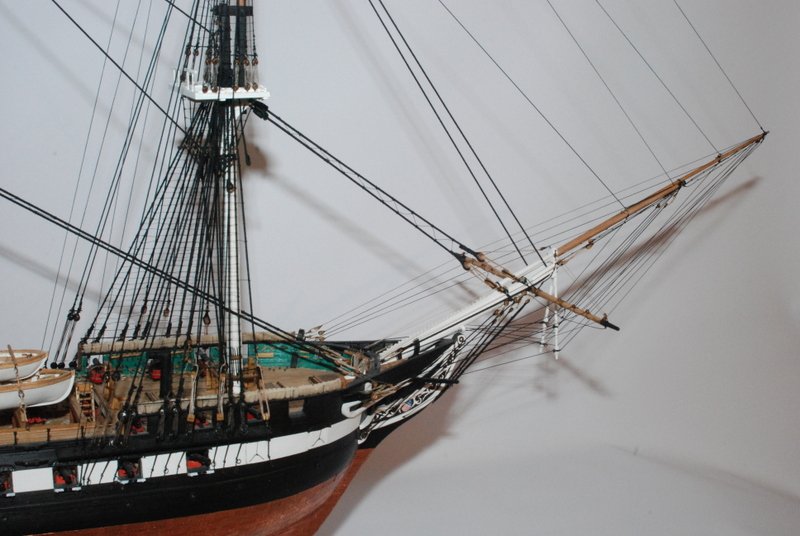
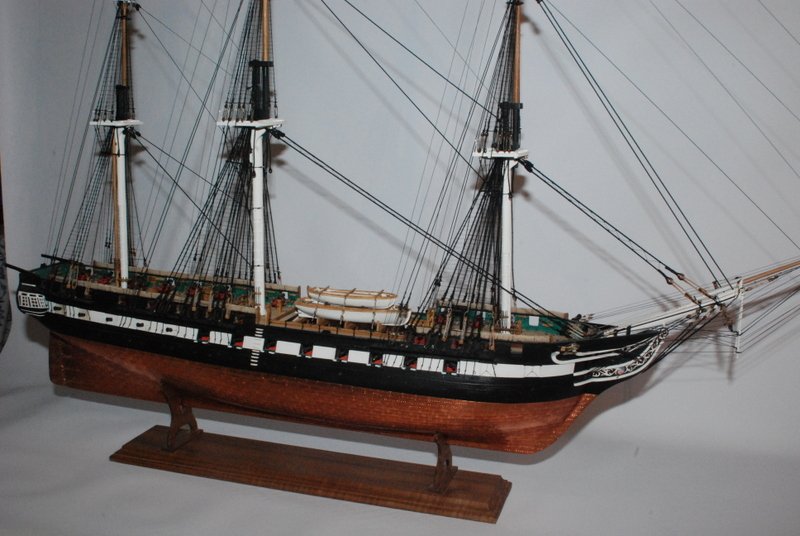
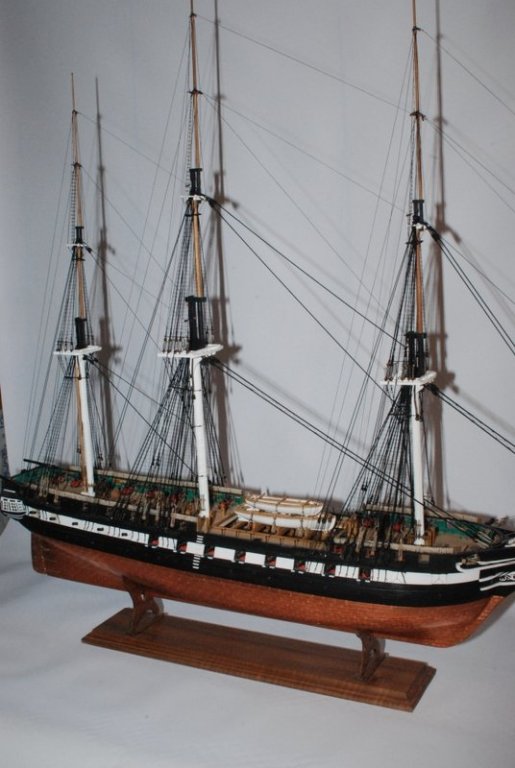
Thanks Popeye and Ken. And now after almost 4 years of work, I have come to a major milestone - the standing rigging is completed! In honor if this event, I set up the back drop and put the Connie on the stand I made for her, and took some glamour shots. It was nice being home for Thanksgiving so I had tome to do this. Enjoy.

- 1,354 replies
-
- 15
-
-
- constitution
- model shipways
- (and 1 more)