usedtosail
-
Posts
2,421 -
Joined
-
Last visited
Content Type
Profiles
Forums
Gallery
Events
Everything posted by usedtosail
-
 You are right, Rich, No plan survives first contact, as they say.
- 1,354 replies
-
- 1
-

-
- constitution
- model shipways
- (and 1 more)
-
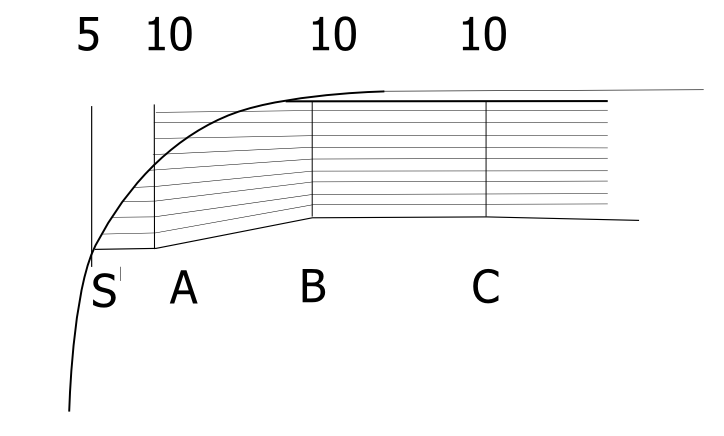
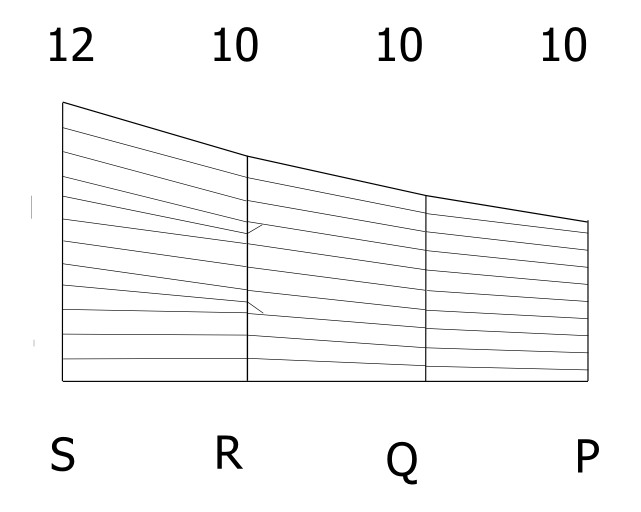
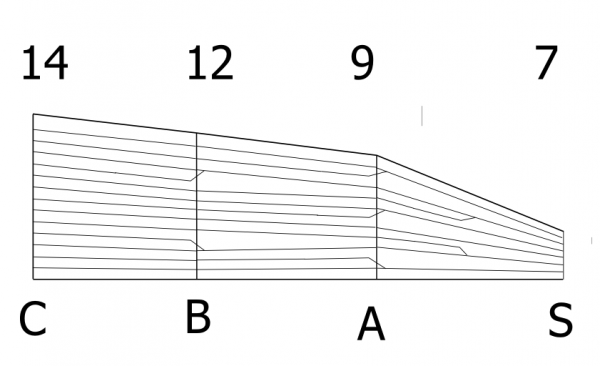
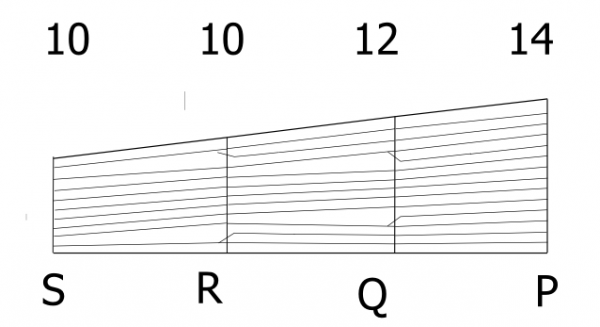
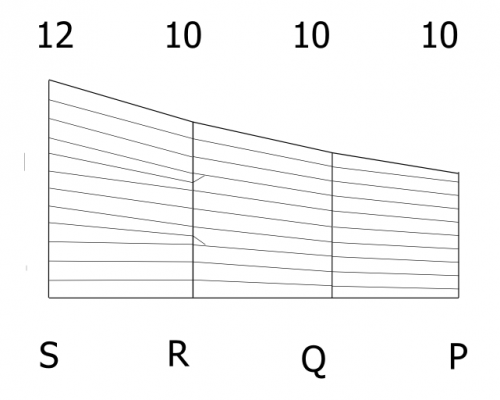
So, I have started planking from the wales down and the garboard strakes up. I have defined three planking belts, so I am planking both Belt A (below wales) and Belt C (above garboard strake) at the same time, as well as doing both sides at the same time. So far, I have only one plank in each belt, so no pictures of that yet, but you can probably visualize that it looks like a bunch of clamps at this point. I was having some trouble visualizing the run of the drop planks at the bow and stern in Belt A, so I drew up a couple of simple diagrams (not to scale) of the planking in these areas and where I could put the drops planks. Here is what I came up with: Port Bow Belt A: Port Stern Belt A: I needed the drops to be on bulkheads and I wanted to space them out a bit. It took me quite a while to figure this out, but I think I have it now. I will be using wider pieces of wood for the planks that continue after the drop, as they will be twice the width of the other planks at the bulkhead. There is a filler block between Bulkhead A and the stem, so I can put those last two drops at the bow there. I thought Belt C was going to be easier to visualize as there are no drop planks at the bow, and I could use wider planks at the stem, but then I couldn't figure out the widths of the planks at their ends. So, another diagram to visualize the planks at the bow, which will help me get the widths right: Port Bow Belt C: You can see that the widths change as I get further toward the stem, but they are still pretty close so I can adjust as I go. I don't know how you all figure this stuff out, but I extended the edge of the garboard plank out to the farthest point on the stem, then measured the distance from the edge of the belt on the stem to this line, and used that distance to get the widths of the planks at that distance. Of course, they taper back to where they actually hit the stem, but now I can see how much that taper should be. For the stern in Belt C, I just need a couple of stealers to fill the width at the stern: I will be using these diagrams as I out the next nine planks in each of the belts and will provide some pictures as I go.

- 1,354 replies
-
- 4
-
-
- constitution
- model shipways
- (and 1 more)
-
Nice work on your cross section, Andy. I enjoyed reading your log to date and look forward to watching your progress.
-
Oh, perfect, as I am going to be home this Friday. Thanks George.
-
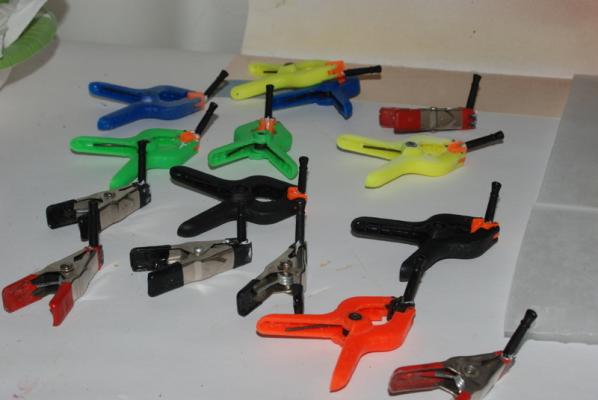
Sorry I didn't respond sooner - I was away for Columbus day weekend, taking in the foliage in New Hampshire. Thank you Scott, Len, Mike?, Dave, George, Brain, and all the likes. Len, thanks for the photos of the air ports. They are pretty high in the berth deck. I didn't realize they had plugs, even though I have probably seen them a number of times.. That makes sense. Mike, I agree with you on the ME kits. This is the fifth one I've built and they have all been painted. I would like to make one with natural wood someday, but I don't think I am ready yet. I am also curious to use better wood, like scratch guys use. Dave, Brian answered your question on the clamps. Just twist a handle from another clip into it, or you can use wood strips instead. I like the clip handles, and I sometimes use the end with the two prongs to hold on both sides of a bulkhead. I made some up with the smaller size binder clips too for tighter spaces. George, thanks for the heads up for the show. I didn't get a chance to see it but I'l bet it was pretty good. Summer before last I got to take a tour of the Constitution with Popey2sea and it was fantastic. The ship is about to go into repairs for 3 years, I think this month, so I won't be able to just pop down and take a look any more.
- 1,354 replies
-
- 2
-
-
- constitution
- model shipways
- (and 1 more)
-
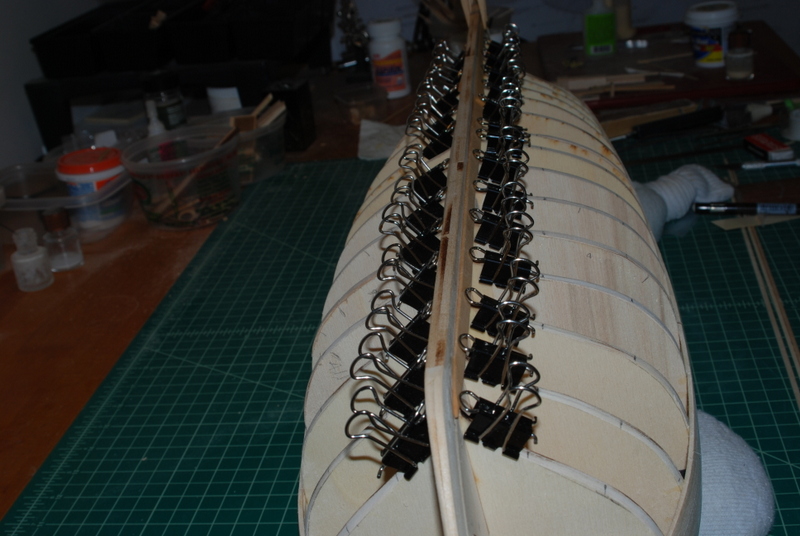
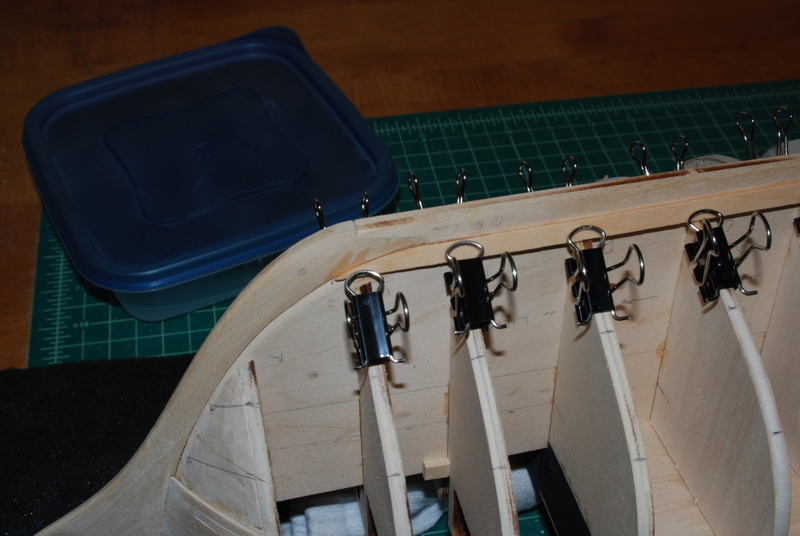
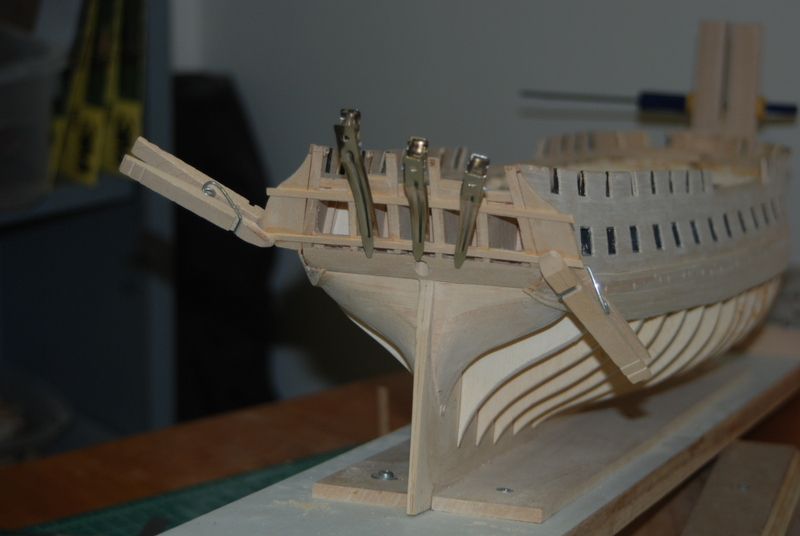
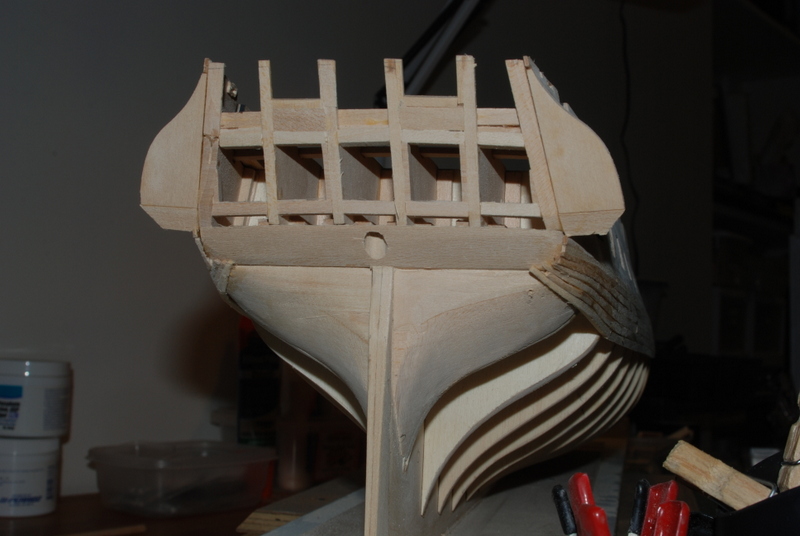
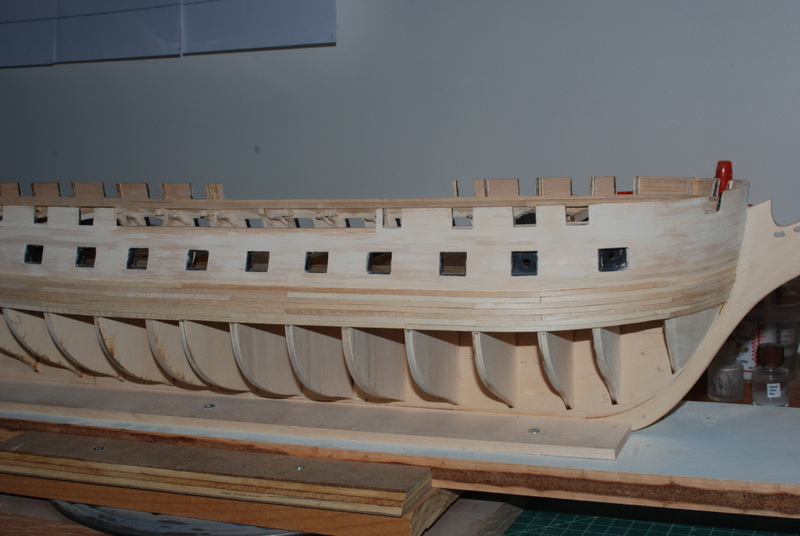
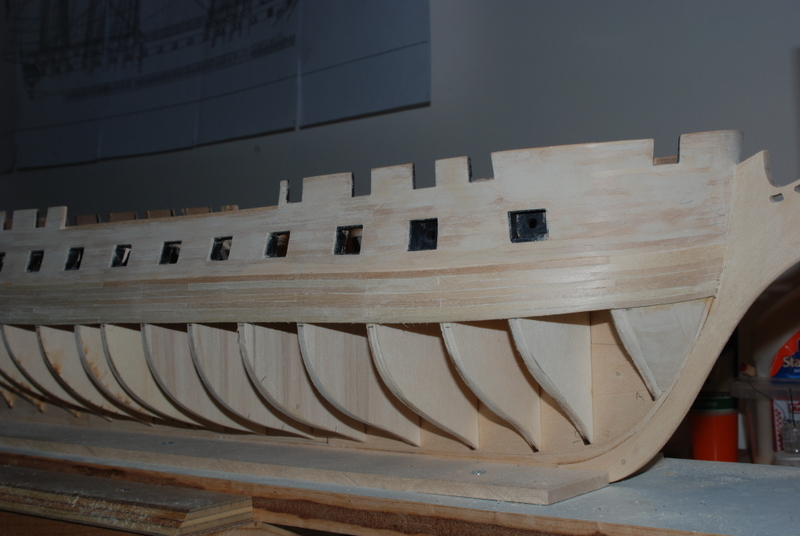
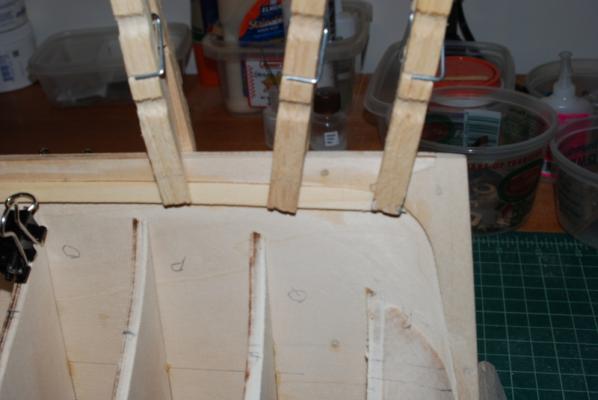
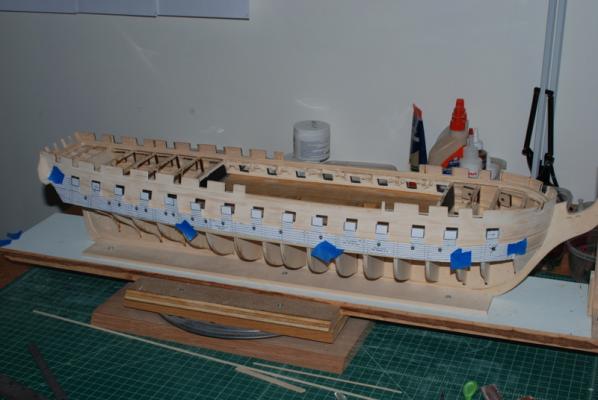
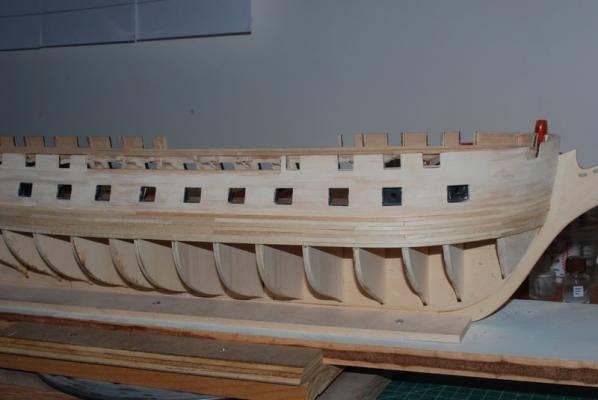
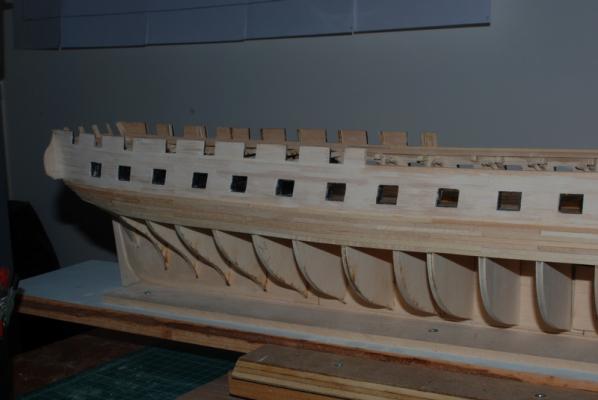
I finished the transom planking but failed to take a picture of it before removing the hull from the building board and turning it upside down for the rest of the planking. Here it is upside down, though: I could not fit the upside down hull into the keel clamper because the clamps are in line with the keel and the gun deck is in the way. Oh well, the last time I planked a hull I used this method, which is to place the hull on a couple of socks filled with rice. I also placed some foam under the stem and stern to protect those areas. It is easy to turn the hull around this way so I can plank both sides simultaneously. I used two battens per side to define the planking belts. I first started to use the measurements of the planking belts on the plans, but I did not like the way those battens were running. I am going to use just three bands between the keel and the wales instead of the four shown on the plans. I cut the garboard planks in two pieces for each side. Since most of the remaining planking will be covered by copper plates, I am not going to use short pieces, but will use longer pieces that are easier to work with. I will still keep track of the butt ends of the planks just so I don't get them too close to each other. For instance, the garboard strake joints on each side of the keel are staggered. I found these planks very easy to make for this model, where in the past I have had problems with these. From the plans, it looks like these end at bulkhead B, so I used a piece of Scotch tape on the rabbet from bulkhead C to B and traced the outside edge of the rabbet. I then transferred the tape to a 1/4" by 1/8" plank and cut the curve out through the tape. The rest of the plank was straight, which is what made this easy. For the stern pieces, I just traced the curve of the rabbet to another piece of 1/4" by 1/8" plank and cut and sanded it to shape. After soaking these four pieces, I clamped them in place to dry, making sure the edge of the planks fit into the rabbet along the keel. Here is what that looks like: The curve at bulkhead B: The curve at the stern: Tonight I will trim and glue these in place. In the mean time, I measured the gap from the bottom of the wales to the first batten to determine the number of planks to run in Band A and the widths of these at each bulkhead. I am definitely going to need to drop a bunch of planks at the stem and a few at the stern in this band. That should be fun.


- 1,354 replies
-
- 9
-
-
- constitution
- model shipways
- (and 1 more)
-
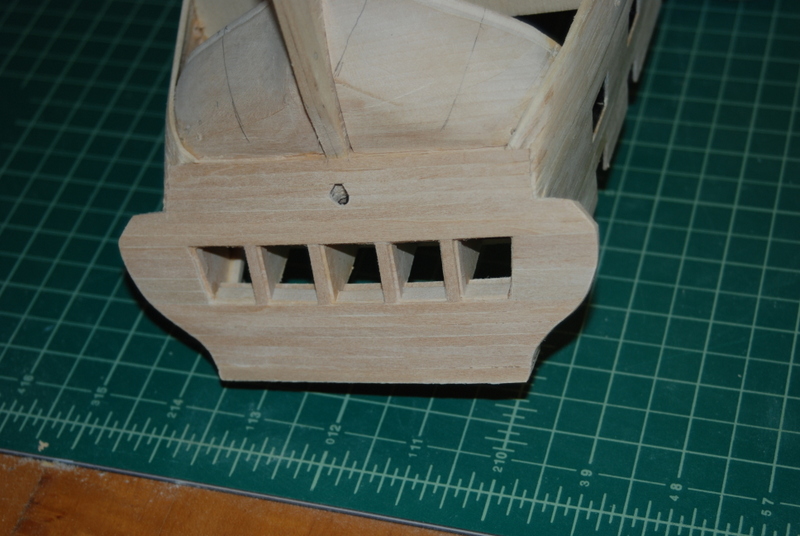
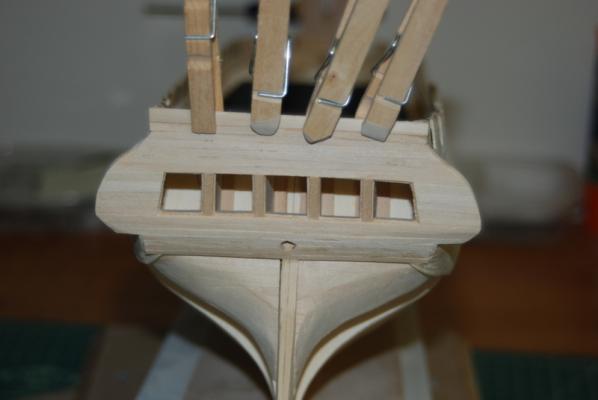
Tim, I am glad to hear I am not the only one that this doesn't work for. I started planking the transom by adding the planks above and below the windows, leaving a 1/32" rebate around the windows. I then added the planks above and below these, and along the outsides of the outer windows, again leaving a 1/32" rebate. This shot looks like Connie is having a bad hair day: For the counter planks, I first filed the ends of the wale planks so the counter planks would fit inside of them. I didn't cut in the airing ports, as I am just going to make thin covers for these later and place them over the planks. Here the last two transom planks are being glued on, after some preliminary sanding. These need to be trimmed for length after they dry. I used vertical pieces of planking between the windows, which worked out to be just the right size. When I build the window frames later they will fit into the rebates and be sanded flush with the planking. I am glad those gallery pieces are now secured with planks instead of just being edge glued on. I figured I was going to knock at least one of them off. I will give these planks some more sanding, then it is on to planking the hull below the wales. I will probably start with the garboard planks and work up for the first band, but we will see. I have to figure out how to secure this beast when it is out of the build board and upside down. I have a keel clamp that might work or I may just put some padding on the workbench and hold it that way. We shall see...

- 1,354 replies
-
- 8
-
-
- constitution
- model shipways
- (and 1 more)
-
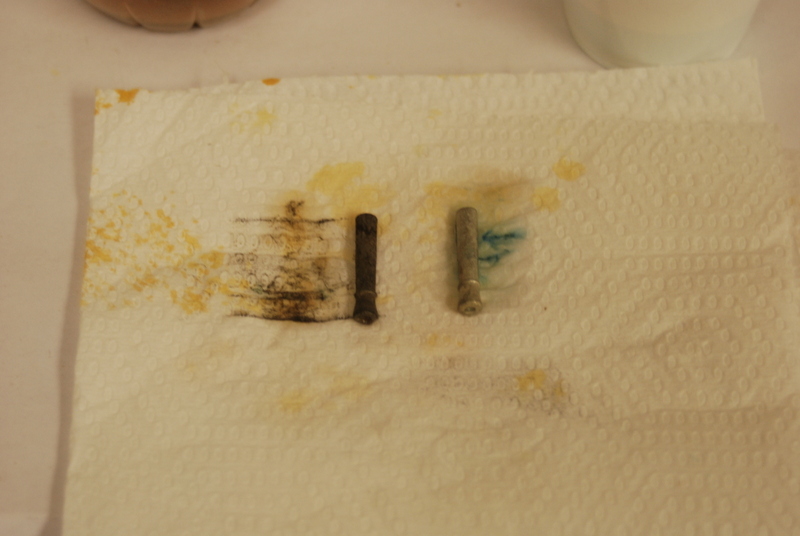
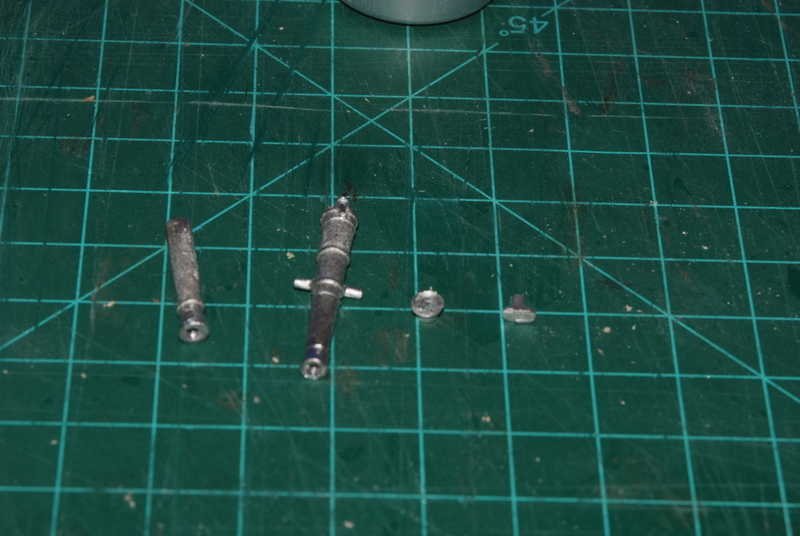
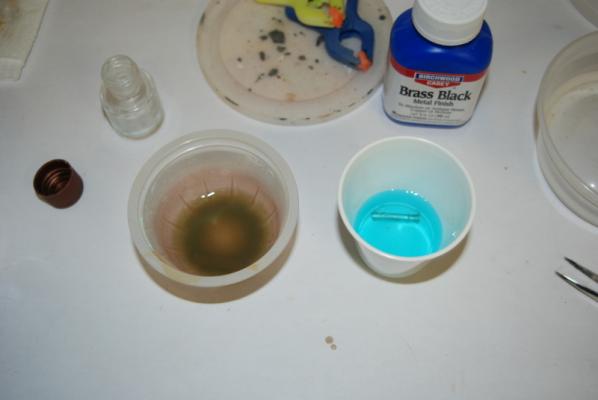
Over the weekend, I was finally able to experiment a bit with blackening the britannia metal, using two of the extra dummy cannon barrels that came with the kit. I first soaked the two barrels in white vinegar to clean them, rinsed them, them put one in a cup of Blacken-It solution (left) and one in a cup of Casey Brass Black (right), both at full strength. As you can see, the Blacken-It went to town and after a few seconds was all brown and cloudy. The Casey solution just sat there, doing nothing. After 10 minutes in the solutions, I pulled them out and rinsed them off again. Here are the results: The Casey's did almost nothing and as an aside I then threw a few copper eyebolts into it and they turned black almost instantly, so it works well on copper, just not on white metal. The Blacken It did make the barrel darker, but it was uneven and not very black, and it seemed to deplete a lot of solution for this one barrel. To do all the barrels would take quite a bit of the solution, I think. So, I am going to stick with my usual approach for white metal - clean in white vinegar, prime with Bulls Eye primer, and paint with Floquil engine black paint. Here are the dummy barrels after that procedure: I may spray these with some Matte Finish to protect them when they are dry.

- 1,354 replies
-
- 6
-
-
- constitution
- model shipways
- (and 1 more)
-
That sounds good Starboard III. Saves the trouble of scanning the large sheets by folding or cutting them. Tim, I also use the copy function on my printer when I need a copy of a section. Luckily it prints at exactly 1:1 so the scale stays the same. My old printer didn't and that was a pain. Thanks for all the likes guys.
- 1,354 replies
-
- 1
-
-
- constitution
- model shipways
- (and 1 more)
-
I know it was less than that, but I also did not copy all the sheets, like the first one that had all the bulkheads on it or the last one with the rigging plan (I think).
- 1,354 replies
-
- 1
-
-
- constitution
- model shipways
- (and 1 more)
-
Oh, I should say first that I had the plans copied at Staples when I started the build and have been cutting up the copies as I need them. I cut the side view from plan sheet 3 (I think), then just scanned that piece into the computer.
- 1,354 replies
-
- 1
-
-
- constitution
- model shipways
- (and 1 more)
-
I know Tim. And these are the small holes. I thought about drilling the hawse holes now too, but those can wait. I have a cheapo Canon Printer/Scanner that came with a scanning application that saves the scans as jpegs or pdfs. I saved them as jpegs then imported them into a free image processing program called GIMP 2. I then exported the joined images as a jpeg and imported it into a free vector graphics program called Inkscape. I printed the templates from Inkscape although that took a little fiddling to get the images to print out at the right scale. Mostly trial and error.
- 1,354 replies
-
- 1
-
-
- constitution
- model shipways
- (and 1 more)
-
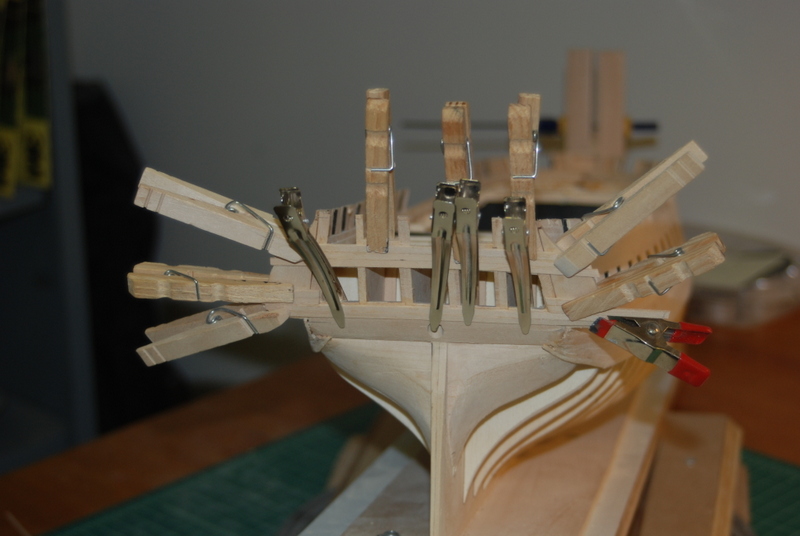
I turned the hull around and used the same technique on the starboard side: One nice thing about having the plans scanned into the computer was that was able to flip the image in the computer and print out the three pages for this side, so I didn't have to work through the back of the plans. Now that this little task is complete, I will be focusing my attention to planking the transom and counter, then finish the rest of the hull planking.


- 1,354 replies
-
- 7
-
-
- constitution
- model shipways
- (and 1 more)
-
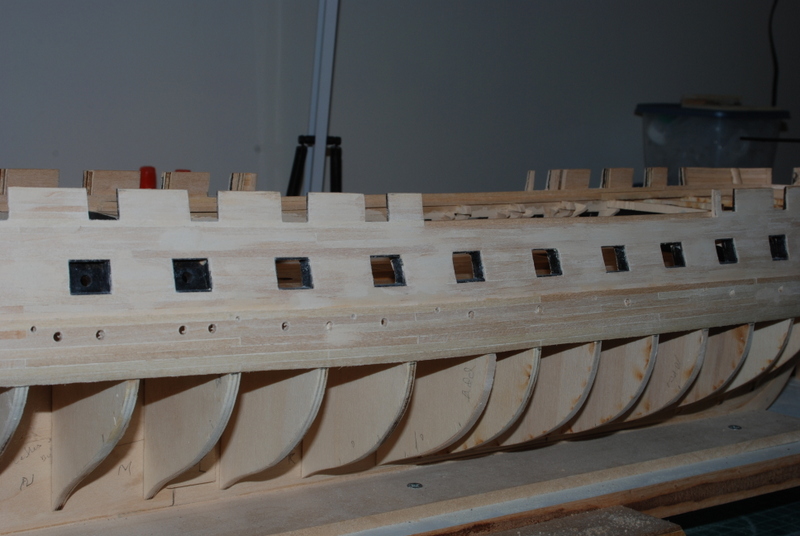
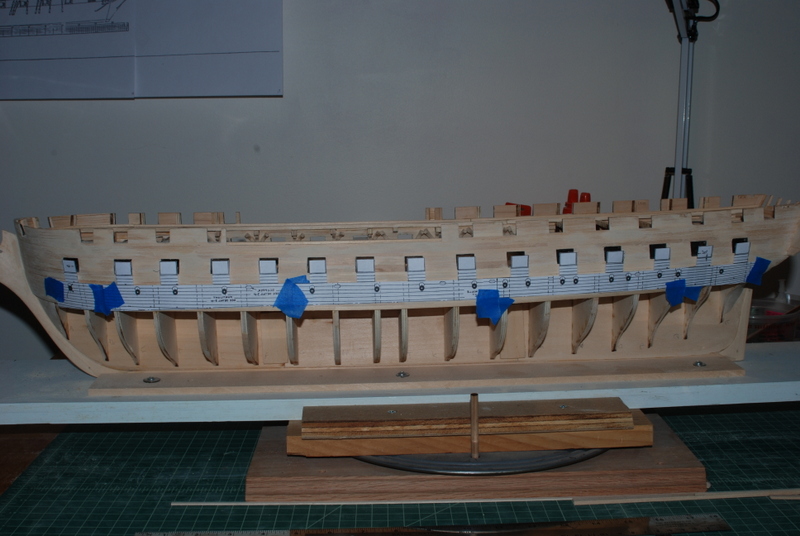
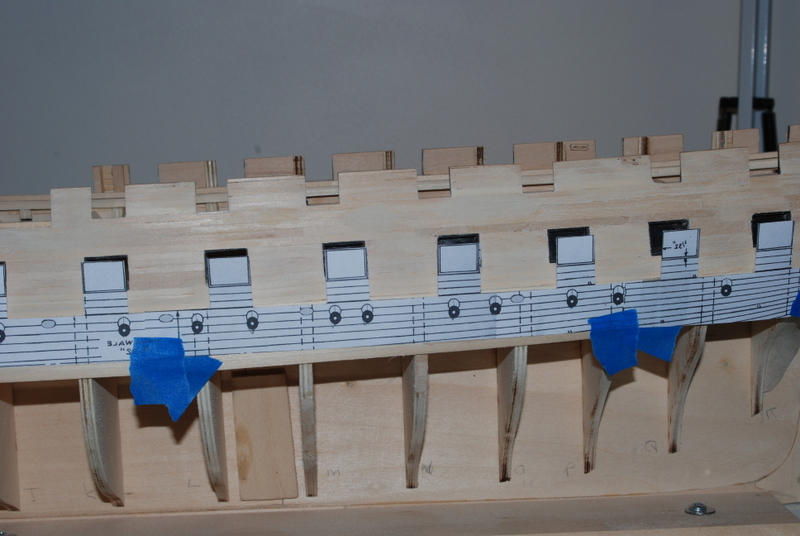
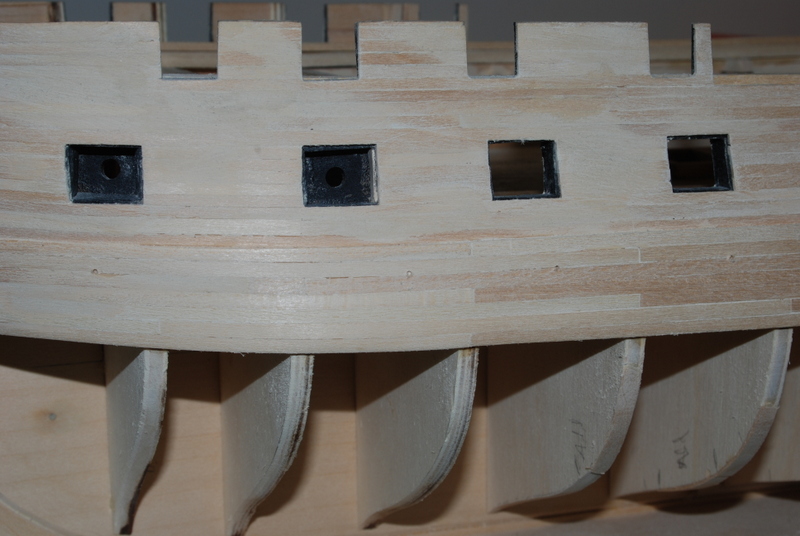
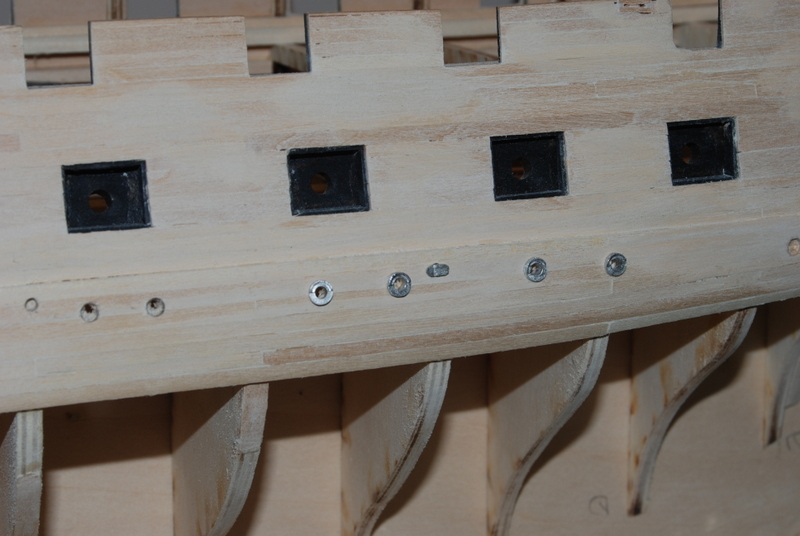
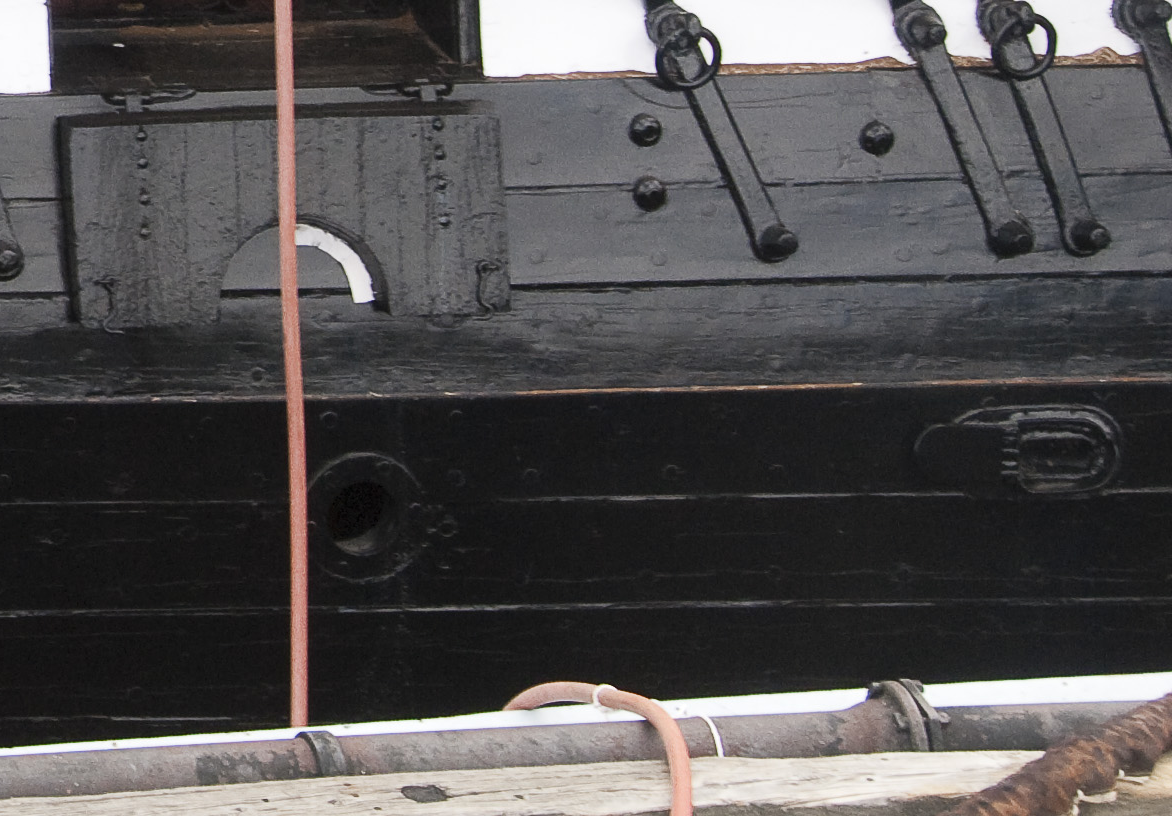
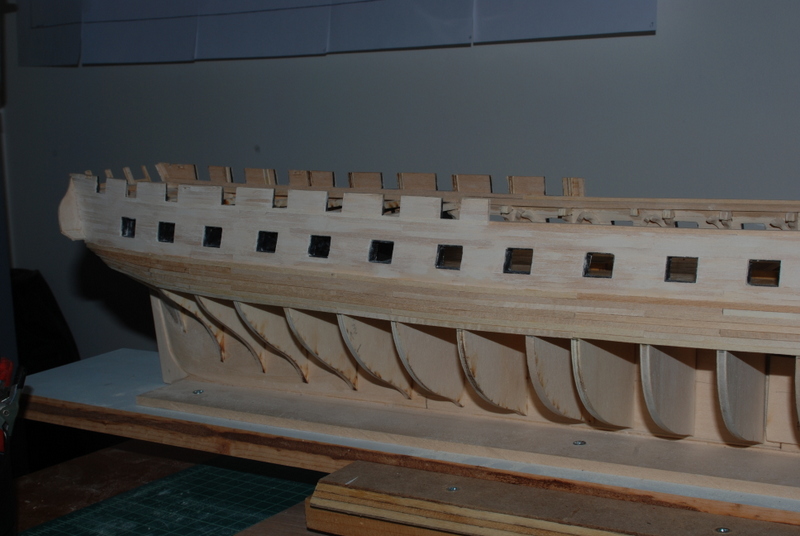
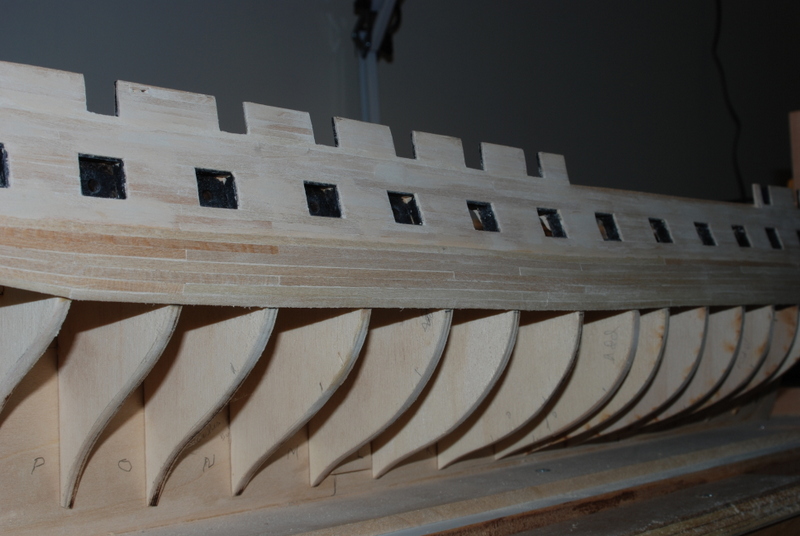
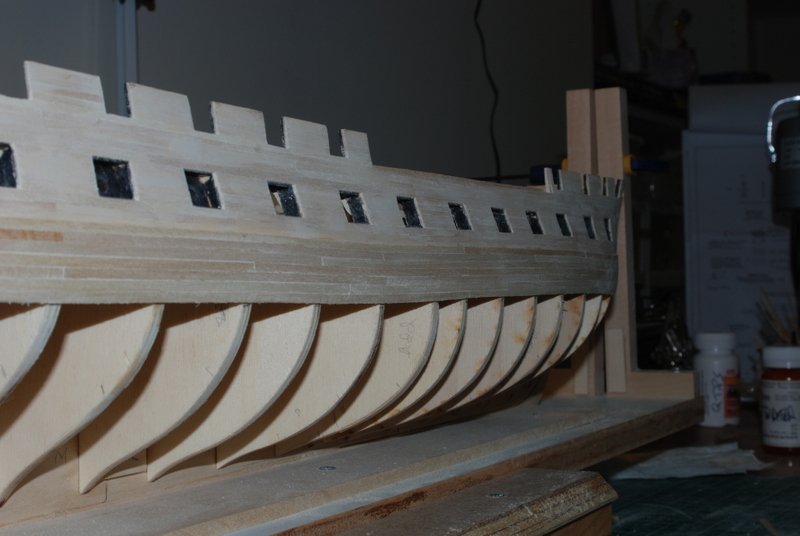
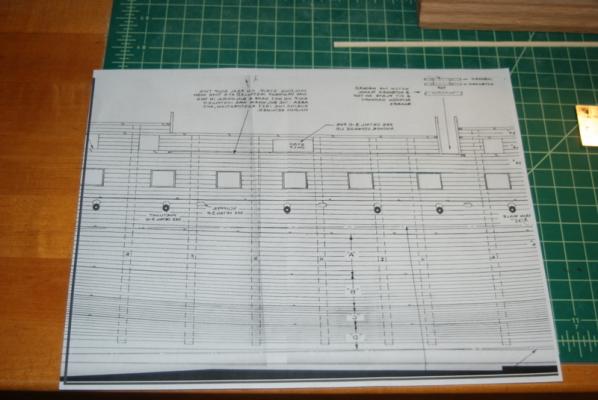
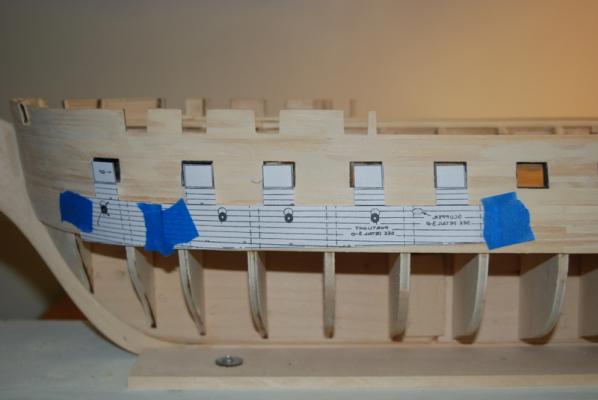
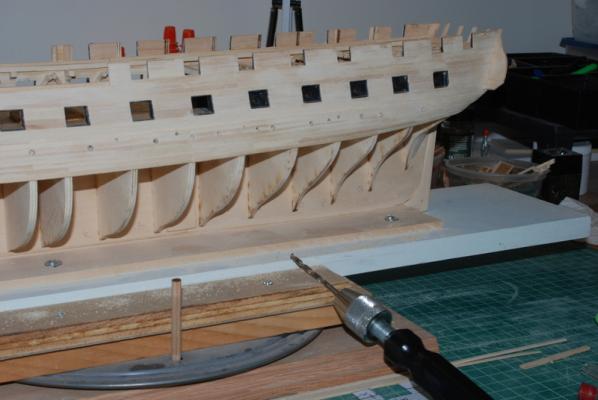
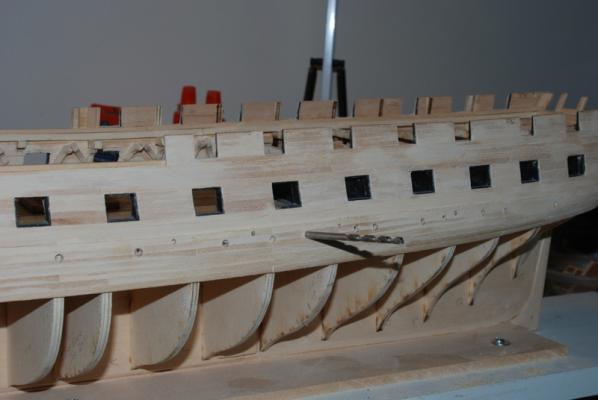
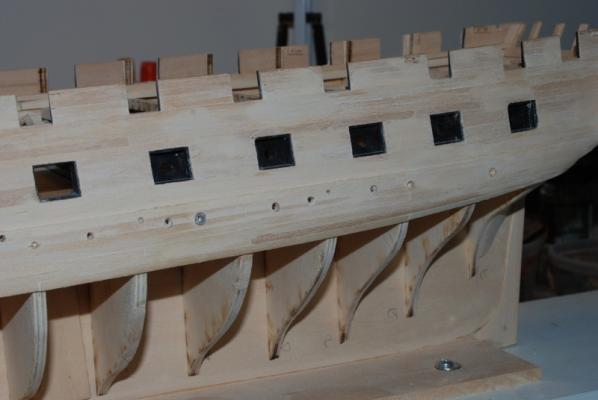
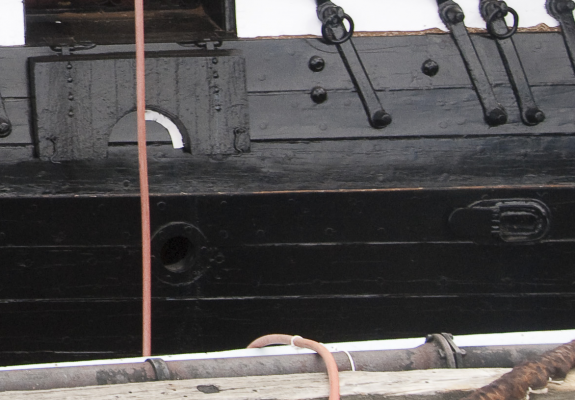
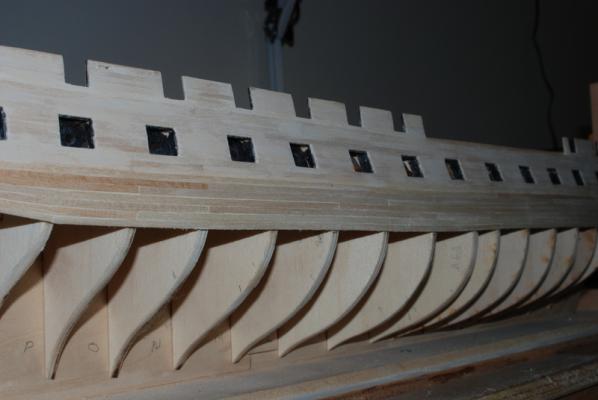
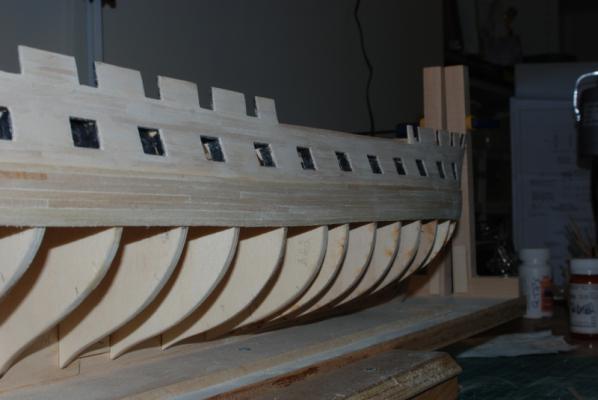
I haven't had a chance to test blackening the britannia metal yet, but I have been working on the hull. As I mentioned last time, I wanted to drill all the holes in the wales for the air ports and scupper covers now, just in case I messed them up. So, to start, I scanned the side view from the plans into the computer and used an image processing program to align the three page size pieces. I had to scan the plans in pieces as I only have a letter size scanner. To check the alignment, I exported the full image to a vector graphics program and drew a straight line on top of the reference line along the bottom of the plans. I would them go back and rotate the pieces again, then check the reference line. It took about three iterations to get the three pieces aligned nicely. One thing that bothered me from the plans was that the scuppers, which are on the bottom of the gun deck, and the air ports, which are in the top of the berth deck, looked too much in line. When looking at images of the Constitution, like this one: it looks like the air ports are a little lower than shown on the plans. So, since I had the plans now in the graphics program, I made up little symbols to help drill the holes and positioned them just a little lower at each air port location. I then printed the plans out with the symbols as three sheets, like this one: I was going to cut and tape these piece together to make one long template, but found that I could use them separately and tape them to the hull as separate templates. I cut them out so that I had the locations of the gun ports for horizontal alignment, as well as the top of the wales for vertical alignment. I taped all three templates to the hull and lined them up where they overlapped: I then drilled pilot holes through the templates, which you might be able to see on this image: Then enlarged the holes using very sharp bits in a pin vice and this drill bit holder that I found somewhere online: To clean up the holes after drilling, I first sanded them flat, then used the back of the drill bit to clean out the hole: I used the air port and scupper cover fittings to check the holes and here are the results: There sure are a lot of holes in the wales now, but they came out nicely without any tearing around them, which is what I was mostly afraid was going to happen. While testing the scupper covers to figure out what drill bit size to use for them, I found that the posts on the back of them were oblong, not round, so I filed them a little smaller and round so I could use a smaller drill size. Even so, the top of the hole can still be seen when a few of these are in place, but I can use a bit of filler later to hide them.


- 1,354 replies
-
- 12
-
-
- constitution
- model shipways
- (and 1 more)
-
You have done a great job Sal. Congratulations and display his model proudly. Oh, and get started on your next one, already.
-
Rich, that bowsprit rigging looks great. I can see now why they may never have had a sail on this spar - no room for it!
- 1,756 replies
-
- 1
-
-
- constitution
- constructo
- (and 1 more)
-
Thanks for the link George. I happen to have a bottle of the Casey Gun Black, too, so I may try both methods now. Good luck with your tests too.
-
George, take a look at this topic if you haven't seen it already: http://modelshipworld.com/index.php/topic/6977-the-blacken-it-trials/?p=231549
- 1,354 replies
-
- 1
-
-
- constitution
- model shipways
- (and 1 more)
-
Thanks George. I have never tried Blacken It on britannia castings but I think others on this site have with some success. I do use it on copper and brass and like the finish very much. I might have to try some experiments to see how it works on the white metal, as I have a few dummy barrels that I won't be using on the model.
- 1,354 replies
-
- 2
-
-
- constitution
- model shipways
- (and 1 more)
-
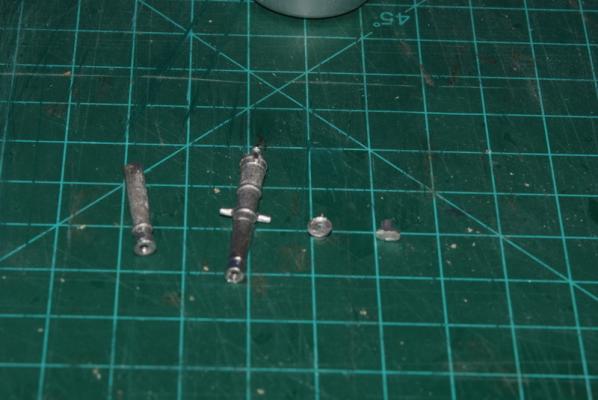
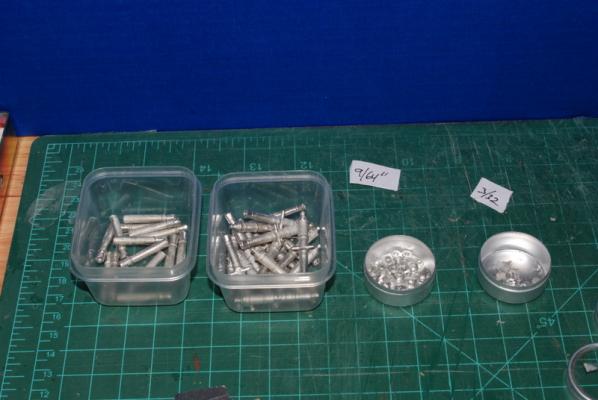
First of all, thanks for all the likes. It sure makes this hobby more fun to have folks like you looking in on the progress and the encouragement. Criticism and suggestions are more than welcome too. I finished up the starboard side wale last night. Here are the wale planks before sanding: This side came out much better than the port side before sanding. I guess I took my time more the second time since I knew how much work it was to get it to look good on the other side. Here it is after sanding, with no filler added: I did end up adding a little filler along the stem and near the stern, but that was it. I will try to be more patient with the rest of the planking to cut down on the sanding and filling. I have been working to clean up some of the metal fittings that came with the kit. I drilled out the bores of the dummy cannon barrels that came with the kit and the "real" cannon barrels that came with the extra cannons that I bought. I used a drill press to clean up the initial hole in the barrels, which were too small and not very circular. I then used a slightly larger drill bit in a pin vise to make the final hole. These are just a tad bit over 2mm in size. I then used a small file to clean up the rest of the outside of the barrels, mostly removing lines from the casting process. I want to drill the holes for the berth deck air ports and the scuppers now, so in case I mess any of them up I can replace that section of wale if I need to. I was not sure about the supplied metal fittings for these, but after I examined them I was pleasantly surprised how detailed they are. Now I just need to be able to paint them without hiding that detail. I am going to paint these black unless some one knows better what color they should be. I had to remove a little flash on some of these, but mostly they were in good shape. I used some scrap planking to test the drill bit sizes for these and found that the posts on the back of the scuppers are oblong, not round, so the hole was not hidden completely by the scupper. I fixed this by filing each of the posts down on them to make them rounder and thinner. OK, here is a question for you historians out there. Were the berth deck air ports just a hole through the hull or was there some sort of glass inside them? I found on the Constitution CD a drawing of a cover that went on the inside of these, which leads me to believe that they were just open in the 1812 era, but if anyone has any other information please let me know. I have made up some templates to help locate and drill the holes for these, which I will show in the next instalment.

- 1,354 replies
-
- 5
-
-
- constitution
- model shipways
- (and 1 more)
-
Did the Constitution ever have a spirit sail, I wonder. Rich, your bowsprit and yard look great.
- 1,756 replies
-
- 2
-
-
- constitution
- constructo
- (and 1 more)
-
Looking good, Mundie.
-
Hi Warren. Thanks for looking in. As to your question, I also used the first free chapter when I started this build and found it helpful. I have built six ships before this one, starting with the Phantom as you did and working my way up to this one. This is only the third plank on bulkhead model, though. I wanted some planking practice with smaller ships before tackling this one, and I could probably have used more practice. The first two models I built had very good practicums and I was very nervous to build the third without one. But, I found that the steps are very similar for most models, and I managed to do it. The fourth was a more complicated model that had mostly Italian instructions and I was able to build that one (Beagle) with the help of the Anatomy of Ship Beagle book. I have not seen the other chapters of the Hunt practicum for the Constitution and I am sure they are very good, but I think if you take your time and follow along with the builds that have been done and the ones going on now you should be OK. A build log is the best way to get help as folks here can see your progress and offer suggestions to avoid too many mistakes, but as you can see from my log, I make a lot of mistakes, but so far they have been easily correctable. That said, I am still only on the planking for the Connie, so I have no idea what sorts of problems may await me down the road, but I have yet to find one that is insurmountable with just doing something over until I am satisfied with it. One thing I do is to make a list of the steps to be performed, using the instructions and plans, so I have a very good idea of the order to do things in. I try to work out all the possible steps that can be done before others to make the job easier. For instance, when I built the Phantom I did not paint the hull black until after I put the copper plates on. If I had done it the other way around I would have had a much better line between the tape and the copper. Of course, this list is not complete at first but I add to it and change it as I go and I have found that this has mostly eliminated forgetting to do something before it was too late or too hard to do. So I would say press on and good luck, and don't be afraid to ask questions.
- 1,354 replies
-
- 2
-
-
- constitution
- model shipways
- (and 1 more)
-
Count me in Michael to follow along on this journey. Good start so far.
-
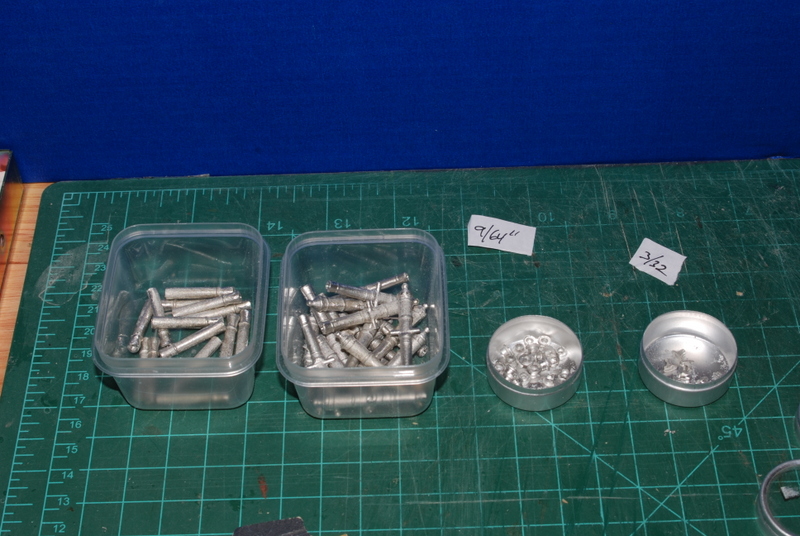
Amazon is where I bought these ball bearings. They are 2mm