usedtosail
-
Posts
2,421 -
Joined
-
Last visited
Content Type
Profiles
Forums
Gallery
Events
Everything posted by usedtosail
-
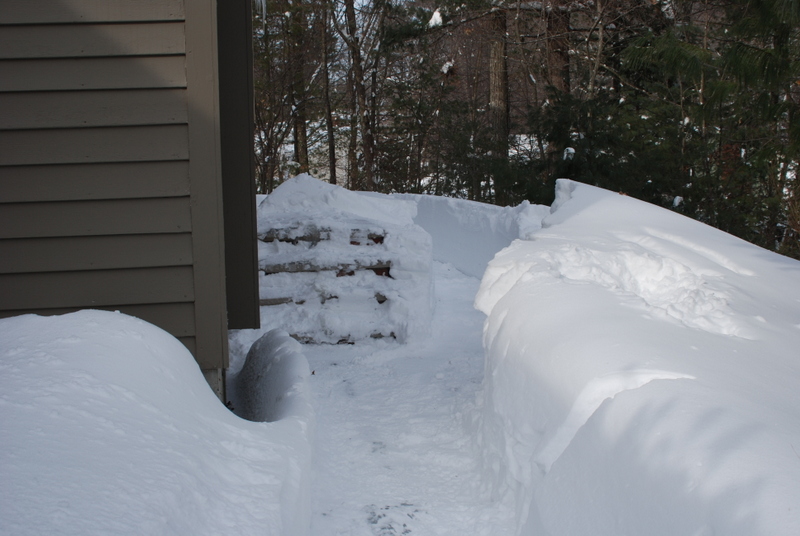
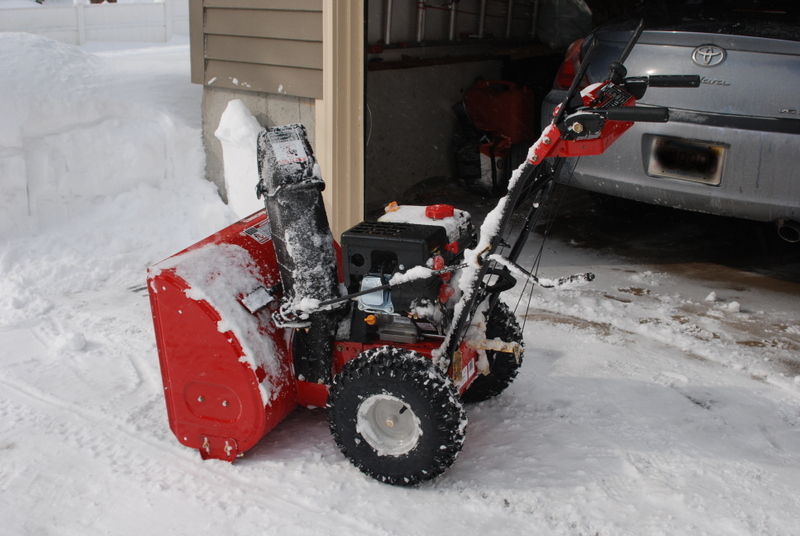
 One more thing I forgot to include in my last up-date. Here is the most useful modeling tool I have been using lately. My old snow blower of 25 years died just before the blizzard last month and I was fortunate to find this one in Home Depot the next day. It has been the most useful modeling tool because it has gotten me back to modeling in half the time of the old snow blower. I actually had to snow blow a path around the house yesterday so the oil delivery guy could get to the filler tube. First time I ever had to do that.

- 1,354 replies
-
- 6
-

-
- constitution
- model shipways
- (and 1 more)
-
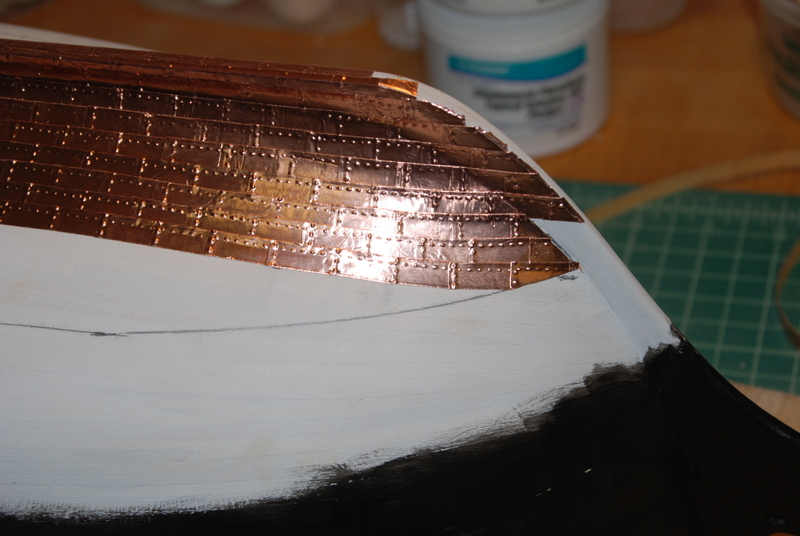
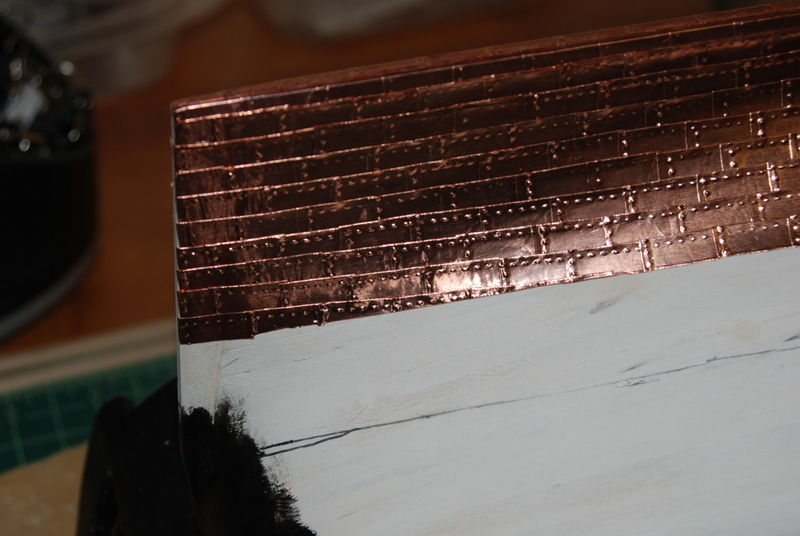
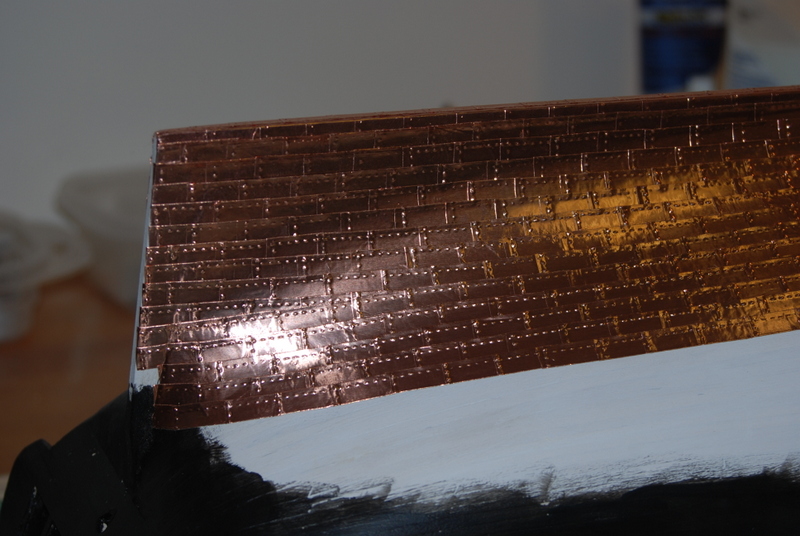
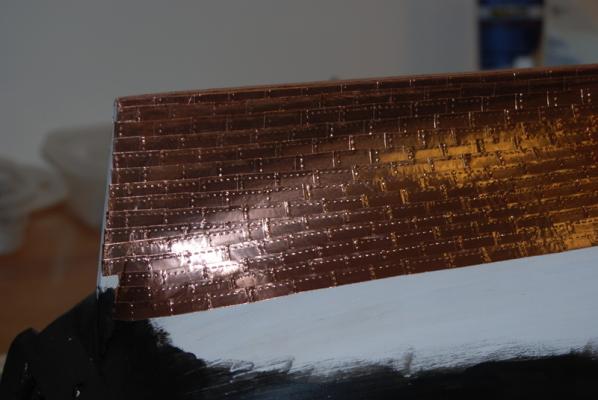
Thanks guys. George, I find the adhesive very good on the copper tape. There is quite a bit of resistance when removing plates. I know it is not a definitive test, but I do have models that are seven years old with no sign of any plates coming loose. I usually burnish the plates down using a piece of wood, but because these plates have the raised bumps, I just use my fingers to smooth them down after they are applied.
- 1,354 replies
-
- 2
-
-
- constitution
- model shipways
- (and 1 more)
-
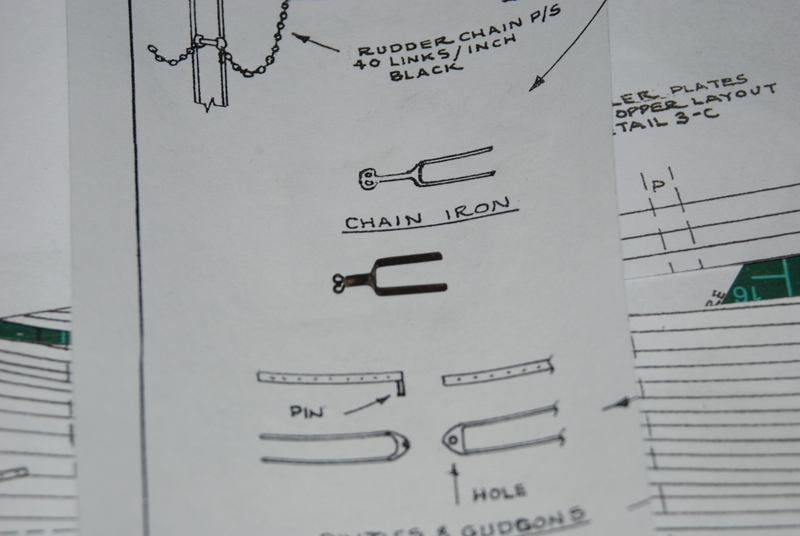
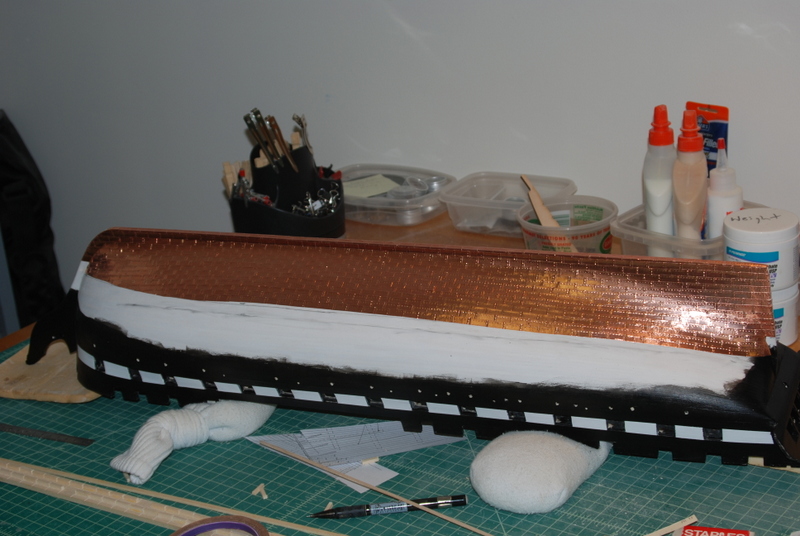
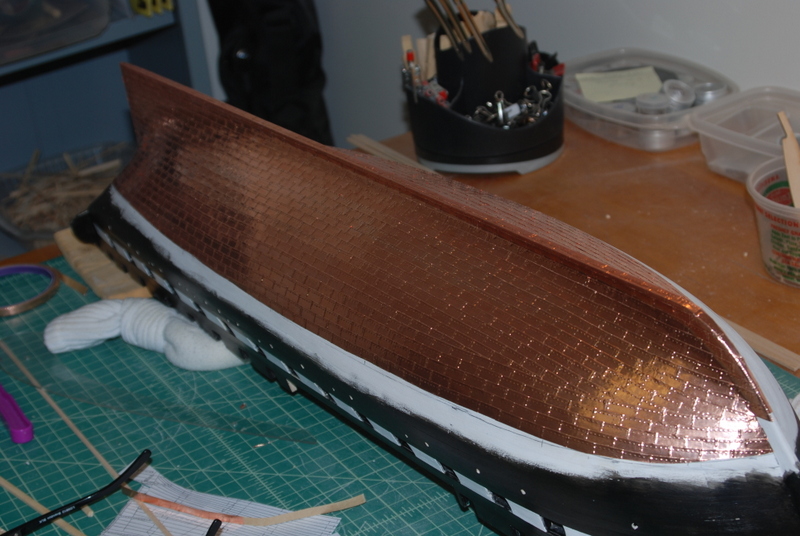
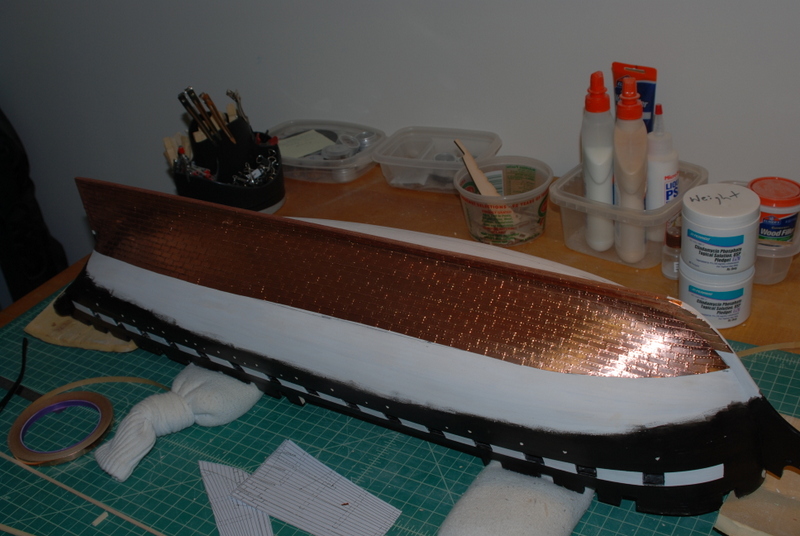
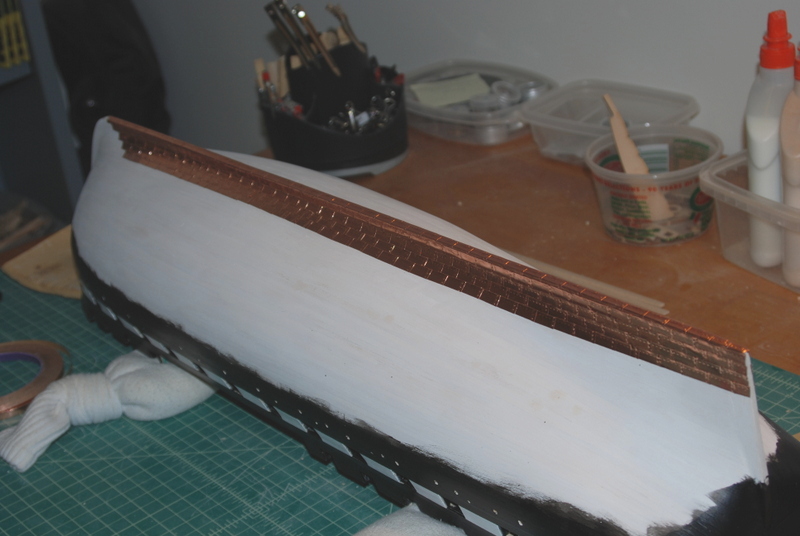
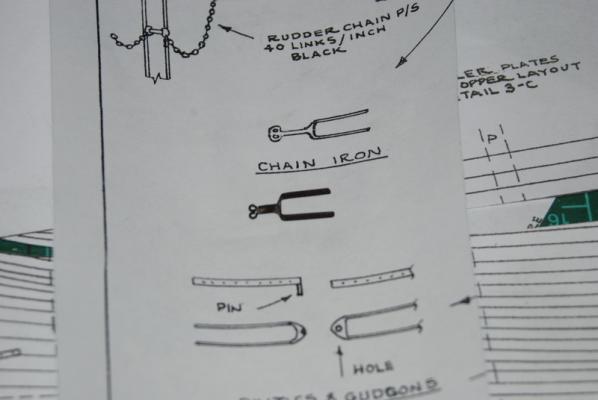
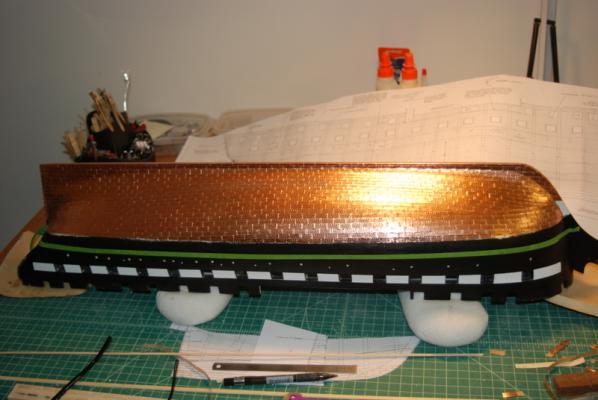
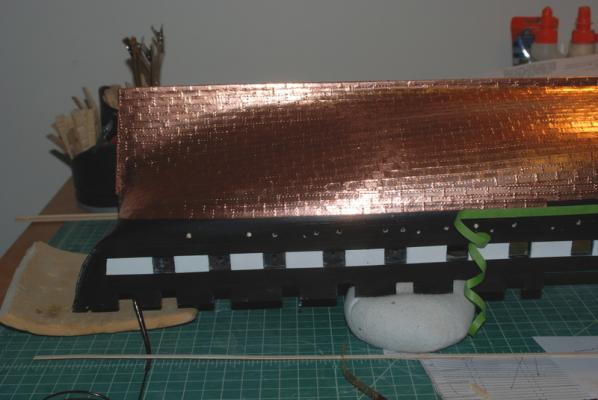
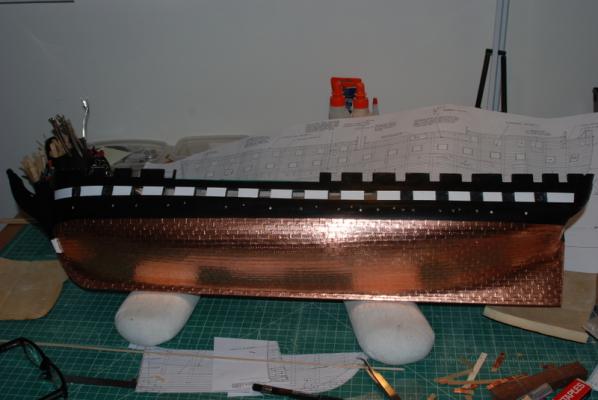
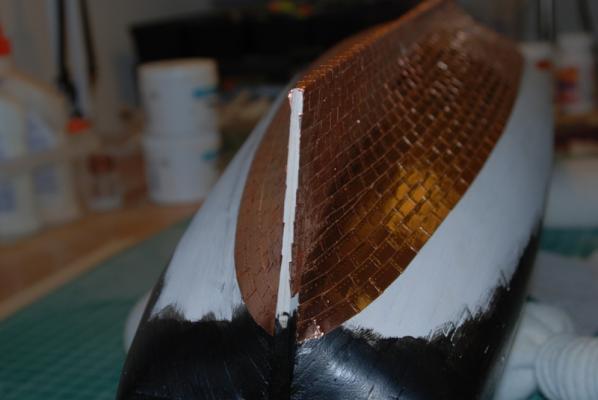
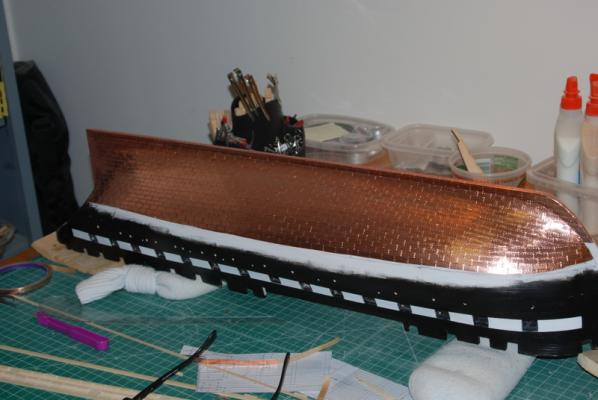
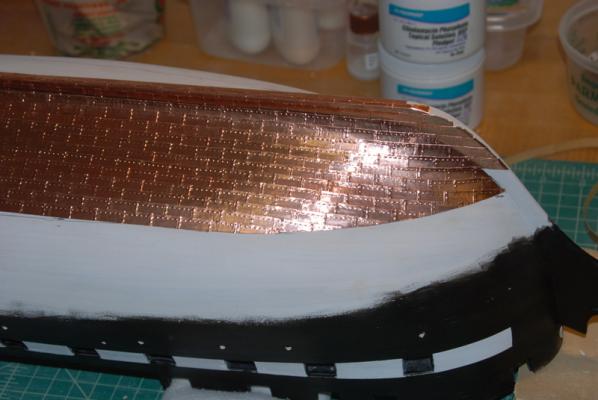
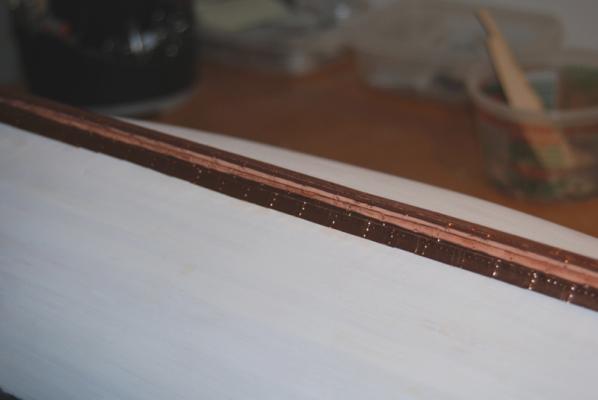
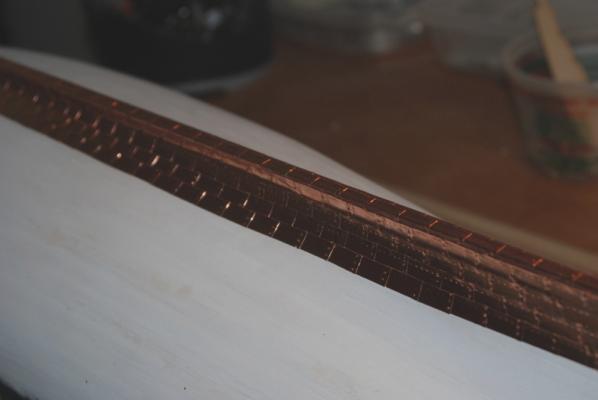
Yeah, George, my kit is only a few years old. I am not sure when they started adding the replacement parts. After the pintles and gudgeons, I made the chain iron. I used a piece of brass tubing that I soldered two eye bolts in one end. I bent the eye bolts so they both fit side by side before soldering them. I cleaned up the excess solder then cut the tube to length and filed the end flat. I bent the same brass strip as I used for the P&Gs and then soldered it to the brass tube. Since this piece goes on the black part of the rudder, I cleaned it up a bit then put it into some Brass Black to see what would happen. The silver solder blackened nicely, as did the brass, so I was very happy. It was then time to get back to the copper sheathing, since all the paint had been applied, including the area around the rudder hole. I first marked out the top edge of the of the final line of plates using masking tape, which I made sure was absolutely straight. It showed that I had some areas that were more than 3 rows wide to complete. So, I took off the trimmed plates from the last two rows of plates in the previous section and left the full width plates. I left the plates at the back of the rows up so that I could slip the new plates under them. I then marked down from the final edge for each row of the dressing belt plates, which showed the gore line at the top edge of the previous belt. I filled in the rows with whole and partial plates to the new gore line. I then completed the three dressing belt rows. I did start the bottom dressing belt at the stern post, instead of near the turn of the stern that the plans show, so I trimmed off some plates from the previous belt there. I also used smaller plates around the sharp turn at the stern to make the curve look better. As I added the plates in the final row, I matched them up with the edge of the masking tape, and pulled back the tape as I went along, to make sure no plates were over the edge of the tape and to check the edge for straightness. I was really pleased with how straight the edge came out. I have since transferred the top edge of the plates to the starboard side and marked it with masking tape, but have not started removing and adding plates yet.
- 1,354 replies
-
- 9
-
-
- constitution
- model shipways
- (and 1 more)
-
Thanks guys. George, in my kit there was a section of laser cut parts with a sticker on it that said to not use them and use the replacement parts on another laser cut sheet. These included the rudder and the two end transom support pieces, and maybe a couple of other parts.
- 1,354 replies
-
- 1
-
-
- constitution
- model shipways
- (and 1 more)
-
Cutty Sark by NenadM
usedtosail replied to NenadM's topic in - Build logs for subjects built 1851 - 1900
Me too. Nice job.- 4,152 replies
-
- 2
-
-
- cutty sark
- tehnodidakta
- (and 1 more)
-
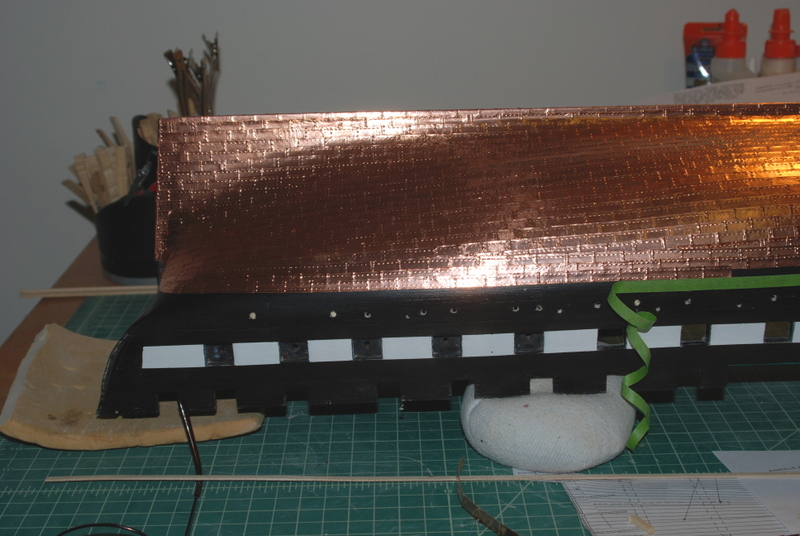
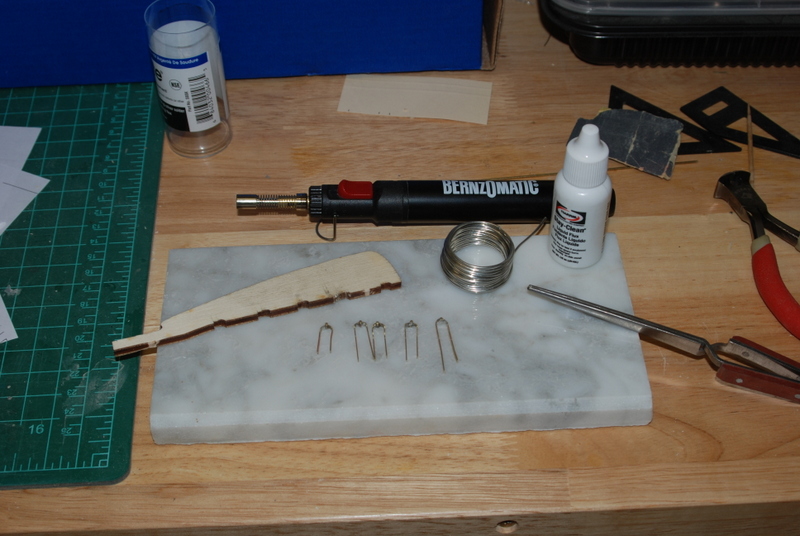
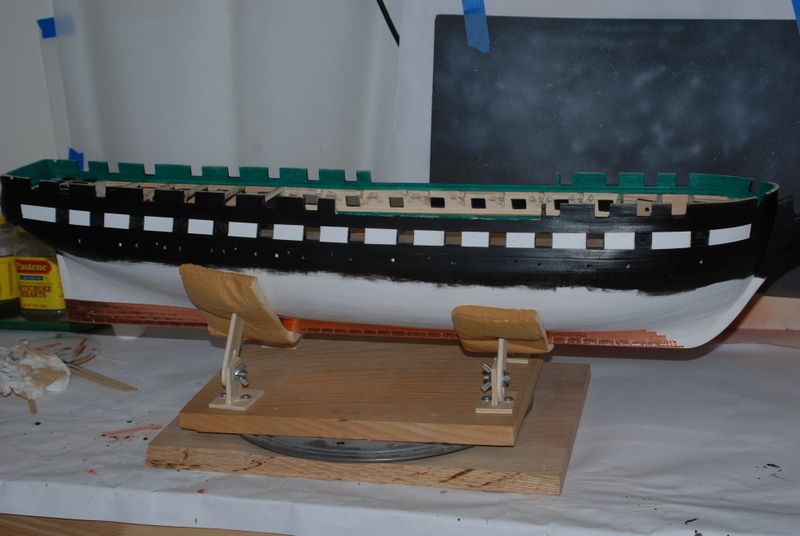
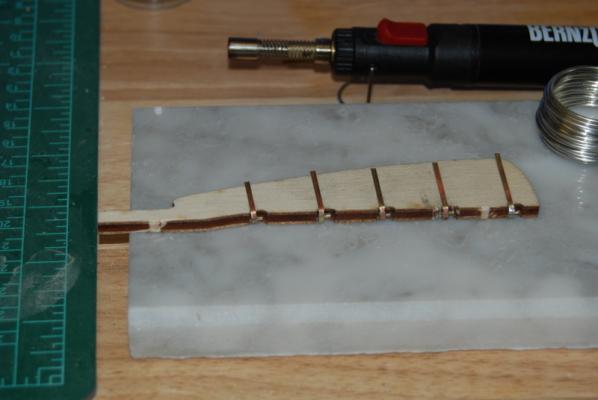
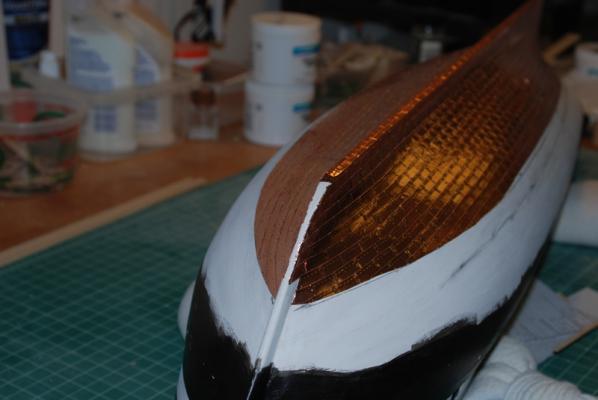
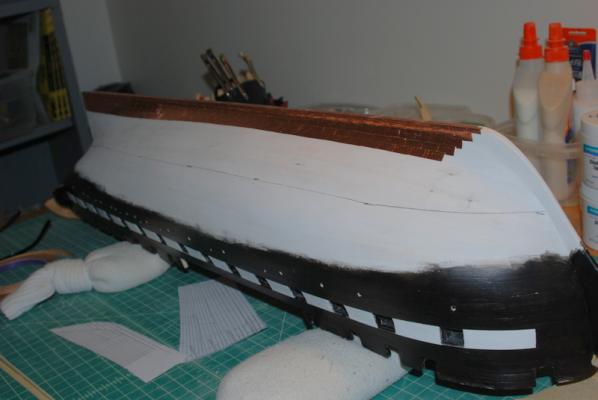
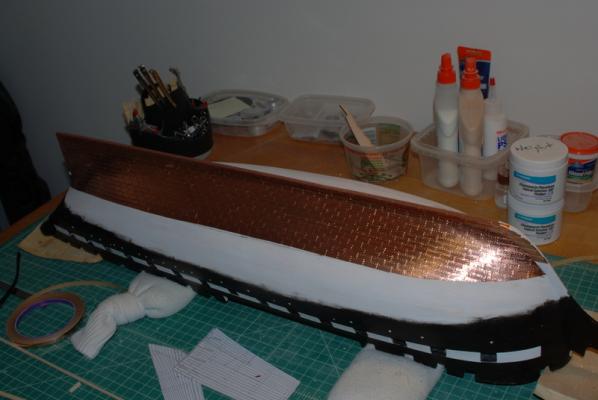
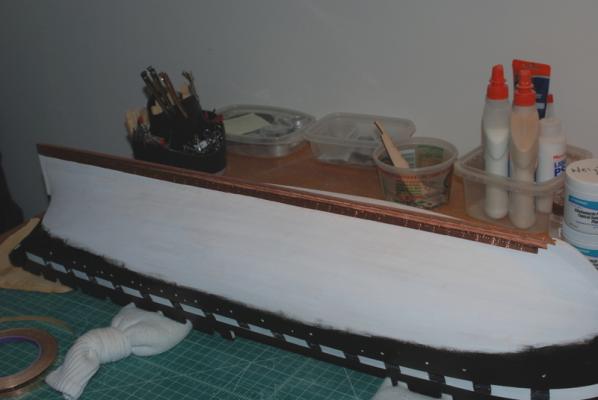
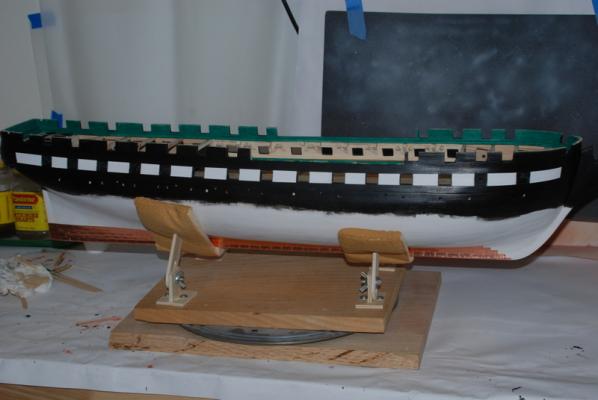
Thanks George and for all the likes. While I have been painting the black down further on the hull, I started on the next task, which is the rudder. I want to make this now so that the cooper tape will oxidize the same as the tape on the hull. This is another little tip I learned on this site from a previous Connie builder, I think from Modeler12. I cleaned up the supplied rudder which comes as a laser cut piece. Actually, two rudders are supplied but we are told to not use one of them. I found this extra rudder to be very helpful as you will see. After I cleaned off the burn marks, I sanded the rudder post round and test fit it into the rudder hole, which of course was too small. Really, it was the wrong shape, as it was round in the plane of the counter but the rudder post fits in at about a 45 degree angle to that plane, so the hole really needs to be an ellipse, not a circle. I used some drill bits and a rat tail file to get the shape right until the rudder post fit in the hole. In the process I did a little damage to the counter, so I added some wood filler and sanded it down to the surface. I gave the rudder a good sanding and a coat of primer. I then painted the top portion of the rudder and the area around the rudder hole with a few coats of black paint. I also painted inside the cut outs for the pintles with black paint, as I am not sure I will put copper foil inside these areas. In between coats of paint I made the pintles and gudgeons. To make the pintles, I used the spare rudder to bend the supplied copper strips. I bent these so the U shape was a little wider than the rudder, then gently squeezed the pintle on the rudder. This put a bend in the short side of the U that I could fit the pin into. I cut the pins from some brass rod and silver soldered them into the U part of the pintles. I have not had much success with silver soldering in the past, but I bought some new solder (Stay-Bright) that worked a treat. It comes with a bottle of liquid flux. I put the flux on both pieces and cut a small piece of solder which I placed inside the U. I held the rod in the U and heated the pieces with a micro torch until the solder melted. I did this on a piece of marble threshold that I had. In most cases the rod was not perfectly straight in the pintle, so I draped the pintle over the marble with the rod on the marble and reheated the joint, so the pintle would hang straight when the solder melted. I cut the rod to size and cleaned up the pintles with a file and sand paper. I am going to leave these bright on the rudder. I made the gudgeans by just bending the brass strip on the extra rudder, but these will get their final shape when I attach them to the hull. Here are the pintles on the spare rudder: I still need to cut the ends of the pintles to length, but I will do that when I attach them to the rudder. Once the black paint dries on the hull, I will be adding the last three rows of copper plates, the dressing belt. Then I will copper plate the rudder.

- 1,354 replies
-
- 8
-
-
- constitution
- model shipways
- (and 1 more)
-
Yes, thank you Janos. Now I get it, and I am going to remember that technique for the future.
-
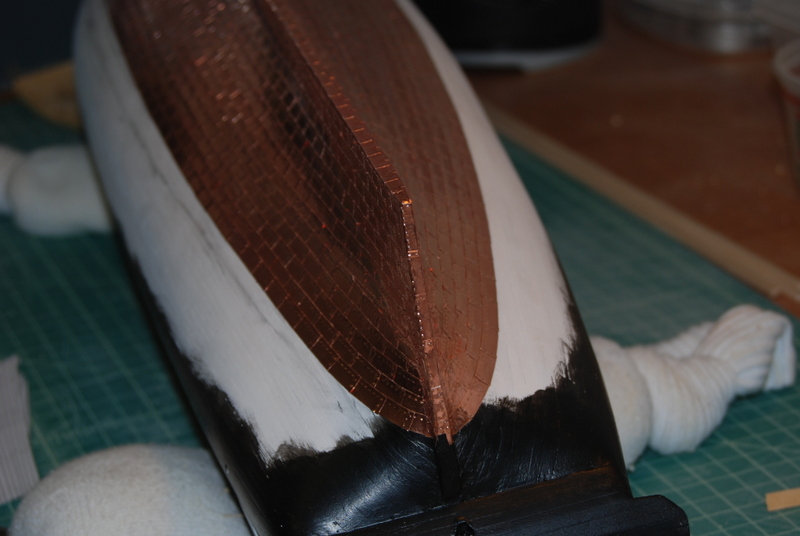
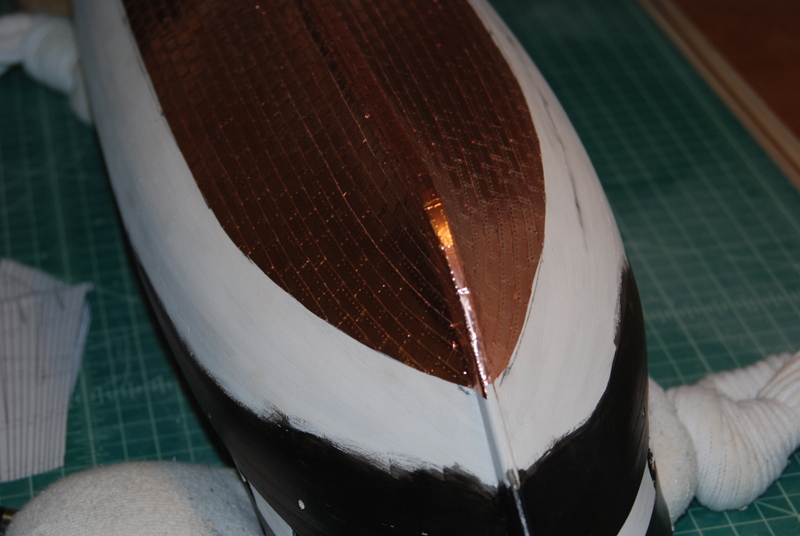
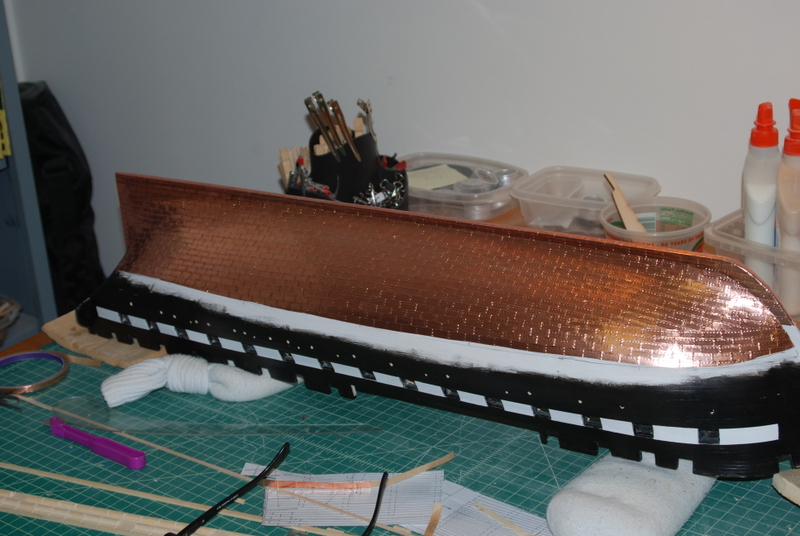
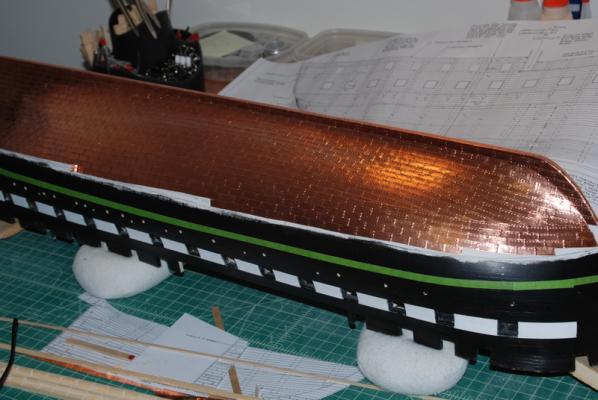
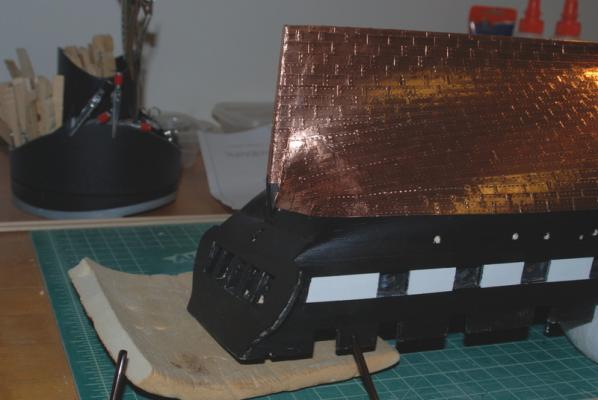
Thanks George, Rich, and Harvey. With all the snow this weekend I was able to get a lot of the coppering done. Here is the other side to the first gore line. I was able to keep the rows pretty even side to side, although the edges look wavy. I have to point out that I kept the copper tape at 1/4" instead of cutting it thinner, which I think makes this job easier, as they are easier to handle and I can control the overlap better. Here are the ends after I added the cap plates along the stem and stern post: I then measured and marked the second gore line. I thought this would be easier than the first, but it also took a number of trys to get it to look right. I was having a hard time envisioning the plates at the stern, but then I noticed the AOS book sitting on a table in the workshop, which has a really nice picture on the cover. It is not done exactly like the MS plans, but it gives a real good idea of how far up the stern post the plates go. Here is the port side plates up to the second gore line: I started the starboard side at lunch today (another work at home day due to the snow), and may be able to finish that up tonight (except that I have to snow blow the driveway tonight). Then it looks like I need to put more black paint further down the middle of the hull, after which I can add the three dressing belts of planks. Getting the top edge of the top dressing row of planks to be really straight is going to be a challenge. I have a few ideas in mind that may help. More to come on that later.


- 1,354 replies
-
- 10
-
-
- constitution
- model shipways
- (and 1 more)
-
Popeye, I would make the rivets more subtle, only because I can't see whoever painted those doors last working around the rivets. They would paint right over them, I would think.
- 956 replies
-
- 2
-
-
- andrea gail
- trawler
- (and 1 more)
-
Yes please Janos a picture would be great. Keith - your balustrades look great to me. That is a very interesting method you came up with that is probably suitable for other items as well, so I will remember it.
-
Nice water line Captain. I think it adds to the model nicely
- 625 replies
-
- 3
-
-
- bounty launch
- model shipways
- (and 1 more)
-
I got to spend about five hours in the workshop today. I first marked off the first gore line on one side. I cut out the two portions of the plans that showed the plates on the bow and stern. I cut these right at the gore line, then lined them up with the keel to mark the location of the line. I then connected the two lines across the middle of the hull. This took a few tries until it looked right to me, especially in the middle of the hull. I marked the line on one side, then used a tick strip to mark it on the other, so they would both be the same. I then started filling in the copper plates to the line. In the bow, the plates are trimmed to fit against the line. I did not need to add any filler rows at the bow. At the stern, I did add a filler row. And here is that side filled to the gore line. Next I will add the plates on the other side to the gore line. I am hoping that I can keep the rows similar on both sides.


- 1,354 replies
-
- 10
-
-
- constitution
- model shipways
- (and 1 more)
-
Thanks George, Tim, and Carl, and for the likes. Yes Carl those plates are cut from the copper tape that came with the kit. The self adhesive really makes it easy to use. The hard part is getting them to line up correctly, which is something that I still struggle with. The jig I made helps me cut them more consistently, which is another problem I have had with this method.
- 1,354 replies
-
- 1
-
-
- constitution
- model shipways
- (and 1 more)
-
Nice!
-
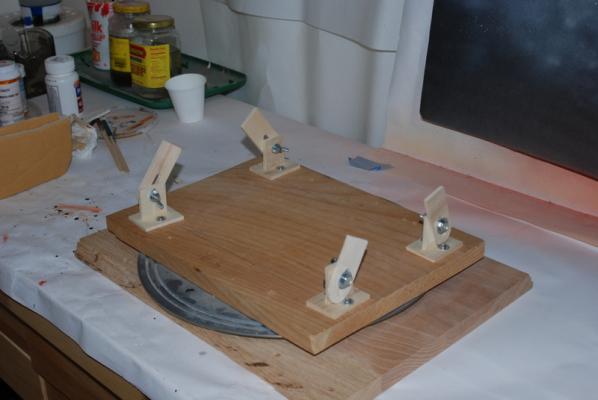
I have started the copper plating. I probably won't be adding too many updates as it is pretty repetitive. I will show how I am making the gore lines, however, when I get to that point, and once I figure out where they are and how to do it. I stared at the plans for about half an hour last night and I think I understand it now, but we will see. I started on the keel and I can add about six rows before I have to deal with the curve of the hull: I am liking how the simulated nail heads are coming out. I think if I tried to use the full nail pattern it would be too much. I was going to use my Keel Klamper to hold the ship after the hull is coppered, but the more I thought about it the less I liked the idea of holding it at only two points so low. and also that the clamps might damage the copper plates. So, I added some supports to a lazy susan I made so that I can hold the model and rotate it as I need to. I will also use some closed cell foam to cushion the hull in the supports. Only a few more thousand or so plates to go.

- 1,354 replies
-
- 9
-
-
- constitution
- model shipways
- (and 1 more)
-
Agreed, that is a great look for the vinyl. Well done.
-
Wow, Jay, you are a brave man! The sails do look really good after the procedure, though.
- 732 replies
-
- 3
-
-
- constitution
- model shipways
- (and 1 more)
-
Rich, I thought you were asking how to tie a line directly to a rail, without a belaying pin. I have had to do that a few times and I don't know if there is a right way to do it. Maybe someone else knows?
- 1,756 replies
-
- 2
-
-
- constitution
- constructo
- (and 1 more)
-
That is a beautiful table top Bill. That finish is gorgeous.
- 335 replies
-
- 2
-
-
- Constitution
- Mamoli
- (and 3 more)
-
Looks great, Sal.
-
Have a great birthday, Patrick.
-
Thanks for the tip, Bill. I have a look for them.
- 1,354 replies
-
- 1
-
-
- constitution
- model shipways
- (and 1 more)
-
Thanks guys. I agree Captain Steve, she is starting to look like a ship. Patrick - the Bengals are a really good team and did well this year. I think they'll do well next year too.
- 1,354 replies
-
- 1
-
-
- constitution
- model shipways
- (and 1 more)
-
This looks like a great tool. I'll have to make one when i get to that point.