Supplies of the Ship Modeler's Handbook are running out. Get your copy NOW before they are gone! Click on photo to order.
×
.JPG.ca33079f5815b861e67b9c2cccd37982.JPG)

Blue Ensign
-
Posts
4,551 -
Joined
-
Last visited
Content Type
Profiles
Forums
Gallery
Events
Everything posted by Blue Ensign
-
 Another interesting card project Richard, they make up into such attractive models. I look forward to seeing your progress . B.E.
- 18 replies
-
- 2
-

-
- Pevensey
- World of Paperships
- (and 2 more)
-
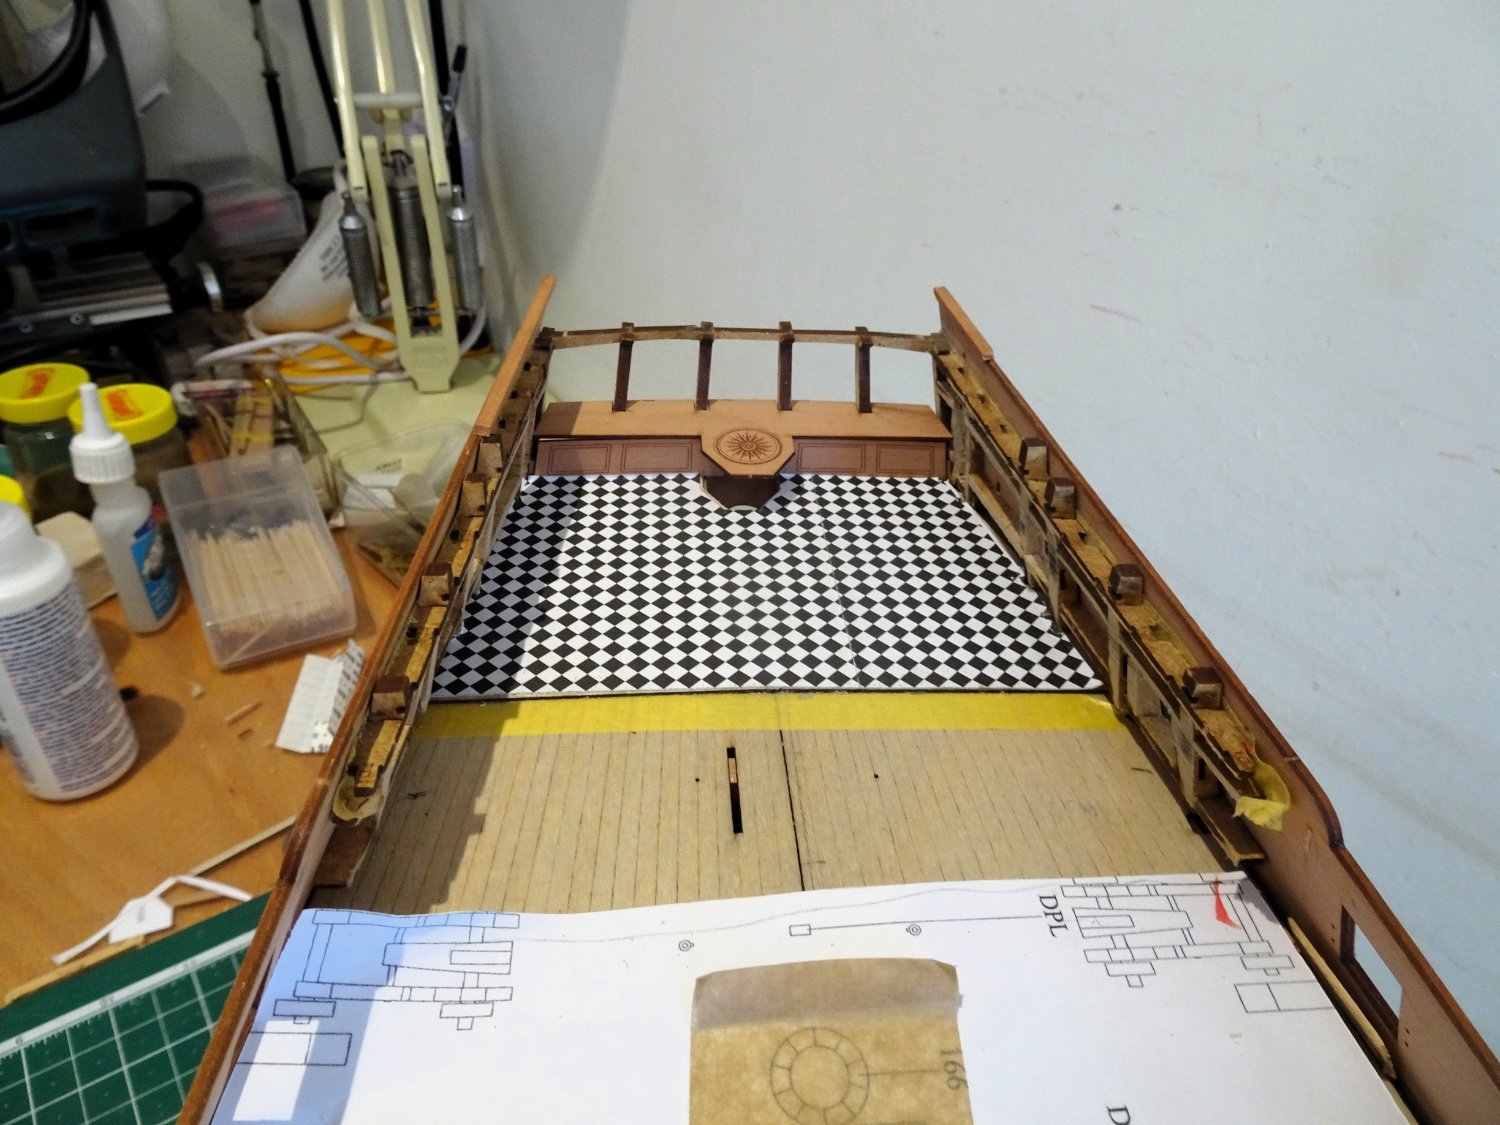
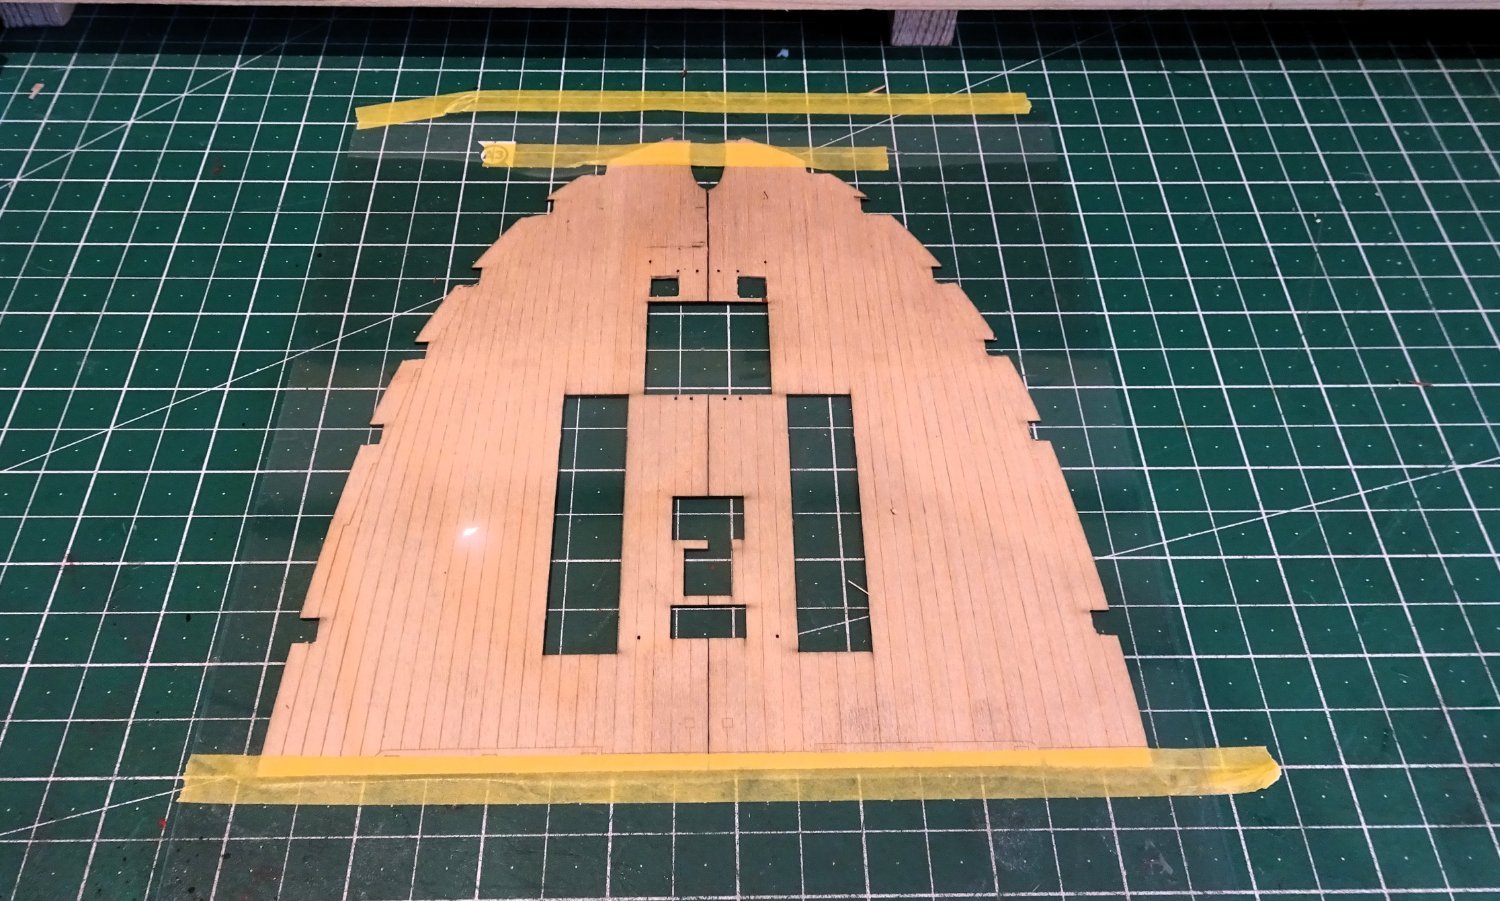
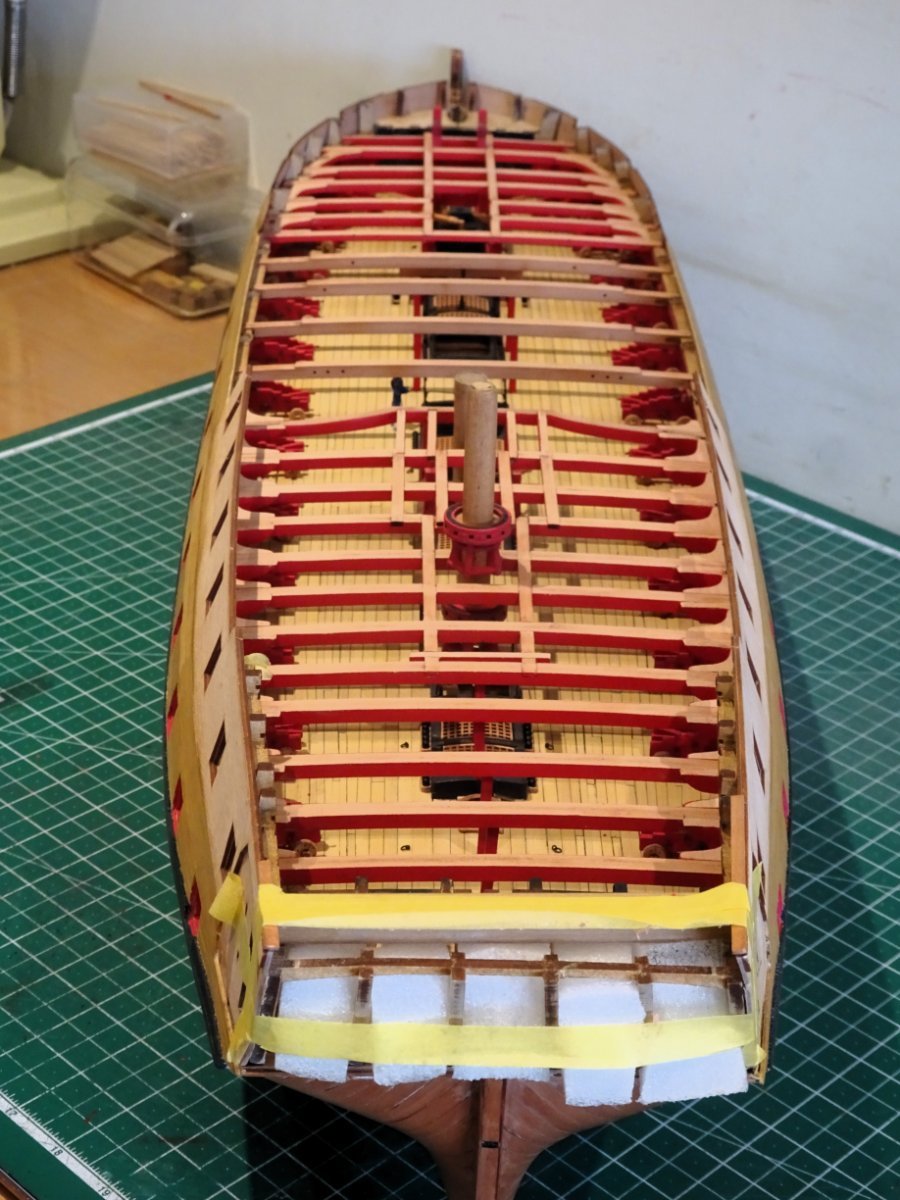
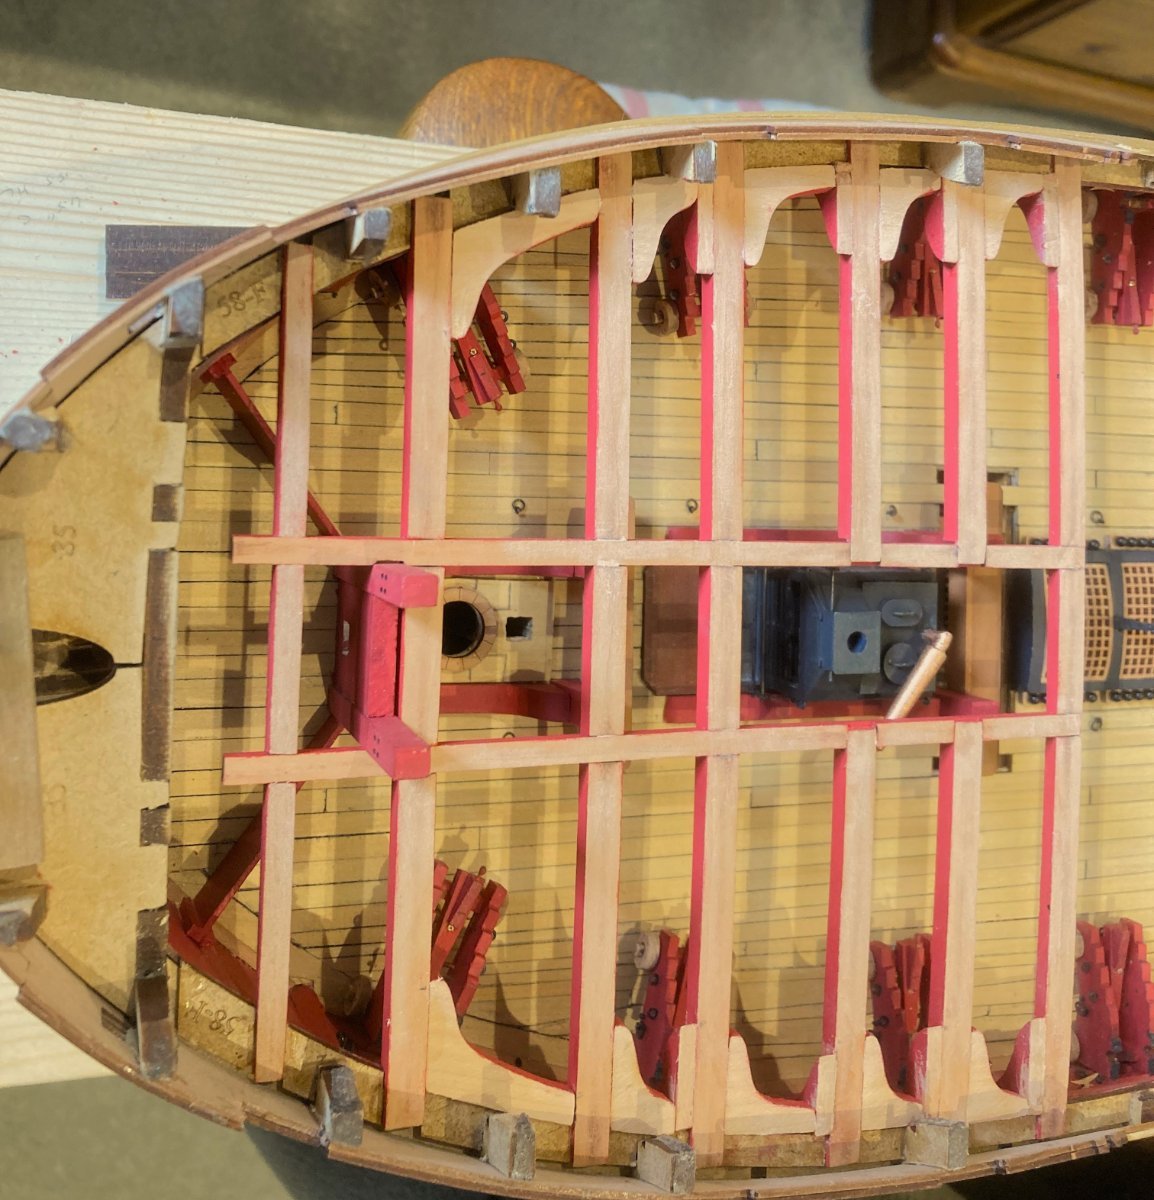
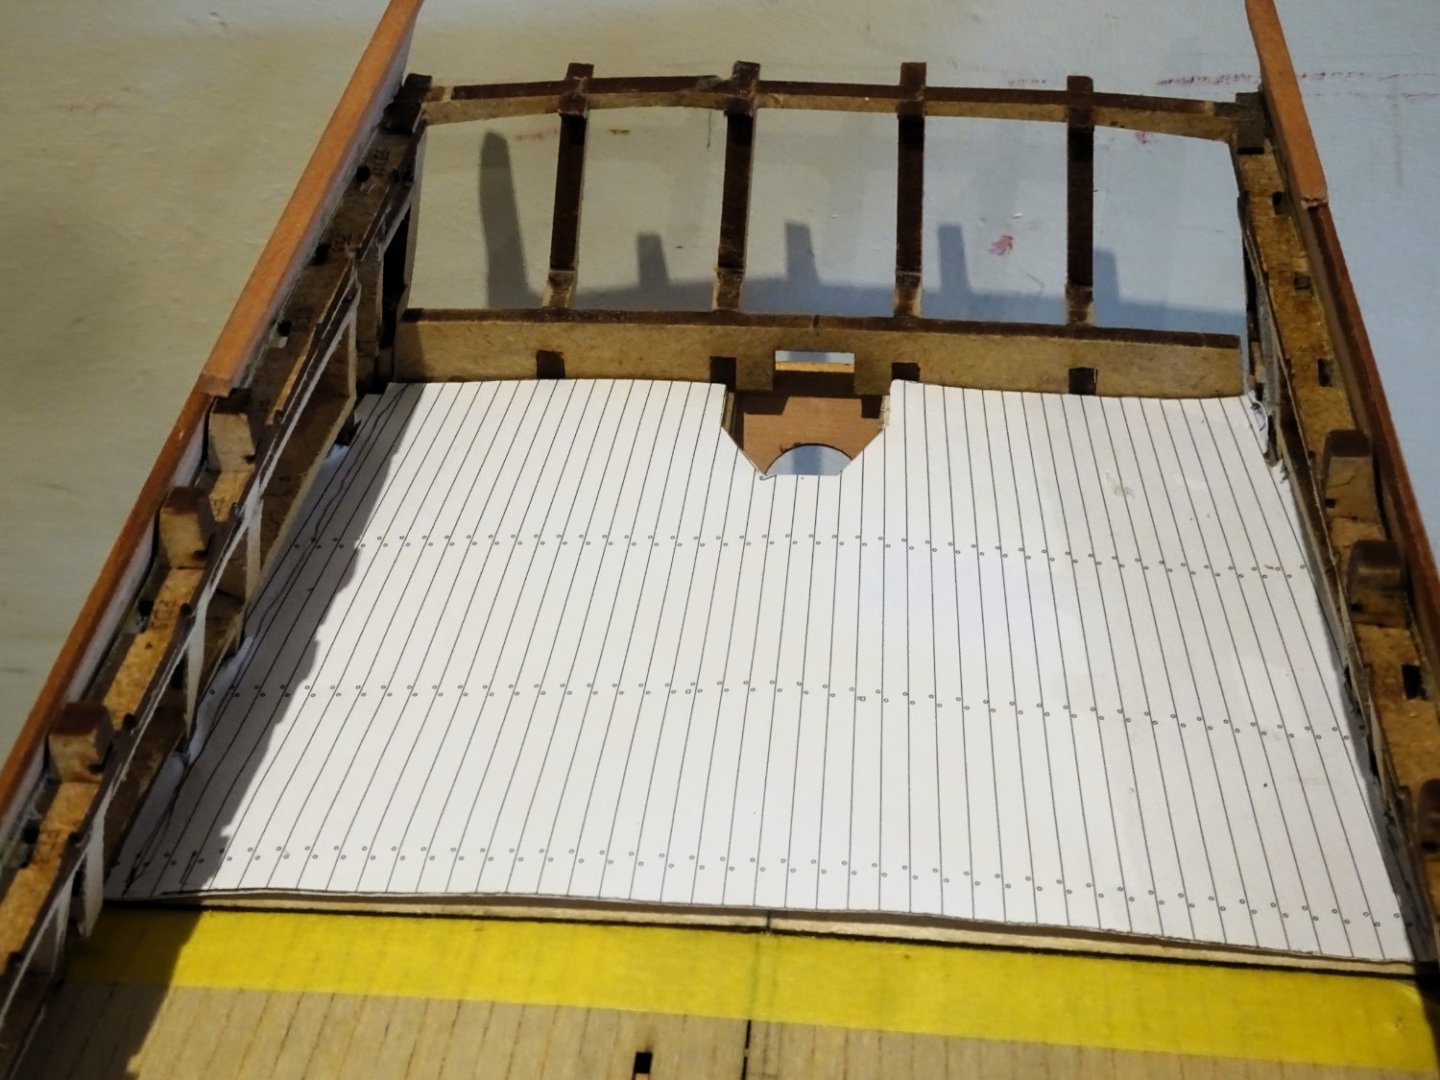
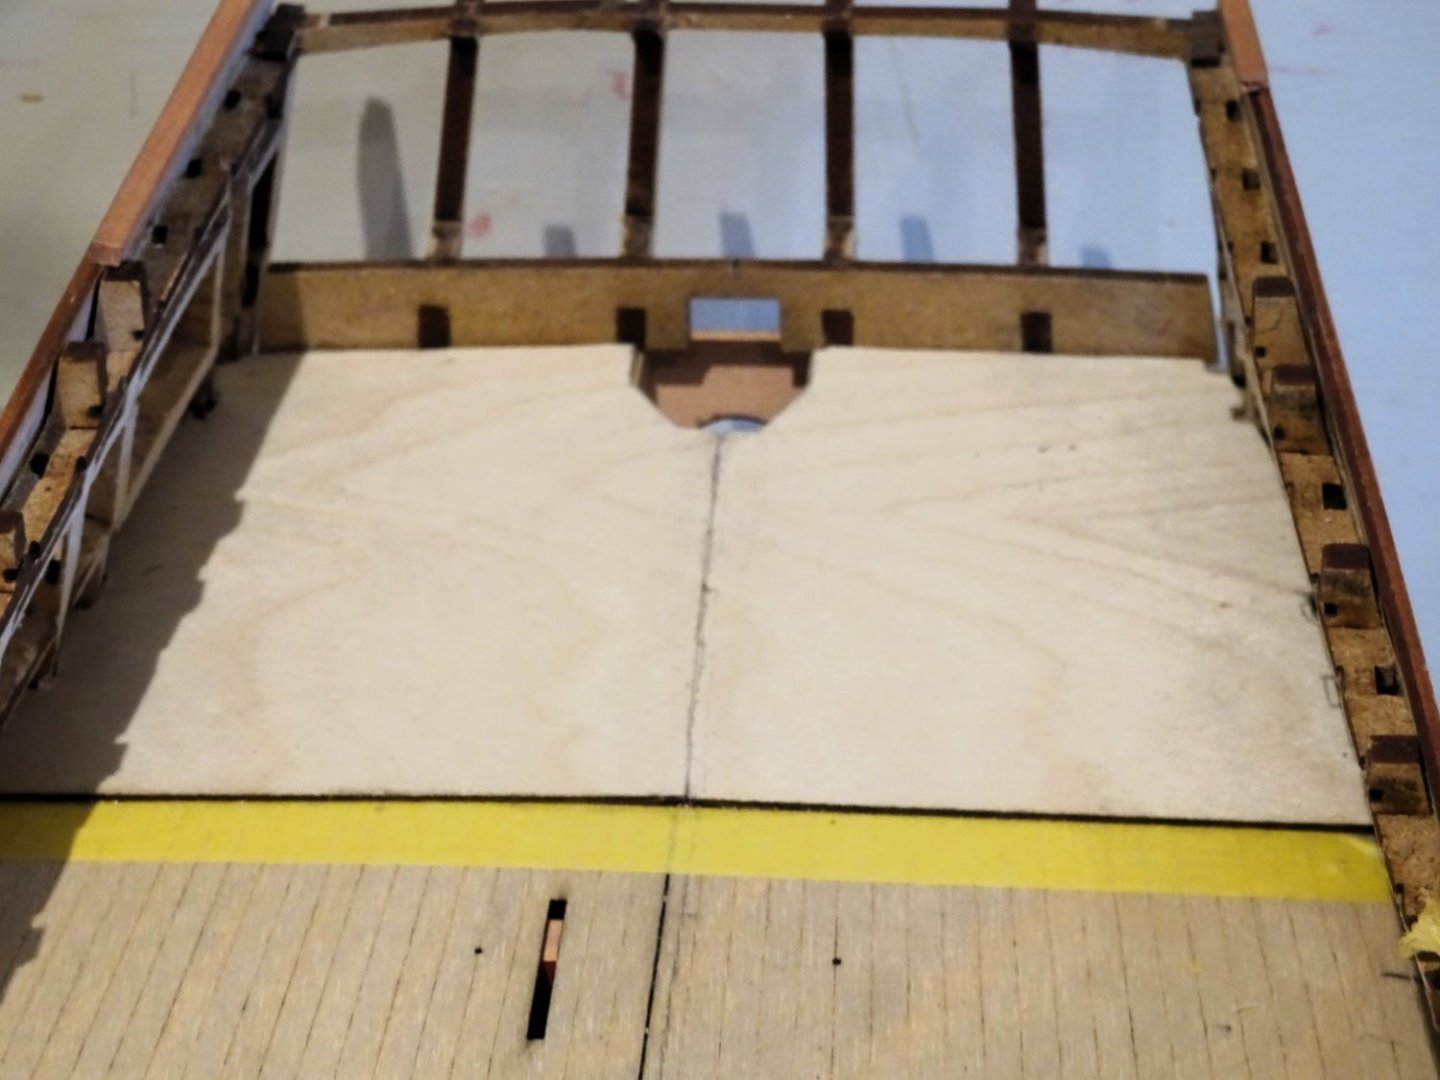
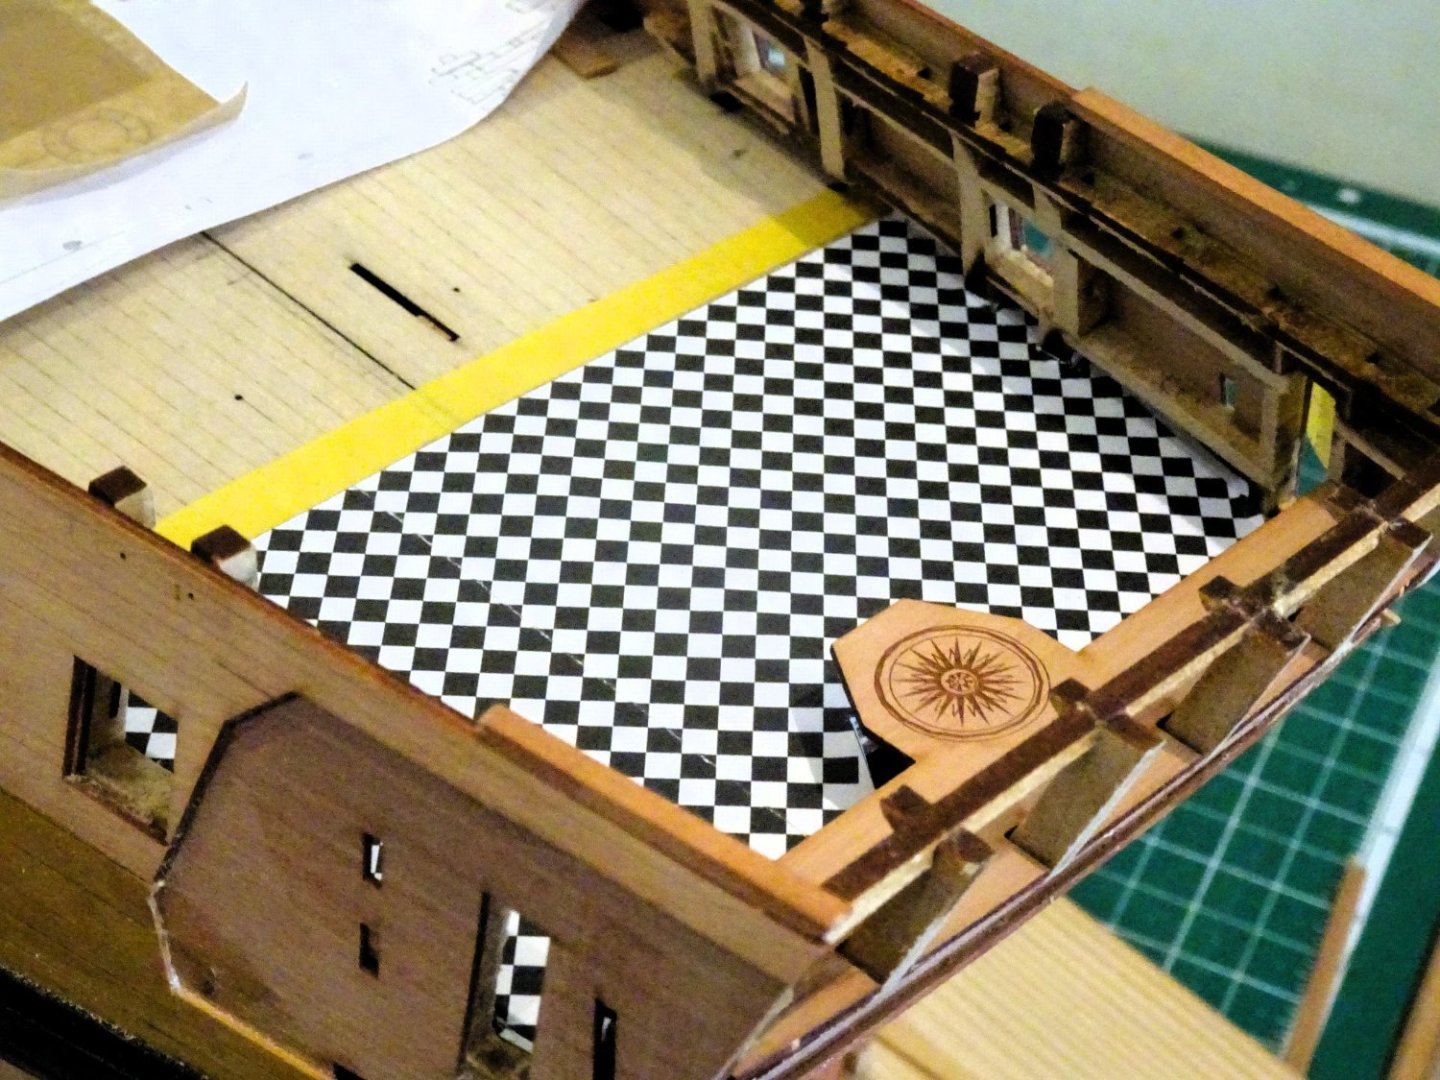
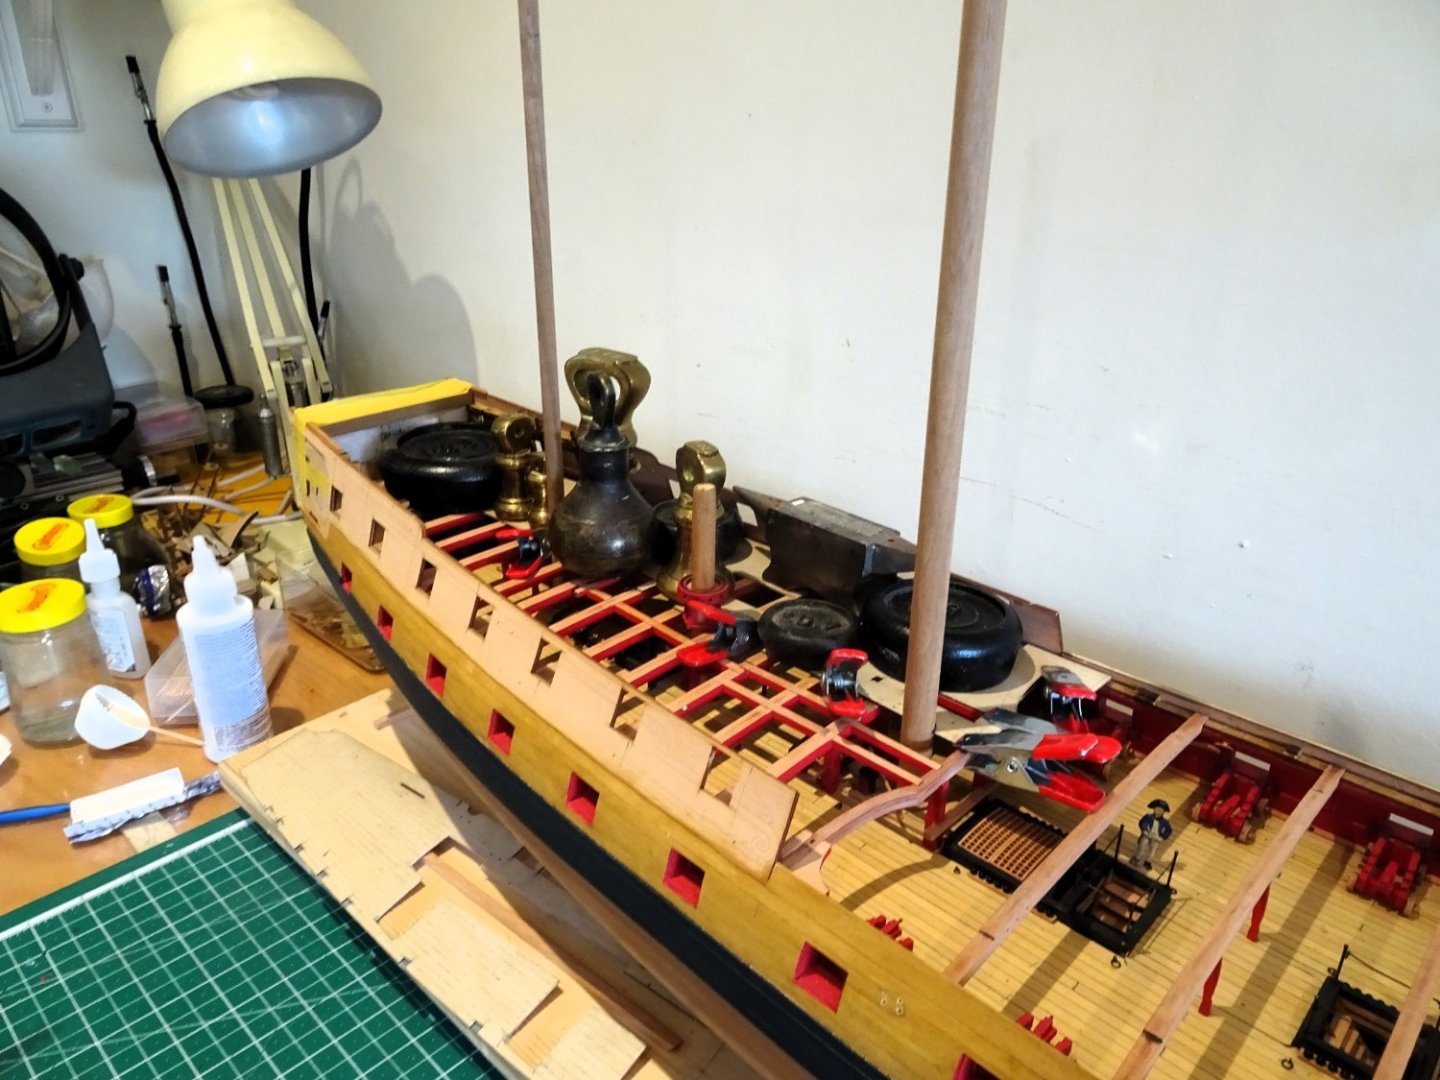
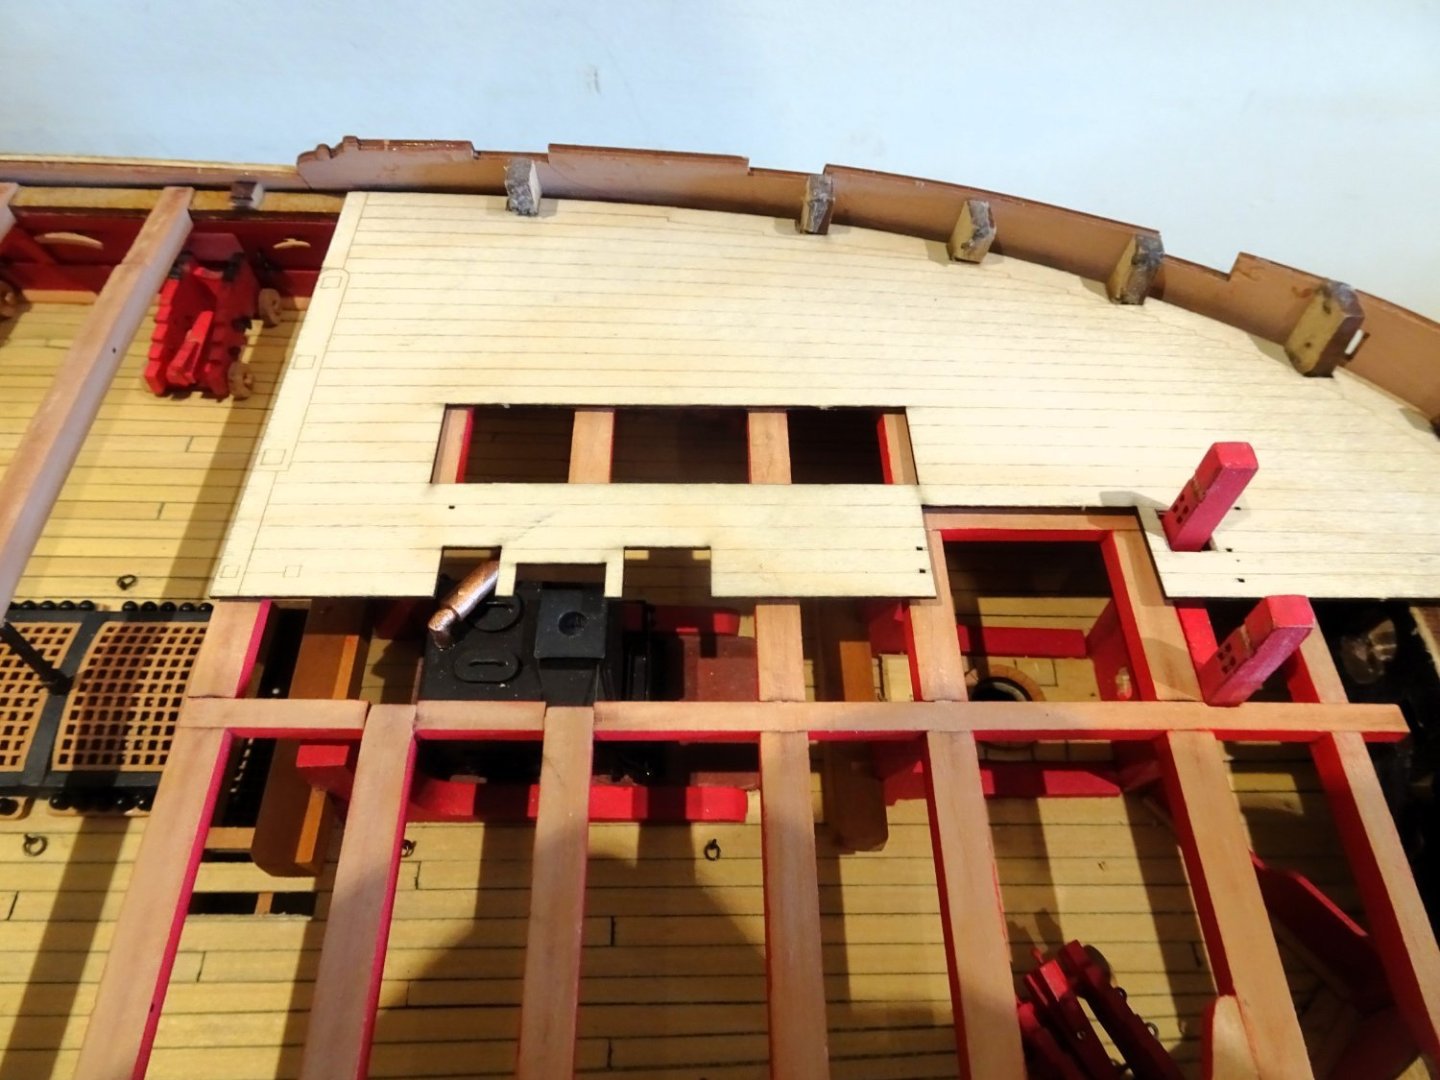
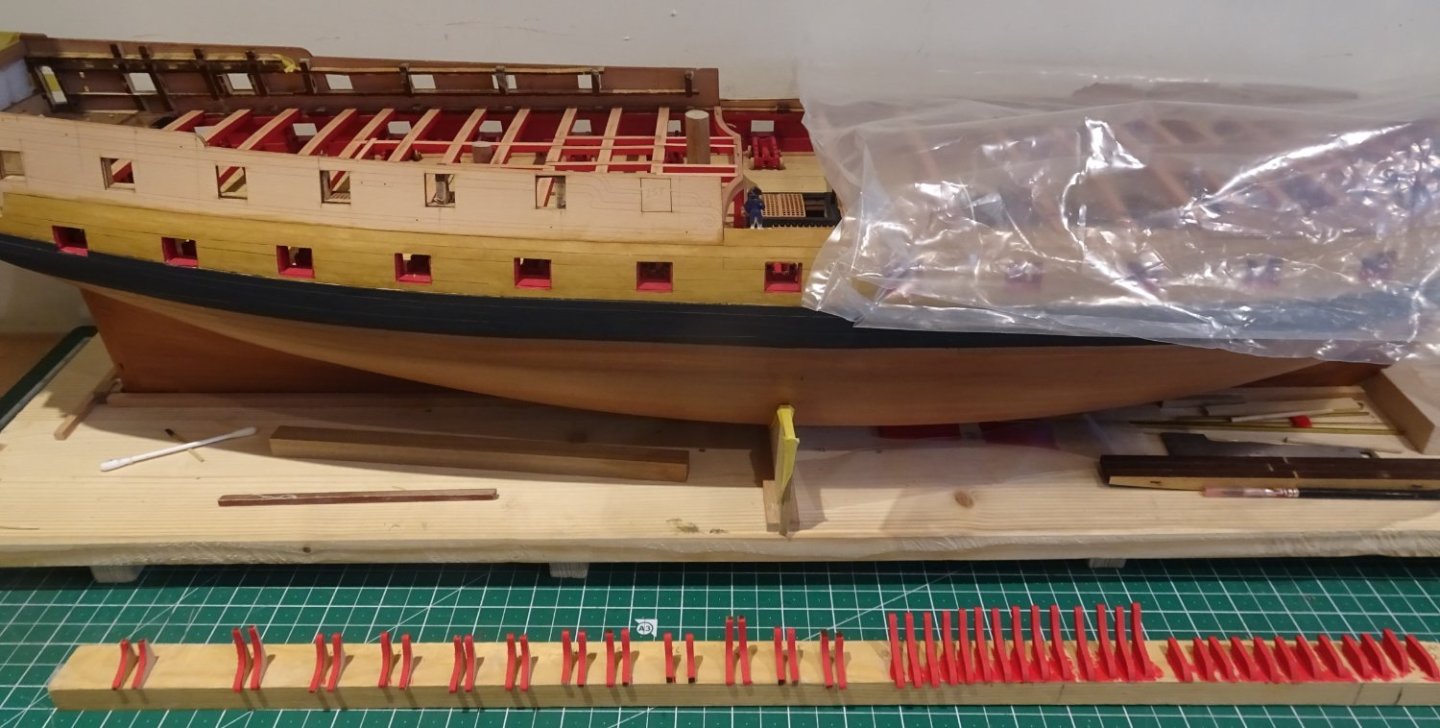
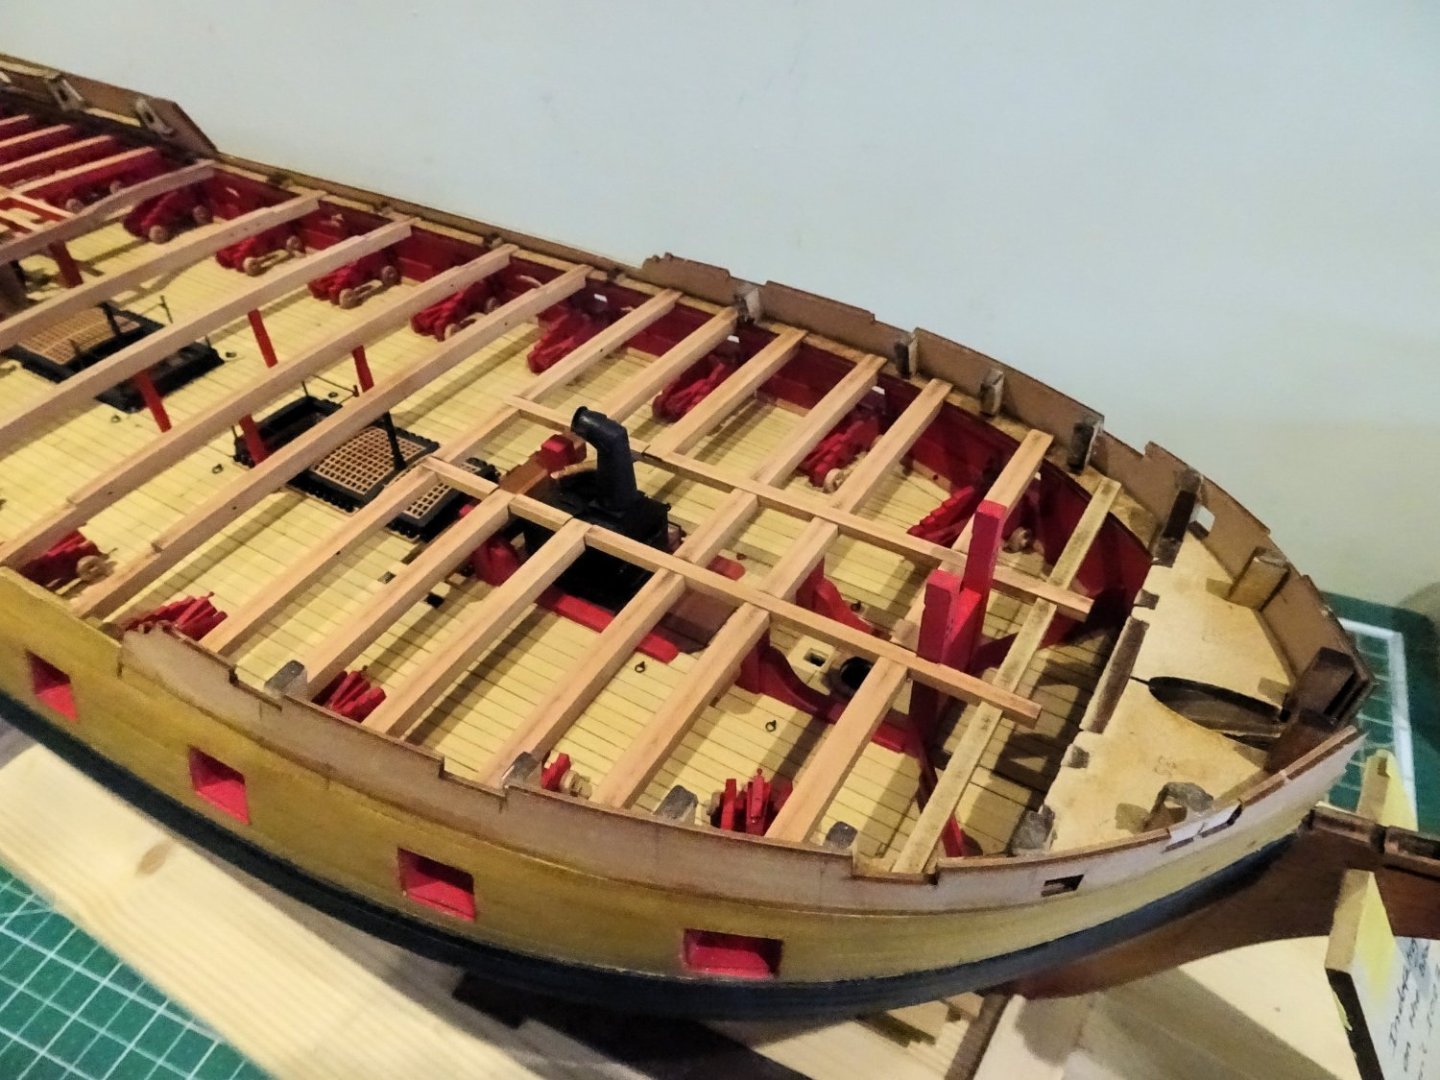
Post Eighty-five Looking at the Stern deck area. I deduce from the blurb that the sections of deck covering the stern cabin, coach, and bedspace are fitted separately as the partitions are designed to fit between them onto the sub-deck. This means that the traditional method of planking the Qtr deck starting at the forward end cannot easily be applied in this instance without the need to cut narrow slots post planking. In normal practice the planking of this area would be tapered as it runs towards the stern, and some 33 strips would be required to do the job. I concluded that there was little point in planking an area soon to be covered by the engraved faux wood block pattern, or for my preference the black and white sailcloth version. 2186 Starting aft I used the stern engraved maple pattern cut from the plans to give me the line of the aftermost partition which will mark the extent of the first planking. 2187 I used some spare 1mm ply sheet to cover the area in lieu of planking. 2190 The b/w sailcloth pattern was applied using spray mount. I did take the precaution of making copies of the pattern before use. 2193 It’s a shame that the pattern was placed on a fold of Plan sheet 2, the line can be discerned, but not so much from directly above. There is a lot to do in this small section, and I will spend some time sorting and assembling all the relevant parts, before I move ahead. The deck planking proper will be done as a separate exercise forward of the fore-most partition. B.E. 29/07/2023

- 648 replies
-
- 19
-
-
- Indefatigable
- Vanguard Models
- (and 1 more)
-
Thank you Glenn, Once the decision has been made to build 'Navy Board' style it's just a question of how much deck to leave off. It is a pity to cover all that detail, but I would have done it even if I fully decked. I'll be barely covering the Poop deck so all the cabin detail will be on view. Given the purity of your joinery I would be very tempted to reveal a little more on your 'Winnie' Regards, B.E.
- 648 replies
-
- 5
-
-
- Indefatigable
- Vanguard Models
- (and 1 more)
-
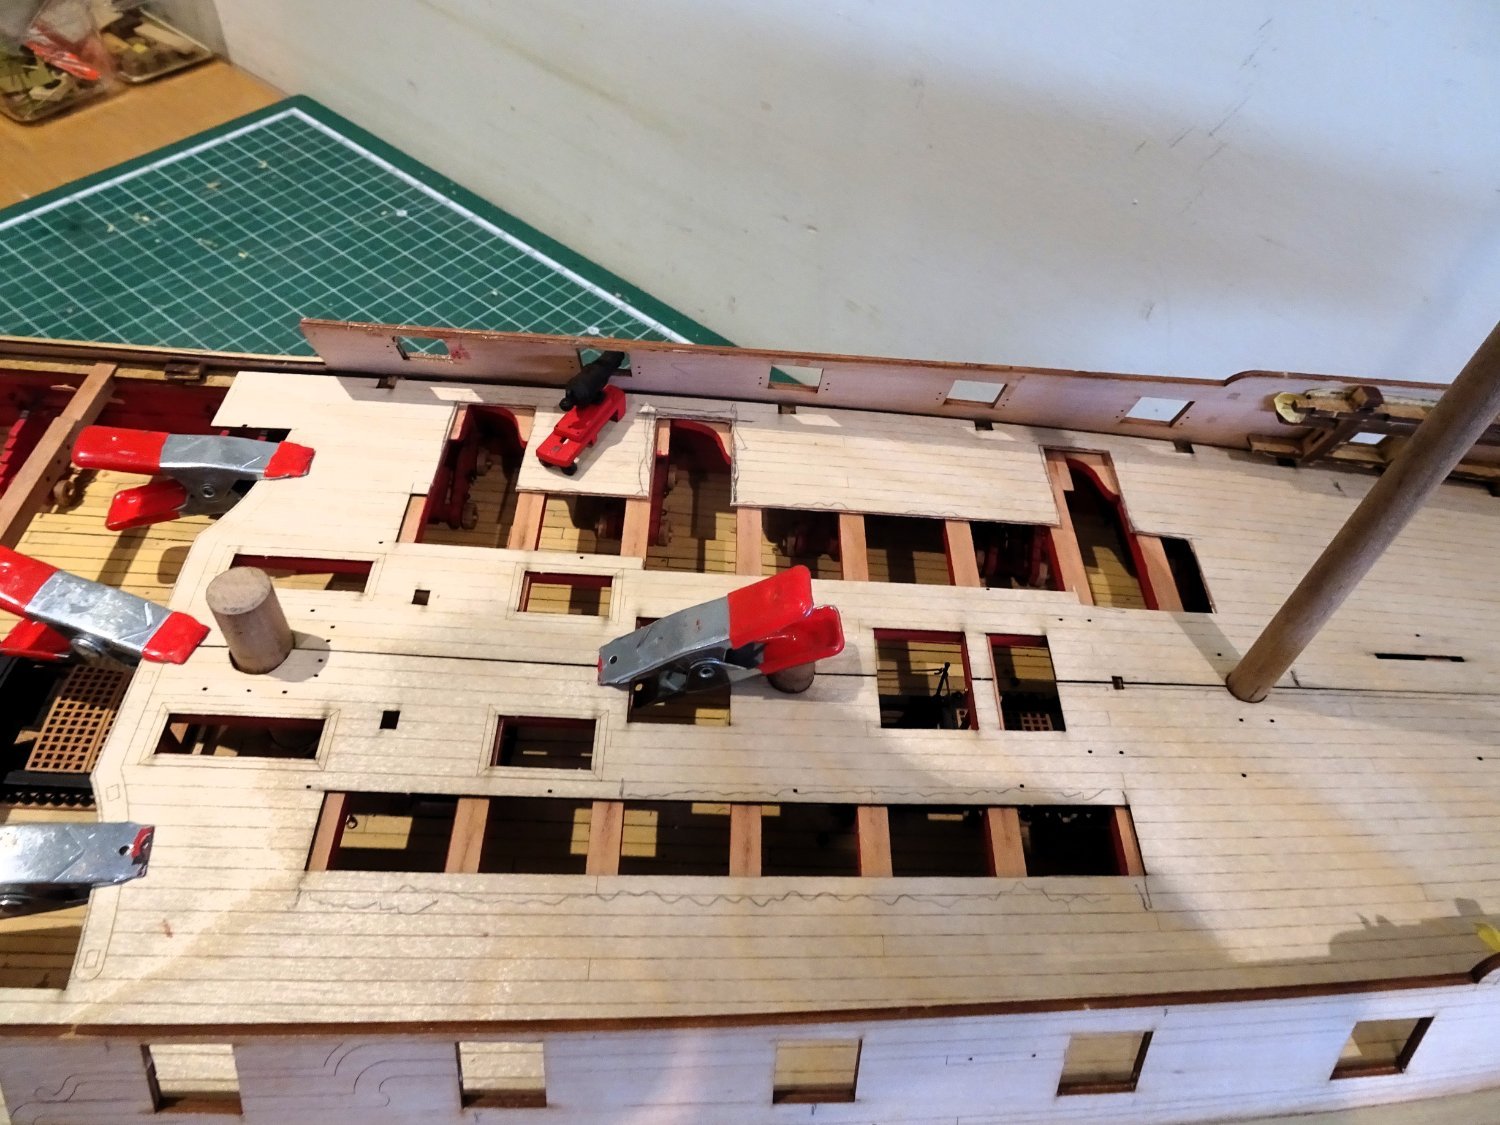
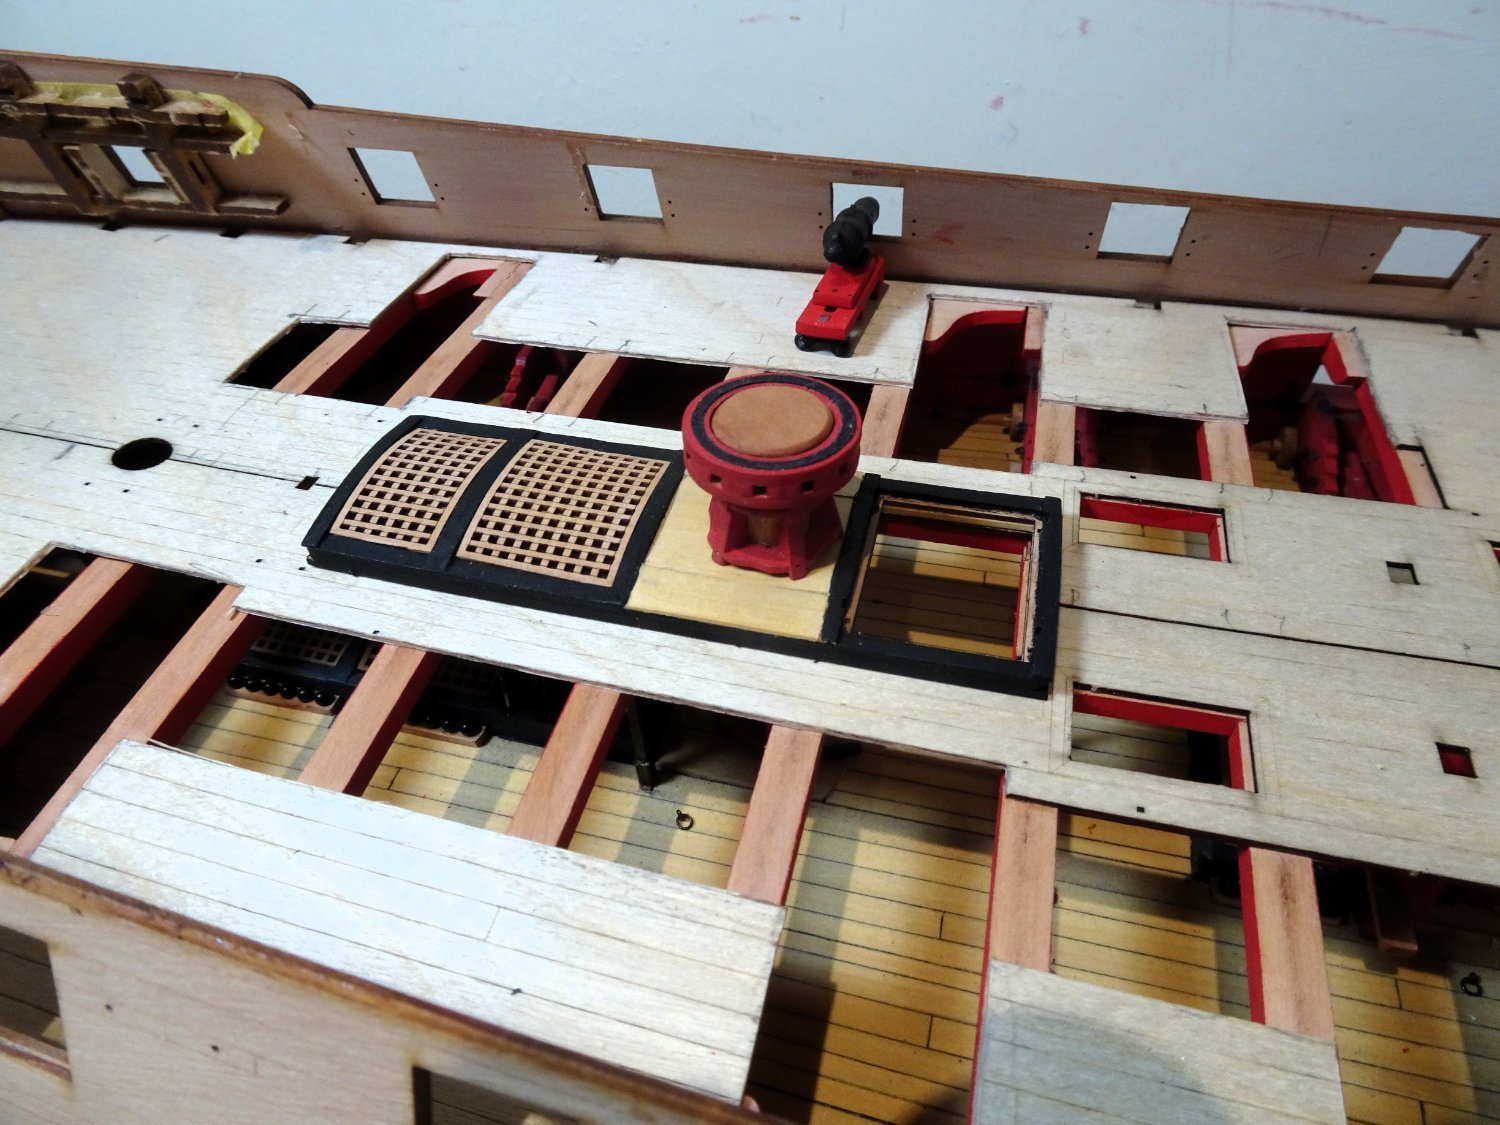
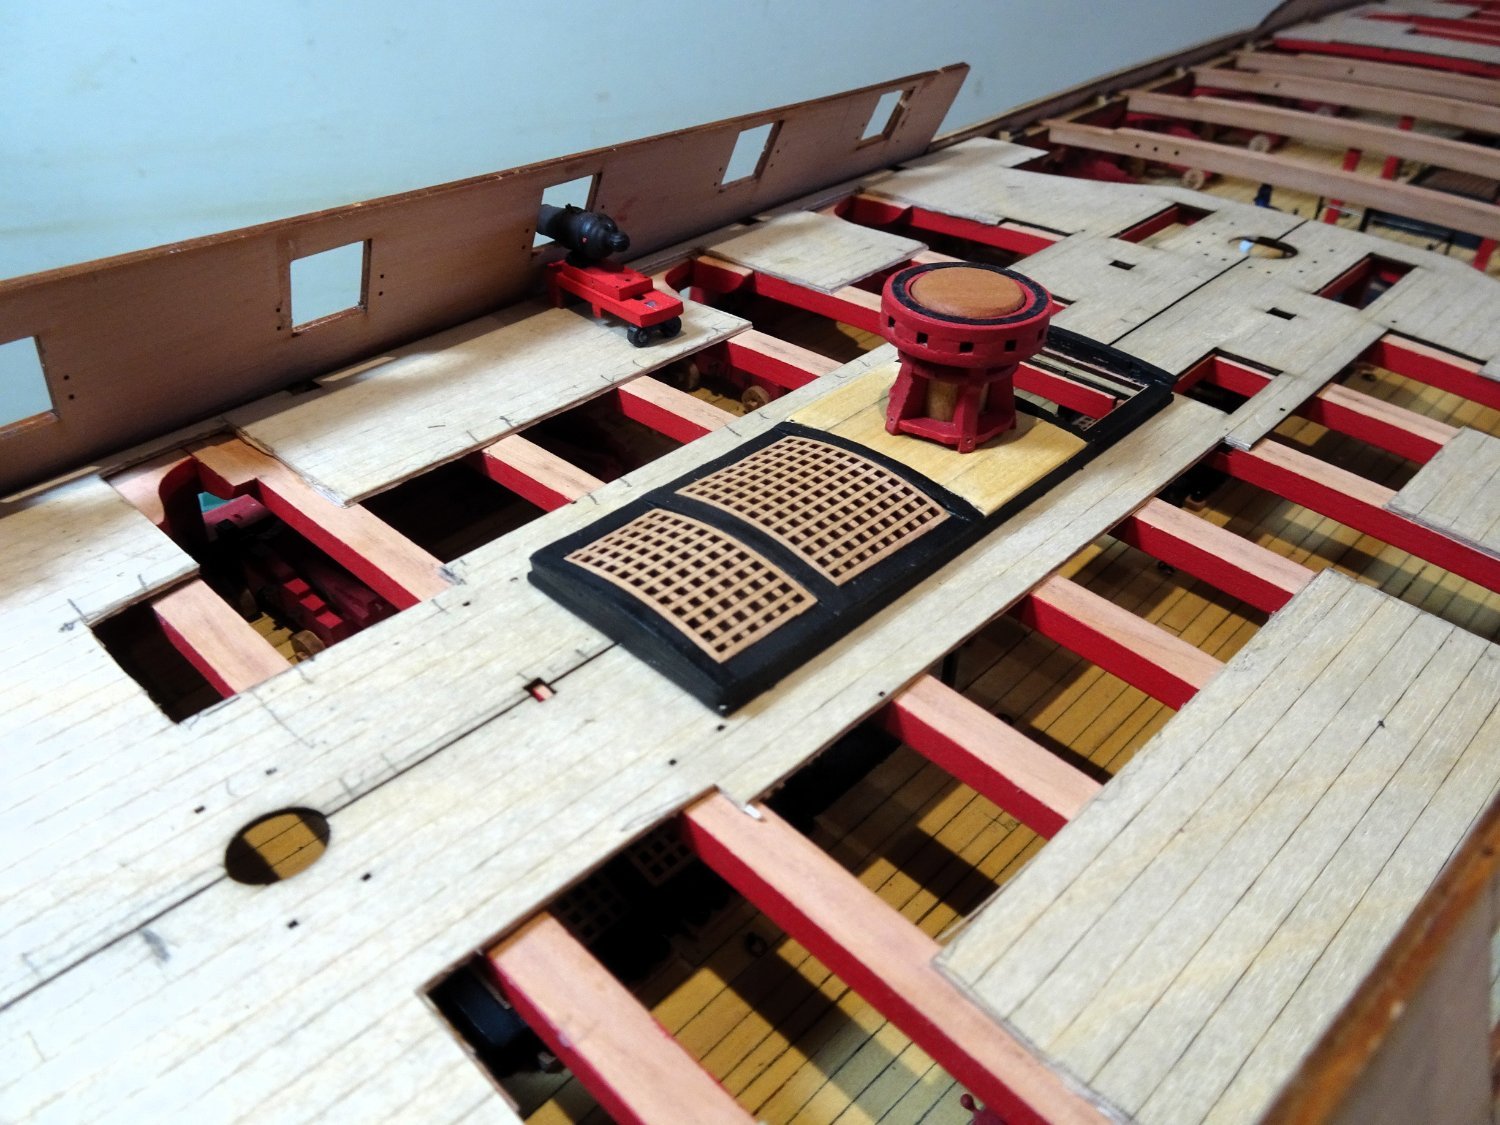
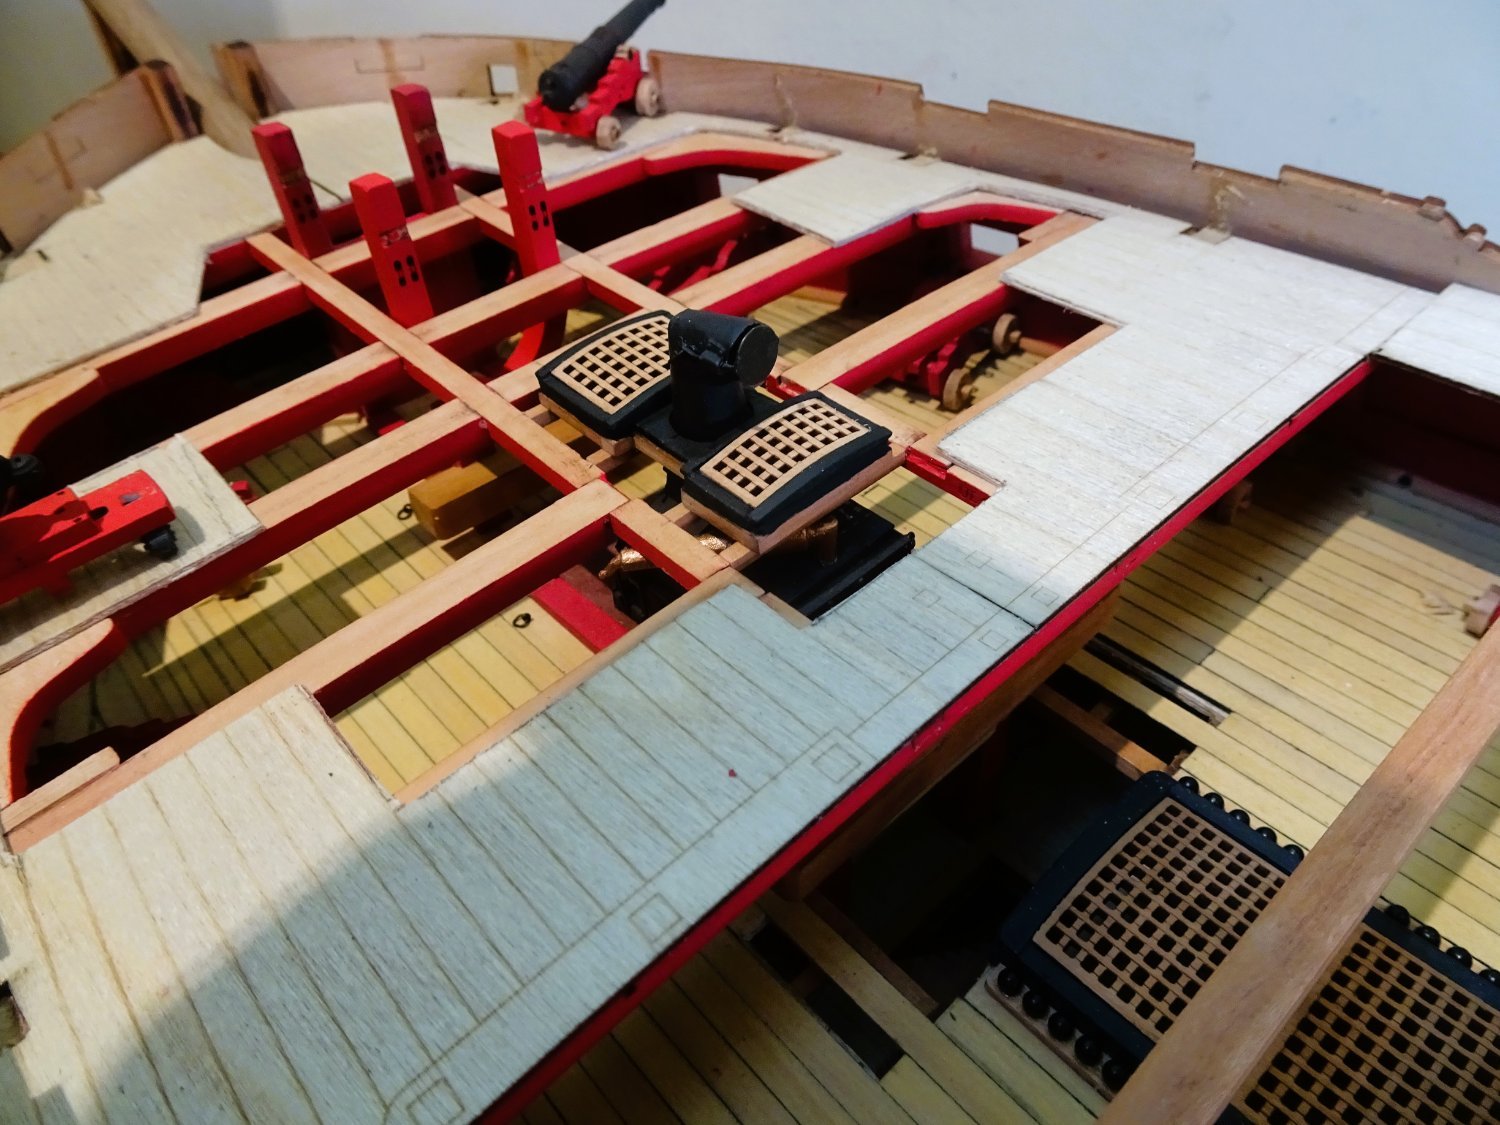
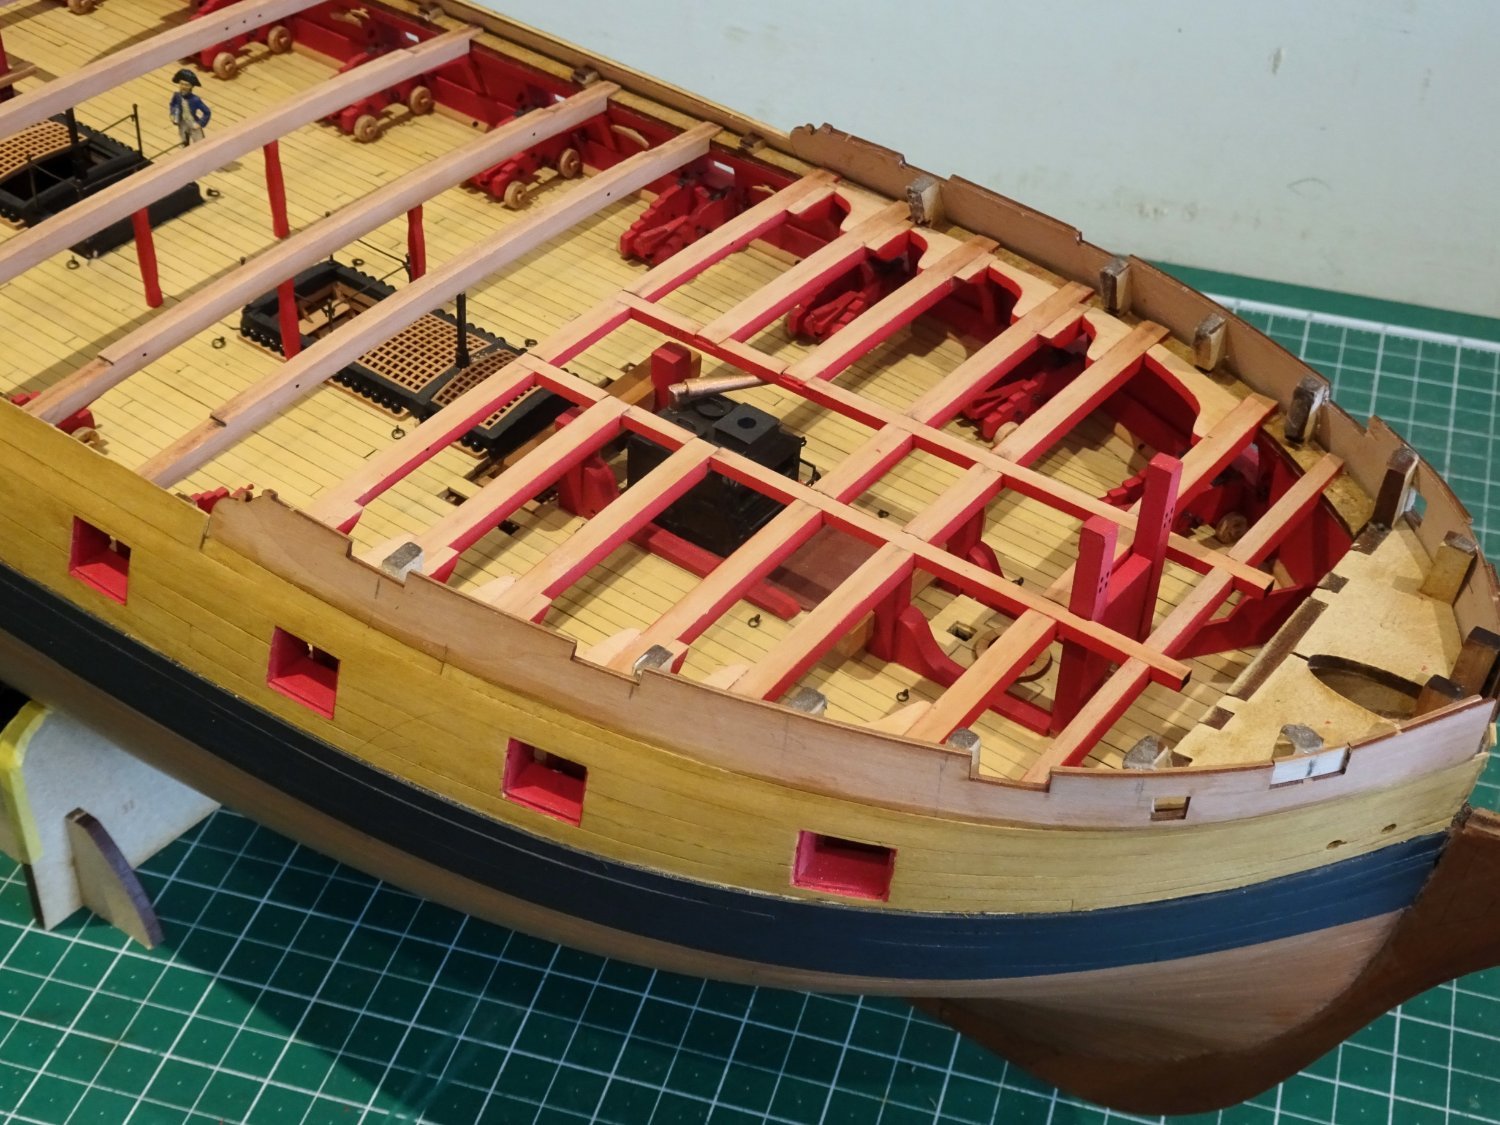
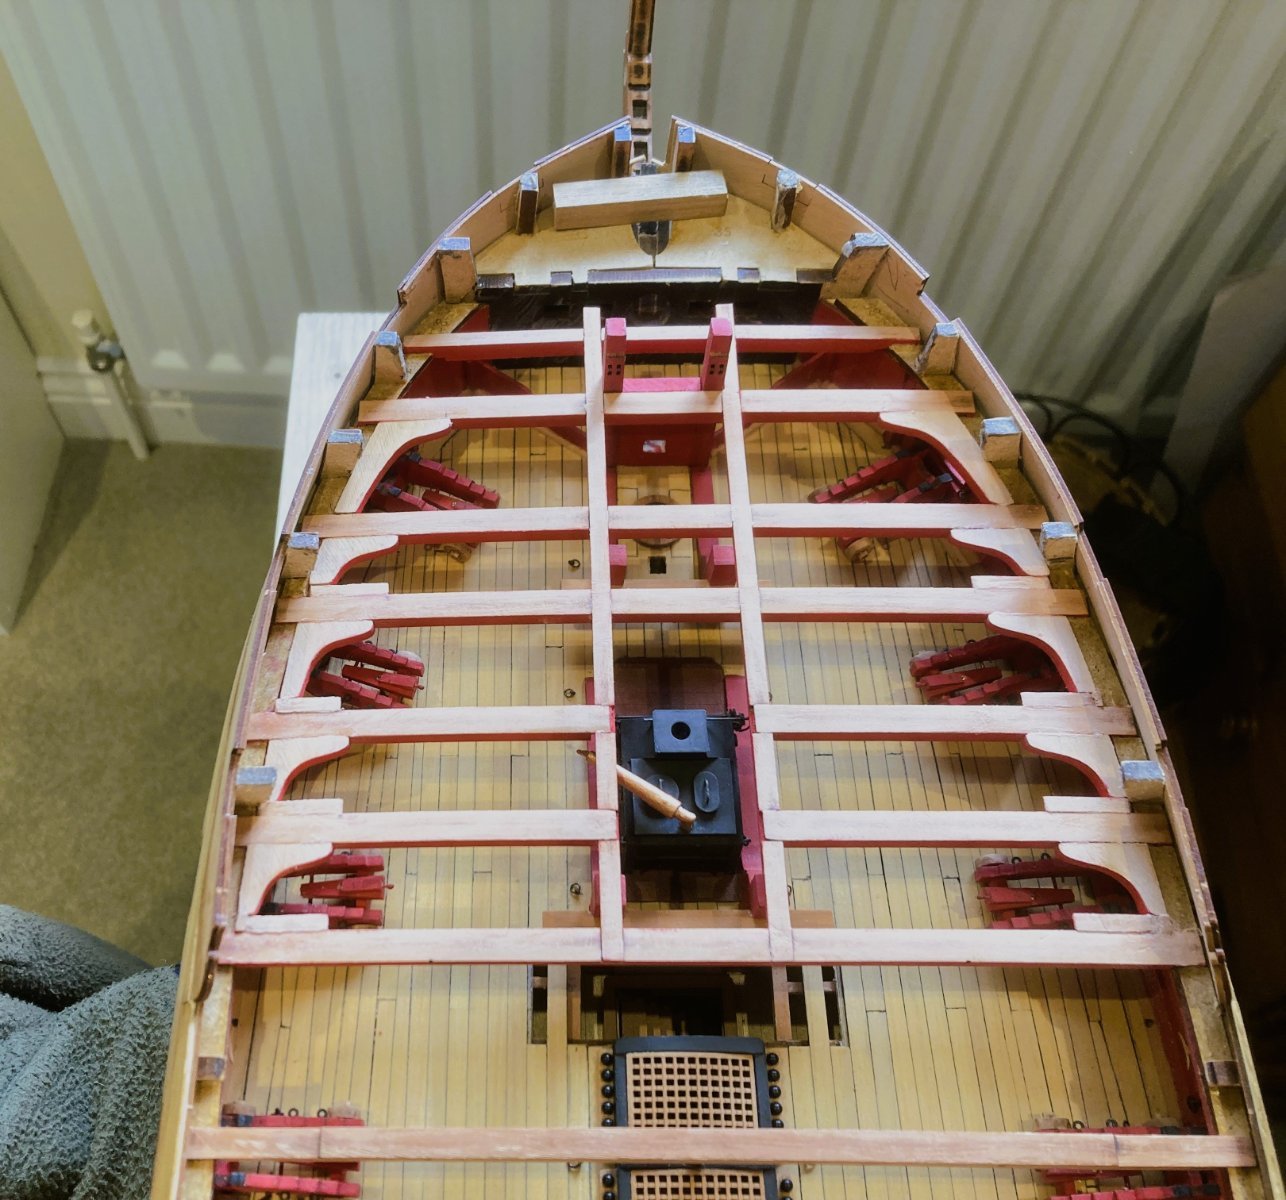
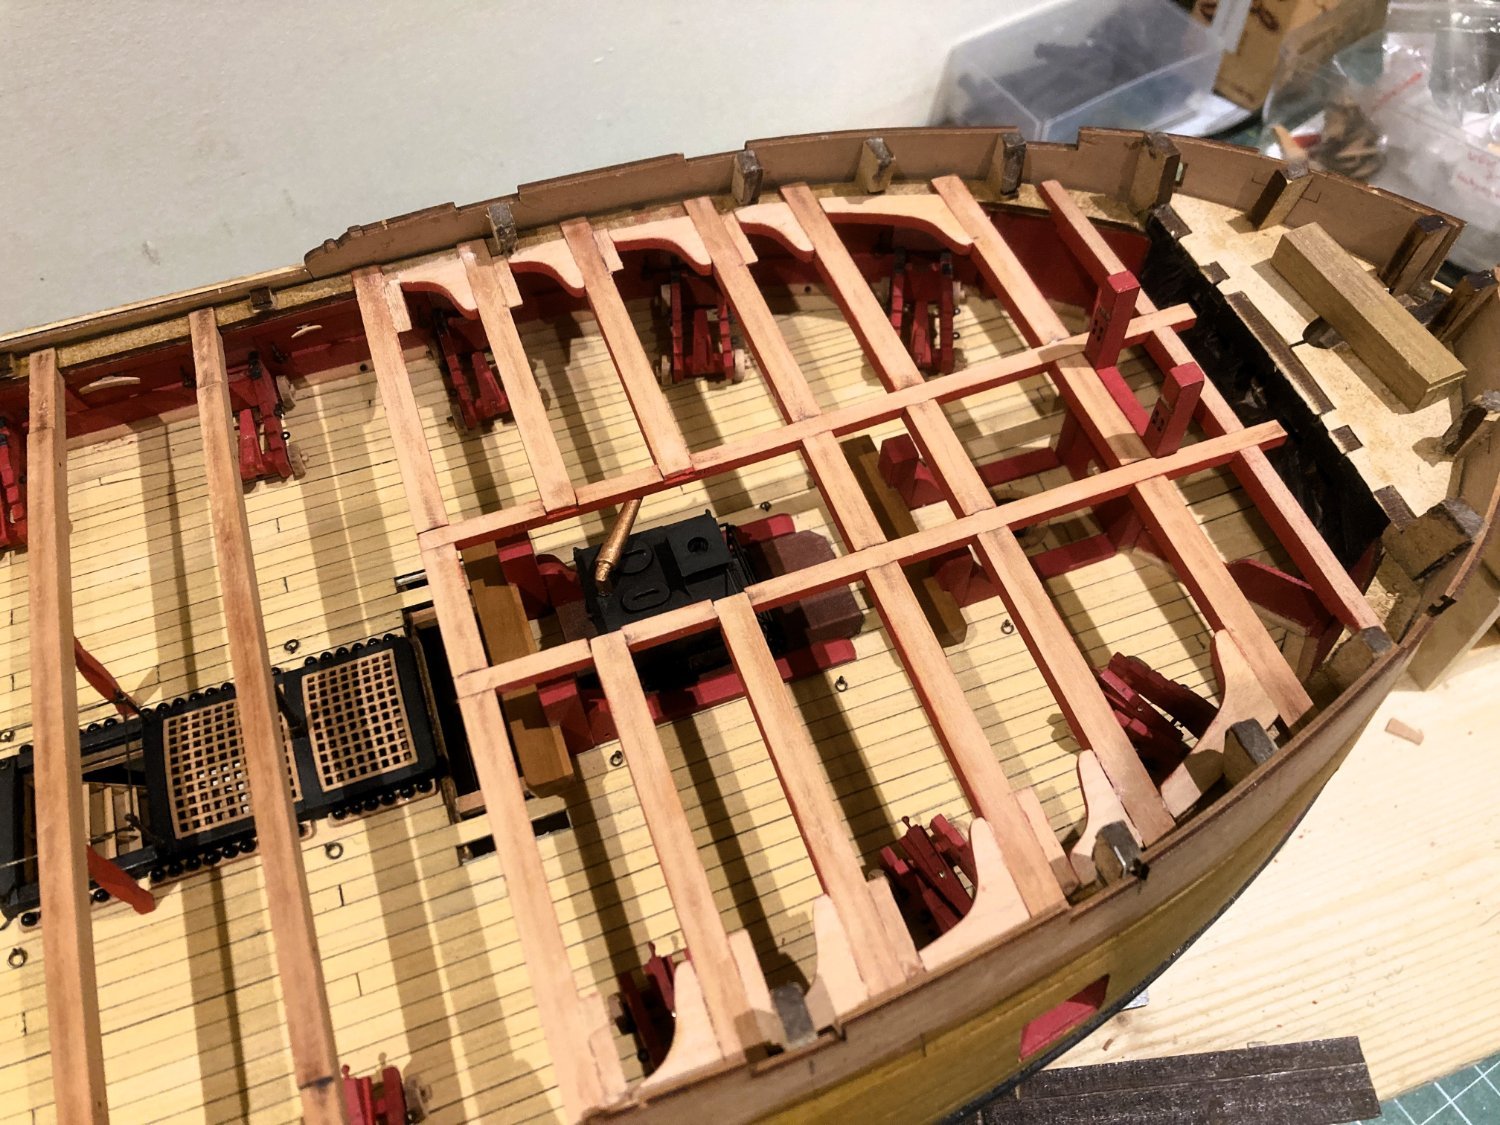
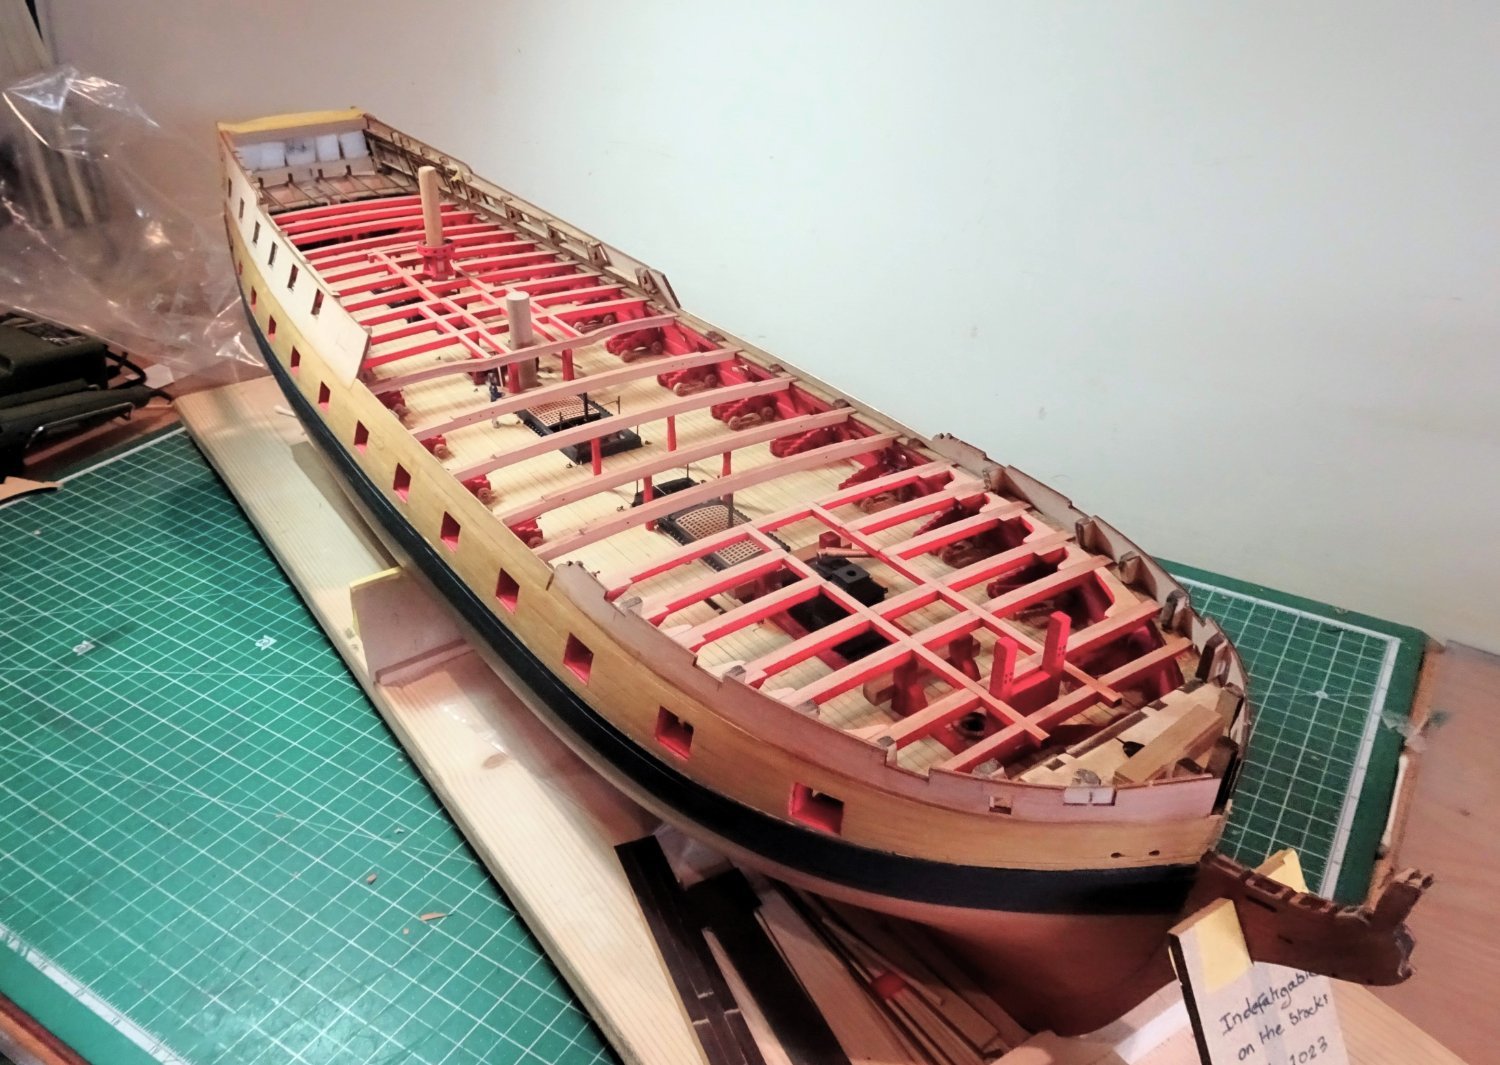
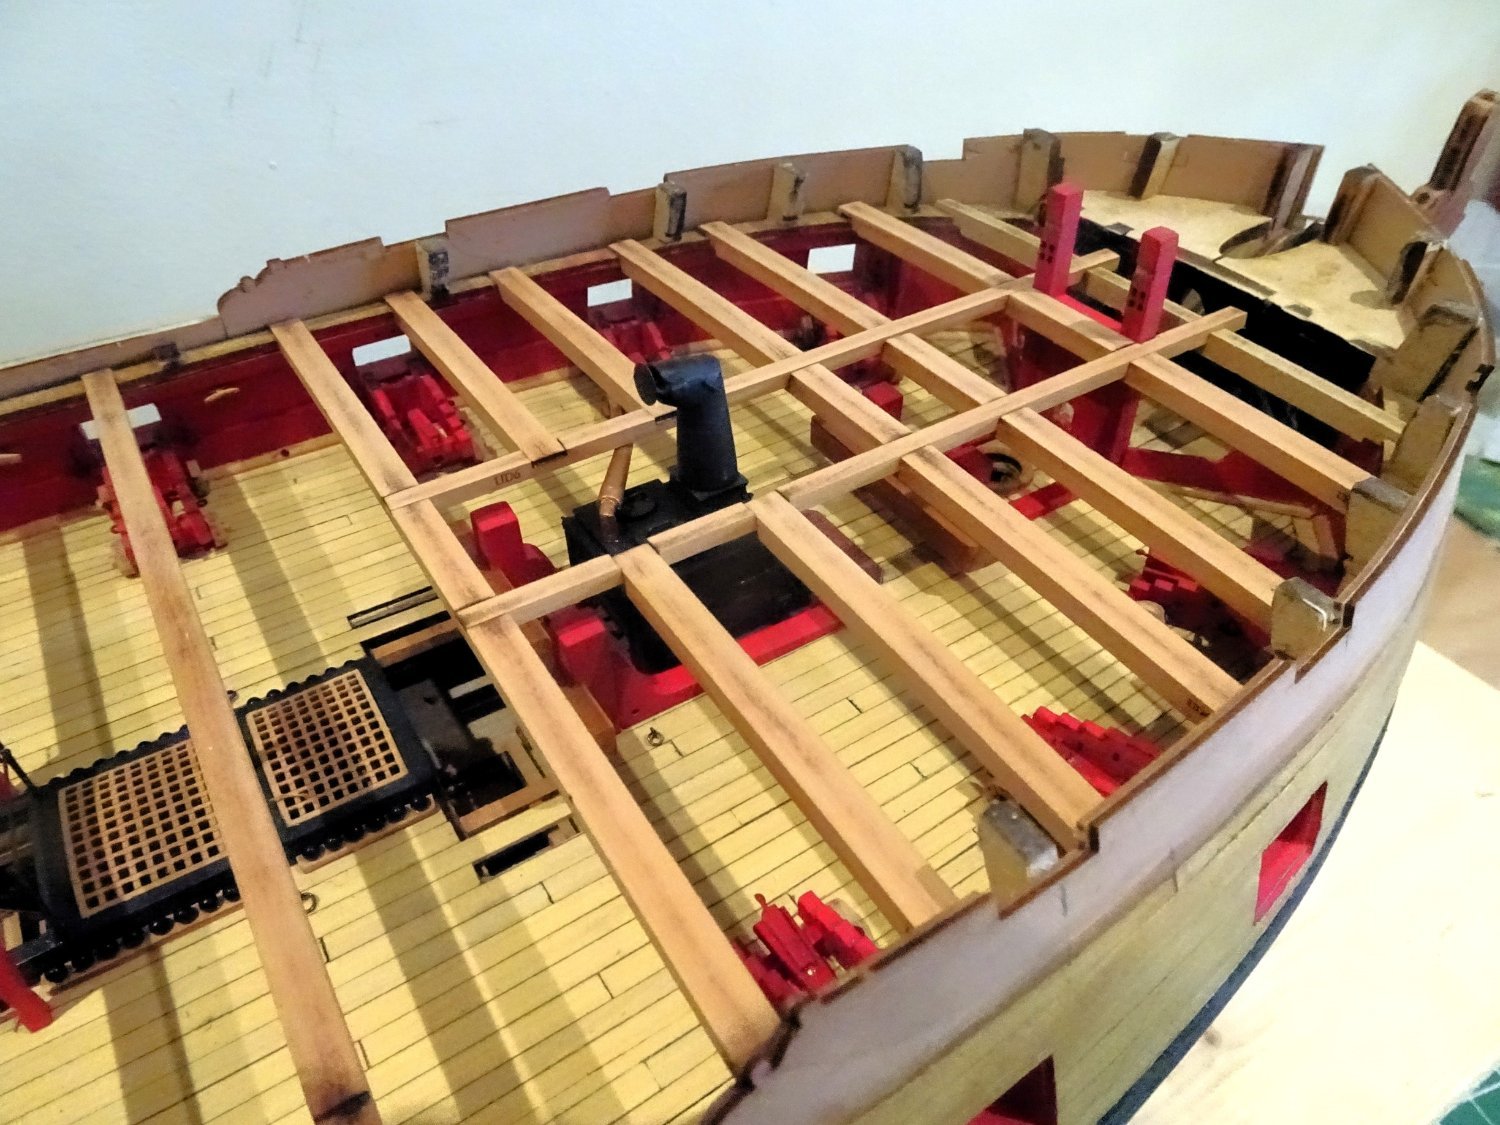
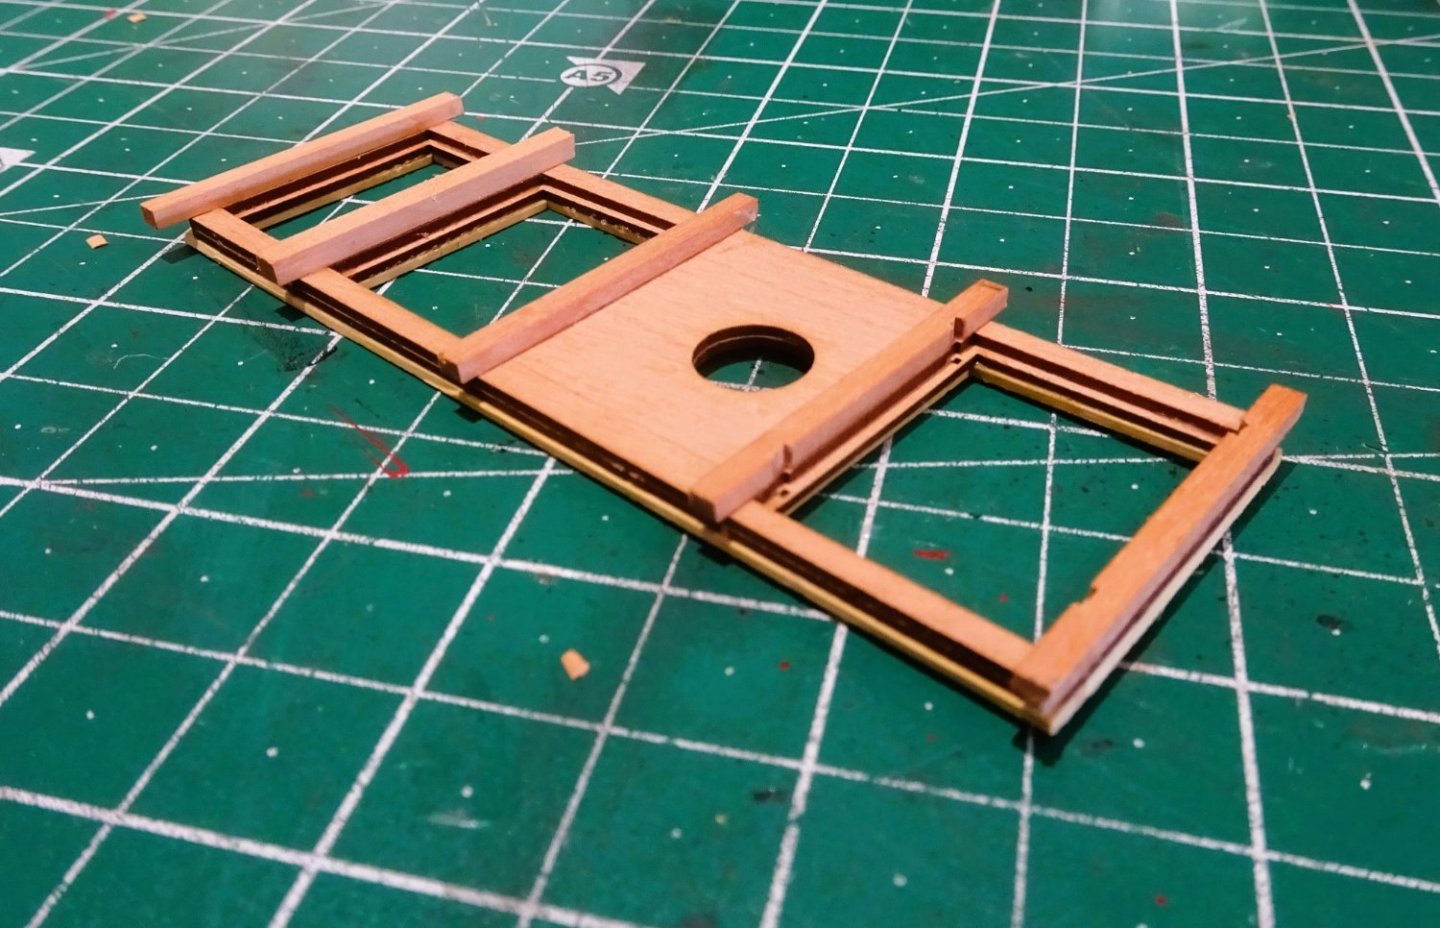
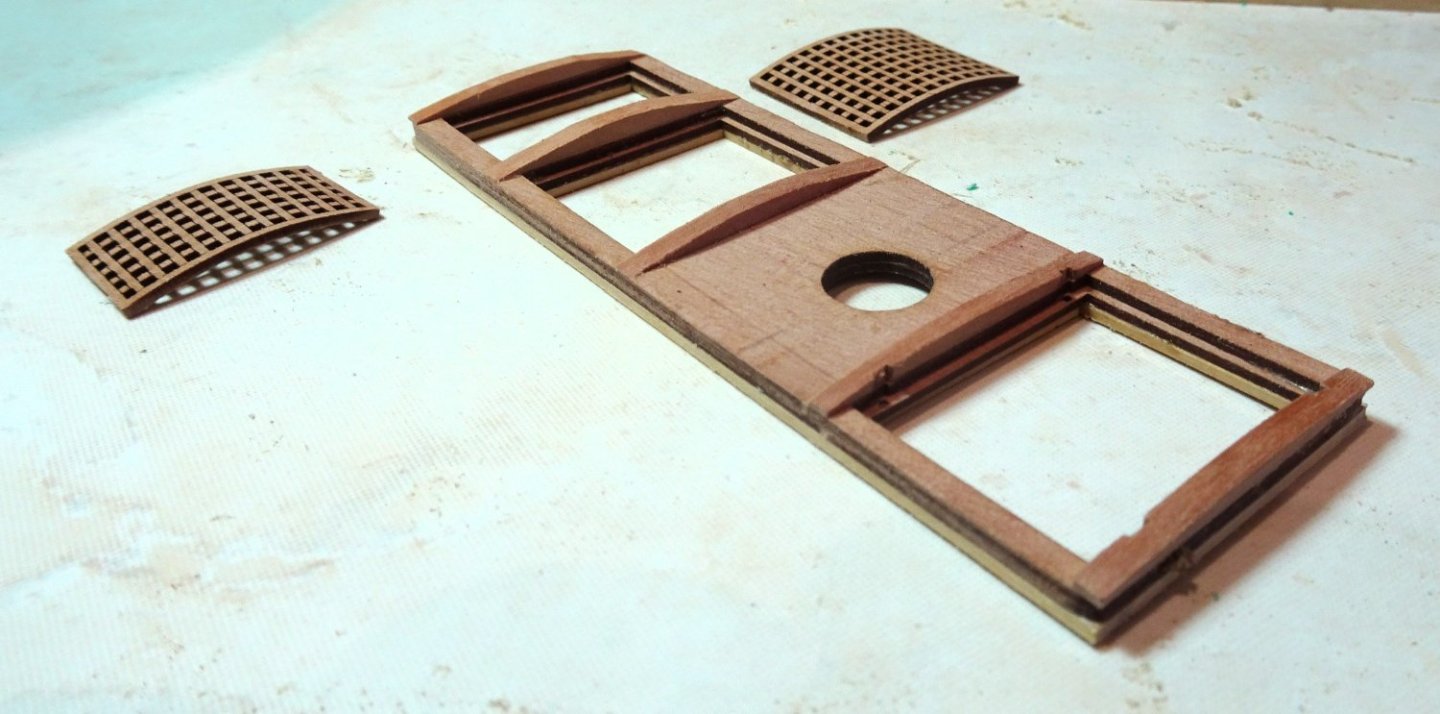
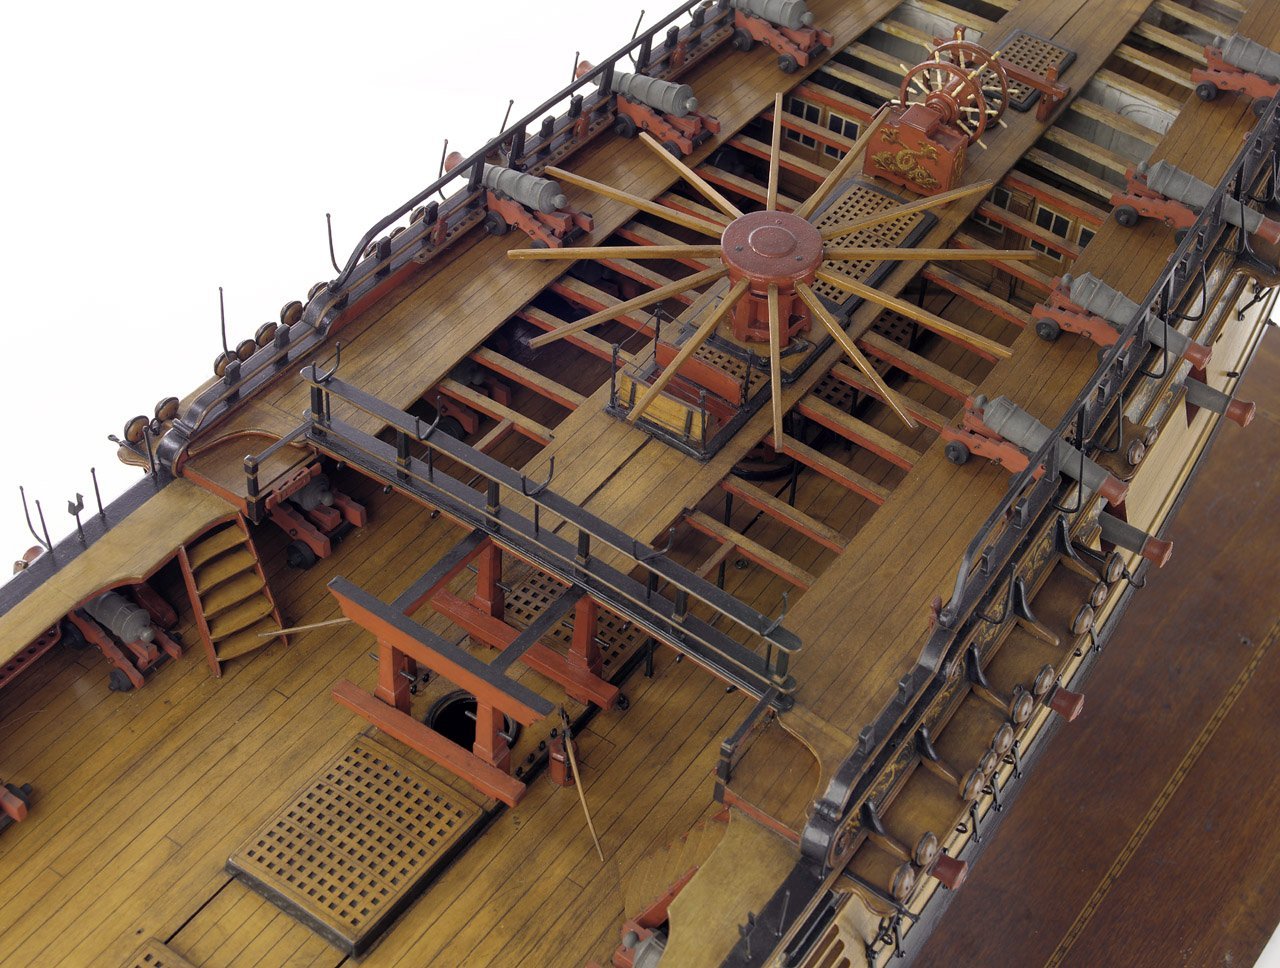
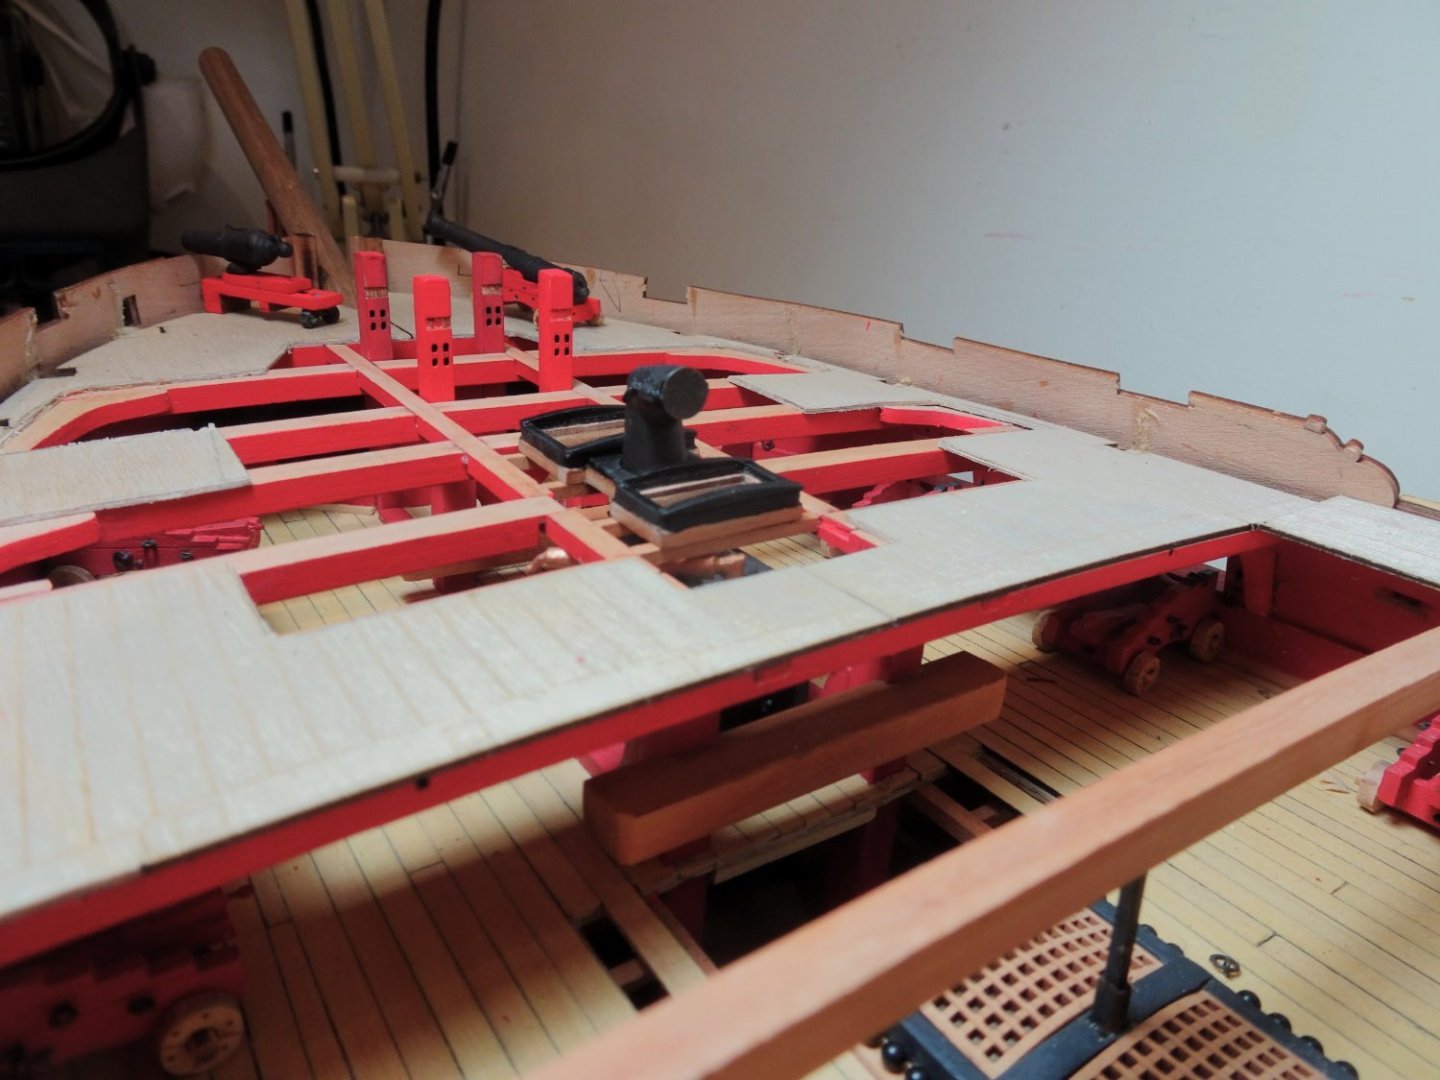
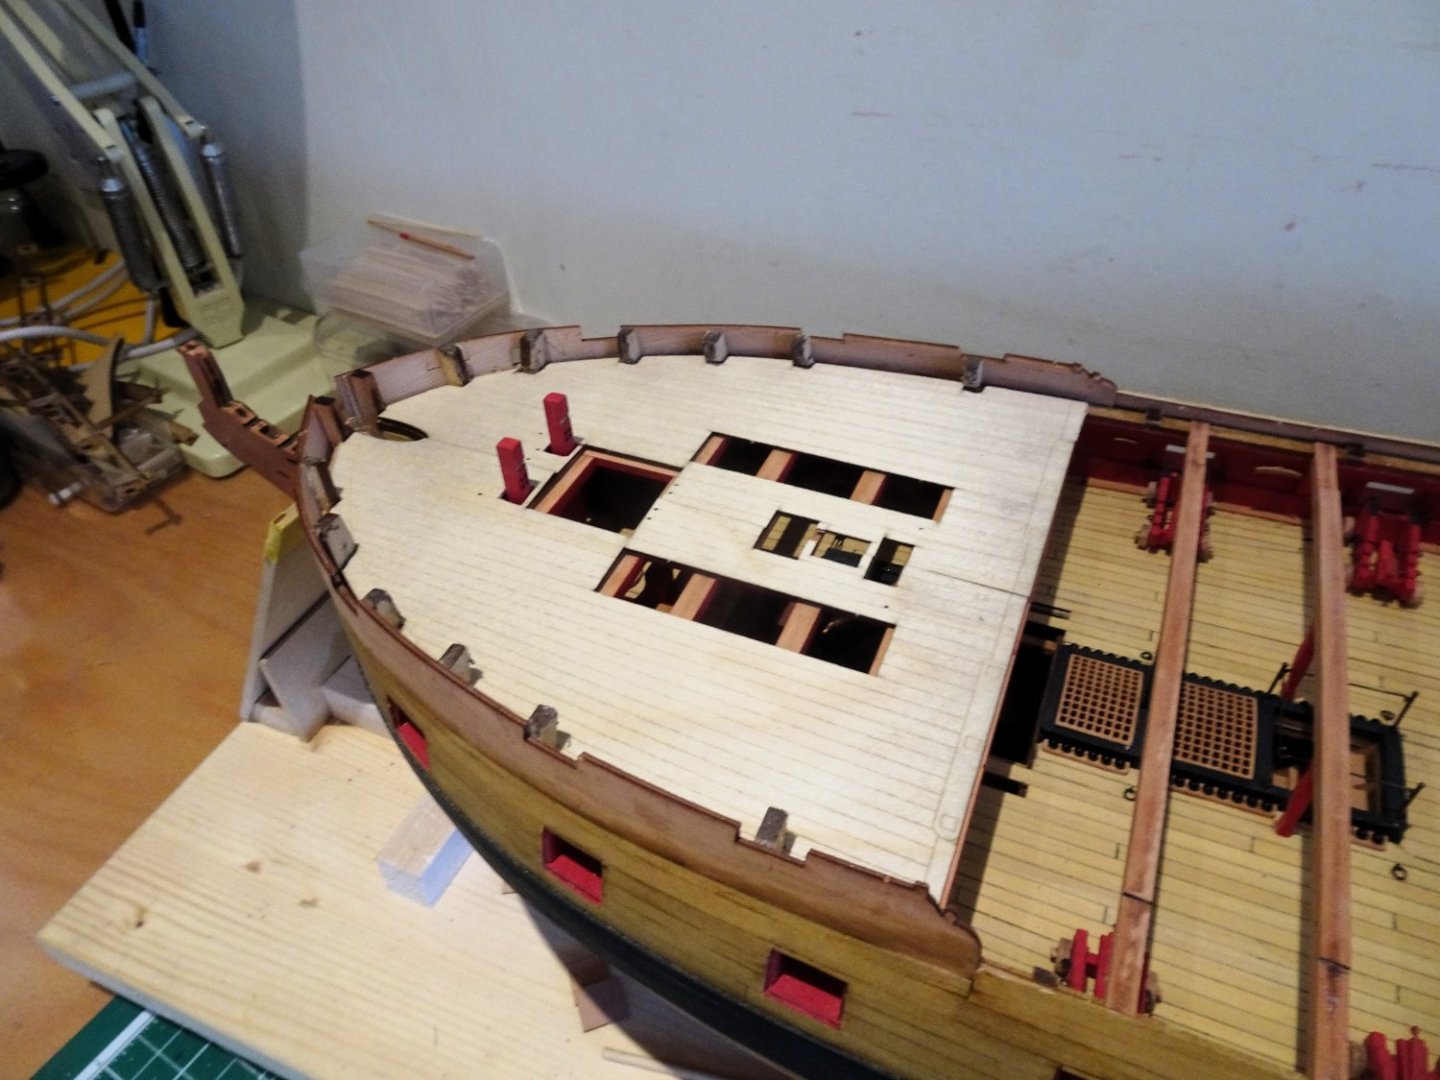
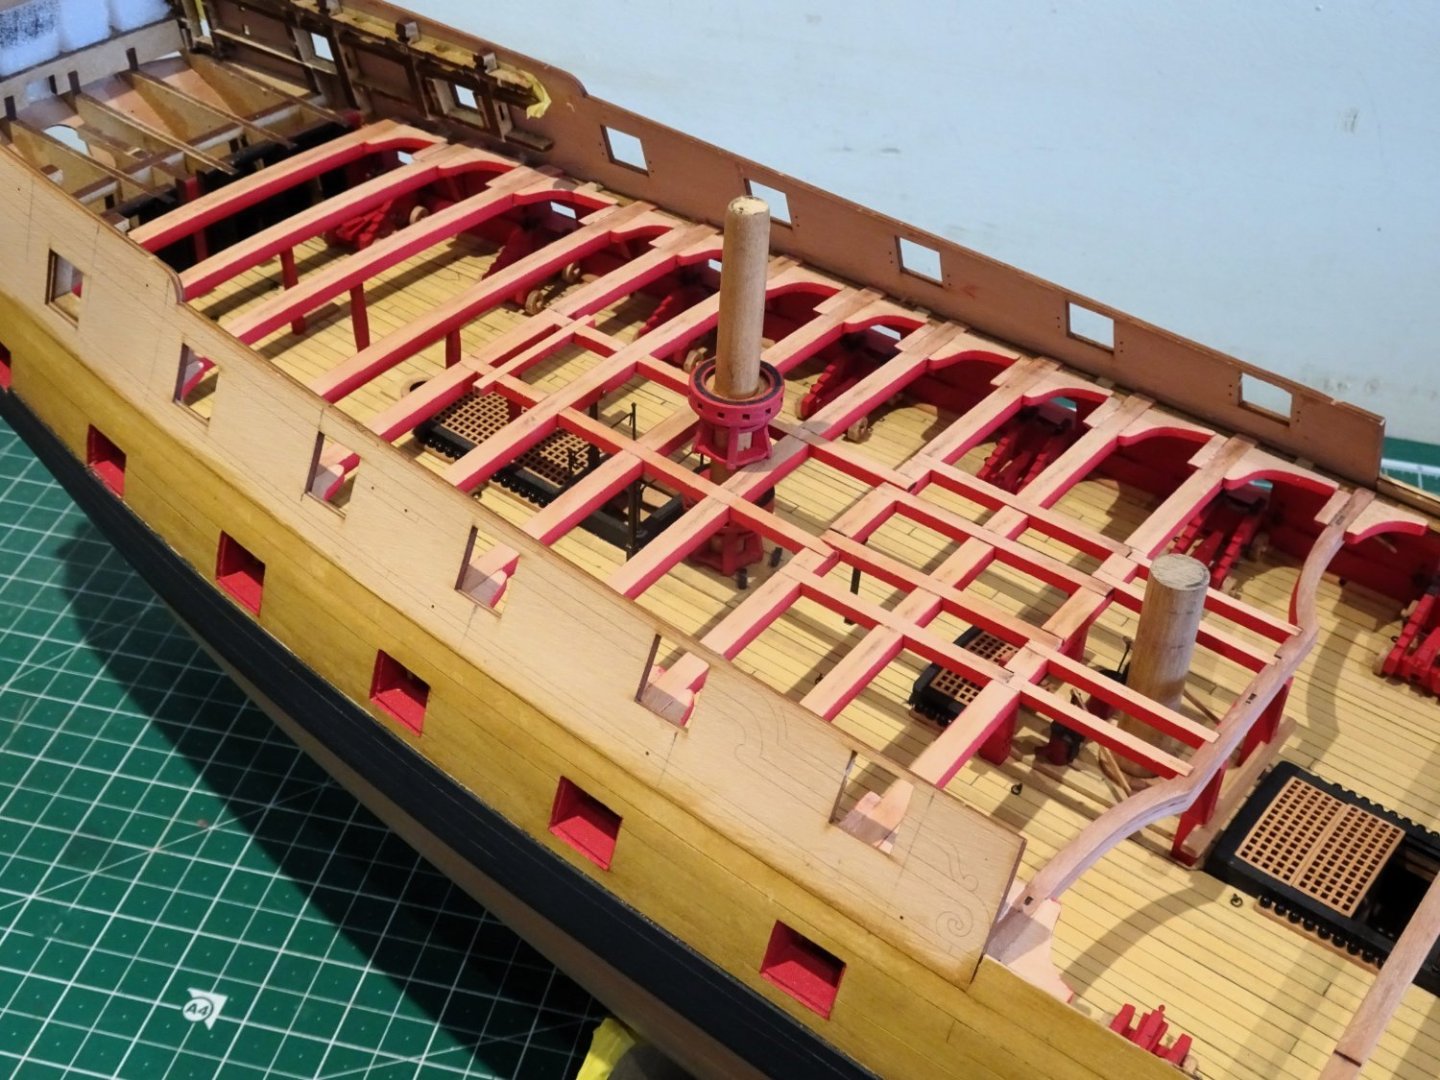
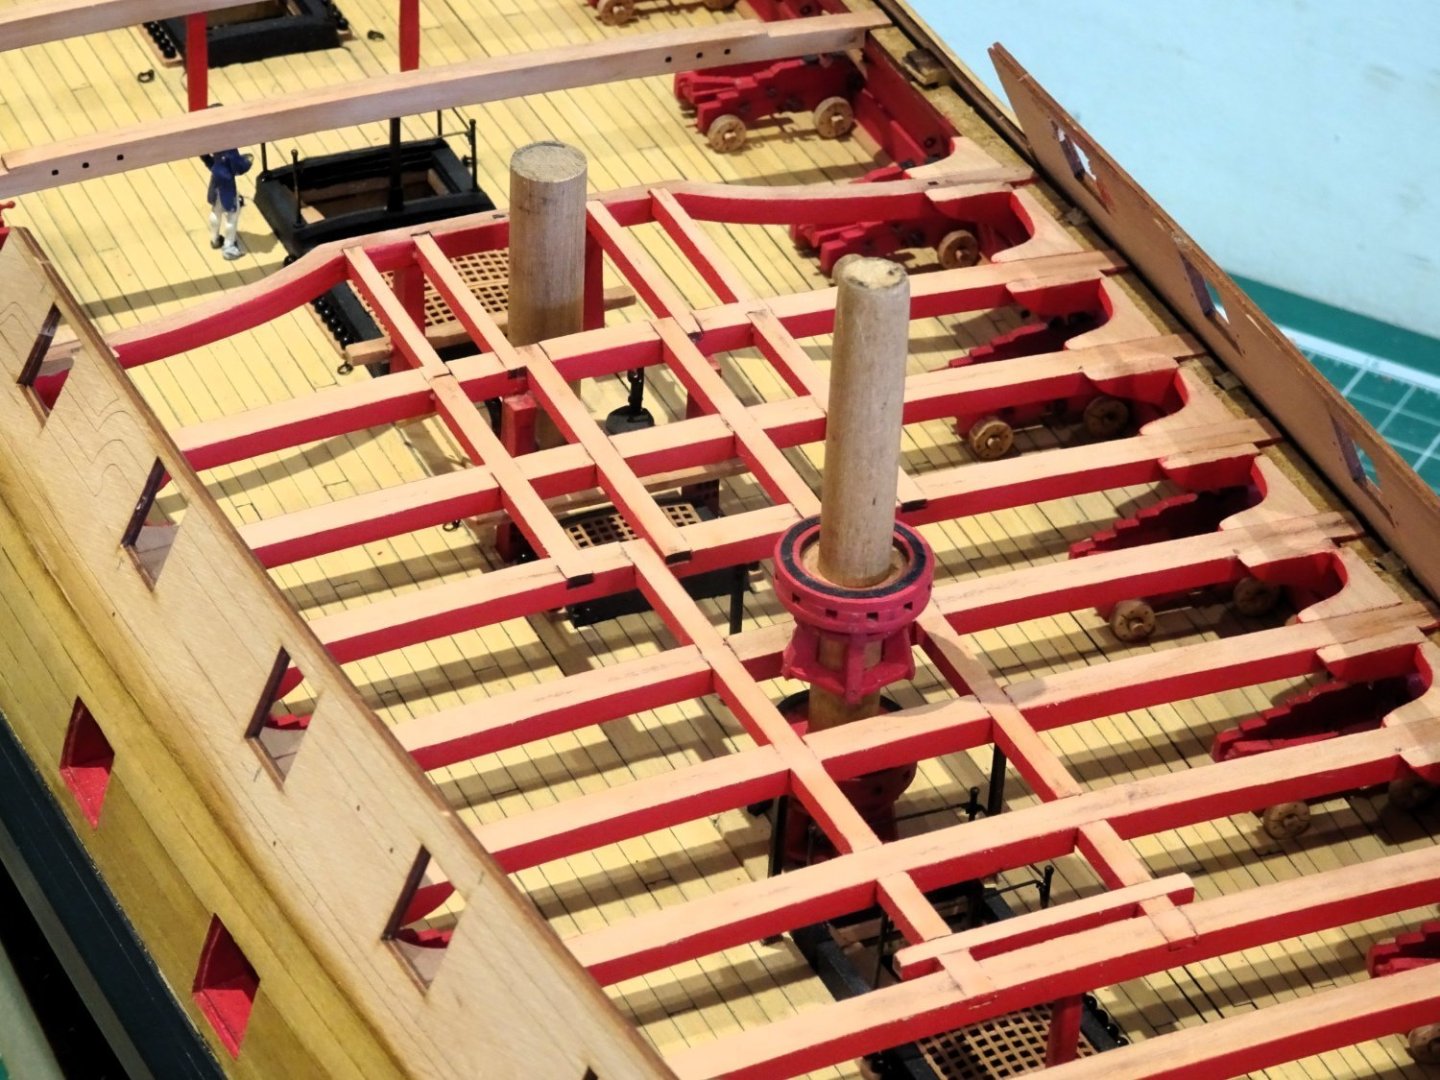
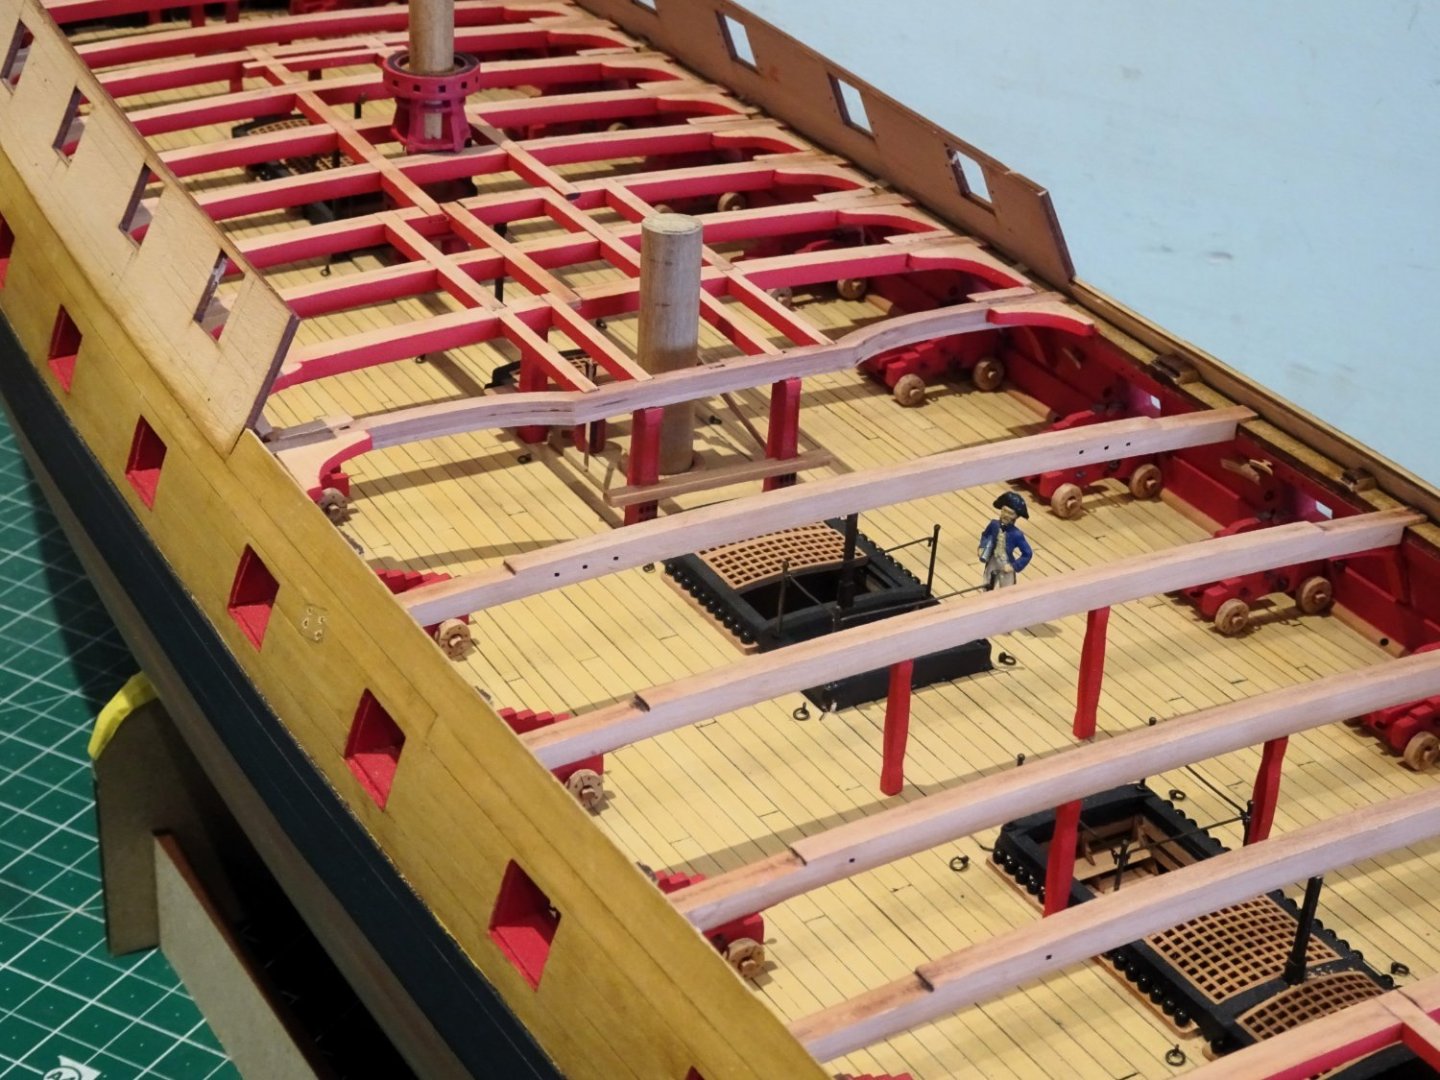
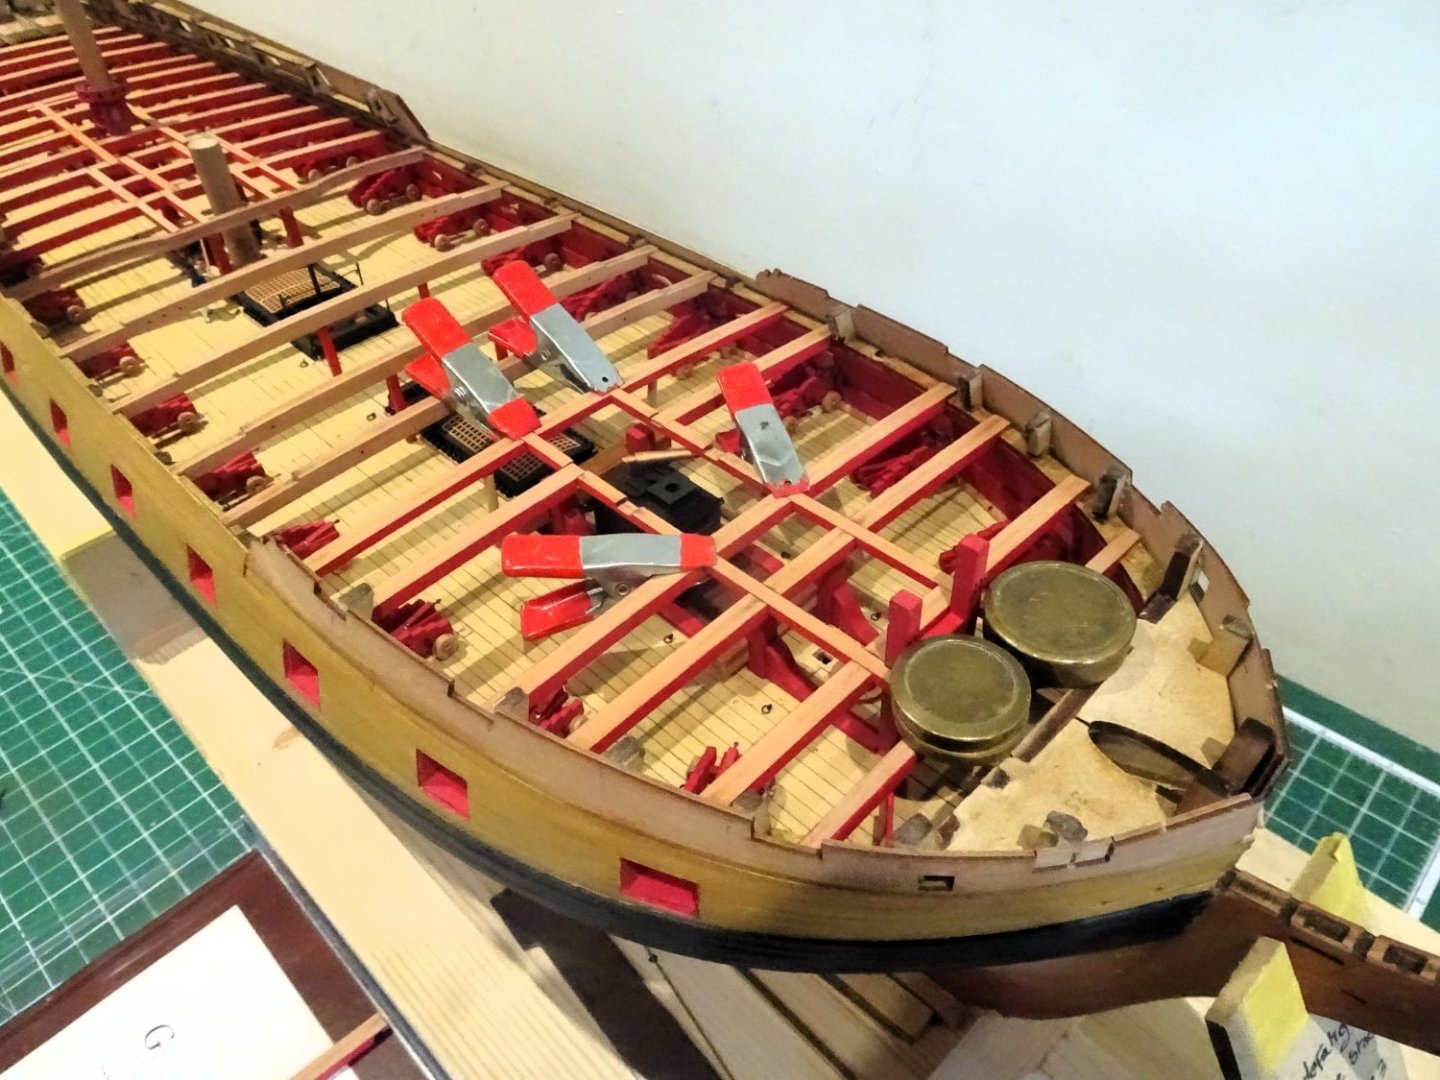
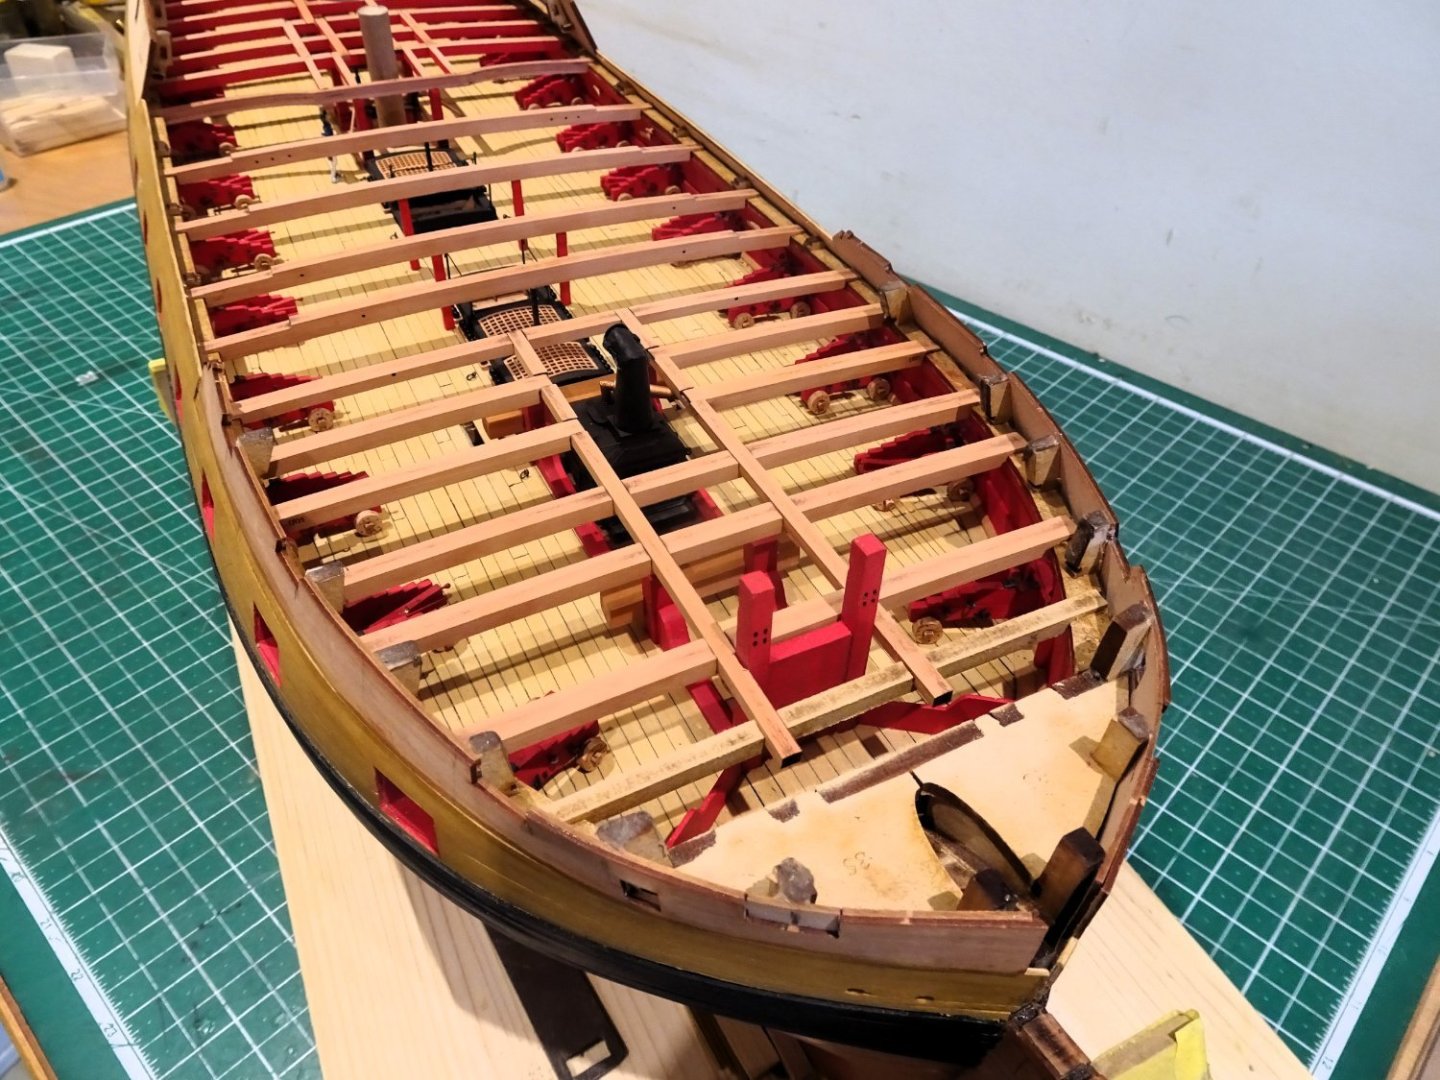
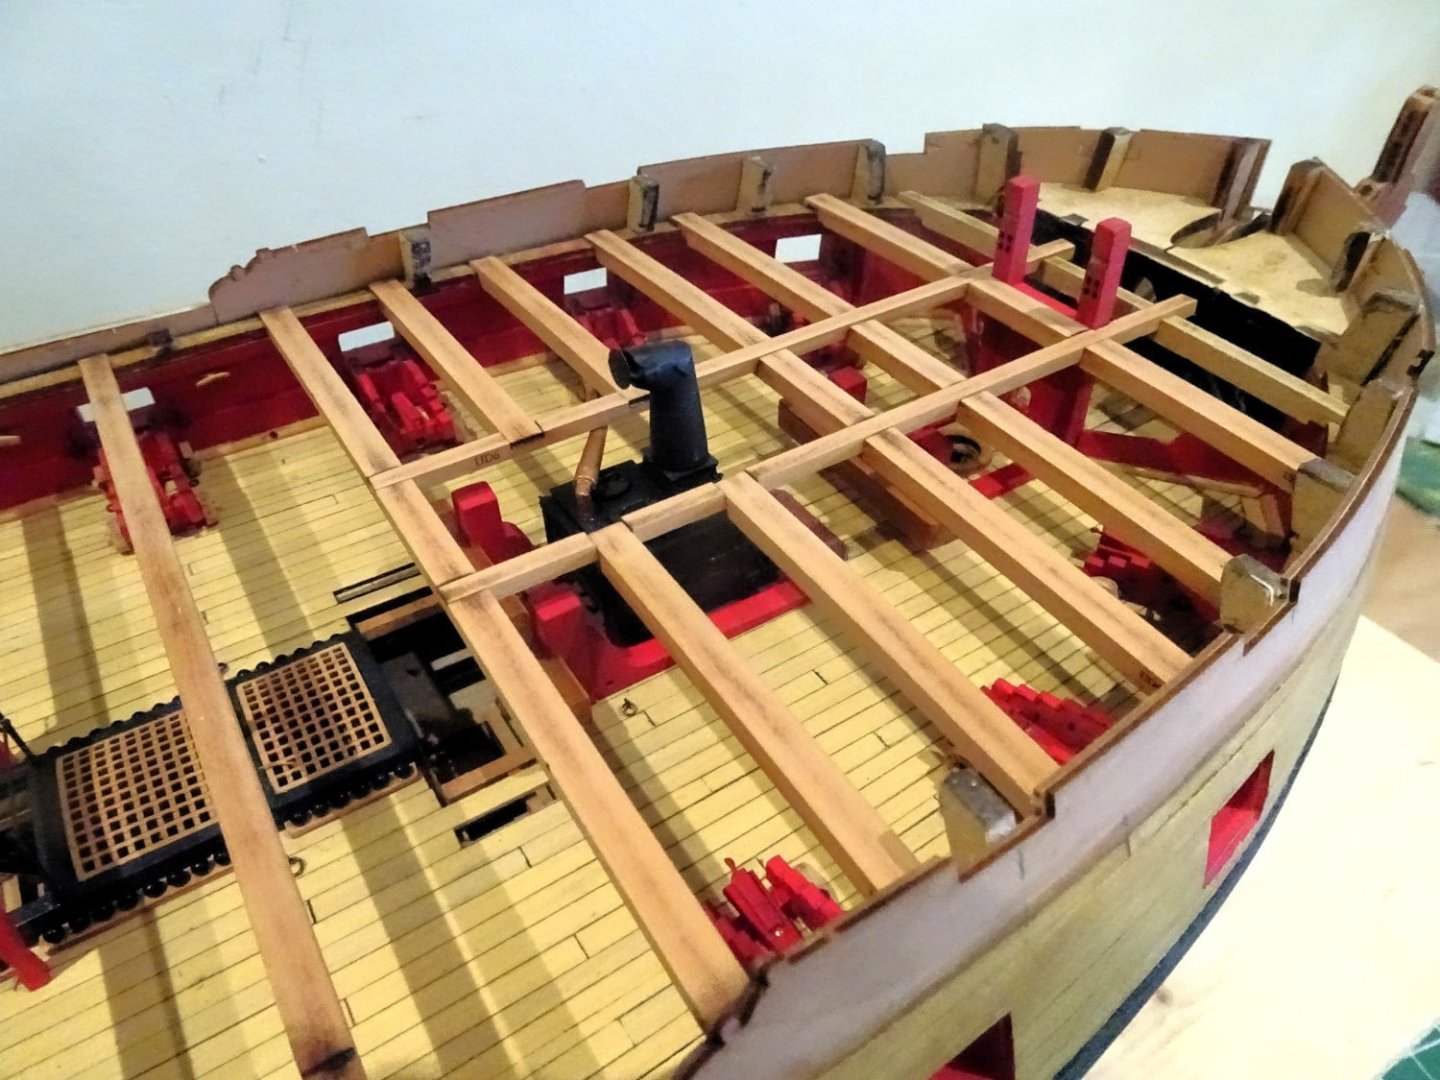
Post Eighty-four The Quarterdeck As with the Fo’csle I have tweaked the Quarterdeck to expose a greater area of the gun deck, whilst still allowing the full complement of carronades to be displayed. 2161 Checking the fit and working the pattern. The aft section which comprises the cabin areas will be fully planked. 2163 The design I settled on. 2167 The ply underdeck fitted with only minimum adjustment, masts and capstan barrel were used to ensure an even fit. 2169 The centre line combination of capstan step, Ladderway, and gratings were raised by 1mm to allow for the planking, and the Head ledges were raised to form a slight camber. NMM Amazon model The contemporary model of Amazon has a very similar set-up and the slight round-up to the ladderway ledges is clearly seen, as are the covers to the ladderway. Ladderway covers have been included with the ‘Indy’ kit. 2170 It is a sign of Chris’s dedication to authenticity that he has reflected the slight taper towards the stern of the grating set. This does mean that the gratings only fit one way, but the difference is subtle. 2173 2174 With the camber formed on both ledges and gratings, the job is done. 2182 2184 2180 The Upper Capstan has been completed, and I slightly modified the Capstan step. 2179 Moving forward to the deck planking. B.E. 27/09/2023


- 648 replies
-
- 21
-
-
- Indefatigable
- Vanguard Models
- (and 1 more)
-
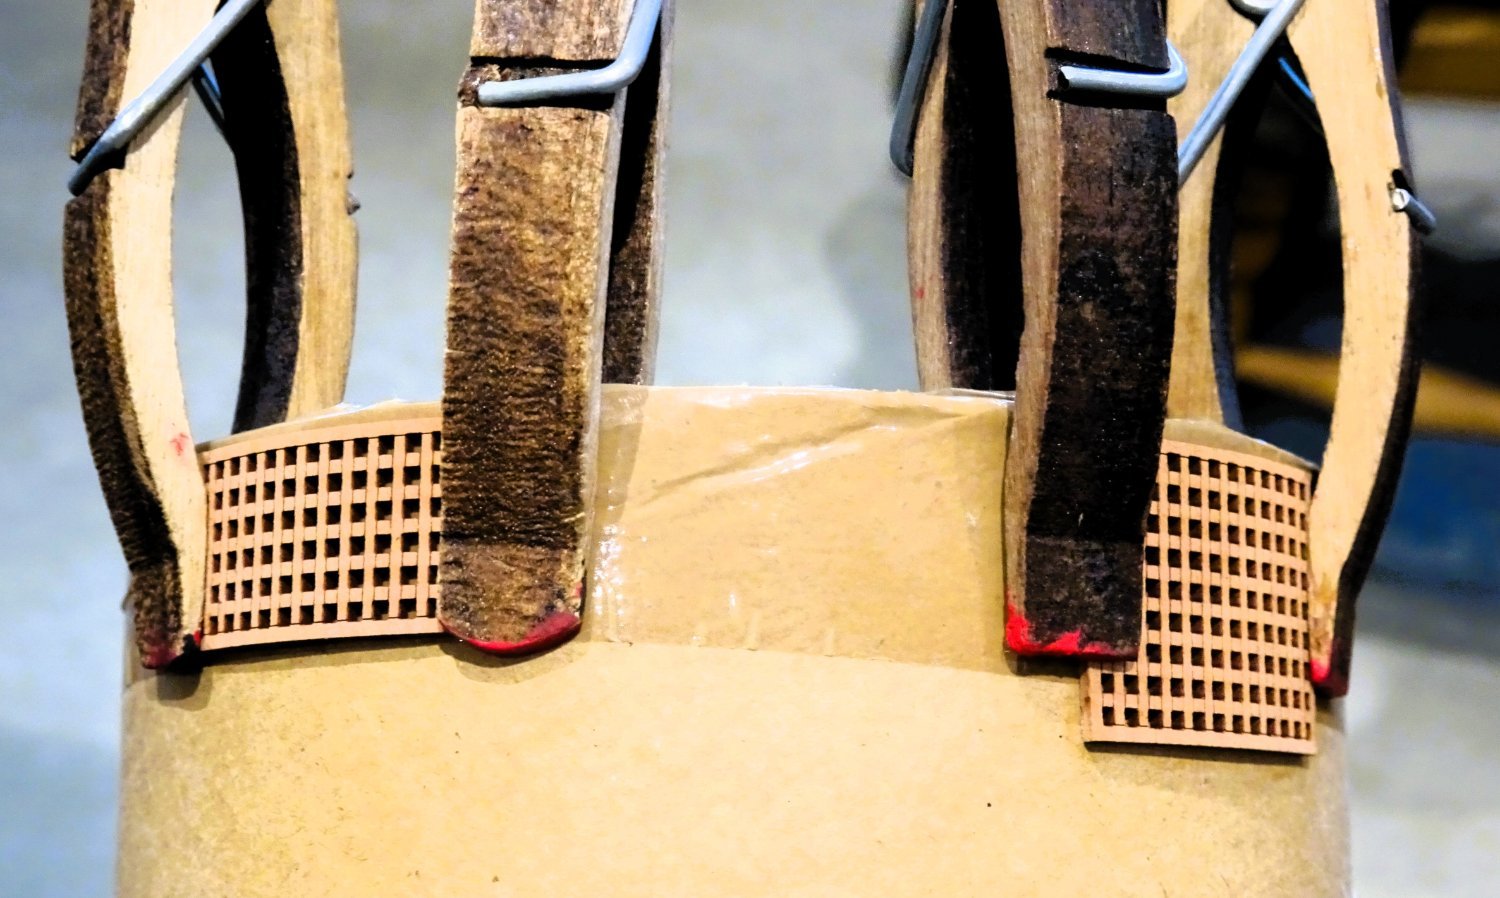
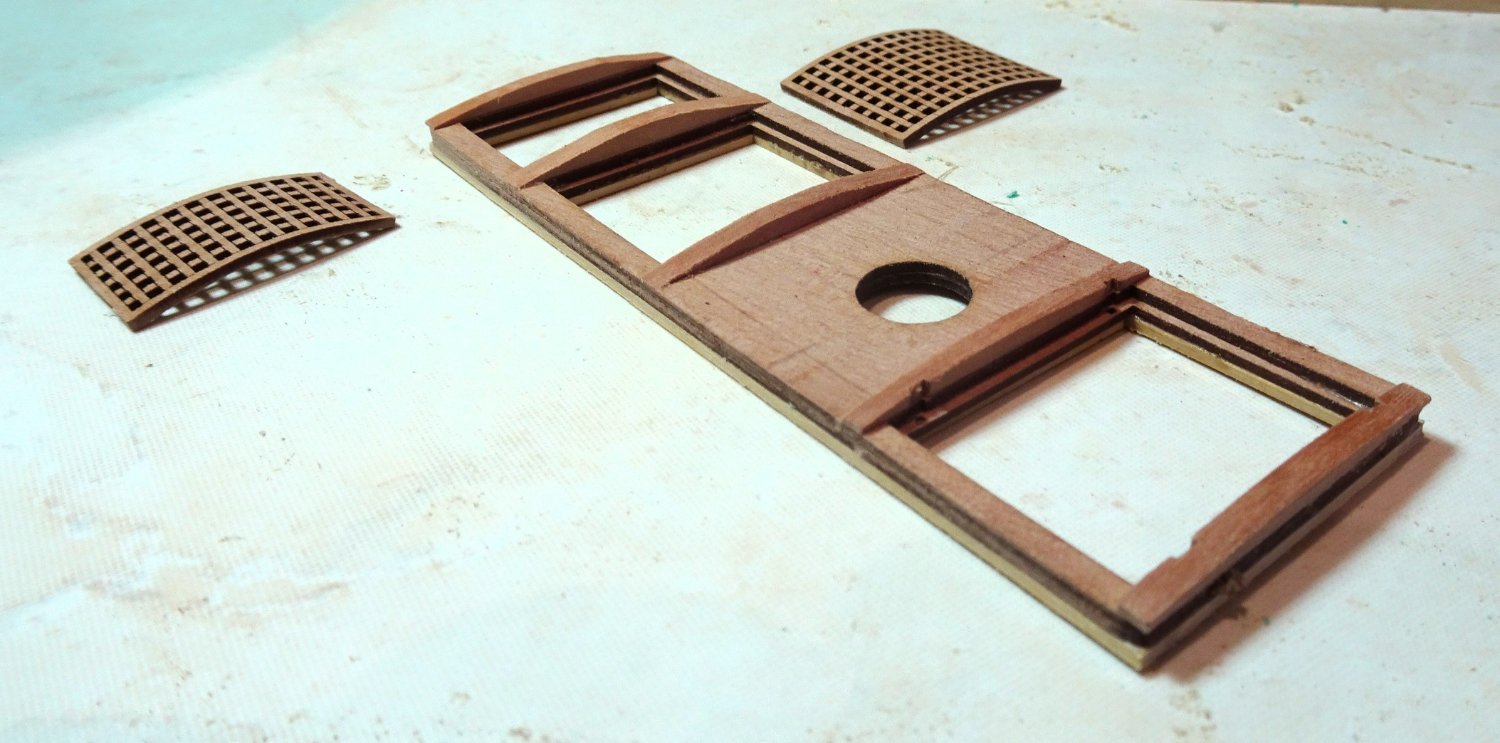
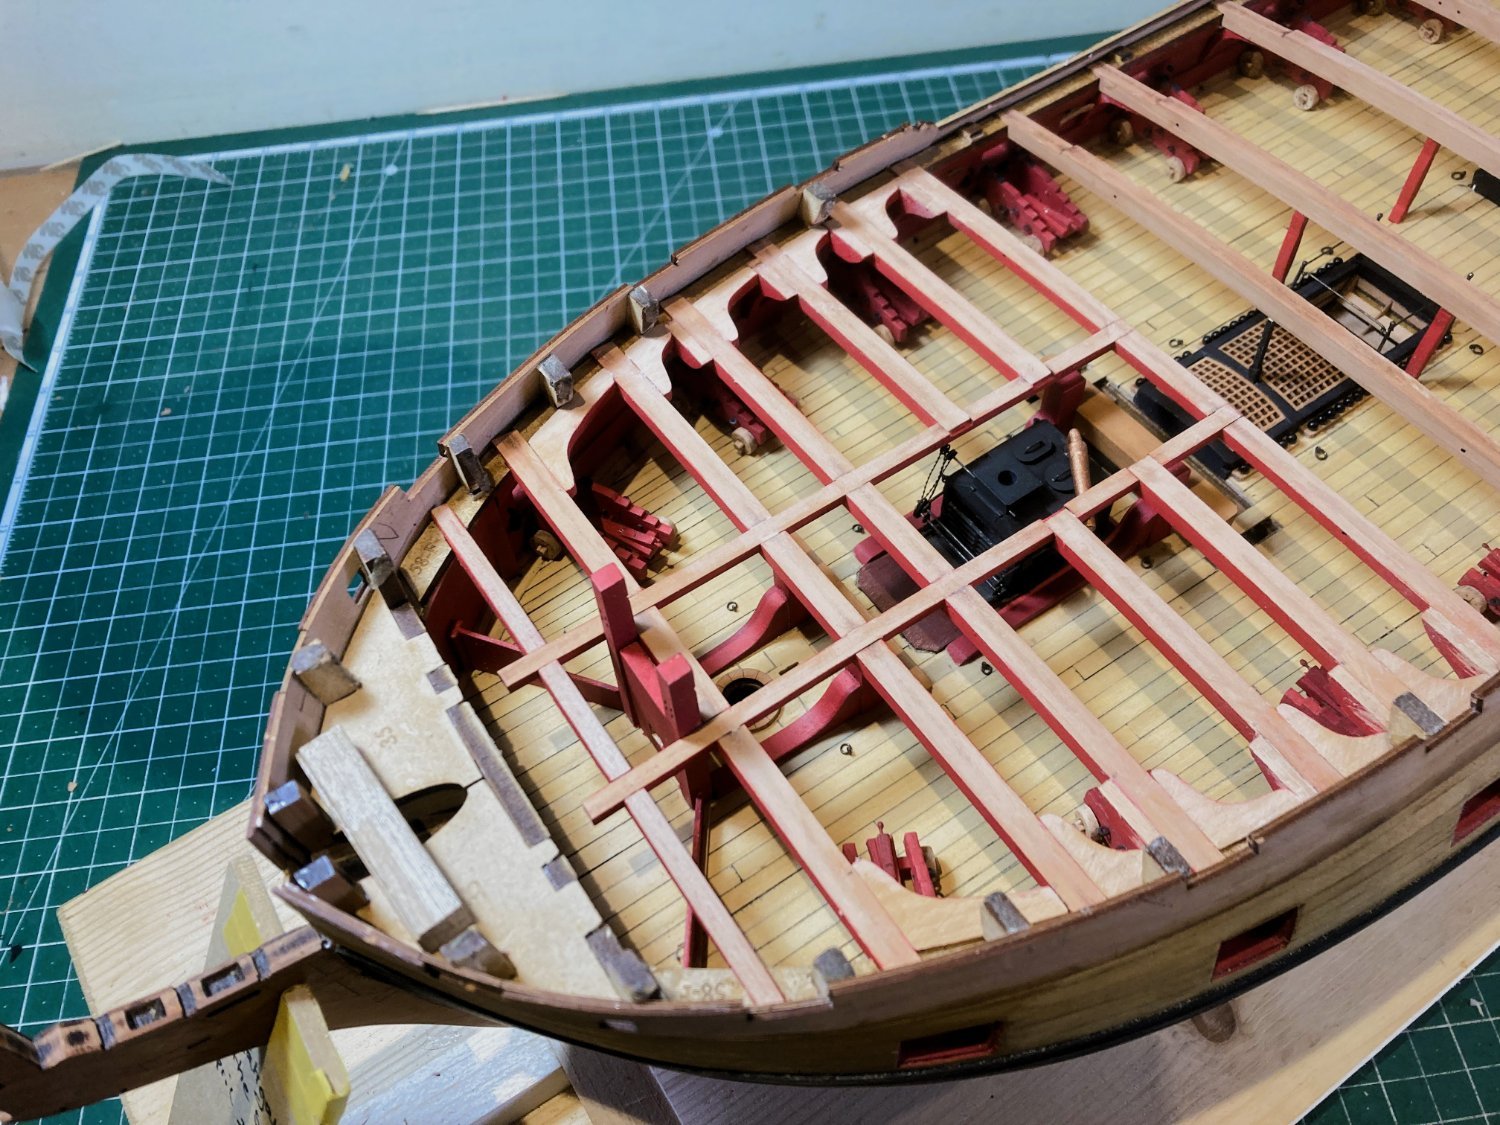
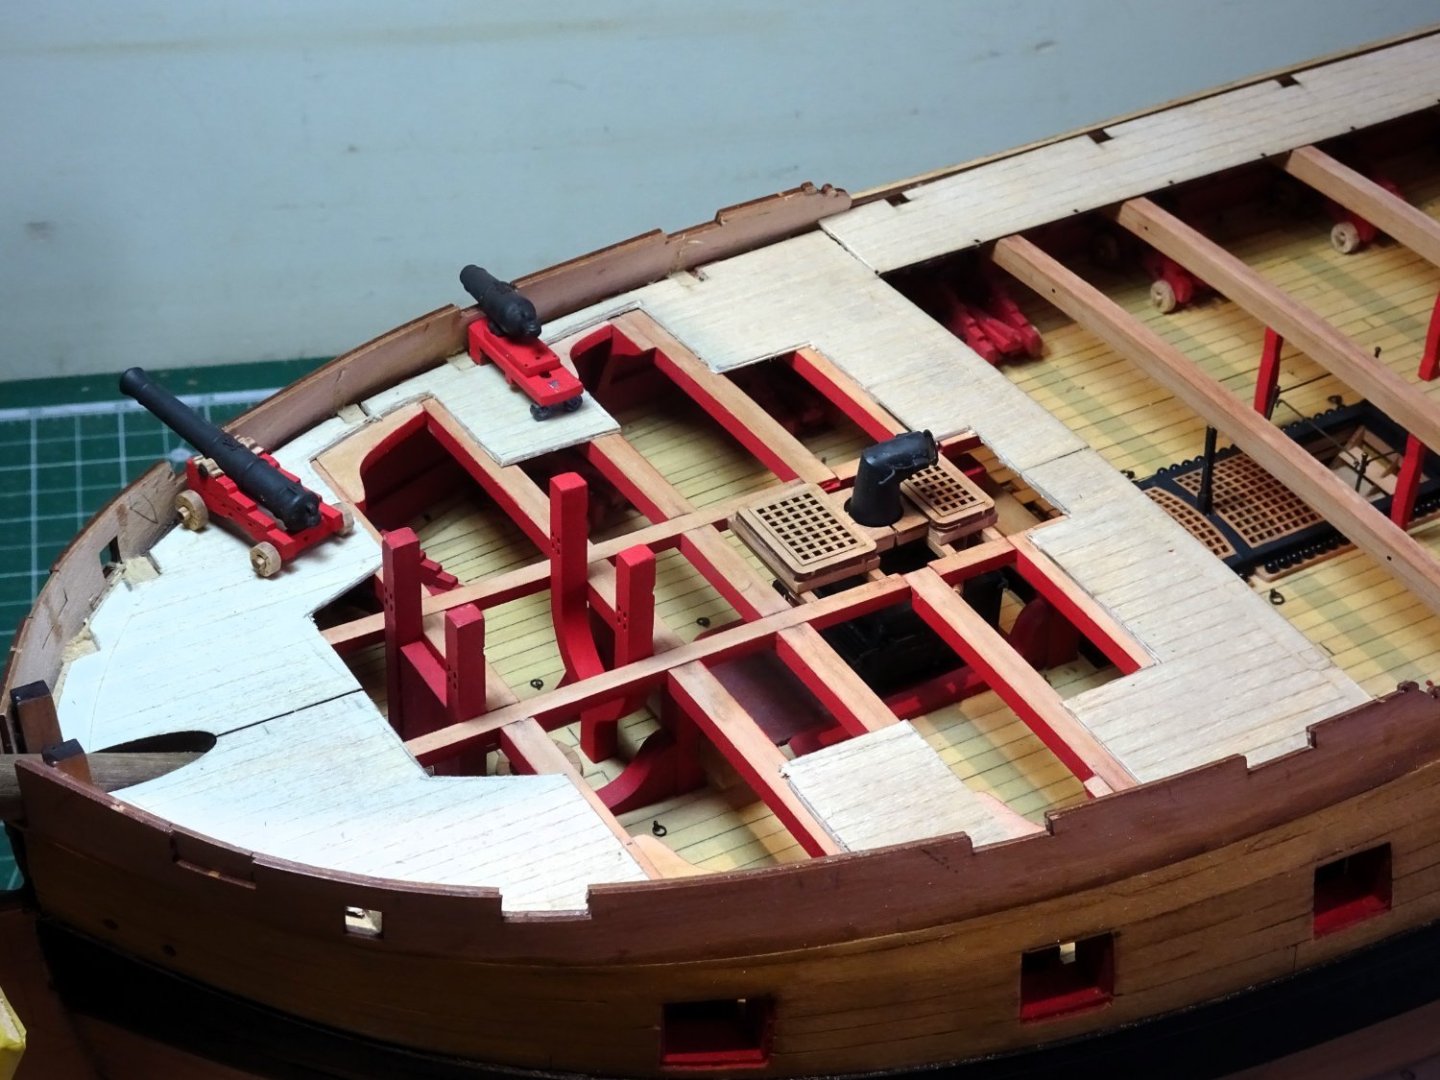
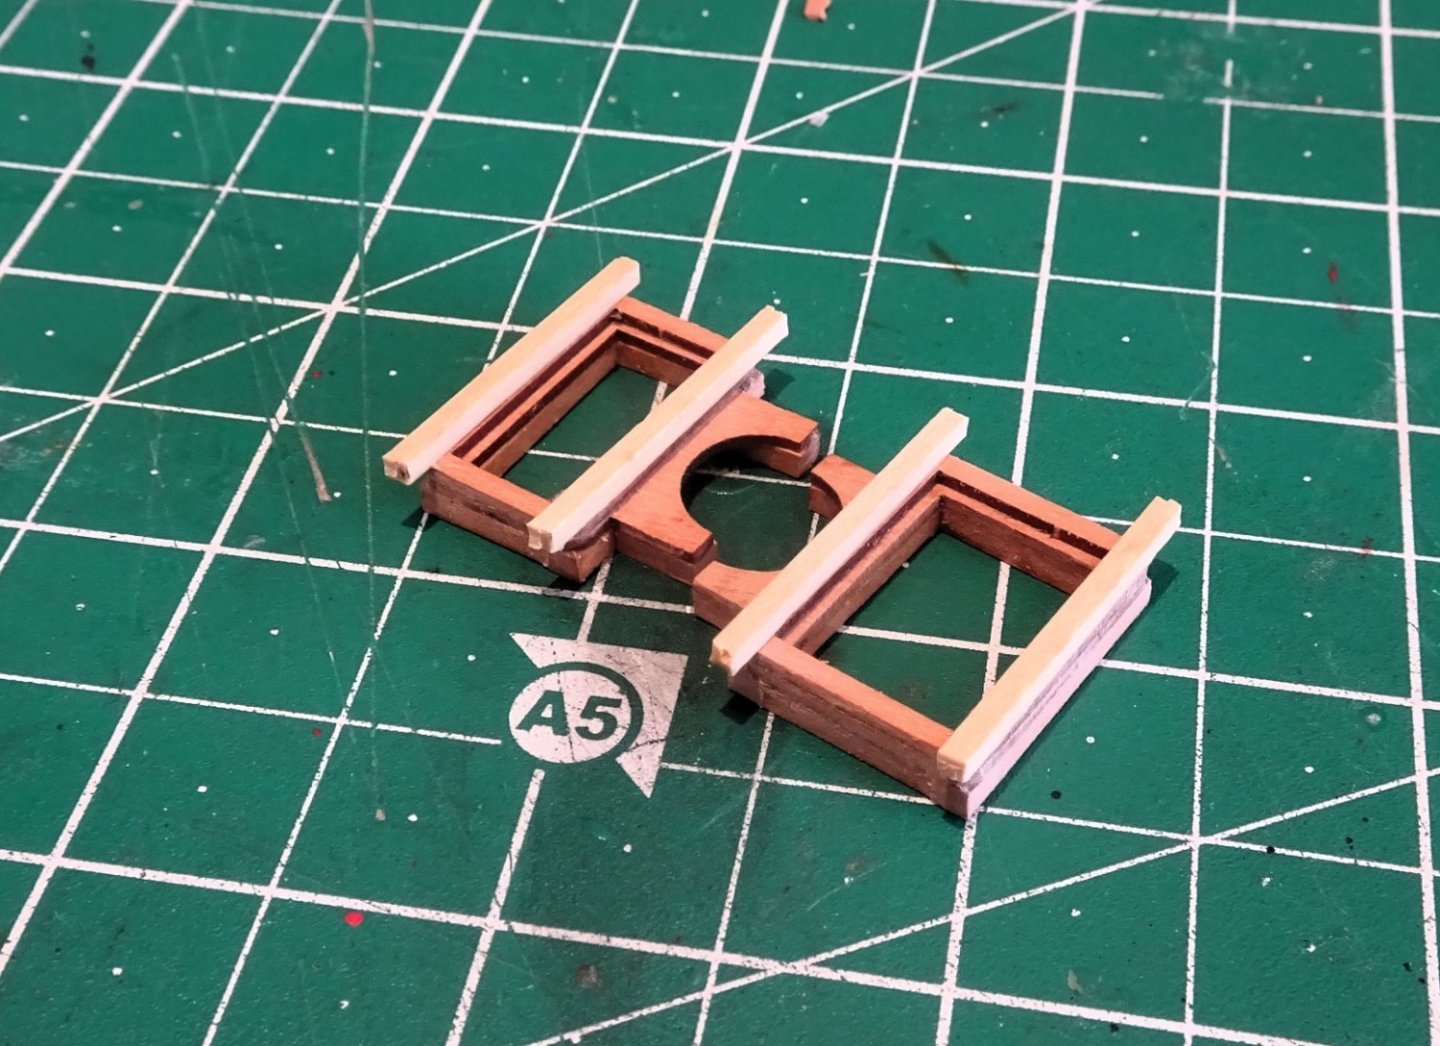
Post Eighty- three Fo’csle cont’d The ply sub-deck has been fitted and the aftermost Fore jeer bitts (the ‘u’ shaped ones), put into place. On my build these did not require gluing into place. 2139 On the subject of the bitts note that the cross pieces both face aft. I’ve left mine off until the planking is completed. 2142 When it comes to the steam gratings a little bit of tweaking is required. These parts have been designed to sit atop the finished deck, so need building up by 2mm to match that level. 2145 They look ok but I do like to see a slight roundup to the head ledges. 2147 This is simply achieved by adding strip to the top and shaping to suit. 2150 Still in a rough state but you get the idea. The final task is to impart a slight camber to the gratings. They are soaked and heat blasted around a large circumference tube of 11cm diameter. 2152 2154 2157 Happy with the result and onto the Qtr. Deck. B.E. 25/09/2023


- 648 replies
-
- 21
-
-
- Indefatigable
- Vanguard Models
- (and 1 more)
-
Excellent idea to re-visit those rails Glenn.👍 B.E.
- 587 replies
-
- 3
-

-
-
- Indefatigable
- Vanguard Models
- (and 1 more)
-
Nicely done Kevin, no hint of the shrouds going out of shape.👍 B.E.
- 443 replies
-
- 2
-
-
- Indefatigable
- Vanguard Models
- (and 1 more)
-
Hi Alistair, I have a fairly clear idea of where I'm going with this, in some ways the Qtr deck is easier to visualise than the Fo'csle. The cabin areas will be fully planked, but the centre line area between mainmast and Mizen will be modified to maximise viewing of the interesting detail below. Regards, B.E.
- 648 replies
-
- 2
-
-
- Indefatigable
- Vanguard Models
- (and 1 more)
-
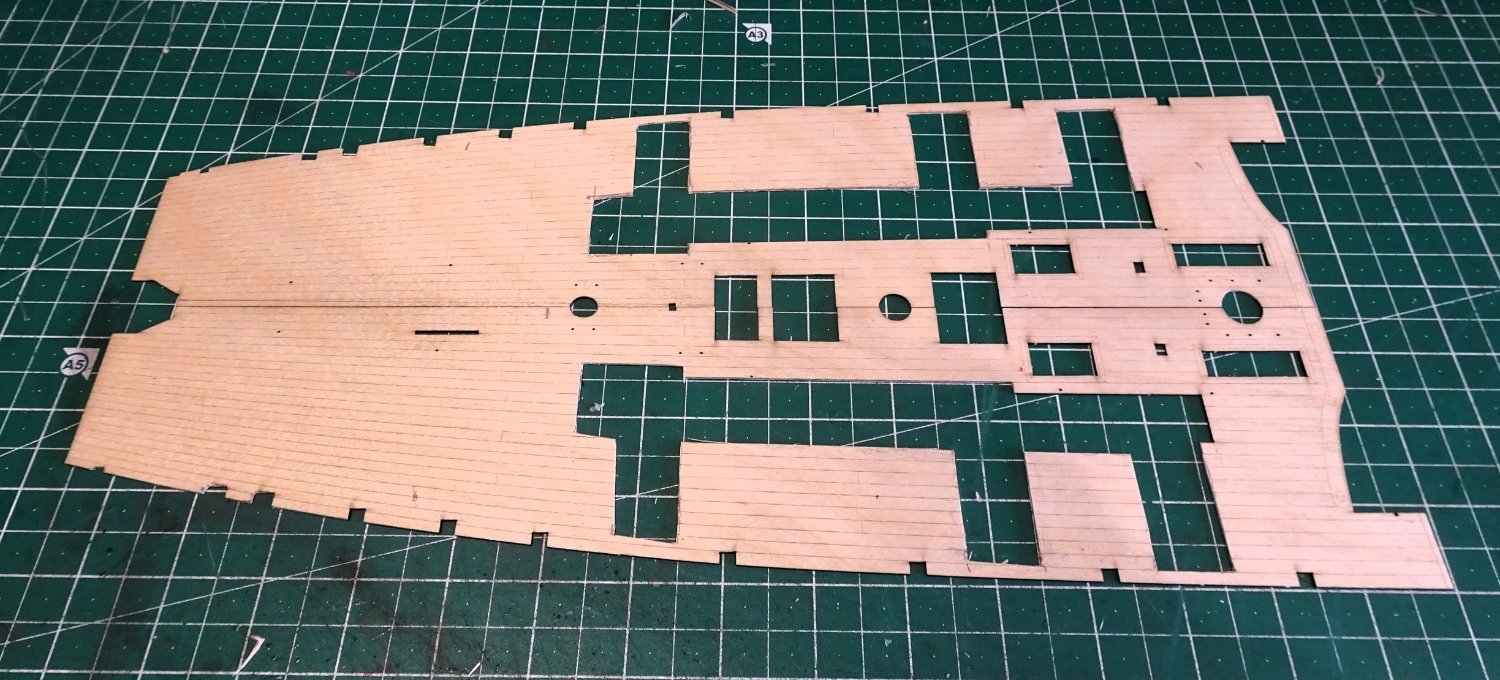
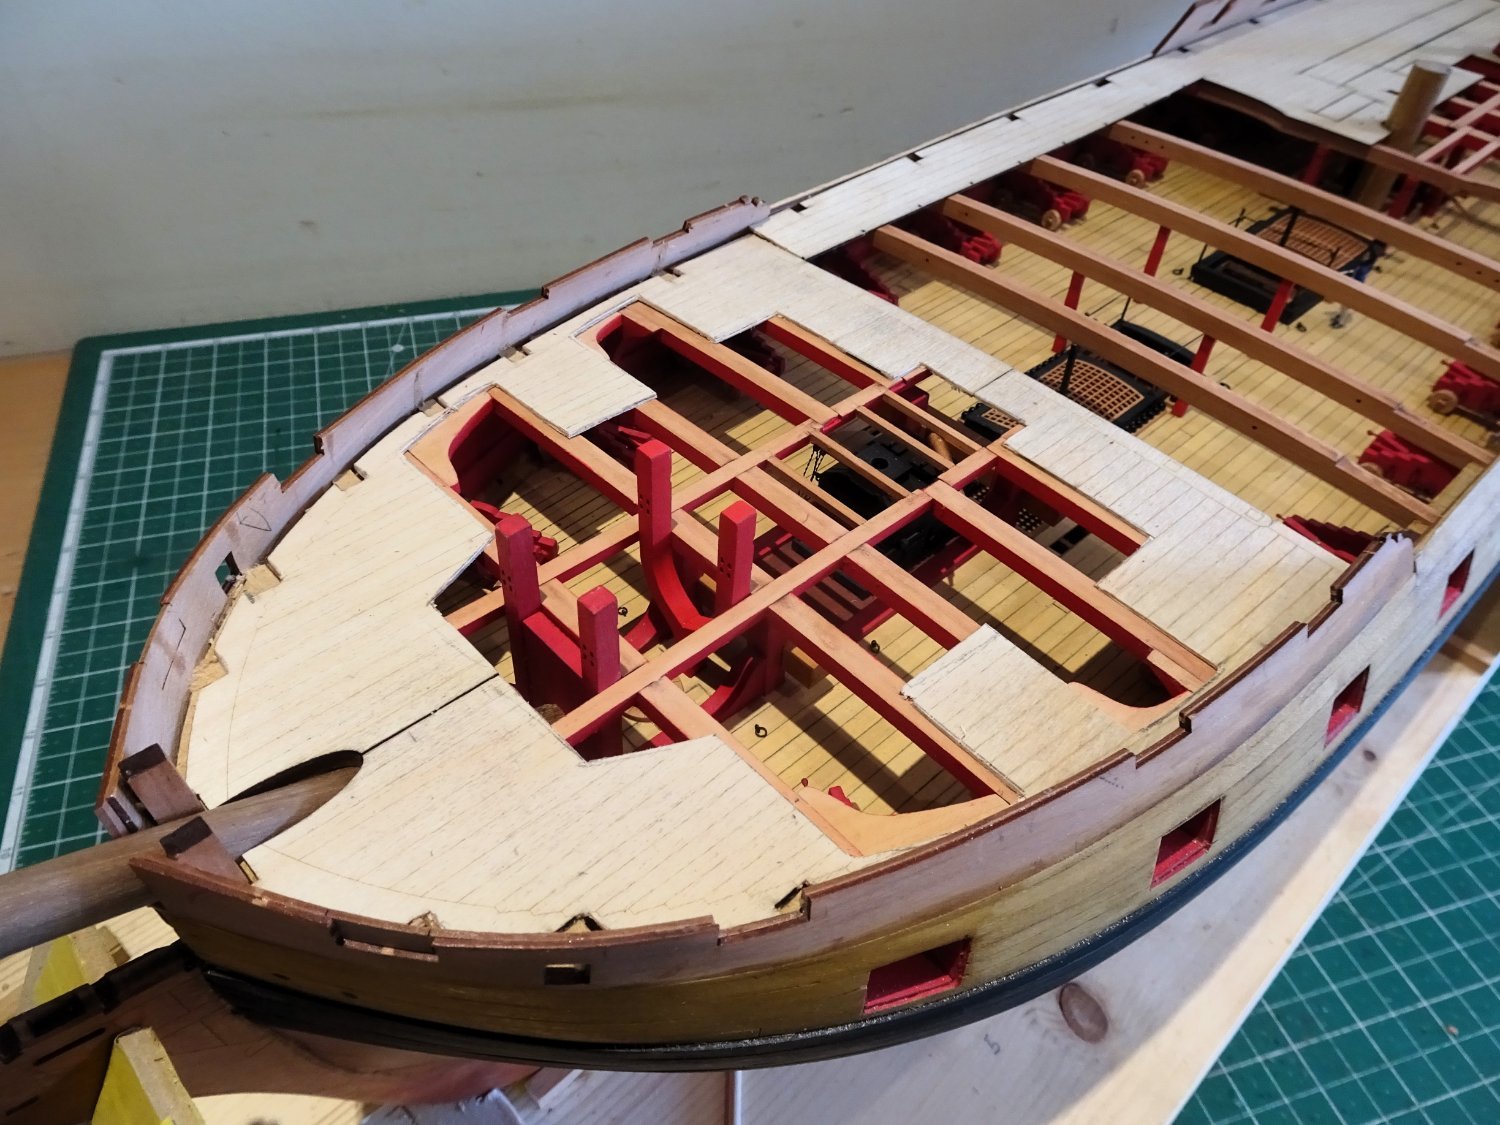
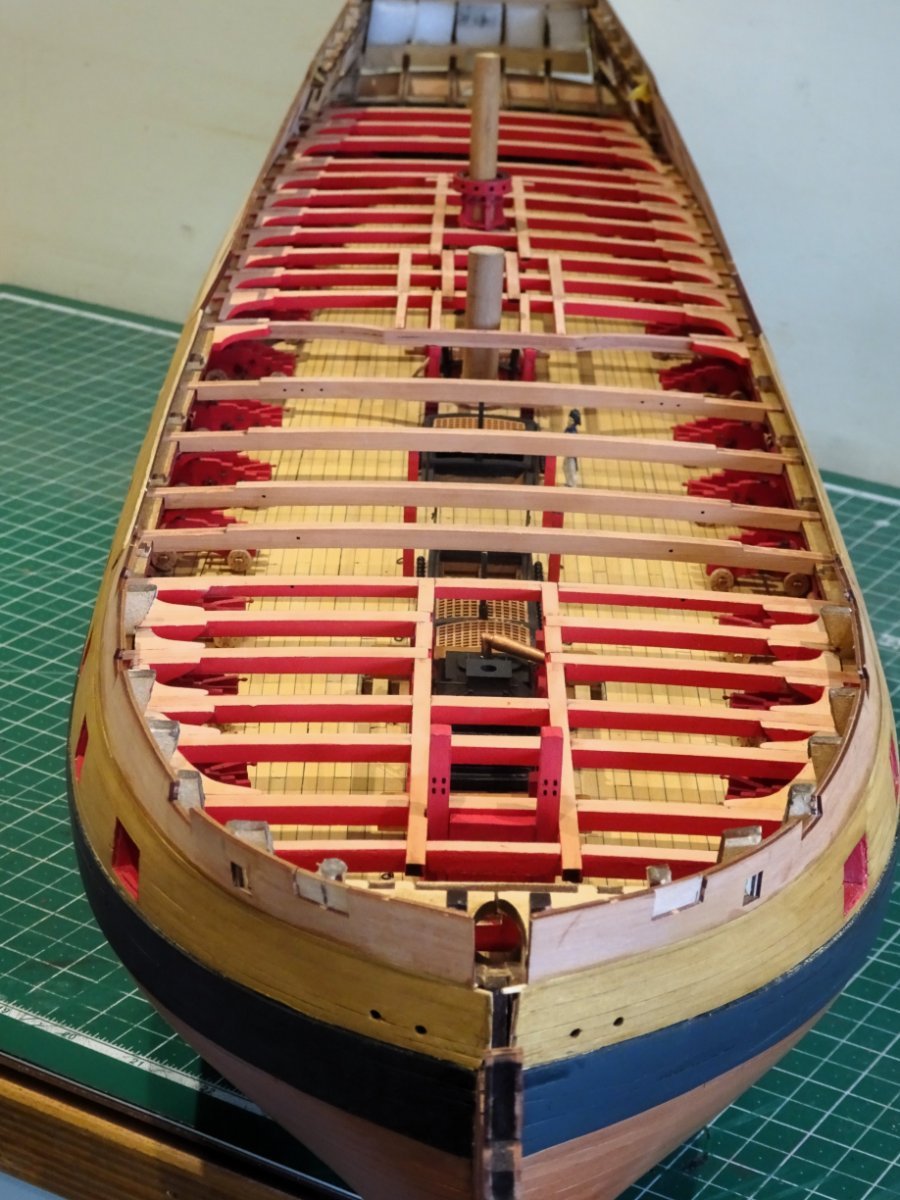
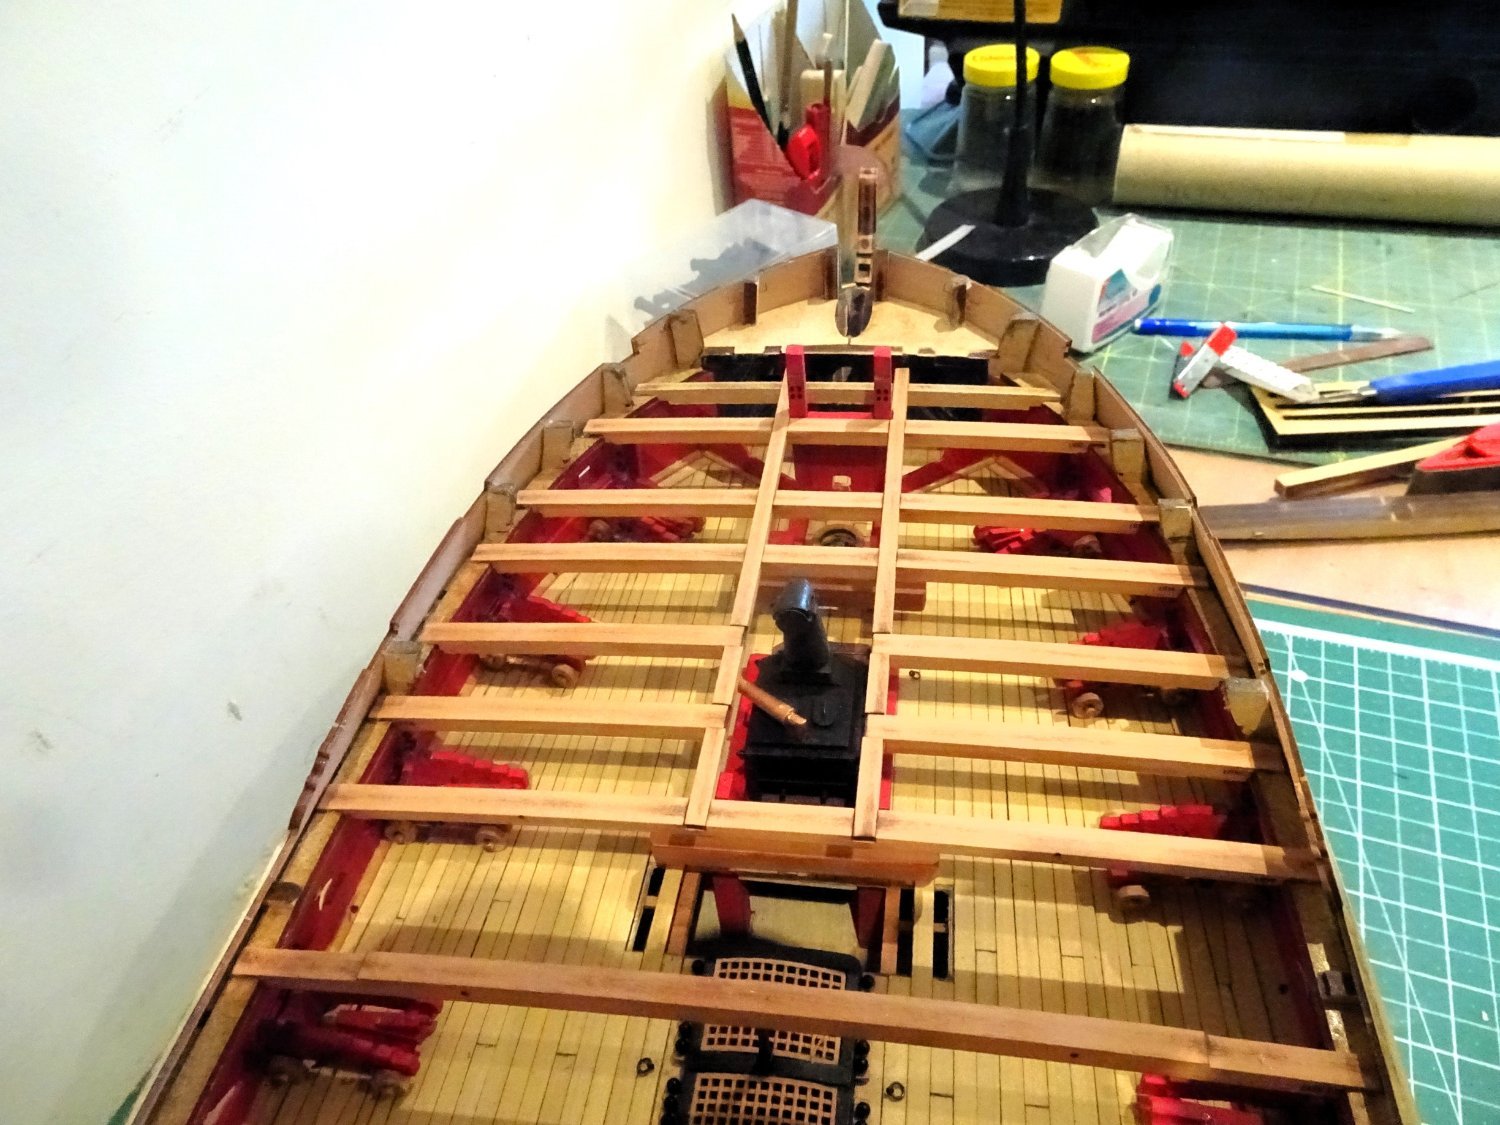
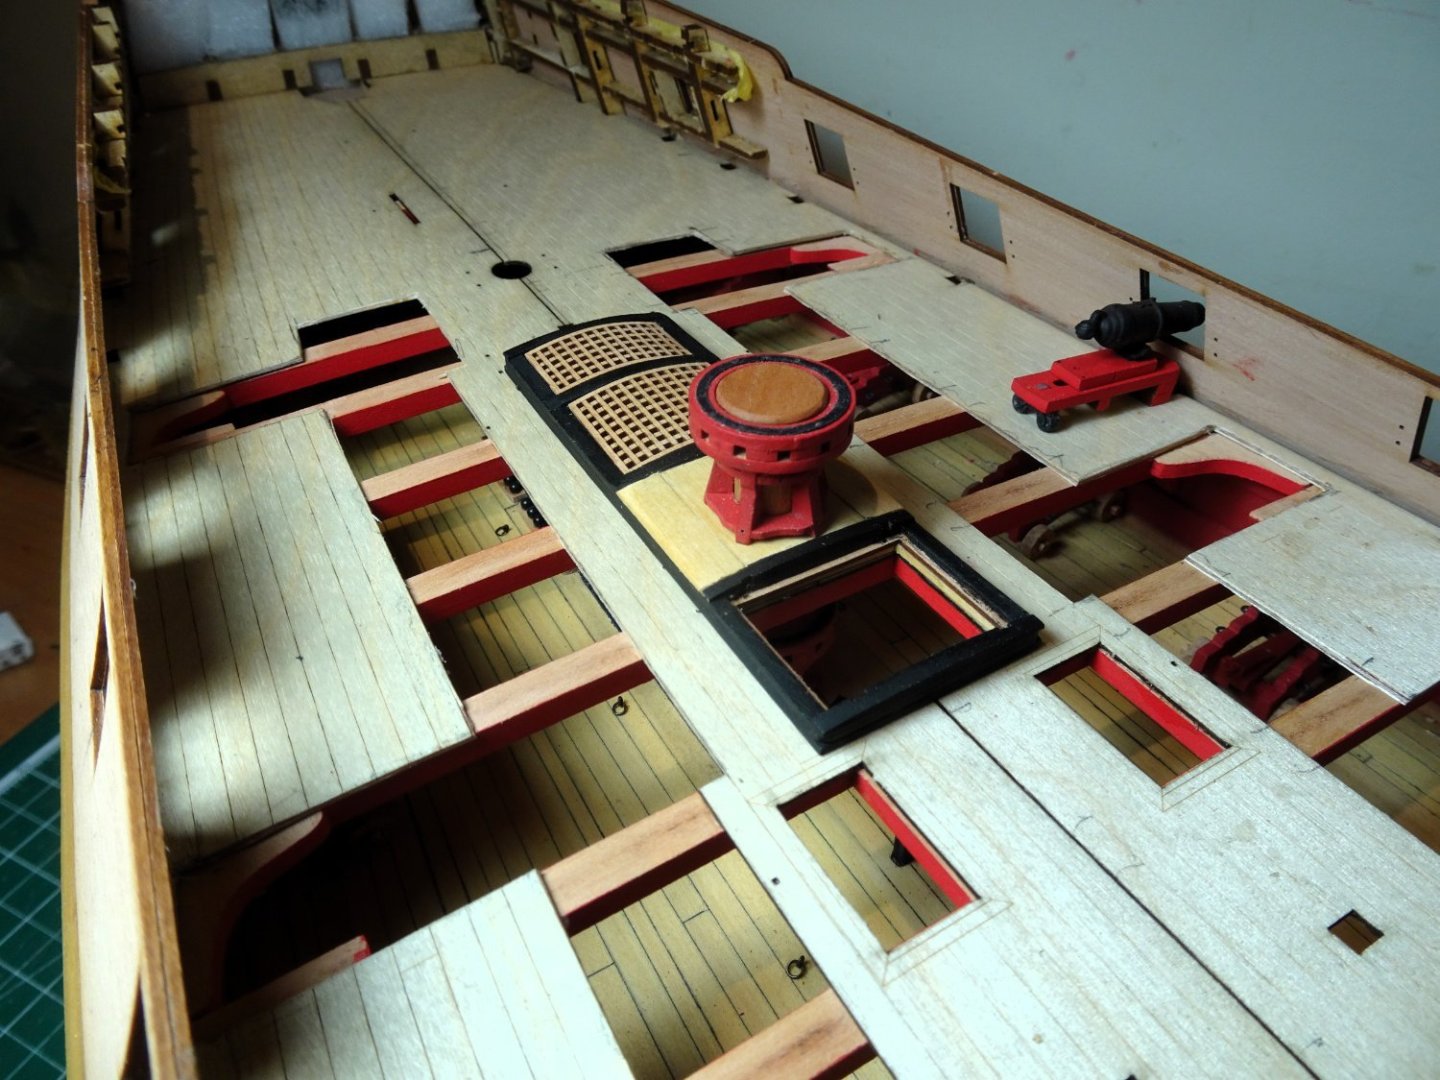
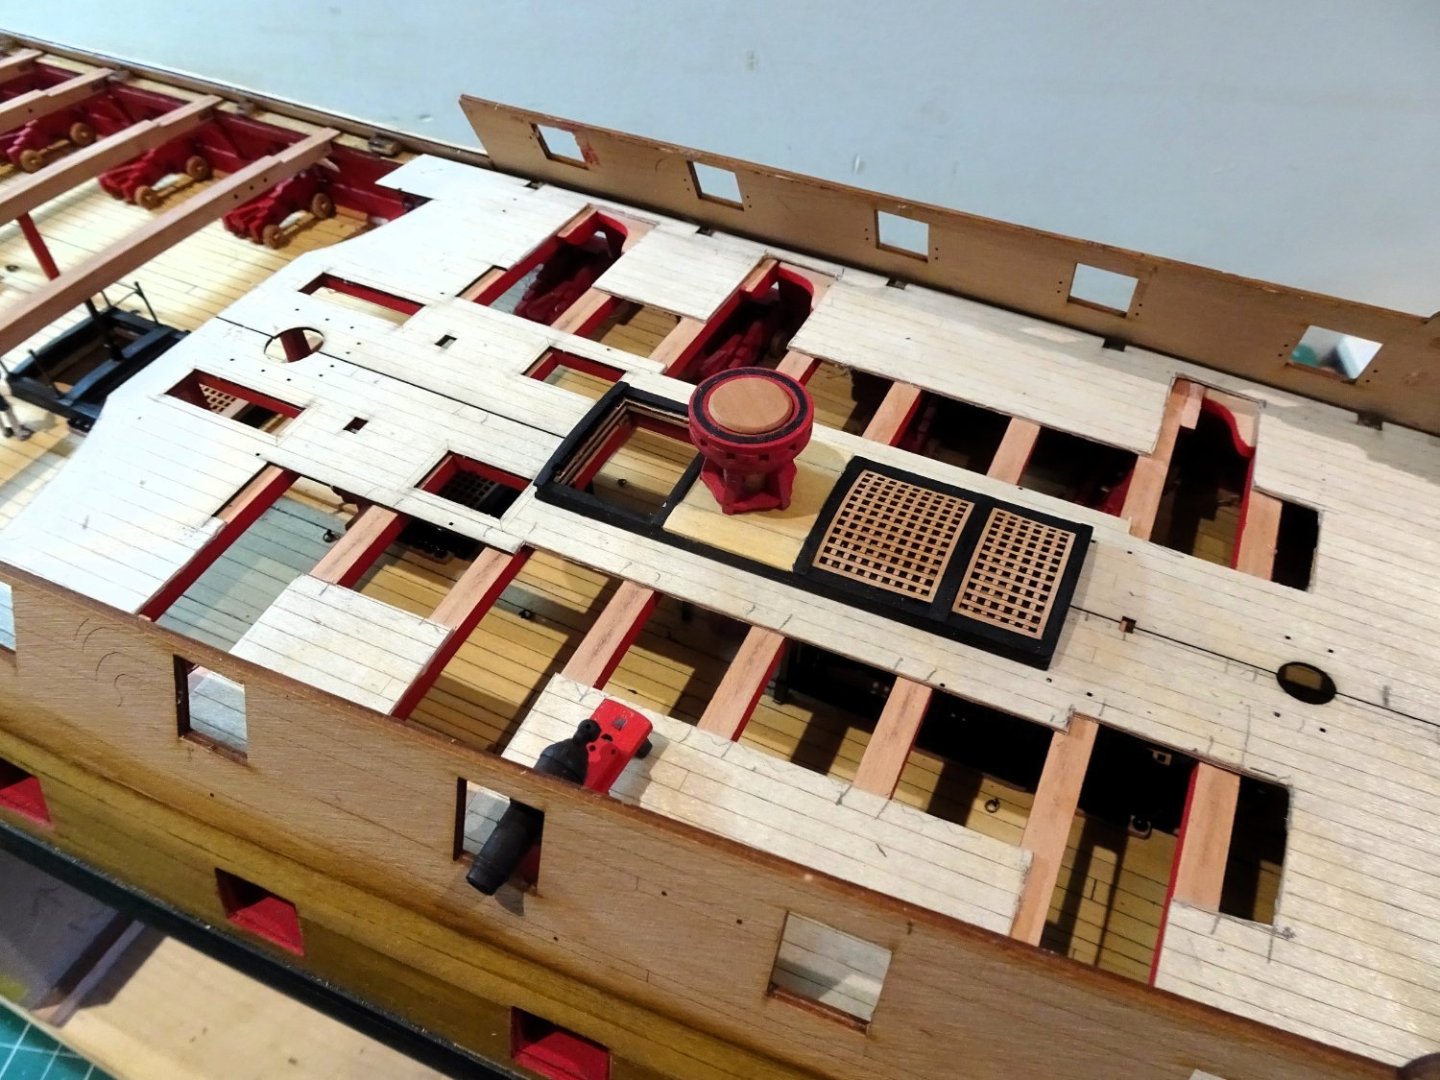
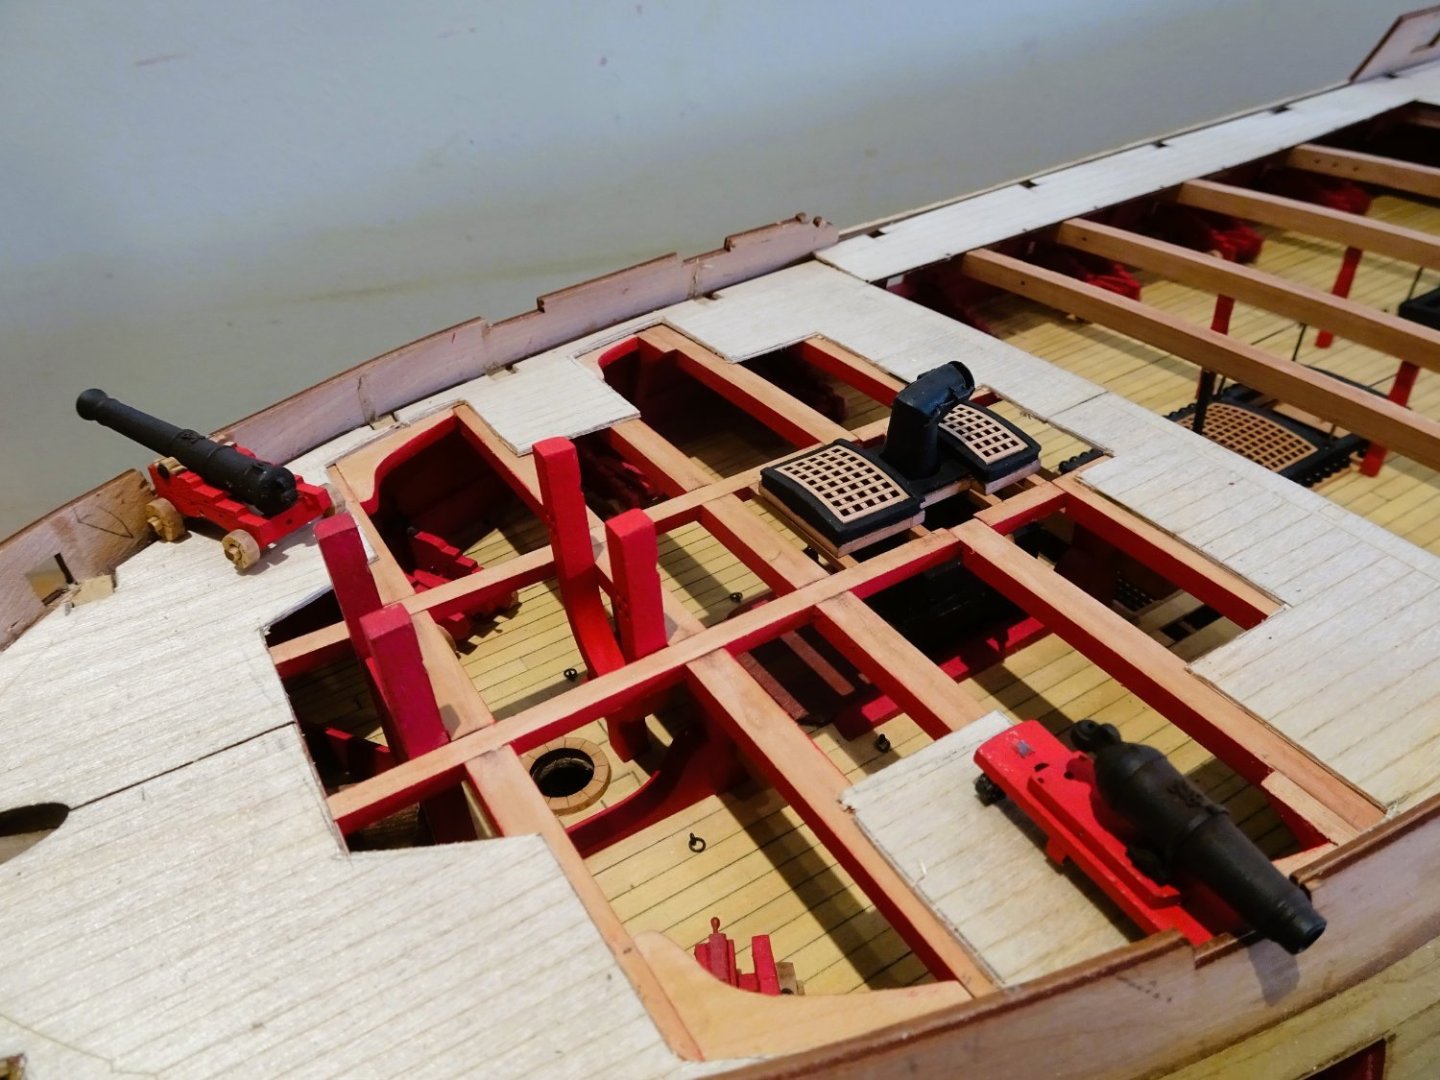
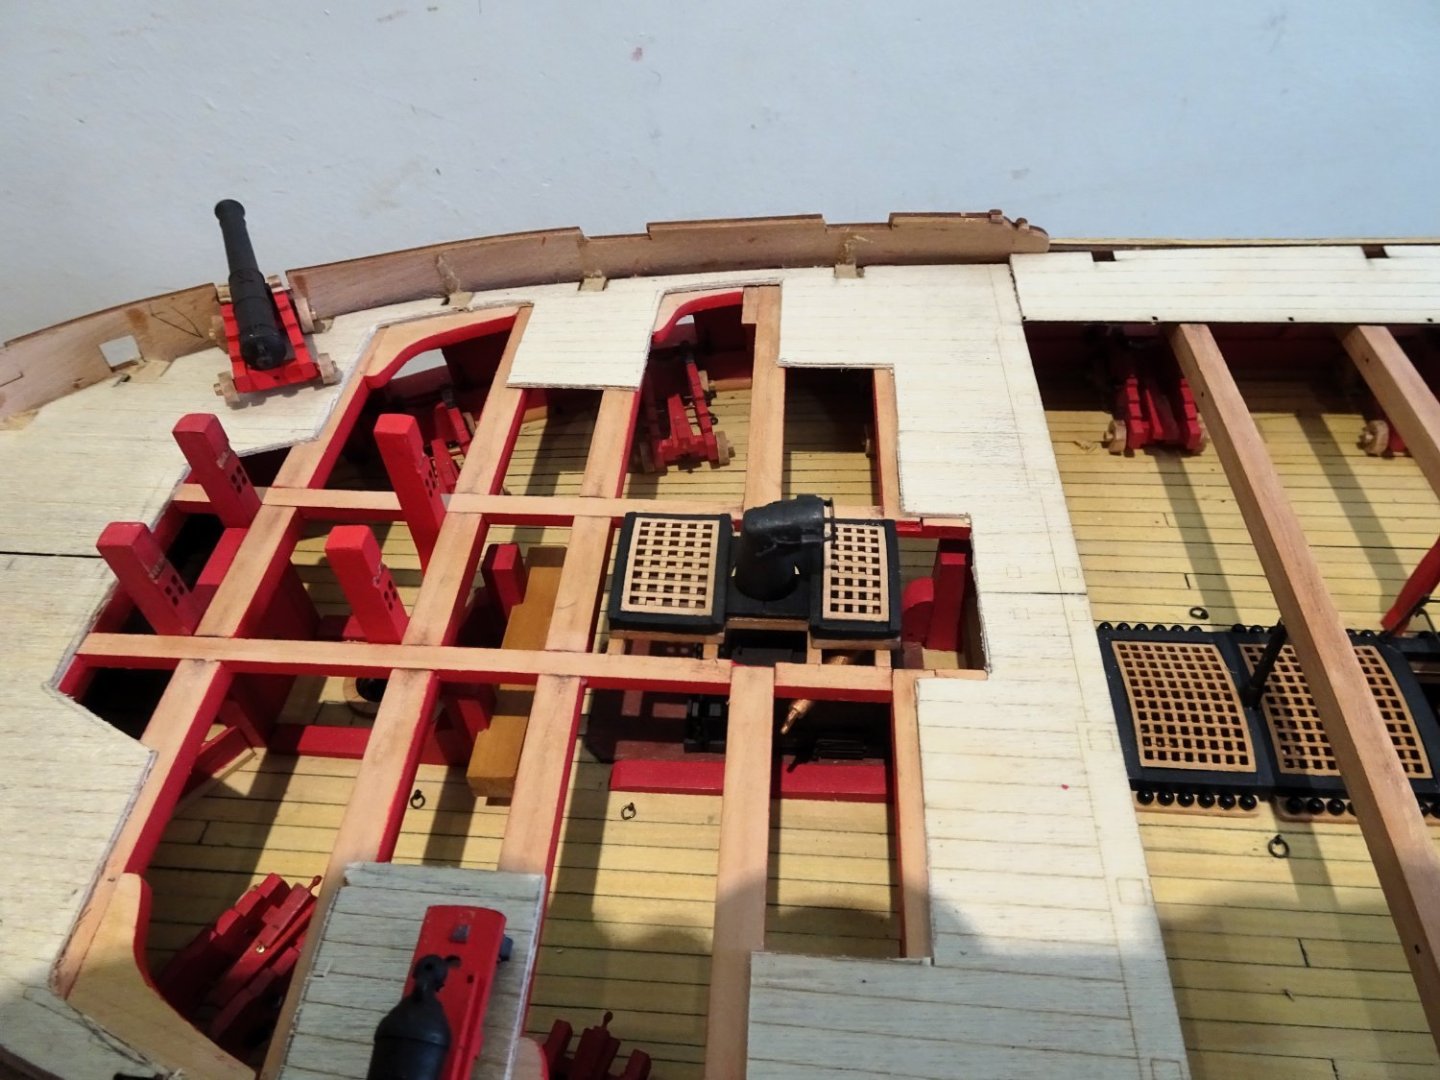
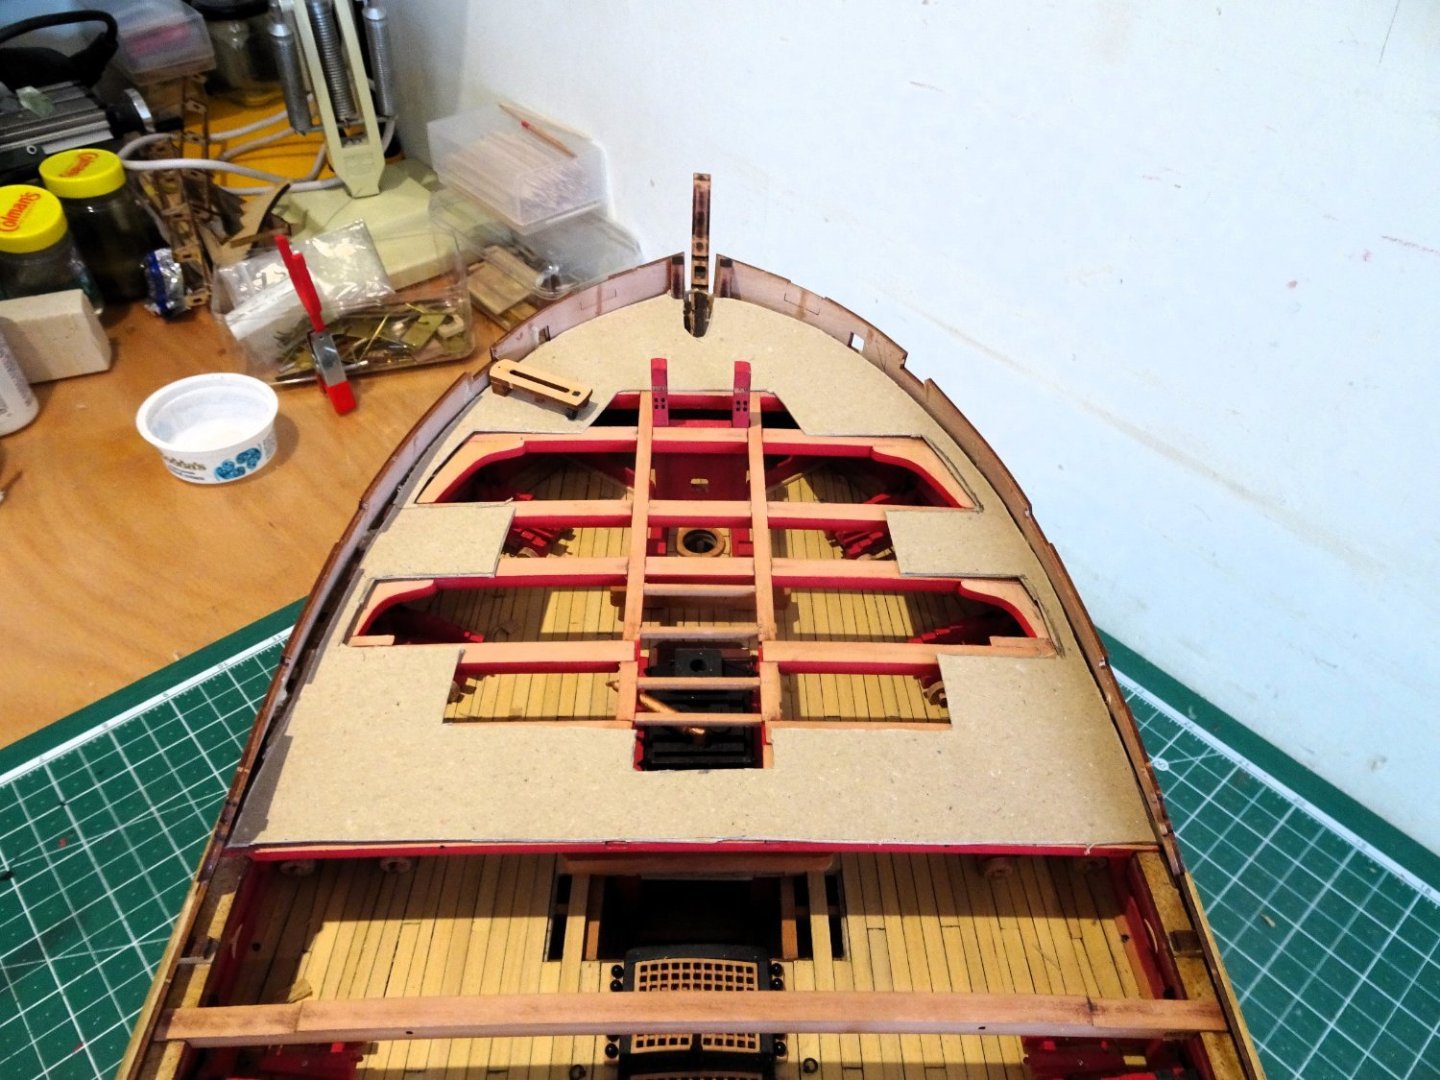
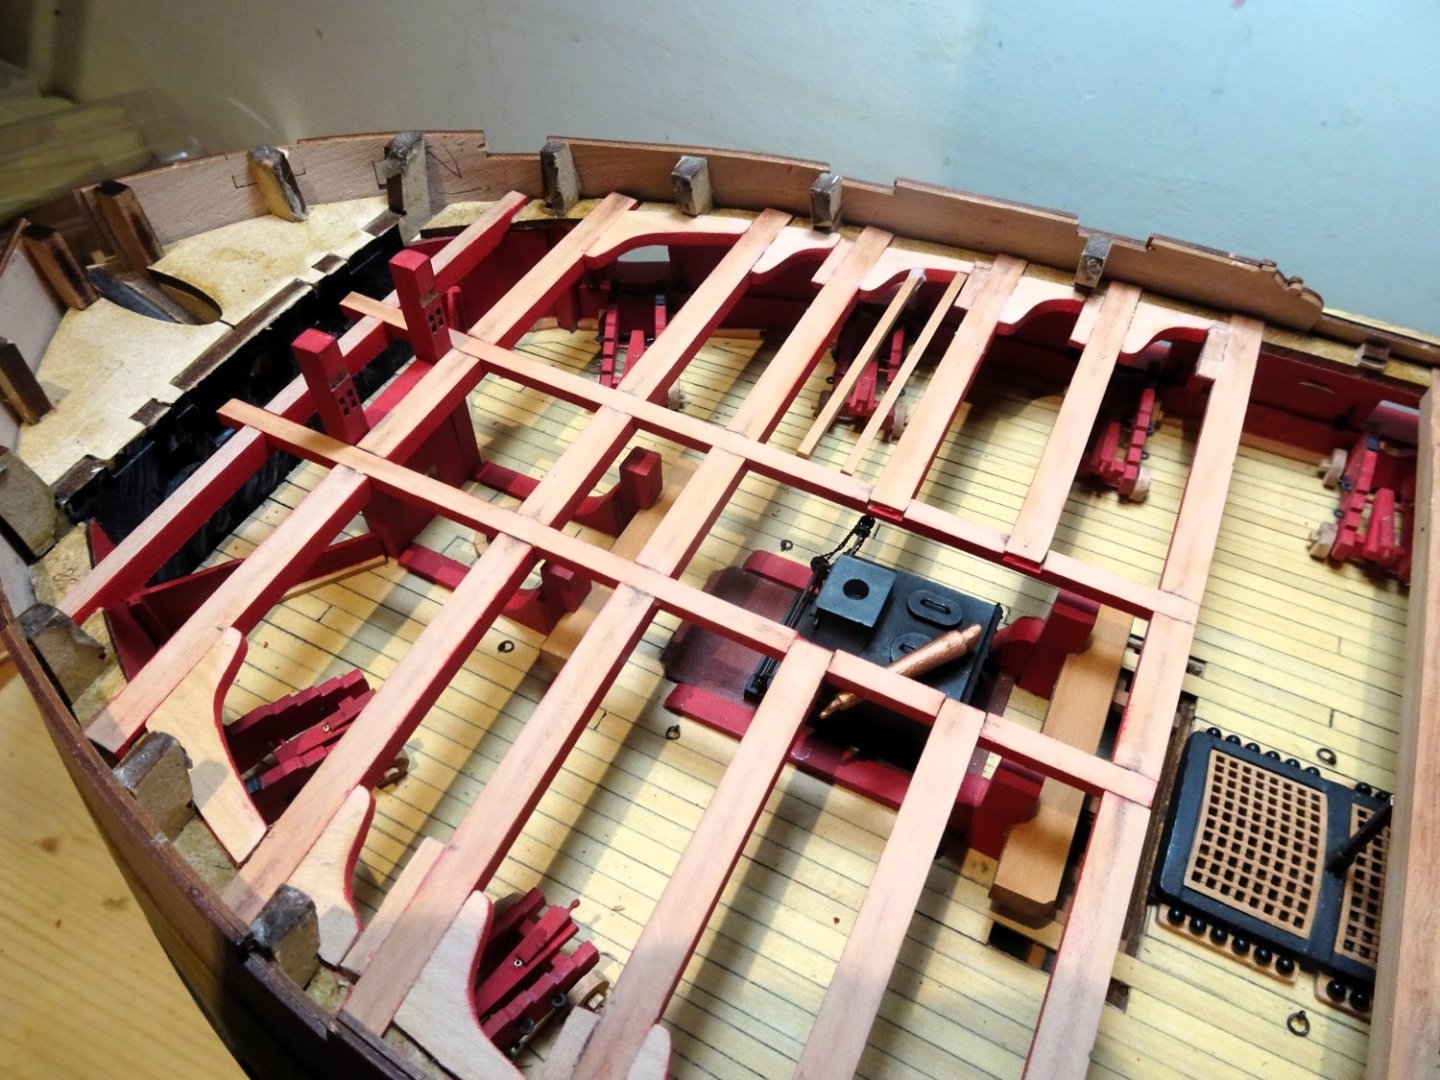
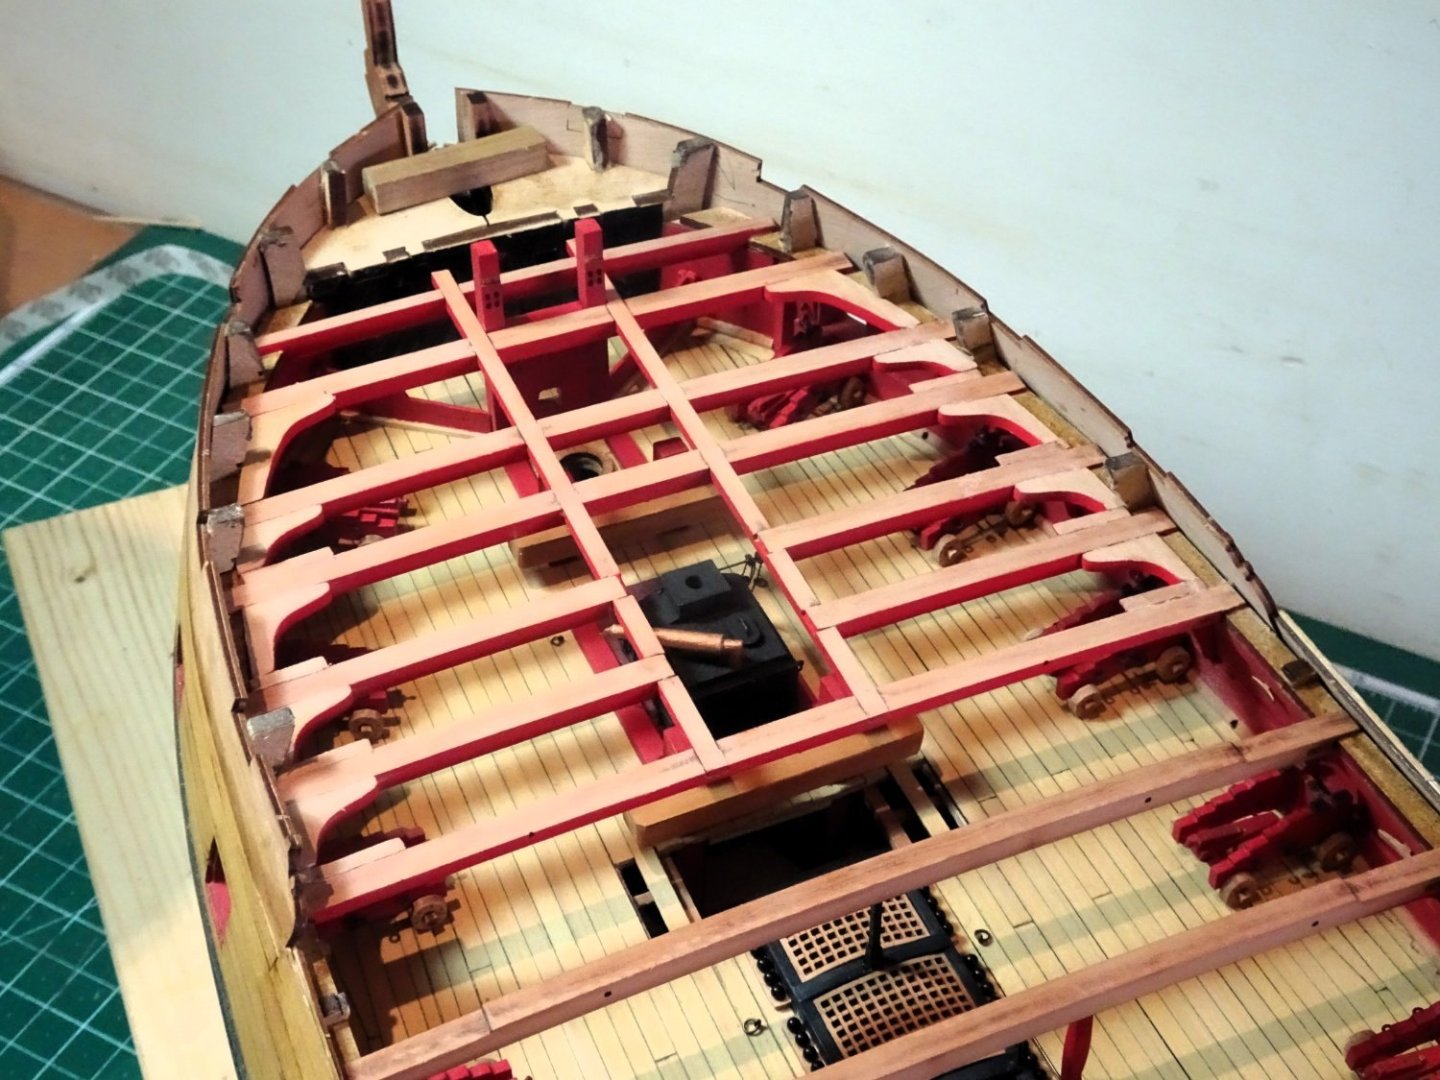
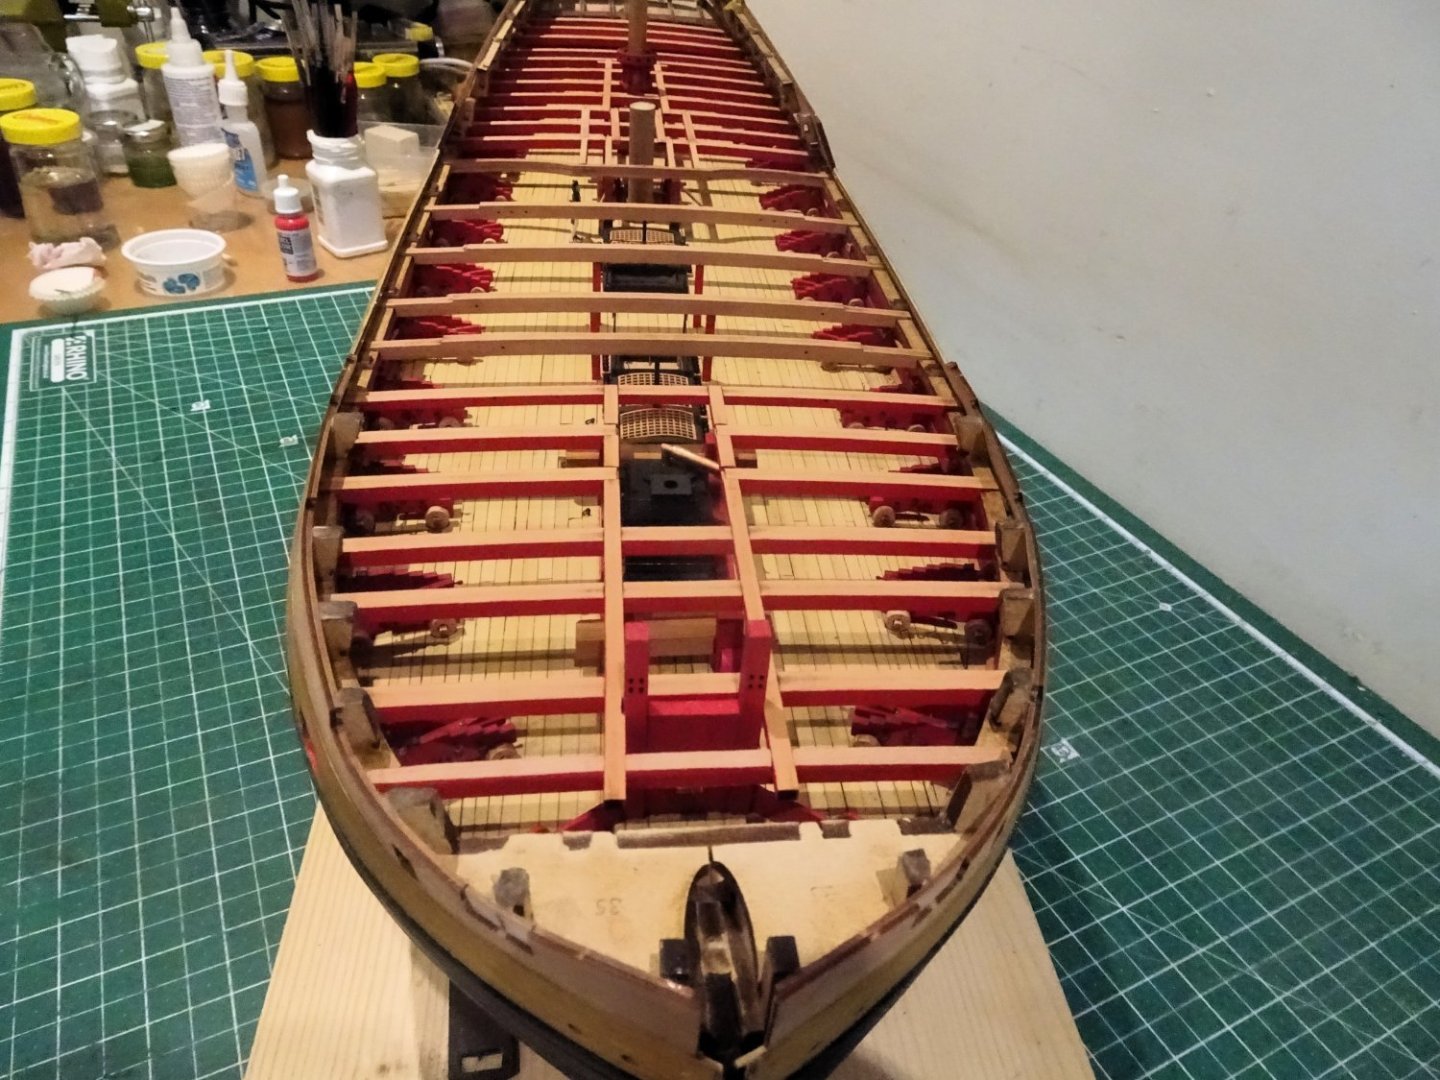
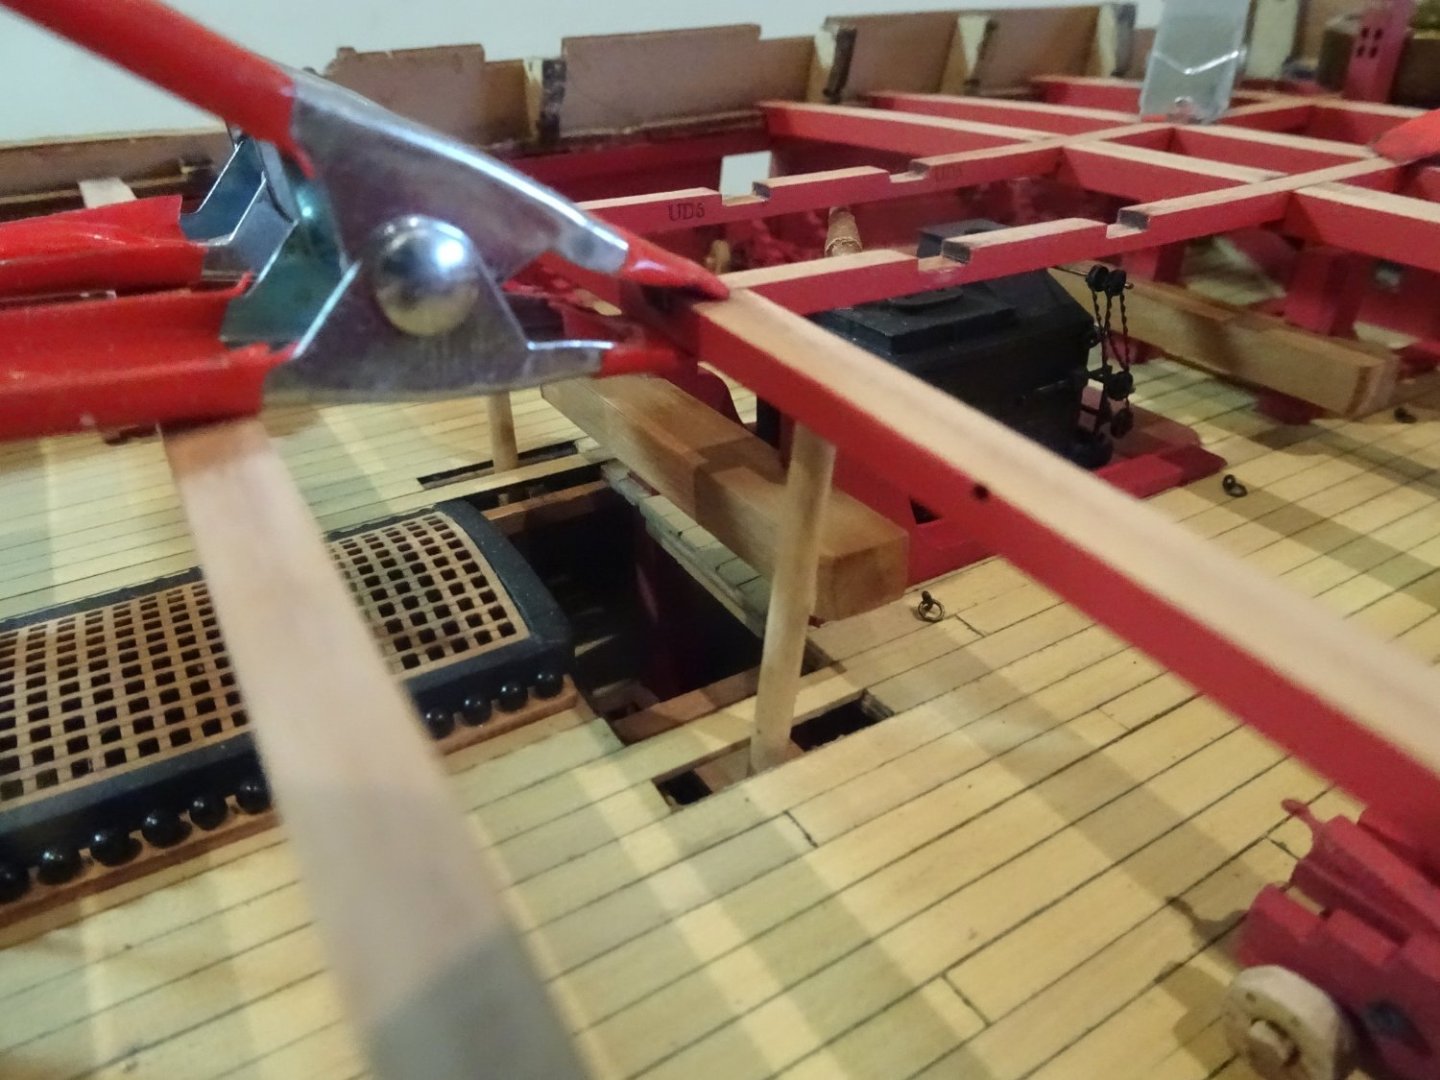
Post Eighty-two Setting the deck planking. A ply sub-deck is supplied in two halves that run the full length of the deck area. I am starting with the Foc’sle deck and my first step is to separate this section from the rest. 2120 With this fettled I notice a lack of support in the area of the steam gratings/chimney, and it seems I will need to add deck ledges. 2123 I used 2x2mm pear section for the ledges. 2121 2124 The sub deck will be used to maintain the correct deck height, but it will be modified to display more of the framing structure and give an enhanced view of the upper deck beneath the Foc’sle. 2125 I cut a clear template of the fo’csle deck to better see the beam layout below. 2134 This is the pattern I’m currently favouring. It has symmetry and allows the fitting of the Fo’csle guns whilst exposing examples of the lodging knees. The centre line fittings will be fixed atop the carlings and ledges and much of the detail of the Upper deck fittings will be visible. It remains for the sub deck to be cut to match the pattern, ensuring uniformity before fitting. B.E. 23/09/223


- 648 replies
-
- 21
-
-
- Indefatigable
- Vanguard Models
- (and 1 more)
-
Is that a temporary line running from the the Fore T’gallant to the Main mast head. I can’t place it. B.E.
- 443 replies
-
- 2
-
-
- Indefatigable
- Vanguard Models
- (and 1 more)
-
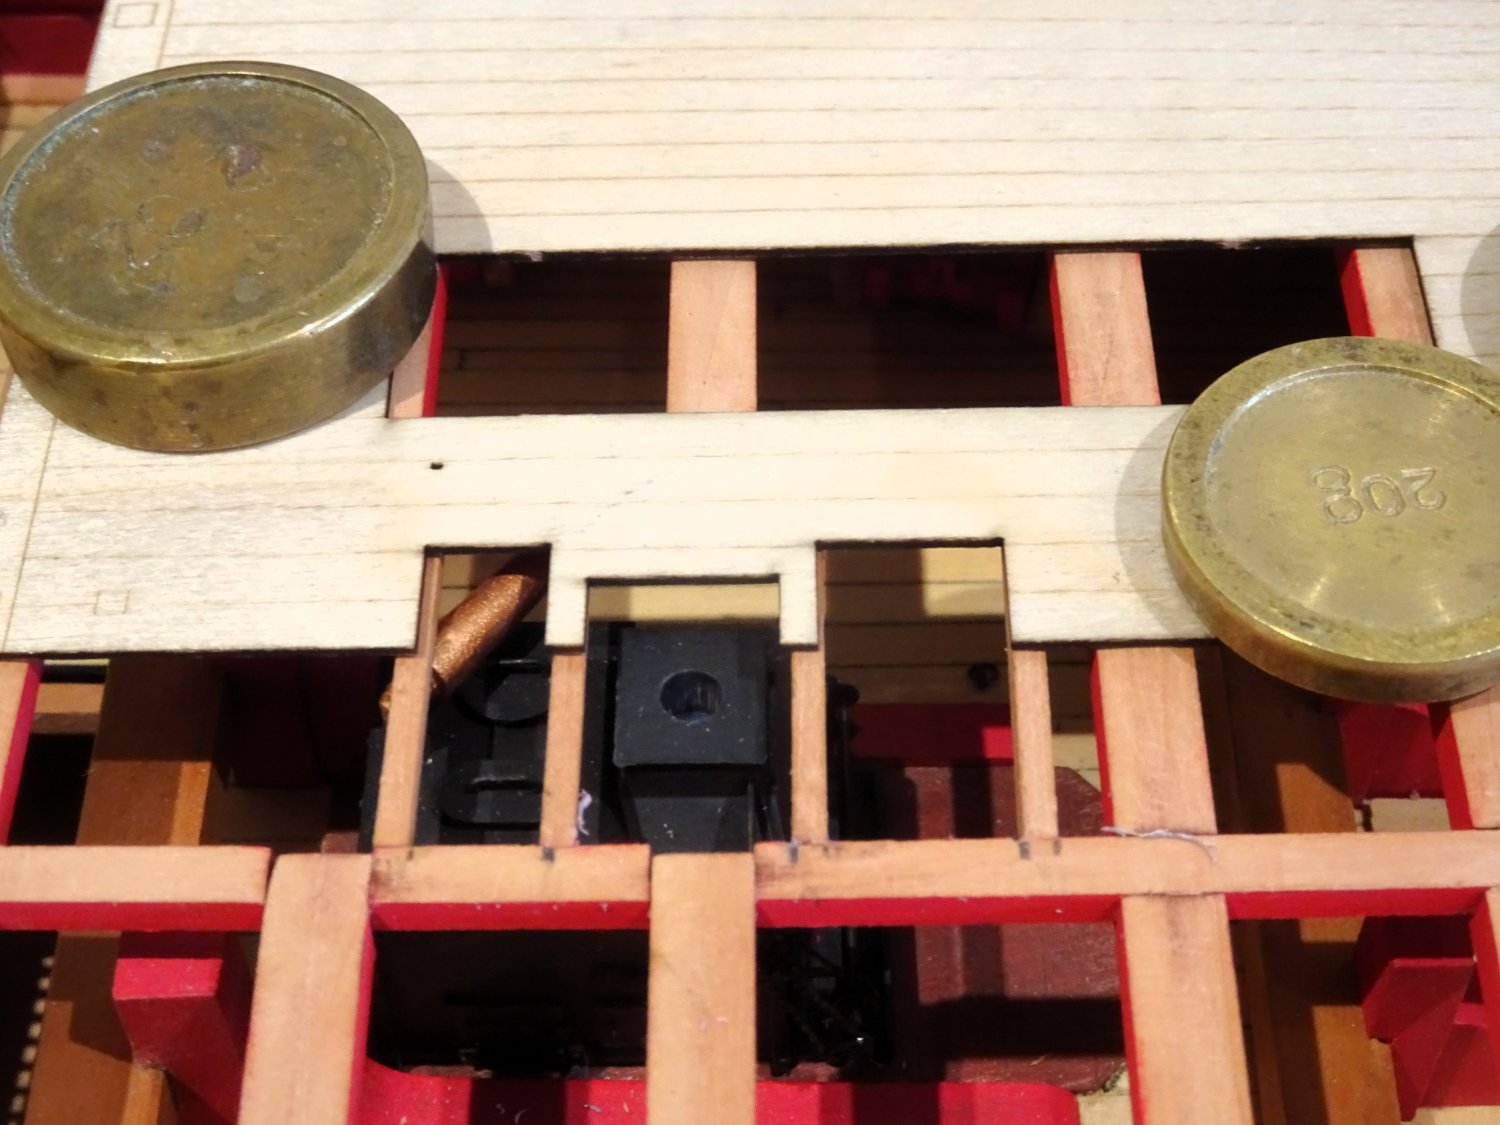
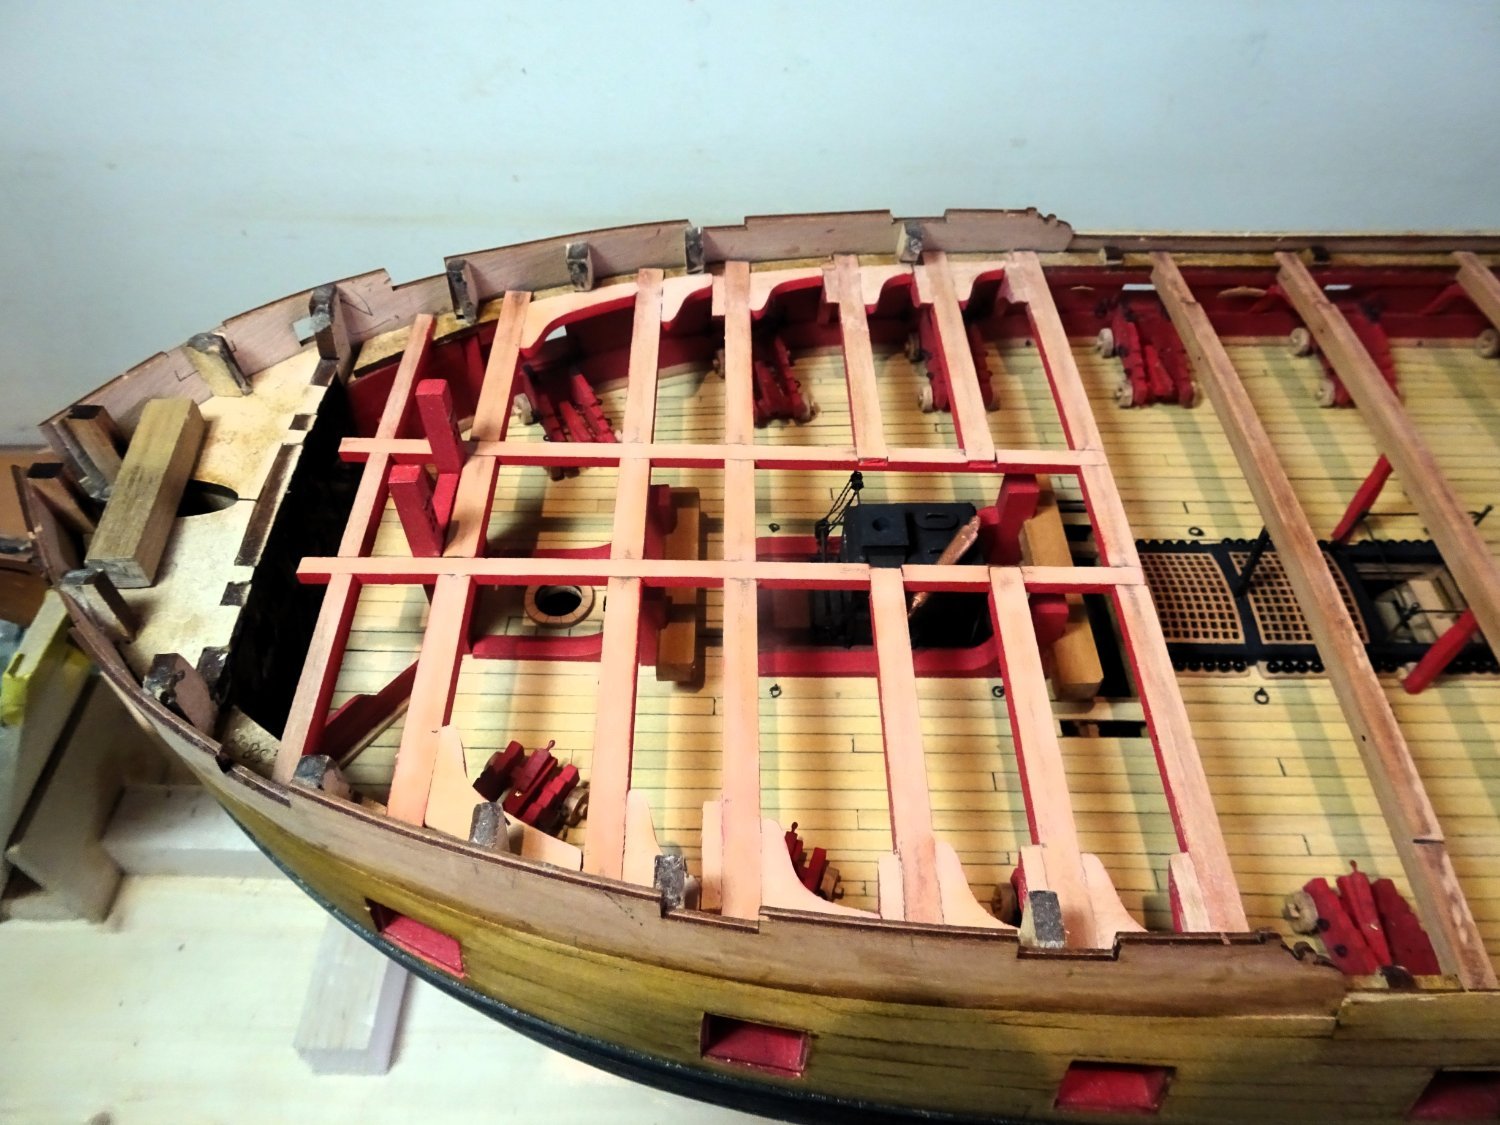
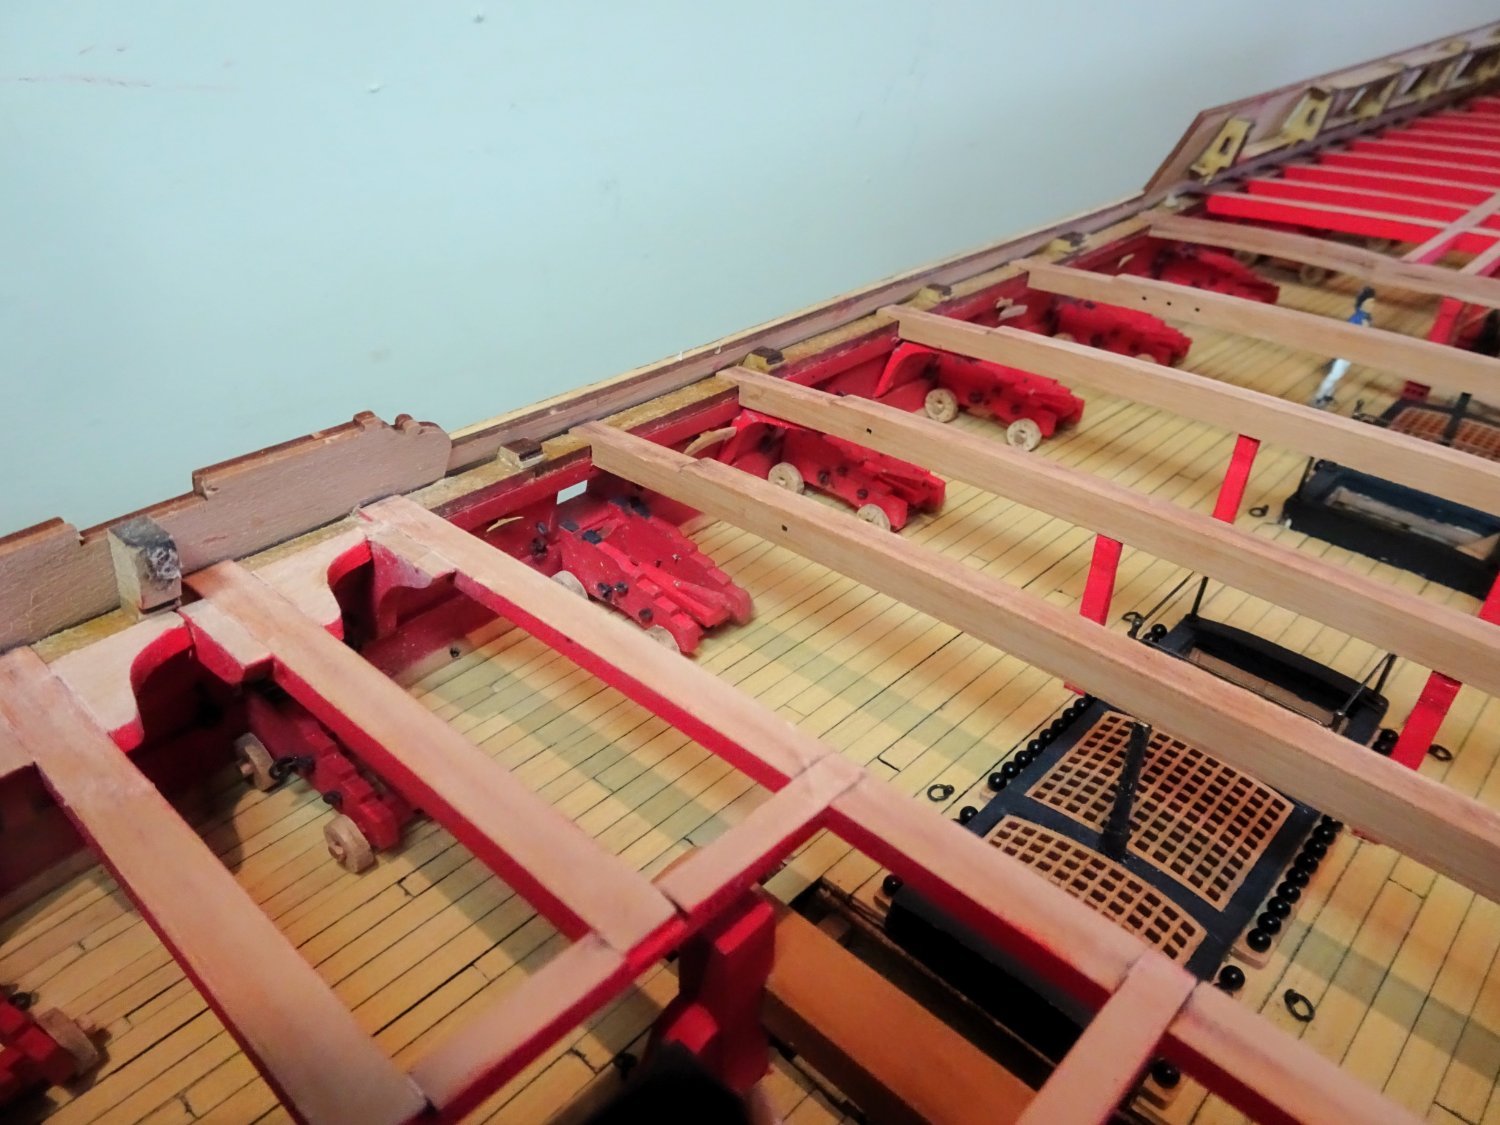
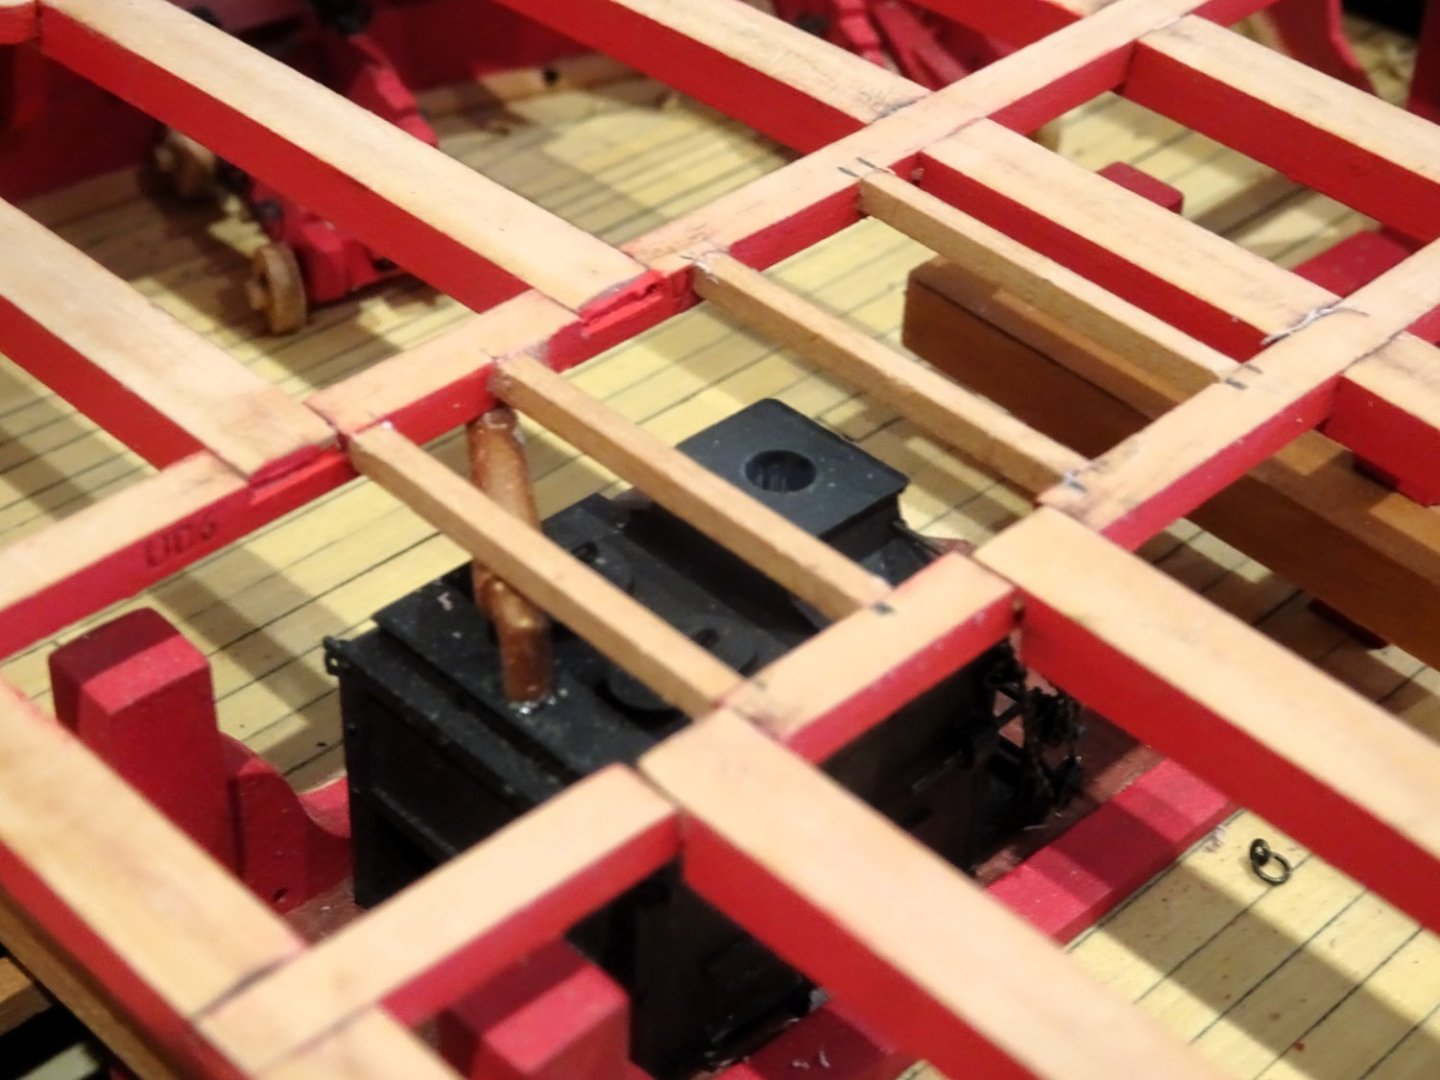
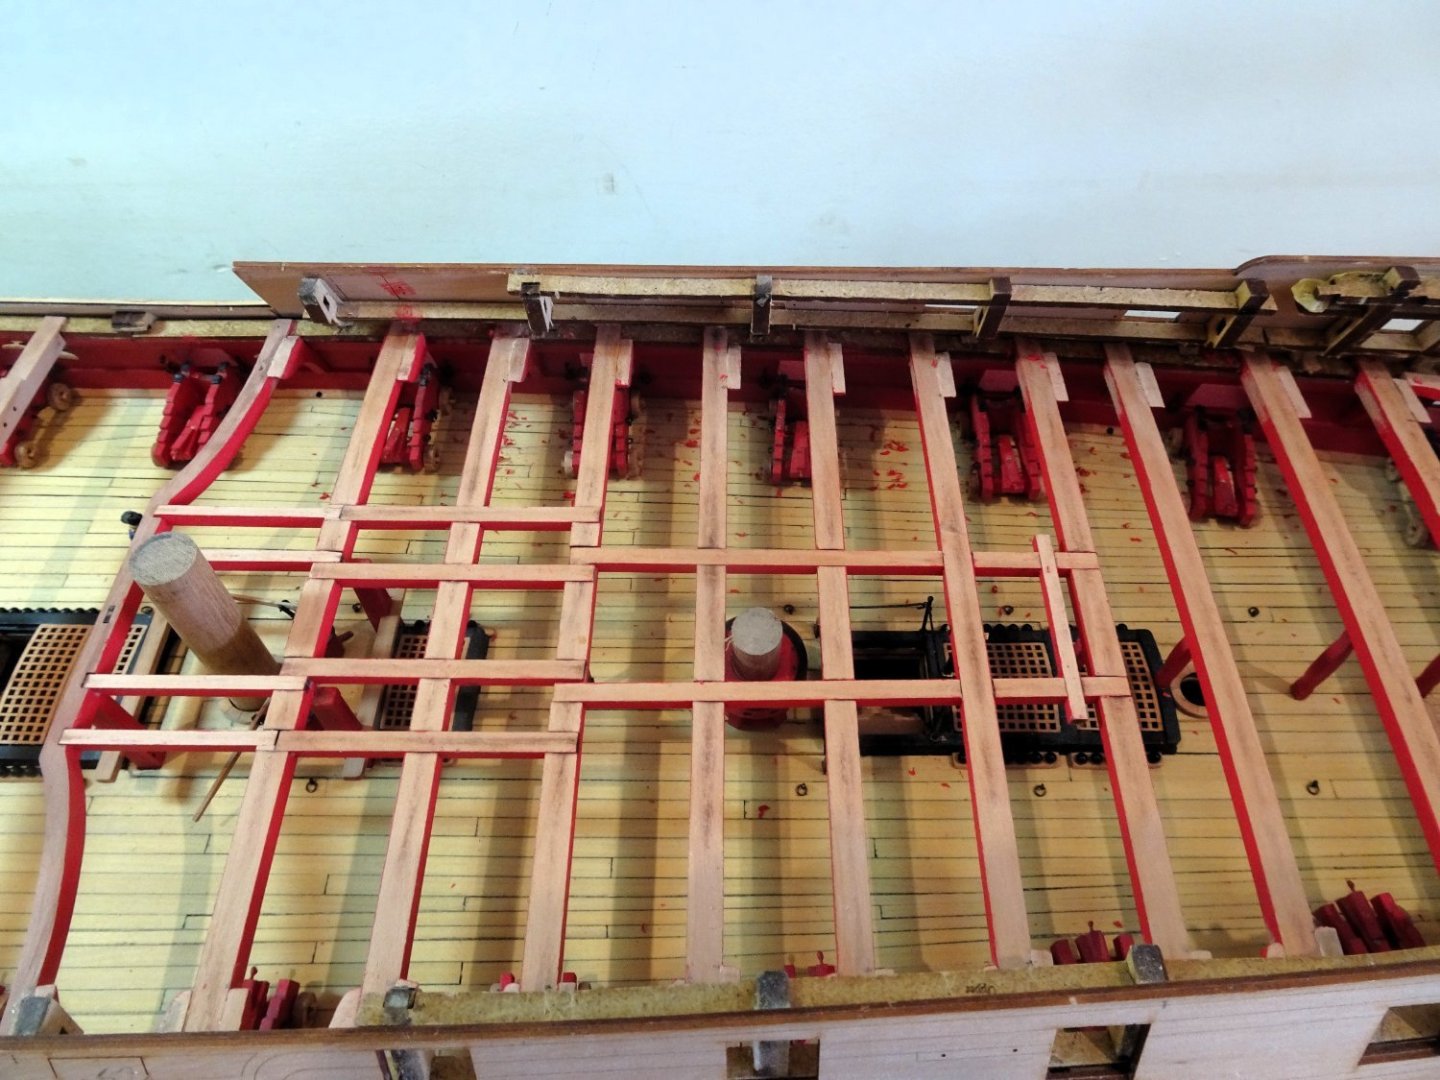
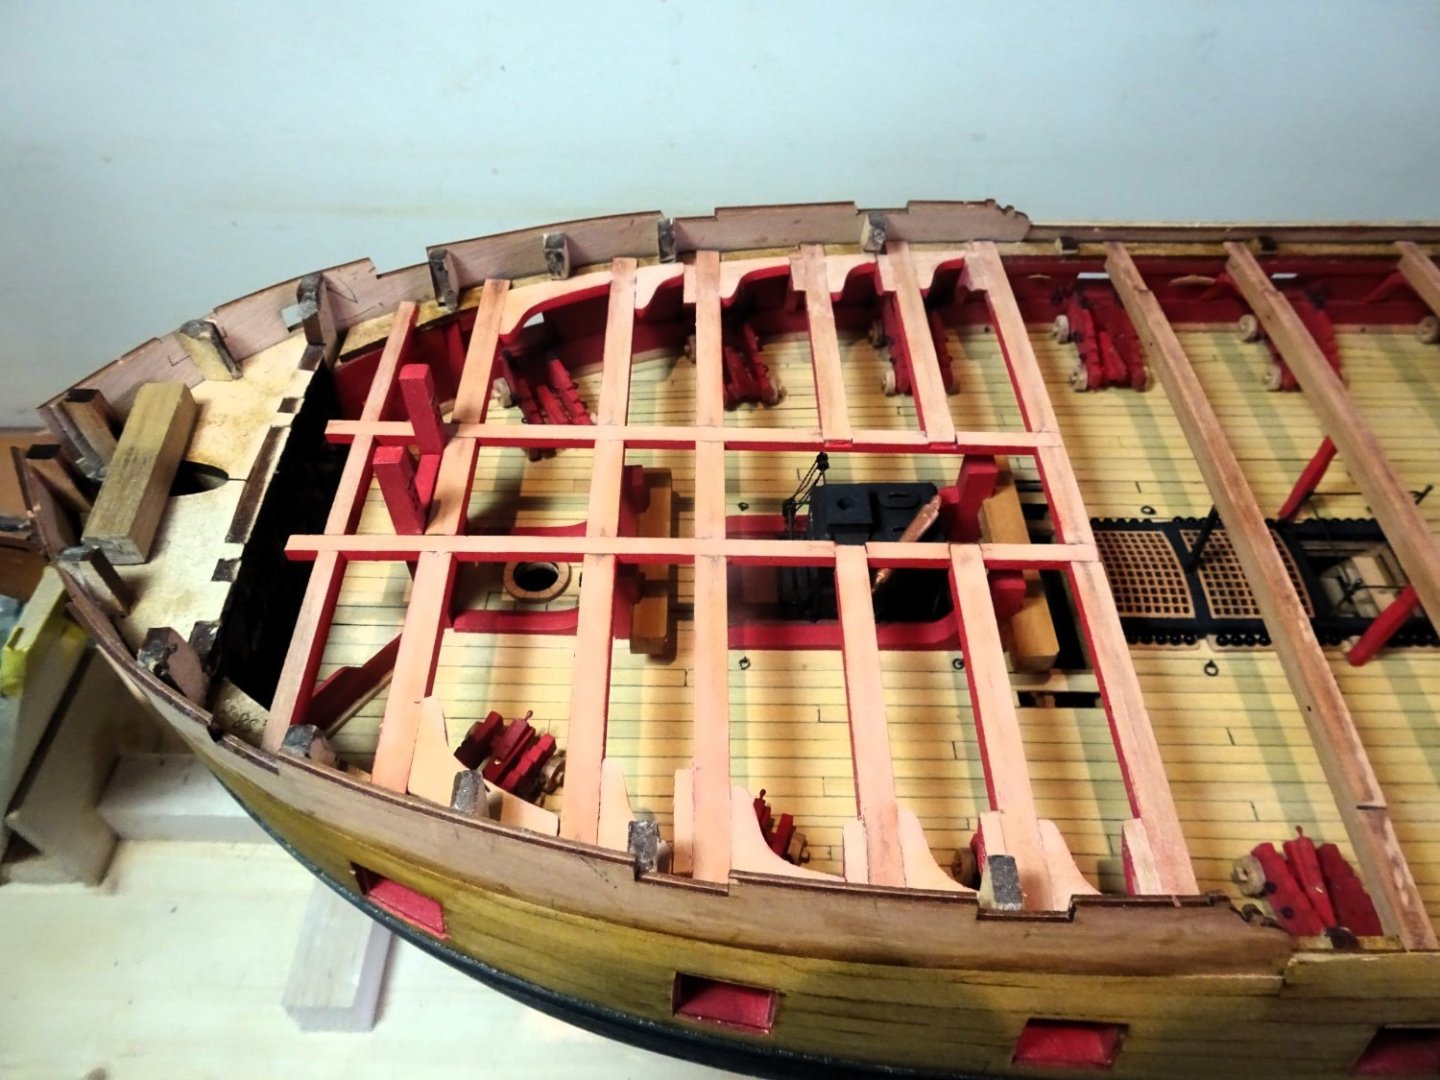
Post Eight-one Quarterdeck knees Prepping the knees didn’t take that long, but it helps to have a system. 2088 2098 Fitting these parts does mess up the painted bulwarks, fortunately there is plenty of room for cleaning up. Were I doing this job again I would have left the area of the beams covered by the knees unpainted before fitting, also the sides of the hanging knees where they attach to beam and Lodging knees. Easier to touch in the paintwork rather than scrape away, and then have to clean up and re-touch anyway. This time I fitted the full hanging knees first, followed by the short versions, and then the Lodging knees. 2092 This photo shows the trimming necessary to allow the knee to sit flush with the beam camber. The rebate on the back edge was lengthened a little to allow the knee to meet the beam camber at the deck clamps. 2099 I had imagined that fitting the Qtr deck Hanging knees would be trickier than those of the Foc’sle due to the tumblehome of the topsides. Surprisingly I found the opposite, but perhaps my experience with the Foc’sle improved my dexterity. 2114 As with the Foc’sle the Lodging knees presented little issues. 2107 2118 I also added the hanging knees fitted below the Waist beams. Three should be fitted but the aftermost location is fouled by the large cleat to take the Fore sheets.🤔 2106 The Foc’sle beams were given a clean up. 2109 2115 2119 Onto the deck layout. B.E. 22/09/2023


- 648 replies
-
- 19
-
-
- Indefatigable
- Vanguard Models
- (and 1 more)
-
I'm on the cusp now of working out the Foc'sle and Qtr deck planking patterns to best advantage, and I'm curious myself how that will turn out. B.E.
- 648 replies
-
- 4
-
-
- Indefatigable
- Vanguard Models
- (and 1 more)
-
Well done Mark on producing a fine looking model, I like the look of her. This kit is not the easiest to deal with, and bluff bowed ships, not the easiest to plank. ps that's a very nice mouse you produced, great weave effect.👍 B.E.
-
Nice work Mugje, your bow fairing looks very good. 👍 B.E.
-
I think they were used on the Foc'sle to frame the area around the central openings for the steam gratings / chimney, but I agree they did not seem to feature on the Quarterdeck framing due to the less weight borne by that deck, compared to the Upper deck. B.E.
- 648 replies
-
- 2
-
-
- Indefatigable
- Vanguard Models
- (and 1 more)
-
Thankyou Mugje and Theo. @ Theo - Deck ledges are narrower timbers that run between the carlings athwartships. 2095 2094 These pics show a mock up of how they were fitted. In reality they were let into the carlings, but ran flush with the deck beam cambers. B.E.
- 648 replies
-
- 16
-
-
- Indefatigable
- Vanguard Models
- (and 1 more)
-
Hi Tony, I use equal amounts of varnish and white spirit mixed together. Wipe it on, and immediately wipe it off for initial protection, apply further coats for a deeper colour. B.E.
-
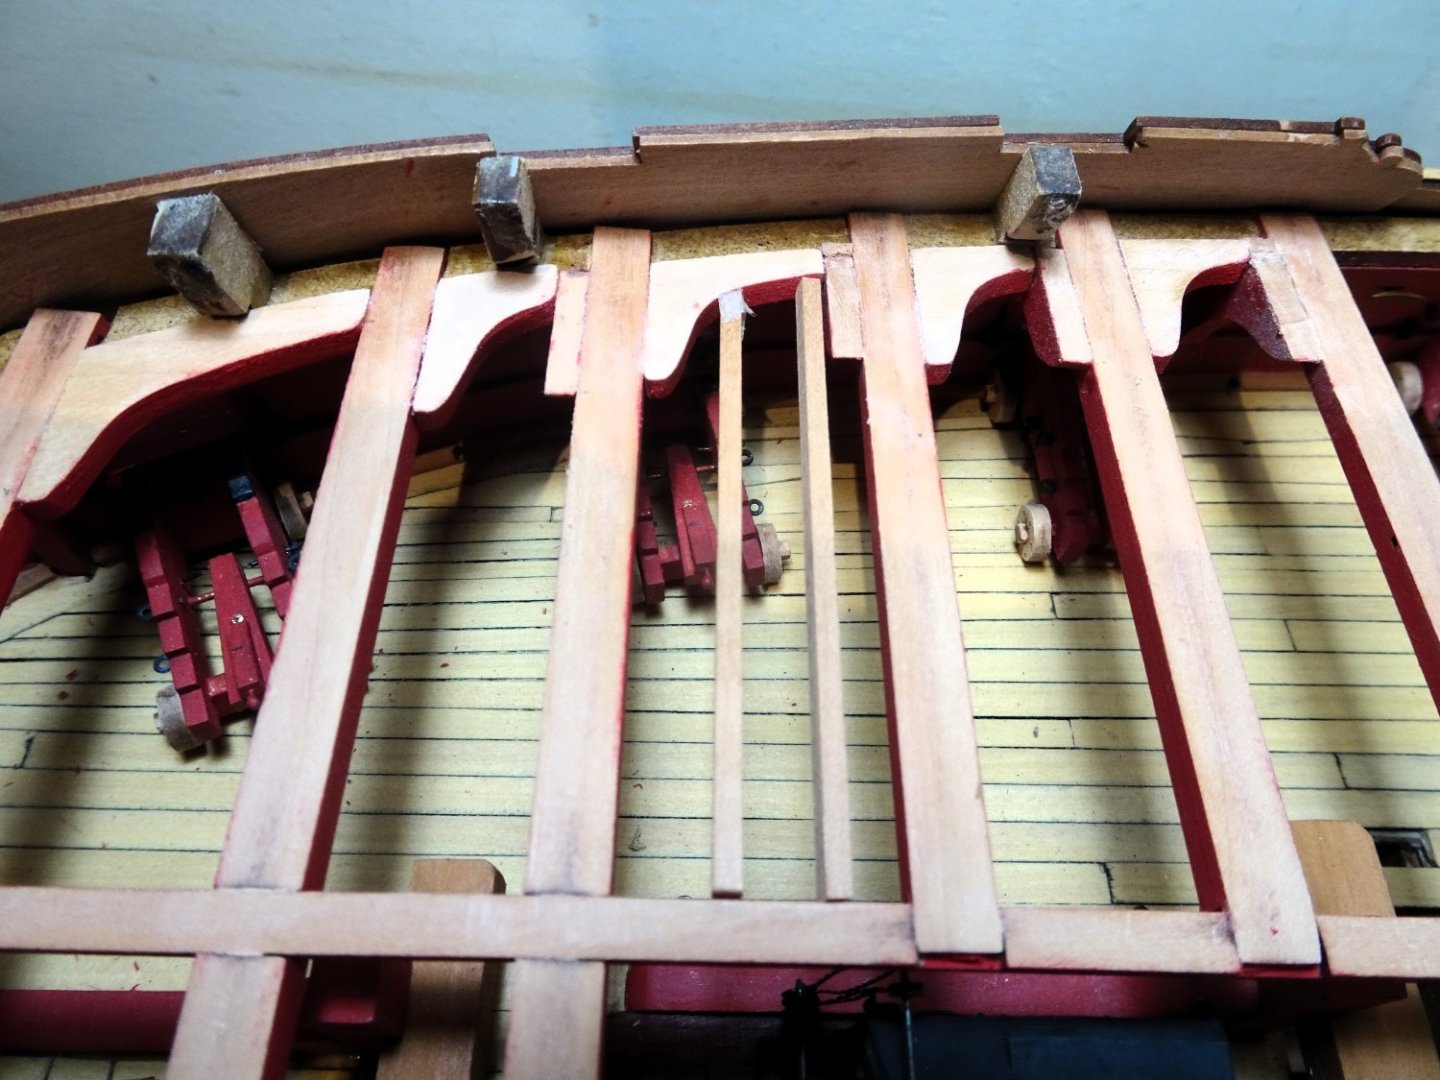
Post Eighty Knees Three full days’ work sees the completion of the Fo’csle deck framing. There are four styles of knees used on the foc’sle and waist, many of them location specific. Each needs cleaning and painting prior to use, and I found a sanding band/ mandrel made quick work of removing heavy char from these small fittings. I used a Proxxon 60/EF drill for the purpose, but any other similar tool (Dremel) would serve equally well. Once cleaned and painted, Plan sheet 4 gives the location for fitting, and I’m good to go. The phrase ‘good to go’ belies the very fiddly process of fitting these knees. 1369 I start at the Bow and once the fore-most Lodging knees are fitted the fun begins. 1368 I attend to the Hanging knees first, some of these are referred to as ‘dummy’ and are a fore shortened version to avoid fouling gun-ports. I fitted these first. 2080 As I expected fitting proved tricky, the full-length knees even more problematical, getting the vertical arm and horizontal knee to match the deck beam and quickworks was a tad trying to say the least. 2081 I found it necessary to adjust the angle of the knee where it joins the deck beam. I took the approach of fitting the bulwark part and then trimming the knee angle to lie flush with the deck beam. 2079 The remaining Lodging knees which proved far less trouble, fitted neatly between the beam and hanging knee. 1366 I am not adding the Ledges that fit between the carlings and knees as these would obscure a lot of the view, which would defeat my purpose. 1372 I think the addition of these fittings adds immensely to the look of a ‘Navy Board’ style model. 2083 The paintwork took a hit during fitting, but I will attend to this once the larger exercise of fitting the Qtr deck is completed. B.E. 20/09/2023


- 648 replies
-
- 20
-
-
- Indefatigable
- Vanguard Models
- (and 1 more)
-
Hi Dave, I think I thinned it to the consistency of skimmed milk and applied it quickly using a broad chisel brush. I too use silkspan, or modelspan as it is now called as it has good strength qualities. Use of a hairdryer once applied, eliminates any risk of puddling, but the beauty of Silk/modelspan is that it can be re-wetted multiple times, particularly useful for sail shaping on the model. B.E.
- 126 replies
-
- 2
-
-
- le superbe
- heller
- (and 2 more)
-
You're welcome, and thanks for looking in on my build, glad you found it of use. B.E.
- 855 replies
-
- 1
-
-
- Sphinx
- Vanguard Models
- (and 1 more)
-
Post Seventy-nine Foc’sle (Part 2) 2073 The Foc’sle beams are fixed into place. 2074 Temporary props are used to support the breast beam whilst the carlings set. 2070 2067 The foremost beam of the Foc’sle deck is an mdf version, originally designed to incorporate the Bowsprit step. To match the other beams, the top was faced with 0.6mm pear. With the beams now fixed I move onto the Hanging and lodging knees. This is a prep intensive exercise with char removal, painting, and fettlin’ to fit. Those opting to fully deck the model need have little concern for such detail, as it will all be covered, but I would probably have done them anyway, given that Chris has taken the trouble to provide them. B.E. 17/09/2023

- 648 replies
-
- 21
-
-
- Indefatigable
- Vanguard Models
- (and 1 more)
-
Post Seventy-eight Foc’sle More cleaning up of heavy char and a dry fit of the Foc’sle beams. 2056 2063 2064 2065 The beams and carlings slot easily into place, less trouble than the Qtr deck. Hopefully the Foc’sle breast beam will stiffen up once it is glued into place and the carlings added. Another round of painting now ensues, followed by the addition of hanging and lodging knees. Chris has kindly provided the lodging knees with the Indy kit, which saves me the tiresome task of making them as I did with the Sphinx build. Thanks Chris.👍 B.E. 16/09/2023

- 648 replies
-
- 19
-
-
-
- Indefatigable
- Vanguard Models
- (and 1 more)
-
A fine job on building the hull ECK, well done👍 B.E.
- 233 replies
-
- 1
-
-
- Indefatigable
- Vanguard Models
- (and 1 more)
-
Thank you Theo, A lot of praise should go to Chris whose designs and thoughtful build methods make us all look good, or at least better than we would otherwise. Chuck has a similar effect with his designs, and clear build processes. Even so, below that smooth surface, I’m churning water, and catch myself clenching my teeth working on the trickier bits. If I have a quality, it is a determination to slow down on a build and fight against the ‘that’ll do’ approach. I do strive to improve my builds, not always with full success, but I’m a lot harder on myself than I used to be. I see the same approach in your work. B. E.
- 648 replies
-
- 10
-
-
-
- Indefatigable
- Vanguard Models
- (and 1 more)