


Landlubber Mike
-
Posts
4,551 -
Joined
-
Last visited
Content Type
Profiles
Forums
Gallery
Events
Everything posted by Landlubber Mike
-
 Wow much more bang for your buck than I got. Thanks for the tip! You’ve got enough there to rig all of MSW for years. Maybe I should just send my 1/700 models for you to rig? 🤔
- 179 replies
-
- 7
-

-

-
- hatsuzakura
- pit road
- (and 2 more)
-
I've picked up some beading wire too. It works ok in certain applications, but in others I've been less impressed. It seems very soft and prone to getting kinks, at least the type I picked up. You can also pick up very thin copper and even lead wire. If I remember correctly, I used something like 0.25mm and 0.45mm copper wire (maybe even thinner) for the pole and supports at the bow (not sure of what exactly that thing is called). The automotive modelers use a lot of this kind of wire for obvious reasons. I probably paid 10x from a model vendor what the cost would be if I knew where to source it from non-modeling applications, but it worked nicely.
- 179 replies
-
- 9
-
-
- hatsuzakura
- pit road
- (and 2 more)
-
I didn't build this one, and I think it has a bluff bow, but I would echo that at the bow, it's better to start tapering from the beginning. The first few planks will look ok, but then as you add more runs, you'll get a clinking effect. Not a big deal if it will be sanded off in preparation for the second planking, but better to have a trial run with how much tapering will be needed. I didn't quite understand the concept of marking the hull with planking bands and dividing up the distance at each bulkhead, but after getting through it with my first build, it now makes complete sense. It's more work on the front end, but less work to have to sand, fill, etc. on the back end. At the stern, the last couple of bulkheads and associated tuck into the counter always seem to require a lot more fairing of the bulkheads than one would think. And frankly, I've found you usually have to start the fairing a few bulkheads ahead of the last few in order to have a nice curve going into the counter. Otherwise, you can get a sharp line in the planking run between the last bulkhead and the stern counter. Again, the first couple of planks may look ok, but after five or six, you realize you might have a problem. It might be too late here, but I'm now a convert to using filler blocks at the bow and stern. Takes quite a bit of work in the front end to get them in, but then the planking goes so much smoother. In particular, you have a nice stable base of support to glue the plank down and run it into the bow and stern instead of relying only on gluing points along the bow and stern and preceding bulkhead.
-
'The Terror' - BBC series Mar 2021
Landlubber Mike replied to Rik Thistle's topic in Nautical/Naval History
That looks like the AMC production from a few years back. It was interesting. I wouldn't say it was a completely historical piece, but more historical fiction. Certainly must have been terrifying being stuck in the middle of vast expanses of ice, supernatural creatures or not.- 8 replies
-
- 3
-
-
- John franklin
- 1845
- (and 2 more)
-
This build is incredible, thanks for sharing! Last summer I purchased this kit with the Pontos sets from a fellow modeler who I think was a bit overwhelmed by everything (the box itself will scare off most). The Pontos sets look absolutely fantastic, but now that I'm seeing your build, I think I might look into getting some of the Veteran aftermarket. Those guns are amazing! Might need to put the family on a ramen noodle diet for the next three months to be able to afford them...small price for them to pay, right?
-
Thank you Dan, really appreciate the kind words. Thanks to everyone for all the support!
-
McLaren M8B by CDW - Accurate Miniatures - 1:24 Scale
Landlubber Mike replied to CDW's topic in Non-ship/categorised builds
Well shoot, I've spent the last few weeks dealing with home stuff and trying to clear the work bench, and see Craig has made a masterful start on this one. As he mentioned, Lou/lmagna was incredibly kind and generous in gifting me one of these beautiful kits as well. I've built a few Accurate Miniatures kits thus far and they have been very nice kits with great deal - but this McLaren kit is something else. The plane kits had maybe 9 or 10 steps, the McLaren has close to 30 if I remember correctly. And the details are amazing, much more than the typical car kit that is out there. I picked up this PE detail set for the kit from Model Car Garage. Apparently on some of the car boards people thought it nicely enhanced what is already a great kit: Maybe I'll start mine sooner rather than later. I have a few Gunze Triumphs that I started work on, but as I mentioned to Craig and Lou, I had some plastic crazing issue when I tried using Zero paints for the first time. I probably applied the paint too heavily, but it could also be a compatibility issue with the primer I used or the plastic that Gunze used. My guess it was my error, and I'm now wondering whether I mixed the paint enough. On my Citroen build, I sprayed a Mr. Hobby gloss clear from the rattle can and it stripped some of the paint. I don't think I shook the can enough so all I ended up shooting was the thinner. The next time I shook the can a full minute plus and had no issues. After that experience, I'm thinking that I had a similar problem with the Zero paints in not mixing them sufficiently (compounded by the fact that I poured the paint from the jar into the airbrush cup, rather than use a pipette which I'm going to start doing so I am not only pulling from the very top of the jar). Sorry for the interruption - just wanted to say good job and thanks for all the extra info to Craig, and thank Lou again for his generosity.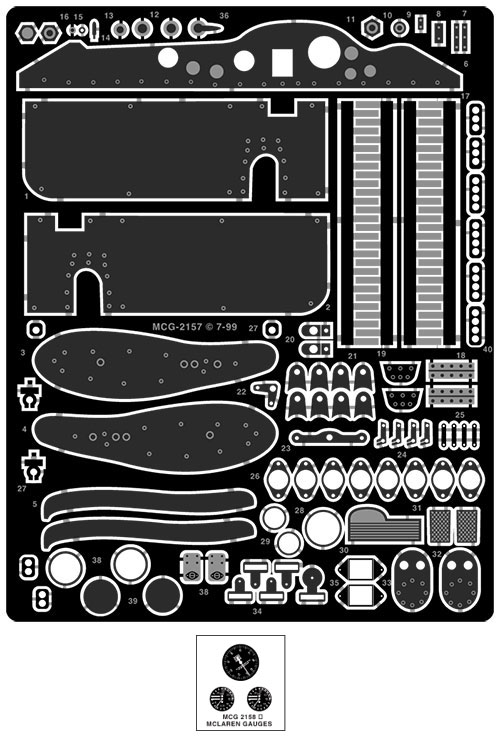
-
This is going to be stunning (already is). Really nice work!
-
What an awesome build - very nice job!
-
M29 Weasel family 1/72 (scratch) by Backer Finished
Landlubber Mike replied to Baker's topic in Non-ship/categorised builds
Very cool - that's a lot of wheels! -
Seems much more than ok to me - nice job!
-
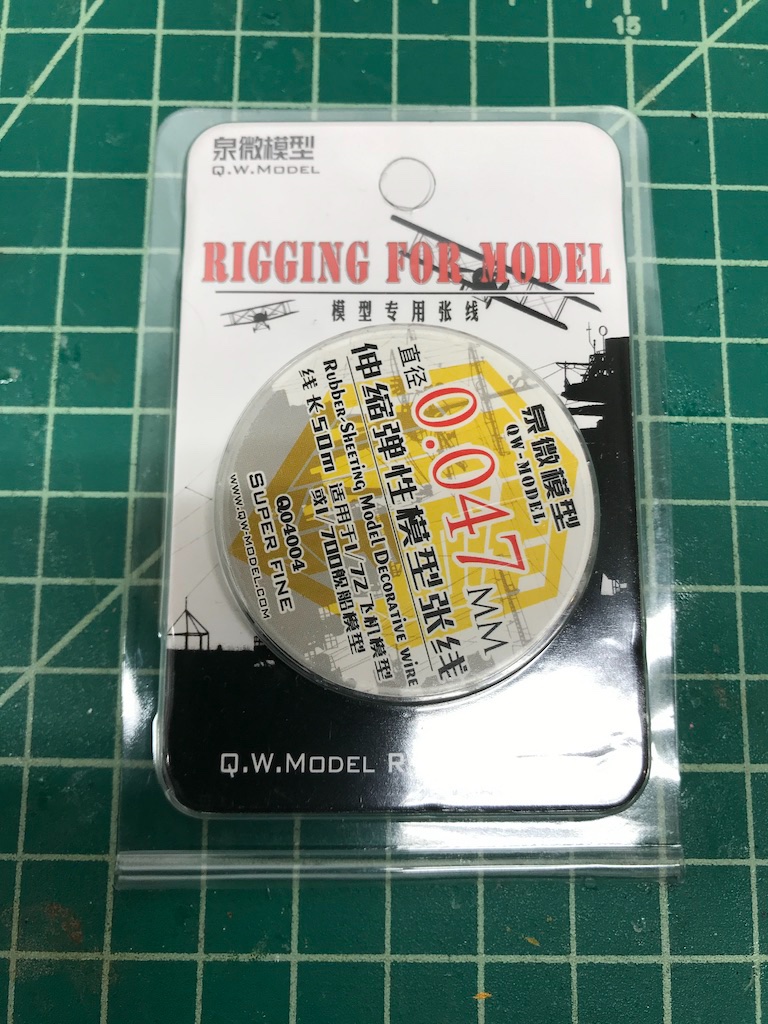
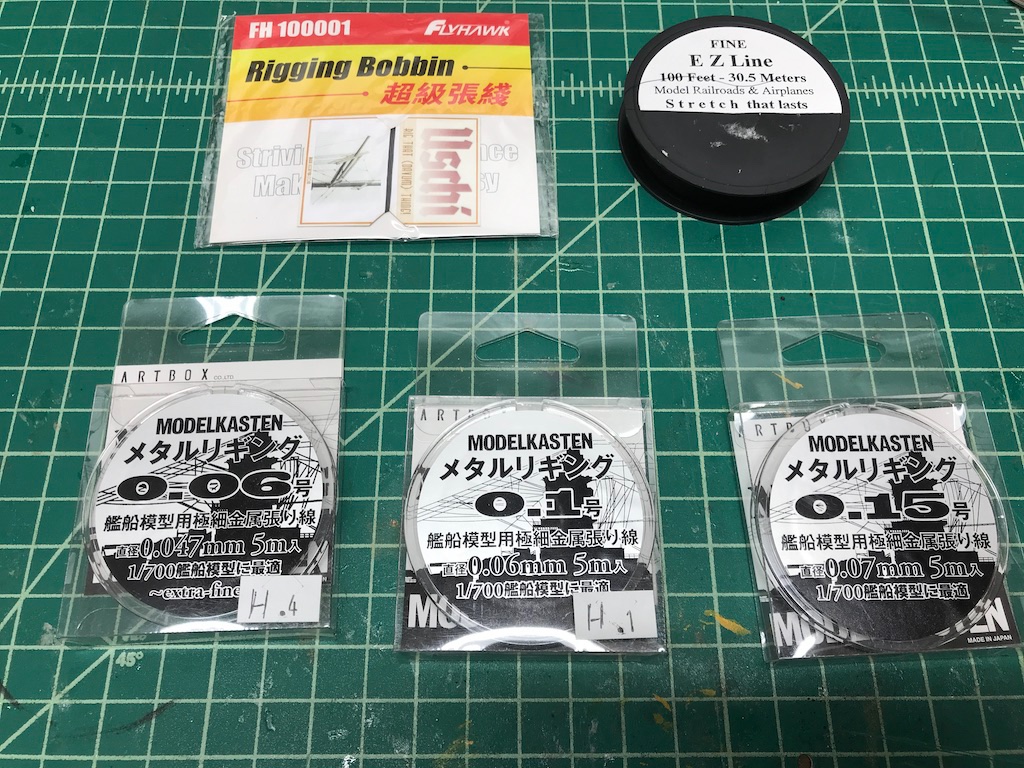
Thanks Craig and Popeye, really appreciate it! Popeye, I used this line from Q.W. Model. It came in a variety of sizes, but I used the smallest version I had from them which was 0.047mm: I forget where I picked it up, but it was probably just added to another order that I was making. It works very similarly to EZ-line, where it stretches very nice to make tight lines, or can be run to show a little slack (which I tried to do on the front lines of the destroyer). I would say, however, this diameter seemed thinner than the EZ Line fine, which I used on my 1/48 F3F builds. I don't know about using very fine copper wire for the rigging. I suppose it could work if you found the right diameter, but I don't know if it would give you the right look if you needed lines with a little sag, etc. Plus, any sort of kink would be almost impossible to completely straighten out, unlike thread or this kind of rubberized line. I'm sure there are others that have used wire to good effect though, so I'll be curious to see how it works for you. Here are some other lines I happened to pick up as well that I'll try out in the future. I came across a couple of build logs at 1/700 where the modeler used his wife's hair from her hairbrush. My wife is blonde so that wasn't an option. Maybe I should tell her I need to find myself a dark-haired girlfriend so I can have a free and endless supply of rigging line? 🤔
- 179 replies
-
- 9
-
-

-
-
- hatsuzakura
- pit road
- (and 2 more)
-
The Shimakaze that I'm working on is the Hasegawa 1/350 kit. I was about to start it last year, but then thought I'd maybe start with something smaller and less expensive to be able to get a little experience since the Hasegawa kit is really nice and the Infini upgrade set is fantastic. So, I'm now back on that kit but will probably work on a 1/700 kit alongside it.
-
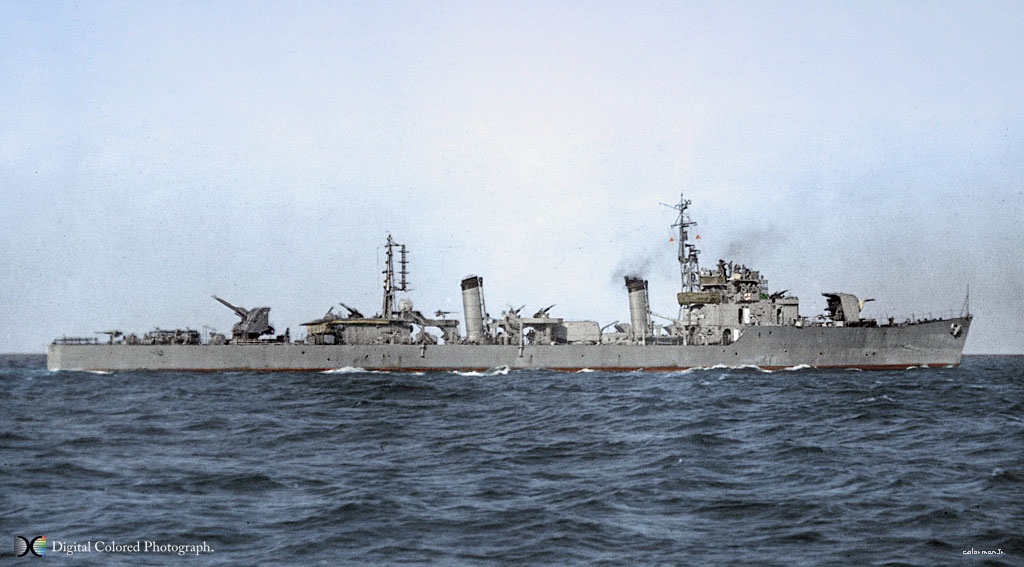
That's really helpful EG - you're an amazing source of knowledge as always! Interesting that the horizontal plate runs are noticeable, but with their construction techniques, the vertical joins aren't. I've seen some models at 1/700 scale where the modeler put in some vertical joins - not enough to match what I would imagine where the actual number of plates used - which has a certain nice artistic look to it. But when looking at pictures (which admittedly aren't super high resolution), you don't exactly see the vertical joins. Here is one of the IJN Hagi, which is one of the clearest, colorized photos I've seen, and I can't really make out any vertical joins.
-
Oh sorry Mark, I thought you meant the picture with the engine compartment open. That's the window if you can believe it. The lower half would flip up that way. I thought it was a neat feature of this kit that they split the driver's side window so you could show this feature.

-
Amazing work Tom, wow! You are a master at PE. I didn't think about Future for PE parts. I've just been using medium CA and occasionally white glue (Gator Glue). I recently saw a video on youtube where a 1/700 modeler was using Tamiya X-22 as an adhesive for very small parts. I was going to try that out sometime, but will also try out Future. Thanks for the tip! By the way, I have a 1/48 Walrus in the stash and I hope it comes out half as nice as your 1/200 version!
-
I think that's just the rear wheel well and shine coming off the finish from my lighting. Sorry, looks odd doesn't it? My lighting set up isn't the greatest and I'm taking photos with my iPhone.
-
Thanks everyone, I really appreciate all the kind words. @lmagna, I haven't figured out which to do next (and am embarrassed to post the list of 1/700 kits in the stash). I'm probably going to pick some of the more easier ones to do to get more experience, and then work my way up to the cruisers, battleships, and carriers. I'll probably go with an auxiliary ship - I've got a few in the stash that look really cool with all the cranes and sub-decks and stuff - seaplane and submarine tenders, submarine and seaplane carriers, food supply ship, oil supply ship, etc.
- 179 replies
-
- 9
-
-
-
- hatsuzakura
- pit road
- (and 2 more)
-
Not sure. My Shimakaze hull has the horizontal plating lines already built into the hull so I don't think I need to do the tape technique. I was wondering about the horizontal plate lines though, as in whether I had to etch them into the hull.
-
Looks fantastic! Can I ask, when doing this technique to mark the plate runs, do you also mark the vertical edges of the plates?
-
Thanks man, really appreciate the kind words. I still have a ways to go, as I seem to make stupid mistakes. Example #1 - I sprayed Mr. Hobby gloss clear from the rattle can on the hood, and ruined the paint job. Stupid me, I didn't shake the can long enough, and I think it being a brand new can, I was spraying mostly the thinner in the can. Example #2 - I had already added the license plate decal to the hood, so when I went to repaint the hood, I taped over the decal. Somehow paint got under the tape and ruined the decal (stupid me, I probably didn't burnish the tape enough), so no license plate on the hood. When I look at work from folks like @CDW, I have a real appreciation for how tricky it can be to get a picture perfect finish like he does. Can't hide the flaws like you can with planes and ships! Good news is that I have a pretty decent stash of car kits so I have more opportunities to practice.
-
Sorry, I didn't mean that nothing changed. I just meant that the car remained relatively unchanged in design. Take a look at Fords, Chevy's, etc. during the same time period and there are obviously significantly more changes in body style, technology, etc.