


Landlubber Mike
-
Posts
4,551 -
Joined
-
Last visited
Content Type
Profiles
Forums
Gallery
Events
Everything posted by Landlubber Mike
-
 Excellent work Eric!
 -
McLaren M8B by CDW - Accurate Miniatures - 1:24 Scale
Landlubber Mike replied to CDW's topic in Non-ship/categorised builds
For acrylic paints, how long will you stick them in the dehydrator? I usually only have very small blocks of time to model, so if I paint one night, it's not usually until the next night that I will get to it so personally I haven't had a reason to use one, but I could see if I ever started with enamels. -
Thanks Lou! This one wasn't too bad in terms of cost of aftermarket. Some others though...ouch!
-
I was getting a lot of binding on my Byrnes saw, and Jim suggested pushing the back end out a bit. That really helped my binding issues.
-
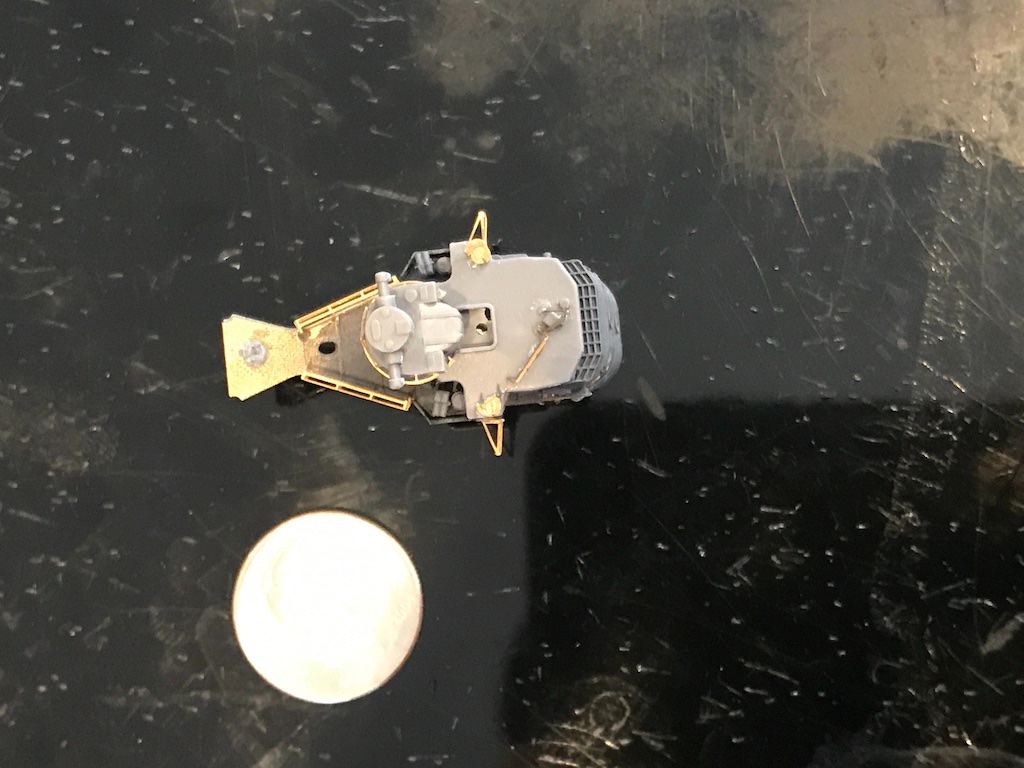
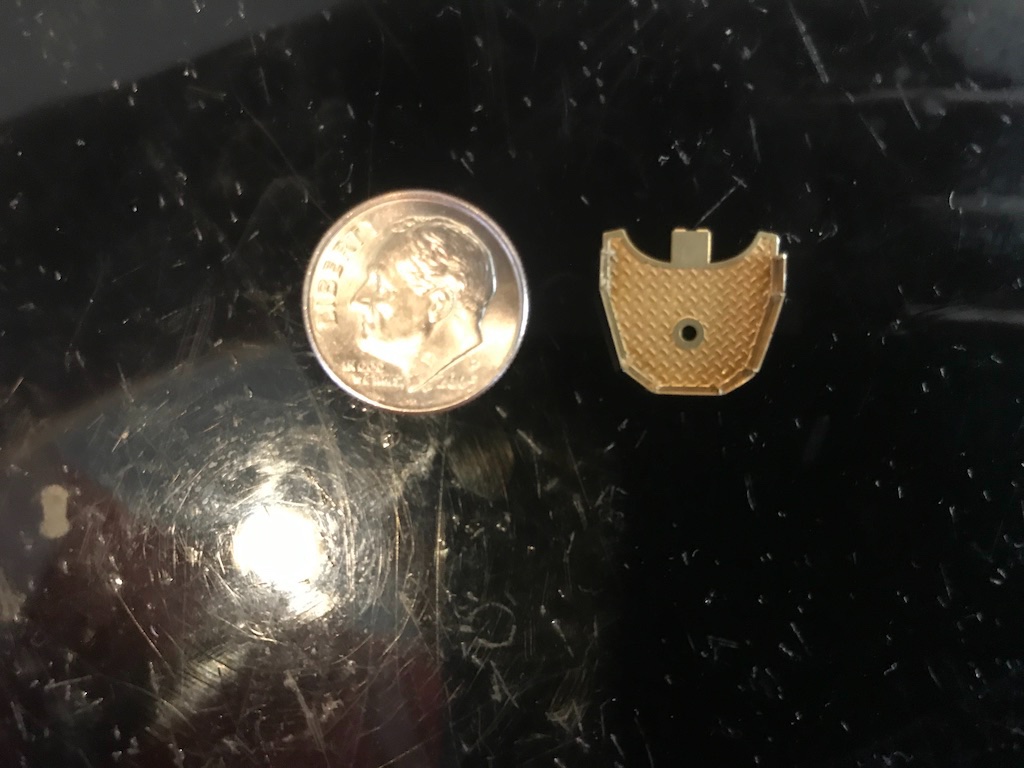
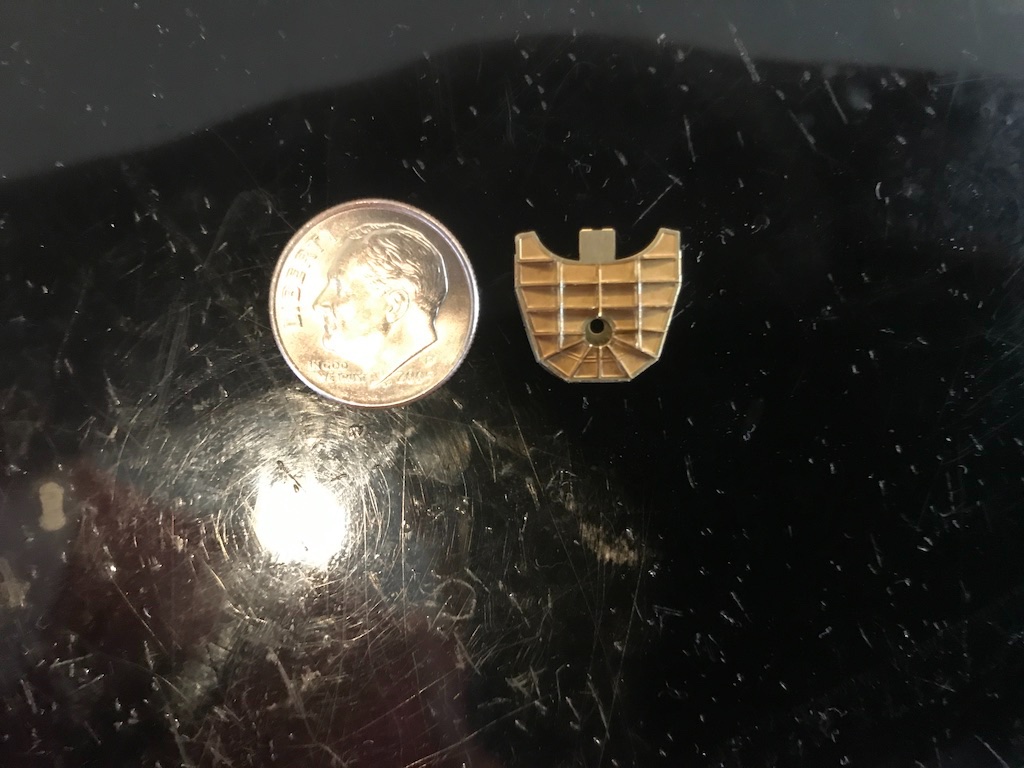
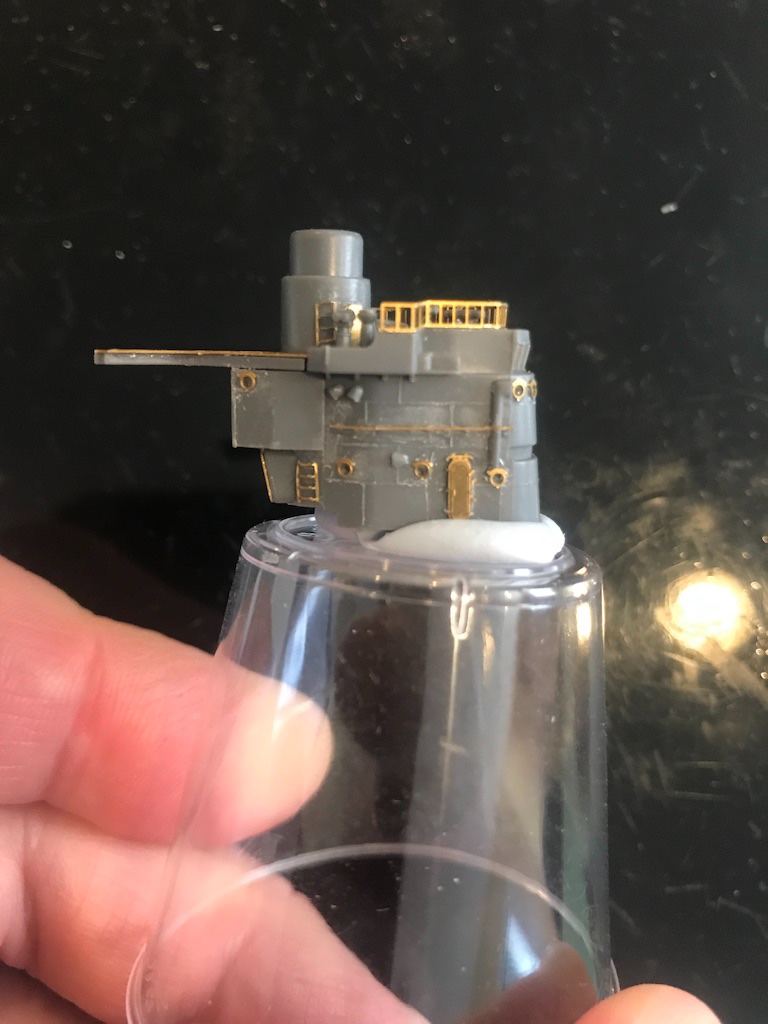
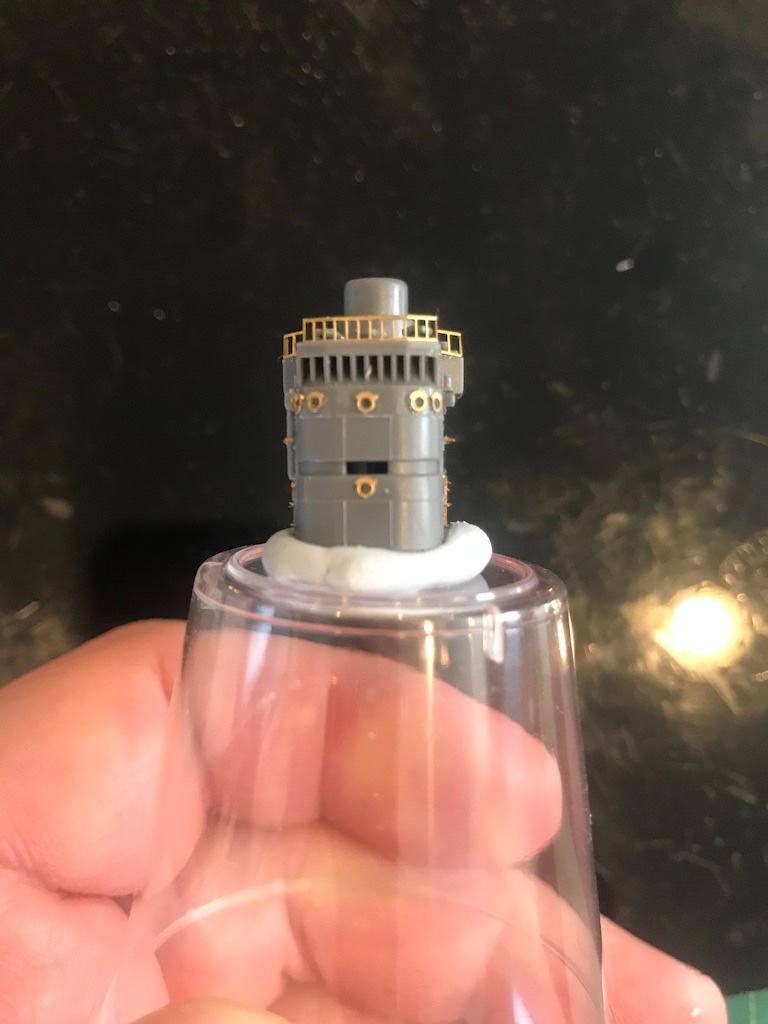
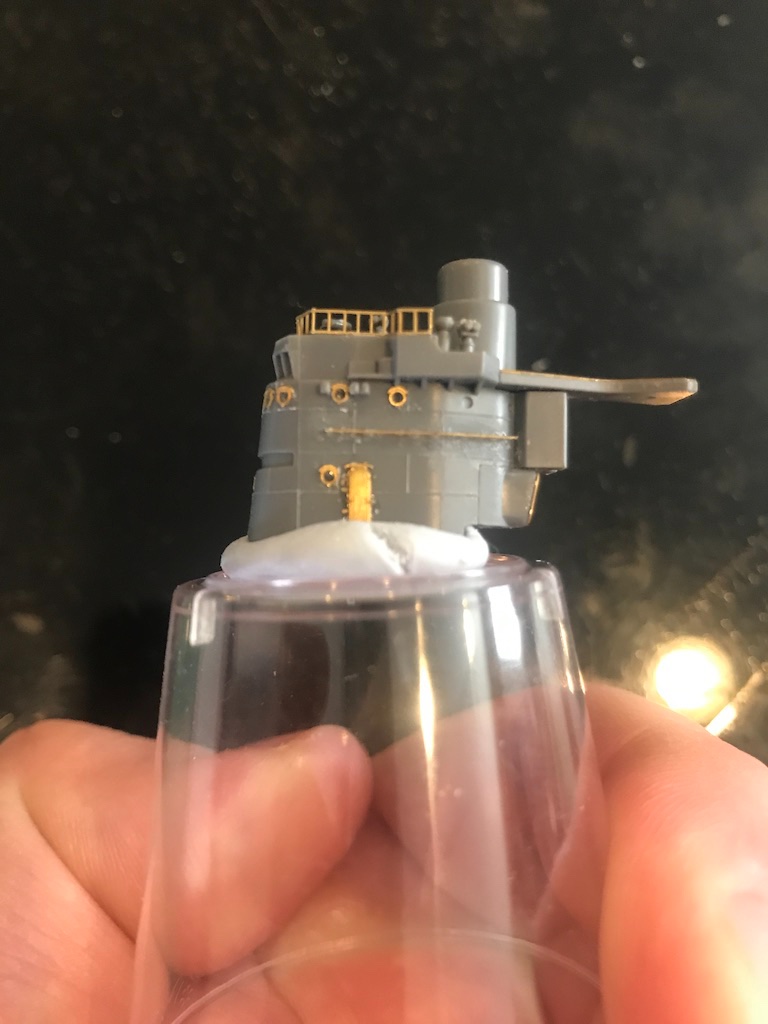
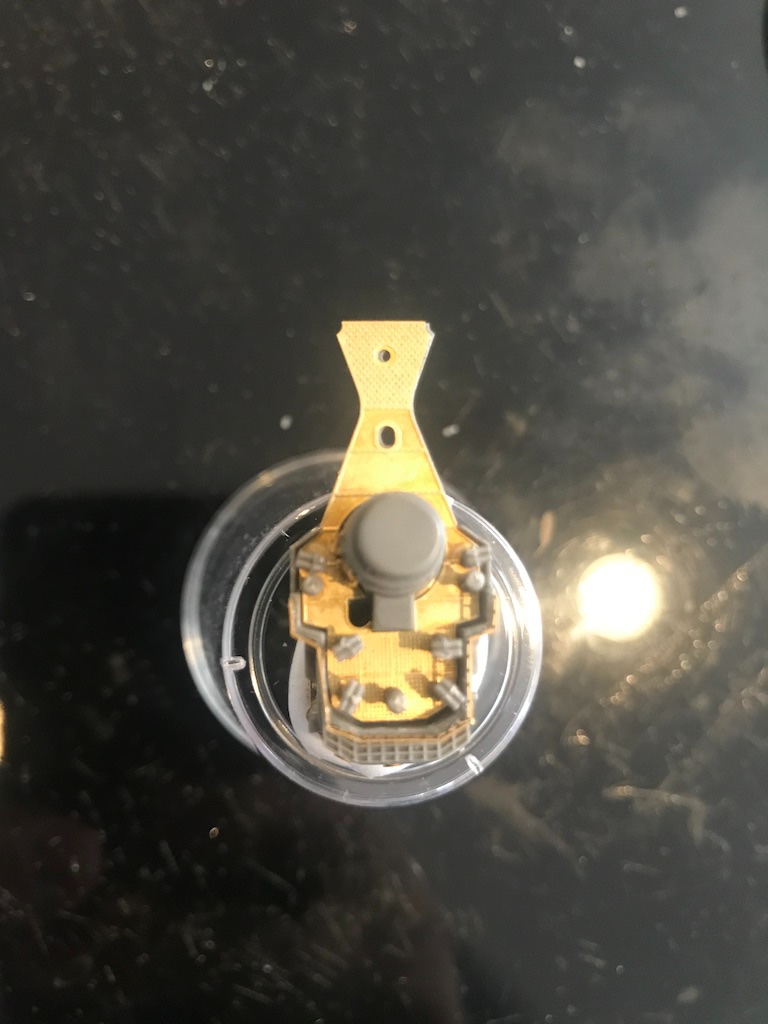
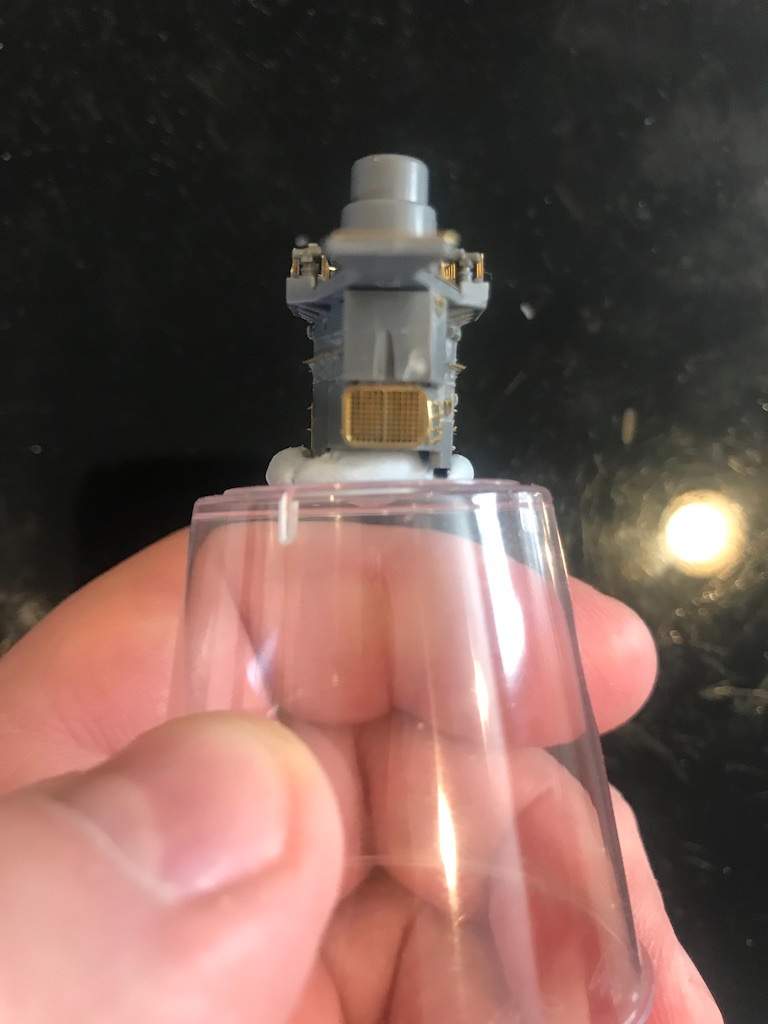
I finished the bridge and deck that comes off the front. Lots of great little details in the Infini set for sure. Even the underside of the deck, which one won't be able to see, had close to a dozen lattice support pieces. The Infini set has been fantastic. Aside from the issue I had with the ladders, the PE is firm, cut clean off the frets (the tabs connecting the parts to the fret have an indentation that allows the knife to get in and make clean cuts), and have great details. The pictures in the instructions are well done too so you have a good sense of what you need to do. Highly recommend the set if you are going to build this kit. Thanks for looking in!
- 154 replies
-
- 14
-

-
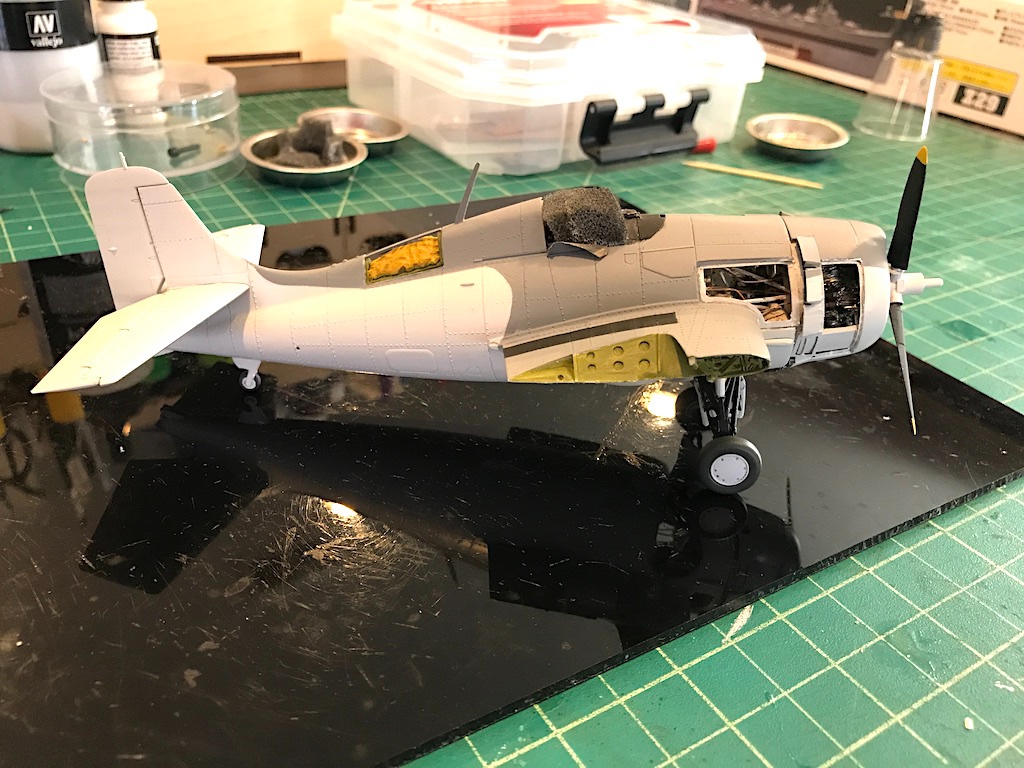
This model has languished a bit - in part because I wanted to finish up other models, but also because of modeler paralysis in planning out the various steps with all the aftermarket and general modifications to the build. Hasn't helped that the Aires aftermarket set isn't plug and play, but has required quite a bit of finessing. Also, there's a lot of tricky things to plan around, including the US insignia on the side fuselage coming up on the panels covering the life raft, how to attach the folded wings to the stubs, etc. But, I did dust it off the other day and glued the engine, cowl, and landing gear (propeller is just on to test everything out). Took me hours of sanding, cutting, test fitting, rinse and repeat to get all that to work with the kit parts. In the end, it's looking not too bad. I have some touchups I need to do, then will clear for decals and weathering. I also need to soften the line between the Dark Gull Gray and Insignia White - that has me a little nervous, but I just need to get it done and move on. Thanks for looking in!

- 241 replies
-
- 16
-
-
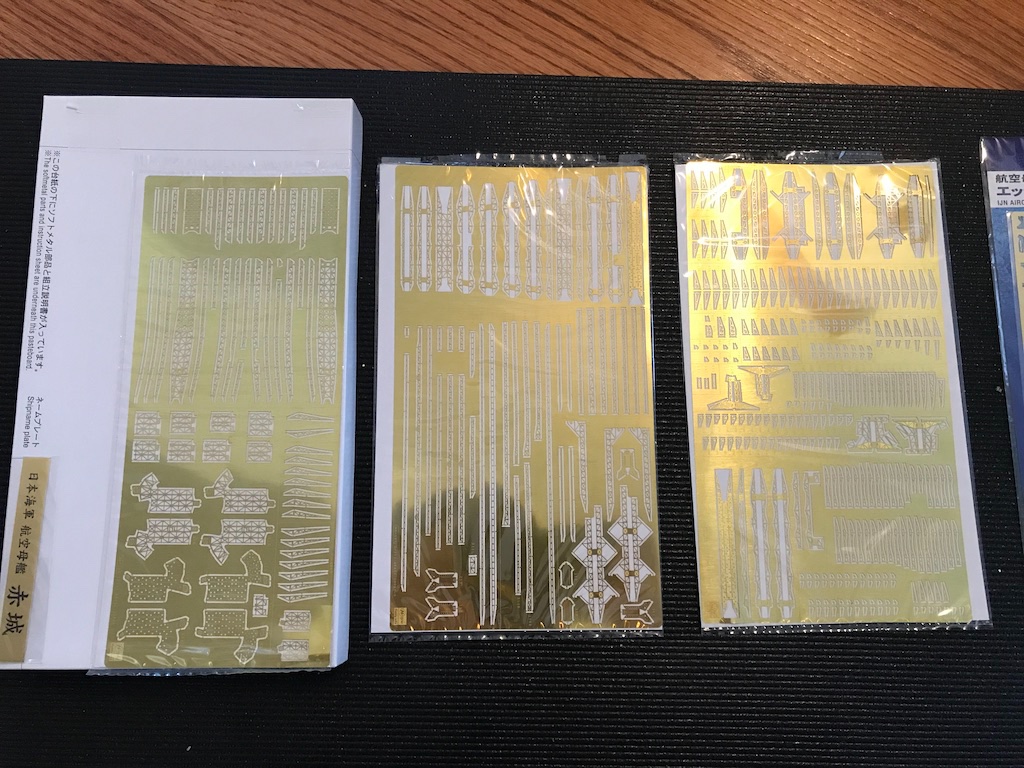
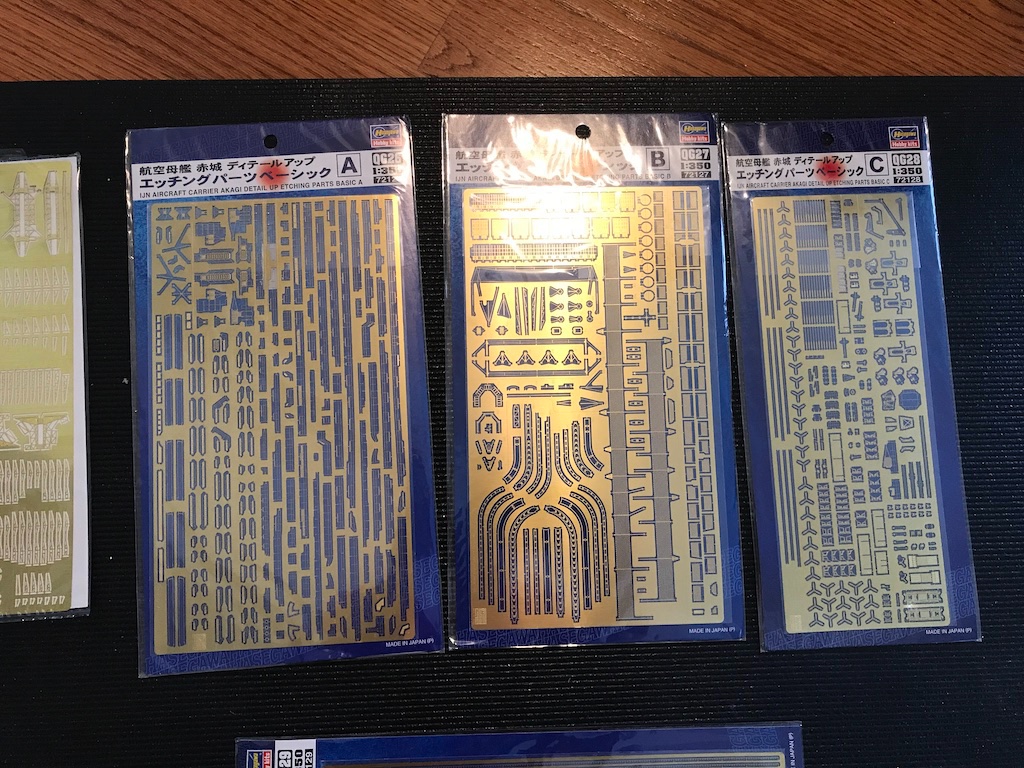
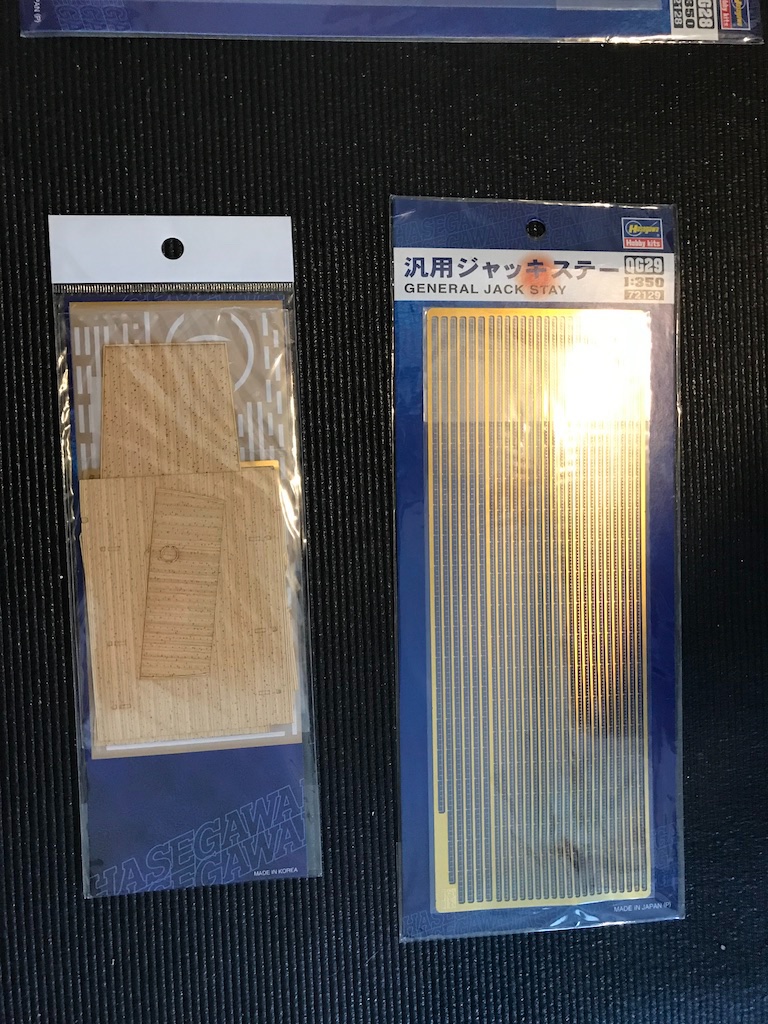
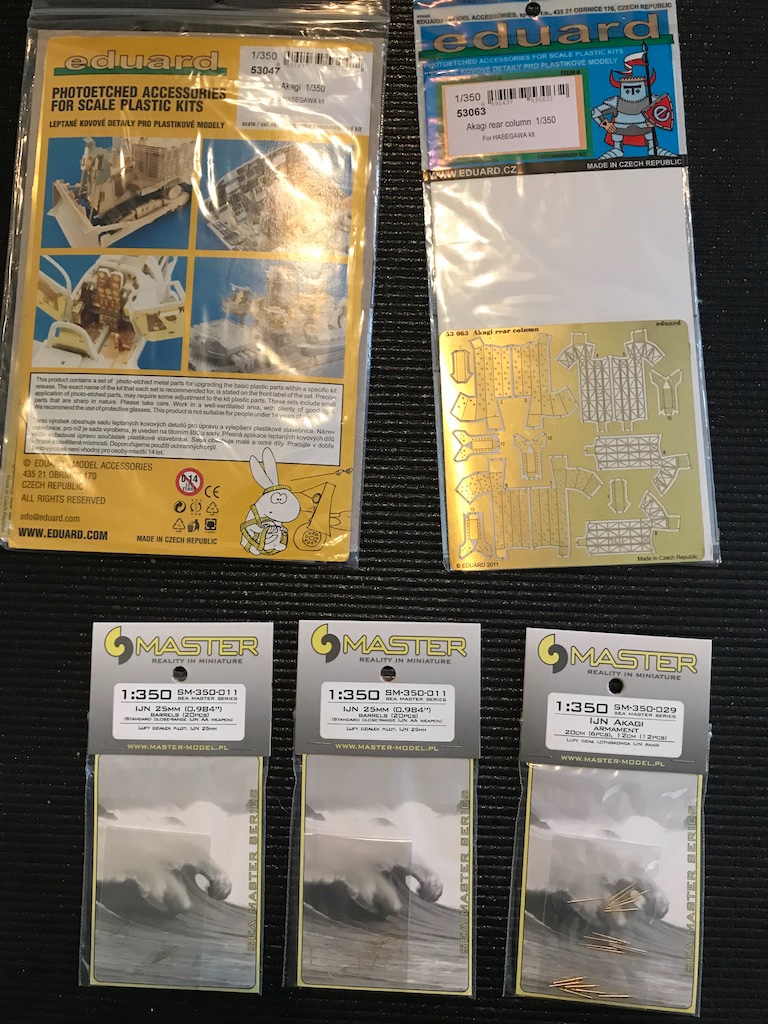
Here are pictures of the aftermarket I have for the kit: Detail Up Super: The individual detail sets A, B and C (QG26 - QG28): General jackstay (QG29) and deck (QG25): As you can see, the Detail Up Super is completely different from the other three sets. I would say that if you are planning to build the Akagi and really want to build it out into its full impressive glory, you kinda need that set. It has all the intricate bridge-like lattice work under the deck which are a great detail on the model. That, along with the giant hinomaru on the deck and general reverence for the ship, is what sold me on the model. I had also randomly come across these aftermarket sets for fairly low prices so picked them up as well. Couple of Eduard PE (53047 and 53063) sets. My guess is that most are duplicative of the Hasegawa sets, but maybe some are better, some are in addition to the Hasegawa sets, always nice to have spares, etc. Also, I picked up those Master barrel sets. It's been a while since I thought about this kit, but I believe that the kit and Hasegawa and Eduard aftermarket sets do not replace the standard plastic barrels on the kit. Planes Aftermarket: I didn't take pictures as the boxes are elsewhere, but you can also add additional plane sets: QG30 for carrier planes, and QG40 for ship-borne seaplanes. Infini also makes a really nice PE upgrade set for the planes in IMP 35051RI. Hope that helps, I know I was really confused and assumed that the Detail Up Super included everything. Personally, I find Hasegawa's approach of breaking up the aftermarket sets into multiple sets some of which have the same names (like Fret A) very confusing. Fujimi is almost worse with their G-up lines of aftermarket. I much prefer the approach of aftermarket companies like Pontos, Infini, Fivestar, etc. which allow you to buy all upgrades in one box. What I don't know is whether Hasegawa plans to re-release these aftermarket sets in the future. Might be worth trying to track them down when you can just in case they don't, or they end up overhauling the kit to the point where the new aftermarket doesn't work with the version of the model you have.
-
It took me a while to learn, but it's important to not only keep the piece of wood down on the table, but also against the fence. Featherboards help, but are a little hard on such a small saw (I sometimes clamp a steel ruler against the fence to serve as a featherboard). Push sticks are usually the way to go (and are much safer than getting your fingers too close). Not sure how long your pieces of wood are, but I find that issues tend to multiply as the pieces get longer.
-
Are you keeping the wood against the fence the whole way? My guess is you might not be keeping it flush towards the end of the cut. I had similar issues when I was starting out. Maybe it's also binding after the saw? Once I set the front of the fence, I push the backside out slightly to get a little more clearance since the saw doesn't come with a splitter.
-
McLaren M8B by CDW - Accurate Miniatures - 1:24 Scale
Landlubber Mike replied to CDW's topic in Non-ship/categorised builds
Nice pick! Are you looking to adopt more kids? I'm past the potty training stage... -
Looks amazing! Can I ask what you’re using for washes? For example, the gray wash you mentioned, are you air brushing it? Hand brushing?
-
McLaren M8B by CDW - Accurate Miniatures - 1:24 Scale
Landlubber Mike replied to CDW's topic in Non-ship/categorised builds
Is that the Revival kit? If so, you did a really fantastic job on it! Did you enjoy the build? I have a couple of Revival kits in the stash, might have this one. -
I think the A, B, C and Detail Up Super sets (not to mention, the separate sets for the wooden deck and General Jackstay) all differ as to what parts of the build they cover (no, or at least minimal, overlap among the various sets): https://www.ipmsusa.org/reviews2/ships/details/hasegawa_350_akagi-details/hasegawa_350_akagi-details.htm
-
Not bored of the updates at all Kevin, on the contrary, I (and I'm sure others) like seeing them on this very cool subject. Especially since there aren't many logs of it.
- 273 replies
-
- 4
-
-
- panart
- amerigo vespucci
- (and 1 more)
-
I tried doing that at 1/700 and it was too tiny and the brass too fragile. Ruined quite a few! On my current 1/350, the Infini stairs fell apart when I bent the sides in. The Hasegawa were a little stiffer/thicker brass and were fine. Eventually I'll get it right!
-
Yeah, brain fart on that one. I believe you're right, they go on the inside otherwise you wouldn't have a clean edge. Hang in there on the PE. After a little bit, it's not too bad. I don't know if you have PE ladders that you're dealing with, but I find those pretty tricky - especially ones where the stairs fold out. I think I've figured out a way that works for me (essentially, fold the stair out first while on the fret, then cut out and bend up the rails), but I was glad I had spares around to ruin/practice on.
-
It can be like origami depending on the piece. Have to plan out every fold because if you fold things incorrectly the first time and have to fold it back the other way, the PE may break apart at the fold line. Sometimes if a particular piece has a series of folds, I find it better to add a tiny bit of CA to lock in some of the folds. For example, if you are folding something like a box, get some of the sides up, add a touch of CA to the interior lines, then get the remaining sides and top of the box completed. One thing I learned - sometimes the PE will have what looks like a very narrow channel or groove cut out on one side of the fold line. That usually gives an indication which way the piece folds. For the life of me (maybe the two margaritas I just had are affecting my memory), I can't recall which way the fold goes. I believe the grooved side is on the outside of the fold, but hopefully someone can correct me if I'm wrong. Another way to tell is often times the PE will have the decorative outside versus a plain flat side. Naturally, the plain flat side is the inside or to-be-glued side.
-
Greg, can I ask why you have a bottle of Tamiya lacquer thinner open in the last pictures? Are you using it to remove excess CA? If so, I hadn't considered that...the things you learn!
-
Best bet is eBay. Sometimes they pop up on Amazon too. I purchased the Akagi with the three (or maybe four, I forget) detail sets from a MSW member a couple of years ago, but I remember looking for the sets back then and seeing them pop up occasionally - sometimes for very big bucks unfortunately. I'd pick it up wherever in the world you can find it if the price is right. Put in an eBay saved search for it - a lot of Asian sellers end up listing kits and aftermarket for international sales. Years ago I would never have bought things from overseas, but the past couple of years, I've managed to source a variety of kits and aftermarket from Japan, China, the UK, France, etc. My current F4F-4 Wildcat build came from Greece of all places (under $50 with shipping for the kit and a bunch of aftermarket)!
-
Some of the newer kits are now in resin or plastic with resin and PE added to the box so you don't have to go out and get aftermarket. In 1/700 scale, companies like Niko, Rainbow and FiveStar are already doing that. In 1/350, Snowman put out a kit of the IJN auxiliary seaplane tender Akitsushima with a resin hull and resin and PE in the box (wooden box of all things). And Pontos not too long ago put out what I think is their first model kit - the Antarctic explorer Soya in 1/250 - which includes the plastic hull, wooden deck, PE and brass fittings, etc. all in the box. So rather than have to omit or remove plastic, the kits are designed from the beginning to take what is typically aftermarket but is included in the box. A cool development, and my guess is that more will follow, especially as modelers are increasingly looking to aftermarket to improve their models. I was just looking at a couple of my 1/700 Niko kits this morning. Having gone through what I went through on my 1/700 destroyer build of replacing much of the kit plastic with PE, the Niko kits - which are very nice by the way - might almost feel like cheating in that there are considerably fewer pieces in the kit. The hull is in one piece, the deck superstructures are cast in resin and just about complete, and many of the details like guns are cast in resin so need to fold PE into complicated shapes. The PE fret is quite small and mostly limited to things like railings. The Snowman Akitsushima is very much the same. http://www.nikomodel.pl/index.php/en/resin-kits/ships-en/scale-1-700-en/item/asaka-maru
-
Nice PE work! Can I ask - how are you planning to paint the deck items with the wooden deck down? Do you have a mask? My current build has a linoleum sections of the deck with appliqué type stickers from Hasegawa, but I was planning to wait as long as possible before installing those deck sections to avoid having to mask.
-
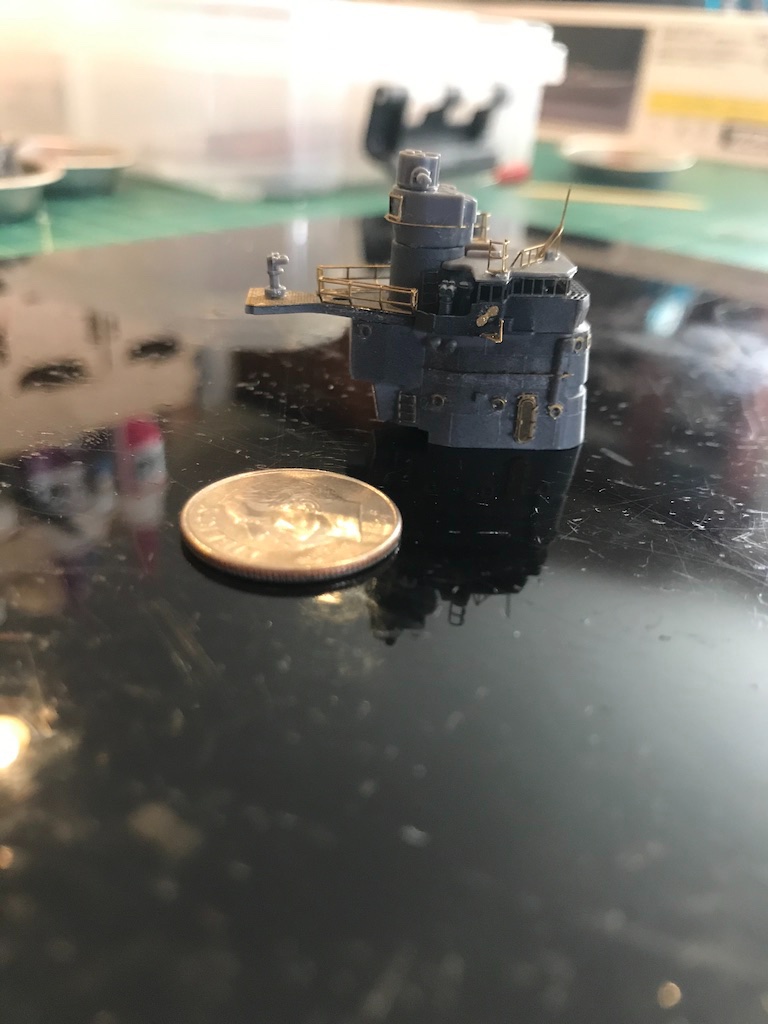
I think I can do peanut butter and banana, but bologna and whipped cream sounds pretty nasty 🤢 I've been making some progress on the Shimakaze the last few nights. I'm adding what I can to the hull that won't get broken off (or has less of a chance of getting broken off) so I can paint everything in one shot before adding the linoleum deck sections. I retried using Gator's Grip glue, and really like it. I had tried it with my earlier 1/700 build but had a hard time getting it to work without being too messy, but it was probably user error. So, depending on what I'm gluing and where, I will use plastic cement (Testor's squeeze tube), the Mr. Hobby and Tamiya jars of liquid cement with the brush in the handle, medium CA, two-part epoxy, and now Gator's Grip. It was a little overwhelming seeing all those adhesive options when starting out in plastic, but I think I've now figured out how each can play a role in the modeling process. In the meantime, I've got quite a bit of the bridge finished. Lots of pretty brass to dress it up. The kit isn't too bad, but the Infini set really dresses it up. For example, the windows in the kit are decals applied over a plastic solid piece. I like the Infini approach of using PE instead. The Hasegawa PE upgrade set has a similar PE set of windows, but I liked how the Infini ones looked a little more. It doesn't look like much, but this was hours of work! Definitely helped to have the experience working in 1/700 scale. I think I might pause here and paint the interior of the window section before adding the roof. So far I'm pretty happy how this is coming out. The Infini set is very precise. Their ladders where steps fold out are a bit touchy though (two of them disintegrated when I tried to fold the side handle rails), and I had to use the Hasegawa upgrade set for a pair. I just need to figure out a better approach to folding them I think. I was regretting getting the Hasegawa upgrade set as it was essentially duplicated (and bettered) by the Infini set, but now I'm glad as I have a spare to fall back on if I screw things up -- which is very likely! Thanks for looking in!
- 154 replies
-
- 15
-
-
Same here - amazing work Chris!!! I can't believe this is card!
- 10 replies
-
- 3
-
-
- puigcerda
- paper shipwright
- (and 2 more)


