
DONATION DRIVE - SUPPORT MSW - DO YOUR PART TO KEEP THIS GREAT FORUM GOING!
×


Landlubber Mike
-
Posts
4,541 -
Joined
-
Last visited
Content Type
Profiles
Forums
Gallery
Events
Everything posted by Landlubber Mike
-
 That satin black is gorgeous. Very nice job!
 -
Great start! Looks like it will turn out a beauty in your hands.
-
Coming along really nicely! Very well done!
-
So that's why I couldn't find any clamps at Home Depot. Now I know! 😳 Great job Chris!
-
From another website - looks like the crest was on cruisers and above: https://www.kinenkan-mikasa.or.jp/en/tourmap/central_exhibition_data/bow_crest.html In June 1898 Japanese Navy, following the Royal Navy decided to put the Imperial Crest of Chrysanthemum as the bow crest of all ships above cruiser class and was referred to as Imperial Japanese Navy (IJN). This Bow Crest was equipped on MIKASA's bow from her commissioning till 1987.
- 179 replies
-
- 8
-

-
- hatsuzakura
- pit road
- (and 2 more)
-
Looks fantastic Jason! I seem to recall anchor buoys being about 1/3 the anchor length as well, but can't recall where I saw that (maybe in zu Mondfeld). My approach was similar to yours, except I used clay for the buoy part. The rope work around the buoy is a real pain but it makes for a nice detail not ordinarily seen in models.
- 800 replies
-
- 2
-
-
- snake
- caldercraft
- (and 1 more)
-
Thanks Ken. I've seen them on carriers and battleships and other larger ships, I don't recall seeing them on destroyers. I have some extra PE parts that are little round discs - I probably could use one of those. At this scale, it doesn't have to look like the flower. Edit: looks like the chrysanthemum may have only been reserved for the capital ships: https://forum.worldofwarships.com/topic/79574-why-do-ijn-cvs-cls-cas-and-bbs/
- 179 replies
-
- 7
-
-
- hatsuzakura
- pit road
- (and 2 more)
-
Thanks BE - it's been a learning experience for sure. I'm curious to see what things are like when I start work on my 1/350 Shimakaze - I bet the PE will look huge in comparison to what I've been used to on this 1/700 model.
- 179 replies
-
- 8
-
-
- hatsuzakura
- pit road
- (and 2 more)
-
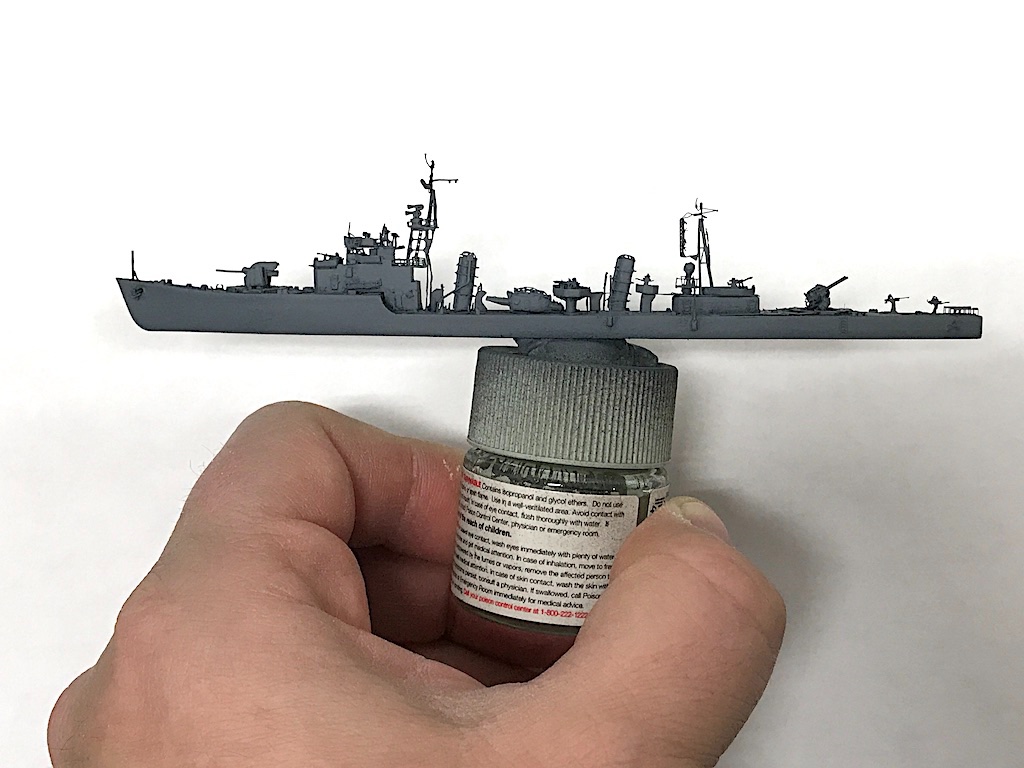
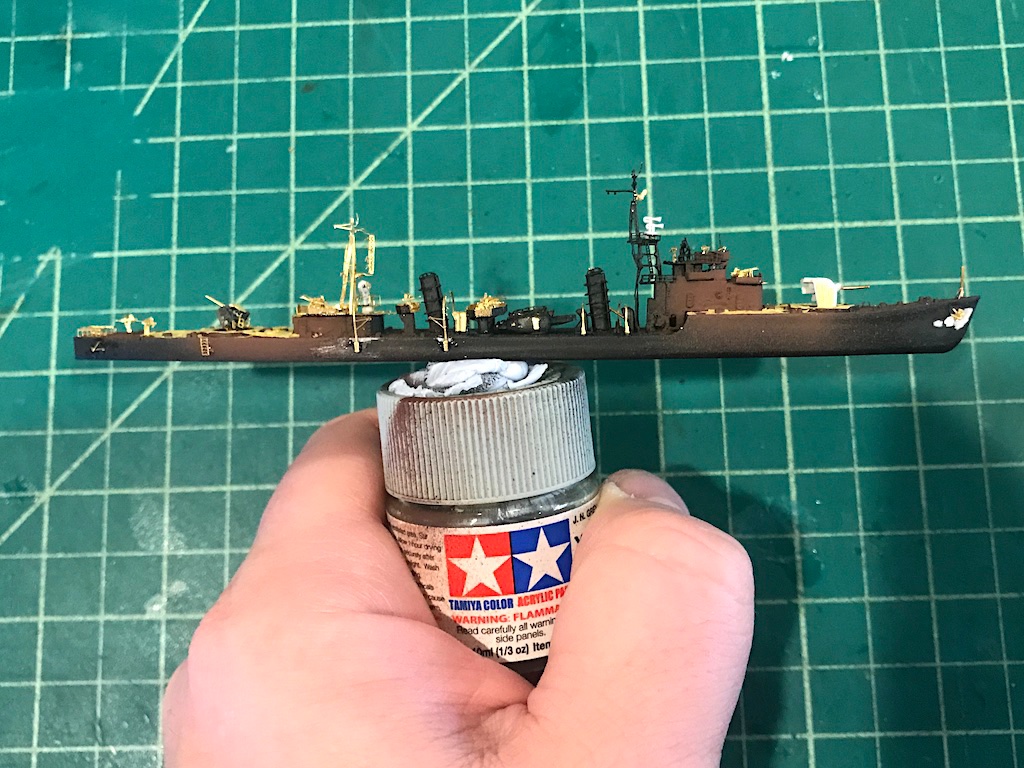
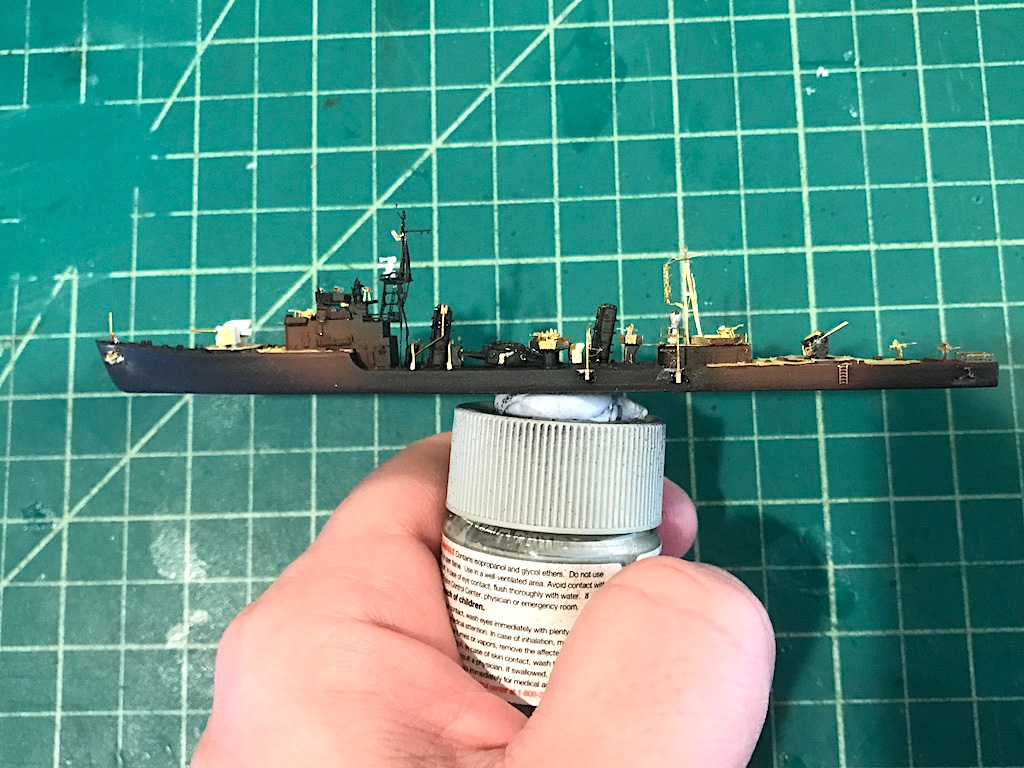
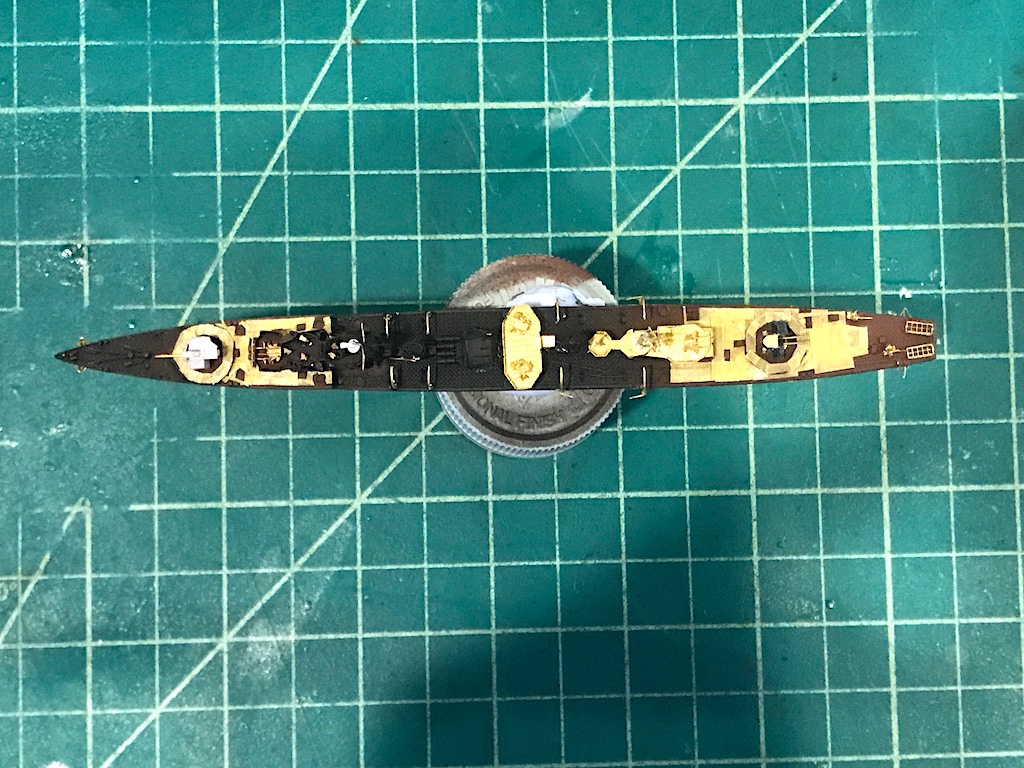
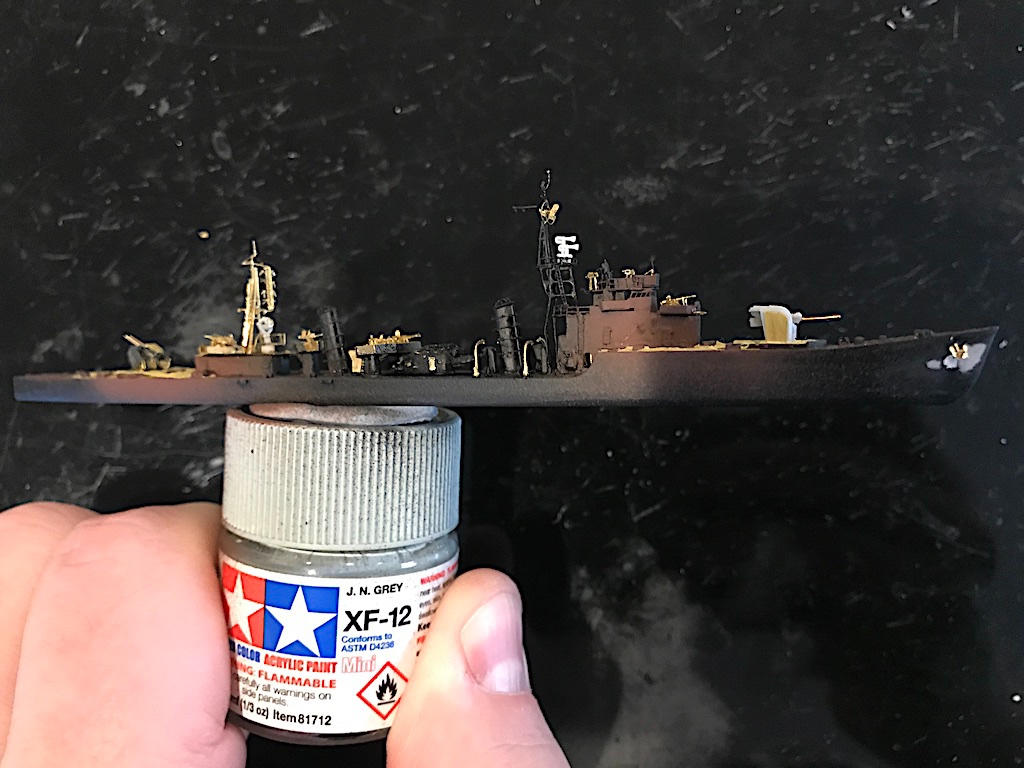
Felt good to finally get some paint on this, after such a long period of it sitting on the shelf. I ended up priming with thinned Vallejo black primer. For the gray, there are various grays used by different shipyards. This ship was built by the Yokosuka Naval Arsenal. Some companies like Tamiya make paint colors specific to the various shipyards (Kure, Maizuru, Yokosuka, etc.). I wanted to stick with Vallejo, so I went with Vallejo Medium Gunship Gray with a tiny bit of Vallejo Intermediate Blue mixed in to get what I think is a fairly close match to what the Tamiya paint (XF 91) looked like. It gets a little crazy trying to be exact, as colors render differently on the computer and even vary across pictures of the same paints posted by different sellers. With shading and weathering, things will change in the end anyway. I like how things came out. With the black primer base, I lightly sprayed the gray so the hull is already shaded in the various recesses, which makes things much easier. Next I'll try to add some washes and a touch of highlighting, and then start adding the remaining details like the rails which are still on the PE frets but painted. Thanks for looking in!
- 179 replies
-
- 18
-
-
- hatsuzakura
- pit road
- (and 2 more)
-
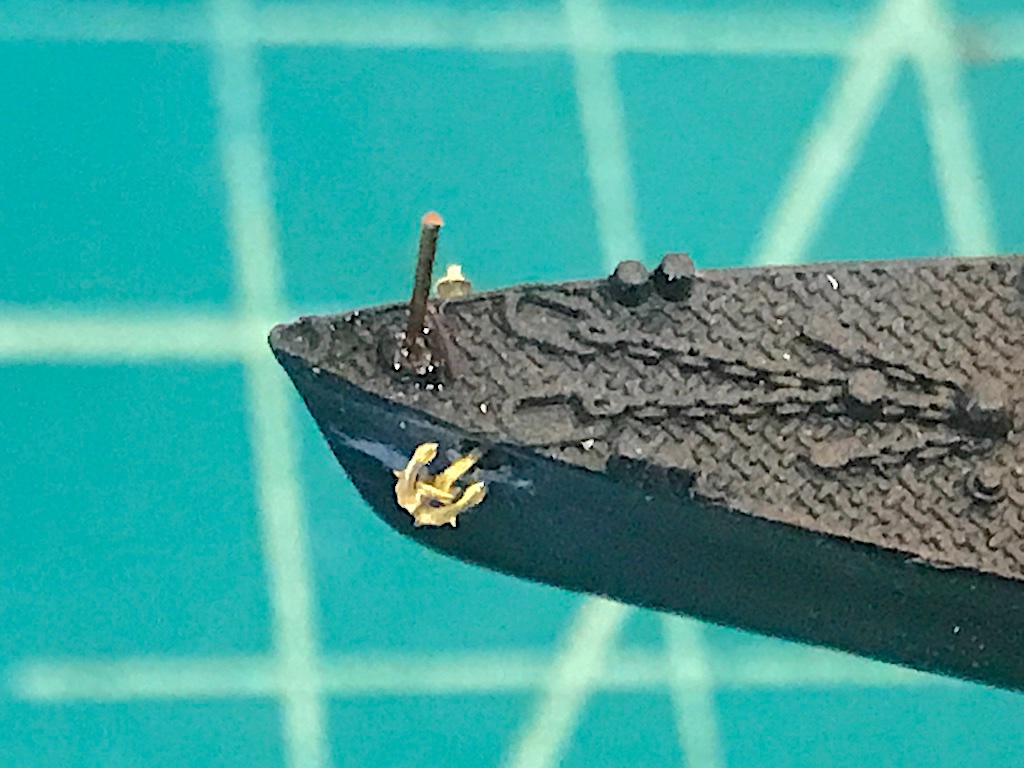
There is a tiny PE piece that goes at the very tip of the bow in the Five Star set which might be the chrysanthemum. A little hard to tell from the pictures and the instructions. It's like a facing down C in shape. The pictures of the completed model on the Five Star box seem t show a little bead or something possible in the middle of the C, but it's really too hard to tell from the pictures.
- 179 replies
-
- 6
-
-
- hatsuzakura
- pit road
- (and 2 more)
-
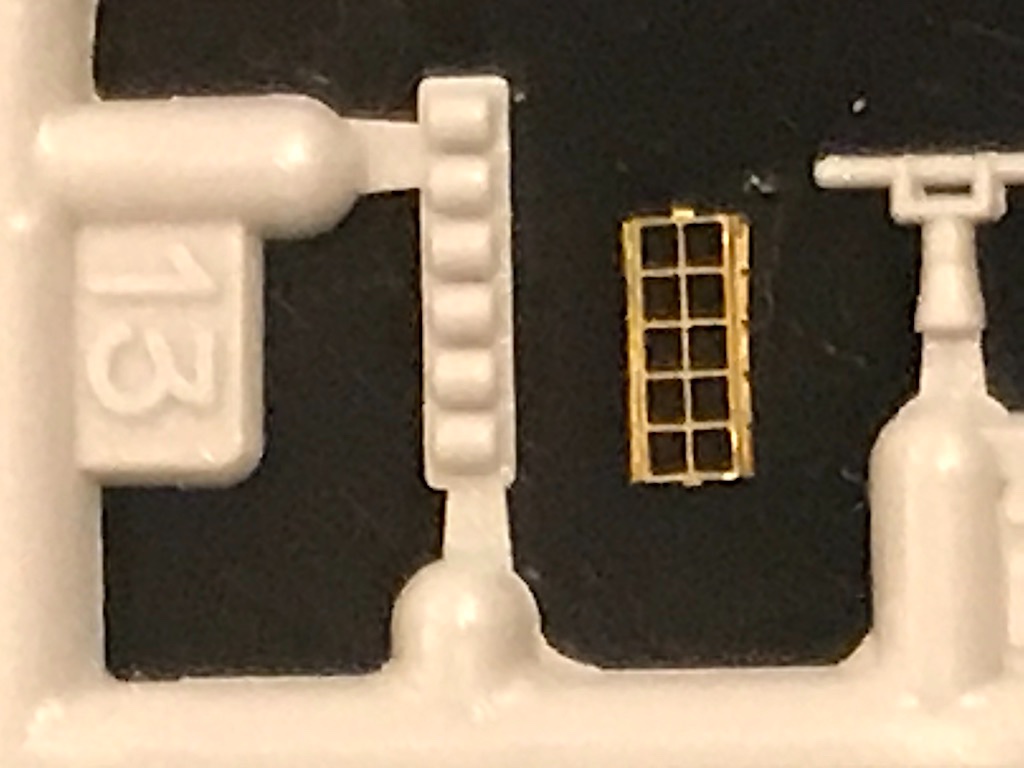
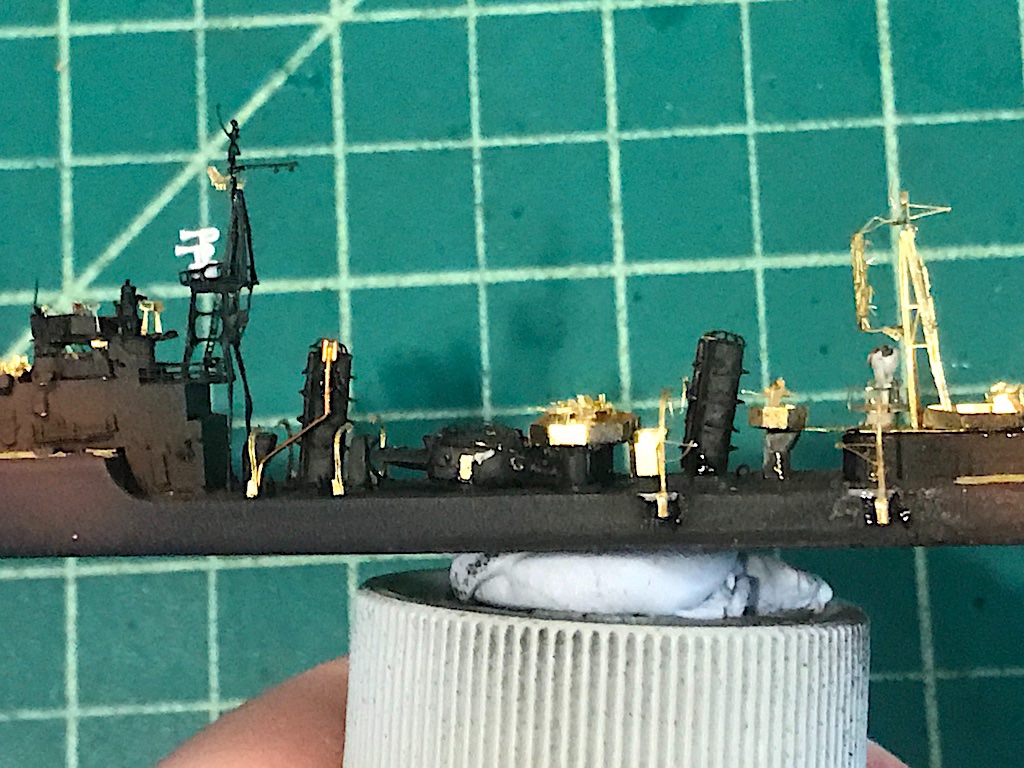
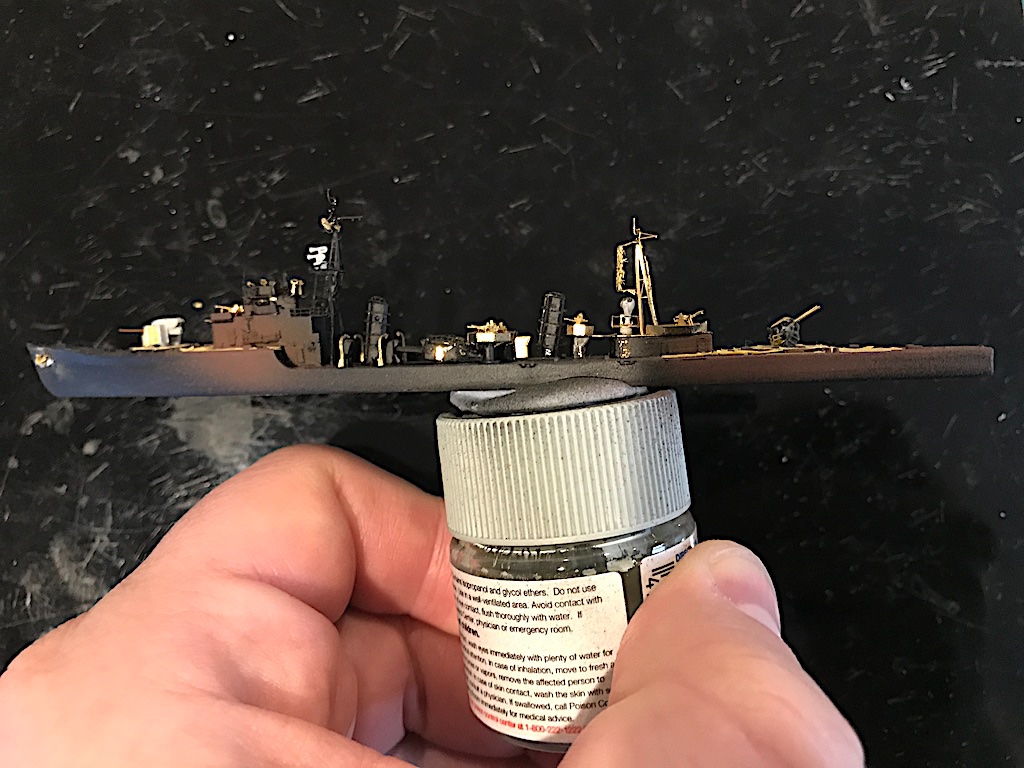
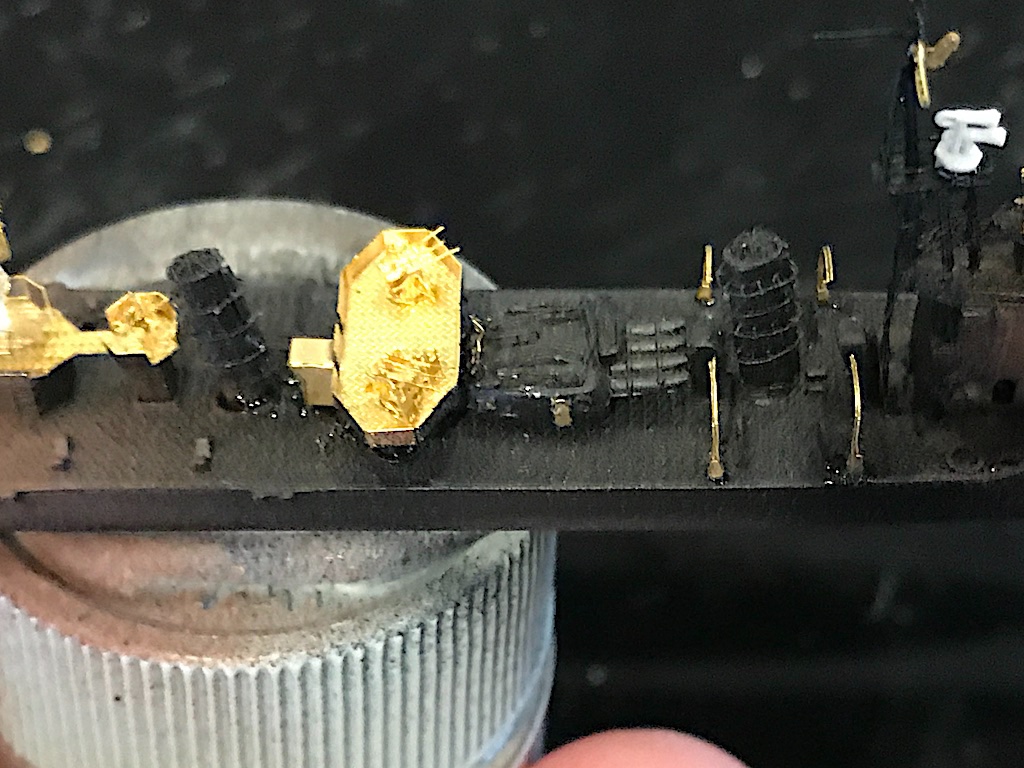
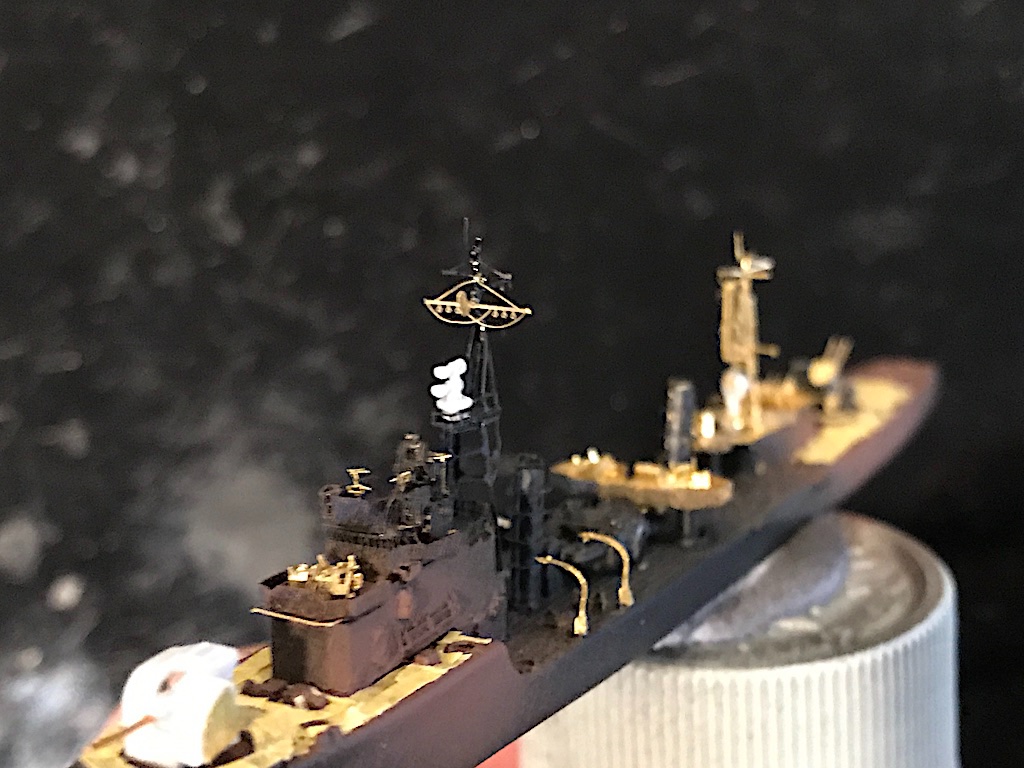
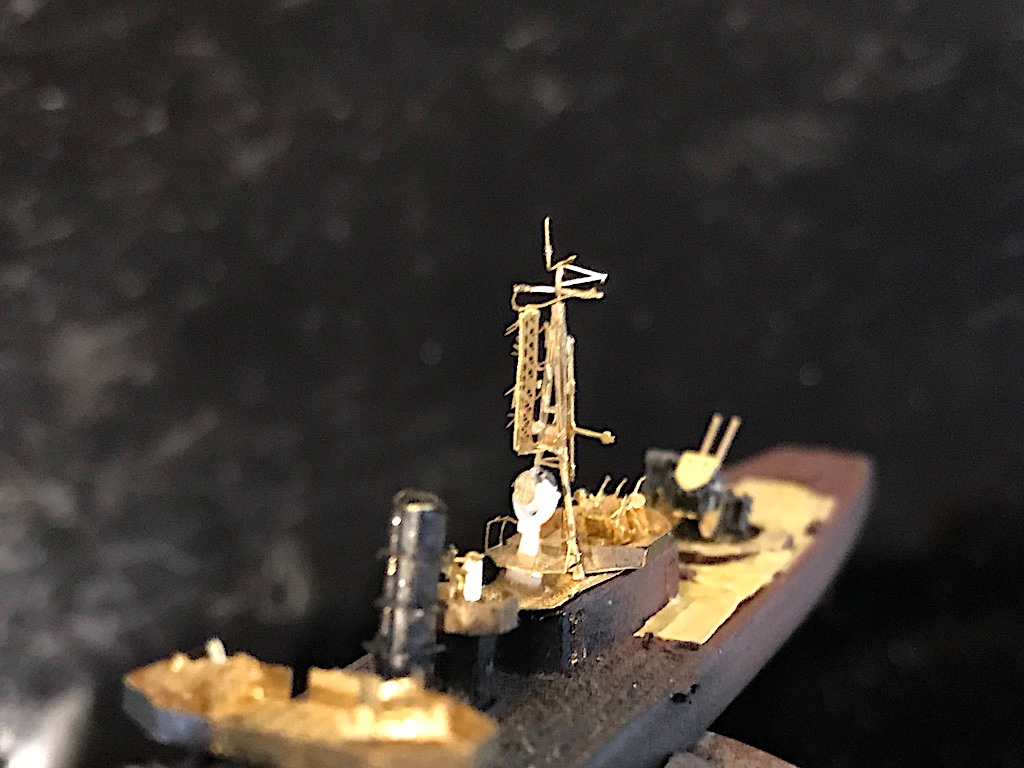
While waiting for other models to dry in the spray booth, I have been plugging along on this one. Lots added - front post, the larger davits, a few more single AA guns, depth charge rack, etc. I think this is about all I can do at this stage before painting everything, and then separately adding the remaining details - which there are still a bunch! I thought a destroyer would be a good entry to the 1/700 world, but there's actually tons of details peppered throughout what is a smaller ship. Some fun comparison pictures... Comparison of kit depth charge rack (left) with PE: Davits - these are created with two pieces, the top part which you fold two halves together to build up the thickness, and then the base. The base is only maybe 3-4mm long, and you have to fold the two ends in to make it a U shape. Then you take the top part and insert it through a very tiny hole in the top of the base, and have it settle into an even smaller hole at the bottom of the base. I had the dreaded "ping" off the tweezers on one of them, but fortunately I was able to find it. I don't know what I would have done if I lost it, but all is good. I almost forgot that the front funnel had a long pipe that attached along the port side, so scratch built one since the kit one was way out of scale now that I added the PE rings. I think I did this in 0.30mm brass wire - probably a tad underscale, maybe I should have gone with 0.50mm. I'm worried about trying to remove it and ripping out some of the other brass on the funnel, so I'm just going to leave it. I am wondering though about the kit radar on the top of the bridge - seems a bit overscale. I might have a resin replacement I can use from FineMolds, will have to check the stash. It's probably not too bad, and will look smaller once painted and no longer stark white. Some other pictures. I have to remind myself that these are taken at extreme magnification because they look a bit disappointing in the pictures, but to the normal eye, they look fine. I think at this stage I'll prime and paint, then add the remaining details which include another 10 AA guns, the rails on the deck to cart munitions, small boats, rails, a bunch of things that look like crates, etc. Then there are some optional details like ammo boxes. Thanks for looking!
- 179 replies
-
- 14
-
-
- hatsuzakura
- pit road
- (and 2 more)
-
Another beauty Craig. Filling up that new case quickly
-
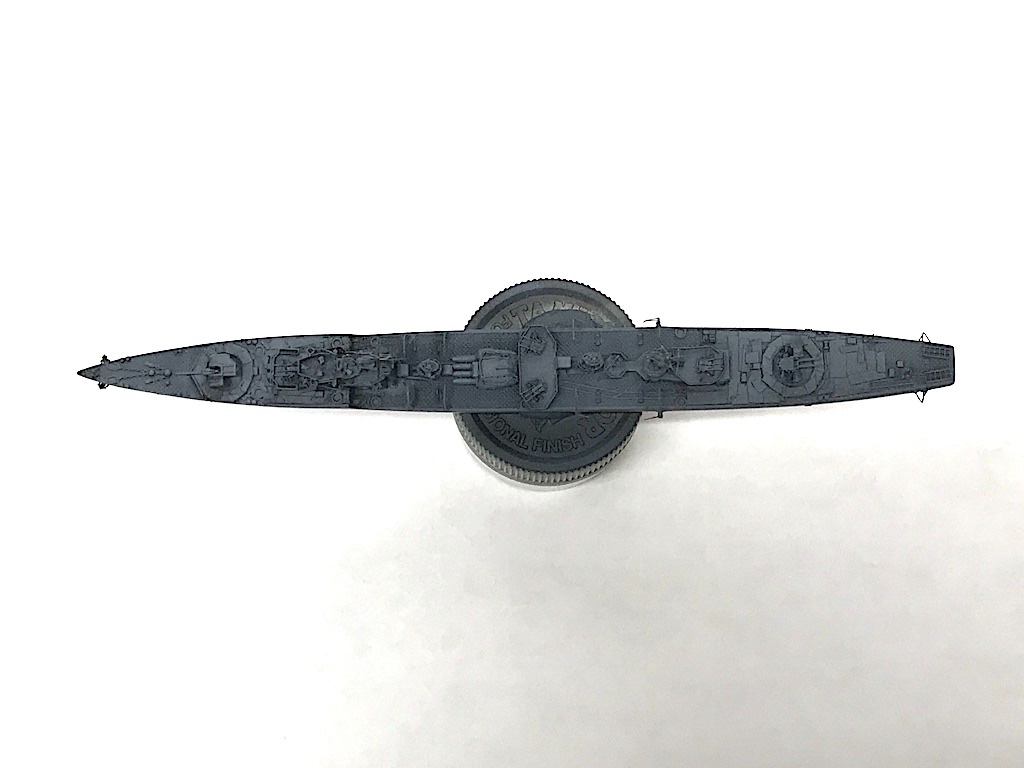
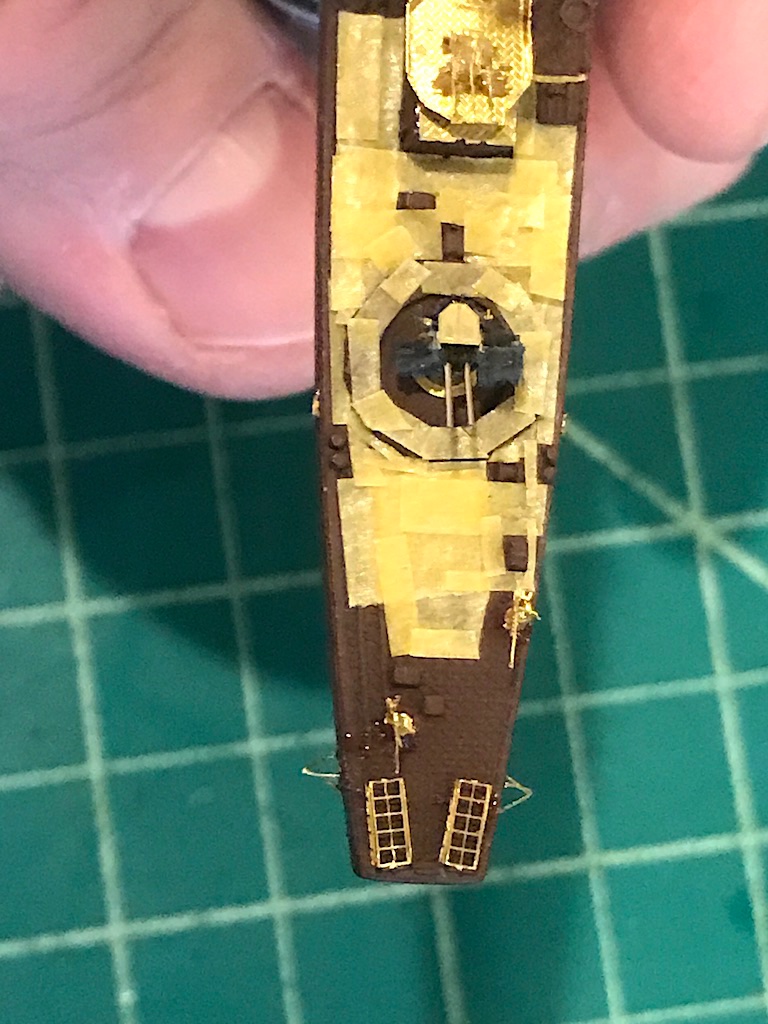
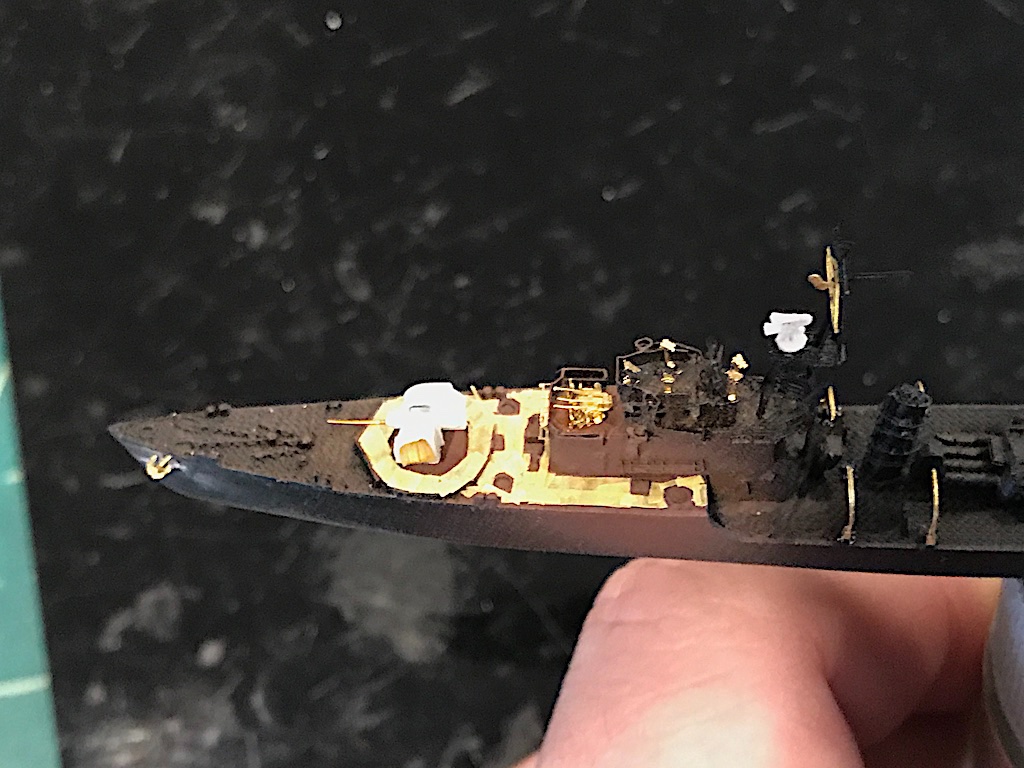
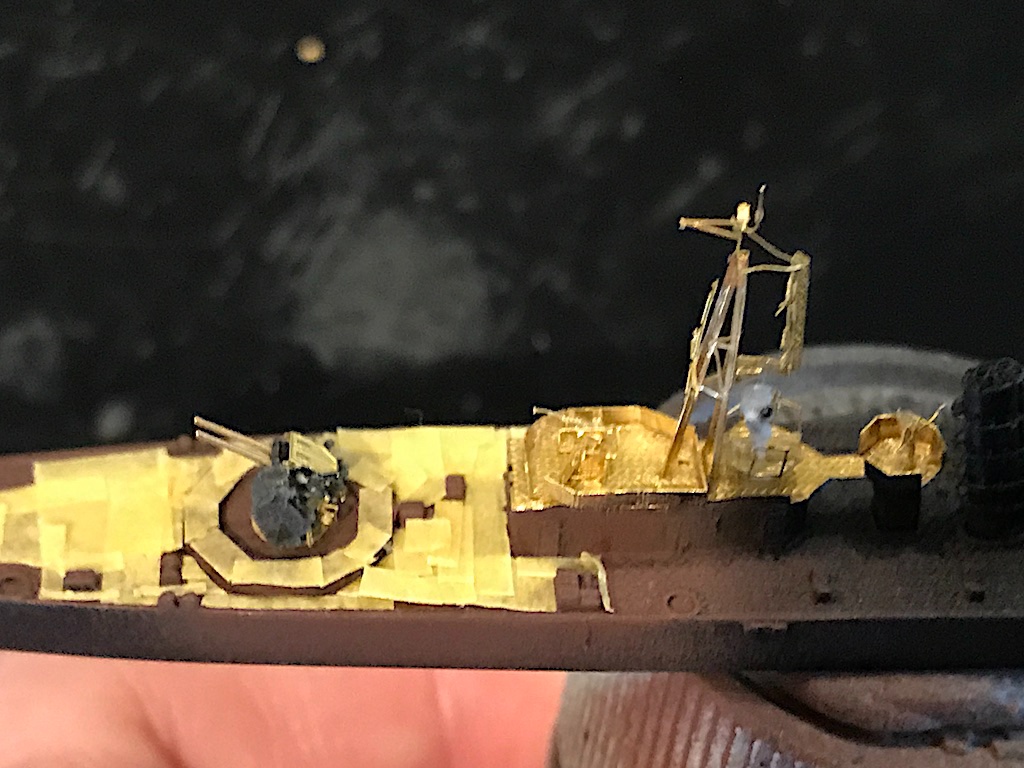
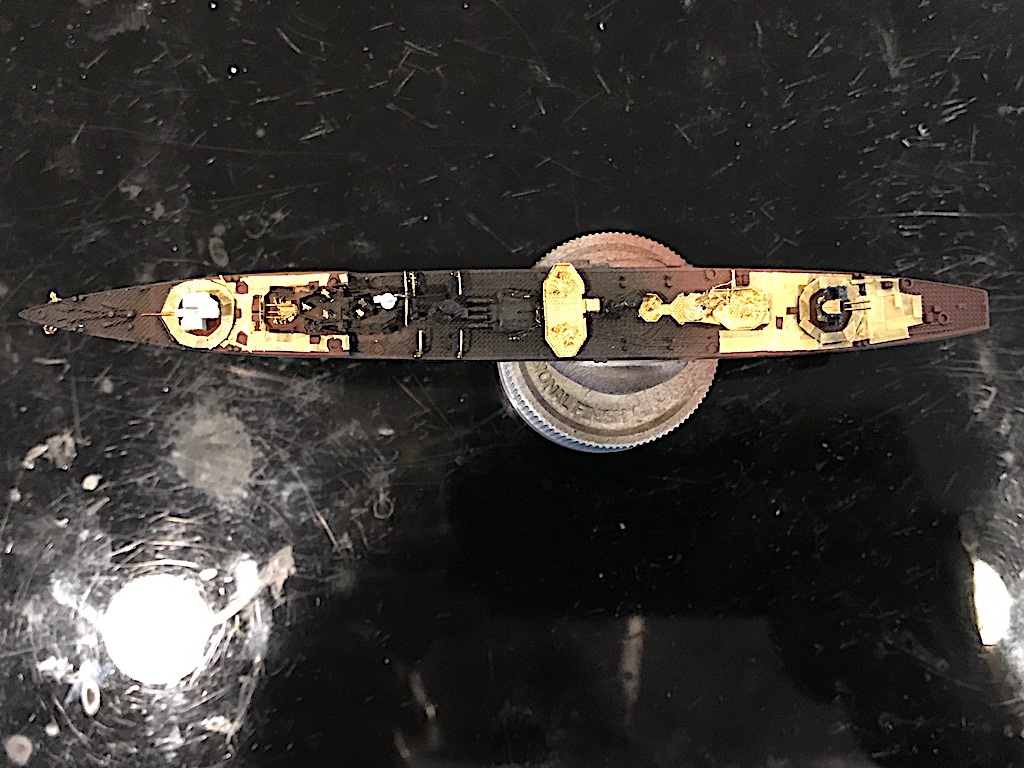
I've been on a roll moving this project forward this week, so continued it again the last couple of nights. I've added what I think I can in the middle of the ship, including single AA guns, rangefinders, on deck davits, railings, etc., as well as the anchors. I've been debating whether to add the outer hull details like the steps for fear of knocking them off, but I think I'll take the chance to add them now rather than later and have to touch up the paint to cover glue marks. Once all that is on, I think I can paint and prime the ship. Then I'll remove the masking, and add the remaining deck details. For those details, I think I'm going to have to prime and paint them on the fret, and then assemble and add to the ship. Given portions of the deck are linoleum, I can't just add all those details now as many sit on the linoleum portions. Here are some pictures of where things stand. My apologies for the quality - it's a little hard to take them using my iPhone at such high magnification, though frankly, I'm impressed that the pictures even came out this well. Thanks for looking in!
- 179 replies
-
- 16
-
-
- hatsuzakura
- pit road
- (and 2 more)
-
Wow Tim, that looks fantastic! Would never know it's wood.
-
Looks like a great one OC - will be fantastic in your skilled hands!
-
Break them out! Maybe us lunatics can do a group build project 🤔
- 179 replies
-
- 7
-
-
- hatsuzakura
- pit road
- (and 2 more)
-
Go for it! Definitely post a log on here so that I'm not the only one in the insane asylum.
- 179 replies
-
- 8
-
-

-
- hatsuzakura
- pit road
- (and 2 more)
-
Thanks Jason! I generally use very fine tweezers to do the folds, often times with the part being held by very fine reverse tweezers (not sure what they are called - the ones that start closed and when you squeeze them they open). Sometimes I can hold a part in my left fingers and fold via tweezers. What's nice about the PE (at least in this Five Star set) is that the fold lines are already preset with very shallow grooves so you don't have to guess or exert much force to start the bend. Amazing that they can pull that off in such scale.
- 179 replies
-
- 9
-
-
- hatsuzakura
- pit road
- (and 2 more)
-
I don't cut them on the cutting mat, but use this black acetate set from The Small Shop: https://thesmallshop.com/collections/photo-etch-cut-off-sets/products/sms016-photo-etch-cut-off-set-large-by-the-small-shop
- 179 replies
-
- 7
-
-
- hatsuzakura
- pit road
- (and 2 more)
-
There is actually a huge aftermarket for 1/700 ships, probably at least as big as that for 1/350 thought the players are a bit different. It's amazing what people are putting out in terms of sets. You can get wooden decks, deck masks, resin-cast guns and other deck items, etc. Sometimes the manufacturer has sets that are included in the kit or available separately, but generally, it seems that the more comprehensive sets are available from third parties - Five Star, Rainbow, Artist Hobby, Flyhawk, Shipyard Model Works etc. For me, I've generally been seeing what's out there in terms of aftermarket and then buying the associated kit, rather than start with a kit and get the aftermarket. You can, however, add generic detail sets for ships like carriers or seaplane tenders if you have a kit that doesn't have a dedicated PE set - places like Toms Model Works and White Ensign make a number of very good generic sets. You can also buy various detail items a la carte if you want more detail for a particular item from places like Fine Molds, Rainbow, Ocean Hobby, etc. People are also starting to put out resin sets which have limited PE, but the hull, guns, funnels, etc. are cast in resin. The detail is amazing, and less to obviously remove from a fret, fold, glue, etc. Take a look at Niko models - I just picked up a couple of their kits and was really impressed with what they are pulling off in resin at this scale. I've mentioned this before, but what is great about 1/700 is the incredibly diverse range of subjects you can build that aren't available at 1/350 or bigger scales, especially things like auxiliary ships like oilers, seaplane and submarine tenders, minelayers, etc. I personally find those workhorses a little more interesting than something bristling with guns. Sorry for the digression. For tool kit: -- Optivisor -- Good tweezers are a must! Get the finest tweezers you can get. I have some Swiss ones that I picked up a while back that work nicely. The general hobby ones you see will be too big, ooo imprecise, etc. I sometimes use a self-locking one to hold a part, while using a standard tweezer to make folds. -- Then you will need something to remove the pieces from the fret. They have clipper type tools you can use, but I think they will be too big as 1/700. I use a #10 X-acto type blade (the one that has a bigger profile and a curved cutting surface at the end. -- Cut off set - to help see the piece and remove it from the fret, I find the black acetate and hold downs to be incredibly helpful. You can get them from The Small Shop: https://thesmallshop.com/collections/photo-etch-cut-off-sets -- For folding, at 1/700 I can get away with mostly using tweezers, though sometimes I use Tamiya PE folding pliers (they come in two sizes) especially if I have to flatten out a piece that got bent on removal. I also have a couple of "Hold and Fold" PE bending sets from The Small Shop: https://thesmallshop.com/oollections/photo-etch-bending-tools I haven't needed to use them yet, but they will come in handy when I get to larger scales. -- Glue - I generally use medium CA that I apply via a pin. You can use white glues too like Gator Glue, but I've found medium CA to be a little better dealing with the small parts in 1/700. Thin sets way too fast to be able to adjust a piece, and white glues take too long (at least at 1/700). I'll be using Gator Glue when I start my 1/350 kits. -- Wax pencil - one other thing I found helpful at times is using one of those wax pencils to help you pick up tiny parts. They have just enough adhesion to lift a part, but not too much that you have a hard time getting the part off. That's about it. Not too complicated.
- 179 replies
-
- 11
-

-
-
- hatsuzakura
- pit road
- (and 2 more)
-
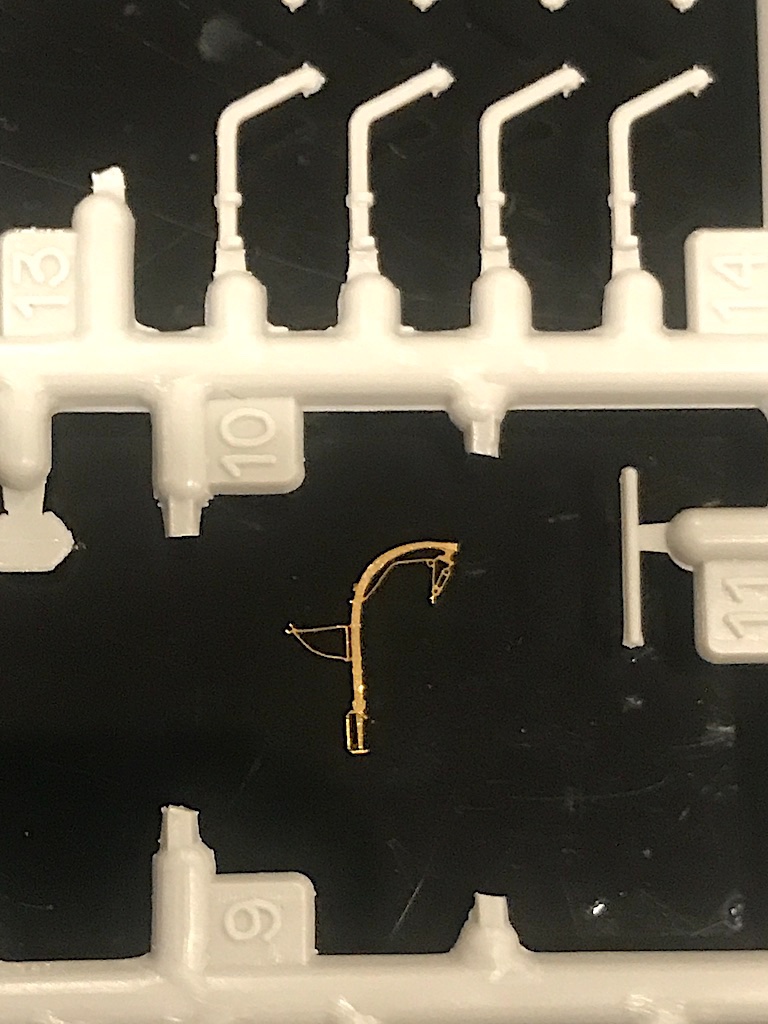
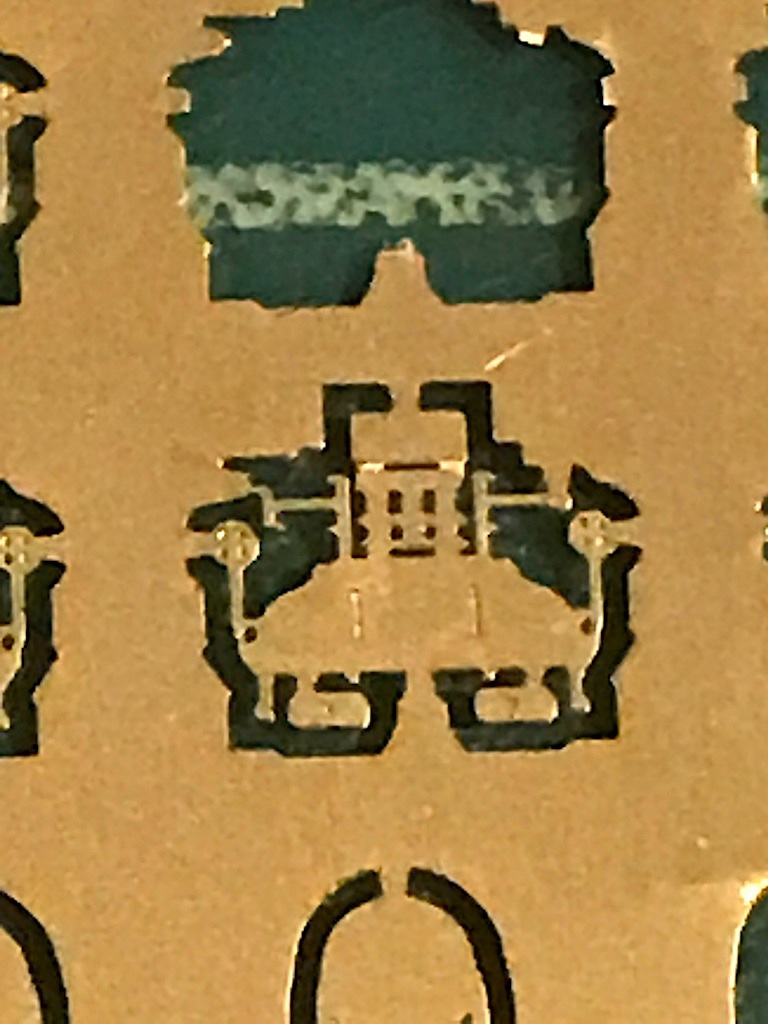
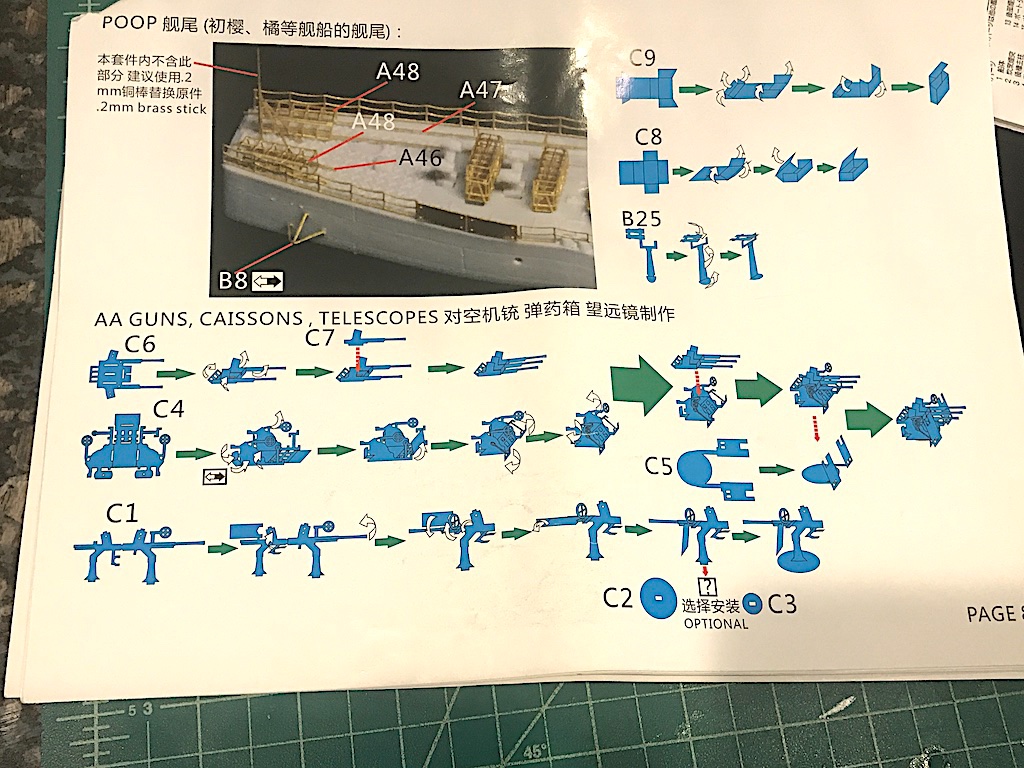
It is easier in some cases, but it's almost by necessity because the pieces are so small. Beyond the folds, what is tricky is cutting them out of the fret. You have to be careful to press straight down or you might cause serious bends to the rest of the piece. For an example, here is a picture of the base unit of the triple MGs (part C4) - this wasn't so bad, but some of the others like the tower pieces which involved long thin brass, were extremely tricky. Even then, I find i have to flatten or rework the piece to get back to the original shape once out of the fret. Here are the instructions for the various guns and rangefinder. If you look at part C4, you can see what was involved - 14 folds!
- 179 replies
-
- 11
-
-
- hatsuzakura
- pit road
- (and 2 more)
-
Awesome work, and thanks for the info and tips!
-
Looks fantastic, great paint job and finish! I needed some sunglasses to view those pictures the shine is so bright 😎 When you say 2K clear coat, are you using Zero paints? I bought some of them to paint the bodies on some Triumph TR2-3A kits I'm working on. Have the bodies primed, just need to paint them. If you did use Zero paints and clear coat, was wondering how you found them? Oh, and what color green is that? Looks really nice, almost like a British racing green.