HOLIDAY DONATION DRIVE - SUPPORT MSW - DO YOUR PART TO KEEP THIS GREAT FORUM GOING! (Only 20 donations so far - C'mon guys!)
×


Martin W
-
Posts
1,412 -
Joined
-
Last visited
Content Type
Profiles
Forums
Gallery
Events
Everything posted by Martin W
-
 Hi Guys, thanks for checking in. Mike -- I am indeed considering using the heartwood. It can be a bit crumbly, but I'm hoping that I can cut some pieces along the grain to give the carriages strength. The practicum I followed for the Rattlesnake included a section on fabricating the brackets, and I have reviewed that a little while ago. I think it just might be a possibility. Spy -- That's a good looking carriage. Is it the walnut ply? I would have been tempted to use the ply if it had been in the kit, but those metal carriages aren't any good. Right now, everything is still in the realm of possibility (except for the metal carriages). Cheers, Martin
- 467 replies
-
- 1
-

-
- fly
- victory models
- (and 1 more)
-
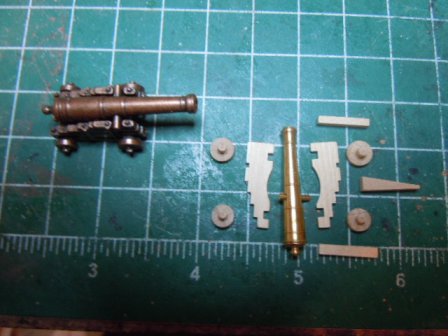
Greetings -- Just a quick update. Having finished the capstan, and contemplating the stove, I thought I might also replace the DREADED gunport strips that I'd removed due to concerns over their height. I also thought it would be wise to follow the advice of those intrepid path breakers who are well advanced in their Fly/Pegasus builds, and use a sample gun to check the height of the ports. Here's a curious detail. I gather that the Pegasus kit has walnut or walnut-ply laser cut pieces for the carriages. Other Fly kits might have as well; and mine has instructions for the laser-cut pieces, but is actually supplied with metal carriages that are, well, to put it delicately, unsightly. I bought some guns & carriages from RB, and have read accounts of Chuck's guns. Here's a comparison of the RB & the kit-supplied gun: The kit-supplied carriage is all one piece of molded metal. There would be no way to fit the ring bolts. The RB carriage, made of basswood, looks to be about the right dimensions, with the carriage sides (the brackets) at 1/4" high and 7/8" long. The trucks, axletrees, and quoin are also supplied, but curiously no transom or anything else. The trucks have that little post sticking out one side, so I assume the flat side would be glued to the axletree. Not surprisingly, Chuck's site shows not only all the parts but also contains a nice PDF of instructions. The gun barrels themselves also look more detailed. And so . . . . I've placed an order, and await. Of course, another option would be to fabricate my own carriages. I'm not going anywhere, and the heat has set in on the southern plains, so there's time to think about this. Cheers, Martin
- 467 replies
-
- 1
-
-
- fly
- victory models
- (and 1 more)
-
That's an impressive revision on the forecastle planking -- both in terms of the work and that you took the time to do over what didn't satisfy you. Cheers, Martin
-
Hi Mike, I just peeked in to check out your other build. This is a terrific log, with lots of thinking involved, and good research. It's great to follow your process in resolving the endless series of questions that make modelling so captivating. Oh, and your work looks good too! cheers, Martin
-
Mike -- Thanks for checking in. If you have access to a Woodcraft store around DC or No. Virginia, you might check out their wood selection. That's where I got the heartwood. Cheers, Martin
- 467 replies
-
- 1
-
-
- fly
- victory models
- (and 1 more)
-
Mike -- like you, I got my kit below retail, actually at about half price. It was a deal offered by MSW itself: a basic donation to the site got the kit. Voila. A scratch build is a dream for me, though pretty far off, as I'm still trying to master -- or maybe I should say just learn -- the essential skills. When I look at the logs in the Scratch Build category, oh, my mouth waters. Cheers. Martin
-
Thanks for the info, Mike. There happens to be a Woodcraft store sort of close by, so I'll go check out their stains. I removed the bulkhead extensions for my Rattlesnake -- not so much because I knew what I was doing as because I was following the practicum. In the end it made for a nice appearance, but that bashing required replacing a series of other bits & pieces, like the false QD deck. For my Fly, I'm trying to keep to a kind of golden mean of making use of the good kit parts, but making my own if I can really do better -- and if it seems like it would be fun. Cheers, Martin
-
Thanks for checking in, Alistair and BE -- and thanks for the encouraging words, they mean a lot from you guys. I put the false deck of the QD in place last night, along with the beam & the top capstan. From the look of it, a frightening large half round will have to come out of the beam, and it'll have to be raised substantially as well. Cutting out that ply wont' be fun, and I'm even surprised it is so low, given that the kit's capstan is about the same size as mine. Cheers, Martin
-
Lovely work, Nils. What wood did you use to carve the heart blocks? They look spot on -- consistently shaped, smooth, and detailed. Your seizing is also to be commended for its tightness and consistency. Cheers, Martin
-
Hi Mike -- that's a valuable experiment. Two questions: where did you get the GF stains, and have you seen them in brown? (I know, this sounds like I'm in a shoe store ) As I mentioned a while back, I would really like something to put on the plywood bulkheads, to make them look less like ply. If I can't find anything, I'll follow Alistair's strategy of covering them with boxwood. But those dyes do look interesting. Cheers, Martin
-
Hi Jon -- I followed the basic design of one hole on each side, and found that that was about right -- there weren't any lines missing a place to go. As for the flattened bit along the top -- that makes some sense in that it would make the bees more stable. Still, you have to decide how much of the English Swan design should be transferred to the American Rattlesnake. Cheers, Martin
- 974 replies
-
- 1
-
-
- rattlesnake
- mamoli
- (and 1 more)
-
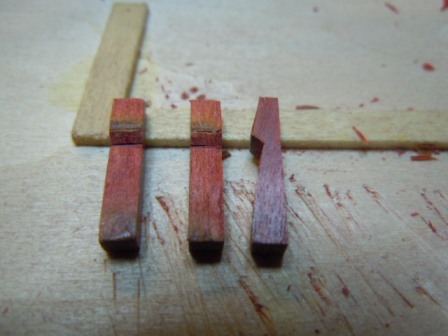
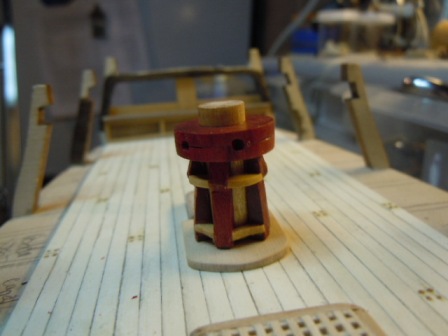
The summer is in full swing here on the prairie, so it's time to stay indoors, away from the biting insects and muggy heat, and cool off with some modelling. The Capstan -- Not surprisingly, FFM gives a good, detailed account of the parts to this piece. One notable difference with the kit supplied capstan, is the number of whelps: the lower capstan should have 5 whelps, and the upper capstan 6. In reality this would necessitate a 10-sided barrel for the bottom capstan and a 12-sided version for the top. FFM provides diagrams that can be traced and then glued onto the end of the stock to be cut for the appropriate part. I don't feel the compulsion to detail my basic problems there -- they can be chalked up mostly to lack of skill -- but mostly it came down to trying to avoid butchering wood needlessly. In the end, I opted for a round dowel that remained round. For the whelps and trundleheads, I decided to use some heartwood. I bought a chunk of this a while back for a few bucks, and wasn't sure what to expect. It's truly red. It isn't bad to work with, though does get a bit crumbly at times, as with this whelp: That piece is destined for the scrap bin. Here are a few more successful versions, unsanded to show the natural color of the wood: And here is the lower capstan, in effect complete: Right now it's dry-fitted, just to judge its placement. The dowel visible at the top will theoretically connect to the barrel of the upper capstan. And, of course, the bulkhead here -- #9 I believe -- is totally in the way. Cheers, Martin

- 467 replies
-
- 2
-
-
- fly
- victory models
- (and 1 more)
-
Very tidy rigging, Peter. This is a beautiful build, nicely photographed. The figures complement the sails and all the other fine details (in particular I have to admire the line belayed on the bitts -- just the right amount and nice volume). Cheers, Martin
- 431 replies
-
- 1
-
-
- pegasus
- victory models
- (and 1 more)
-
Thanks for the compliment, Alistair, it's encouraging. For the coamings, I cut down my boxwood stock to about 2.7 mm, which is notably thicker than yours and Spy's. I'm not sure now how I came to that particular thickness, but this hatch would look better if it were thinner. I might do another one this weekend. Cheers, Martin
-
Thanks Nils -- You're right about that. But your own build has inspired all of us to think about the fine details of these beautiful ships. Even if they're not visible, simply knowing they're there makes the build all the more enjoyable. Cheers, Martin
- 467 replies
-
- 2
-
-
- fly
- victory models
- (and 1 more)
-
Jon -- There's actually quite a bit of riggin you can do while the masts & spars are off the ship. Especially with the bowsprit, if you attach the spars to the mast, you can then attach many of the running lines, giving yourself plenty of extra line that will be belayed onto pins later on. I made a secure base to hold the masts and bowsprit so that I could rig them by drilling large holes into an 8" long 2x6 -- 2x4s weren't stable enough. It's surprising that what seems like chaos before you start, really turns into a logical series of (somewhat repetitive) steps that make real sense. You'll enjoy it. Cheers, Martin
-
Hi Spy -- That's the foremost hatch on the Main Deck; I believe it's just aft of where the Forecastle will be. I sized it just to fit the opening in the plywood. If it looks too narrow, then perhaps coamings are too thick? Thanks for checking in, Martin
- 467 replies
-
- 1
-
-
- fly
- victory models
- (and 1 more)
-
Hi Jon -- Glad to see you're back at it. The trestle trees look good; they can be surprisingly tricky, since they're a bit small and vary in size. Like you, I relied on Hahn's dimensions, but studied the MS plans diligently to get all the blocks in place. Even after I mounted the masts, however, I still found that I'd missed some details and had to squeeze my fat hands through everything to put them in place. As for the ebony -- I managed to get some for the Ratt, and actually found it pretty unpleasant to work with. It doesn't take shapes willingly -- won't bend. And I've heard over and over again that the dust is toxic, so that sanding has to be done carefully. Most people, I think, do what you did, and that is dye an easier wood. I painted some of the QD rails, and in the end can't tell the difference between them and the ebony. Cheers, Martin
-
Just a couple of quick photos. First is of the 2 lateral bulkheads with the fore & aft set in between. I've added door knobs, which I made from the heads of little nails. They look a touch large, but I couldn't think of anything smaller. Next is the ladderway. As Spyglass has mentioned, this hatch is pretty narrow for a ladder. This is a ladder from boxwood that I made using a jig Alan Yedlinsky describes. I sanded the stringers down quite a bit to squeeze the ladder in. It's all dry fitted for now. Cheers, Martin
- 467 replies
-
- 1
-
-
- fly
- victory models
- (and 1 more)
-
"More steady" Nils? My word, you set a brisk pace already. Great work, and fascinating detail as always. Martin
-
Hi Mike --- I've been wondering about what to do with those extensions as well. The ones in the waste do come out after you put the gunport strip on. The ones supporting the q-deck and forecastle pose a different problem and a challenge to anyone thinking about kit-bashing. I guess you could just cut them and replace them, but the planking would -- I believe -- still go between the bulkheads, not covering over them. To run planking over them would alter the dimensions of the deck, making it even more crowded than it already it. The stern extensions also pose a problem, mostly in that they're flimsy, and in opening up the cabin I've made them even flimsier. Cheers, Martin PS -- On the topic of the kit's wood, I'd say it's definitely adequate, and even better than the wood that came with my Rattlesnake. But I do think boxwood is better looking.
-
Hi Alistair -- I've looked at your bulkheads quite often. I even made pilasters along the style you used, but then found that they were much, much too large. And you're right, I did put the gunport strip on, but worried that it was in the wrong place so I took it off. Then I started thinking that I might have an easier time installing the hatches, bulkheads, etc etc without the strips, so I haven't put them back on yet. Thanks for checking in, and thanks to others for the likes. Cheers, Martin
-
Thanks for that, BE. I'm not completly happy with the bulkheads, particularly the doors, but can't think of how to improve them. Not to worry about Bounce and treats. If a treat exists, she has had it, and now expects it . . . demands it (she's a terrier, after all -- in the 14th century that classification was generally spelled terrour). Cheers, Martin
-
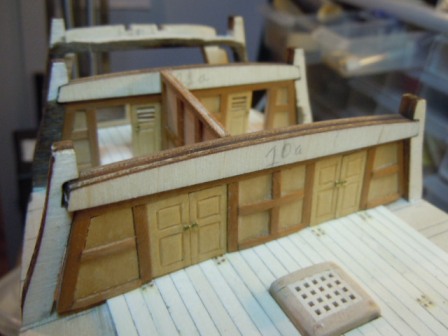
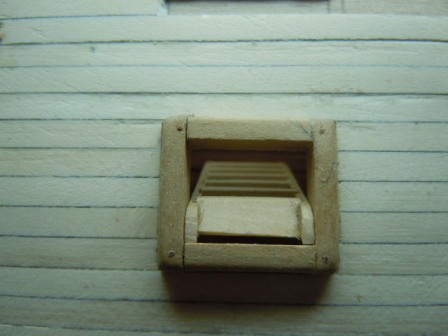
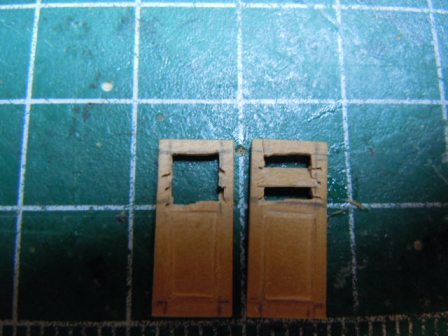
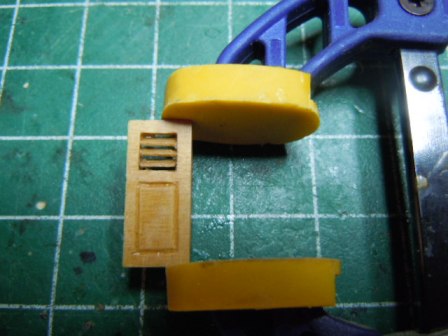
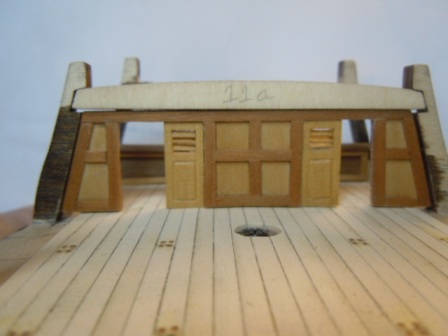
Bulkheads: The two bulkheads under the Quarterdeck are straightforward, especially when following the advice in FFM, to use thin plywood on which to apply veneers. That's what I did, but still found the work surprisingly slow. Cutting the ply from the template was a snap, as was gluing the veneers. I had some 1/64" boxwood strips that I outlined with 1/64 cherry. So far so easy. For the doors, I used some 11/16 X 1/32 boxwood, that I also happened to have on hand, and they seemed to work quite well as scale representations. Then I read David Antscherl's suggestion that louvers would be nice, and I looked admiringly at BE's louvered doors. There was my challenge. I had some very thin boxwood scrap from some trimming I'd done earlier, so I thought I'd use that for the louvers. But the question was how to get louvers into the door so that they'd stay? Now, I have a micro mill that I haven't figured out how to use yet, so I thought this might be a golden opportunity to put it to work. After several hours of trying out different clamping methods and coming up with a small enough cutting bit (I settled on a micro burr that I use for carving with the Dremel), I ended up with this: Ouch! Those are so ugly that any self-respecting crew would mutiny. Lesson: more practice, more thinking about how to use the mill, and where to get tiny end mills to cut something at this scale. In the meantime, I cut some narrow strips of the boxwood veneer -- which gave me cleaner edges -- and simply glued them into the opening of the door at a somewhat appropriate angle. I aimed at getting 4 louvers per door, but they proved so finnicky that I settled for three: Here, then, is the aft-most bulkhead with two of the louvered doors in place -- no knobs yet: The other two doors are not installed yet because they will be shown opening aft, and I didn't want to chance having them break off. Through the doors you can see the first stages of furnishing the Cabin, with a walnut window seat. You can also see that I've been experimenting with staining the bulkhead with walnut stain in hopes of not having to paint. I'm far from satisfied with the result here. For the second bulkhead, I decided to free myself from the burden of louvers, and just cut conventional panels on the doors, marking out the distances in pencil and then running an exacto point alongside a ruler, and then deepening the cut with a 1mm v-gouge. In these photos my work looks as though I just dashed through the gouging, but in fact each door took around 45 minutes. Meanwhile, Bounce has been to a birthday party -- it wasn't hers, but she assumed the gift would be something she could eat. Oh, the outrage!


- 467 replies
-
- 5
-
-
- fly
- victory models
- (and 1 more)