
HOLIDAY DONATION DRIVE - SUPPORT MSW - DO YOUR PART TO KEEP THIS GREAT FORUM GOING! (Only 20 donations so far - C'mon guys!)
×


Martin W
-
Posts
1,412 -
Joined
-
Last visited
Content Type
Profiles
Forums
Gallery
Events
Everything posted by Martin W
-
 Hi Nils -- That's a teaser. I ran into something like that on the Mizzen mast of my Rattlesnake, and it ended up that I had set the rake of the mast a bit too much aft. That doesn't offer a solution, but I have to think that someone with more experience will have something for you. Good luck, Martin
 -
Beautiful work on the chain plate! I think I'm going to have to study metallurgy! You've also done a fine job of making the detail of the decoration visible. I like that white line and the white of the horns. So, in making the plaster cast, how did you get the detail? I ask out of complete ignorance of any kind of casting technique. Cheers, Martin
-
Hi Mike -- I have to say that mine fit well also, and I kept thinking I was doing something horribly wrong because everything looked so square. In the end, I did manage to get 2 bulkheads too high, but, oh well. That's interesting news about the redheart turning orange. I have already put polyurethane on the bit I used on the capstan, and since I'm not going to use redheart on the gun carriages (which is why I got it in the first place), they won't be in any danger. But now I wish I had thought to change out the extensions as you've done -- they look terrific. That bear looks pretty big -- but that pose suggests that he's got a negative opinion! Cheers, Martin
-
Hi JPett -- Your stern looks really good. And those gun barrels are also sharp -- but to my eye they look oversized; what am I not seeing? Here's the link to my current build: http://modelshipworld.com/index.php/topic/5960-hms-fly-by-martinw-amati/ I'm fully embedded with the Fly/Pegasus crowd, though still find lots to admire with my old Ratt - mates. Both of these models are really good, with lots of detail, and the builders in both camps are doing phenomenal work. Cheers, Martin
-
Right, and one challenge with the rigging is that the more you add, the tighter the spaces you have to squeeze your fingers through.
-
Those extensions look good, Mike. I can't wait to see how they look as the build progresses. I'll have to second Spy's concern, though. The bit of work I've done with redheart showed that it can be crumbly at times, so if the grain doesn't run the lenght of a piece it will be brittle. I also think it would actually look more natural for the grain to run the length of each piece, even when they abut, since that's how the wood would be used anyway. Cheers, Martin
-
Lovely work on the rigging, Nils, it looks taut and precise. You've done terrific work. Martin
-
Spy -- that's more than a pennyworth, it's plenty of valuable information. i definitely agree about the soaking and resoaking -- in fact, my concern with my jigsaw joint began by my thinking that I'd soaked the strips too much and inadvertantly opened one side of the joint. But I now see that multiple soakings don't hurt, they help. And those vertical curves are truly sweet. Still, it's baffling to me why the joint would not meet on the bulkhead -- why design a weak joint into the build, if that was Chris Watton's plan. And like you, I'm going to have to recut the bowsprit hole, both to open it up and to raise it -- that's the fault of getting bulkhead #1 in too high. I've also cut down the cross piece of 1 & 12 so that the forecastle & quarter deck will sit properly. Thanks for detailed info! Cheers, Martin
-
Well, maybe. You'd have to bend the strips in order to wrap them around the bow. What would be easier, I think, is just to set the forecastle & the quarterdeck on to check for how they sit. If they are in full contact with each the bulkheads, and if the bulkheads are square to the keel, then everything should be copacetic. The strips are such a ROYAL pain that there's no use agonizing until necessary.
- 467 replies
-
- 1
-

-
- fly
- victory models
- (and 1 more)
-
Hi Mike -- thanks for checking in. The way I figured out bulkheads 1 & 12 were too high was largely by way of setting the strips along all the bulkheads, looking at the gunports, and trying out different adjustments. When I began to think that those 2 bulkheads were off (Alistair's suggestion really helped there), I looked back at my notes, and saw that I had had difficulties in getting them to go down onto the keel as far as I thought they should have gone. Although I didn't mention anything about this in my notes, I do recall setting the forecastle & quarterdeck on the bulkhead to test for level, and they seemed high then. And then this past weekend I looked at their bottom portions in relation to the rabbet, and began thinking those might be high. And that's when I decided they had to be off. Whether the fault is mine or the kit's, I don't know, and it doesn't even matter. I also recall that the bulkheads can be hard to fit onto the keel. I took that to mean that the fit would be permanent, but it also means that you have to be sure about the location, the squareness, and everything else before putting a drop of glue on. -- I have a memory of looking along the edges of all the bulkheads, thinking I was going to have to do some faring, then realizing I set in a couple backwards. As for the stain -- I'm actually surprized at how good it looks. I had really planned on using some redheart, and had already begun doing some provisional cutting of the redheart stock for the carriages. But since Chuck's are boxwood, and are right on scale, I thought I would let this one instance of non-natural color creep in. Let's hope it's not a slippery slope of cranberry! I'll be looking forward to seeing your carriages soon. Cheers, Martin
- 467 replies
-
- 1
-
-
- fly
- victory models
- (and 1 more)
-
VERY nice work, Vitus. The pins and gudgeon are delicate pieces, and your soldering looks just about perfect. Cheers, Martin
-
Jon -- In looking back over the photos of the collars, I just have to reiterate my admiration. I know how tiny these pieces are, and when blown up in the pictures any little flaw looks enormous. You've done some fine work there. Bravo. My kit was also a Mamoli kit, and I also got it well below their price -- with the added wood called for in the practicum, I still paid less than half (I recall it being somewhere around $250). So it's possible to get a kit for much less than you'd pay directly from Mamoli. But you'll still have to shell out for upgrading all the crummy fittings -- and that seems to be true for virtually any kit. Rigging, gun barrels, lots of the wood is simply rubbish. Anyone thinking of building the Rattlesnake, however, will do well to take it on, using either kit. It's a beautiful ship, and an enjoyable build. It is also just challenging enough to be a great skill builder without overwhelming a modeller (like me) coming to it with just a little experience. Jon's log, Bob Hunt's practicum, and MSW are all great guides. Cheers, Martin Martin
- 974 replies
-
- 1
-
-
- rattlesnake
- mamoli
- (and 1 more)
-
Nicely crafted work, Jon. Those collars and hearts sure beat my versions cut out with the Dremel. Very nice indeed. I'm also glad to hear you're going to rig the crowsfeet -- they really do make a nice appearance. I have an account of having made the euphroes on my Ratt log. Now that I have a mill (which I've successfully used twice), however, I might make them differently. Really, though, the actual rigging of the crowsfeet is not that diffiuclt. Keep at it. Martin
-
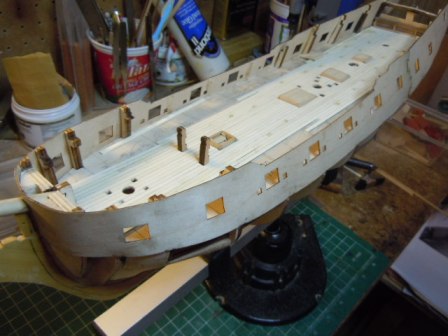
Just a quick update. I pulled off all 4 strips, soaked them again and refit them. In putting them back on I paid especial attention to the ports themselves, and how they lined up vis a vis the deck and the bulkhead extenions, trying to keep everything aligned and as straight as possible. Here's the result: To my eye, this looks just about right, with the ports all pretty much on a level. The culprits were, as Alistair suggested, two bulkheads, #1 and #12, both of which were about 3/8" too high. Looking back at my notes from February or so, I saw that these two gave me considerably more difficulty that any of the others. They looked wrong, but couldn't go down onto the false keel any further, even with considerable sanding. So now I see the first consequence to that error. Thanks again to everyone for the help and suggestions. It's a much better version of a bad design than I had before. Cheers, Martin

- 467 replies
-
- 2
-
-
- fly
- victory models
- (and 1 more)
-
Nils -- It's taken me a while to catch up: whew! there's lots going on here. Bravo on little Nina!!! And your build, as always, shows some impressive progress with more and more details. Your crowsfeet look expertly done (your eyes must be sharper than my own). And your workroom is a testament to the breath of your experience -- and to your tidiness. Cheers, Martin
-
Mike -- that's a very intriguing bash. Even if you did do the waist extensions, at least you know what the procedure is, and that it should work. Cheers, Martin
-
Thanks guys, the pictures do help a lot, just to see what the angles should be. I would appreciate having them here for at least a few days, so I can study them as I keep at this. Alistair, I too wondered about the bulkheads being too high, but they are in fact down on the false keel as far as they would go. At the bow, I used the dowel, which is the thickness of a bowsprit, to gauge the height of the strip -- and maybe that put the strip too high there? Following Toni's suggestion of setting a batten along the tops & bottoms of the ports revealed that problem is, as Spy suggests, in the waist. Somehow the strip went low there, so that the aft strips then had to rise upward. The aft ports all move upward. At this point, my thinking is that I should try to reset the strips, just because the angle is too severe to be hidden. I think the strip needs to come down a wee bit at the front, up in the middle, to give a straighter line with the aft strip. I'll let you all know how it works. Cheers, Martin
-
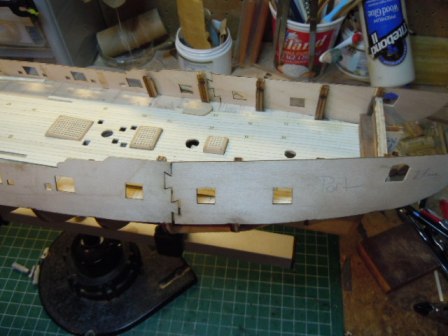
Here you go Spy, two shots from above: Perhaps the problem is that the strip is too high at the stem? That was my problem before, though there doesn't seem to be a lot of room there to lower it. Martin
-
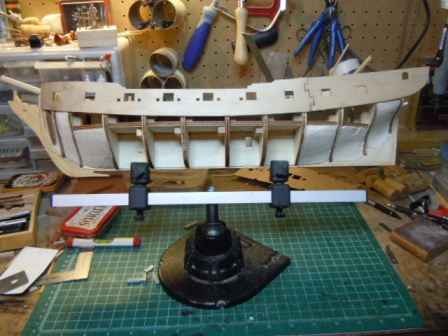
Lots of good advice, folks. As I look over your photo, Spy, I actually begin to wonder if my problem is even bigger than I had thought at first. As Toni reminds me, the first time I put the foreward strips on, I thought they might be forming too much of a crescent, higher at the stem than along the waist; and now, with the aft strips on, I get that sense even more. Here's the full-hull shot you requested, Spy. The tops of the strips are aligned with the tops of the tops of the bulkheads. The port side could come down a skosh, I suppose, and that might tighten the joint. The idea of laying some battens or planking strips along the gunports and where the wale would go is really good. I'm outside cutting wood for bookshelves for the next hour or so, but I'll give that a shot when I come in this evening. Alistair -- you hit the nail on the head when you said that I need to start planking. Yes! Thanks again all, Martin
-
Hi Spy -- Thanks for the response. In answer, let me say, yes this is the port side, and the starboard is just about identical. And, yes, the aft strips do seem to rise a bit, but that's to keep the tops level with the tops of the bulkheads, and to keep the gunports at consistent level with those of the fore strips (determined by distance from the deck). I do recall seeing your reinforcement of this joint, and that was what made me think I should do the same; but I also want to plank the insides of the strips, which is why I wondered if the reinforcement would interfere. More thinking to be done. Cheers, Martin
-
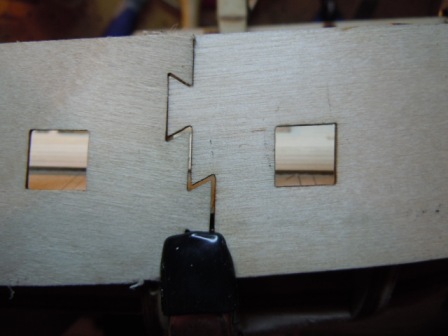
Greetings -- This isn't an update so much as a plea for suggestions. I have attached the aft portions of the hated gunport stips, and have found that the jigsaw joint is quite loose: I don't know why it's this loose, if soaking the foreward strips made them expand or shring (I also soaked the aft strips), or what. I have glued some scrap behind the joints, under the deck. I haven't done this above the deck because I'd planned to plank the inside bulkheads, and didn't want the scrap/blocks to interfere. I know this will all be concealed by the quarterdeck, but I would like to have a neat, shipshape interior. So my question is this: must I reinforce the joint? or can I trust (read HOPE) that it will hold when covered with planking. Cheers, Disjointed Martin
-
Ahoy back, JPett -- it's great to have you back in the Ratt Pack. I just measured one of my guns from the Rattlesnake, and it comes in right at 25 mm. RB Models has guns at 26 mm, which just might do the trick -- or would at least be worth considering. Here's the link. http://www.rbmodel.com/index.php?action=products&group=085 And I actually think that ADHD is a basic component of the initian desire to build model ships. Cheers, Martin
-
Ok, it's done for only the first one. But now you can get the rhythm going, since you've figured out the biggest problems, or at least the first set of big problems. Cheers, Martin
- 431 replies
-
- 1
-
-
- pegasus
- victory models
- (and 1 more)
-
Thanks for that, BE. In looking at them again, I can't help but feel a certain trepidation in handling such TINY pieces, aligning them, and still getting no glue outside the lines. Maybe an IPA to steady these flippers at the ends of my wrists. Cheers, Martin
-
Great work as always, Nils. I recall back on MSW 1 there was a discussion about whether or not the deadeyes should line up neatly in a row, and plenty of people argued that it might be overly fastidious to line them up, since a working ship would always have been adjusting and re-tensioning the lines. Still, we do aim for a kind of ideal. Great photos, Martin