HOLIDAY DONATION DRIVE - SUPPORT MSW - DO YOUR PART TO KEEP THIS GREAT FORUM GOING! (Only 20 donations so far - C'mon guys!)
×


Martin W
-
Posts
1,412 -
Joined
-
Last visited
Content Type
Profiles
Forums
Gallery
Events
Everything posted by Martin W
-
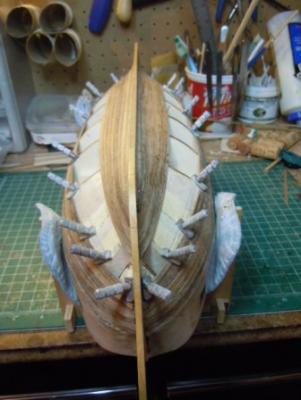
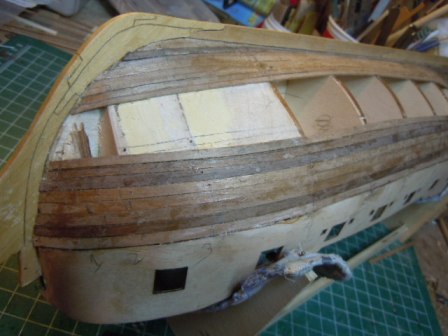
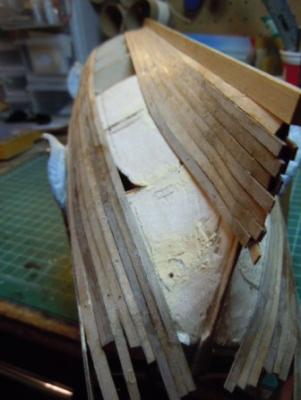
 Well, at 14.52 CST, today, I laid the final plank of the first layer. Whew! Here's the port side view: Those 2 light colored planks are the spiled pieces for which I had to use some scrap of another wood than walnut. Because they're scap, and because they won't be seen, I ended them on the same bulkhead. Overall, I was surprised by how many more challenges this middle band of planking posed than either of the other two. I had to correct my calculations with almost every strake, and especially toward the stern. What this leads me to think is that I'll need to reconsider the calculations for the 2nd planking from the very beginning in order to anticipate that middle band. As I was planking along the bow, I wish I had Spy Glass's forsight to have kept the stem off in order to bend the planks. Aaargh! And by way of updating a previous update, I recalled why I chose to use the walnut for the first planking when I picked up a piece of the lime: it's quite a bit thicker than the walnut, so I thought it might make for too bulky a hull. Now, I need to trim up the stern, cut around the rabbets to ensure a smooth and even rabbet for the boxwood, and then plenty of sanding and filling in low spots (this last came as a bit of a shock: I think one of the bulkheads should have been fared more than I did, since it has an indentation on either side). And I need to figure out how to make the margin between the planking and the ply gunport strip smooth. And I need to figure out where to have the butt joints. Finally, I'd like to say that I've always thought one of the great benefits of living in the States is Thanksgiving!! I hope my friends in other lands have a reason to feast as well, because it is only pleasure to sit around a table with good folks for several hours. An over-full belly makes me feel nothing but but cheer toward all -- Martin
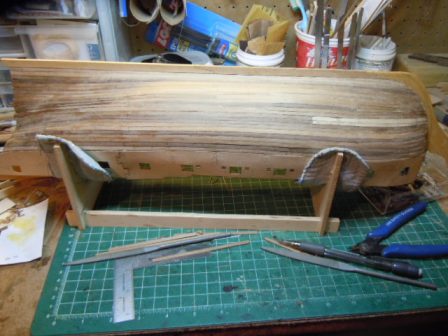
- 467 replies
-
- 4
-

-
- fly
- victory models
- (and 1 more)
-
Great work, Bob. This boat looks so good, I'm definitely in favor of seeing you add another! Cheers, Martin
-
That's a terrific detail to add, Peter, and you've done a great job on it. But, oh, sometimes my head starts to spin with so many, many lovely details to understand, and remember the placement of. --All the more reason to revisit your log, eh? Cheers, Martin
- 431 replies
-
- 1
-
-
- pegasus
- victory models
- (and 1 more)
-
Interesting, indeed. I can't wait to see it. Cheers, Martin
-
Terrific work, Jon. Don't feel bad about those cleats -- I tried carving a few myself (following Bob's direction), and ended up with little pieces that looked more like wooden Dutch shoes than anything else. I did, however, cut the shroud cleats, following Antscherl's method. But those are flat-sided, and easier to cut -- and to cut in quantity. Cheers, Martin
-
Hi JPett -- Great going on the big One-triple-oh! Too bad we all lost our ranks (dunno why) just when you were hitting your millenial. Thanks for the tip on the glue (again) -- I'm going to give it a go. More importantly, your planking looks really nice. The treenails are neatly aligned, and those hooded planks add a great touch. There is plenty to admire in your build! Cheers, Martin
-
Add my voice to the chorus of praise -- for BE, Alistair, you, and MSW!!! As for the bitts, that contrast between the redheart & pear could be interesting and attractive. A good bit of the cross piece could end up being covered with belayed rigging, though, so it would be a good idea to check the rigging charts and see how much will go there. Cheers, Martin
-
Things look good, Mike. Are your bitts cut from red heart? I think I missed whether said. Cheers, Martin
-
Congratulations on your advancement, Peter. And congratulations on getting to spend time in Cayo Ueso, one of the best spots in the universe. It's good to have you back here in the modelling world. Cheers (I'll tip a glass in your direction this evening!) Martin
- 431 replies
-
- 1
-
-
- pegasus
- victory models
- (and 1 more)
-
Great work as always, Jon. It's a pleasure to see how well your build is coming together. Bob Hunt would be proud indeed. Cheers, Martin
-
Hi Mike and Alistair -- you guys both make good points. I spent the weekend attempting to do some spiling. JPett -- one of the Ratt Crew -- suggested I edge-glue a few pieces of walnut planking together to form a wider sheet. Great idea! the only problem was that I found out Titebond II is not waterproof (but it says "Water Resistant" on the label, eh?), and everything fell apart in the soaking. My next effort (since I was too lazy to go out and look for something actually water PROOF, and it was 7.30, and the snow was starting to fall, and, and . . .) was to cut up a piece of scrap left from the frames holding the ply gunport strips (which happens to be 3/63" thick, the same as the planking). That went well enough for me to make another realization: the aim is not to get a parallel piece, but an un-paralleled piece. The bottom edge should fit the previous planks, and the top edge should make for an easier line for the subsequent plank to follow. Aha! And now it's the start of a work week, so I might just be able to squeeze in some time during the evenings. If I do figure this out, it'll definitely be sheet stock from here on! But then, again, stealers & drop planks are always sound options. Watch this space, Martin
- 467 replies
-
- 2
-
-
- fly
- victory models
- (and 1 more)
-
Thanks Guys, I appreciate you checking in. Mike, I think I used Testors -- whatever is sold at Hobby Lobby, my only source for such supplies out here on the prairie. I first had to prime it, though, and I think I also used something from the same label. It was pretty thick, and had the result of blurring some of the distinct lines. Alistair, you're no doubt right. And when I was griping to myself that styrene is no fun, my Un-enjoyment was exacerbated by that fact. Nonetheless, I liked the touch it gives your build & BE's. And then there's the point that one can only learn by trying to do what othes do (and make look SO easy!) Thanks for looking, Bob. Your work on Essex makes my jaw drop day after day. Always very skilled. I might mention that BE's reference to spiling made me go through the planking guides I have and re-read the sections on that technique. Well, as it happens, the very next plank I need to lay has been giving me fits, since it wants to bulge out in a clinker effect. Well, there's the solution. The only problem is that I don't have any walnut that's wide enough and 3/64" thick. This will take some thinking. Suggestions? Martin
- 467 replies
-
- 1
-
-
- fly
- victory models
- (and 1 more)
-
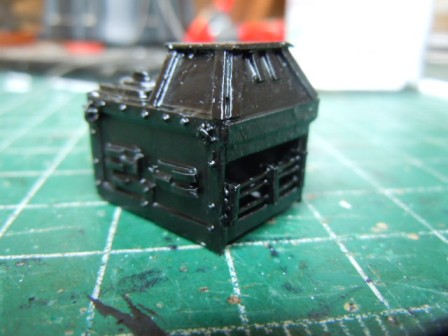
Thanks for that, Alistair. I do indeed remember your boxwood hull, and thought it looked great. I also like your coppered hull, however, and have always asserted that covering up fine details that took hours and weeks and months to perfect constitutes one of the strokes of mastery. I would like to copper a hull someday. (For that matter, I would also like to build something at 1:48, where I might actually be able to see what I'm doing.) Of my previous two builds, one is walnut, the other has holly below the waterline. Since I love the look of boxwood, that's what I've decided on for The Fly. Since I also consider this very much an educational process, my hope is to develop my skill set in calculating, measuring, and shaping. While I'm online, I thought I might show what I've done while waiting for the planks to dry: Here's my stove, fashioned after FFM, BE, and Alistair's versions. It still needs the brass rails along the top edge, and the pan at the bottom, but that's as much as I can think of doing. Like you guys, I covered a block of basswood with styrene (which I didn't get a whole heap of joy working with). The bolts are pieces of wire that I glued into pre-drilled holes. Now as I wait, I'm planning on putting together the gun carriages. It's not bad work, but after about the third one it loses its novelty. Cheers, Martin
- 467 replies
-
- 6
-
-
- fly
- victory models
- (and 1 more)
-
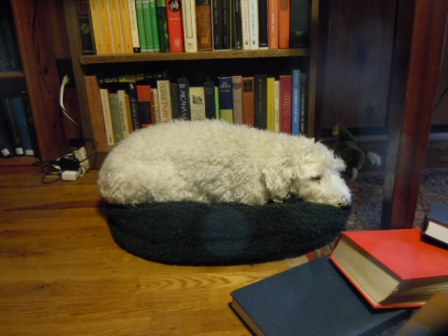
Thanks for checking in, guys, and thanks as well to the likes. It's nice to have folks to talk to about this, since Bounce is doing little more than sleeping and the missus just doesn't want to know. I'm using the walnut because, uh, mmm, well, there was a reason for my decision that I made back in the spring sometime, but I can't recall what it was. The second planking is going to be boxwood, which I ordered to be the same width as the walnut so that the solutions I came up with on the first planking would (theoretically) translate directly to the second. I have, in fact, soaked the walnut planks for a minimum of 30 minutes each, then clamped them in place and left them over night. When I've actually glued them, they're usually pretty well formed. The problem at the stem, I think, was due to not being able to get the clamp close enough and tight enough up against the plank itself. Spy, your solution of the piece of scrap wood looks good. I tried something like that, but the wood was much smaller and kept dropping out of place. Mike, like you, I'm somewhat averse to painting where I don't have to. I like the looks of the painted builds here, but think that using unpainted would might make my own build somewhat distinct (unless my blunders attract all the attention). I also like the look of all-boxwood. So that's my plan (read: hope, foolish hope?). And, BE, thanks for the nice comments. Truth be told, I chose the most flattering pictures. And thanks to William for the canine commiseration. Sorry to hear about his own experiences under the knife. Bounce is getting close to the big one-four, and has a few age issues that lead to other problems. Cheers to all, Martin & Bounce (snore)
- 467 replies
-
- 1
-
-
- fly
- victory models
- (and 1 more)
-
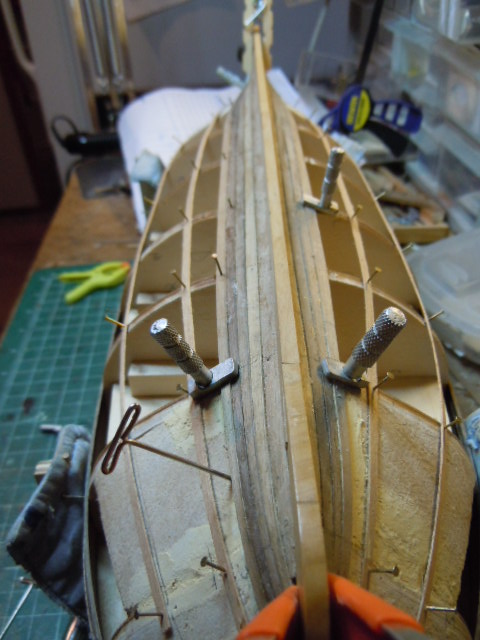
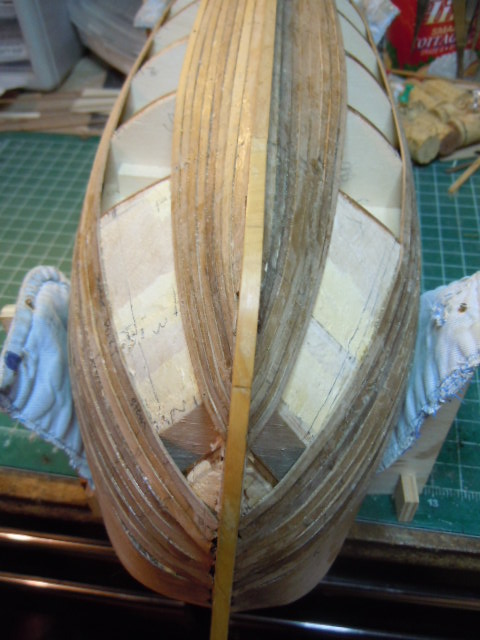
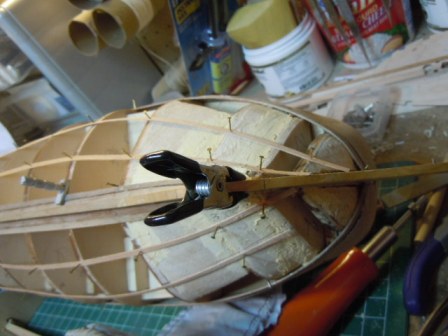
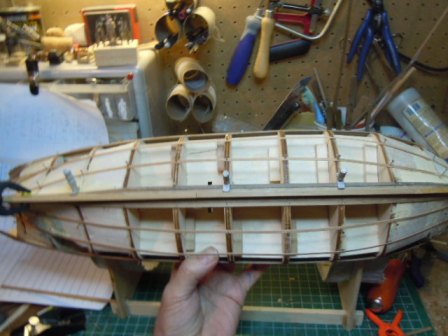
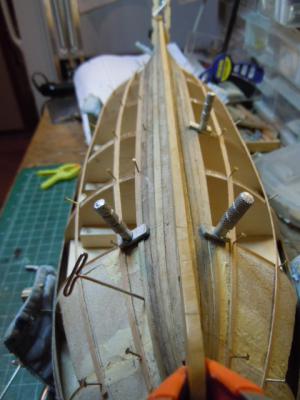
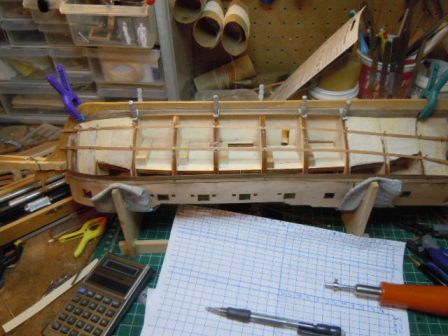
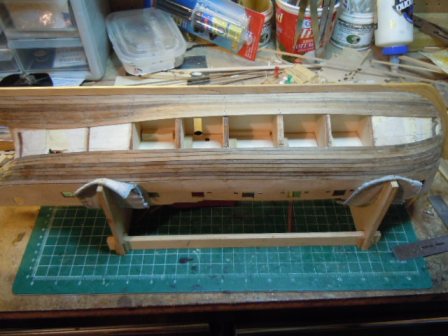
Friends -- It's been a long while since I've posted an update -- so long in fact that I had to go back through my own log to see where I left off. My First Mate and Confidante, Bounce, had surgery to remove bladder stones yesterday, so I'm hanging out with her today and administering some serious pain killers, which seem to have made her lose interest in modelling concerns: Right now, I don't even think a rough sea would wake her. What I've been up to is the first planking. Now, on my other builds I was less than satisfied with the planking, since I got myself into several jams that resulted in impossible strakes appearing in various parts of the hull. So this time I am determined to move will all the care necessary to end up with both an eye-appealing final planking and one that holds some relation to reality and accuracy. I read through the planking tutorials that are posted here on MSW, and the one that was published in Model Shipwright 2011 (sorry, I can't recall any of the authors at the moment, except David Antscherl). Even though these were for the most part (not entirely) redundant in describing the method of setting down battens, then measuring the distance between them at each bulkhead, I found the slight differences to be clarifying, and the additional illustrations among all the tutorials to help me see how to proceed. Here are the battens: This preliminary step took a surprisingly long time, as I found that whenever I sighted along the hull from a slightly different angle I would decide they had to be moved in one way or another. My aim was to get them spaced evenly, and for them to delineate straight, parallel bands that would accommodate more or less the same number of planks. So, first I laid the Garboard planks: I bevelled the edge to get a clean fit in the rabbet, and did a little tapering at the bow, but didn't really see that much else needed doing. After working out the number of planks in each band (I'm using the kit's walnut, which is 5/32"), I could then calculate the amount of tapering needed for each plank by measuring the distance along the bulkheads. I recorded the calculation in the chart visible above. Upholding the absolute rule that no plank can be tapered under half its original width, I found that most of them needed a good bit of tapering at the bow, from bulkhead #4 forward. Doing this kept them from curving upward. Here are the first four on each side: Once I got the first band filled in from the keel, I started downward from the gunport strips (or upward, since the hull is upside down), following the same procedure, but without much tapering at the bow. Here you can see one of the nagging problems I ran into, namely getting the planks to set into the rabbet at the stem: I would think I had it, clamp it, check, tighten the clamp, waiting for the glue to dry, and upon removing the clamp relying on my sailor's vocabulary to find synonyms for "oh, drat, the blessed clamp let the dang plank slip." (I've never understood why, but I find that the fouler the language the more effective the catharsis.) I expect, however, that I can bevel those wayward planks with an exacto so that the top layer will fit in smoothly. That's the plan, anyway. -- I subsequently replaced the clamps I was using with planking screws, which were a bit tricky, but definitly held the planks down tighter. Here's the view from port, with the first two bands complete: And here's the starboard bow: So far, by tapering each of the planks (and sometimes recalculating the taper) I haven't had to use any stealers or drop planks. But I suspect that will change in the middle band, where the curve of the bow seems to have most effect on the lateral bend of the planks. At the stern, this middle band also covers the broadest area of the three bands, as you can see here: Yes, you're right, that is one ugly hiney, definitely in need of a trim. That hump in the planking right about bulkhead #10 actually disappears when the ship is set upright -- it simply traces the curvature of the hull. As always, I've peered for long stretches at the build logs of my betters, in hopes of approximating their skills. At one point in his log, Blue Ensign asks himself, "has it really been twelve days since I started this?" That has tickled me almost every evening, since with the measuring, tapering, soaking, forming, gluing, clamping, re-clamping, I have managed maybe 2 planks per night. I started this phase sometime back in early October, so I guess I might say, paraphrasing BE, "Six weeks!?! Criminey. And if, IF, IF I get this first layer right, I'll be doing this all over again, and with boxwood --Woohoo!" As always, comments, criticism, advice, warnings are all welcome. Cheers, Martin

- 467 replies
-
- 3
-
-
- fly
- victory models
- (and 1 more)
-
Well, you guys are a different generation -- I thought those must be novels. I like those scuppers, Vitus. I don't think I'd seen those on the plans. Cheers, Martin
-
Mike -- I have gotten the rigging for my 2 rigged builds from Keith Jewell in the UK (Isle of Man, I believe); his company is called Modelling Timbers. What I like is that his line is high quality Egyptian Cotton, very nice to work with, easily dyable, and it holds knots. And Keith is a good guy (or decent cove, as I believe one would say in Manx). Here's the link: modellingtimbers.co.uk/4.html On the other hand, I saw Chuck do a demonstration of making rope at the NRG Conference last month, using nothing more than the inexpensive rope walk from Model Expo (I believe it runs about $30 -- I bought one some years ago, and used it to make thicker rope from my cotton thread). In his charming way, Chuck insisted that we should all be making our own rope because it's so easy. And the rope he makes is quite nice, indeed. If he takes over the wood milling for the world of modelling, he might want out of the rope walking. And here's the Maestro himself: Cheers, Martin
-
Great work, Mike. That redheart looks stunning, and the cutting you've done on has ended up with sharp, clean lines. I'm impressed that you can work so late -- if I tried working on a build past 8 I'd never sleep. Cheers, Martin
-
Great work, Jon! I can't get enough of those shots of the head -- that's a difficult and complicated series of details, and you've handled them well. And that's good news that your dentist was willing to hand over his burrs. Congratulations on that one! Cheers, Martin
-
Mike -- I had wanted to try following the pattern from FFM as well, liking the look of those anchor planks. But as you indicate, they have to be slightly larger than the standard width, and when I ordered the holly for my deck planking, I neglected to take that into account. I'm wondering now, looking into the hazy future when I have a quarterdeck & forecastle to plank, if I should order some wider stock, even though it's liable not to match. Cheers, Martin
-
Hi Mike -- Terrific update! I must say that I like the taper you put on those planks leading into the hatches, it's a really nice touch. And your mast partners are also handsome. Who cares that they might get obscured, they could also provide an intriguing detail for the discerning (and admiring) eye. An interesting possibility of using your mill to shape the bitts. I'll paying attention, since I, too, have a mill that I have not really figured out. It seemed like just the thing to raise my capacity to a new (ahem) level, but so far I've mostly managed to destroy otherwise nice pieces of wood. Oh, those clamps! Cheers, Martin
-
That will be an interesting sail arrangement, Nils. The color of cloth you've chosen also looks just about right. I hope you got everything straightened out with your heater. I had to replace the air-conditioning/heating system in my house last summer, just during the middle of July when Oklahoma temperatures reach their hottest. It's good you caught yours before the real cold came on. cheers, Martin
-
HMS Victory by JPett - Corel - 1:98
Martin W replied to JPett's topic in - Kit build logs for subjects built from 1751 - 1800
Hi there, JPett -- This is a fantastic build, and your narrative of the travails along the way is as interesting and clear as always. Here's the planking mantra: "hmm, that looks right . . . it's gotta be right . . . . oh, @#$%&* now I have to pull it off" Say that 3 times and you just might get the plank to sit right. Cheers, Martin -
Glad to hear you're still at it, Scott. One knot at a time! Cheers, Martin