
HOLIDAY DONATION DRIVE - SUPPORT MSW - DO YOUR PART TO KEEP THIS GREAT FORUM GOING! (89 donations so far out of 49,000 members - C'mon guys!)
×


clearway
-
Posts
2,234 -
Joined
-
Last visited
Content Type
Profiles
Forums
Gallery
Events
Everything posted by clearway
-
 Hi Boyd- will certainly look ok when glued in and varnished- there are plenty of reference works on shipbuilding if you want to research further. Been having thoughts about the chainplates billings provided and am thinking of scratch building more accurate ones- are you game!? Keith
 -
certianly looking the part now Keith- erm bad news though- if rigging victory is doing your nut in- wait till you rig the cutty sark! Keith
-
good job there, Are you going to add planking to the deck or just use the printed deck? Keith
-
Fun huh! I normally rig all the shrouds first then move on to rigging the yards, leaving the backstays till last. I must be a bit nuts as i love doing the rigging. Are you going to rig the braces correctly and include the missing ones? the braces on the foreyard are wrong on the billings plan. Keith
- 104 replies
-
- 1
-

-
- victory
- billing boats
- (and 1 more)
-
Hi Keith, when i was nearing the end of my cutty sark build i realised i was one deadeye short!!!!!! Luckily i had a spare in my bits box- on the other hand i did end up with a few blocks left over to add to my odds n sods collection. Keith
-
coming along nicely- i was considering buying this one myself but opted for billings hms victory instead. Keith
-
looks fine from here, everything tidy and square- importent to get the skylight right as it is very noticable on the finished model. Good luck with the figurehead! Keith
-
there is also www.model-dockyard.com based in u.k. but do overseas mail order as well as cornwall model boats.
-
thanks boyd- will certianly bear your suggestion in mind- i use walnut because it has a really nice colour when it weathers a bit. Keith
-
coming along nicely there jesse- nice work. Keith
-
You should be able to order wood strip from either your local model shop or many of the online model shops. I ordered the extra wood for the wales from my local model shop. Keith
-
strakes= planks, wales are the thicker bands going along the hull and stealers are infill planks. Keith P.S. also read plank on frame models volume 1 by harold underhill
-
looking good and being paper should be easy to staln and varnish. keith
-
Looking very nice there. If you want finer window frames you can use strips of self adhesive paper cut from address labels or franking labels etc. applied direct to the glazing- i will be using this method for my billings victory.
-
Thankyou Boyd, just using 5mm wide obechi for the wales as she is going to be painted. If i was leaving her "natural" finish would have used walnut. I am thinking of replacing all the ply posts for the pin rails with 4mm square walnut though and just varnishing them. Keith
-
also you will need to taper the planks at the bow and most of the stern, as boyd says you can also use stealers- check my log there are shots of bow and stern and a shot of the hull upside down to give you an idea. Took me a couple of weeks tp plank mine. Keith
-
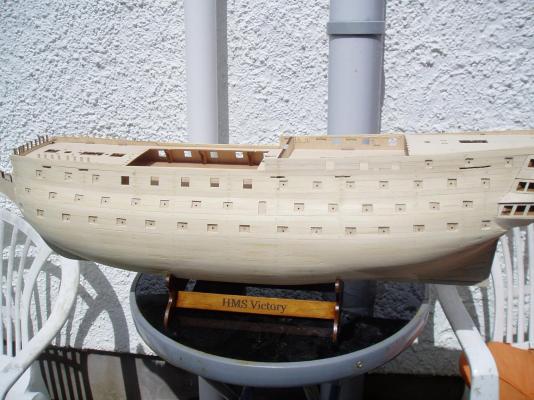
While waiting for timber for the wales to be delivered (E.T.A. sometime this week) decided to finish the display stand- was varnished using ronseal quick drying dark oak stain and varnish. Also cut all the "blind" gunports to size. Keith
-
looks good so far- i built the billings cutty sark and their method was to use blocks of balsa which were then sanded to shape after fitting- you then sealed and painted the hull so no good ifyou want a natural wood finished hull. Keith
-
Nice job there,i used the copper tape method for my cutty sark (5mm wide x 15mm length) and ran the top two "runs" parallel to the water line- took something like 3000 tiles to do all the hull- it is the billings 1/75 version. Vowed i would never do it again, but here i am having just ordered 60 metres of tape for my Victory! Keith
-
Thanks david- certianly enjoying the build- i think! Will certianly take a lot of scratchbuilding or upgrade of fittings to get a more convincing model with the billings kit though. Keith
-
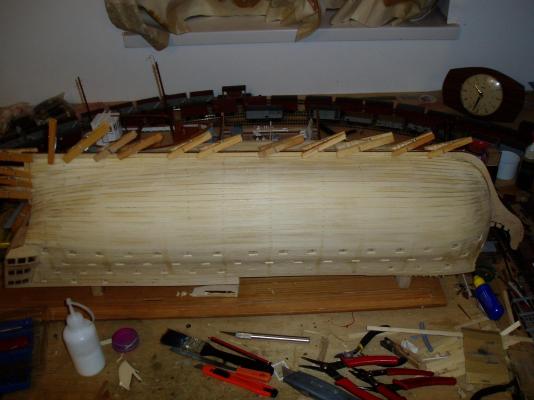
Not much advance over the weekend due to nice weather and gardening taking priority! Got the overlays for the prow, keel and sternpost in place, fine sanded the upper hull and opened out the "un-lidded" gunports. Next job is to attatch the wales when the timber on order with local model shop arrives. Will leave final shaping of upper hull till as late as possible as i dont want to weaken the bulwarks on the quater deck too much. Keith

-
seeing this brings back memories from 17 years ago! I bought my cutty back in 1997 and the packaging for the fittings is a different style so may be 1970's vintage. Mine was just die cut as well- adds to the fun. Are you going to alter the unrealistic anchor deck?- see my post in finished kit built gallery. Keith
-
looking great there, wish i had invested in the caldercraft victory instead of the billings one now! Keith
- 439 replies
-
- 1
-
-
- victory
- caldercraft
- (and 1 more)
-
looking good there, i recently remasted and rigged a very old version of the mantua kit for the owner of the local model shop which must of been about 30 + years old, luckily all the instruction/ plan sheets were still in storage at his grandmothers house! it does build into a nice model. Keith


