RichardG
-
Posts
695 -
Joined
-
Last visited
Content Type
Profiles
Forums
Gallery
Events
Everything posted by RichardG
-
When doing my coppering, I found peeling the paper away from the copper worked better.
-
Seeing booklet takes me back about 50 years 😀
-
My most recent order was placed on Oct 13th and arrived yesterday. Unfortunately we've all been spoiled by Amazon and their billions of dollars investment. I can see the mail arrive from my "working from home office". Yesterday I could see him put the mail in the box but noticed he had a flat cardboard package as well. He drives a couple of feet to the end of our driveway. I then manage to get downstairs and beat him to our front door. This is what passes for excitement in these times.
-
What do I want for Christmas
RichardG replied to Worldway's topic in Modeling tools and Workshop Equipment
The Byrnes thickness sander is next on my list of "expensive" tools. However, that will also mean improving my dust collection system. Fein vacuum cleaners are supposed to be amongst the quietist, so that's on my list too. But there's also the space issue. One option I have considered is some good pre-planning and just using the sander outdoors as weather and season permits. This is not a simple hobby 🤔 -
Can I ask where from?
-
What do I want for Christmas
RichardG replied to Worldway's topic in Modeling tools and Workshop Equipment
I find the disk sander I have (unfortunately not the Byrnes one) very useful. Also do you have the cross-cut sled for the saw? I'm using this a lot. -
What do I want for Christmas
RichardG replied to Worldway's topic in Modeling tools and Workshop Equipment
I just one of these to help the filter on my shop vac clogging up so quickly Haven't bought the bucket for it yet though. -
What do I want for Christmas
RichardG replied to Worldway's topic in Modeling tools and Workshop Equipment
My first response when my wife asks me this "How much can I spend?" -
A "like" on the pear and a big "sorry to hear that" on the accident. Unfortunately you can never domesticate power tools. I hope it heals quickly and well. All the best
-
My wife is teacher who is currently doing remote learning because of the pandemic. She's been finding all the sitting makes her very stiff, so we purchased a nice adjustable desk with a 42"x24" top. I've just realized this would make a really nice bench when she retires in 3 years or Covid ends (whichever is sooner). I won't mention it to her yet though. We ordered it from Amazon https://www.amazon.com/gp/product/B08L5JZ6J5. It was not cheap ($300) but it is very sturdy.
-
Bill, my like of your post was that you're persevering with the build, not that I'm happy with the problems with the kit.
-
Byrnes Table Saw making a 1mm by 1mm strip
RichardG replied to CharlieZardoz's topic in Modeling tools and Workshop Equipment
I'm curious, what size blade did you use? -
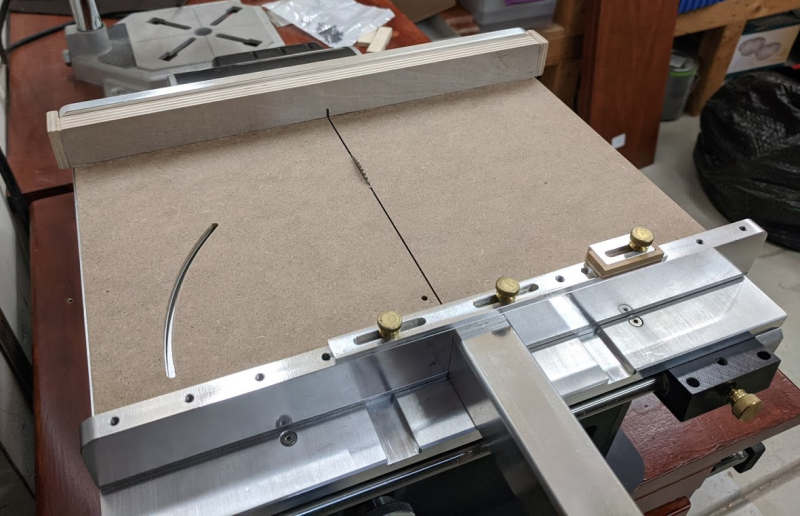
As I was beginning to use my new saw, I was getting some tear-out when using the cross-cut sled with a 3" 70T blade. So I decided to make a zero clearance insert. Using some 1/8" hardboard and plywood, I came up with this: I made a quick jig for my scroll saw to allow me to cut the slot for the angle fence. The fixture just lifts in and out, the base is a snug fit front to back and the plywood at the rear stops any sideways movement. The stop was then 1/8" too a tall so I made a small fitting from 1/16" plywood and boxwood to raise it up. The original thumbscrew was too short so I replaced it with a new brass one. Although I didn't need to, I replaced the others to match. I also needed a longer pivot screw for the angle fence but the main adjusting screw was fine. This of course means I've lost 1/8" from the maximum thickness of cut. Most of the time this will not be an issue but I have additional 4" blade if I need it.

-
- 4
-

-
Absolutely agree but not for planking strips 😉.
-
The Byrnes saw is very small and quiet but I understand your dilemma. At this time we don't seem to have a solution. As people have pointed out (Chuck from Syren in particular), it's not a fun or very profitable business.
-
Byrne's saw for cutting thin brass???
RichardG replied to CPDDET's topic in Modeling tools and Workshop Equipment
Apparently the saw will cut "larger" stock as well. Greg Herbert used the saw to help make this tiller. https://modelshipworld.com/topic/370-speedwell-by-dvm27-greg-herbert-ketch-rigged-sloop-1752/page/7/?tab=comments#comment-654207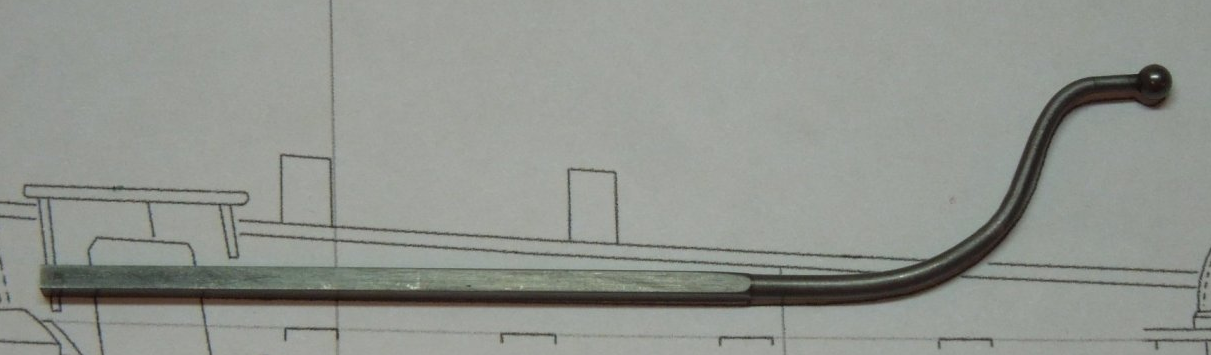
-
I used this paper when coppering my cutter. It's an interesting and comprehensive document.
-
Byrnes Table Saw making a 1mm by 1mm strip
RichardG replied to CharlieZardoz's topic in Modeling tools and Workshop Equipment
I've used paint stirring sticks. The one gallon size is about right. HomeDepot sell them for about a dollar for 10. -
Byrnes Table Saw making a 1mm by 1mm strip
RichardG replied to CharlieZardoz's topic in Modeling tools and Workshop Equipment
As a newbie to the Byrnes saw (although I've used a larger saw quite a lot), I don't think you need a push stick that small. You would be cutting 1mm strips from a wider strip that is 1mm thick. You keep cutting strips off until the remainder is too narrow to work with. The remaining strip will be wider than 1mm. How narrow a strip would be left will come with practice but I'm assuming several mm. -
This stuff is great. Make sure you use the alcohol based one, the low-VOC version is not as good.
-
I did roughly the same, starting it with a knife and making sure I curved the paper back not the foil. Holding with the knife while peeling is a good idea - that I didn't think of. As to gloves, I didn't use those. I find with working at a small scales, my coordination is difficult enough even without gloves. I did not have any issues with fingerprints. I think this varies from person to person. You might want to try first.
-
Patrick, I forgot to mention that the hull already had a coat of poly applied many years previously. You might want to using sanding sealer prior to the acrylic. Just sanding sealer would work but I found the color evenness of the primer helpful in keeping the copper lined up.
-
Just a bottle of acrylic from Hobby Lobby I think. Thinned slightly and a couple of coats. Since I was covering it up anyway, it didn't have to be perfect (which is good given my below average painting skills).
-
I think sealing the wood is a good idea. I used a gray primer on my hull before coppering. This provided a smooth base, enabled me to use a sharpie to mark the waterline, and was a good contrast with the copper color. 100% agree on the basswood.
-
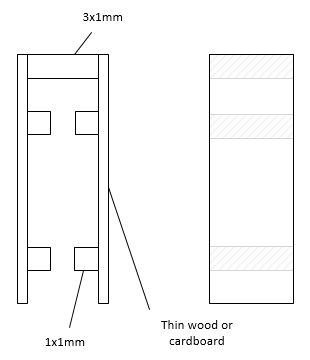
Maybe a small jig made from scrap wood or card. By using a little bit of the 3x1mm and 1x1mm you can get the spacing correct. I'm thinking of something like this This would be flexible enough to use with fingers to hold the spindle in place while gluing. If the top and bottom rails are already in place then just have the 2 pieces without the top strip. If you make the width of the jig the right size, it might also help with spacing.