HOLIDAY DONATION DRIVE - SUPPORT MSW - DO YOUR PART TO KEEP THIS GREAT FORUM GOING! (Only 44 donations so far out of 49,000 members - C'mon guys!)
×


mtdoramike
-
Posts
2,094 -
Joined
-
Last visited
Content Type
Profiles
Forums
Gallery
Events
Everything posted by mtdoramike
-
Very nice work Grandpa, she will be a real beauty when you finish with her. The Mantua Victory was always one of my favorite representations of the Victory. Oh and by the way, Grandpa, your not going to mimic every single thing on the model to the real ship, at best all you can do or hope to do is suggest, which is what your carving are doing, and a fine job I might add at that.
-
With the above said, if i built the Victory again, i would build it without sails so the entire deck area as well as spars could be easily seen as well as all the rigging. I would also like to add here that the Victory and it's display case are quite large. The display case that I put here in was 54" in length, so it has a very commanding presents no matter where you display her. This was one of my motivating factors on the Library donation, I had the pleasure of building a HMS Victory model which was on my bucket list, I gained more experience and knowledge from the building and research of the model as well as marking another bucket list item off of my list which was to build a ship and donate it to a local Library so that anyone could enjoy, critique or marvel at the finished product without it costing them anything. Plus and this is a BIG plus, I get to go by and visit the Victory when ever I want without listening to my wife complaining about dusting the display case, cleaning the case or asking where can we move it next to get it out of her way. I went by the Library one day shortly after the donation and there was a fellow there taking pictures of the Victory so I asked him what he thought of the model and he thought it was great and took pictures of it to show friends since he was out of town and for future reference if he decided to build one. He asked several questions about the model and for the life of me I can't recall what they were, but I tried to answer them as best I could. When I was leaving the guy commented to the Library coordinator how knowledgeable I was regarding the model and she laughed and said, he should be, he's the builder of the Victory model. I smiled as I continued to walk out the door. I laugh when people say what a selfless act this was to build and donate a model, but only I know what a selfish act it was on my part and I'm good with that knowledge hahahahahaha. mike
- 230 replies
-
- 1
-

-
- victory
- artesania latina
- (and 1 more)
-
To me, an admiralty version is an option, but if I were to spend as much time, money and effort to build a ship model as grand as the Victory, I just couldn't and wouldn't see myself short cutting the whole experience by not fully building the model from stem to stern, to the mast tops with all the mind numbing tedious rigging inbtween. To me it's about the adventure and not the destination, from learning to the research. I spent probably as much time researching as I do building every model I have ever built and as of today, it about 45 models built with a few still waiting there turn, a Chris Craft mahogany run about 36" I'm working on now and then a Vietnam era gun boat named the Crockett. Both of these will be radio controlled.
-
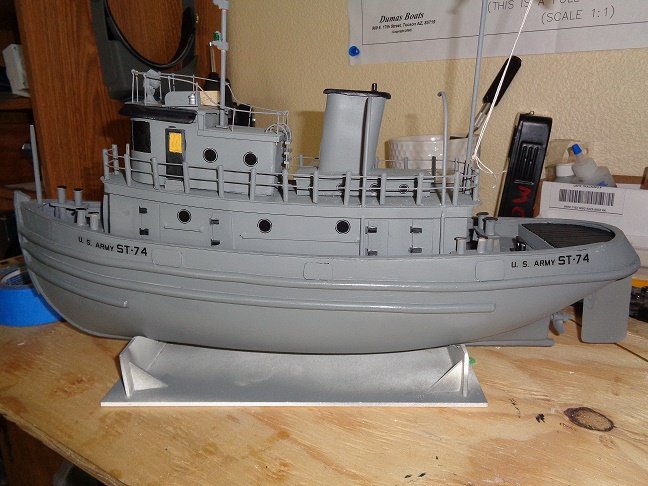
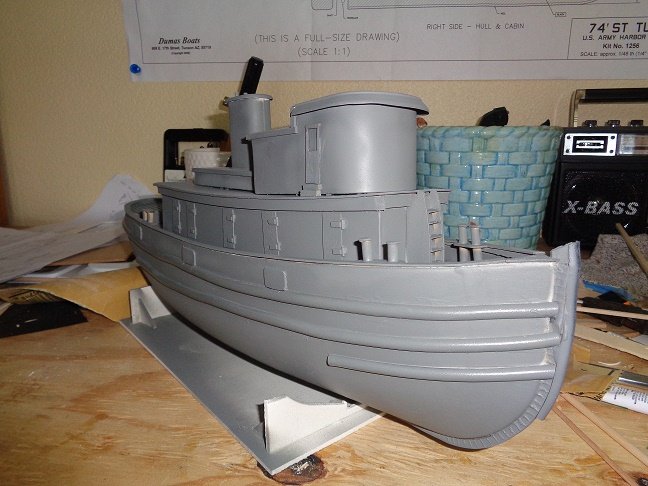
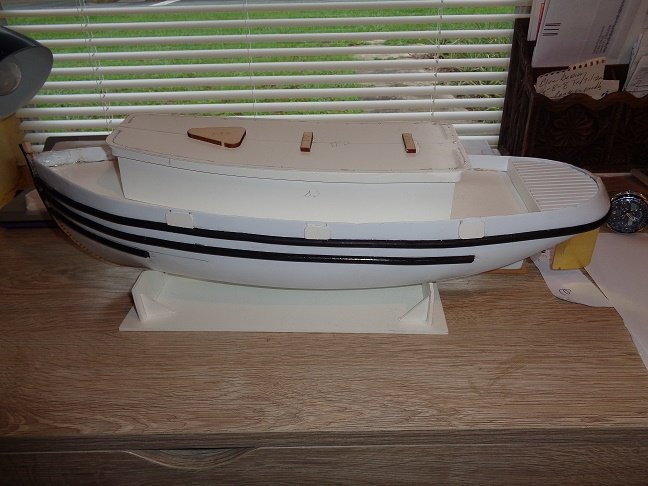
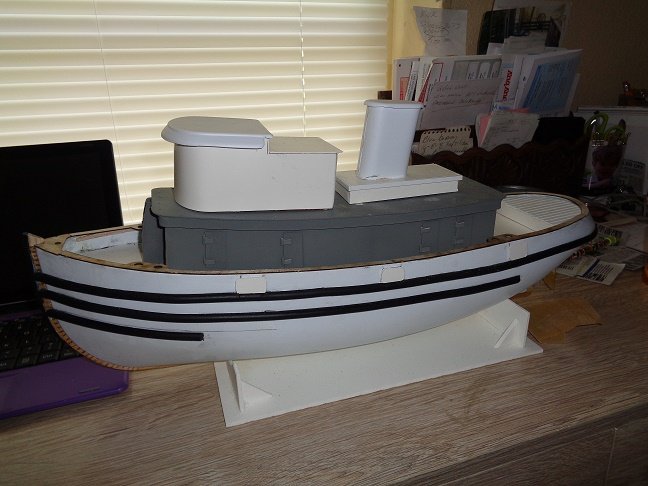
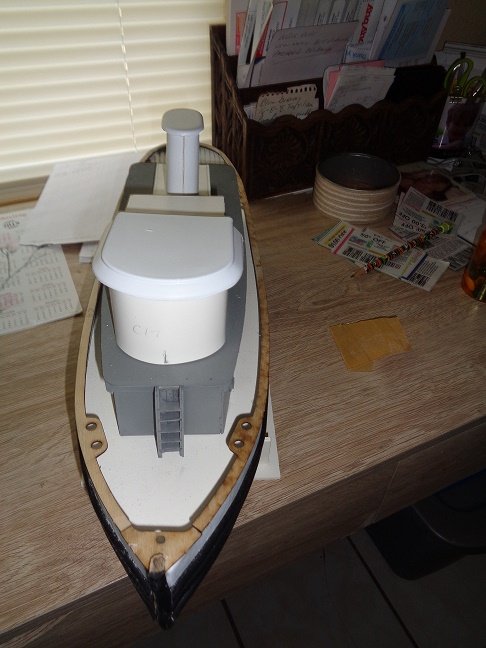
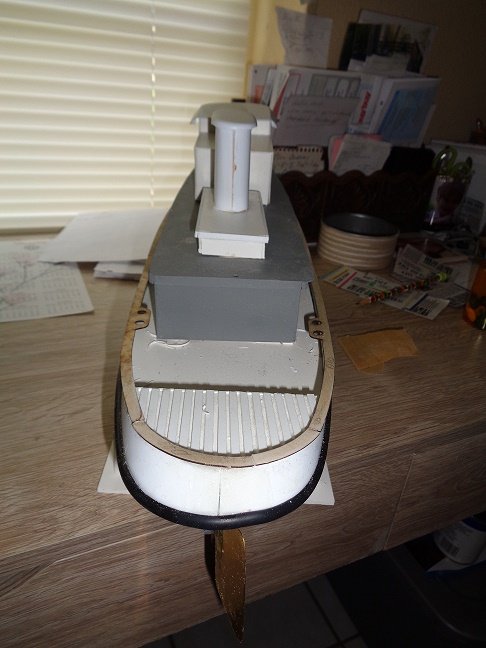
I'm adding my 1 3/4 cents about this kit in a mini review of the Dumas 74' Army tug. Mini Review: When I received the Dumas 74' Army Tug it was with the intent on building it for my 6 year old grandson's birthday. Nothing has changed there. I inspected the kit for fit and finish as well as inventory of all the parts. I love getting that new kit in the mail and I get giddy as a school girl on prom night when I see the mailman with a package addressed to me. I knew going in that this particular kit had a plastic preformed hull, which I can't stand, but as far as construction goes, the preformed hull does make for quicker assembly since you don't have to plank framing and then glass it with resin and fiberglass cloth. Now has this changed my feeling about preformed plastic hulls you ask? Nope, not in the least. Had the hull been plank on frame, the needed weight to balance out the finished model would have been quite a bit less if any at all. But due to the weight or lack of weight to the finished hull and the fact that the top cabin area caused the finished model to be quite top heavy and very tipsy. I found no issues or problems building this kit, the instructions and plans were more than sufficient for anyone to build this kit. I do have a slight confession to make, I deviated from the instructions a bit where it indicates using brass rod for the guard rail stansions. I chose to use 1/8 dowel rod for the stansions rather than soldering the railings together and the reasoning for this is, I SUCK AT SOLDERING yes, everyone has their limitations and sucking at soldering is mine. Yes, I have used $20.00 soldering irons up to $100.00 soldering stations and I still suck at it. Had this build been for a client on a commission, I would have subbed out the soldering part, but since it's for my grandson, I figure he won't mind. My final impressions of this kit: If you are looking for a fun project that won't break the bank ( cost of this kit is around $100.00 or less) that can take you a hundred or so hours to build and will give you a nice representation of a 74' Army tug when finished. But if you are expecting a museum quality model, then this kit won't be for you, as I have stated before, this is a kit museum quality models don't come from kits, there are a dime a dozen of them and also as the kit instructions state right off "This kit is meant to be a toy" so don't sweat it, build it and have fun.
-
Thanks CD, it was a fun build
-
I'm getting close to finishing the old 74. It will be a birthday gift for my grandson, with radio, battery everything installed ready to hit the water. But this afternoon, while giving the old 74 a trial run in the tub, I found that she is quite top heavy due to the upper cabin. So in order for her to sit well in the water at the proper water line without tipping over, she will require a tad over a pound of lead or dead weight in order to balance her. I went with a 380 sized motor and a 7.4 2 cell 1500mah lipo battery. I started to put in a 540 motor, I have a few of them laying around an a 3s 3000mah lipo, but I didn't want that much power for my grandson in such a small boat. I really hate adding dead weight, but in this situation, I guess it can't be helped.

-
You will I'm sure, and it's never to early to start planning for the display case. I could have built one, but the only wood available to me here is oak and when the rubber met the road and I calculated the building cost versus $1000.00 to have one made from mahogany, it was a no brainer for me. So I went the easy route. The City Library was actually going to see about having a display case made for it, but I told them NO, my donation included that as well. mike
-
What some beauties, That Trinidad was always on my to do list, but I'm not really into building tall ship models anymore. Someone needs to step up and grab one of these fine models. mike
-
Absolutely beautiful Ron, after seeing your photos, it makes me really have second thoughts about painting her, what a waste of good wood. When I was sanding the hull, my wife would refer to it as the pecan shell because that was the color of it. 400 hours, you have probably another 1600 to go. It took me 2000 hours to finish. Have you thought about how you are going to display her when finished? Due to it's size, it will be a bugger to display.
-
What is your issue with the plans and instructions with this kit? I have seen both and this kit and found it to be more than adequate to build a decent representation of the ship.
-
I think I'm going to do some accent colors on her, maybe blue, red or black.


-
Boy that Holly is sure going to be pretty once it's applied and sealed
-
To me, there is no con's to double planked hulls except the extra time involved. The pro's of a double planked hull are, you don't have to worry to much about fit and finish on the first layer, just get it laid, smoothed out and fill in any cracks. The second or finished layer of planking shouldn't have putty and all seams need to be tight and have the best fit possible if you want a great looking hull upon completion. That is unless you intend to paint the hull then you can slap putty on until the cows come home. But why would you go through the expense of Holly wood if you intend to paint it, if that is the case, use some cheap wood strips, scrap wood or what ever you can find for the hull planking. mike
-
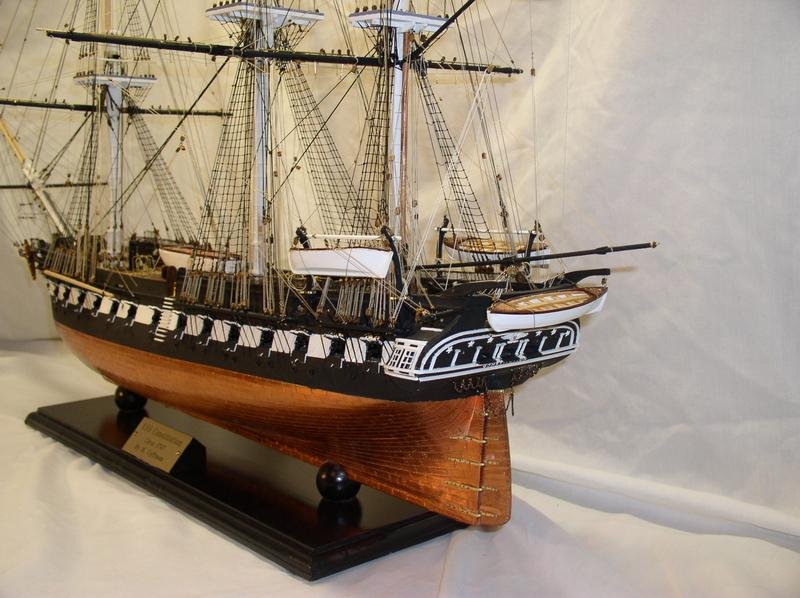
JS, my Constitution was a commission piece for an insurance corp in the state of CT. I also built the Mamoli version of the Connie that went to a Computer Software Co. in the state of NJ. So both of those builds were meant to be fairly quick turn arounds requiring me to be finished with 6-8 months. So there was limited amount of scratch building done on either one. I have had a couple of requests for Constitution builds, but have turned them down due to the inability to obtain any of the Constitution wood as well as too much time restraints required. If I ever live long enough to build another, it will be started with the Model Shipways kit but with extensive scratch building done to the point that each deck would be finished out and there would be a cut away down the side of the hull to be able to view and access the interior. Your work on her is absolutely stunning. This is a tutorial of true craftmanship in progress. What would have really been something was if someone was there to do how to videos of your work in progress and post them on YOUTUBE for future reference for new builders of this model to show what a little initiative, extra time and forethought could be achieved with a run of the mill kit. mike
-
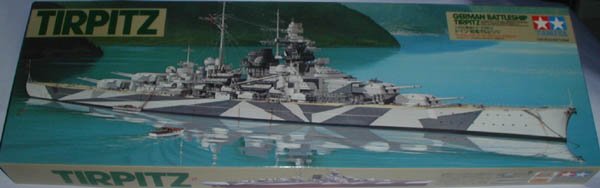
I agree Lou, at 1/350 scale, this is not a lake model, but more like a pond model and I figure about 50 feet distance would be about tops for visual reference. My older kit actually comes with a gear box to run two props with one 280 motor which is both included in the kit and is pictured on the side of the Tamiya box. I was surprised to see this because on all the descriptions I have found on this kit, I found no information that this was included in the kit. The Tirpitz kit shows two prop operation, but I thought the Tirpitz ran 4 props. I will most likely change the gear box and run two independent motors, I don't like running gear setups unless there is no other option.
-
CD, I looked in the Tipitz box, and didn't see anything that looked like torpedo tubes, but I could have overlooked them. I don't usually like to fiddle with a new kit too much once I receive it because then it makes me itchy to start building it rather than finishing my current projects. I did however see a small brushed motor and small gear box inside the box, which I assume could be used to make something on the model move. Don't know if that came with the original kit or something extra thrown in the box, since it was posted as new old stock. I do know that the motor would be too small for that sized model unless you have two of them. I plan to run two motors and props rather than the actual 4 and will install two dummy props and see how it goes.
-
I built this model of the Connie about 7-8 years ago and found no issues with the transom to speak of, in fact I found the plans and instructions quite excellent. Also, the Constitution wood comes from the Constitution Gift shop, not actually the museum itself. But some times they run out of wood and is only replenished when they are doing refits or repairs. They rarely if ever have any wood larger than what you were able to get. It makes great cross trees, mast heads, anchor collars and the like.
-
I got a little work done on the 74 in the last few days.
-
questions for Artesania Marie-Jeanne Fishing Boat
mtdoramike replied to legend's topic in Wood ship model kits
First off, the only reason for a second layer of planking on a model is pure looks of the finished product for those who aren't really great at planking and wind up using a ton of putty. Secondly, if your goal is to make this model sea worthy, then your best bet is to use fiberglass cloth both inside and out and coated with 3-4 coats of fiberglass resin thinned out a bit to help it lay smooth while curing. You can use any glue you want whether it be water proof or not, some use bondo putty like they use for cars. Once it's covered with cloth and resin, you could probably drop it off a bridge and it would still float. I usually use 2oz for smaller boats and 4oz cloth for 36" or larger. You can make any boat R/C as long as you have room for the running gear. mike -
Absolutely BEAUTIFUL, I have always loved this ship and you are really doing her justice. Man what a beauty.
-
By the way Mike, what is the size of the finished model going to be? they usually list them in millimeters, but since I don't live in millimeter country, inches would be great.
-
Oooooooo, I was wondering when you were going to start a thread on one of these bad boys. Looking forward to you cracking open the box and showing the contents. mike
-
Me too CD, I was actually looking at the Bismarck during the Amazon Prime days to see if it would be one of those few items on sale, but it wasn't. Then I ran across this Tamiya Tirpitz that was new old stock, I think the kit dates back to like the 80's or early 90's and at $48.00 I couldn't pass it up especially since it's basically a spitting image of the Bismarck. I can order a update set like the wooden decking (which will be covered with resin to make it water proof) and some detail brass parts to spruce it up a bit. I figure all in all, I could have a total of $150.00 in it with the electronics and such. I was also eyeing the Tamiya Enterprise 1/350 scale aircraft carrier, but at about $200.00, I figure I'll try one of the cheaper kits first. Then if it goes well or I can get a decent deal on the Tamiya Enterprise, I might try building it R/C as well and maybe donate it to a local VFW. Now that one I would really go all out on like hop ups, interior lighting 1/350 scale figures and the works. But right now that is just a dream or bucket list of mine.
-
in actuality, scale is irrelevant. The main issue is, is the model large enough to fit all the inner working of the R/C components without them riding on top of each other. But at close to 30" long, the hull would be the perfect size for conversion, large enough to stow away the electronics, but yet small enough to transport easily. The only thing I'm going to be mindful of is water line and weight issues because after adding the R/C equipment and additional ballast if any how it will sit in the water. I'm positive, it will not be the type of R/C boat you would water grab on a windy choppy day, but more like a calm almost glassy day on the pond. Plus Tamiya makes it with a solid plastic hull, so no piecing it together with a seam. mike
-
I was able to pick up this Tamiya 1/350 scale German Battle ship Tirpitz, which is the sister ship to the infamous Bismarck kit for $48.00, which I though was a pretty good deal since it retails for about double that price. I intend on building it radio control, which shouldn't be too difficult since it as well as the Bismarck with both made for R/C use with diagraming of the R/C setup in the instructions. This model will be more of an inside build versus me having to work out in my shop like I usually do with my wooden models.