

rek
-
Posts
5 -
Joined
-
Last visited
Reputation Activity
-

 rek reacted to bruce d in I am sad and devastated to announce the passing of Jim Byrnes, my dear friend and owner of Model Machines
Very sad news, I am sure everyone here will respect their wishes.
Please, when appropriate, send our sympathy.
-
rek reacted to KeithAug in Schooner Germania (Nova) by KeithAug - FINISHED - Scale 1:36 - 1908 / 2011
I was quite enjoying hearing about all your youthful misadventures. The kids of today will be thinking you are all delinquents.
-
rek reacted to iaincwil in Making your own Hobby Wood
nothing much else to say you have all said it with the exception of making an drying cupboard you can build a frame with racks for the wood and in the bottombuild a box with two light bulb fittings in the top have holes for the heat then cover the whole thing with polethene make sure you have the ends of the wood coated either with wax or paint if in planks use strips in between to let air ciculate around plug in and tape up, another alternative is an airing cupboard if there is room in there,
this is the equivalent of home kiln drying, I have stacks of holly been under my shed now for around 4 years ready to come inside for a while now, also best part of 1/4" ton of mahogany in my loft been there for about the same length of time will have to dig out a plank to cut up,
-
rek reacted to Mark P in The Kriegstein Collection
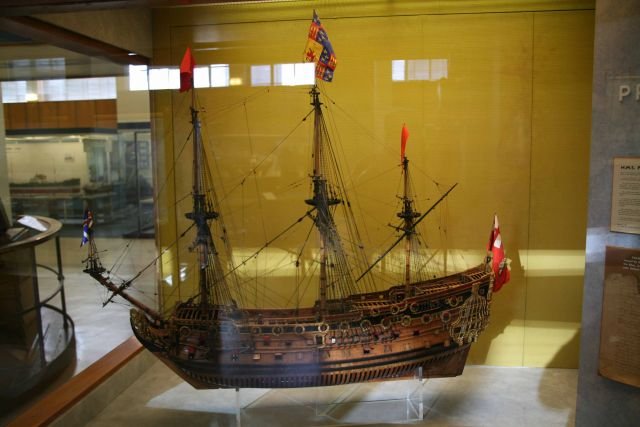
Back in February, I made an advance order for a forthcoming volume about the Kriegstein Collection of 17th & 18th century ship models, to be published by Seaforth Books. After several postponements this was finally published at the end of September. There have been two previous books published by Seawatch Books on this subject, both of which were highly informative and desirable works. Owners of these books will have some idea of the quality of both the Collection, and the photographs of it; but this latest offering is larger, has many more pages, and gives greater details of other areas of the collection than has been the case with either of the preceding volumes.
The Kriegstein Collection is the largest collection of contemporary 17-18th century models in private hands, and consists almost entirely of museum-quality examples, superbly made and decorated. Each model is photographed many times, and is well-described, with a history of the model, its acquisition by them, and reasons for its stated identification, where known. The two brothers Kriegstein, who along with their supportive father, are the owners of this beautiful collection, take their role as guardians of such valuable heritage very seriously. Their admiration for the models, and for the craftsmen who made them so long ago, is clear to any reader; as is their mission to preserve them, and to make as much information as possible about them available to interested parties. The collection also contains many valuable and beautiful artworks by top-drawer maritime artists, such as the Van de Veldes, as well as some very interesting ancillary items; and a good number of prisoner-of-war models from the Napoleonic era.
The photgraphs throughout are in full colour, and are of a good size, with many close-up details of each model.
The book's overall size is 293 x 285 x 30mm (11 1/2 x 11 1/4 x 1 3/16 inches. It has 288 pages, including notes and an index. The recommended price is £50.
The first 14 chapters are about models of English warships; there follow two on French models, and then a model of the American ship 'Franklin' of ca 1800. Three sectional models of bomb vessels follow, then six models of various ships' boats, including several with detailed figures of the crew on board. One of these is a troop transport, for landing soldiers from ships, and has no less than 16 oarsmen, a naval officer, 38 redcoats, a sergeant and two musicians, all with their uniforms painted in detail. There follows a Dutch state yacht of ca 1690, a model carving of the figurehead for Royal Caroline, and another for the Queen Charlotte of ca 1784. A model of the Victory's foremast with battle damage as received in 1805 is next, then two chapters on the various artworks in the Collection. Prisoner of war models follow these, and the book finishes by covering 'Care and Conservation', and 'Fakes and Forgeries'. Their latest acquisition, a previously unknown late 17th century model of an English ship, is covered in an appendix. This model is still in France, and is awaiting an export licence. It is very interesting in that it shows how much some models have been altered by owners during their long lives, acquiring extensive additions which are completely anachronistic, and obscure the original model to a remarkable degree. If previous models are any indication, this model, once safely in the brothers' hands, will be lovingly and carefully restored to as close to its original appearance as can be achieved; as its new owners have both the drive and the resources to see this accomplished.
This is a beautiful book, and I thoroughly recommend it to any member with more than a passing interest in models of this period.
All the best,
Mark P
-
rek reacted to Kevin in 1895 Horse-Drawn Hearse Wagon by Kevin - FINISHED - Model Trailways - 1/12 - Completed July 2021
thank you Dennis, dont quite know how its going to be presented yet, the wife is contemplating turning one of her dolls houses (shop fronted), into a wagons for hire then i could just park it outside , i have another one arrive today
-
rek reacted to Canute in 1869 Allerton Steam Pumper by gjdale - Model Trailways - Scale 1:12 - Finished
Interesting kit. I'll follow along. Is there a jig for those wheels?
-
rek reacted to rwiederrich in Glory of the Seas 1869 by rwiederrich - FINISHED - 1/96 - medium clipper
I've moved the subject of building a hull model of the Medium clipper built by Donald McKay in 1869 to its own log. I didn't want it to become confusing with my 1/96 version...which is in the sail and yard stage.
Within a small group of focused Glory admirers it has motivated us to(with much study and application) correct and redraw some blatant design errors that were found in her contemporary drawings commissioned by Mike Mjelde and published in his book about the Glory of the Seas. Recent discovered photographic evidence, coupled with previously published imagery has caused those of us who are passionate about her to redraw her profile including these new changes.
I will be building her in 1/75 scale...quite a large hull from what I am accustomed to building....but non the less impressive in stature and availability of detail. She will be built plank on bulkhead style and even that will be modified..where as I will be using pre-machined strips of clear pine...almost veneer like. 2"wide by 3ft long by 1/16" thick variable. This material easily conforms to the shape of the hull and can be cut and manipulated to cover her entirely.
I will follow the method I used when I built the Great Republic.
I have already purchased the 3/16" maple plywood and will be gluing the precut bulkhead templets to it soon.
Here are some images of the drawings and the templets and overall profile....NOTE...I will be making other changes to her stem and cutwater as I go...which I will draw upon the profile so as to follow the corrections that have been made. I want to also thank several members for aiding me in my quest and who also share in the love of the Glory of the Seas....member Clipperfan and member Vladimir Wairoa. Your assistance is and own personal passion is much appreciated.
A Disclaimer for all who may be watching and who are purists in their own right.....I am a crude...lazy....modeler and will most likely use techniques and methods/materials that are overtly unorthodox......please forgive me now and allow me my ranting and miss-steps.
-
rek reacted to Bitao in YOUNG AMERICA 1853 by Bitao - FINISHED - 1:72
Hi, Ronginger. Thank you for your assessment. In fact, it seems to me that no matter what the model or component is, it's important to locate it accurately and repeatedly pretend to assemble it. That's why I spent a lot of time developing production tools to help. Many people see the results, but many people do not think of a perfect interface, I even repeated dozens of times! I don't want to see any obvious holes, or I'll have to tear it down and rebuild it. More than 20 years of experience have enabled me to master the basic skills of machining, but in the actual production process, I usually have many different methods, the ultimate goal is to achieve efficiency and accuracy. I'm not used to doing things the same way, always looking for new ways, even the same parts. Unfortunately, many of these steps are not fully documented in practice and are only filmed at the end of a phase to avoid errors. The grooving of Bridge Deck Crossbeam is finished by milling cutter and engraving cutter. It's not hard, but positioning is important, and that's the unique advantage of my slipway.
-
rek reacted to toms10 in HMS Leopard by toms10 - FINISHED - 1:85 scale POF/POB
Hello again MSW,
After finishing my first build (Constellation) by AL I finally decided on a second adventure. I finally mustered up the courage and decided to do a scratch build of the HMS Leopard. I had come across the plans and for a first scratch build it seemed to have all the ingredients to test my abilities. There seemed to be plenty of information available to guide me along with my MSW friends so I went for it.
Naturally, I have the 50 Gun Ship book by Rif Winfield. I took the 1:96 plans that came with it and enlarged them up to 1:85 scale. The 1:96 was just a bit small to me. I scaled it up to 1:72 and it was bigger than I have room for so I split the difference and ended up at 1:85... same as my Constellation. Working in an engineering office, I have access to the CAD program Solidworks so I transferred the 1:96 measurements from the drawing to the CAD and just played with the scale until I liked it. I have been researching, planning and drawing frames for the past month so there is not much to show at this point. Scratch building is forcing me to learn tons of information on ship building practices which is not a bad thing.
My plan is to build the model with both frames and bulkheads. The reason is I want to cut away the center area of the hull on one side to show some of the Orlop and Lower deck arrangements. I figured I have the plans/layouts so why not use them. I will use frames in the area of the cutout and bulkheads on both ends since these areas will not be seen inside. Below is a sketch of my thoughts. The area inside the heavy outline will be the cut away area.
Here also are some pics of the frame work I am playing with now. Band saws and belt sanders will be busy!
Next is to design the fore and aft bulkheads and the deadwood layout. If I do this right, the summer when the shipyard is open as much, will be spent designing and roughing out the skeleton. Then when the New England winter sets in I will have plenty to keep me busy.
Hope you enjoy the build,
Tom
-
rek reacted to Pete Jaquith in Coppering the Ship Model Hull
Various techniques including copper paint, individual copper plates, photo etched plates, and self adhesive copper tape have been used by ship modelers to simulate the copper sheathing used for under water hull protection on both naval and merchant ships from the late 1700’s thru the late 1800’s. The following notes describe the technique selected for my Topsail Schooner "Eagle" of 1847 build.
Test Pieces – Test pieces were prepared to evaluate the installation process and appearance of various methods including individual plates, individual plates cut from self adhesive tape, strips of copper tape, and both plain and embossed plates. The selected approach was individual plates cut from self adhesive copper tape with embossed nail heads on the exposed plate edges only.
Copper Material – The material used for copper sheathing was .0015” x ¼” wide self adhesive copper tape purchased from Blue Jacket Ship Crafters.
Plate Fabrication – The individual copper plates were cut from self adhesive copper tape using a Carl Rotary Trimmer from Staples Office Supply. The plates were ¼” x ¾” (16” x 48” full size at 1:64 scale). The individual plates were then embossed from the back side using a fine pounce wheel.
Hull Preparation – After filling and sanding any minor dings, holes, etc. on the lower hull and completion of topside painting (acrylic paints); the topside and bare lower hull were sealed with three coats of Minwax Wipe-On-Poly (oil based wiping varnish). A hard smooth surface is necessary for tape adhesion, and a smooth surface is important as any defects will show through the thin copper foil.
Hull Layout – With the model resting in its building cradle, the waterline was laid out using a surface gauge. The gore line was then located using the copper sheathing layout taken from a similar size merchant hull plans (whaler "Kate Cory"). The plate layout consists of upper and lower gore strakes with no dressing belt. The individual copper plate strakes were laid out using a tick strip working up from the keel. The water line, gore line, and individual plate strakes were then marked on the model hull using narrow strips of blue masking tape. Note that properly locating the waterline and gore line are critical as I have seen models where they dip down badly in the stern area.
Plate Installation – Individual copper plates were applied using the masking tape strips as a guide and working from the keel up and the stern post forward. The plates were overlapped approximately 1/32” and butts were staggered like brick work. A fair amount of fitting was required in the upper stern area due to the hull shape, and the upper corners of the plates were cut off for those plates that crossed the gore line and waterline. After installation, all copper foil plates were rubbed down with a soft rag.
Protective Finish – After installation, I cleaned the copper plates with denatured alcohol and applied three coats of Minwax Wipe-On-Poly to seal and protect the copper surface. After approximately 10 months, the copper sheathing is beginning to show some tarnish under the varnish finish. On future builds, I may just choose to clean the copper plates and let them tarnish naturally.
While the above technique is only an approximation of full size practice as the nail pattern would have covered the complete plate and would hardly be visible at this scale, I was pleased with the overall effect. As noted; critical items in the application include having a smooth hard surface, layout of the waterline/gore line, and holding the plate strakes straight.
Brigantine "Newsboy" 1854 Installation – Following completion of the Topsail Schooner "Eagle", my next ship model was the Brigantine "Newsboy" of 1854 (also in 1:64 scale). The copper sheathing installation on "Newsboy" was similar to "Eagle" with the following exceptions:
1. Due to her finer hull lines, I chose to model the copper sheathing layout after the clipper ship "Flying Fish" of 1851. The copper sheathing layout consisted of an upper and lower gore with a single dressing strake at the water line.
2. The copper plate fabrication and installation was similar to "Eagle". Based on the recommendation of friends at the USS Constitution Model Shipwrights Guild, I elected not to emboss the copper plates with simulated nails. I was pleased with the result, and plan to follow this practice on future models of American Merchant Sail from the mid 1800’s.
The following pictures illustrate copper sheathing installation on the Maine Topsail Schooner "Eagle" 1847 and Brigantine "Newsboy" of 1854.
Pete Jaquith
Shipbuilder
-
rek reacted to GuntherMT in Model Shipways kits - all sold!
Good day all, I've got a number of kits that I acquired back when I first got into the hobby and thought I was going to be putting out a ship every few months (man was I wrong). At this point I am moving towards scratch building and do not think I will ever touch these kits, so I'm offering them up for sale.
Shipping origin will be the area of Phoenix, AZ. Shipping will be added to the price and I can ship via USPS or UPS, buyers preference. I will accept Paypal. Feel free to make reasonable offers, especially if you are interested in more than one kit. I've tried to price them a bit better than the best price I think Model Shipways would ever put them on sale for. I would also be happy to meet with anyone in the Phoenix area, and visit the San Diego area fairly often so could make arrangements for anywhere between Phoenix/San Diego if you aren't in a rush.
All kits are opened (but complete) unless noted below. Some of the plan sheets spent several years up on my workshop wall for inspiration and looks reasons.
1) Model Shipways 18th Century Longboat. - $30 - Sold
2) Model Shipways Fair American - $100 -- Sold
3) Model Shipways Pride of Baltimore - $100 - Sold
4) Model Shipways Niagara - $150 -- Sold
5) Model Airways Sopwith Camel F1 - $100 -- Sold
6) Model Shipways USS Constitution - Sold
Feel free to ask for more information either here or via private message.
Thanks to everyone for their interest in these kits. I hope everyone enjoys the kits and I hope to see some or all of them show up here on MSW as build logs in the future!
-
rek reacted to luponero in San Giovanni Battista 1598 by luponero - Medicean galleon
I thank friends for the "likes"
for the realization of the two models I decided to dedicate two continuous weeks each, obviously the builds do not follow this logic, the photos were taken a few days ago compared to the present, this allows me to insert images almost continuously, obviously up to achievement of processing progress in "real" time
The galleon foresees that on the sides there are painted geometric motifs as well as an area adjacent to the two bridges, while between the two decks, the greater and the battery one, no color is reported, so the strips will be "natural", tagliamare is also part of this area so I decided to replace it by creating a new one in walnut (one of my favorite essences)
I used a 1 cm board, the one in the photo above, planing it to 6 mm, the width of the keel
the pieces are identical, only the wood is different, certainly the walnut one is much more beautiful,
the bow is also replaced
after removing the "plywood" one, I put the walnut one
the work on the bow is finished, the result is not bad
see you next time
-
rek reacted to SJSoane in HMS Bellona 1760 by SJSoane - Scale 1:64 - English 74-gun - as designed
So, I think I see it now, thanks druxey. I think the blanks for the mouldings at each location have to be shaped with a different back, to match the surface upon which it sits. The guide is the moulding on the stern, which will have a horizontal top surface. The ones on the quarter galleries then align to this, with a different back angle. And, the mouldings at the sill of the window are different in their back angle than the ones at the window head, because they sit on different raked surfaces. In the drawing below, the green moulding at the left (top and bottom) is the profile swept along the moulding, which keeps the top horizontal to the ground. The green mouldings on the right (top and bottom) are what I believe will match along the quarter galleries. I may have to make up some samples to really see this.
-
rek reacted to Kevin in Lady Isabella by James H - FINISHED - Vanguard Models - 1:64 - Zulu prototype
following with interest, going to build into a very nice boat
-
rek reacted to Jond in Aphrodite 1853 by jond - 1:96 - RESTORATION - Boothbay Maine ship
Boothbay Maine 1853 ship Aphrodite 1:96
Post 1
The beginning
A friend has been rebuilding his Bluenose schooner in my shop for three years. The other day he came over with a broken-down old ship model given away by the Maine Maritime Museum. So it stayed on a shelf since last fall. Now that we are on a quest to build up models of the schooners and ships built in Boothbay, I got an idea. Do some research and come up with a Boothbay ship or bark that in a known scale would be the same size as this model.
There is a wonderful book called Shipping days of Old Boothbay. It is available at the Boothbay Region Historical Society. Not only does is follow families that sailed out of the harbor it lists in several sections much about interesting ships, barks and schooners built here.
On the chapter about barks there was one candidate that at 800 tons could have worked. It was however not typical. Of the 6 barks built in the main period of the 1850’s listed in the book 5 were all 400 tons or less. The Charles Lewis was 745 tons and built in 1875. She had a long life too…maybe next time
On the chapter about ships, again there are about 6. The first one, built in 1853 was the Aphrodite. She was 680 tons and 147 long, 31 wide and 15 deeps. She was built by a well-known builder Stephen Sargent. She sailed far a way and then was lost off the Azores. Perfect size as we took the measurements and found a match with our derelict hull at 1:96
Next up is to find some design. I was very impressed years ago buying a book by William Crothers on Clipper ships. After a little search I found he published a book…American Built Packets and Freighters of the 1850’s How perfect!! Oops it was pricey, but the hull was free so why not. I am so glad I got it…wow what would you like to know.
In the index they identify Alna a ship of the same size built in Maine in the same year. So why not that is my data base. So off we go. This will not be a long build but a fun learning experience. We shall reuse what we can, but I suspect most above the deck will be new.
Unfortunately, we forgot to take a picture of as is. Trust me it was ugly. The hull is a carved soft wood with minor applications. The cabins were just blocking and the rails 1/8th thick, so as the queen said, off with their heads.
Here you see the dead eyes wire loops were wrapped with like No 17 brads.
The figure head was a large clown…yes a clown… goneso. The record of Alna only listed the carved and gilded Billethead. so I will thicken the stem to form a billet and add some stick on tape with gold filligree
The stern was sort of round. Looking through Crother's book, there is a rounded stern that was typical of the era and listed to be on Alna. Also there was no poop deck. So after days of reading and thinking, we are adding a ½ poop deck based on Crothers findings.
Here we have removed most everything and are cleaning up an under-deck. You can see the crudeness of the remaining bow and taft rails removed after this photo
Here a little of the glazing putty to try to smooth out an under deck. there are at least 40 toothpick tips glued into old large brad holes to be sanded as well. When I laid out Alna masts, two matched perfectly an the mizzen within a 1/16. adding the half poop pushes the hole aft so we match there too. the fore deck extends aft and that is good because we gain an overhang
All for now
jon
-
 rek got a reaction from mtaylor in Girona by augustus
Could you provide the source of plans and any other information you are using to build such a beautiful model.
-
rek reacted to HIPEXEC in Kathryn by Mahuna - FINISHED - 1:32 - Skipjack Based on HAER Drawings
She's looking mighty fine, Frank!
-
rek reacted to VonHoldinghausen in Model Ship Building Secrets Dvd
Hi Folks!
Happy christmas and a hope that you have a happy ending of 2014
Over on Youtube on the chanel "Modelsworldru";
https://www.youtube.com/user/modelsworldru/videos
you can see about 80 (!) videos from what I believe is this Dr Mike. Most of them about 30 mins long!
This might actually BE in part the DVD and MORE.
Prepare for loooong nights I think it is almost an entire build log in video format. And other stuff too.
Really made me wanna order some stuff from Proxxon. Seems to be very nice machines.
Cheers!
-
-
rek reacted to Gaetan Bordeleau in 74-gun ship by Gaetan Bordeleau - 1:24
Hi Pierre,
I was keeping a log but it was more for construction details, now it is just the build log on MSW.
On MSW 1.0 we saw another 74 at 1/24 and weight was 130 pounds. It was difficult to move it upstair. The guys were strong men.
Bigger door, bigger home, bigger workshop, bigger ship; it took years to be installed as now. There are a lot of wires and some heavy machinery. The most difficult to bring in was the Hardinge lathe, quite heavy. With that lathe, over 1 ton, I understood what turning without vibrations means. I am satisfied with the installation and it' s versatility. Having the medium tools on wheels is a big plus. Having the tool at the right place at the right time can save a lot of time and a lot of walking.
There could be another possibility a 74 at 1/12 but made in 3,4, ,5, or 6 parts slices, may be I should ask Karl to come to help me.
-
rek reacted to jose_b in La Créole 1827 by archjofo - Scale 1/48 - French corvette
I completely agree with druxey.
-
rek reacted to Mirabell61 in La Créole 1827 by archjofo - Scale 1/48 - French corvette
What a delight to study your build-log Johann !
The accureness you bing into details, (amoungst many others....klincs on capstan for instance...)the composition of brass and Wood everywhere and the feeling for 18th century shipbuilding,... outstanding !!
Nils
-
rek reacted to Dan Vadas in Concord Stagecoach by Dan Vadas - FINISHED - Model Trailways - 1:12 scale - circa 1862 "Cobb & Co"
I've completed the Frame, or chassis.
Here are two pics of the Brace Header "iron" work, made from brass, silver soldered and blackened :
This is the assembly in place, complete with tiny square nuts and two 1.3mm threaded bolts and nuts :
The front and rear Standards are supported by struts, cast from Brittania metal. I've found most of these castings to be adequate without being exceptional. The metal itself is in very good condition, easily bent without snapping (except for 1 piece which was easily fixed). The casting was only so-so, with a fair bit of flash cleaning needed :
One step that the instructions omitted was to check the fit of the CNC lathe turned Wheel Hubs on the axles. This caused me considerable drama, as the axles were between 0.3mm and 0.7mm too large in diameter. Not too bad for the front axle, which was still unattached, but a lot harder to trim on the already-fitted rear axle. After using a flat needle file to correct the front axle I attempted the same on the rear. 10 minutes later I was still nowhere near doing one side, when I came up with the idea of shaving the axle with a #11 Xacto knife - brilliant . It took less than 5 minutes to complete BOTH sides.
The shavings shown in the pic below are from ONE side of the axle :
Here's where I am up to. BTW - the brake mechanism actually WORKS :
Cheers, Danny
-
rek reacted to vossiewulf in Couple questions of Sherline Mill purchase
Not sure why you'd want a Sherline, seems to me there are far better options for roughly the same price. Little Machine Shop is where I have always bought my machine tools. The micro mill is better than the Sherline, but it's the mini-mill for about $100 more than yours that's an order of magnitude more capable with a far greater and varied ecosystem of accessories and modifications and DROs that can be added.
Edit, the HiTorque versions are preferable as those can handle machining steel no problem, but if you're willing to machine steel a bit more slowly, see the Sieg X2 Mini Mill that's on sale for $599. Out of the box I think it's a considerably better choice than Sherline. The HiTorque mini mill is just a Sieg X2 modified per LMS' specs to have an upgraded motor.
-
rek reacted to Modeler12 in Miniature Russian carving tools
Looks like great carving tools.
I also would like the email address and was wondering how payments and shipping are handled.
In particular, I like to see more details of the shape of each tool and if I could order some individually rather than a whole set.
For 23 of those at $360 total I assume a price of $18 each would not be unreasonable.