DONATION DRIVE - SUPPORT MSW - DO YOUR PART TO KEEP THIS GREAT FORUM GOING!
×


Piet
-
Posts
3,568 -
Joined
-
Last visited
Content Type
Profiles
Forums
Gallery
Events
Everything posted by Piet
-
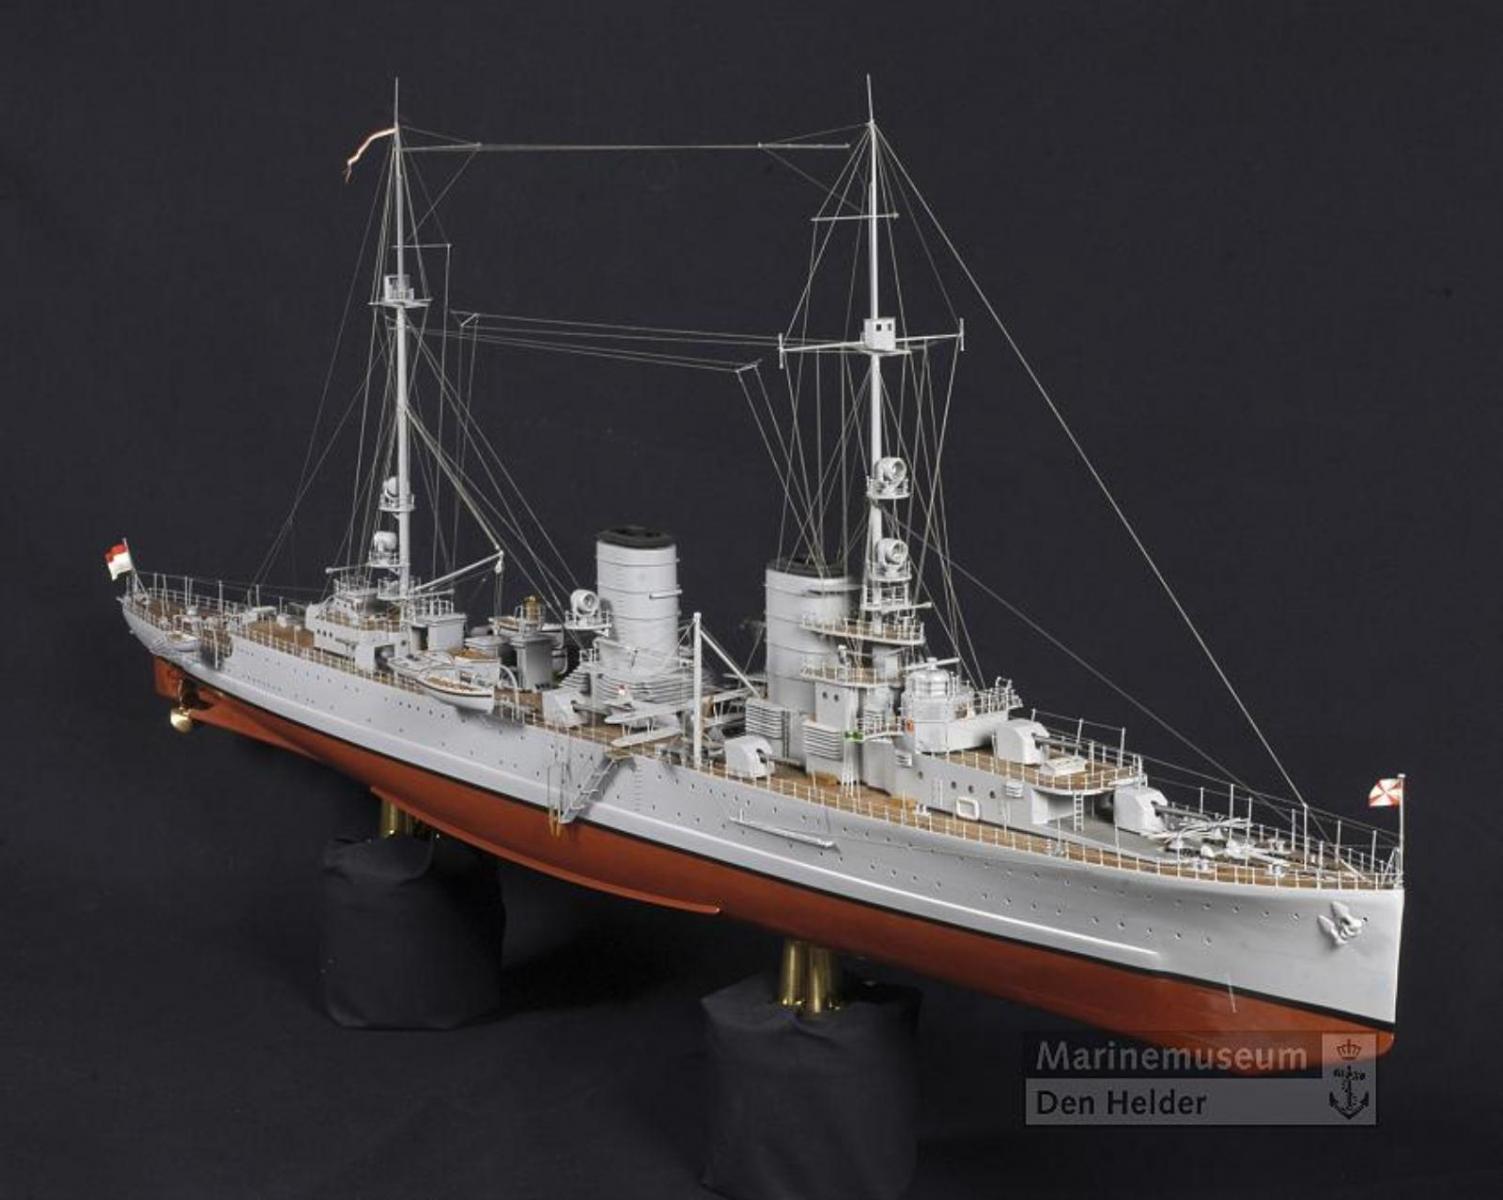
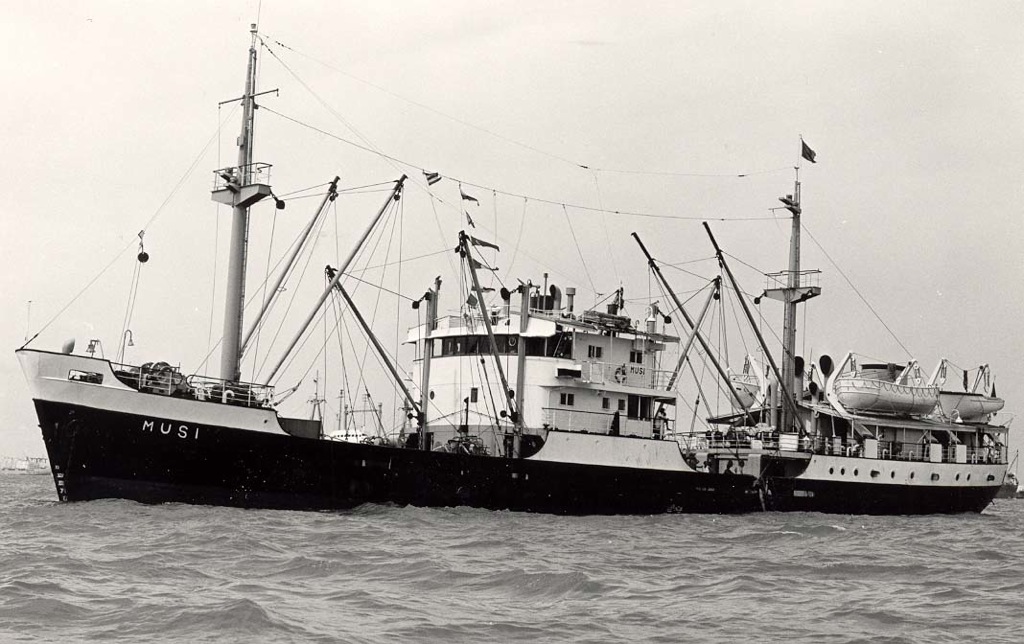
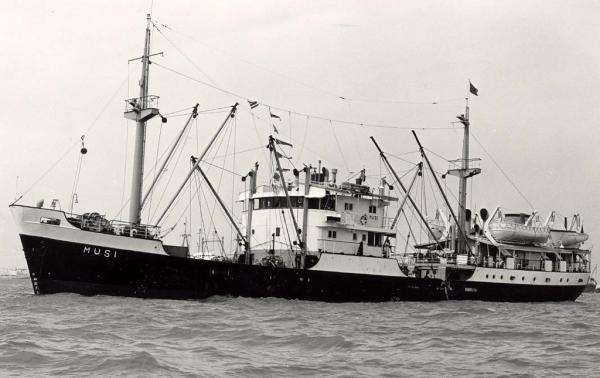
 Thanks fellows for your comments and accolades, much appreciated. And thank all others for visiting and your like vote. Hoi Remco, thanks and yes, I need all the luck I can get. Just to tell yuns that the keel is 1 mm wide for my dingy model. Now you can imagine how thin the rest of the frames and planking has to be. I guess I'll have to fudge a little here and there Hoi to you too Jan, you have more confidence in my abilities then I but we'll try to give it a bloody go Hi Boris, hmmm, Hr. Ms. Java eh? Well, yes, that was my original idea and still listed on my bucket list but - - - I will most likely not do that one. I did purchase the drawings for the model through Remco, just to have them. You know - - - and to tell all yuns the truth, my father hated that old rust bucket with a passion. It was the second time I saw tears in his eyes when he was transferred from his beloved O19 to that old ship when he was promoted. So, I'm just thinking that if he knew that I build a model of the ship he hated and was killed on, what he would think. Would he be pleased? There is a beautiful model of that ship in the Navy museum already, it should function in the honor of all who served on her and gave their lives for country, Queen and family. You on the other hand must go ahead and make the most beautiful model available in kit form with the story of her last heroic stand against a more powerful enemy. I'm sure that your model will be one of the best available because your heart is in it and for the lives of the crew. Thank you for the suggestion but if I would build another ship model it'll have to be the KPM ship Musi. That's ship my wife's father served on as captain before his retirement. Here is a picture of her. For those who are interested in seeing a fine model of the cruiser Java here is a picture of her. My father's battle station was below the # 9 gun, that's the second aft gun looking forward, the one just behind the long room. That's also where the torpedo hit. hello Daniel, thank you for comparing my ladder with a photo etched one. A very great compliment indeed. Well, the pictures show that each part was hand made so there is no argument Yes, the ladder was removable and stowed somewhere in the sub. My guess is that the crew would usually not even bother using it. Being young and agile - - - ladders are for sissies Cheers,
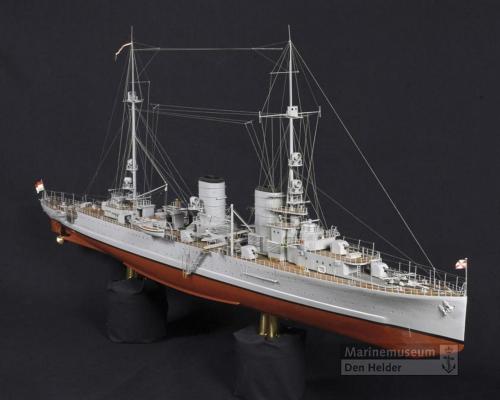
-
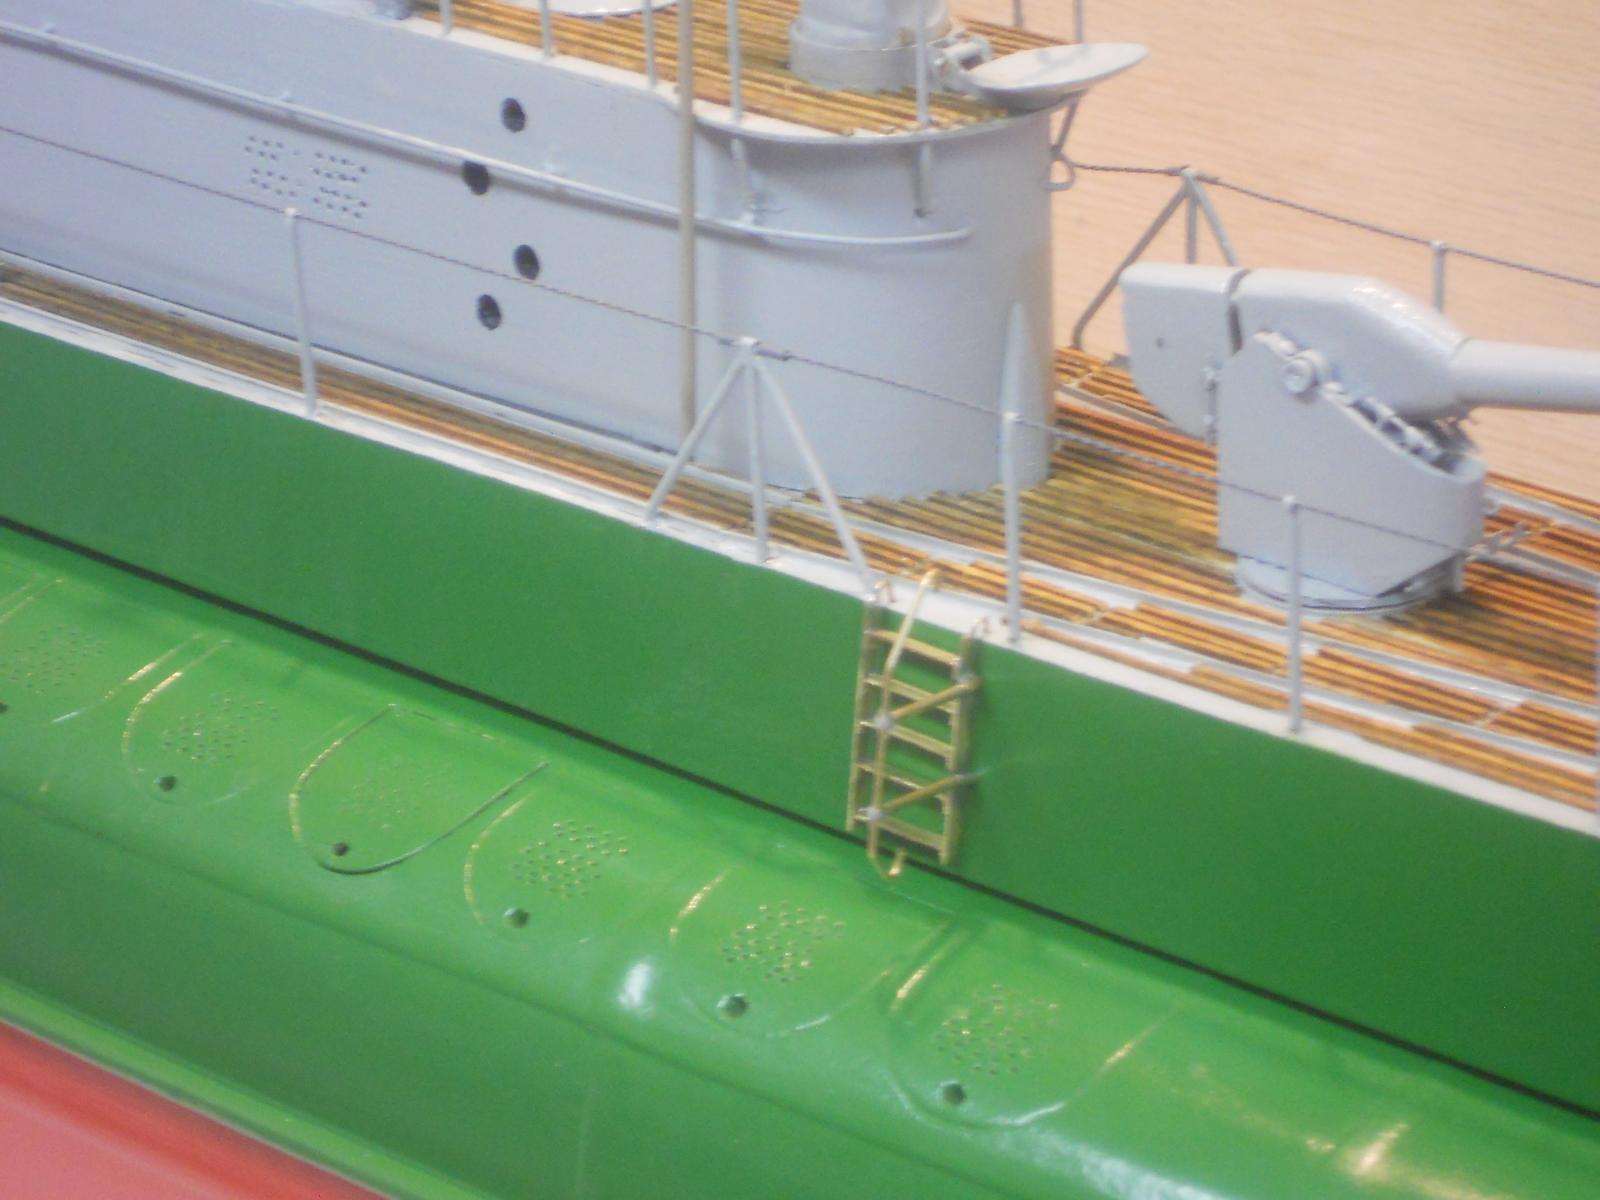
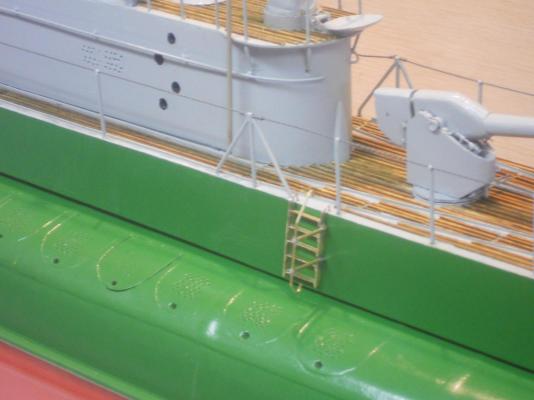
First of all my sincerest and heartfelt thanks to the may who visited and clicked the like button. Thank you all for dropping in. After arriving back home from the doctor's office this morning and a cup of coffee with Gwen I ventured back into the garage and painted the boarding ladder dark grey. It looks a little better this way all dressed up in a coat of paint. I also did some touching up on the paint here and there. Next I grabbed the lines drawings for the dingy and put them on my drafting table. Yup, that means that I have to redraw these to my scale of 1:50 but that should pose no particular problem. What's daunting in my mind is the size of it and how frail it is at this scale. It'll be a challenge alright so wish me luck. I have made one photo of the freshly painted boarding ladder for yuns to see. Hope it carries away with your approval. I may need to add a pair of stand-off's at the bottom ship side to keep it angled out a little more. Hey, I have plenty of this dark grey paint left Cheers,
-
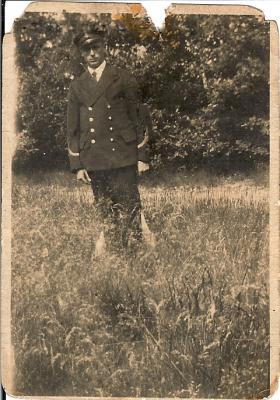
Hello everyone and thank you all for your comments and the compliments, I really appreciate it very much. Hi Mark, thank you and yes, in all the months that I have been working on the O19 things keep popping into my mind of happy times I had with my mom and dad. Gwen and I talked a lot about both our fathers during this build. I am fortunate to have met her father when I was going to the High School in her village. Captain van Vulpen was a very nice gent and I got to chat with him whenever he was home. All that is an extra bonus to me, bringing back good memories. Hello Pat, thanks for dropping in. Yup, not many more details to add but what is left to do will keep be busy for a while yet. To clarify the dingy, it was actually made from wood, at least that's what it looks like on the photos. I'll make it also from wood and in this scale it's going to be a challenge because everything has to be rather thin and light. But so far I have not shied away from a challenge and hope to make a respectable model of it. Hi Omega, good to see you here. Hmmm, a sound track with sound effects, commands by the CO and responses by the crew. Love the idea but then I'll have to do it in Dutch and not too many here can then understand it Besides, when I speak Dutch I have an American accent Hey, I ca do a pretty good immitation of the dive claxon No, a log will already be taxing enough but thanks for the thought my friend. Hello Joe and thank you for your compliments and good thoughts, appreciate them very much. Yeah, well, seeing that the O19 carried a boarding ladder I figured that it would be appropriate to show it. It was a rather easy and straight forward modeling job, after I fixed my first try I'll do my best in modeling a Skulpy figure that resembles my father. The only photo I have of him in uniform is when he was "bootsman" (boatsman in English) This was taken somewhere in the Netherlands but I have no idea what year. I think that a 3D model would look better though but don't know yet where to put it. At the time He served on the O19 his rank was Schipper, which is a non-com position. He could very well be supervising the loading of the torpedoes. Hey, time will tell but the thoughts of all yuns keeps the brain churning. Hoi Freek, yes, I'm going to try my hand at modeling figures. Remco steered me to a nice book on the how-to's. I'll be using Skulpy for this and try to get a likeness. I have only two photos of him. See above for one of them. Hello Popeye, thank you very much for your compliments. Yup, this is a little different as far as ladders go but I just mimicked the ones I see on the photos I have. Yeah, I do have some feelings of sadness now that she's almost completed but also a great sense of satisfaction by how she turned out. There is still a lot of work yet to do when I count the display. Hi Daniel, so good to see you here as well. No, I'm still working on her my friend. Thank you also for your kind remarks. Yes, I remember the rivet discussion too and now in retrospect I probably could have added them as well. Could I still do it at this stage? Yeah, I think so but that would require months of very tedious work that I'm not really up to anymore. As far as future builds, I'll continue with the VOC ship Surabaya and perhaps start the VOC Yacht in the lamp. As mentioned in one of my previous posts I need to make a few paintings of the O19 and finish a painting of a VOC ship I started several years ago. I also need to finish a few paintings of flowers and wildlife I have also stated. Sooooh, stay tuned. Hoi Carl en van harte dank! Yeah, I figured all yuns would get a kick out of my crude wooden jig Hey, it worked for me and freed up both hands. Cheers,
-
Beautiful work John and enjoy your holiday. Cheers,
-
Batavia by *Hans* - FINISHED
Piet replied to *Hans*'s topic in - Build logs for subjects built 1501 - 1750
Don't fret the picture hans, I can see all the details okay when blown up. Fantastic looking ship my friend. Cheers, -
Mayflower by SawdustDave - Finished
Piet replied to SawdustDave's topic in - Build logs for subjects built 1751 - 1800
Great work Dave and as others have said, it's a joy visiting. Hey, it's not that far of a drive to your place from palm Cost, Florida. Plenty of motels in your area? We don't do tents anymore, a little more comfort for us. And yes, I'll bring the O19 ! Cheers, -
Fantastic looking figures Dave and a good walk-through of your method. I have to use Sculpy for my 1:50 scale submarine. Cheers,
-
Great advice and demo from Theo! Now, if I had a mini sheet metal bending brake that would be my first choice. As an old 'tin packer" (sheet metal mechanic / aircraft mechanic) we never, ever scribe any sheet metal. We only use a 3B pencil. However, for our purpose this'll work great if it's only one bend. For all the tiny parts I had to make for the O19 a brake would not have worked anyhow so my thoughts are directed towards doing the bending with my crude method Sjors, if you have a brake use it, you'll like it. Cheers,
- 1,616 replies
-
- 2
-

-
- caldercraft
- agamemnon
- (and 1 more)
-
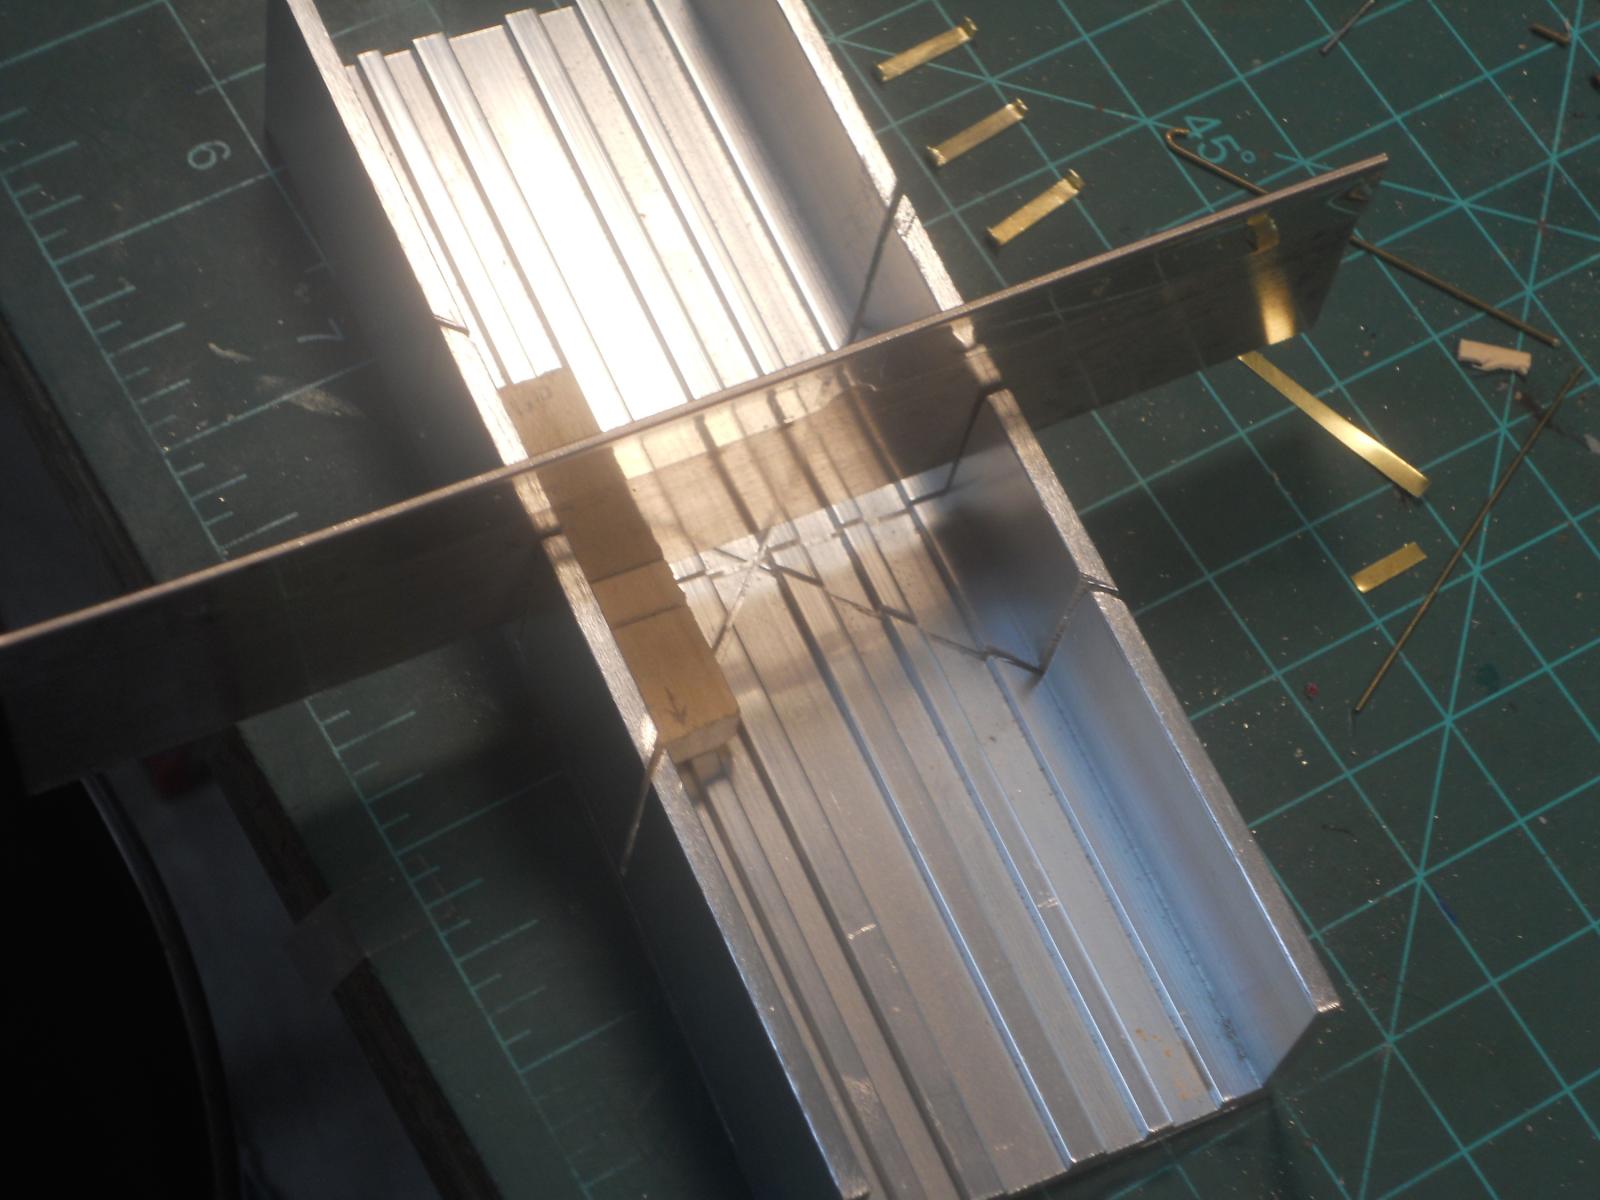
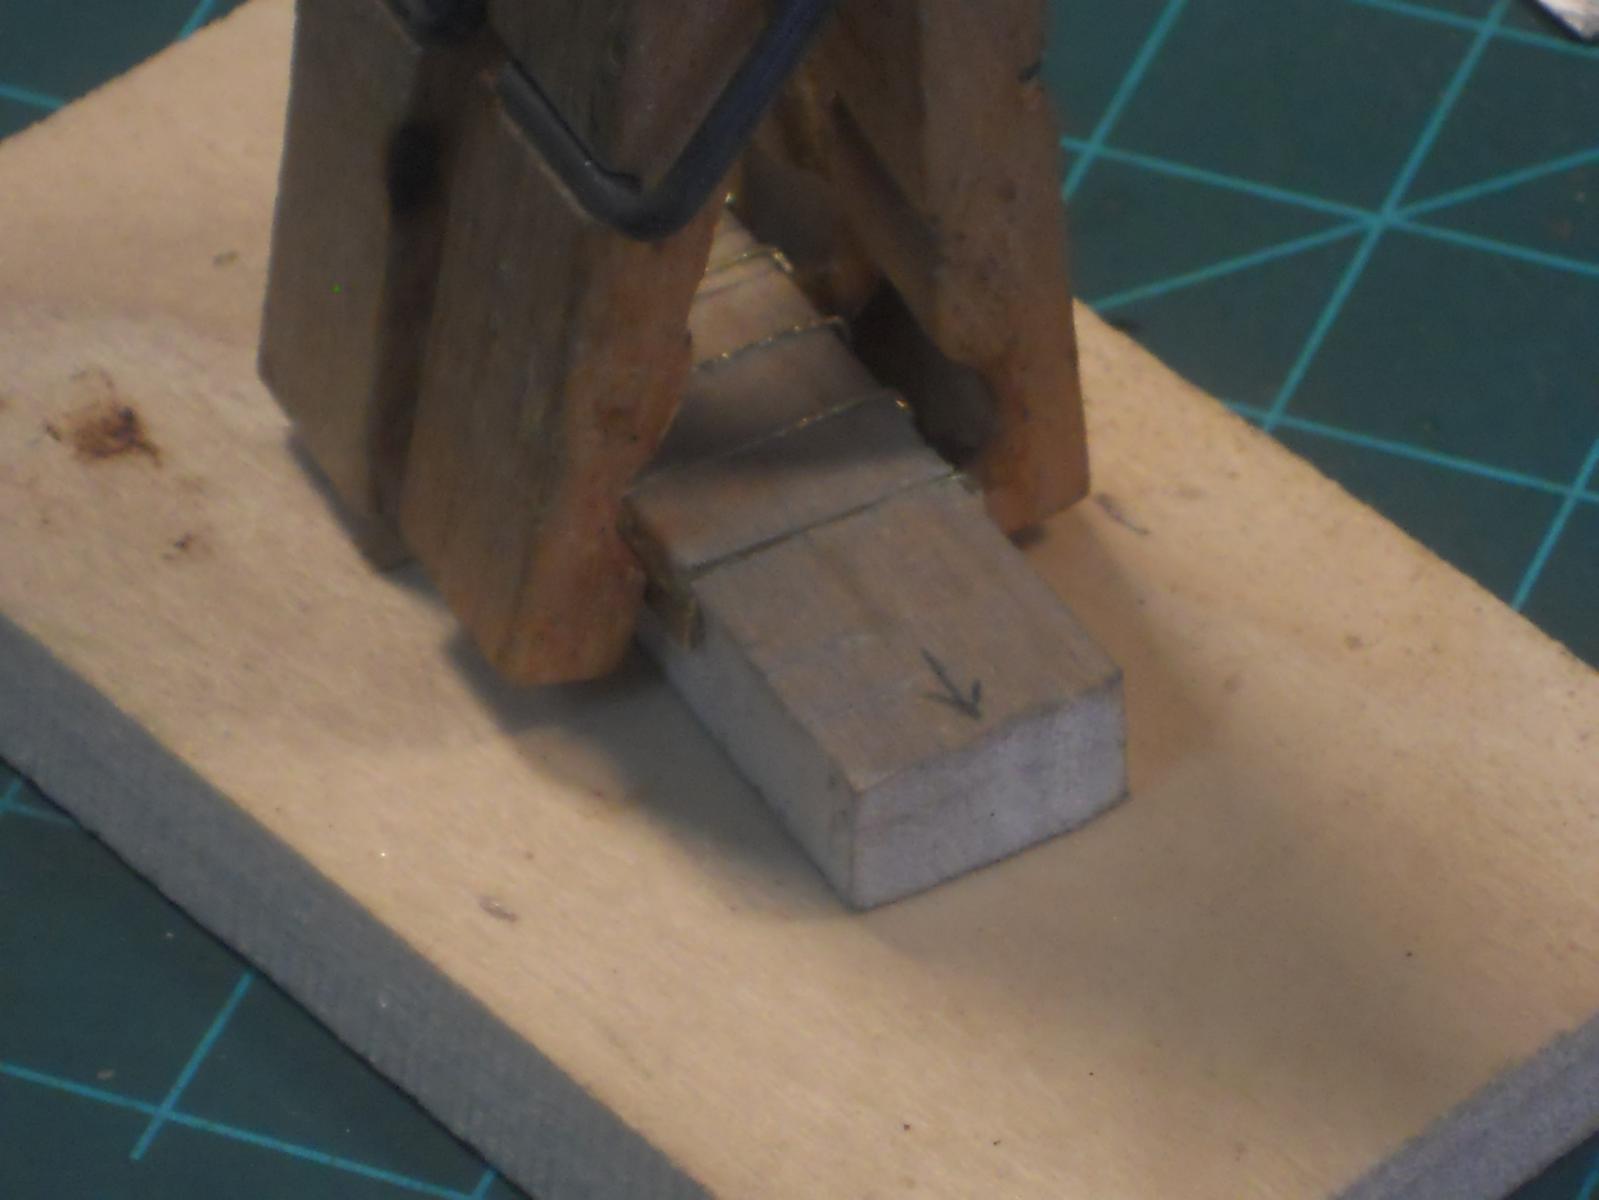
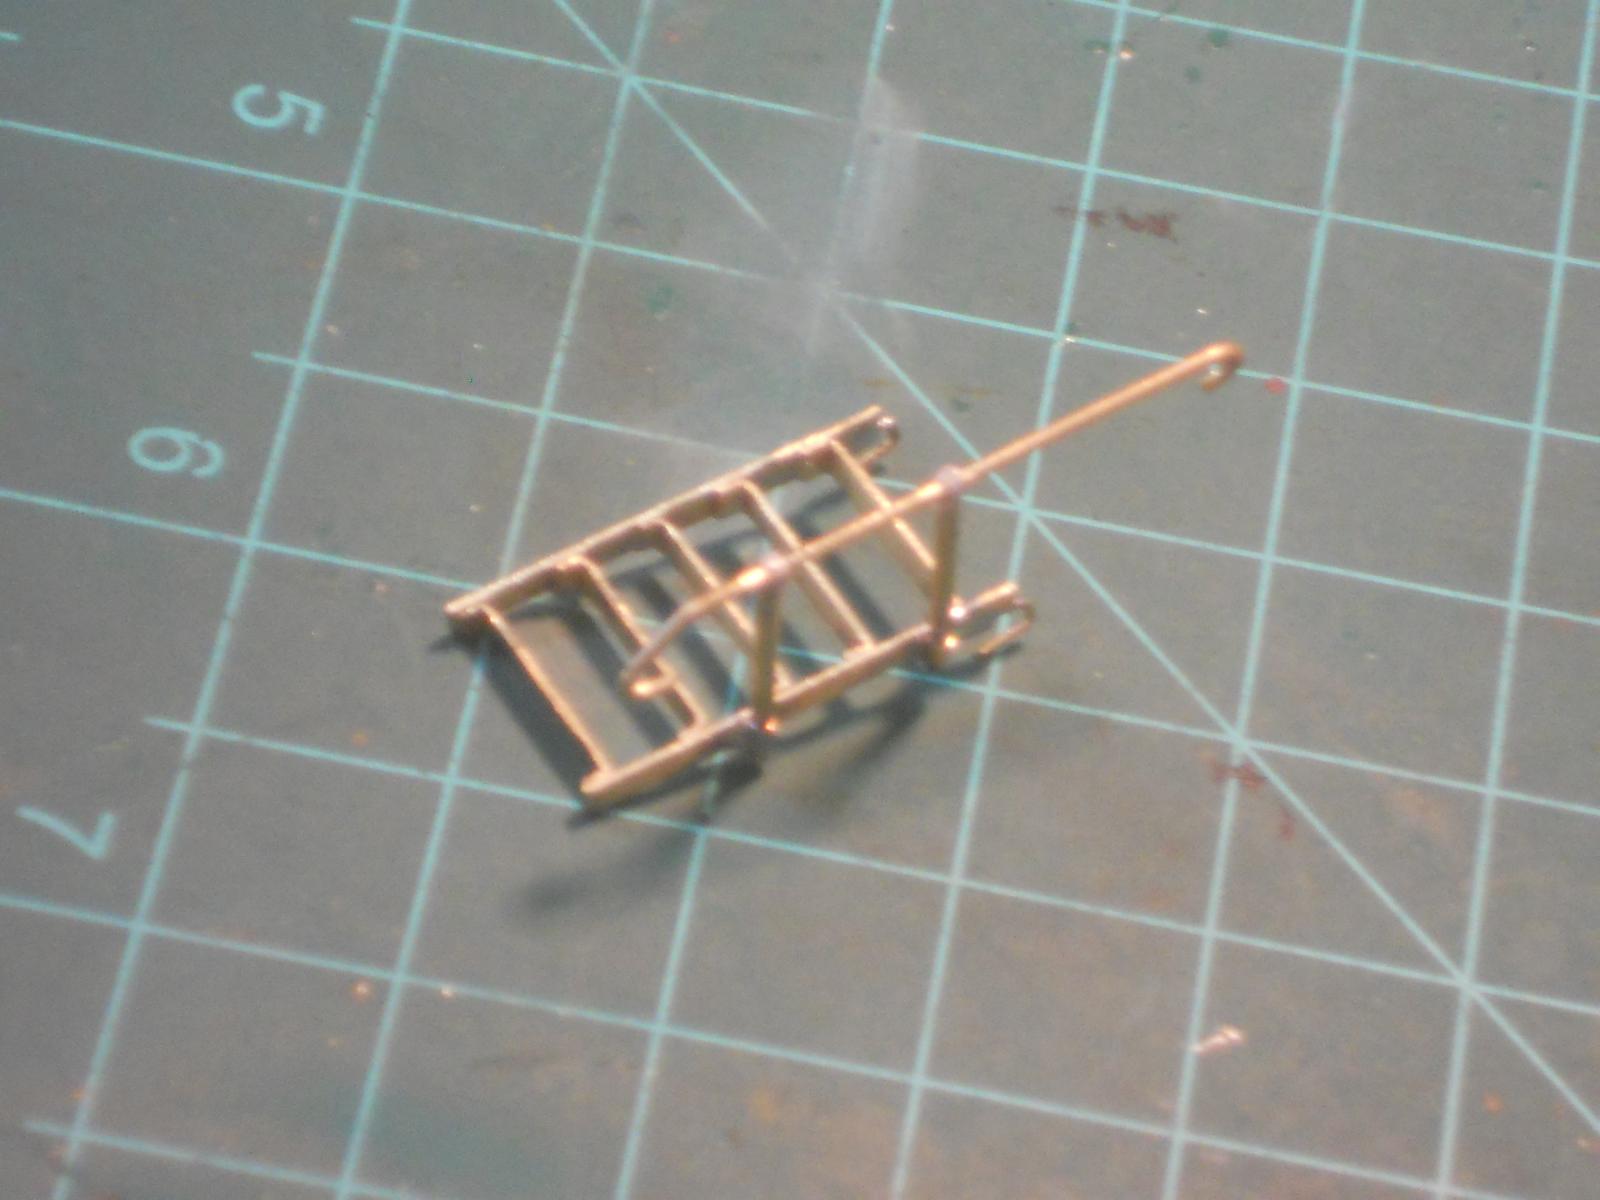
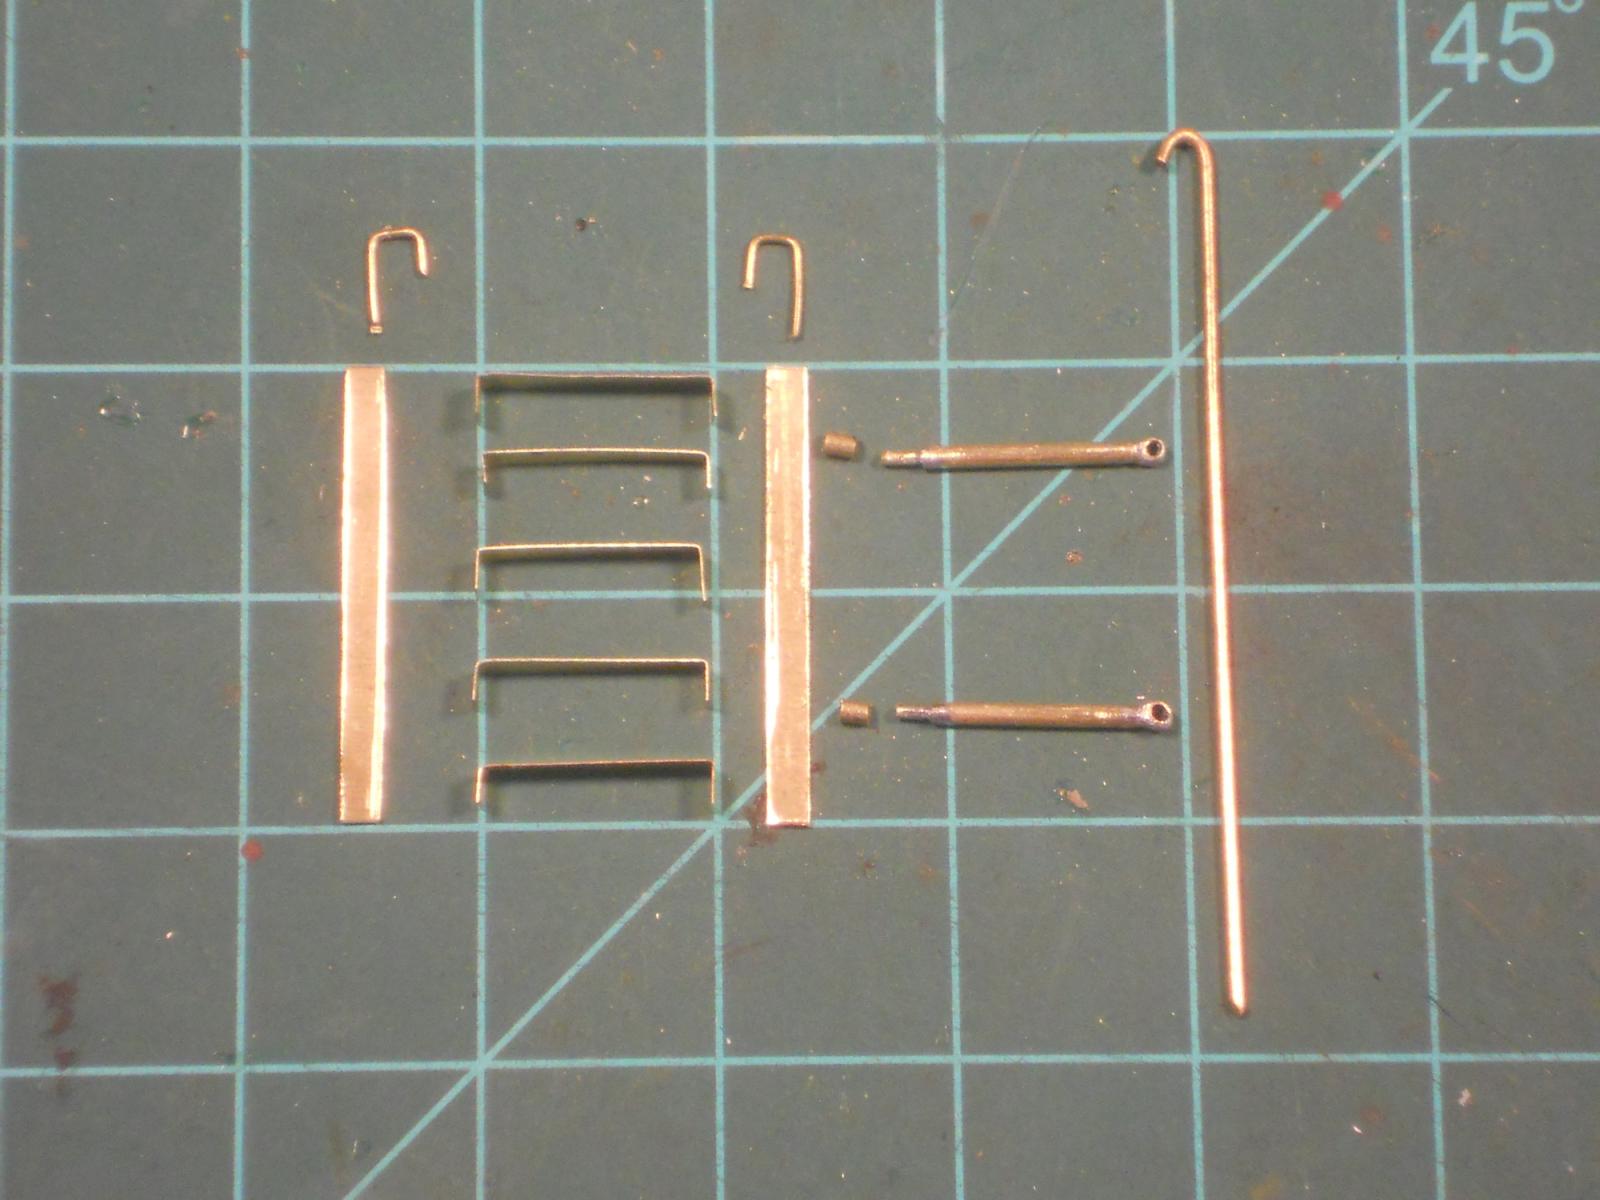
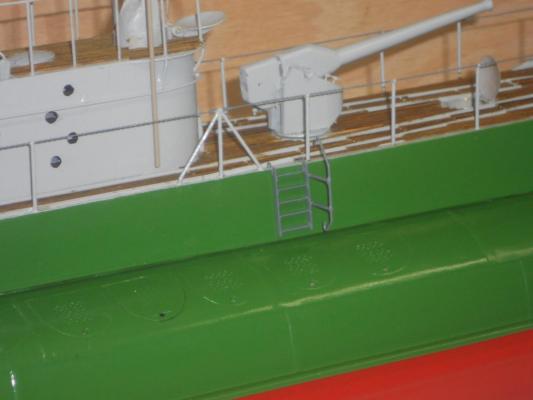
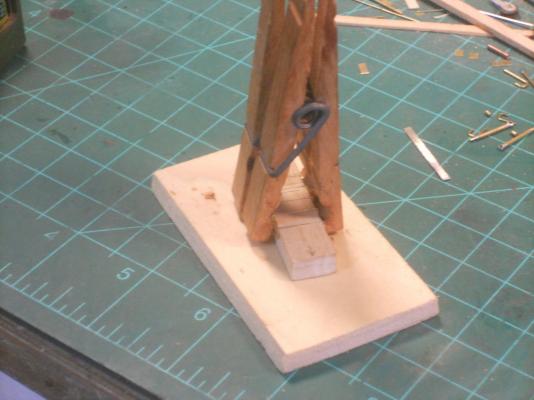
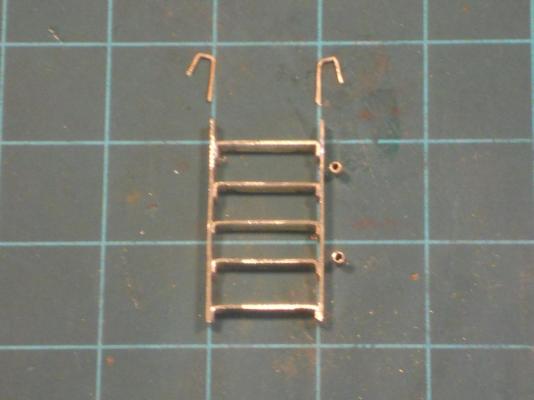
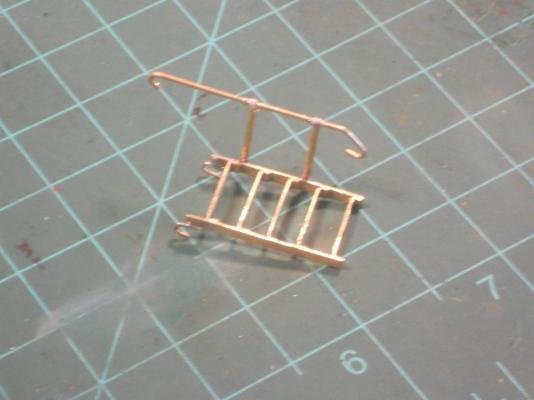
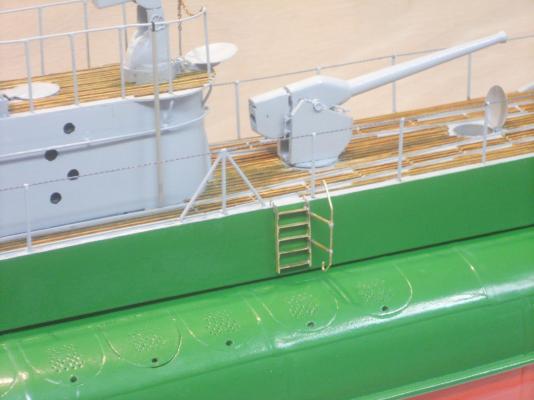
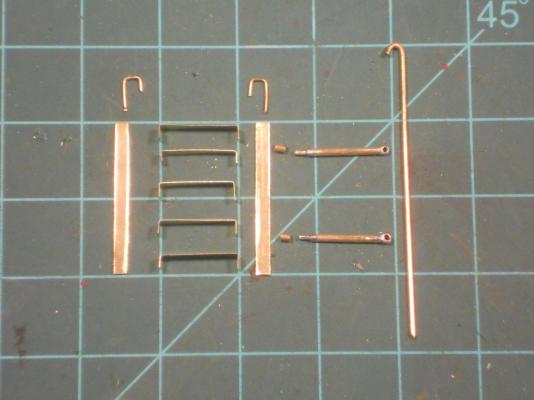
Hello everyone and thanks to all who visited and clicked the like button. This rainy morning I made a soldering jig that also functioned as a step rung guide for bending the little lips. I also made new rungs for the boarding ladder from 0.4 mm brass shim stock. Now they are all the same size and fit very snugly in my little jig. I just clamped the side braces to the upended parts of the rungs and soldered them nice a tight. It worked like a charm. Next came the more delicate and trying job in soldering the boarding hooks and the railing holder tube fixtures. I used a few steel office clamps as heat-sinks and was able to solder these parts on without loosening up the step rungs. A little cleaning by removing some of the exposed solder, then fitting the railing. That worked okay as well. I used some 5 minute epoxy cement to keep the railing rod in place on the stanchions, which make the railing more like one piece. I can still remove it so the crew can stow the entire boarding ladder away inside the lower part of the con or below decks. The ladder still needs to be cleaned with a cleaning solvent so I can paint it dark grey. That'll be done tomorrow after I come back from the doctor's office. (Nothing serious, just a pre-op visit for my next biopsy later in the month). Okay, here are a few pics of today's work. I took a piece of poplar out of my junkbox and made it 11 mm wide in order to get a 133 mm wide ladder. I marked the location of the rungs 5 mm apart and sawed slots to a depth of just over 2 mm. I had to adjust this several times with a 2 mm piece of brass to get the right depth. Now I could make all 5 of the rungs but after the ends were bend to allow enough solder-hold to the side braces I used my duckbill pliers to make the bends sharp 90 degrees by tapping on the bend with a small hammer. Here I have inserted all 5 rungs into the jig and clamped a side brace to the jig assembly. I soldered one side at a time to prevent shifting of the side braces. This worked real fine. After both side braces were soldered on I removed the little of the extra solder that usually seeps out or used too much of. This is a close-up of the above picture for more detail, You can just see one end of the side brace. Here I have laid out the deck hooks and railing attaching fixtures. I'm sorry for not having made a few pics of all the steel office clamps that functioned as heat sinks but suffice it to say that it worked great. Nothing got desoldered and all the parts are nice and square. Next I assembled the loose parts for the railing and while they are on the boarding ladder, nice and straight, I cemented the railing rod into the stanchion tops. I used two of the deck railing stanchions for this, waste not want not This shows the completed boarding ladder on the cutting board looking from the left. No photo etch here, all hand made This is looking from the right side. I have made two small holes in the deck for the ladder hooks to fit in and here I have hooked the ladder to the boat. This is on the starboard side and looking towards the bow. I still need to make the holes on the port side. This is looking towards the stern. Cheers,


-
Thank you Kevin for your continued support and kind words in following my build. Coming from a real submariner it means a lot to me, not that any of the other visitors are less meaningful. Yes, all our builds must come to a, hopefully, successful conclusion. Just the dingy is left to do and then a few crew members and some spare parts. The display board and cace will be a daunting task because of the size but I have a few ideas on it. Next project - - - well, I still have the VOC ship "Surabaya" to work on, which will keep me busy for a few years. I also want to build a Dutch fishing boat or VOC Jacht in a lamp. However, I really want to make a painting or two or three of the O19. Oil? Water color? Colored pencil? So many thoughts, so many ideas. I have already started a watercolor painting of a VOC ship several years ago and can make that into a pic of my model My dear bride Gwen would like for me to build a model of the KPM ship he made captain on, the MS Musie. I need another lifetime added to this one in order to do everything I have planned Please don't fret about your "lost time." It's all a learning curve, the journey should be fun with some frustration thrown in but it's the final destination that counts. Your Vic is outstanding and certainly is something you can be rightfully proud of. It's a privilege for us to be able seeing your artistry. Cheers,
-
ROYAL CAROLINE 1749 by Doris - 1:40 - CARD
Piet replied to DORIS's topic in - Build logs for subjects built 1501 - 1750
Hello Doris, first of all I sincerely hope that your job prospects work out favorably for you. Secondly, your work is certainly inspiring to all of us. Your models are examples for us to strive for. I'm patiently awaiting future updates. Just take care of the situations in your personal life. Cheers,- 883 replies
-
- 2
-
-
- royal caroline
- ship of the line
- (and 1 more)
-
Hoi Sjors, "technically" it may not be accurate but at this stage in your build it's probably a wise desision to leave well enough lone. For future reference - - regarding not getting a sharp 90 degree bend in the copper plates, try using a small thin steel ruler on the reverse part of the plate and bend the plate up against it by using another flat thingy that can be a piece of hard wood or steel. I would probably use a flat-nose or duckbill pair of pliers that have real sharp edges. I made mine that way from an old pair on my bench grinder and I get real good 90 degree angles in brass sheet stock. I do help it a little by tapping the brass against the pliers. A little practice doing this will get you great results. Copper is soft and there should be no reason for not getting perfect angels. Hey, I could hop on over and demo it for you I could also make a few demo pics to show what I mean. Cheers,
- 1,616 replies
-
- 4
-
-
- caldercraft
- agamemnon
- (and 1 more)
-
Bravo Vivian, excellent work! That "night time" picture is fantastic, very inviting. Cheers,
-
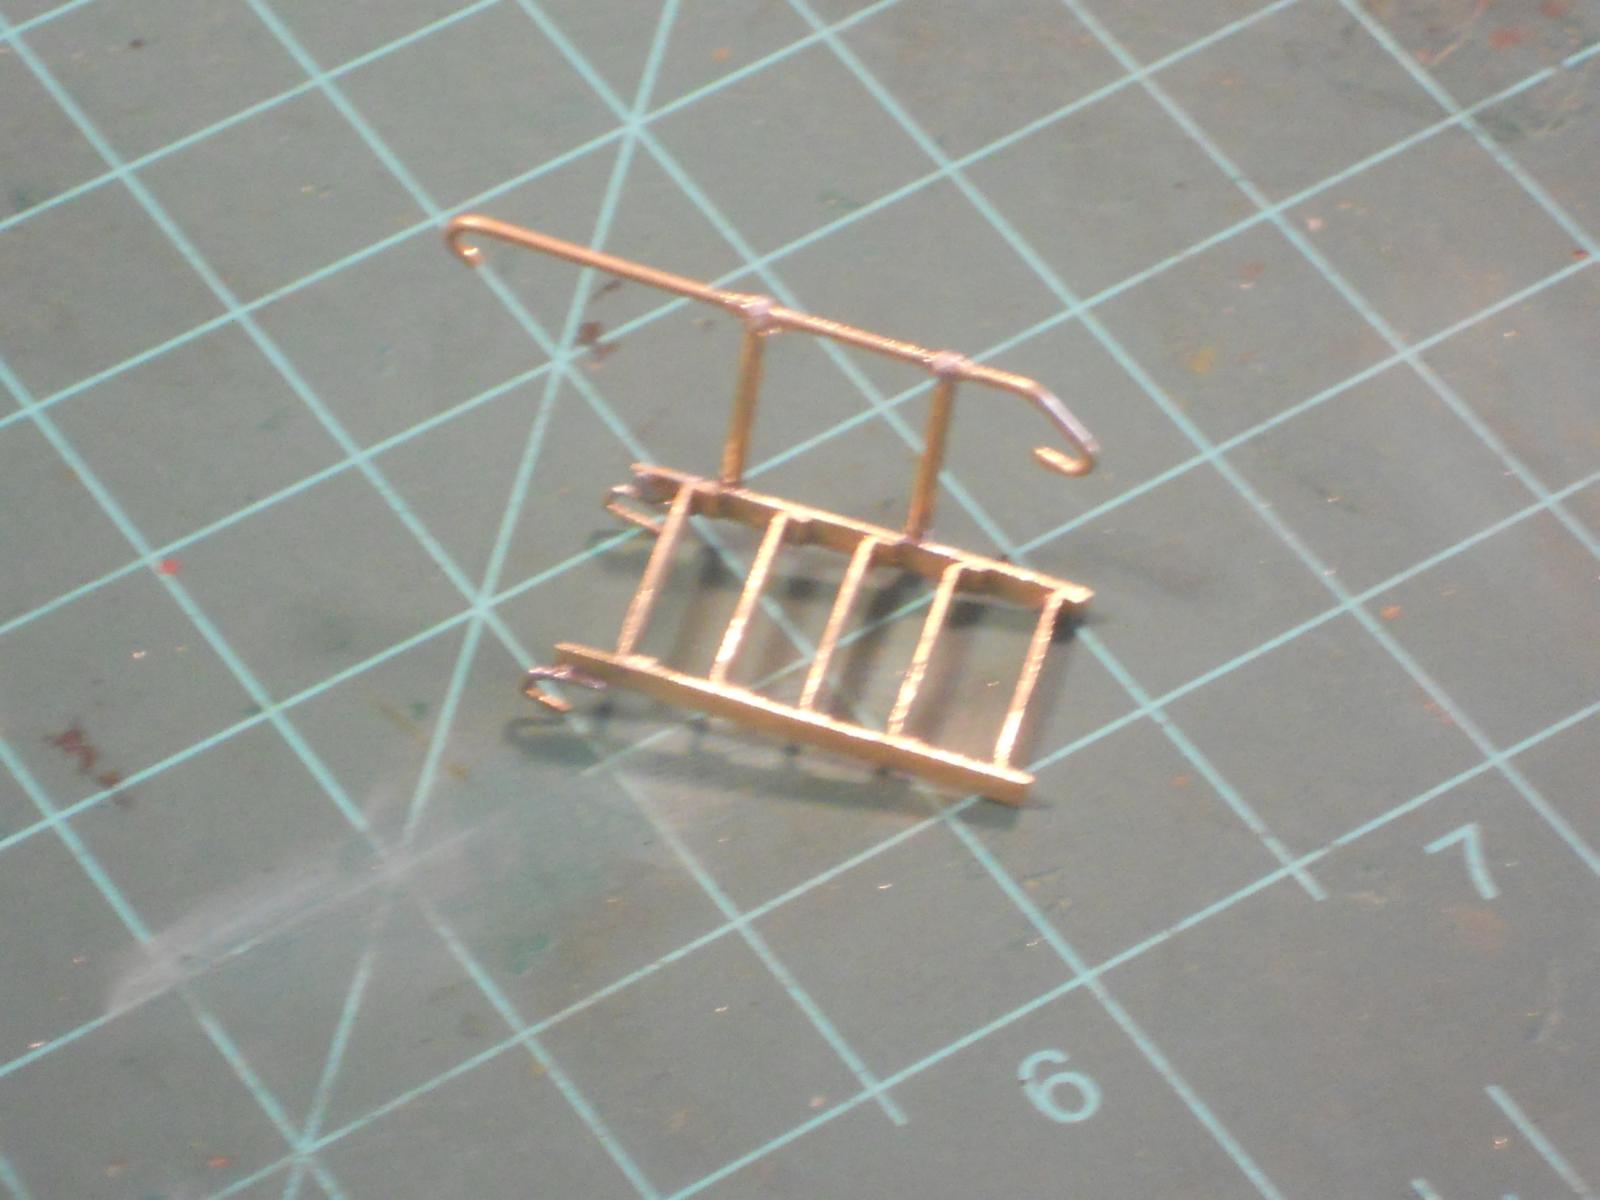
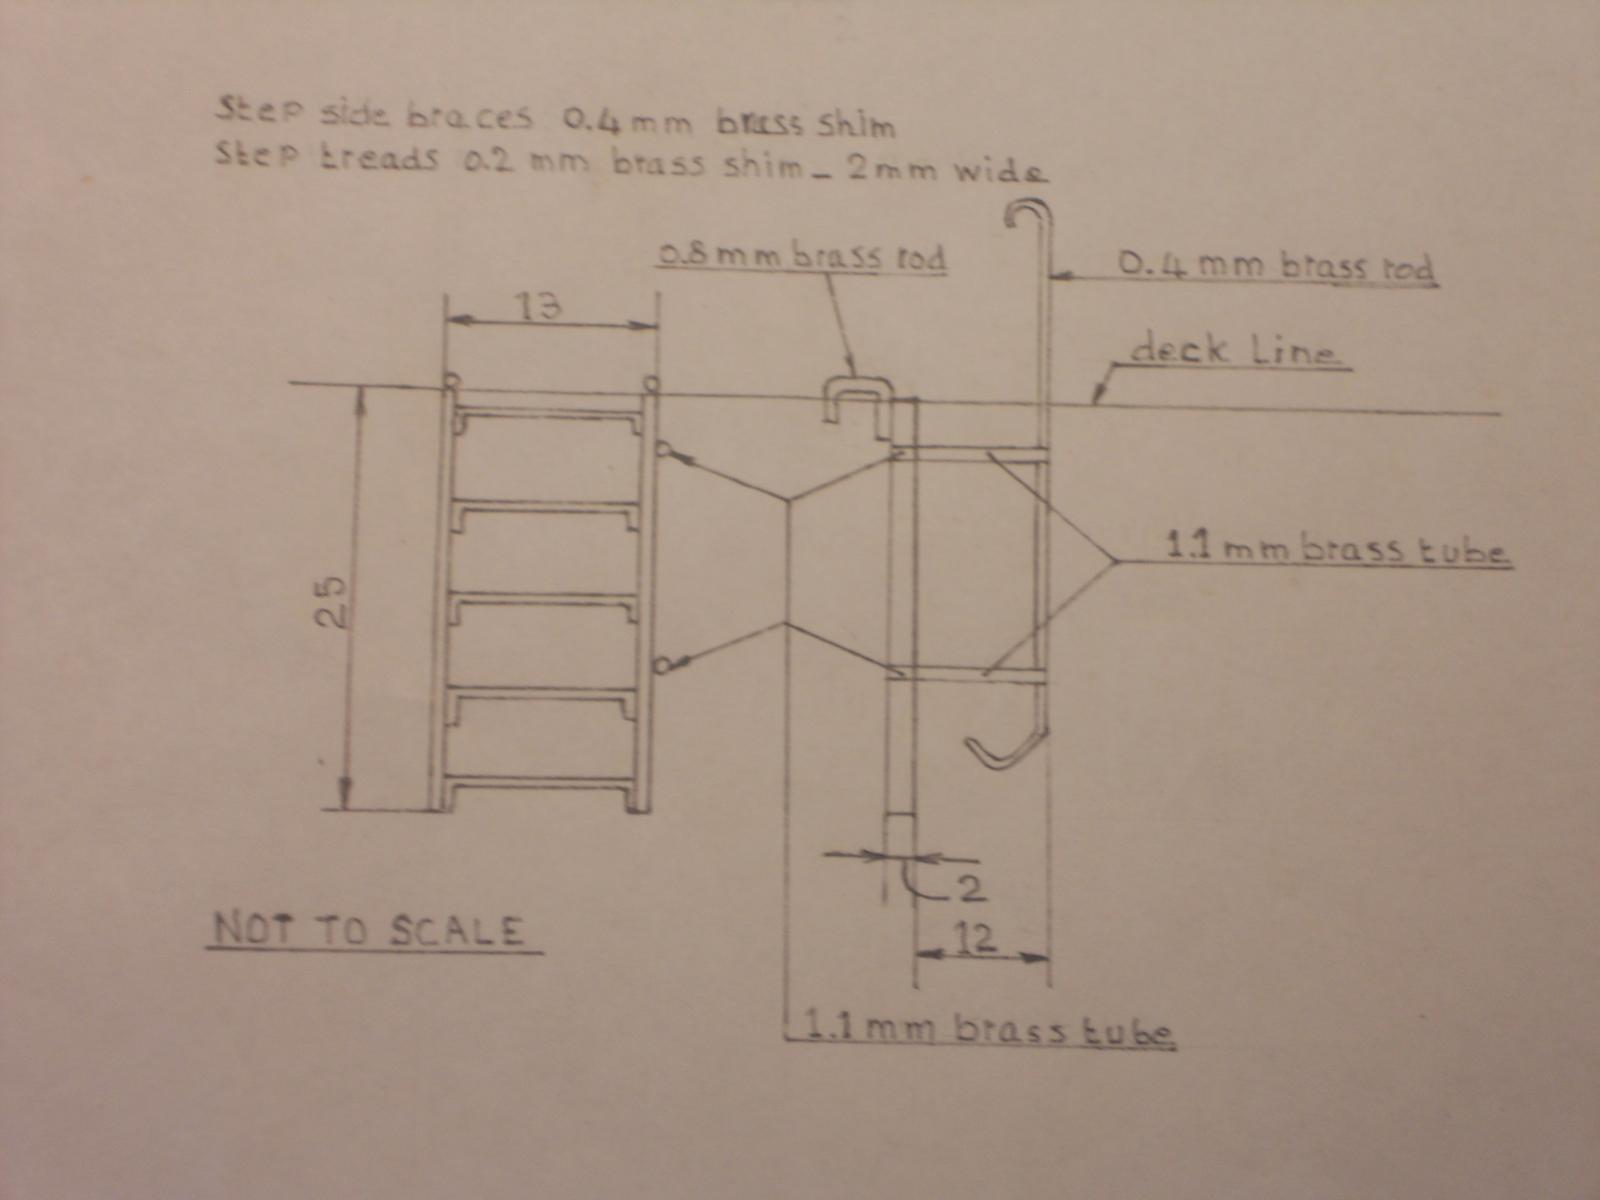
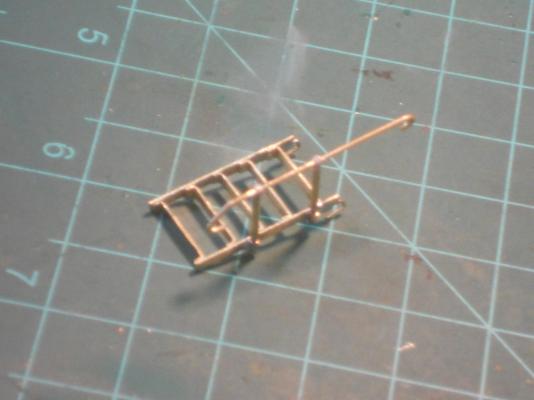
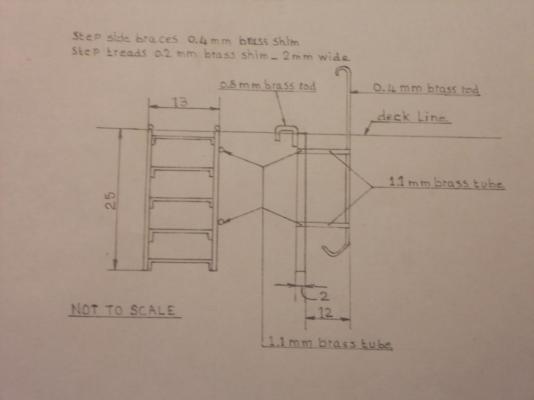
Hello all, This morning I made a new sketch for the boarding ladder. I did this more for my own build archive then a plan to work from. Once I have the idea in mind with the basic measurement I just work on "the fly." Reminds me how our friend Popeye works So after lunch I started cutting the parts and pieces for the boarding ladder. This was easy enough but in trying to jig them up posed a problem. Making the treads or rungs from 0.2 mm brash shim turned out too thin and flimsy. I'll have to make them from 0.4 mm brass shim. I also need to make a jig to bend the small "feet" at the ends of the rungs so that each one is of the same length. Not much of a set-back but I should have known before trying it. Being impatient I guess. Holding the parts of the ladder together for soldering is like trying to hold a house made from cards together. So, I'll have to make a better soldering jig to get everything square and evenly spaced. It'll work out, I hope. You know, working on this little ladder model reminded me of my father taking me to see his boat. That was early January, 1941, when he was promoted and had to get off the boat and was transferred to the cruise Hr. Ms. Java. He wanted to visit the O19 one more time and say goodbye to the crew. It also happened to be an open day like bring your kids to work. This was in Surabaya, the Dutch Navy base in the Colonies. I remember that the boat was tied to a floating like dock and we had to first get down a gangway, cross this wooden dock and then up onto the O19 by means of this steel ladder. Let's see, I was six going on being seven that April and my father wanted to help me. Hmmmm, wrong thing to do with a seven year old boy. I had to jump first from the wooden dock onto the mine tube lids and grap the handhold, then just climb on board, no problem. Hey, I used to climb in the tall kanarie trees in front of our house and the tjimara trees (cimara = Malay spelling), this little ladder posed no problem for me. My father was just smiling. Okay, enough reminiscing. It's close to my bedtime and I need to put an end to this. Here are a few pics of my efforts of today. I have already decided to make two changes. One is the size of the step rungs from 0.2 to 0.4 mm and the other is the size of the two small hooks that hold the ladder to the deck from 0.8 to 0.4 mm brass rod. I'll amend the drawing later with red ink Here are all the parts laid out. You can see how flimsy the rungs are and not even. The deck hooks will also be remade. The railing handhold is not finished yet. It has to be pushed through the two stanchions first before I can bend the lover hook on it. I will secure it to the handhold to the stanchions with epoxy and I am making it removable - as you can see I have soldered pins to the bottom of the stanchions that'll fit into the sockets that'll be soldered to the ladder side. Cheers,
-
Thanks to the many who came to visit and showed your appreciation by clicking like. Hello Boris, thank you very much for your kind words, you make me blush I don't know what is exhibited in the various musea in the Netherlands or other countries but if the USA is a guideline, not much. Gino den Ridder mentioned a group in the Netherlands that may be interested but they have no connection with any museum. For now I'll keep her in house and enjoy looking at her Ho Joe, glad you like the stories about my father's escapades, it keeps my memory alive. It's not much I remember and besides, he didn't talk "shop" that much. He didn't want me to go to sea, he encouraged me to go the airplane route. At age six the "airplane bug" bit me and that's all I talked about. I wish all of you could stop buy and have some fun conversations. John Fleming and his wife Diane did and we had a great time. Hoi Freek, thank you as well for your compliment, putting my model next to museum models. It is a good thing that they do have at least the first Dutch sub and then one of the last pre WW II subs with a rich history. Submarines are not very exiting subjects for static display models in the first place and yes, I guess people, especially the young people like interaction and puch buttons. Cheers,
-
Hi Vivan, I'll see what kind of Indo recipes you may like and PM you on it. There are several mailorder places you can buy all the ingredients. I'll send a few as well. They ship anywhere in the world. Cheers,
-
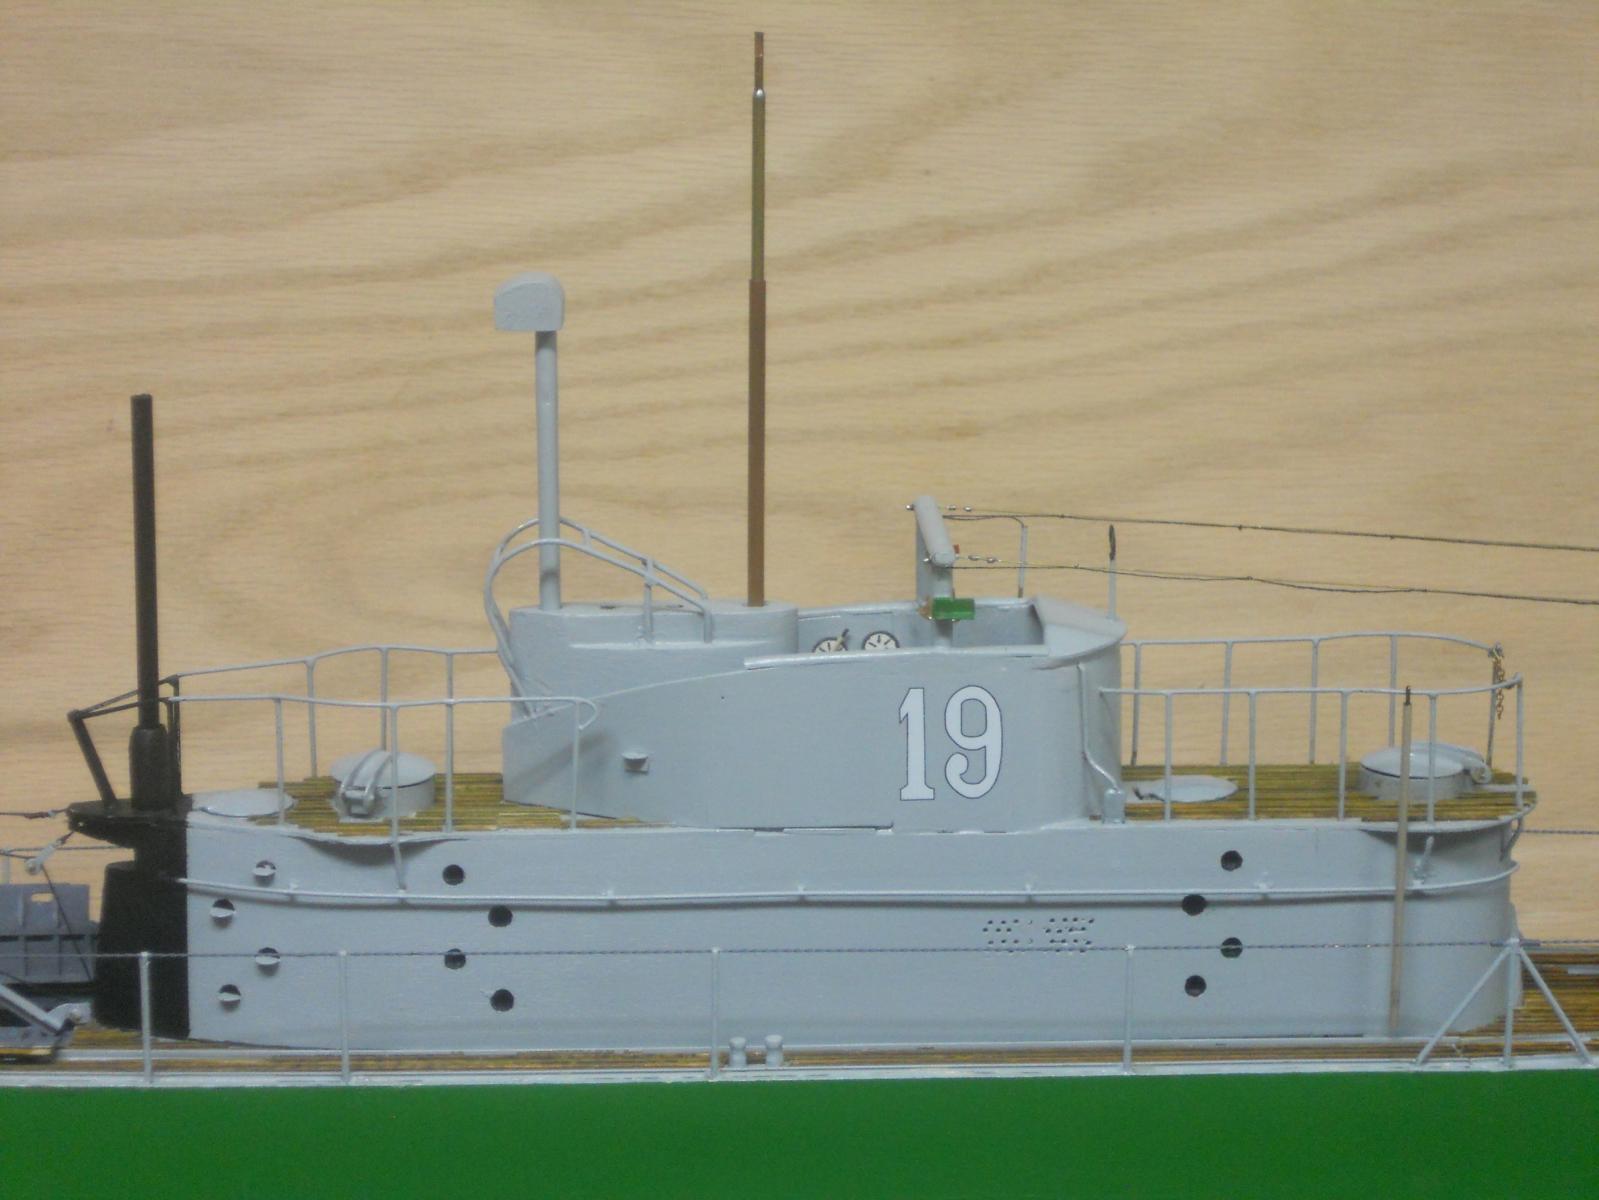
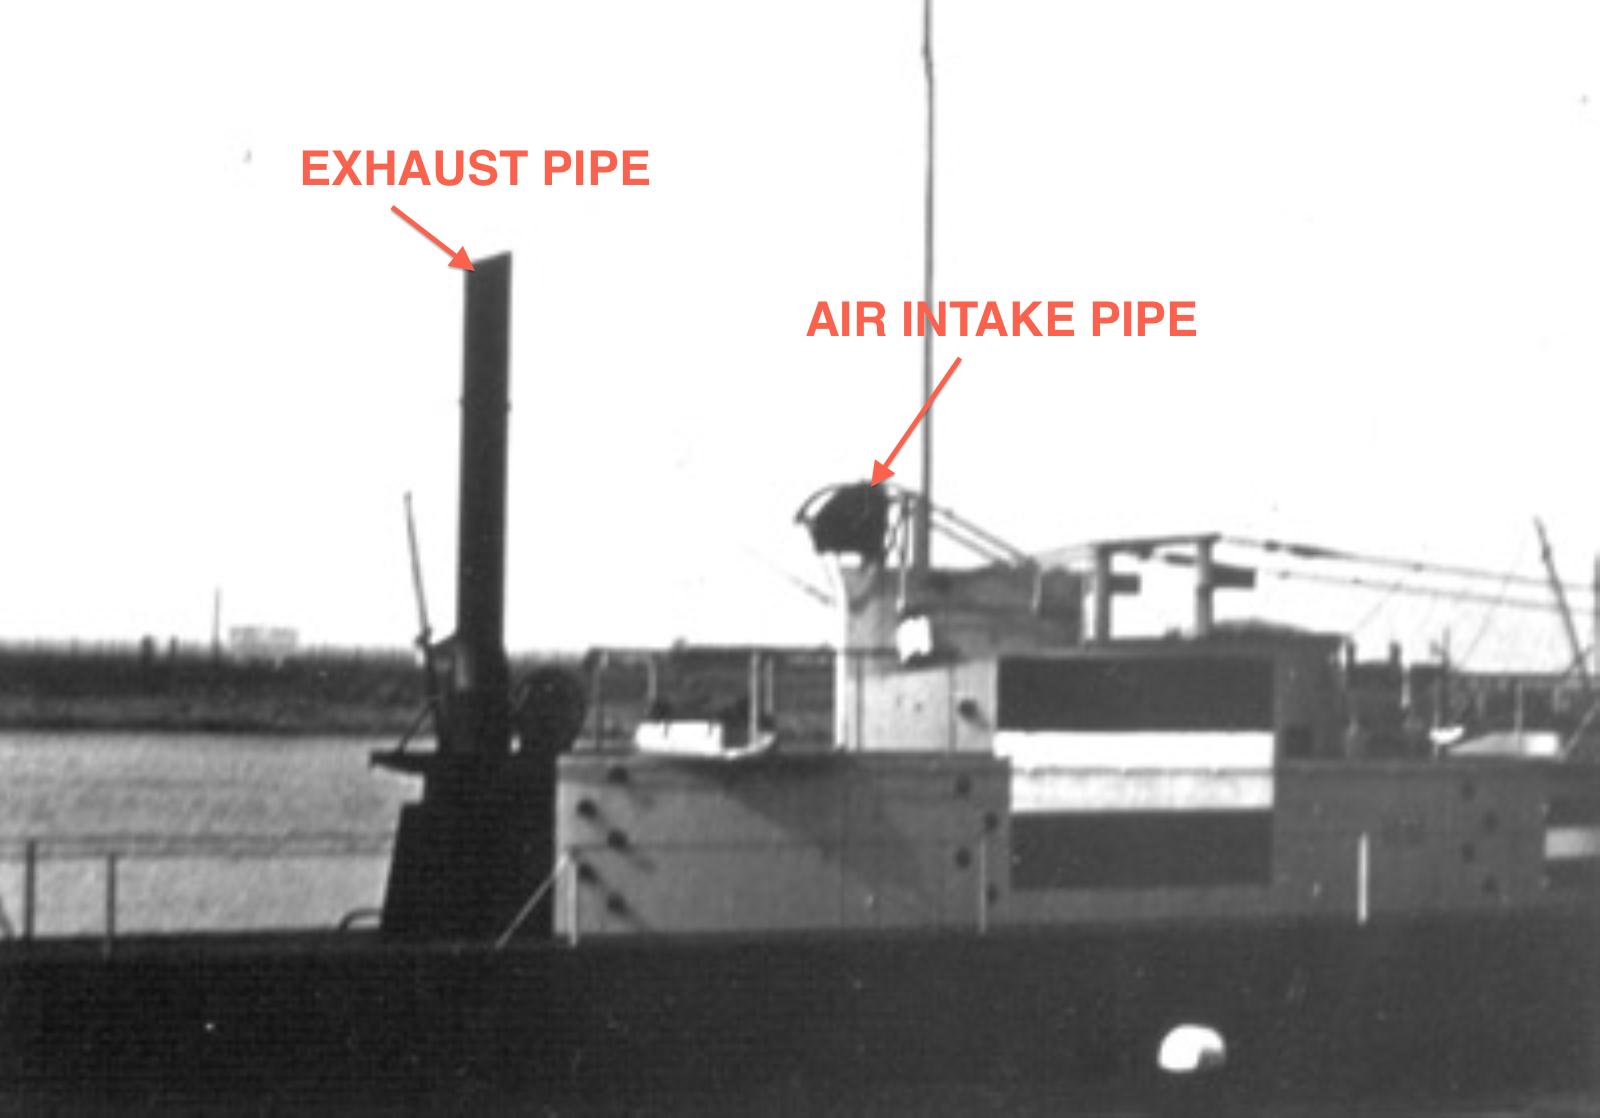
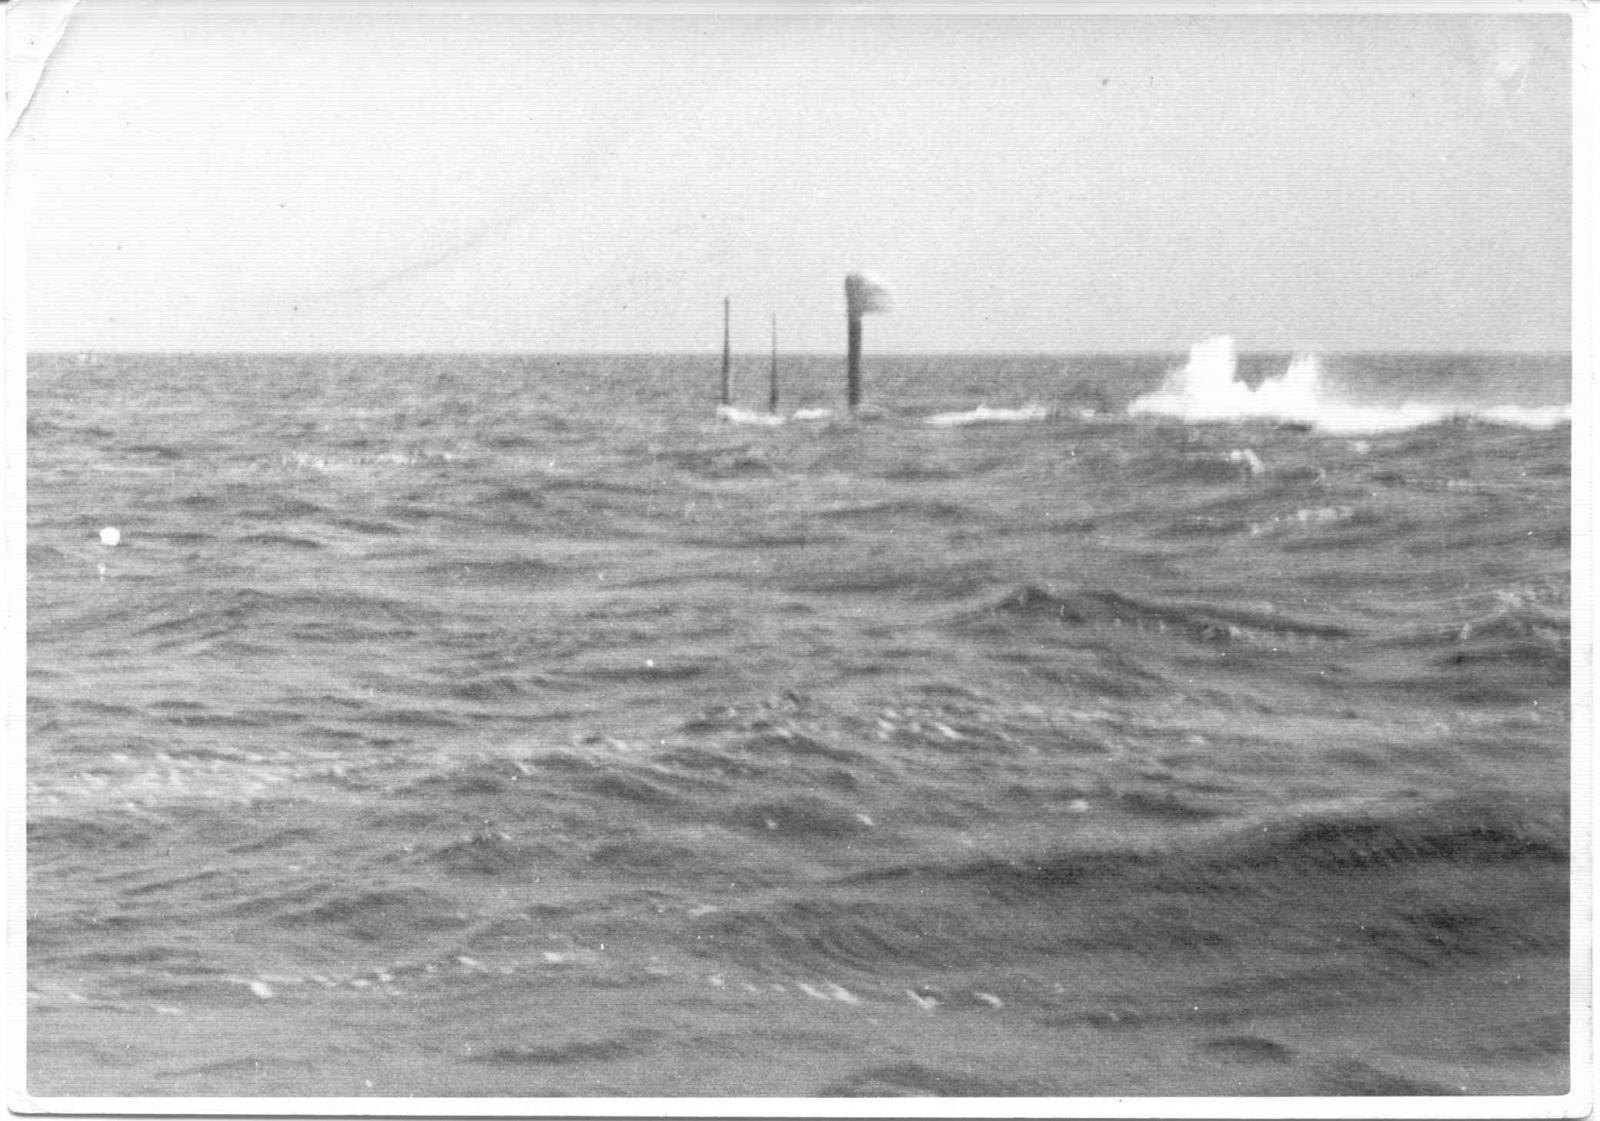
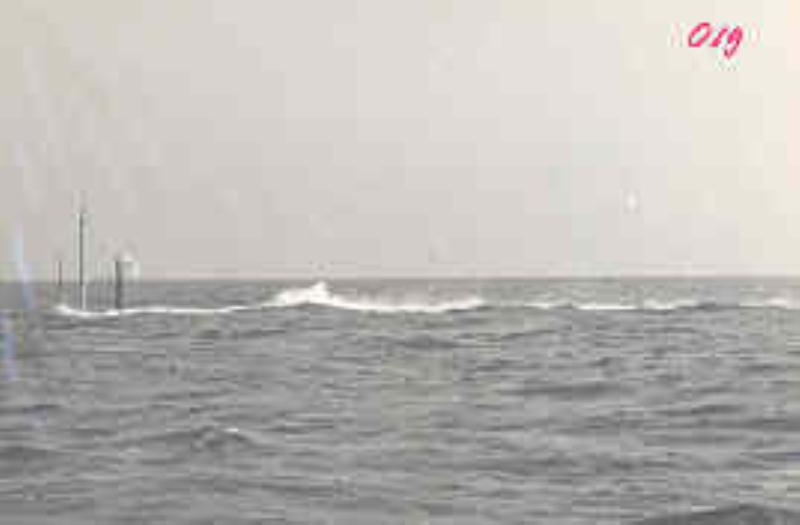
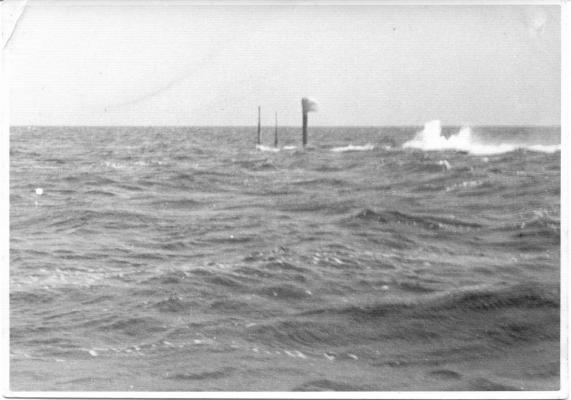
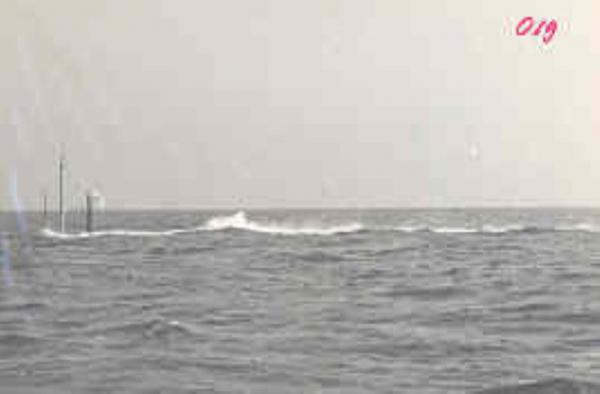
Hello everyone, I started making sketches for the boarding ladder by using the photograph of the O19 when docked in Alexandria, Egypt. First I thought that it seemed to have a fold-down lower section to board over the mine bin section. So, I designed a ladder with a foldable lower section that would work just fine. However, when I blew the picture up (no, not with dynamite i.e. enlarged it) I realized that they stuck a board under the lowest rung, at least according to the shadow on top of the mine bins. So, all my efforts of this morning are for naught, at least for the foldable part. It will make it a lot simpler for me, which is welcome. With the boat not fully loaded she'll naturally ride a lot higher and being clever Dutchmen they improvised. I also have a nice photo of the KVIII with the crew posing and there is also a boarding ladder. I think that I have enough info to make a passable ladder Well, while we must wait for pictures of the building process I figured I'd "bore" all yuns with some pictures of the O19 snorkeling. You may have heard it said that this system was a German invention but that would be wrong. They copied this innovation and used on their U boats. This also reminds me of a story my father told me about what happened during one of the proving runs. They were coming up to surface and as is customary the CO peeked through the periscope and to his horror he saw a close and very speedy Navy vessel boring down on them. There was no way avoiding a collision! So he yelled "dive, dive, emergency dive." They got the boat down real fast but not quite fast enough because that eager beaver Navy ship thundered right over them, with a goodly down bubble and full ahead, even shaking the boat by the turbulence. Fortunately it didn't hit the boat just hit the periscope the CO was looking through Talking about one shook-up CO. That was a close call but excellent performance of the crew. I made a picture this afternoon of the O19 in snorkel mode and add a few pics of her actually snorkeling. Hope you like them. This is a copy about "trimmed dieseling" as it's officially called, from a book by van Jalhay. I have translated the Dutch text so all you non Dutchies can understand what it says. "An invention by a Netherlands Navy officer, Lieutenant Commander 1st Class J.J. Wichers, that would play a great role in the Second World War. The officer of the Navy Steamship Service 1st class J.C. van Pappelendam tasked himself with the technical execution and the result was a pipe through which air was sucked in so that the boat could use the diesels when sailing under water and the batteries would thus not have to be used. Naturally the boat was committed to a specific depth but she could practically remain submerged continuously. The sniffer or snorkel did its entry. This shows my model of the O19 that I configured in snorkel mode. Sometimes they would leave the communications antenna up but I elected to retract it and the battle periscope into the boat. I have annotated the exhaust and intake pipes. I didn't stow the dingy loading boom and tackle, too much trouble for now. Will do that when I'm making the "official" photographs. I love it when I can do a show and tell with this model. This shows the O19 at the builder, Wilton-Fijenoord in Schiedam, the Netherlands in 1939. The reason for the Dutch national flag on the con is that the Kingdom of the Netherlands declared neutrality as in the first world war. They had all ships in Dutch registry paint the national flag on the sides. This didn't help because Herr Hitler had other ideas. In any case, you can see the exhaust pipe extended in this shot. This is one of the action pics of the sub snorkelen. Here is another action shot of the O19 snorkelen. Cheers,


-
Hey, thanks Carl. Okaaaaay - - - boring you want - boring you'll get Yeah, I can use a handful of your worms, can you fax them over????? Cheers,
-
That's really looking very nice Popeye, like a wheelhouse should. Cheers,
-
Beautifully done Dave. LOVE the new look, very realistic. I think that when a viewer looks down from the top of the vessel they may see enough detail of the wheels. As I understand it, they are preserving a section of prairie with bison. Cheers,
-
Hello Vivian, beautiful work. She looks great, especially against the "aged" stone The background reminds me of the backyard of our house in Surabaya, Indonesia, where we lived before WW II. Will your ship be transporting hot peppers from Indonesia? If you need Indonesian recipes just let me know. I used to pop them like candy. Cheers,
-
Thank you fellows for your vote of encouragement. The log'll be epen and kept current but I'll slow down a bit. I may just add an original photo of the O19 once in a while, if that's okay with yuns I was busy all day cleaning up our yard. We have had two days of severe rain with T storms and it left a mess. Gwen was very concerned that water would enter the house but luckily we stayed dry. If this begins to be a habit I may have to build a dike around the house I plan to start with making the boarding ladder tomorrow. Need to make a few sketches first, I think. Okay, that's it for today babes. Hopefully some more stuff tomorrow or day after, who knows. I need to get 1 ½ cubic yard of vegetable growing dirt for my new veggie garden and worms. Cheers,
-
Mayflower by SawdustDave - Finished
Piet replied to SawdustDave's topic in - Build logs for subjects built 1751 - 1800
Wow, that looks really ducky Dave, nice job! Cheers,