Louie da fly
-
Posts
7,990 -
Joined
-
Last visited
Content Type
Profiles
Forums
Gallery
Events
Everything posted by Louie da fly
-
 Ah, you never see these things these days - just another piece of lost technology due to the loss of traditional rivetting. This is what I made with mine . . . (the helmet) - Battle of Hastings re-enactment 2006.
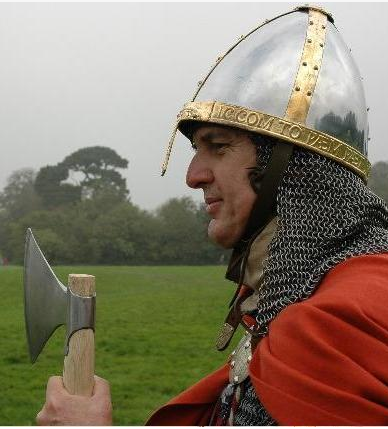
-
Nice work, Mark. You're probably the only person who's aware of the problem with the location of the channels (well, yes, obviously, us now that you've told us). The planking's looking very good - both the carvel and the clinker. Nice and crisp. This is going to be a very attractive model. By the way, are you planning to make your forecastle the shape Caldercraft model shows? There's a lot of information to suggest the forecastle would have been different - as shown in the pics I put up in my post of August 23. I suggested this, with my reasoning at https://modelshipworld.com/topic/4031-mary-rose-forecastle-more-info-on-its-shape/?tab=comments#comment-114264 Beautiful work. Steven
-
Nicely done. Furled sails are always a problem - it's impossible to duplicate to scale the thinness of real sails, so a furled sail always looks too thick and stiff. Your solution is a good one. I'm just about to do a furled sail and I'll be using the same technique. Steven
-
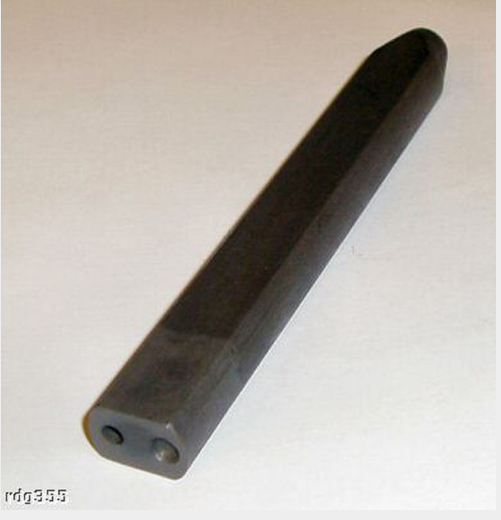
That "pusher" is known in the trade as a rivet snap, used in rivetting metal sheets together. I've got one I inherited from my father which has several functions - it "pulls" the two sheets of metal together and is also used to dome the head of the rivet. Much too big and hefty for your purposes, but the technique is the same. Steven
-
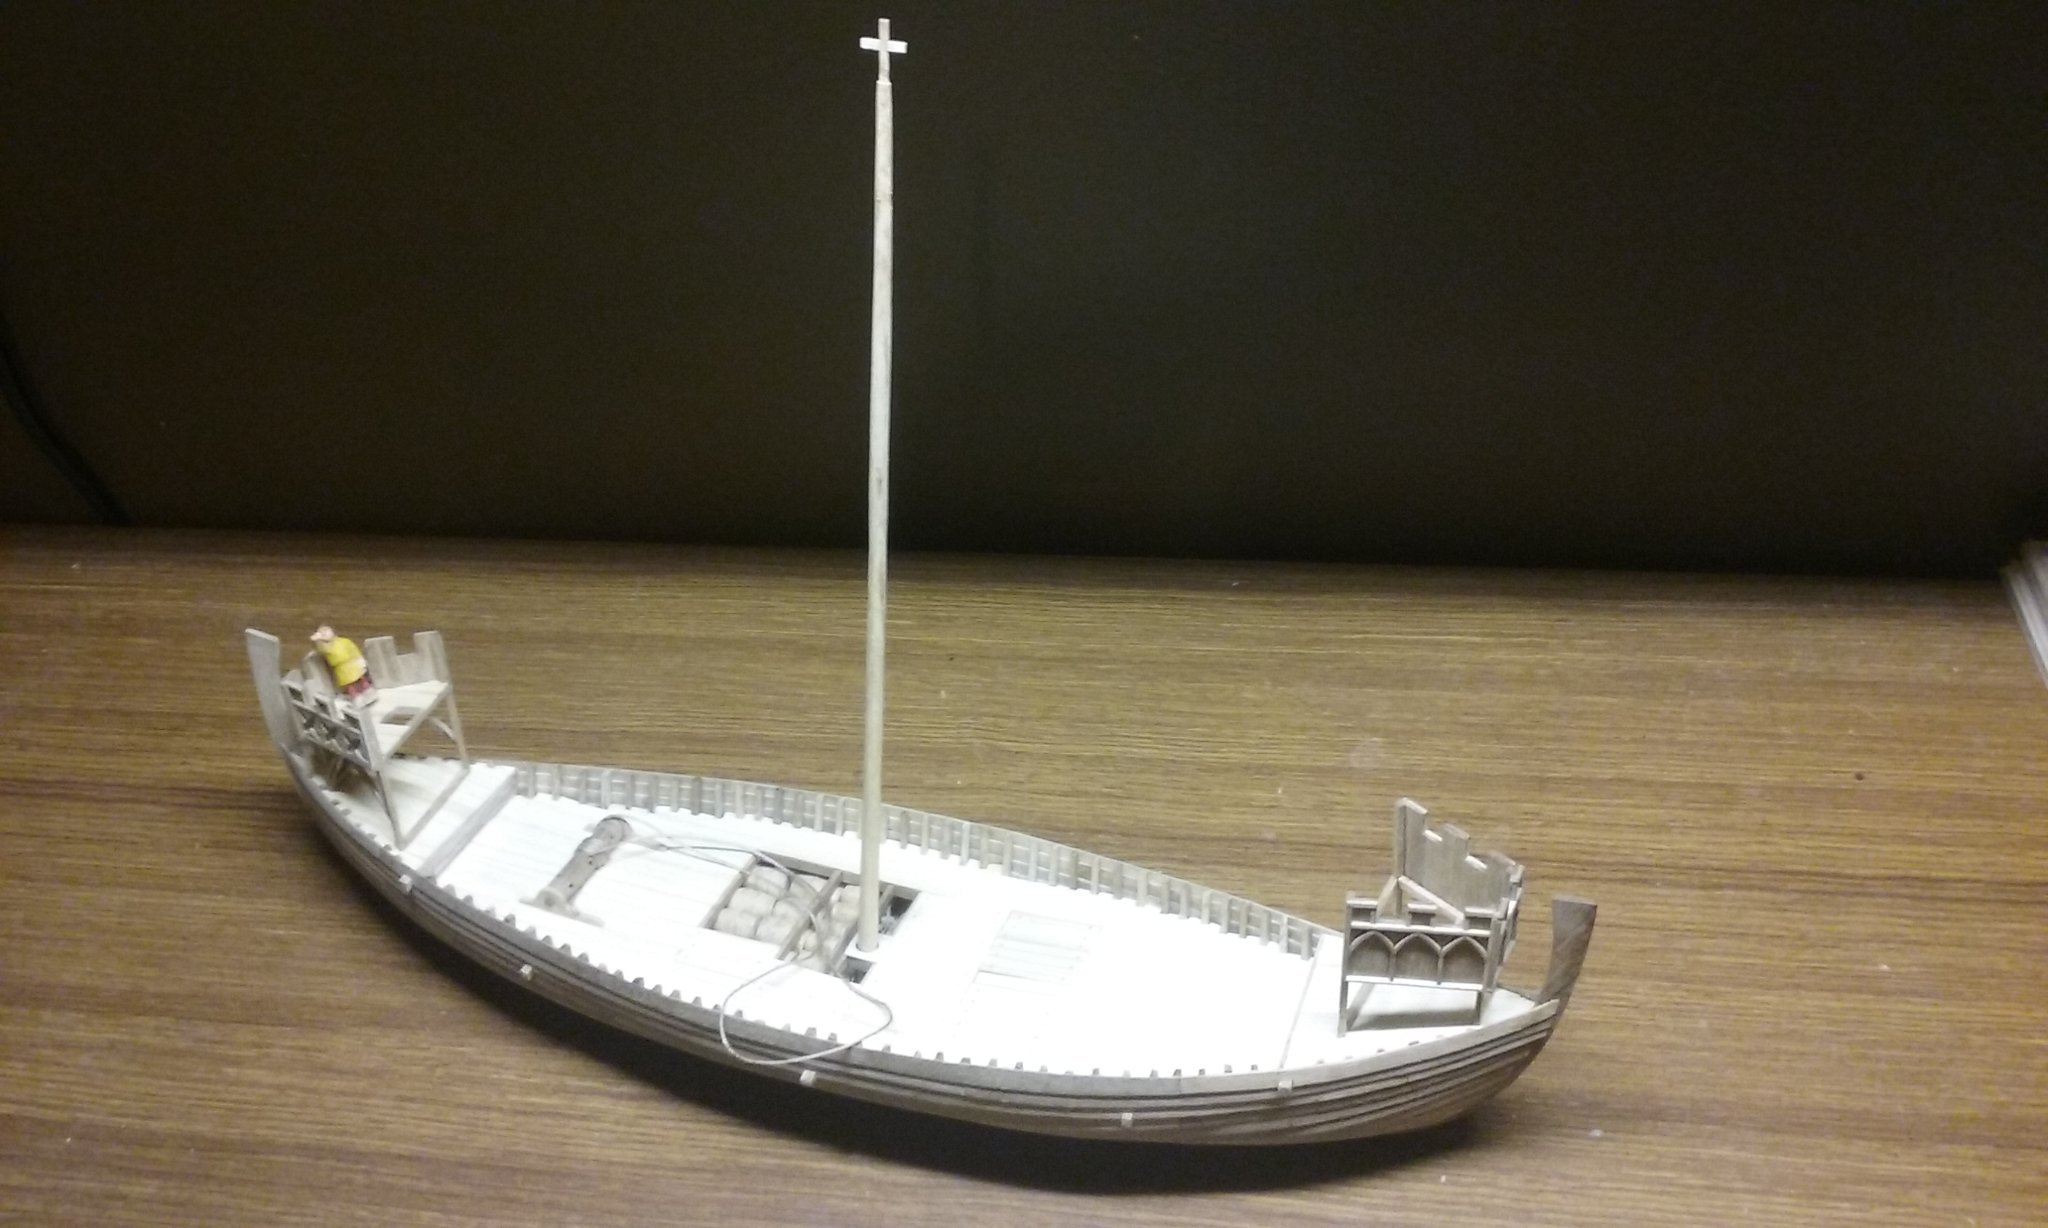
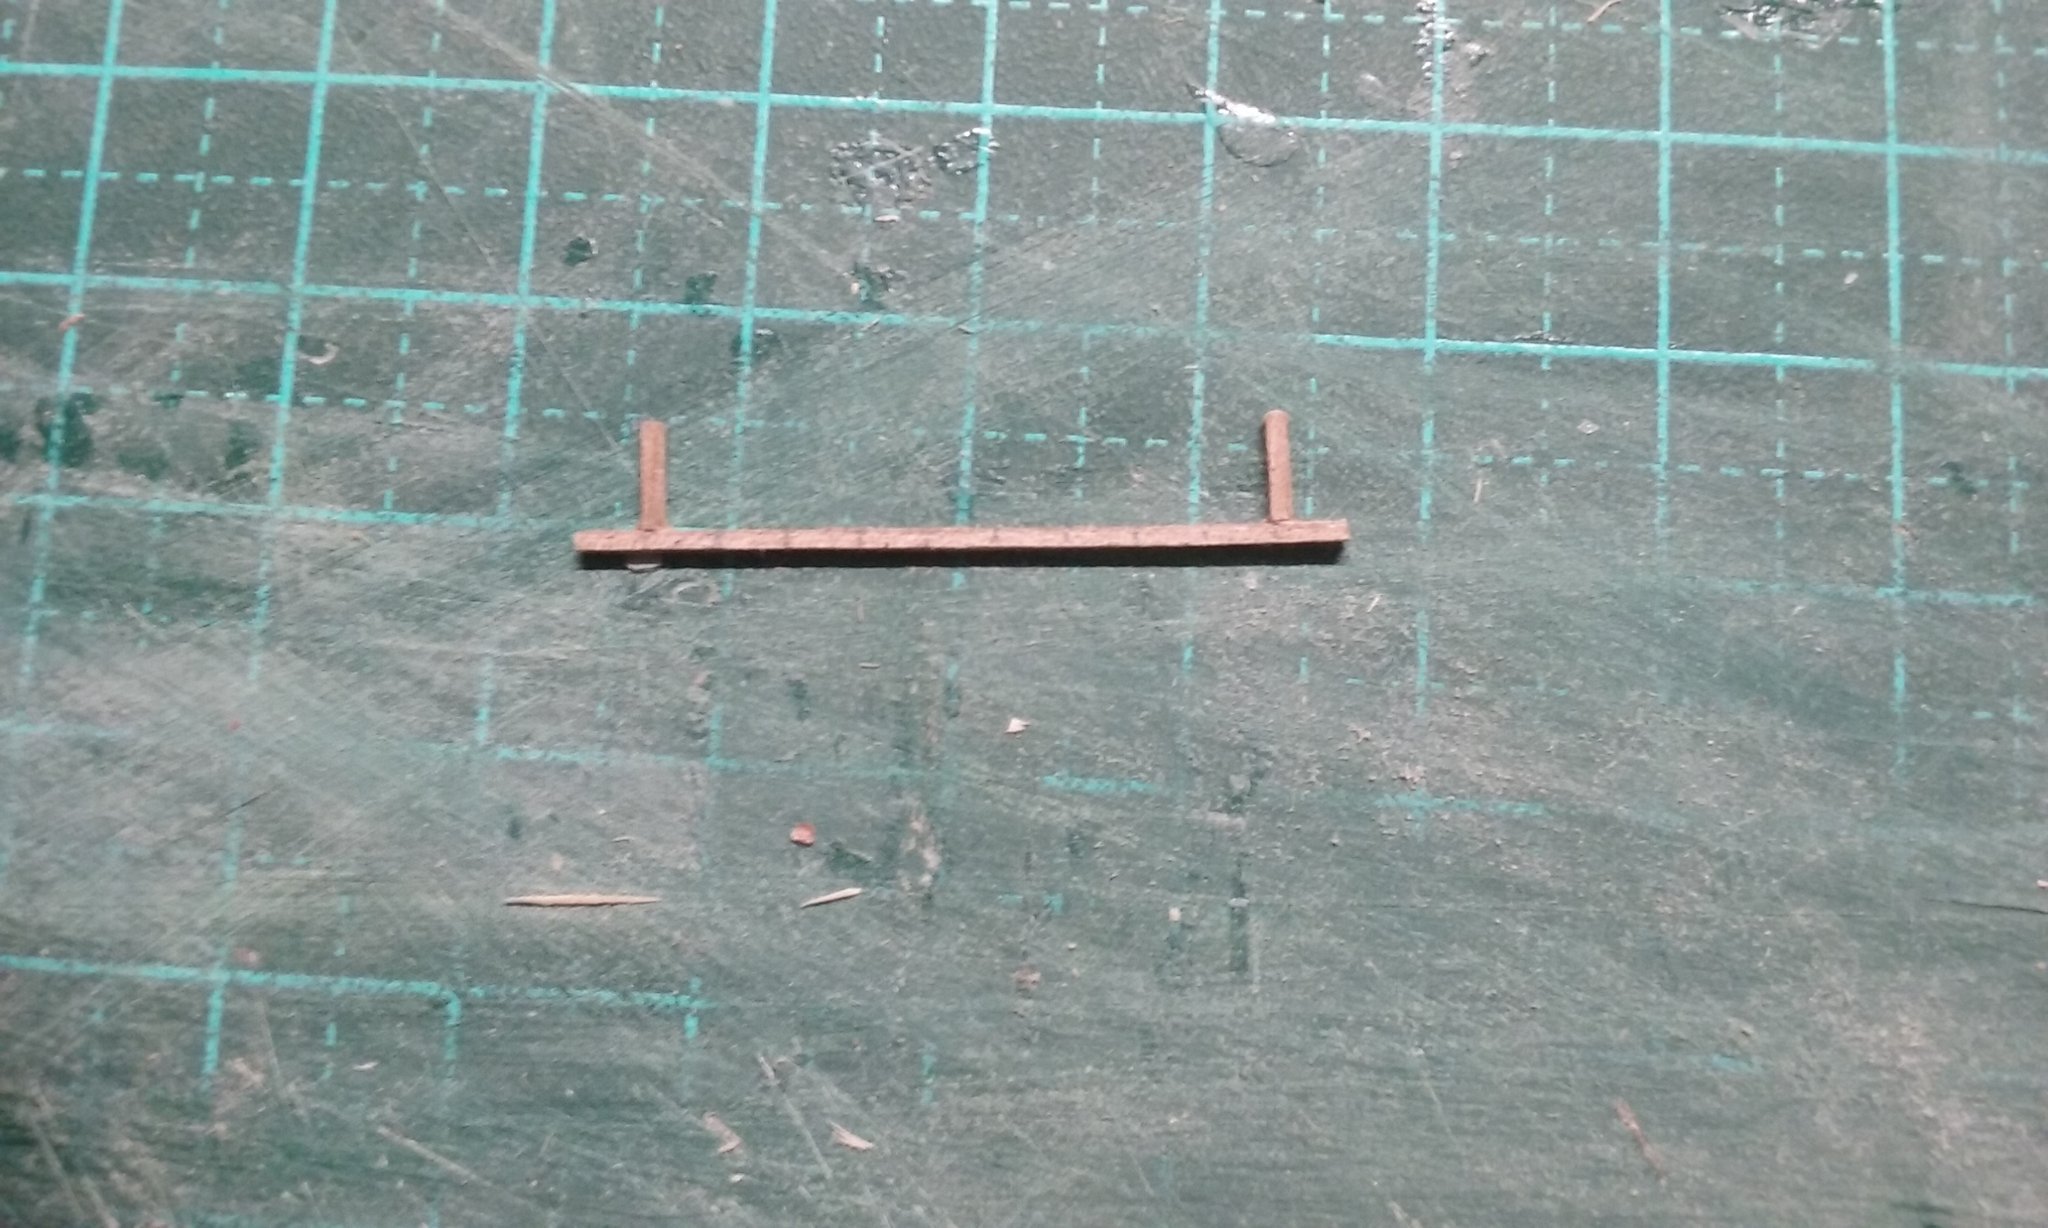
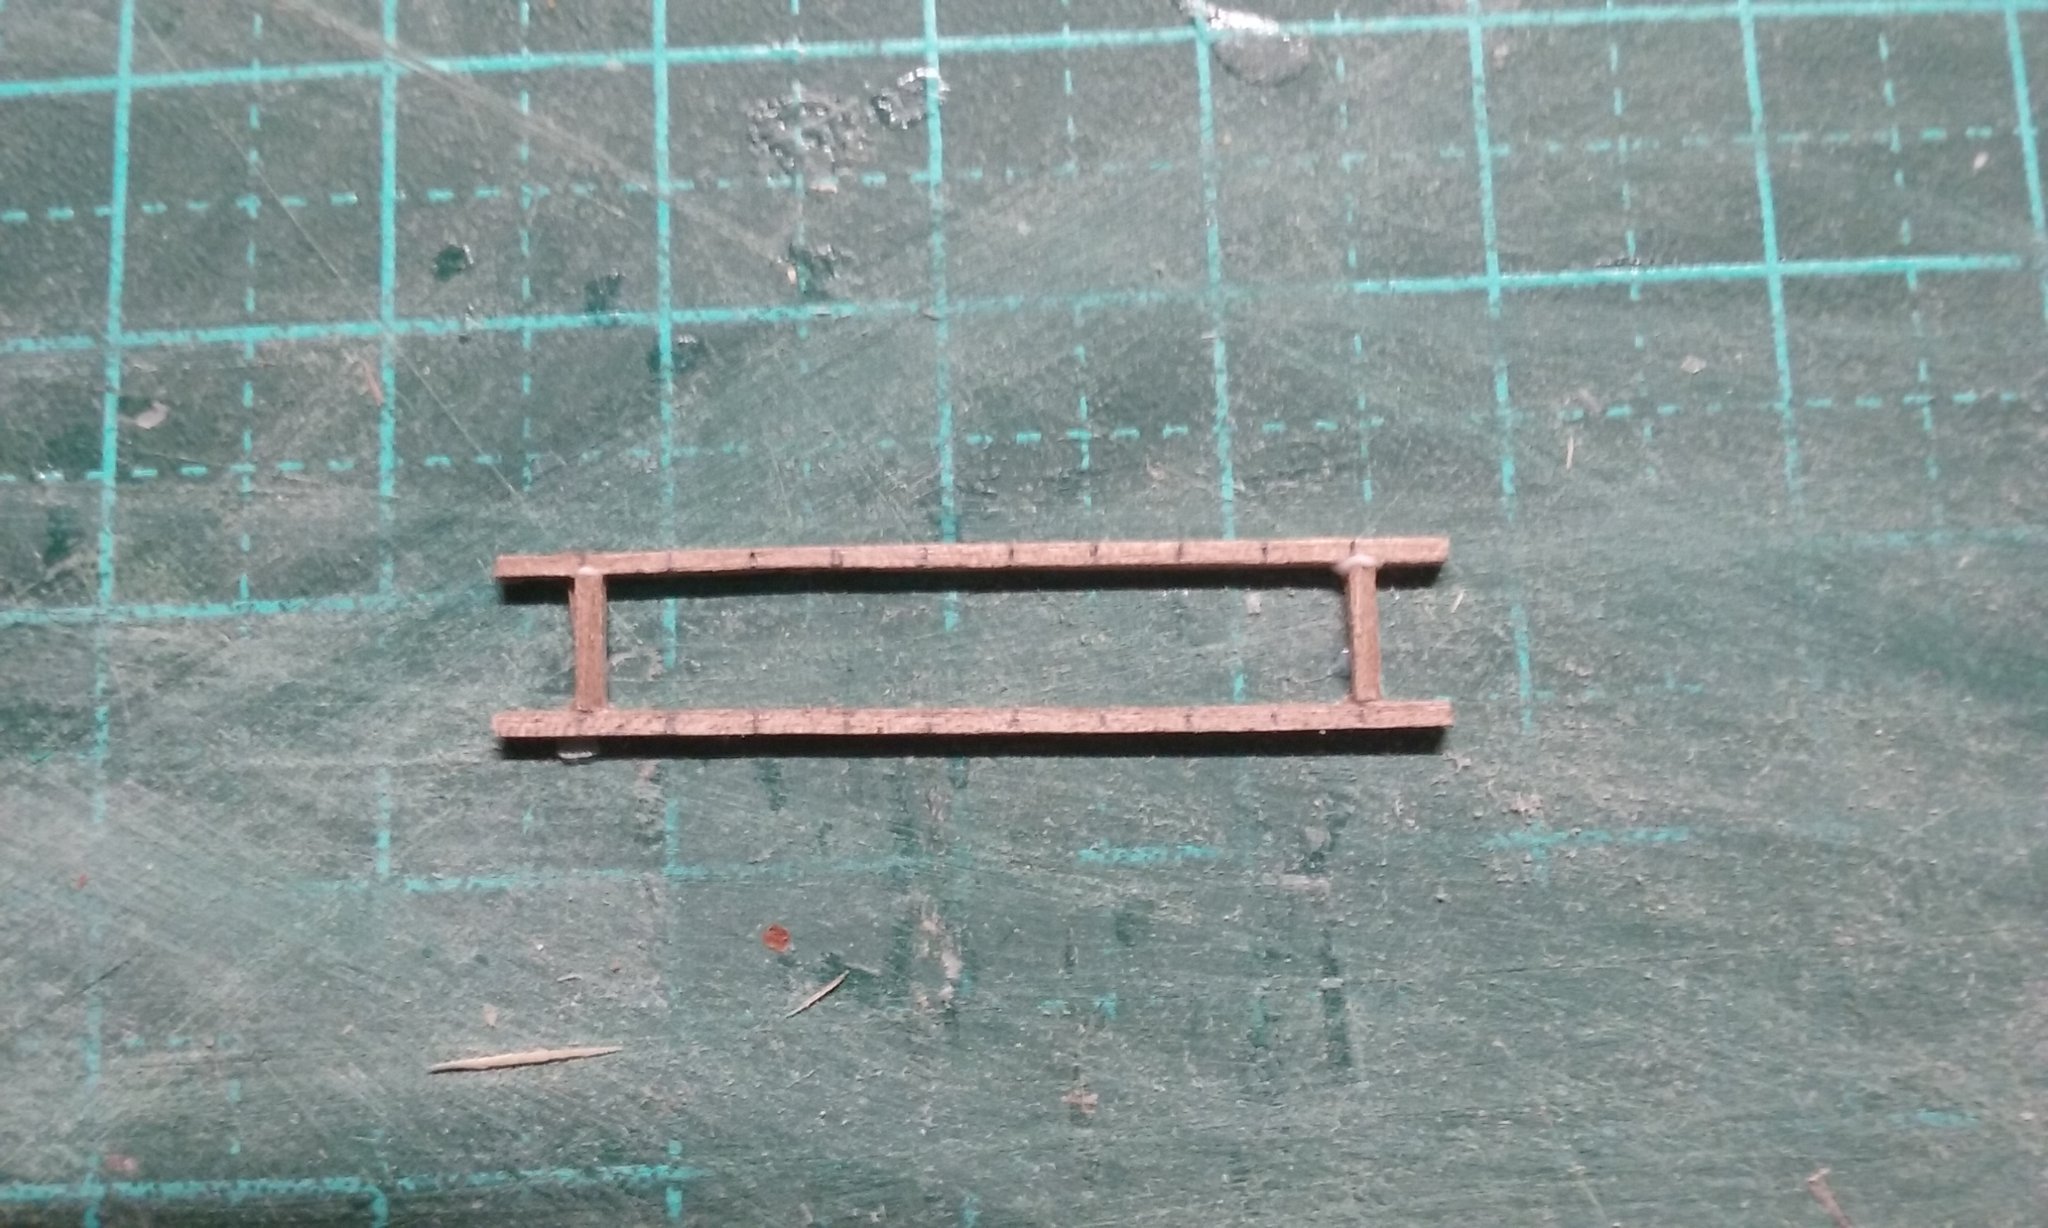
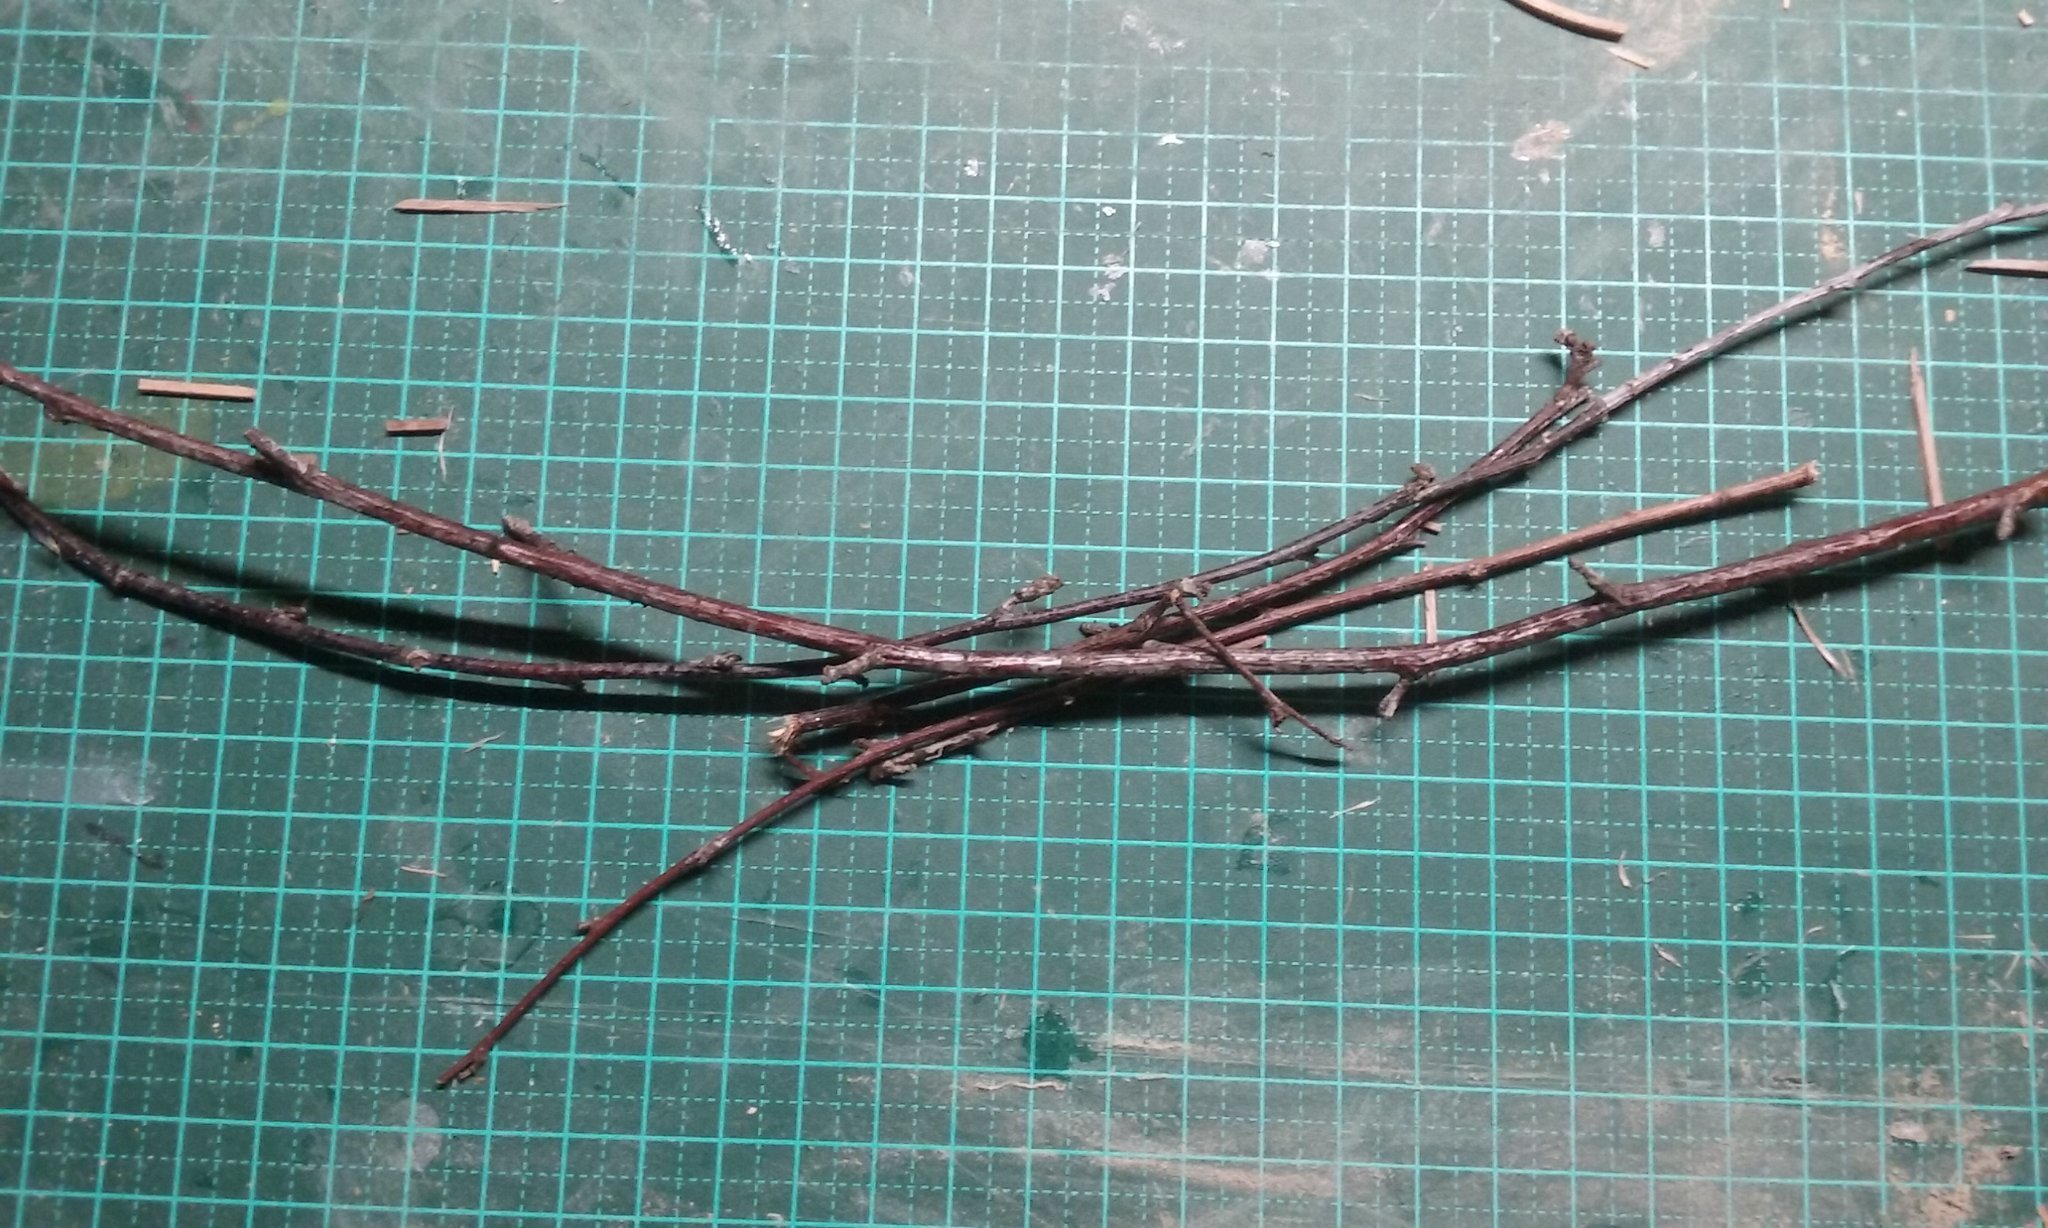
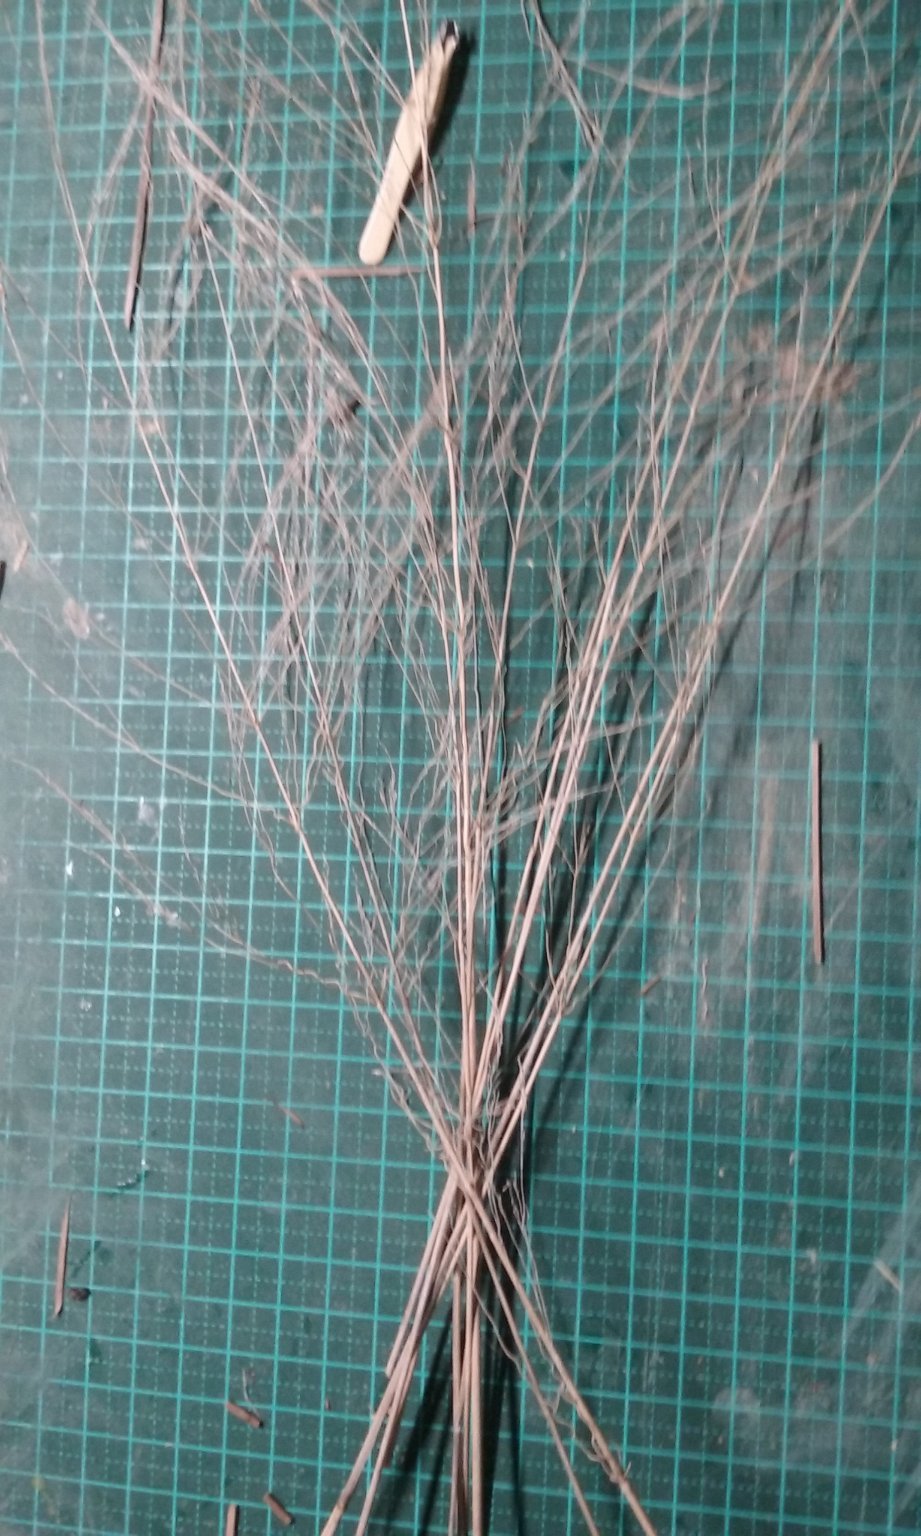
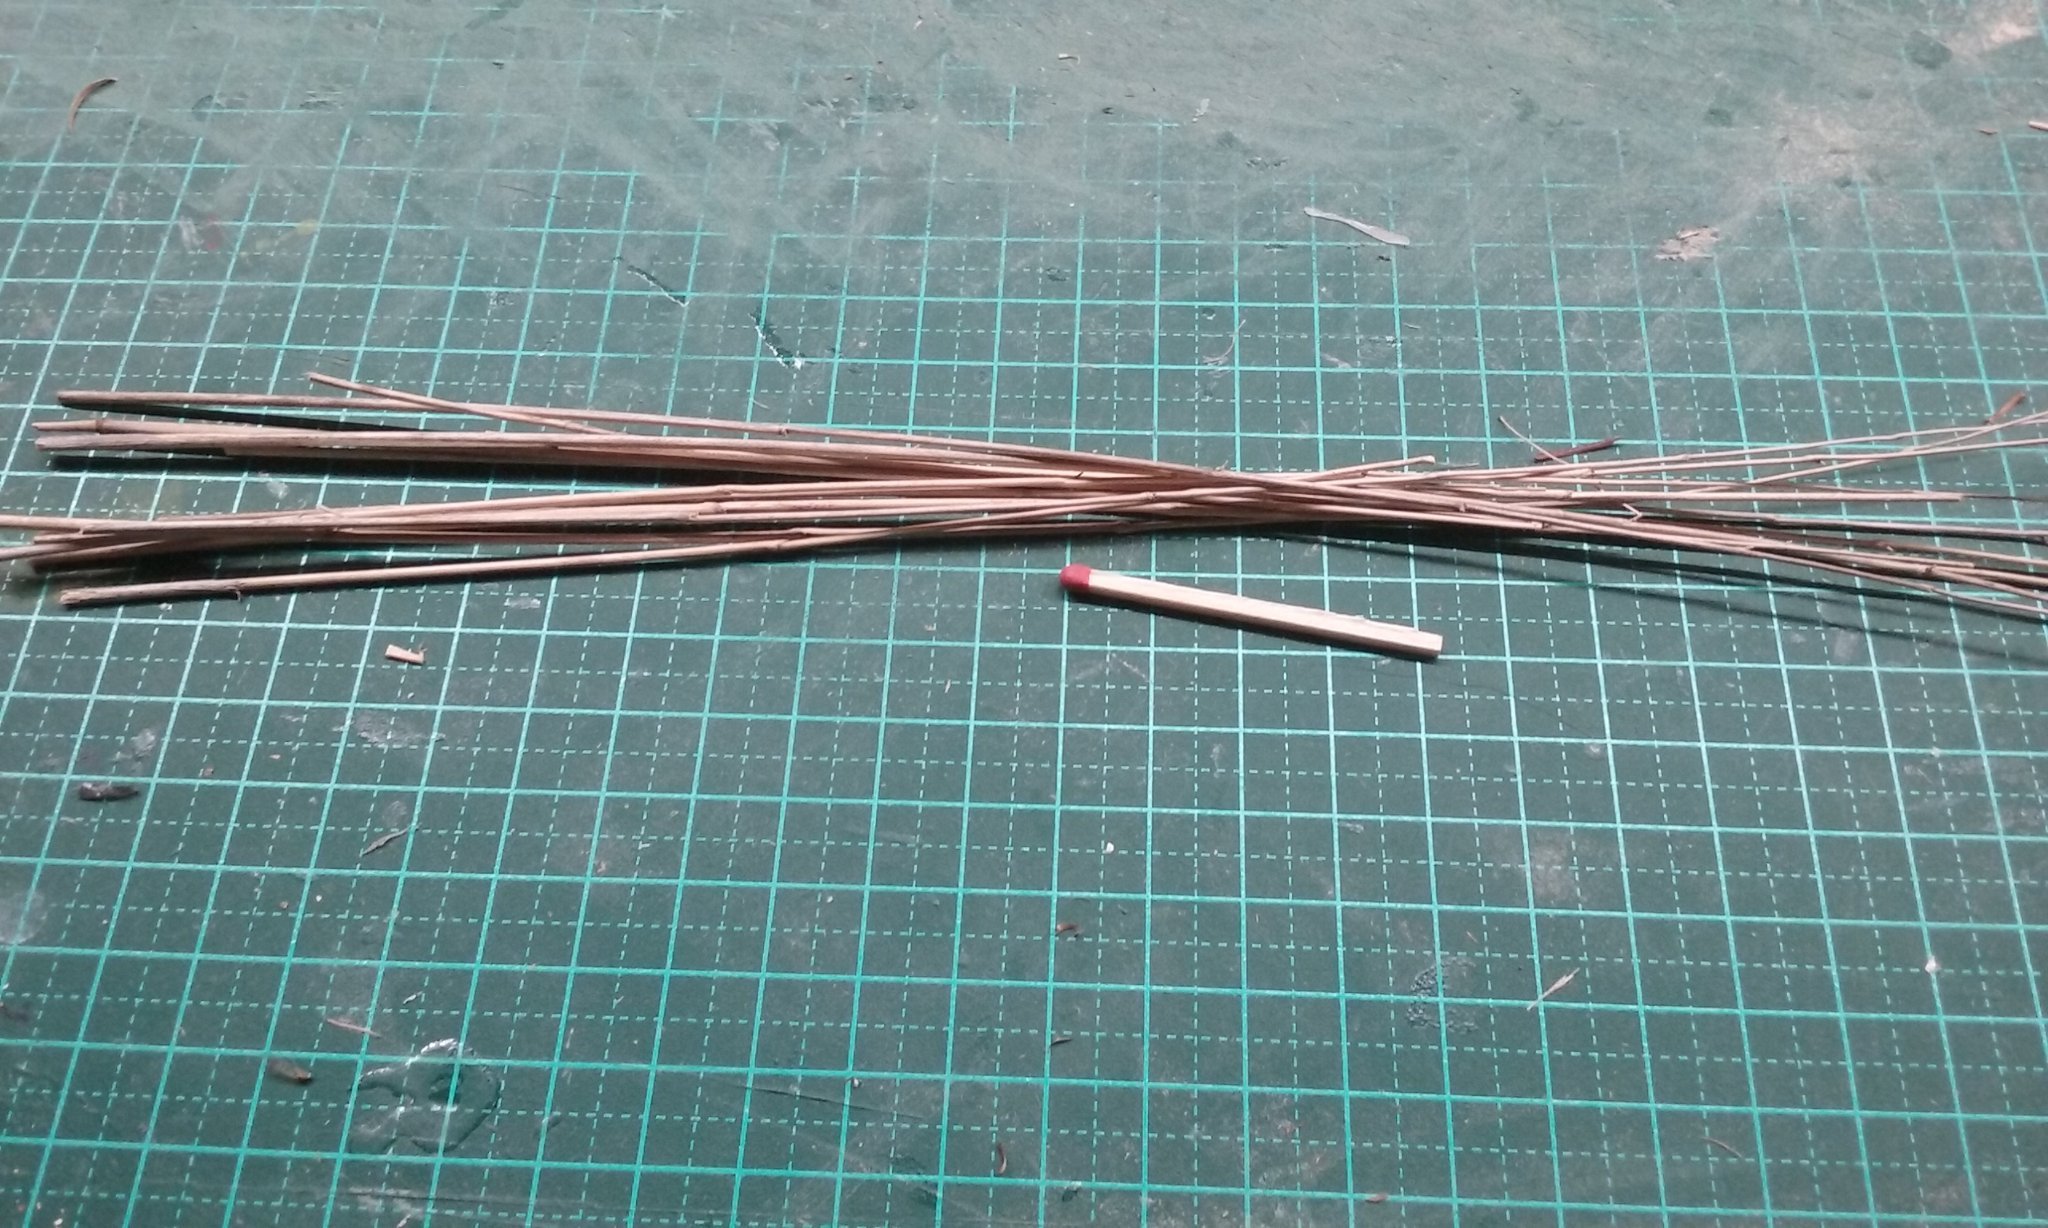
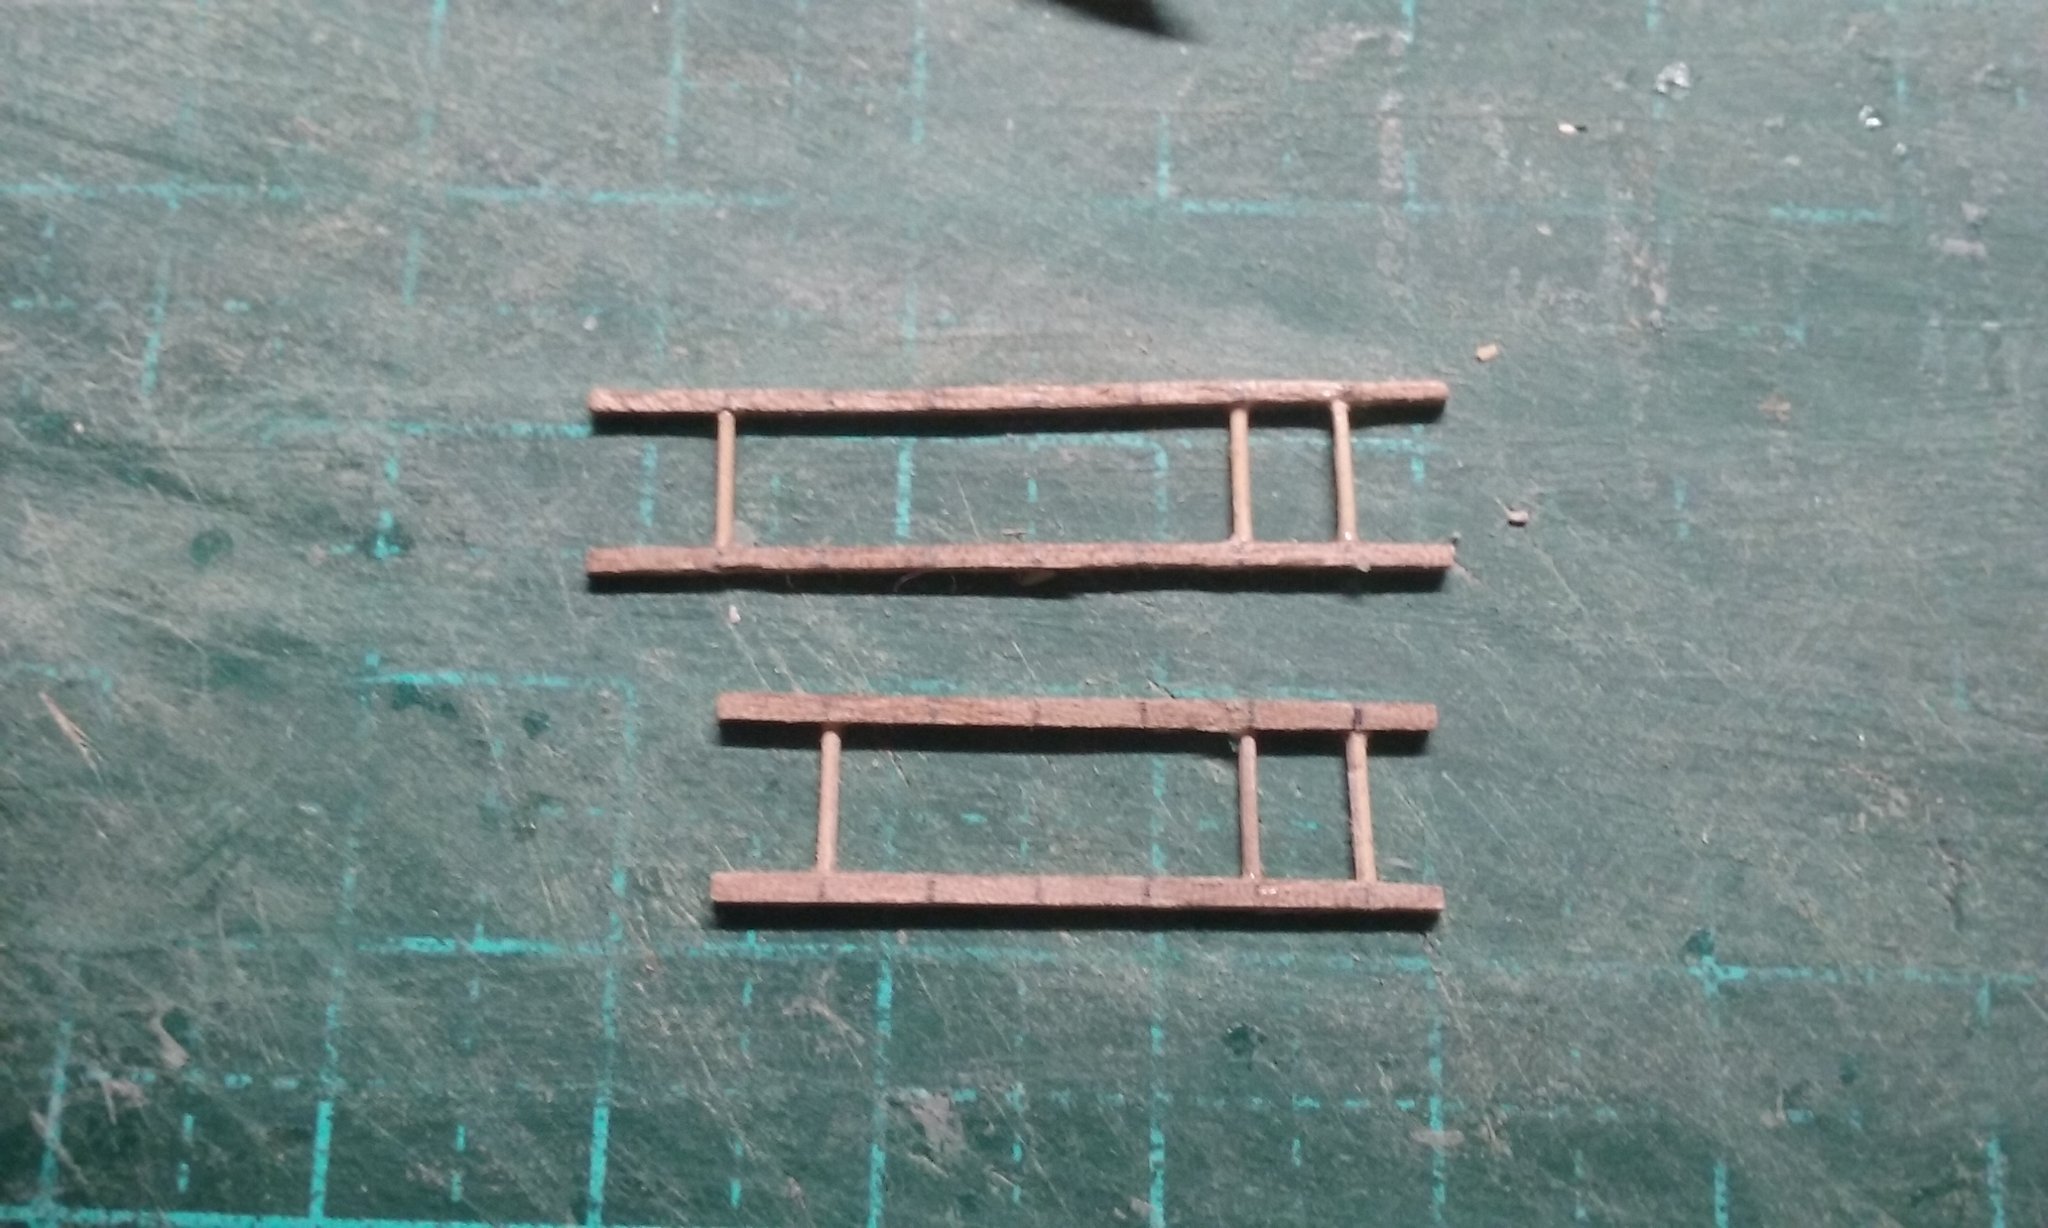
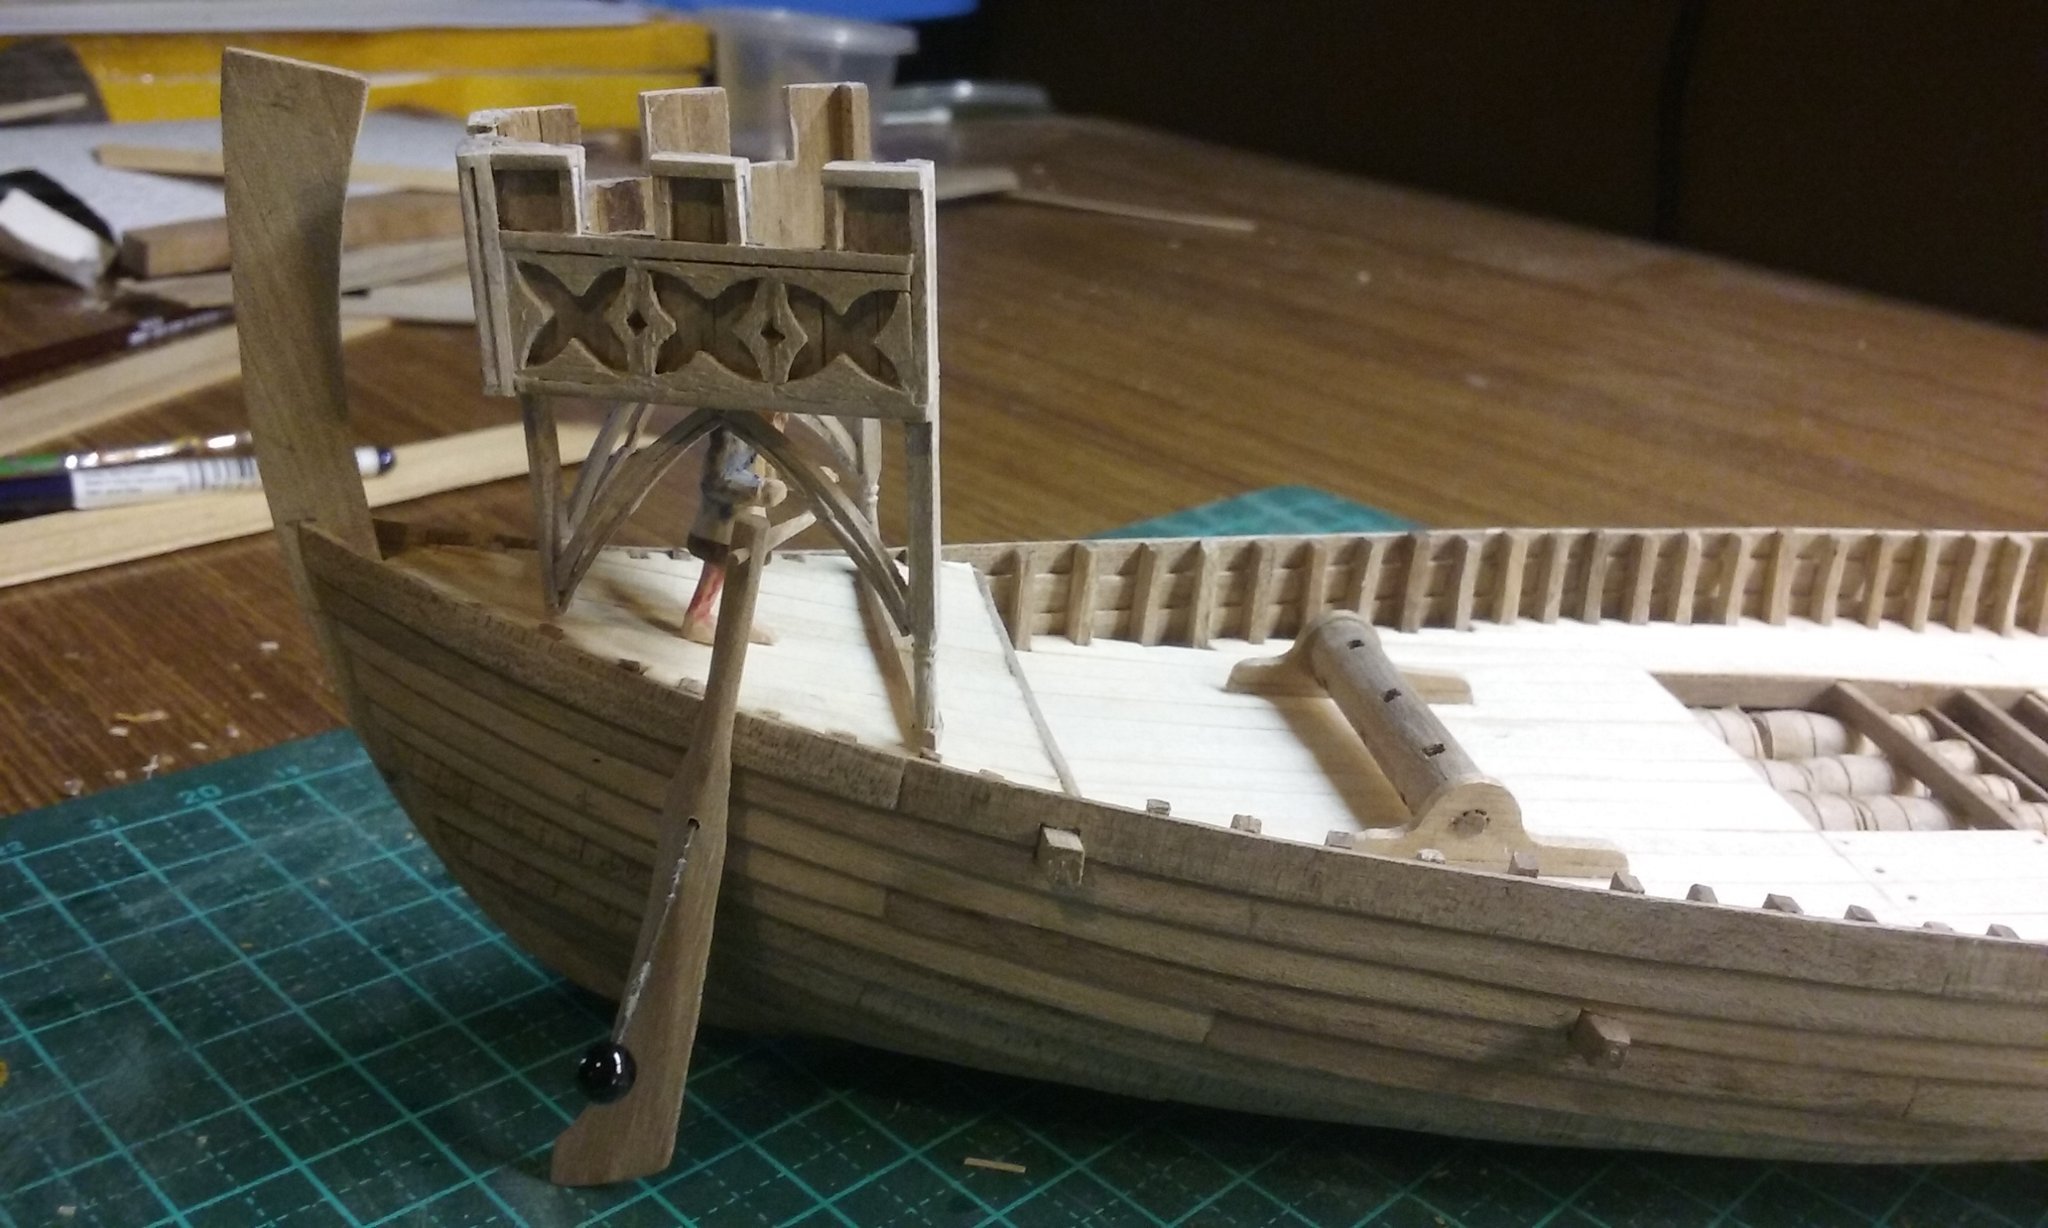
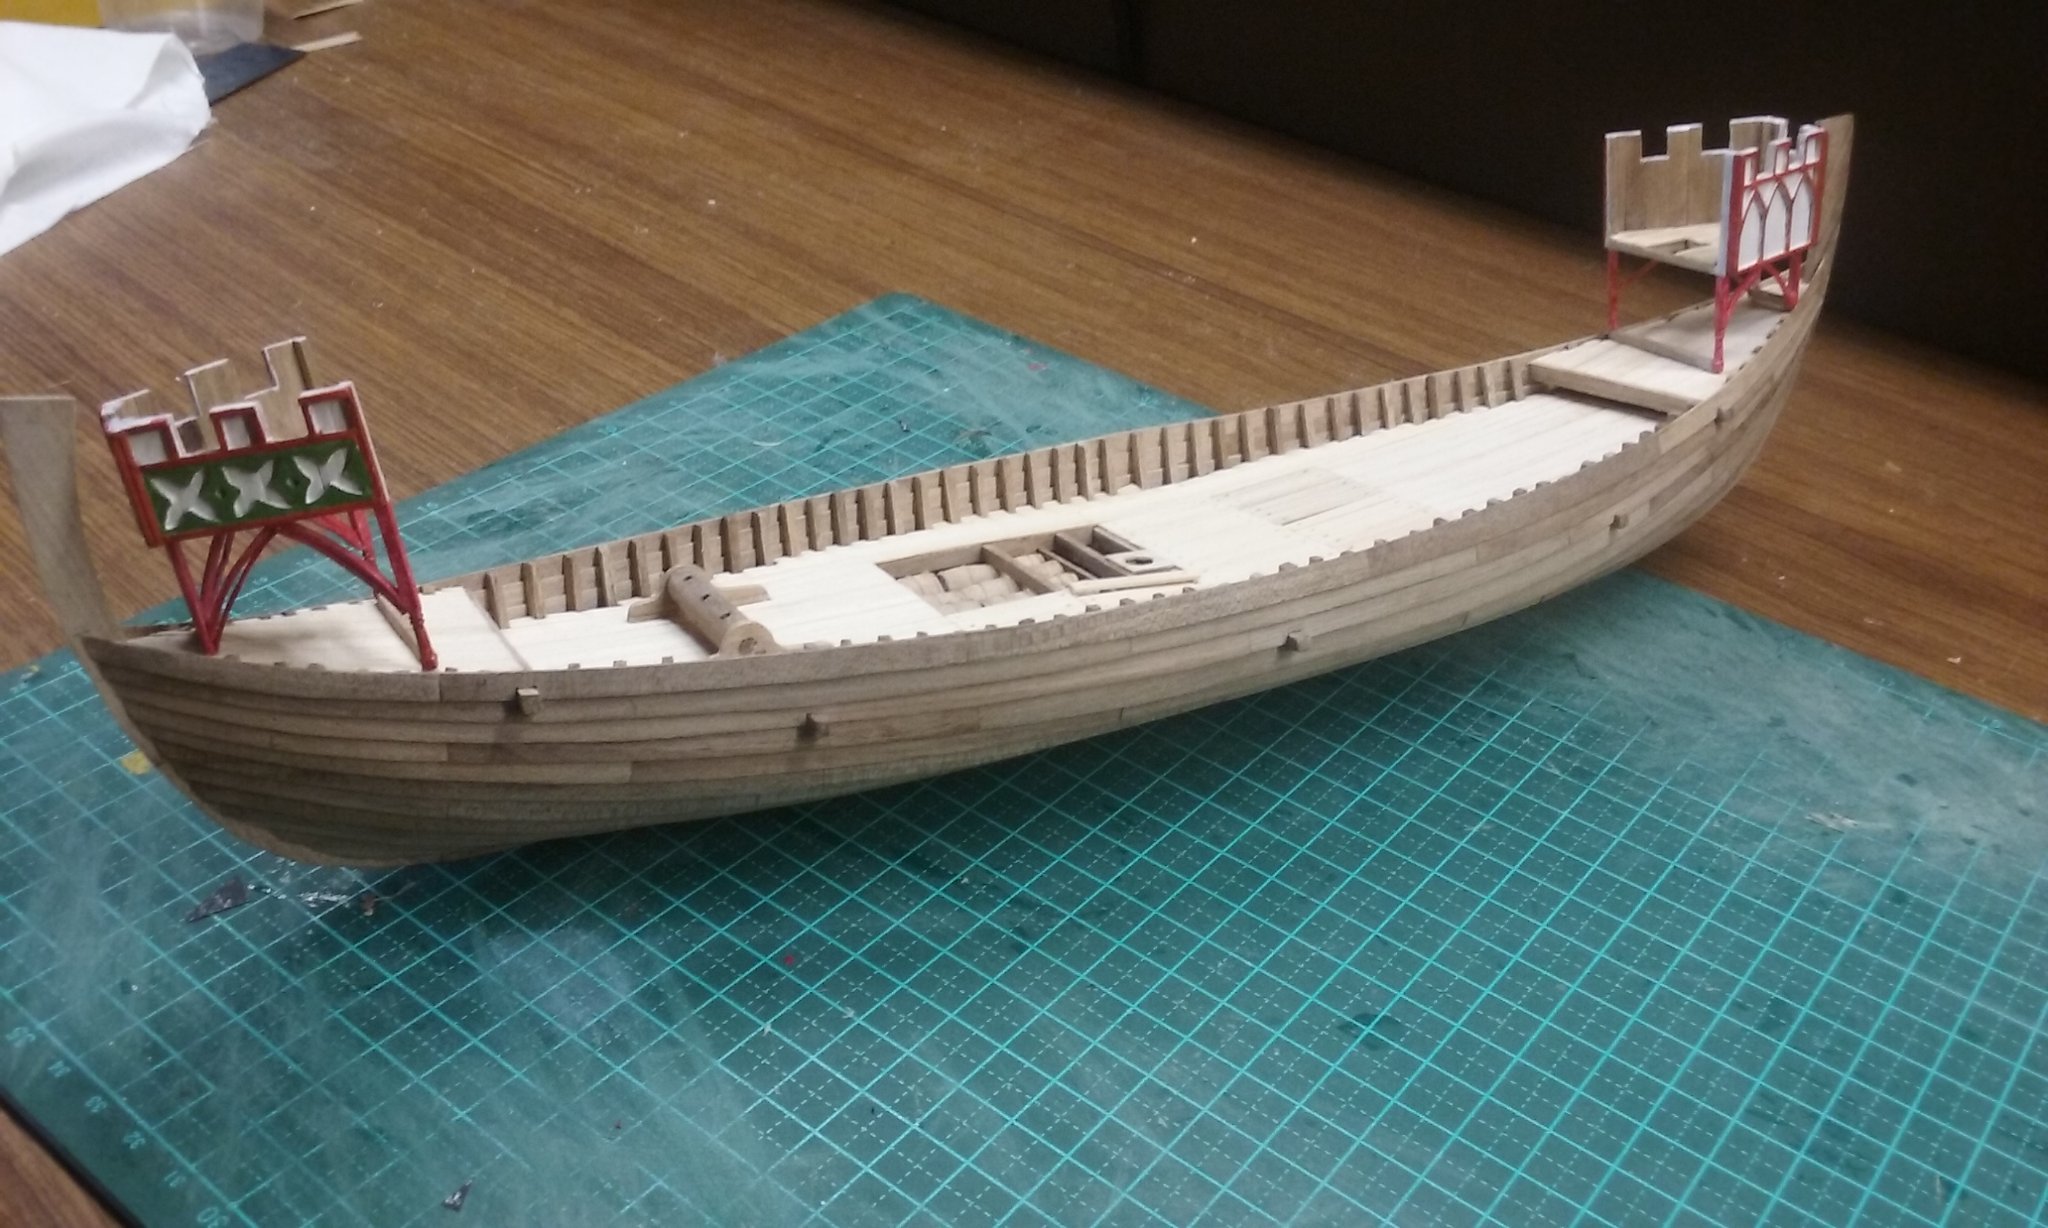
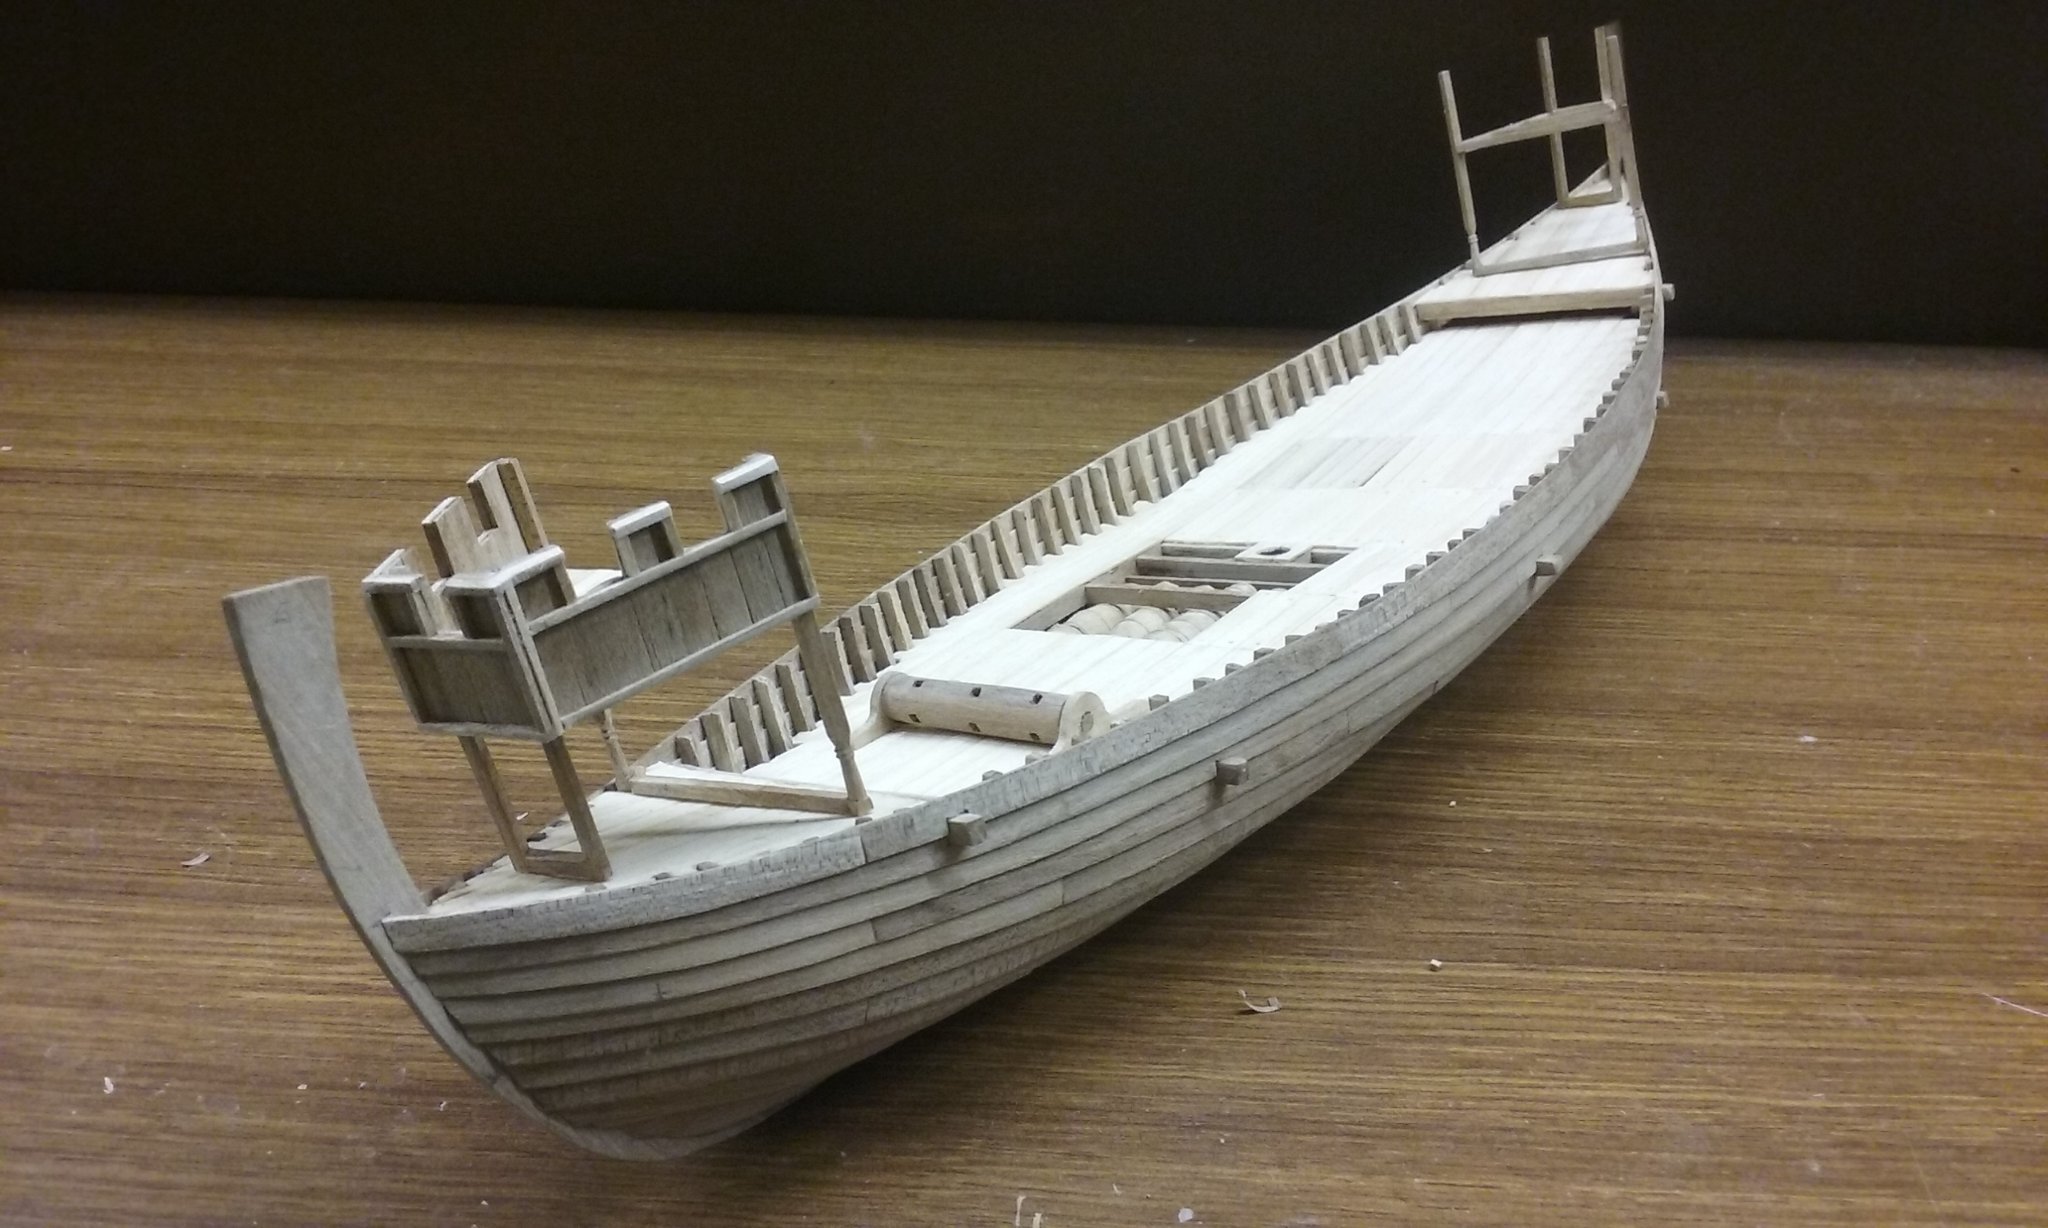
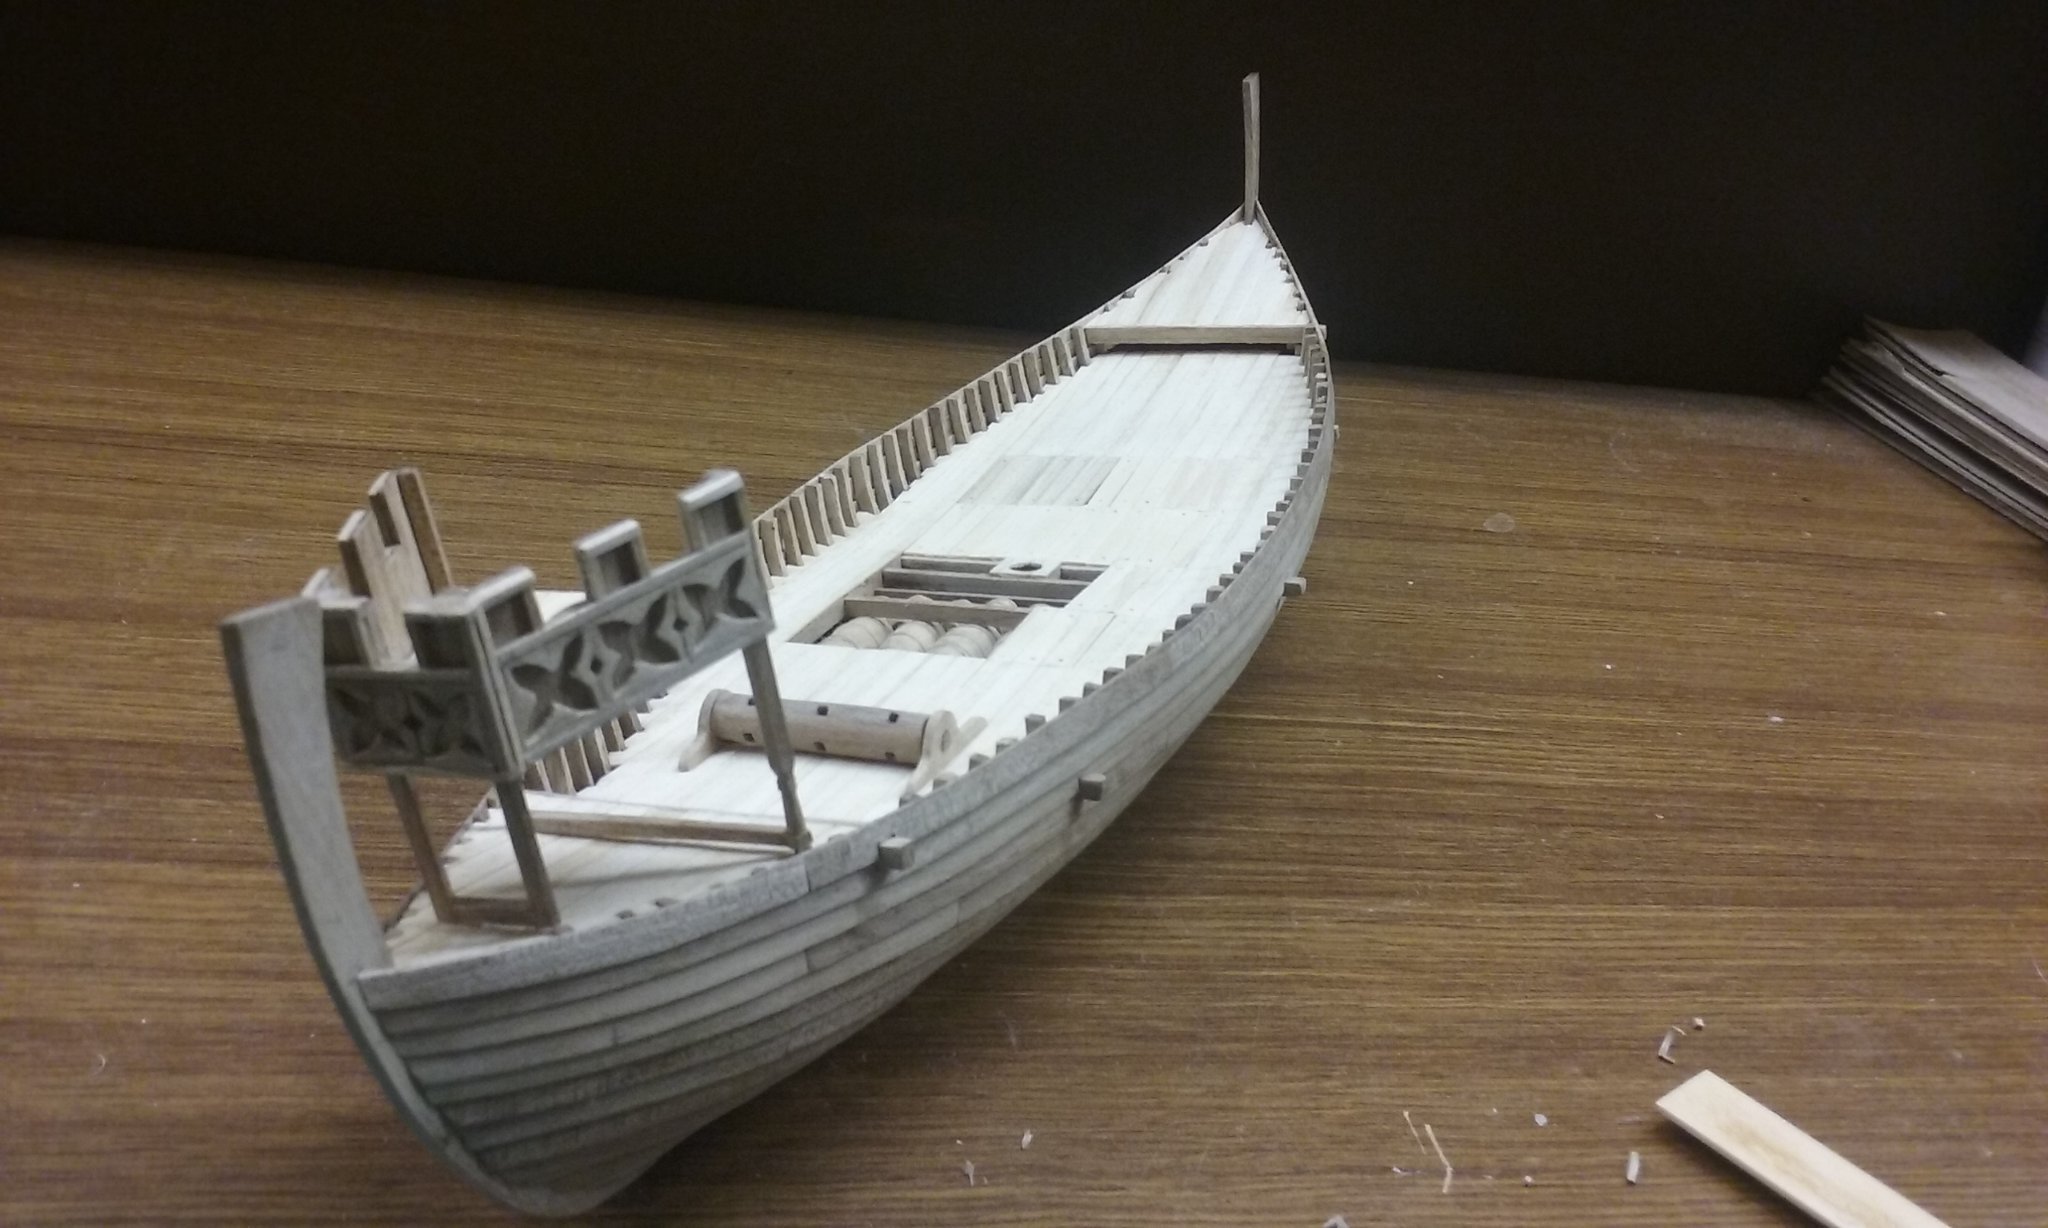
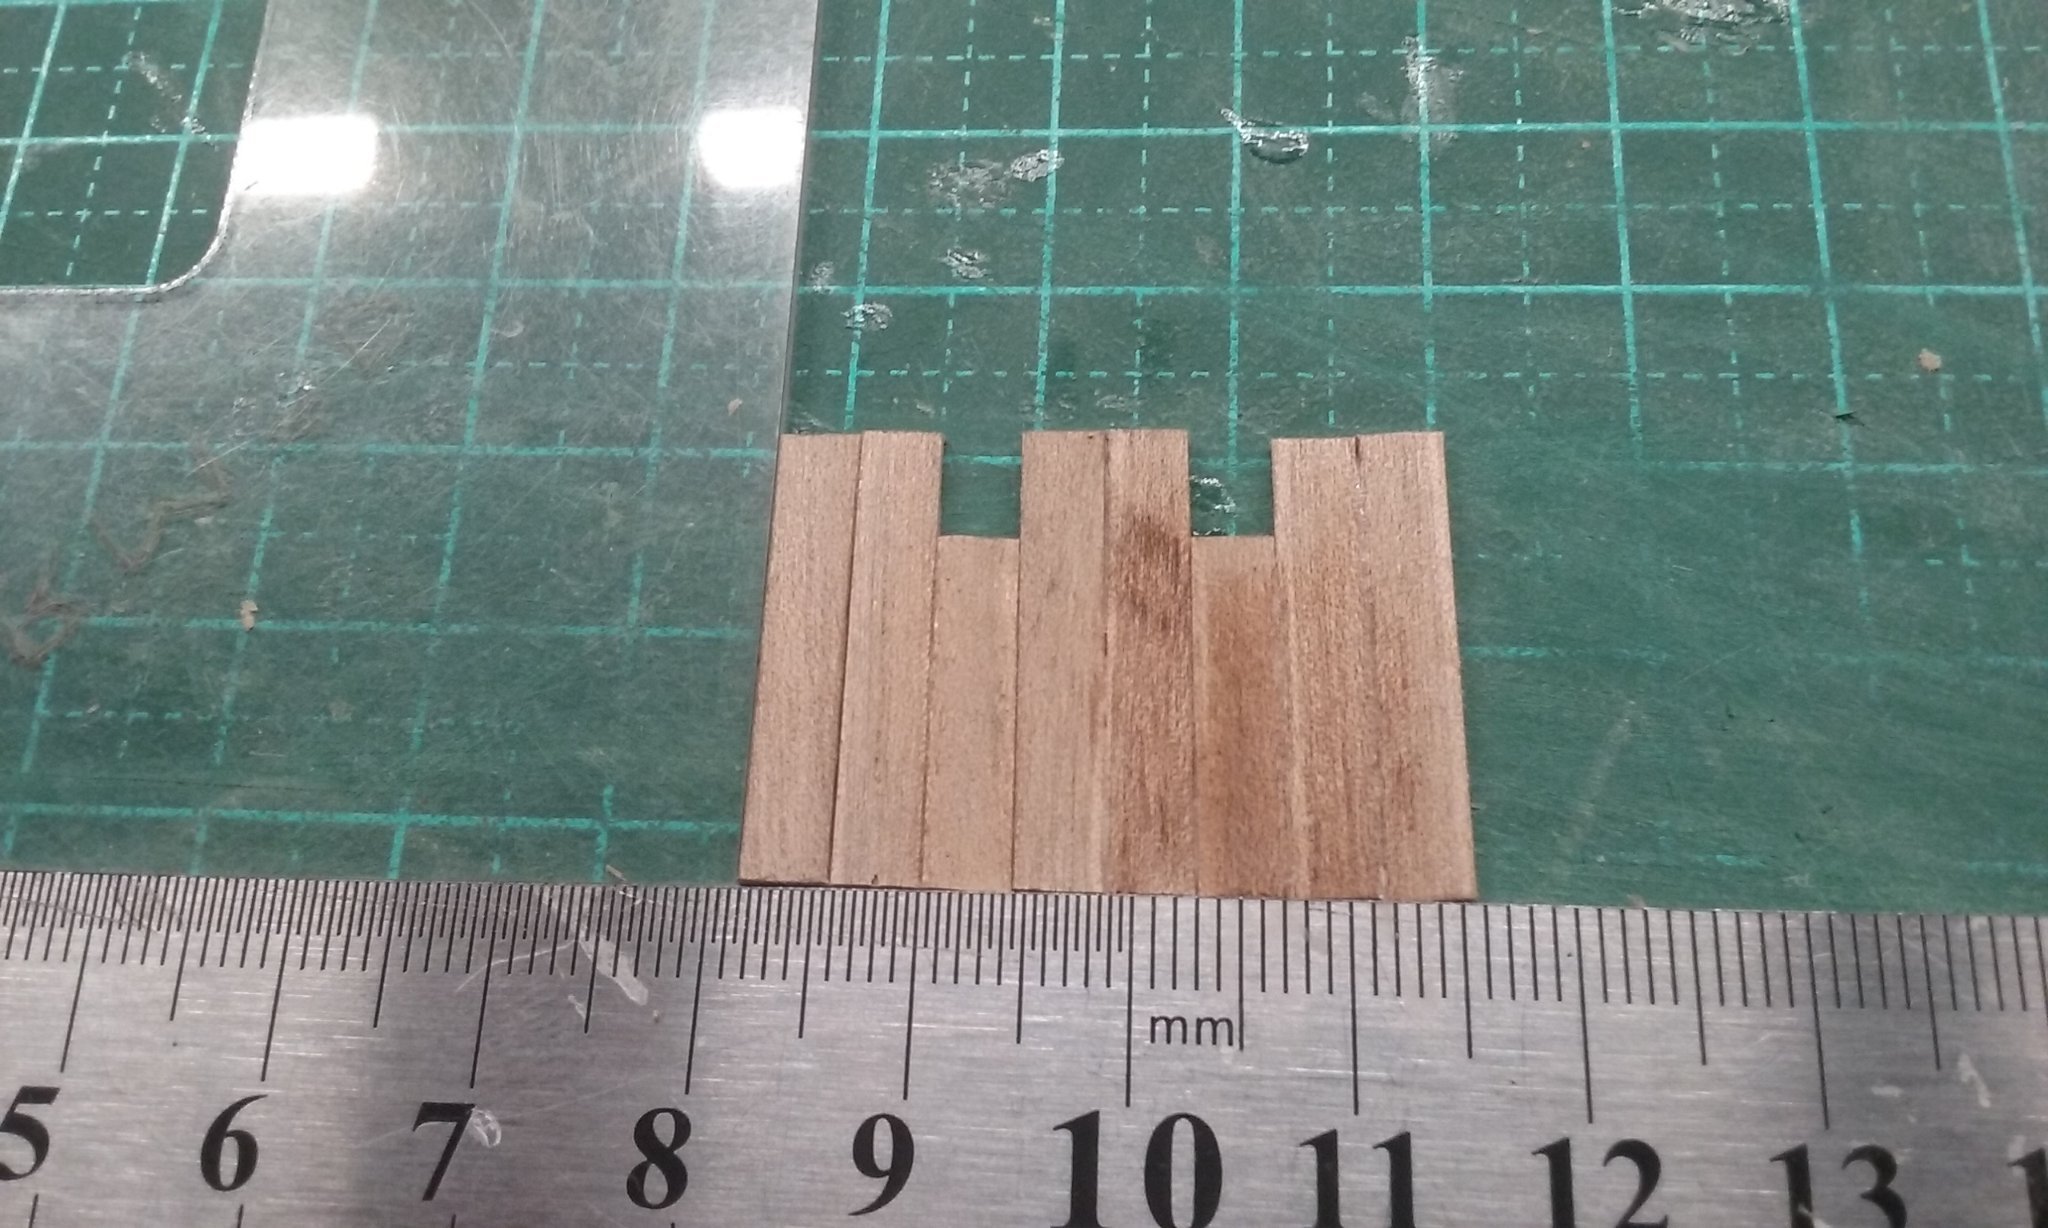
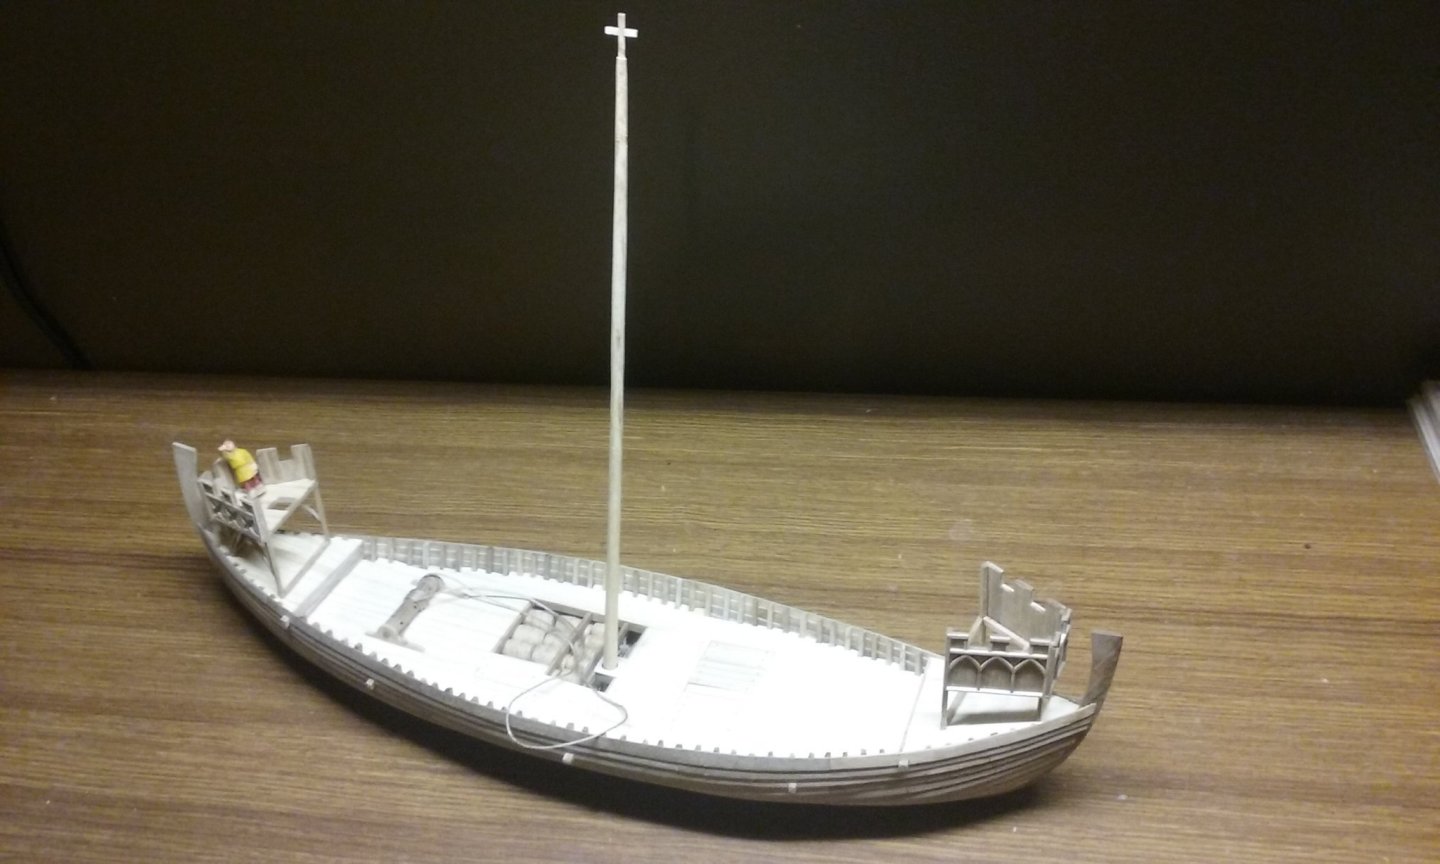
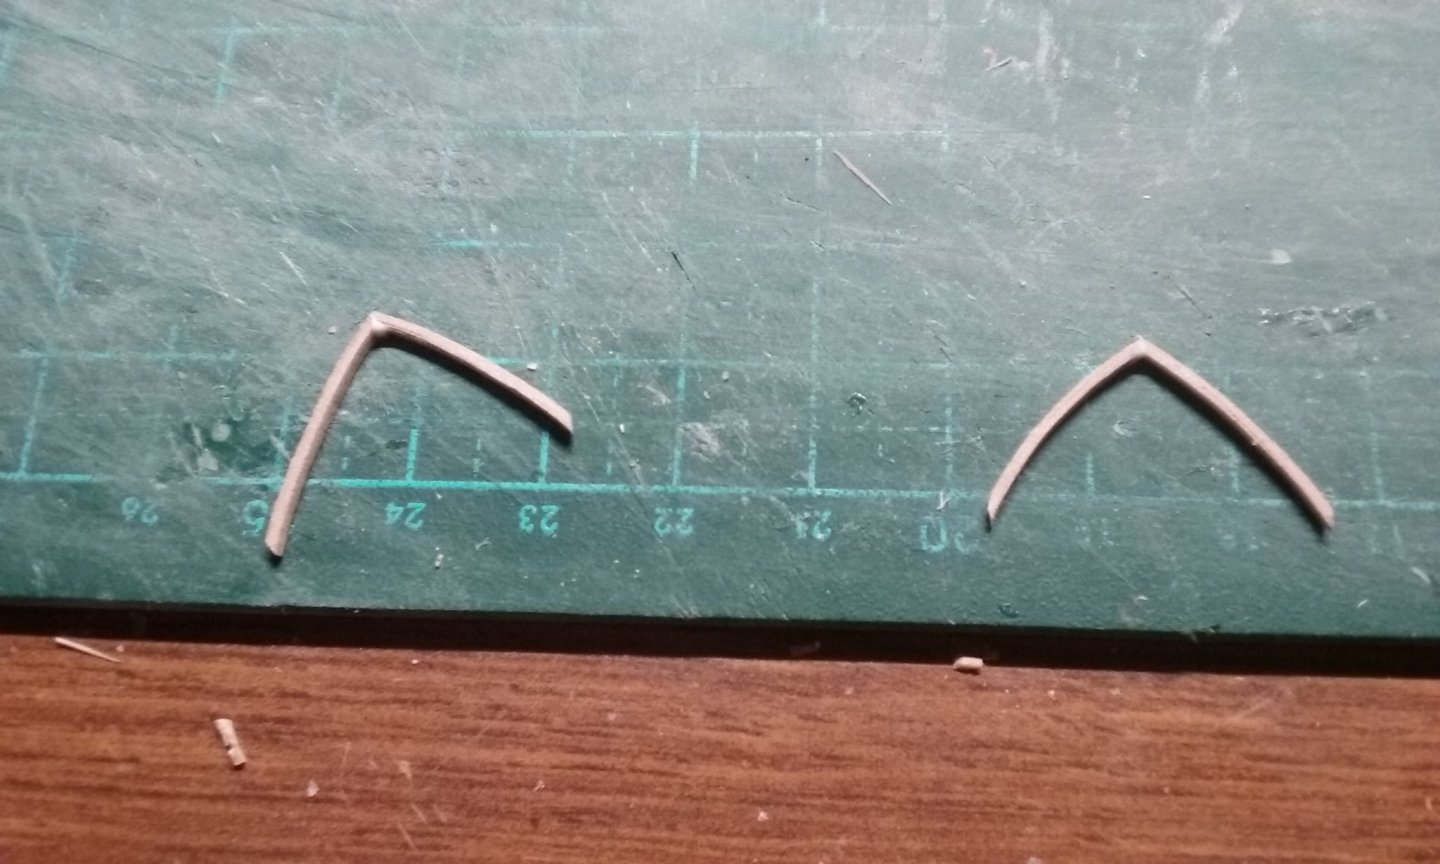
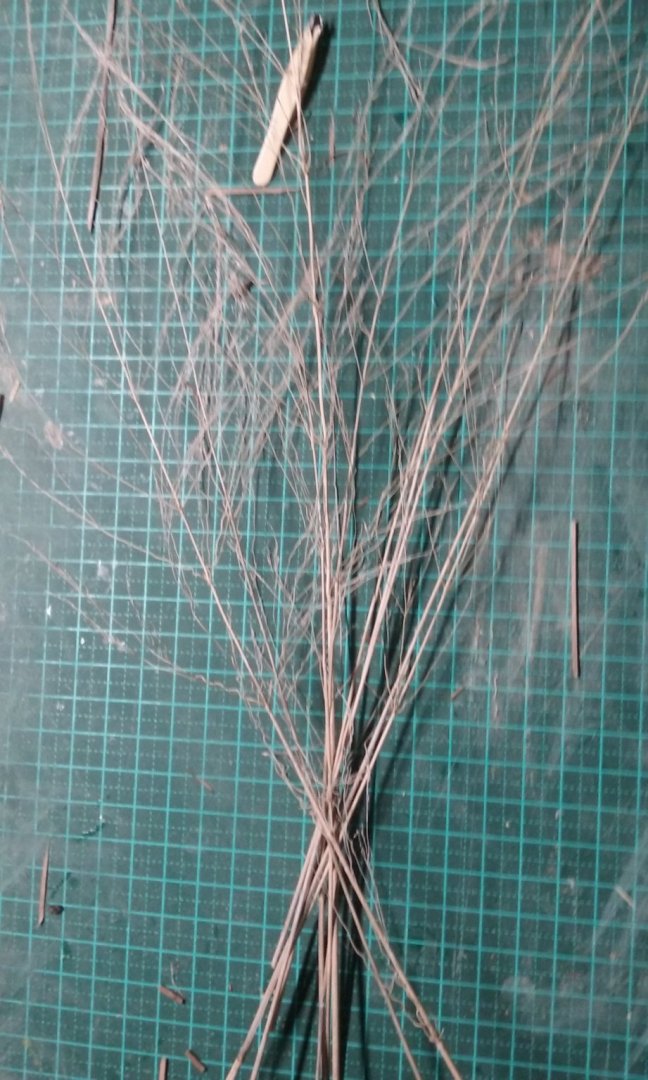
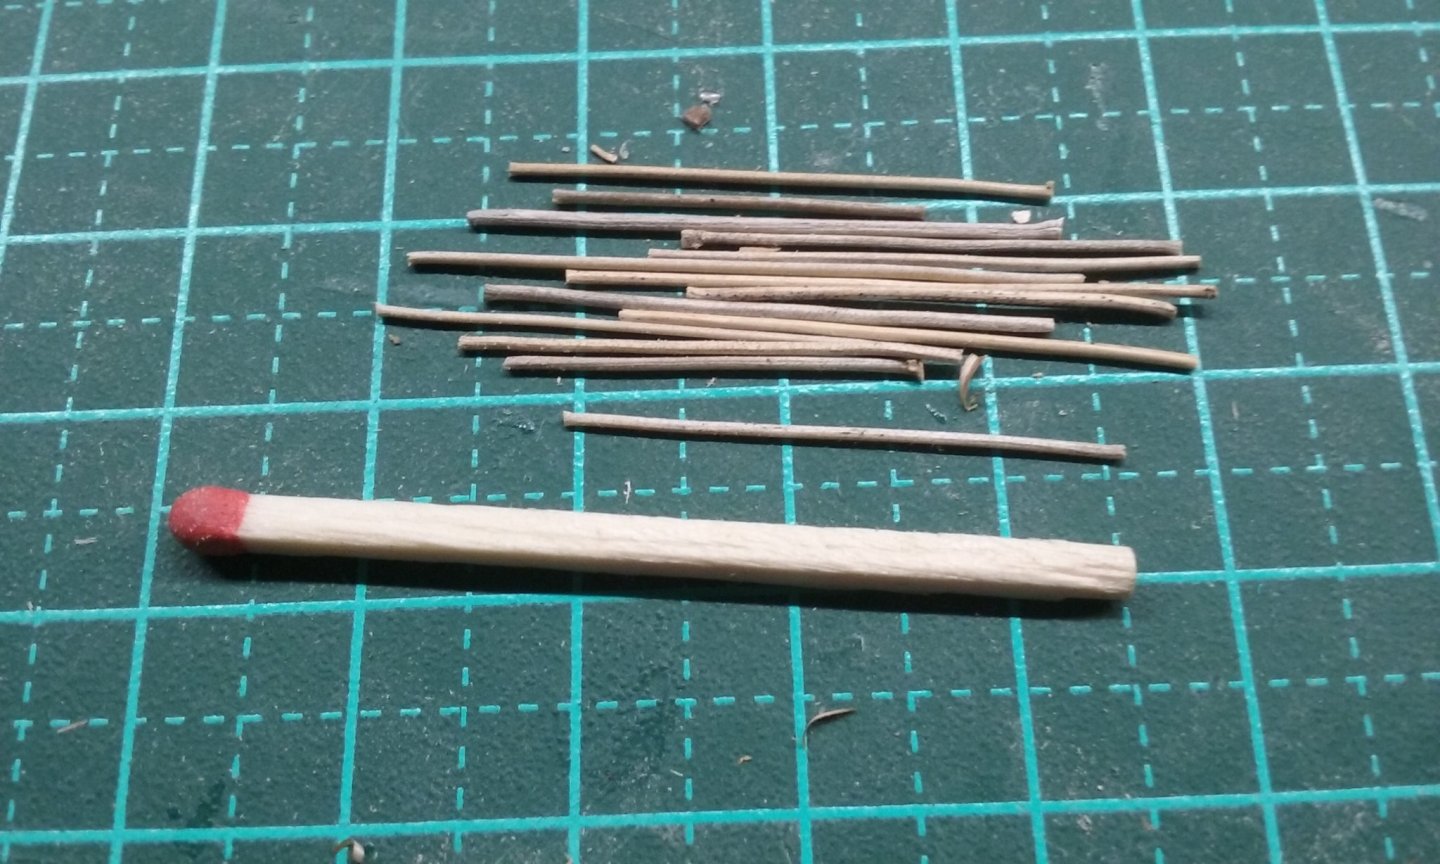
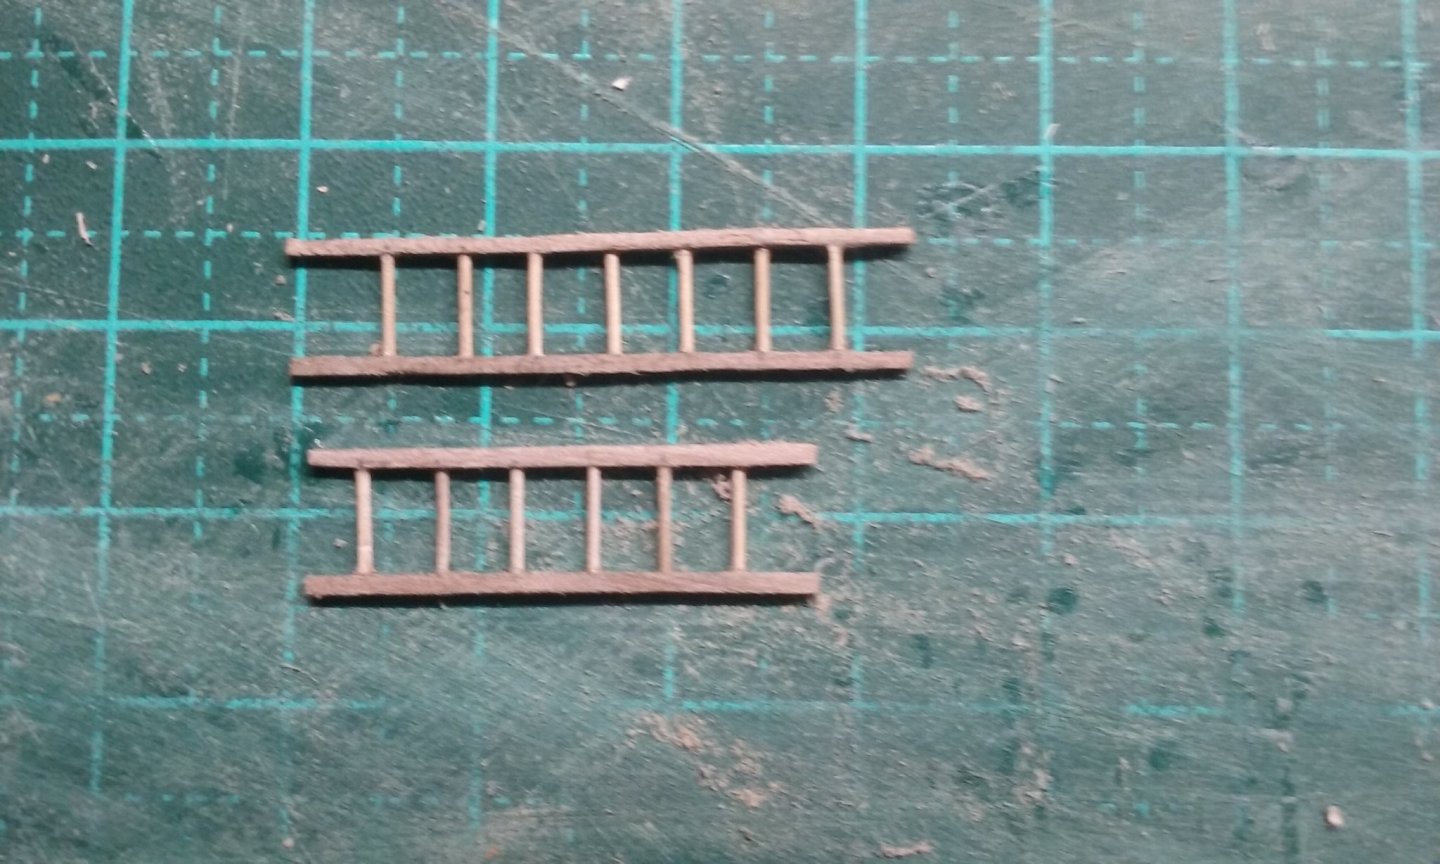
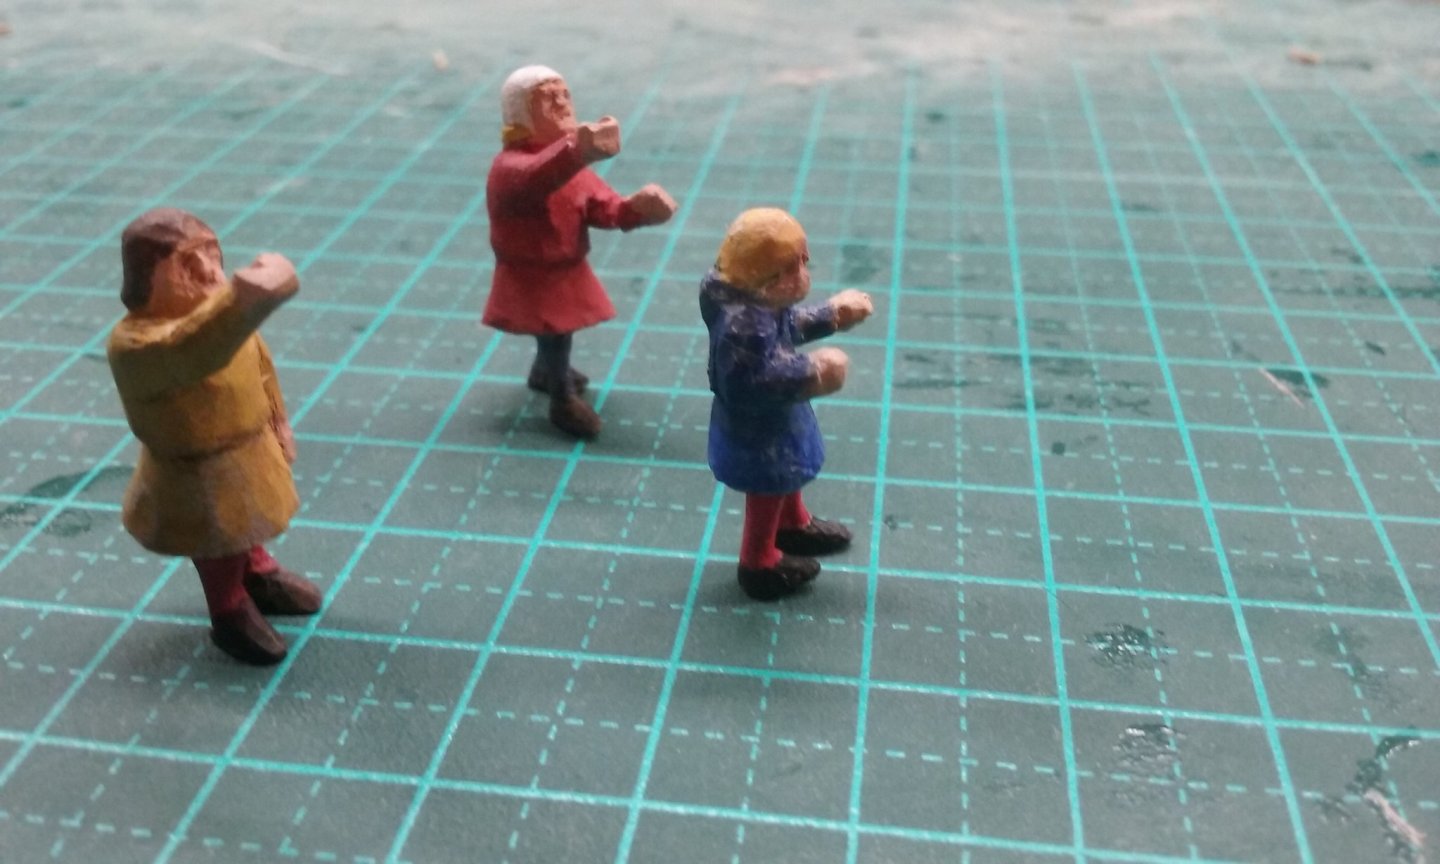
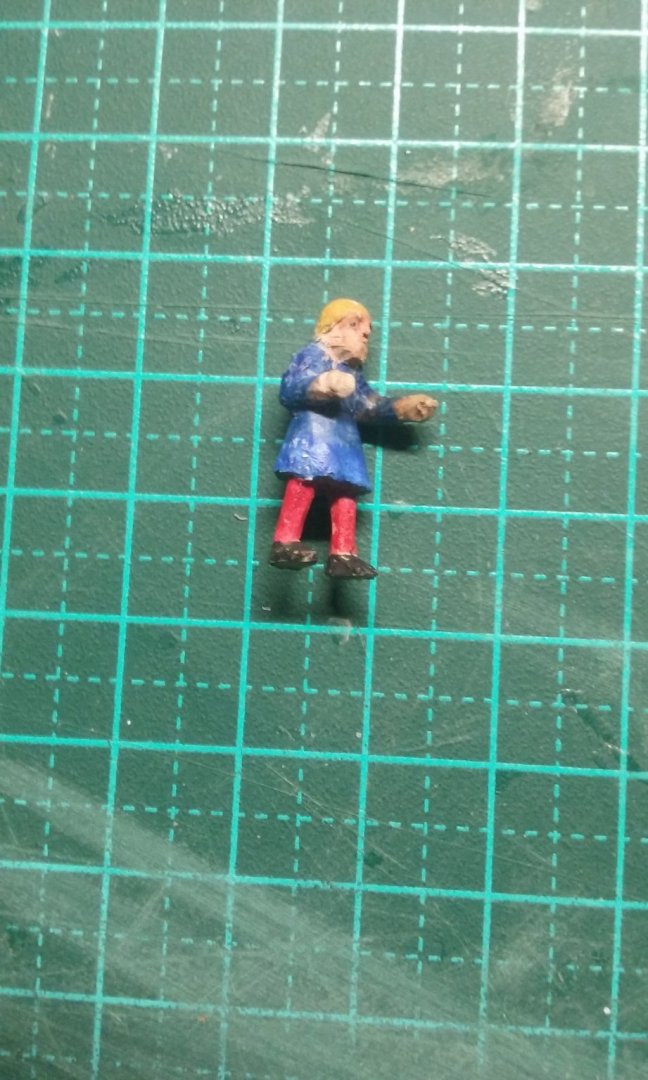
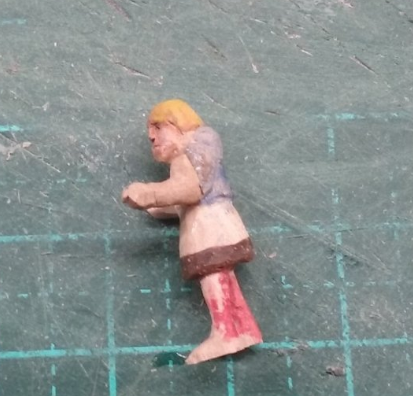
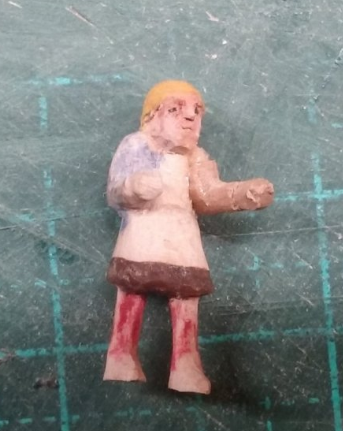
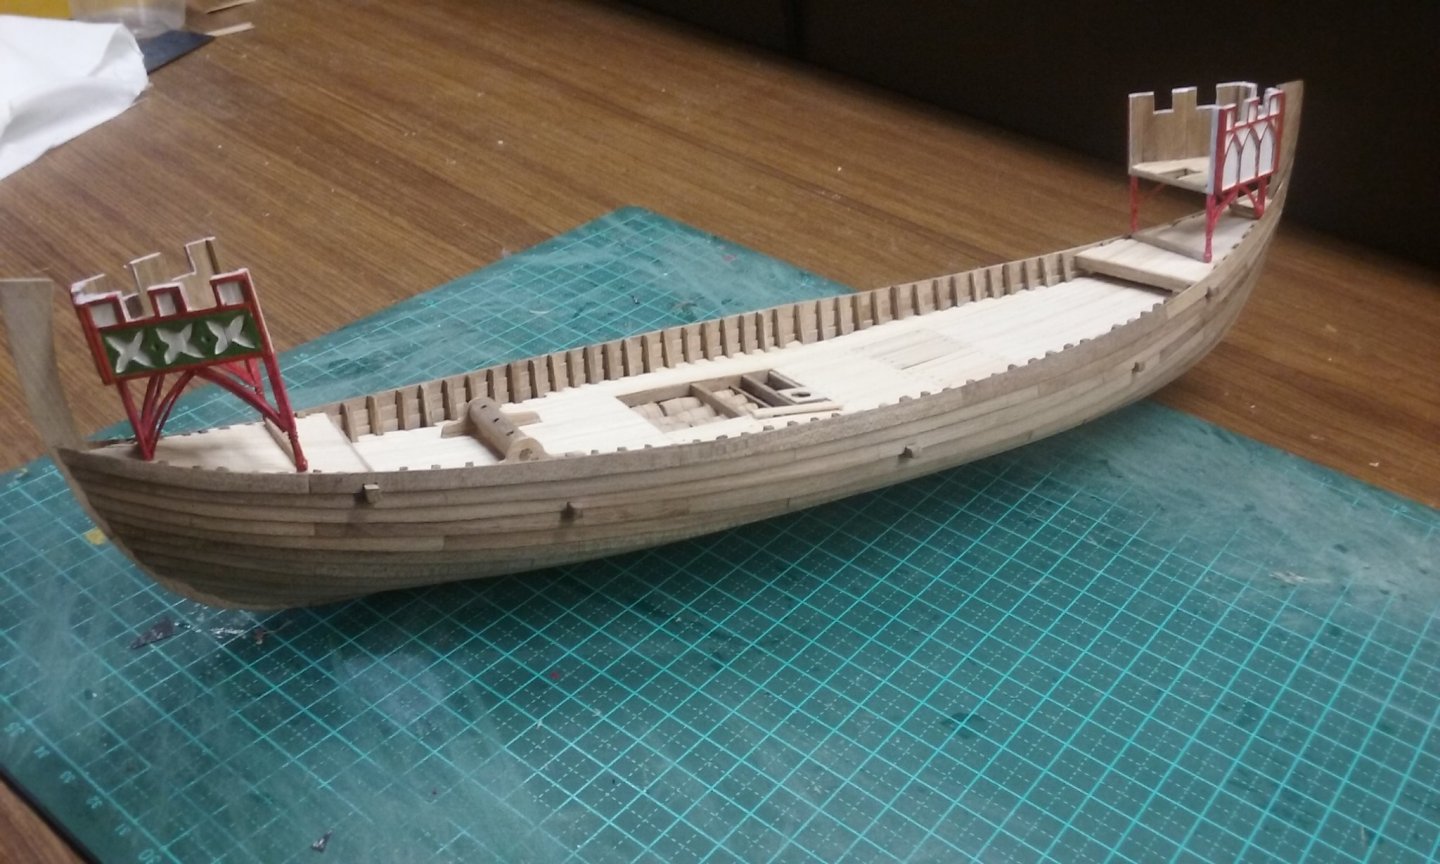
Here's some idea of what she's going to look like with mast and castles in place. The forecastle was complete except for the arches below the platform, so here they are. I curved wooden strip with the soldering iron, as before, but the curve is quite mild. And here is the forecastle with the arches in place. Next - the ladders for access to the castles. First I tried them with square section strips of wood for both side-beams and rungs: But I discovered that not only were the ladders too narrow, but the rungs were too heavy and too close together. I went out the back of the house and measured all the ladders. Distance between rungs seems always to be approximately a foot (300 mm), and the ladders themselves wider than I'd made them. So then I thought of making them as though they were from rough branches. Here are birch twigs from the back garden. Still too thick and I couldn't strip off the bark without cutting into the wood. So back across the road to get some more weeds. Trimmed down: The original idea, since the stems of these weeds taper quite a bit, was to use the thicker ends for the side-beams and the thinner bits for rungs. But I decided I didn't like the "rough" motif as well as I originally had, so I kept the side-beams I already had. However the thin bits made excellent rungs and now with both the side beams and the rungs further apart it all looks to scale. Next, experimenting with the location of the side-rudder. I discovered I'd made the helmsman's arms wrong - his left arm was held too high up. So I cut it off and glued it another piece of wood in its place. And the skirt of his tunic was too short, so I extended it with some "plastic wood" using PVA glue and sawdust. New arm and tunic extension carved to shape and the whole thing painted. Here he is with the other crew members I've done so far ; Castle, helmsman and rudder dry fitted, using a pin to temporarily locate the rudder. There's still a horizontal beam that has to be attached to the hull as the rudder support, and I have to figure out its shape exactly where and how to attach it.. Then I started painting the castles. As the main colour in contemporary pictures seems to be white, I started out with that, using watered down acrylic. And then some red for the decorative bits. Unfortunately, no matter how many layers I added, it still looked washed-out, and the red was too bright for the pigments available at the time. So I'm moving over to the old standby - Humbrol enamel. And I changed the colour layout. I'd always intended to add green around the quatrefoils, but I found that with a white substructure (legs) it all looked too pale. So I changed it to red below the castles themselves. Looks a lot better. And now I'm starting to think about carving the rest of the crew. I took photocopies of the Winchelsea town seal, scaled down so the people on board were at approximately 1:75, and cut and pasted onto a couple of pieces of pear wood. I had to draw in where the picture didn't show them. Got my work cut out for me (sorry!) Steven


- 327 replies
-
- 17
-

-

-
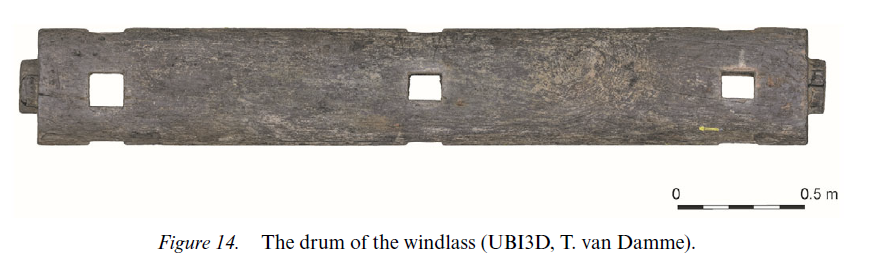
Up to you, mate - it's your model. The only near-contemporary windlasses I know of are from the Bremen cog (c. 1380), the Ijssel cog (mid 15th century) and the Kalmar ship (Swedish, mid 13th century). All have simple cylindrical windlasses. I'm not including any of the modern reconstructions, as I don't know what they based their windlasses on. I have a picture of the supposed windlass from the Mary Rose, (which is what I used on the dromon) but I'm not sure whether that's based on archaeology or speculation. Steven

- 186 replies
-
- 3
-
-
- keelless
- reverse clinker
- (and 4 more)
-
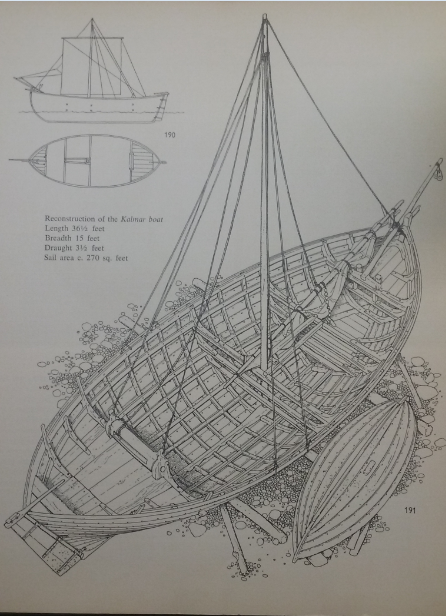
Nice work, Dick. Sensible idea fixing the forestay to the "keel plank". Just a question - is there any particular reason for the facets on the windlass? The only ones from this period that I know of all seem to have been simple cylinders. Steven
- 186 replies
-
- 1
-
-
- keelless
- reverse clinker
- (and 4 more)
-
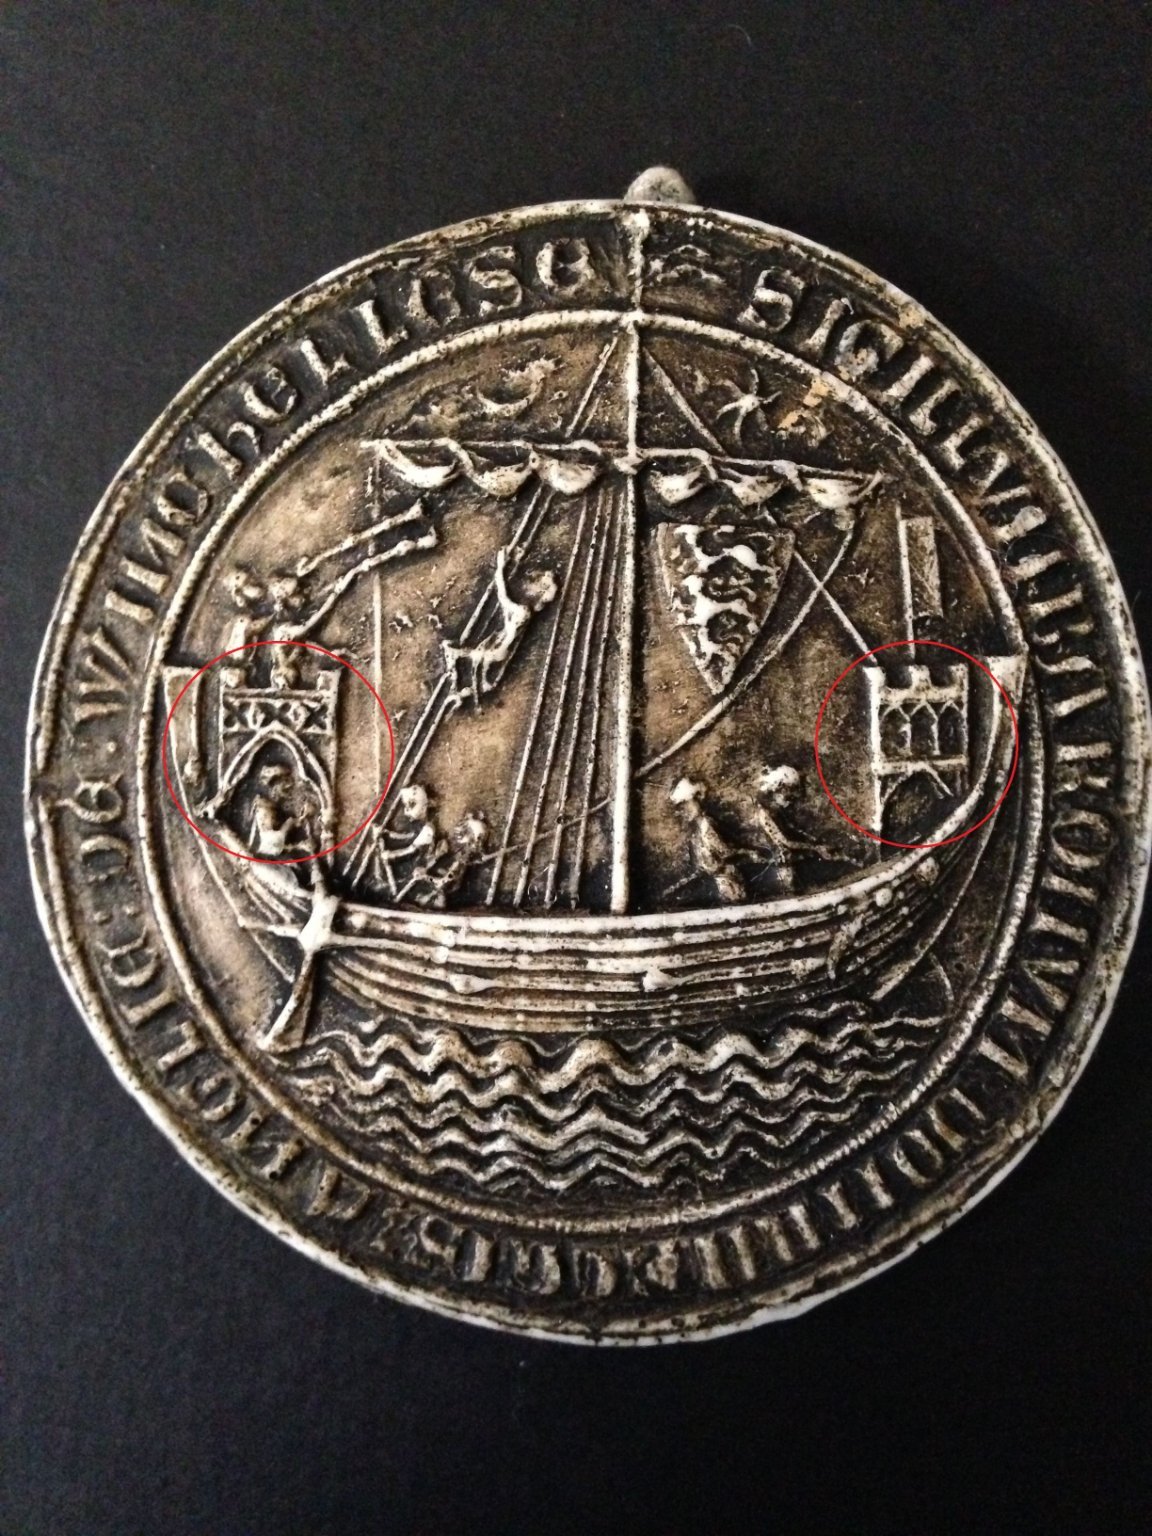
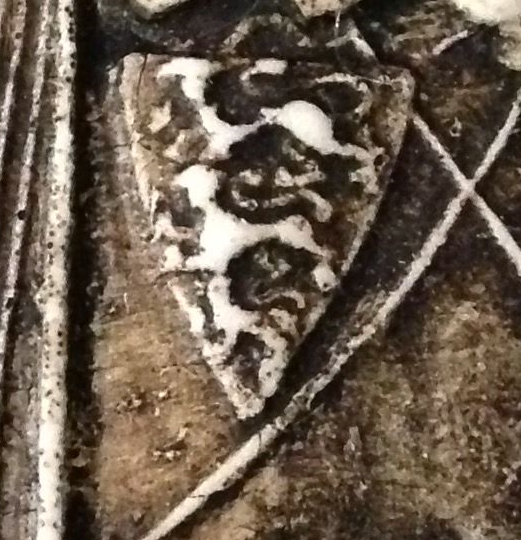
Looking good. Nice crisp work. I don't know what the shields on the right signify in the picture above, but the ones on the left are Queen Isabella's personal coat of arms, showing the lion and castle of the two kingdoms of Leon and Castile which merged in 1301. This is the coat of arms she had in her own right, before she married Ferdinand and became Queen of all Spain. Steven
- 93 replies
-
- 1
-
-
- santa maria
- amati
- (and 1 more)
-
Unfortunately, the same applies to mediaeval military subjects - apart from a couple written by a friend of mine. Steven
-
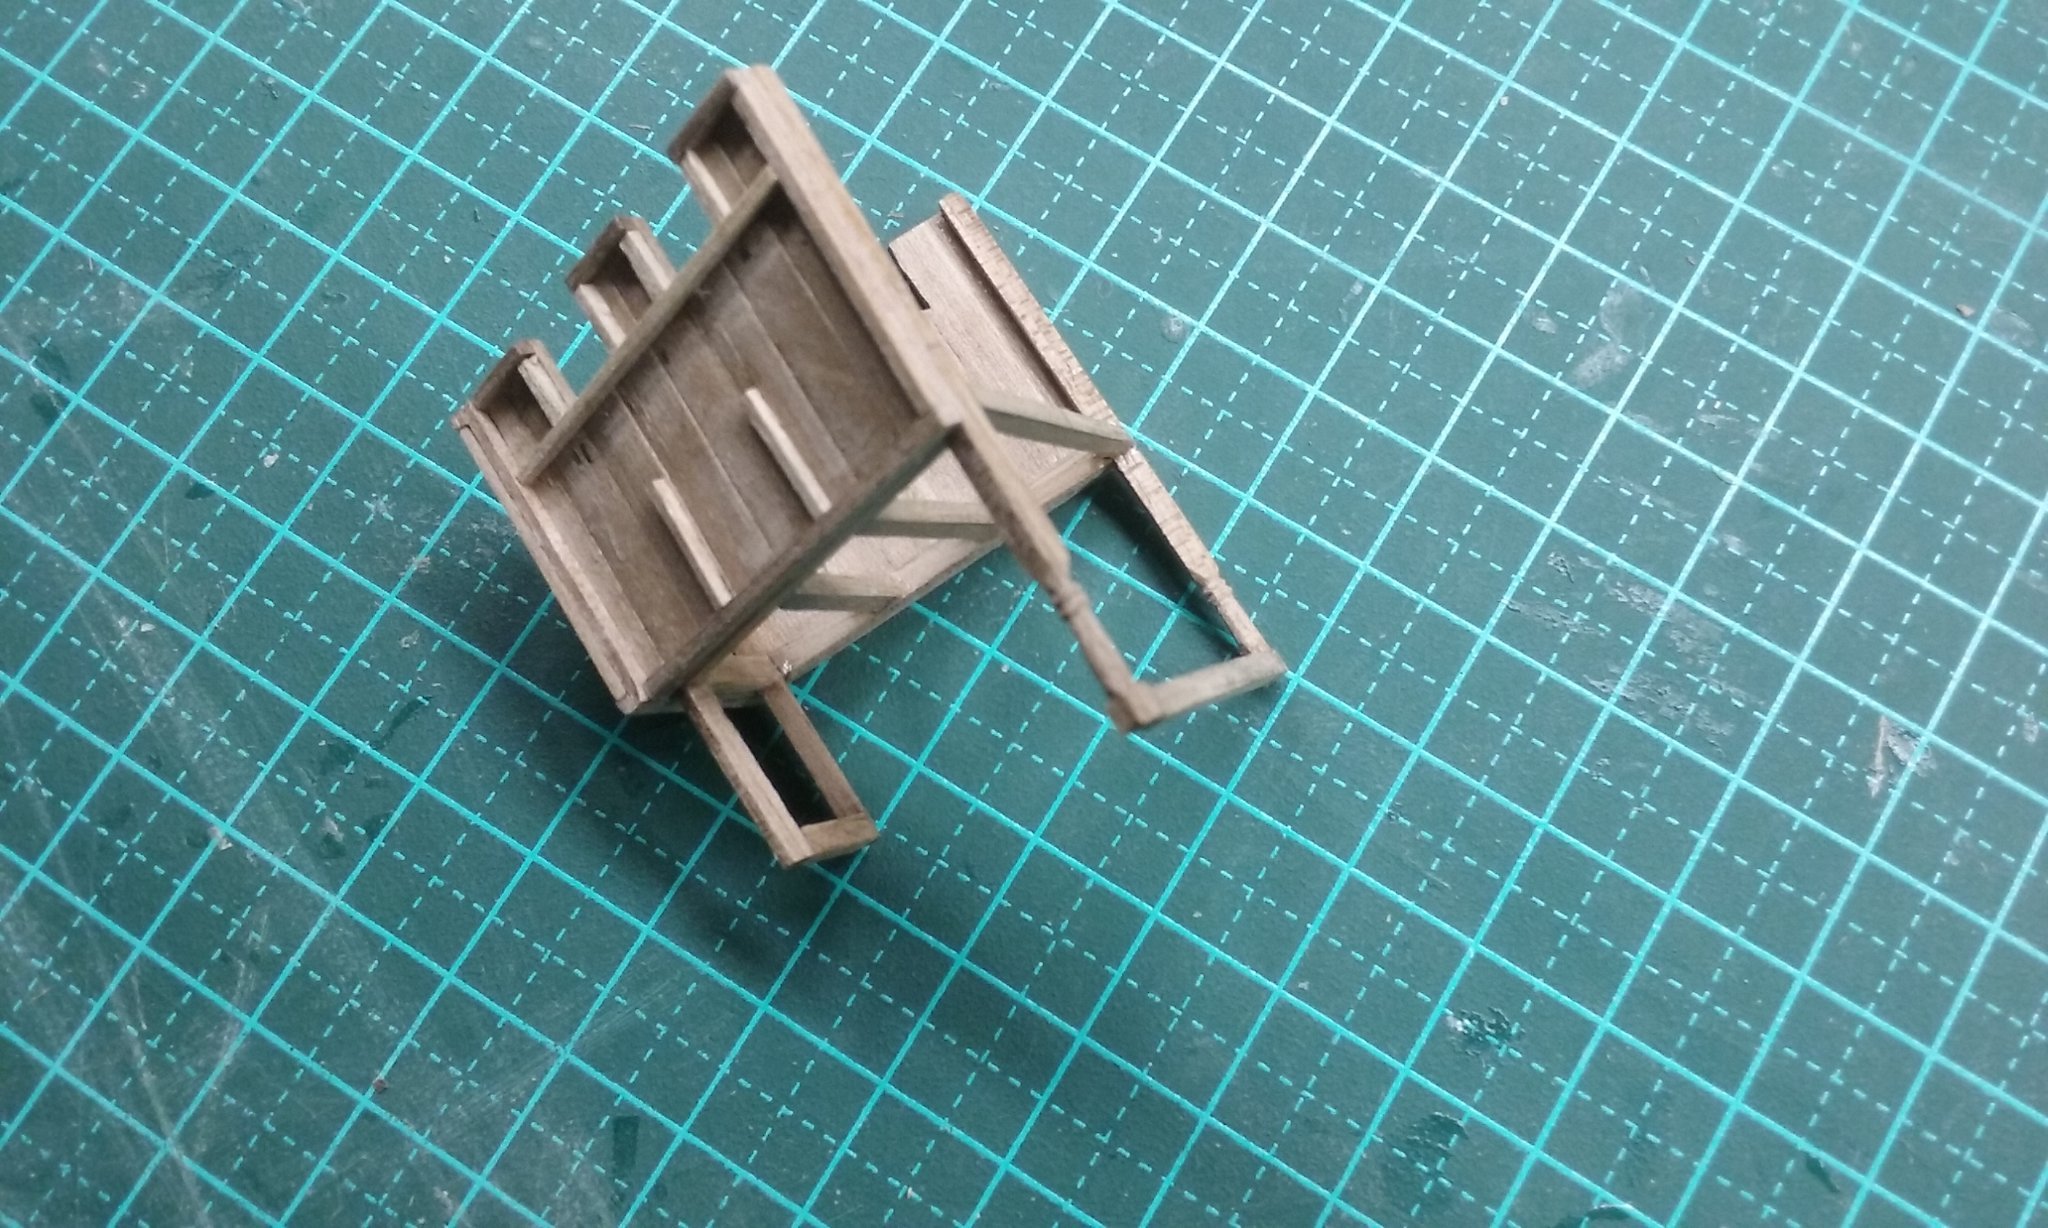
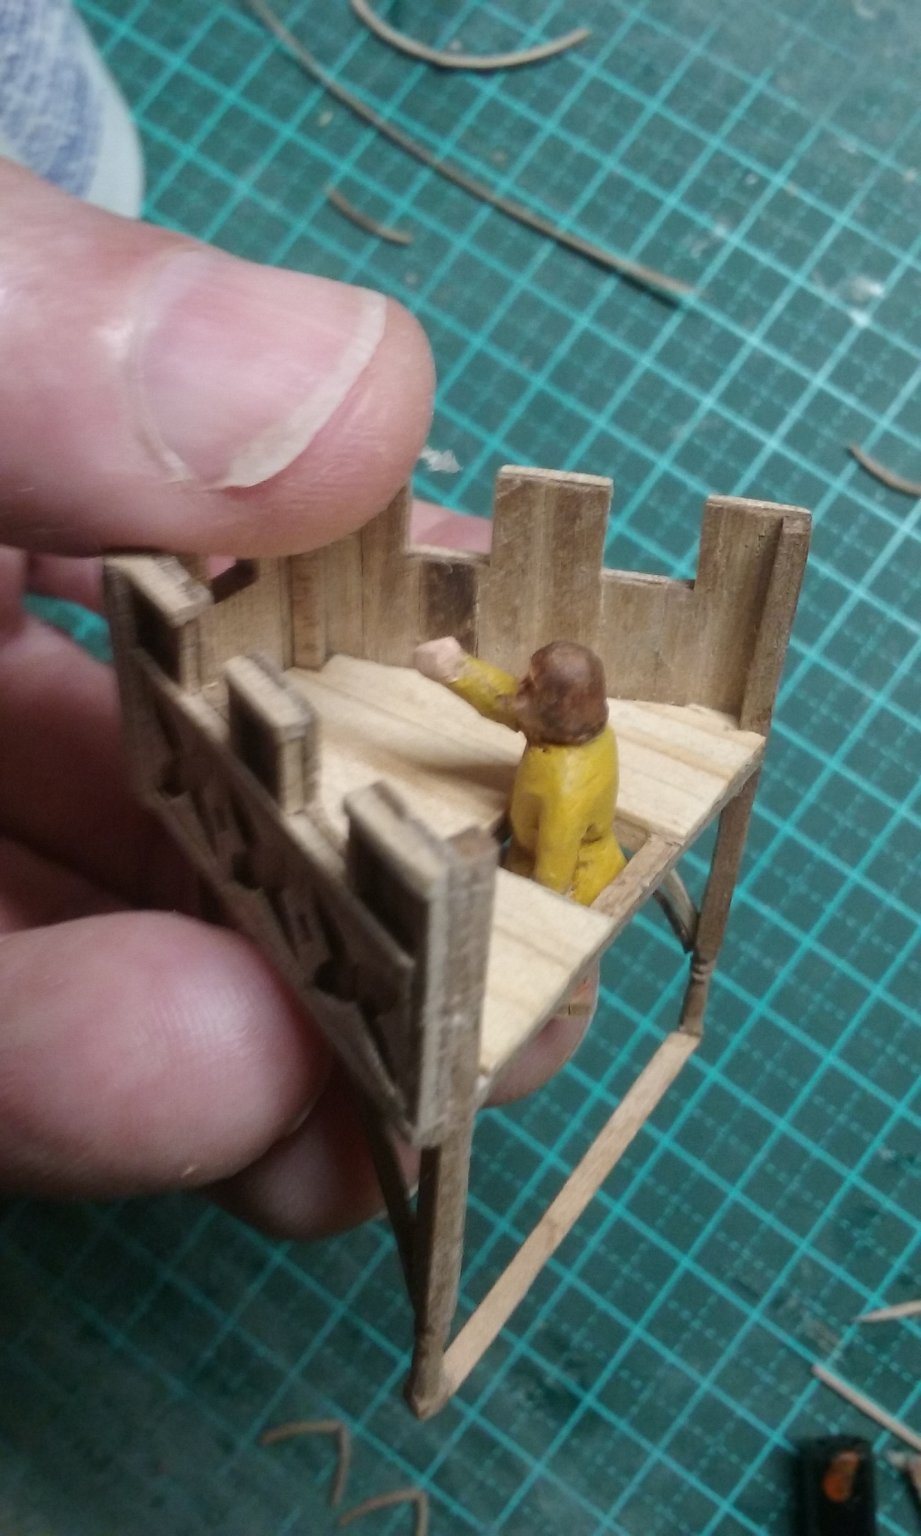
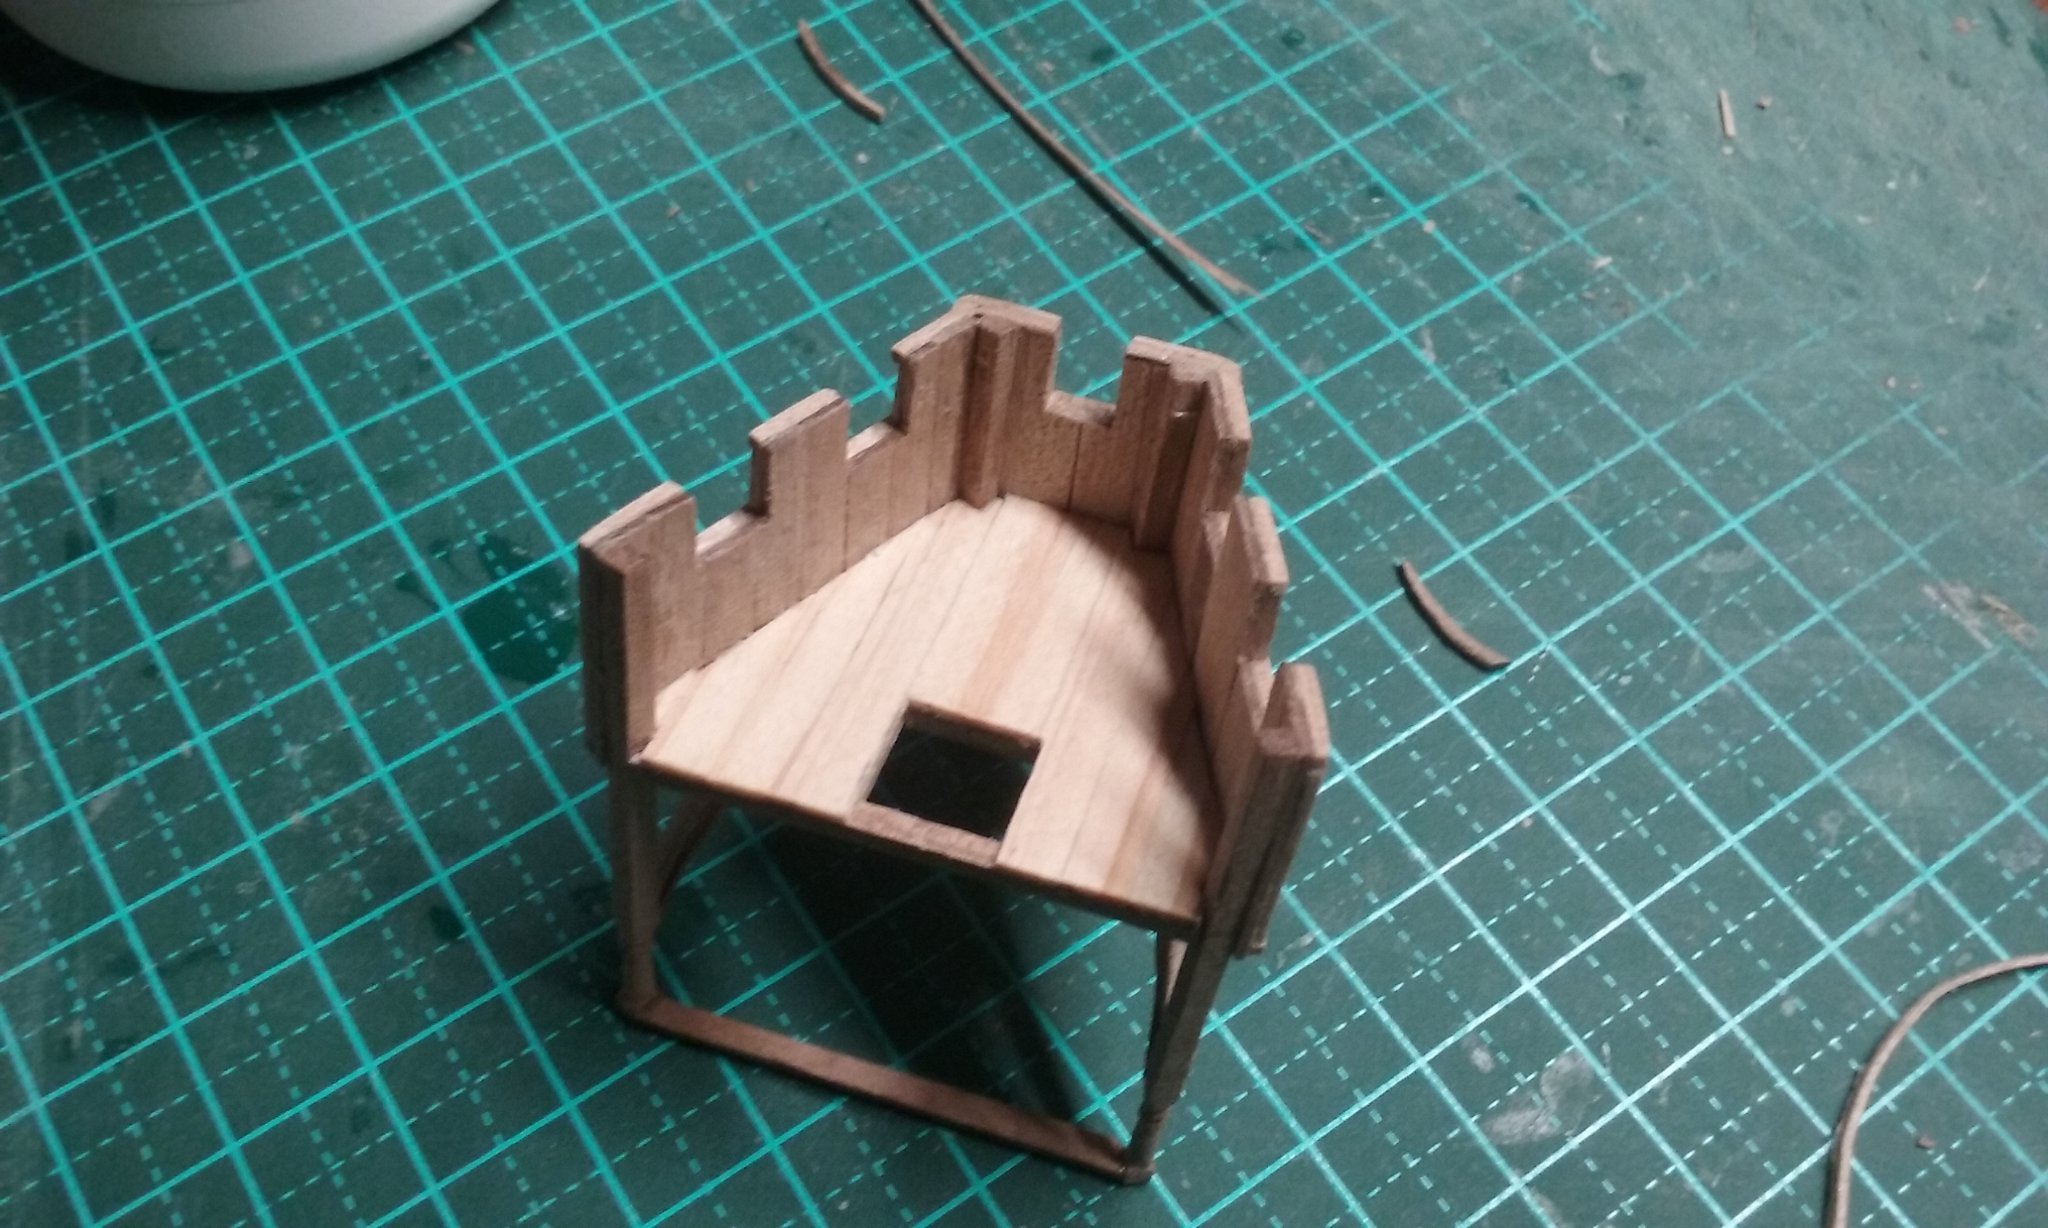
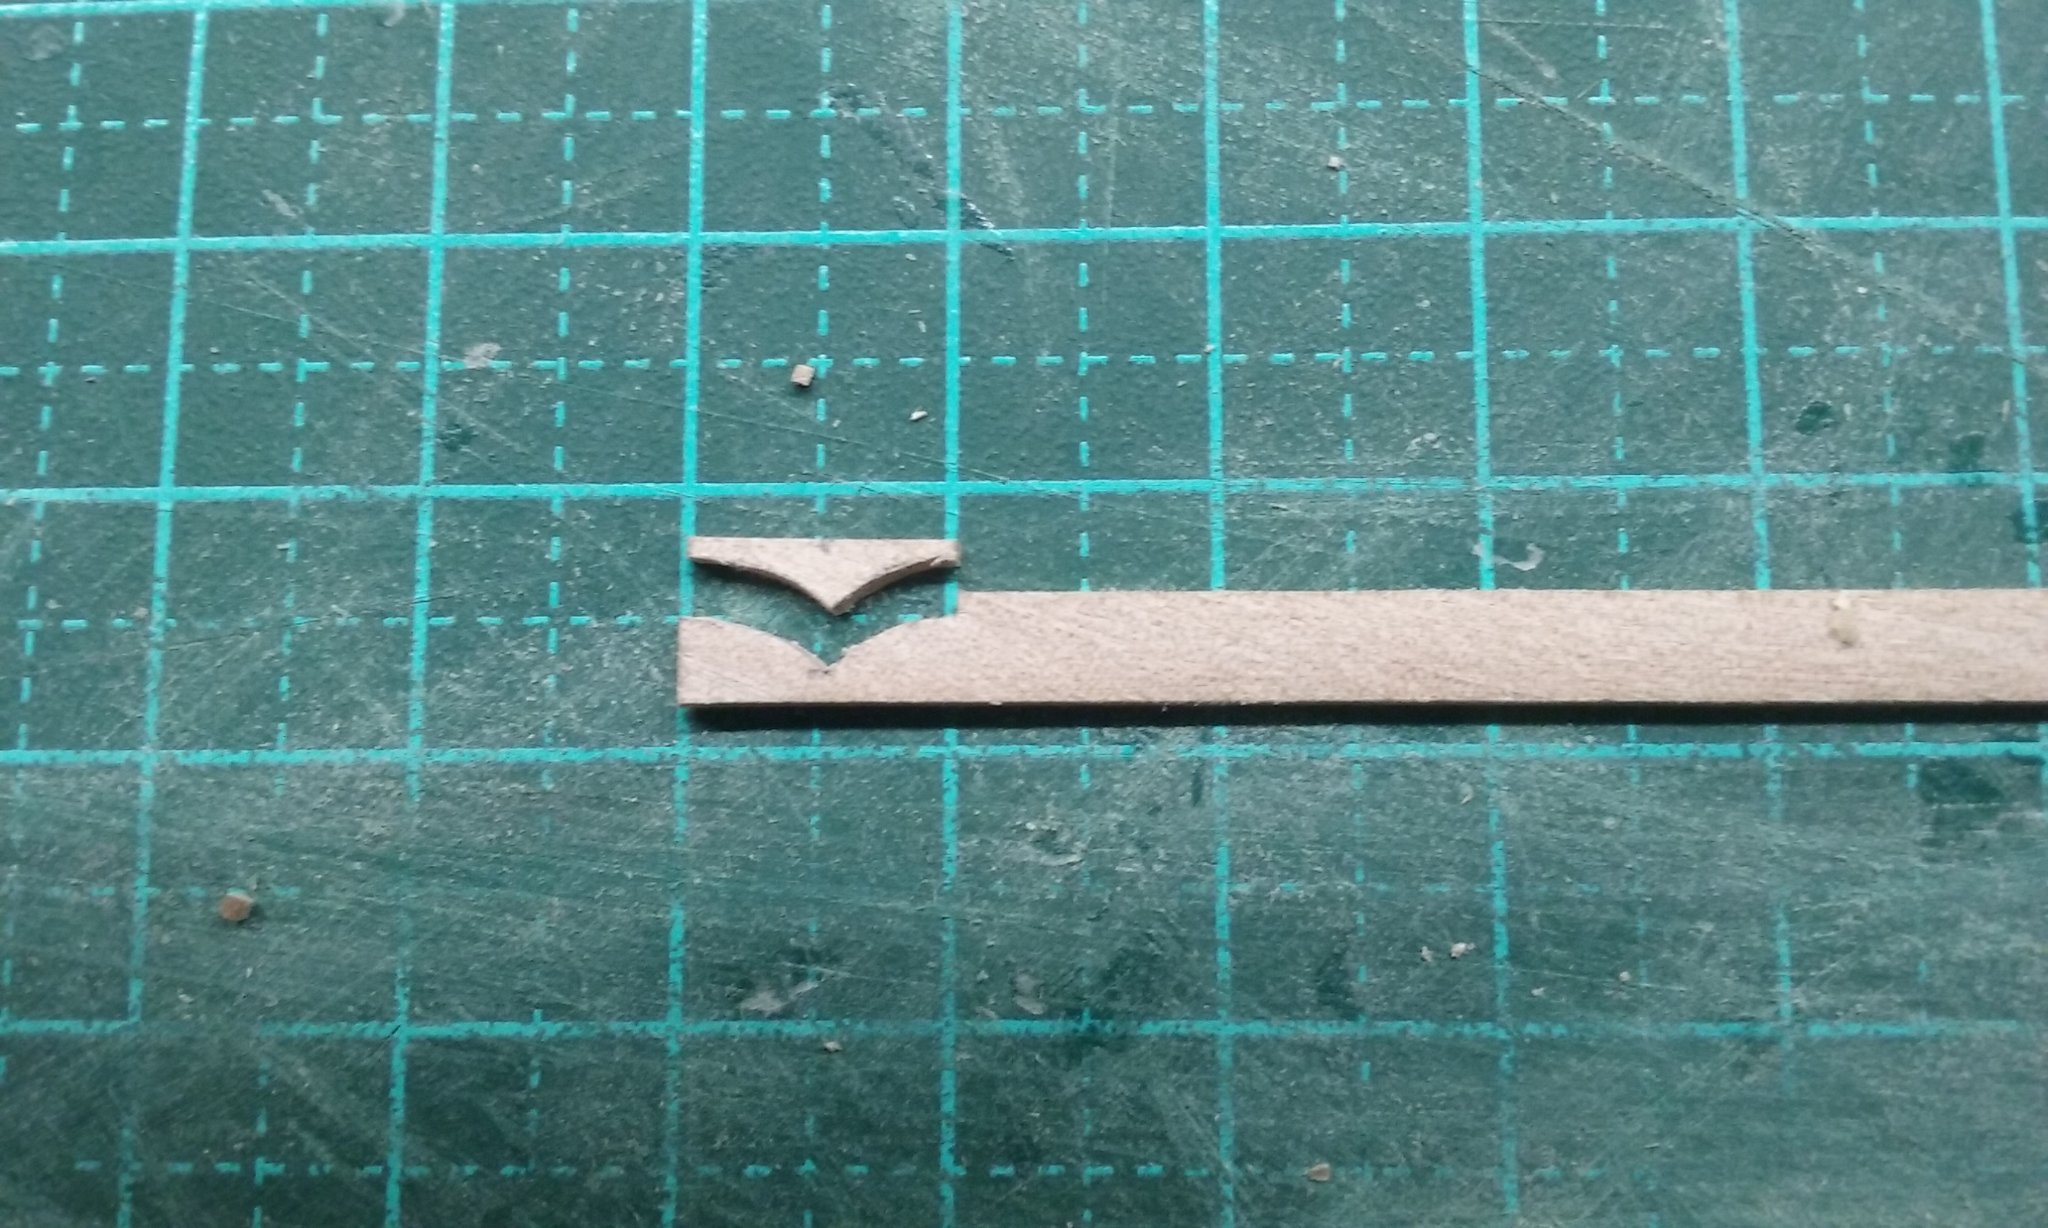
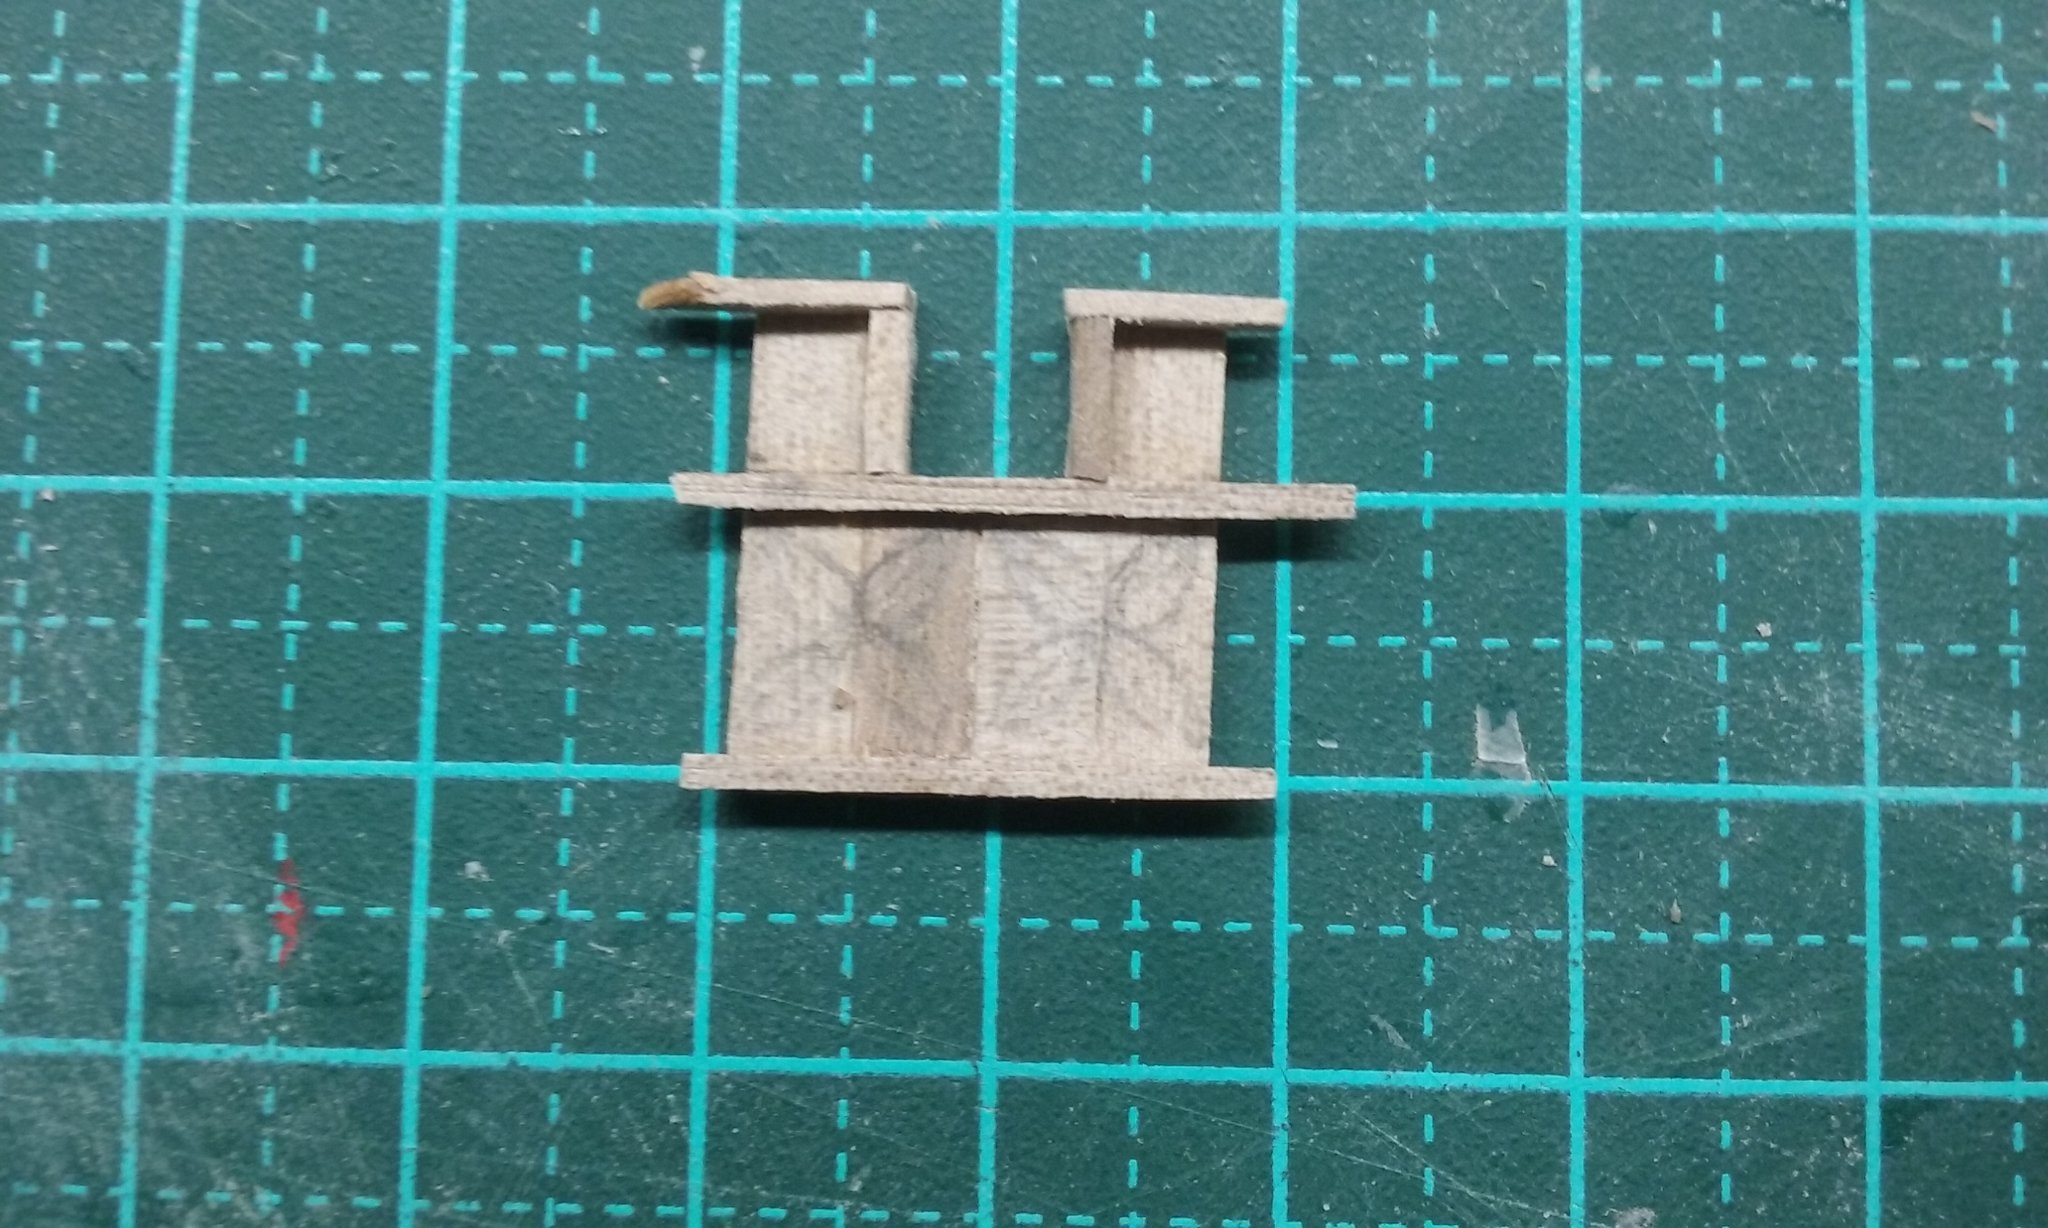
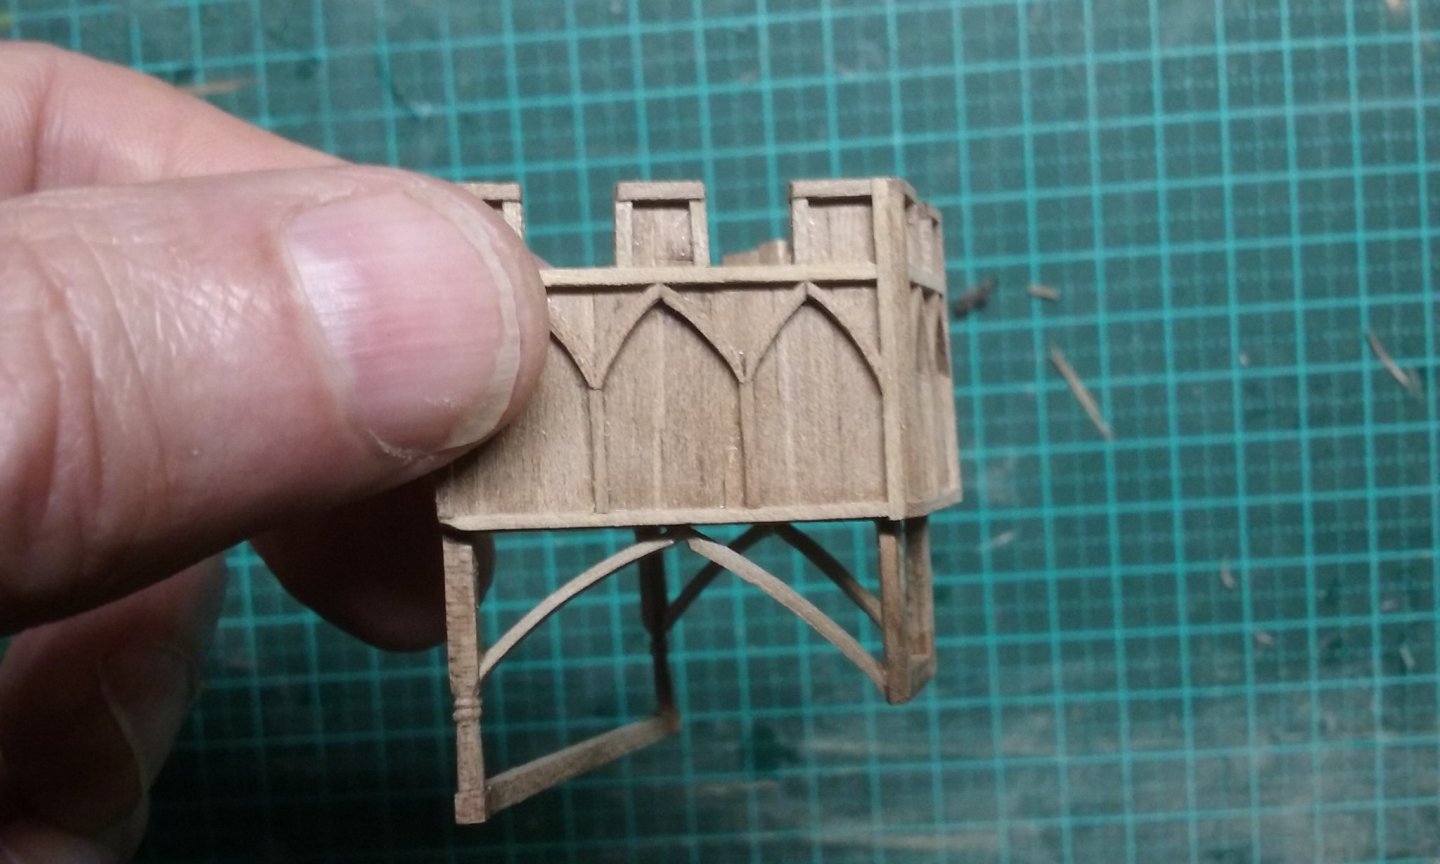
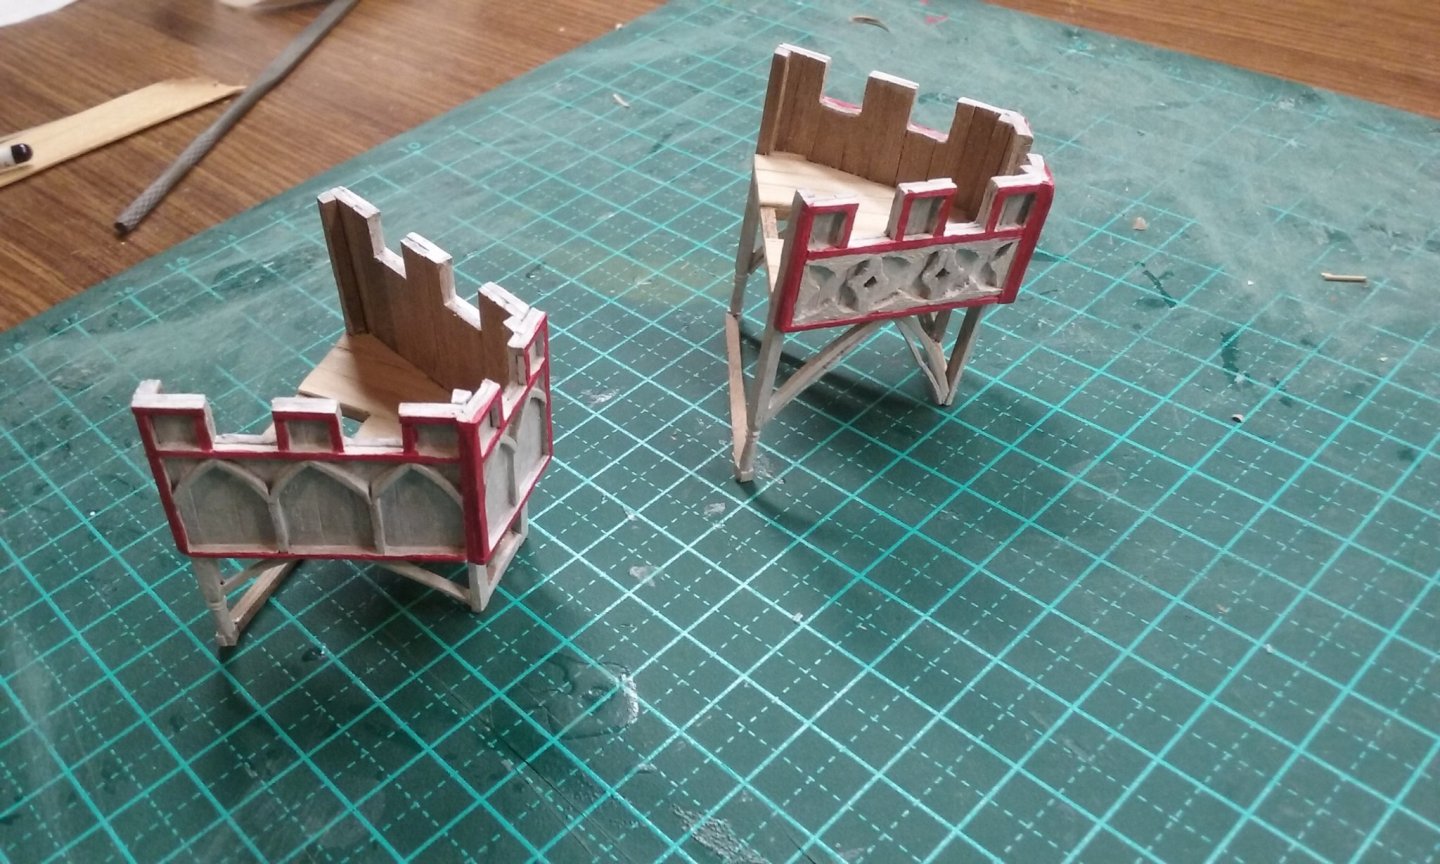
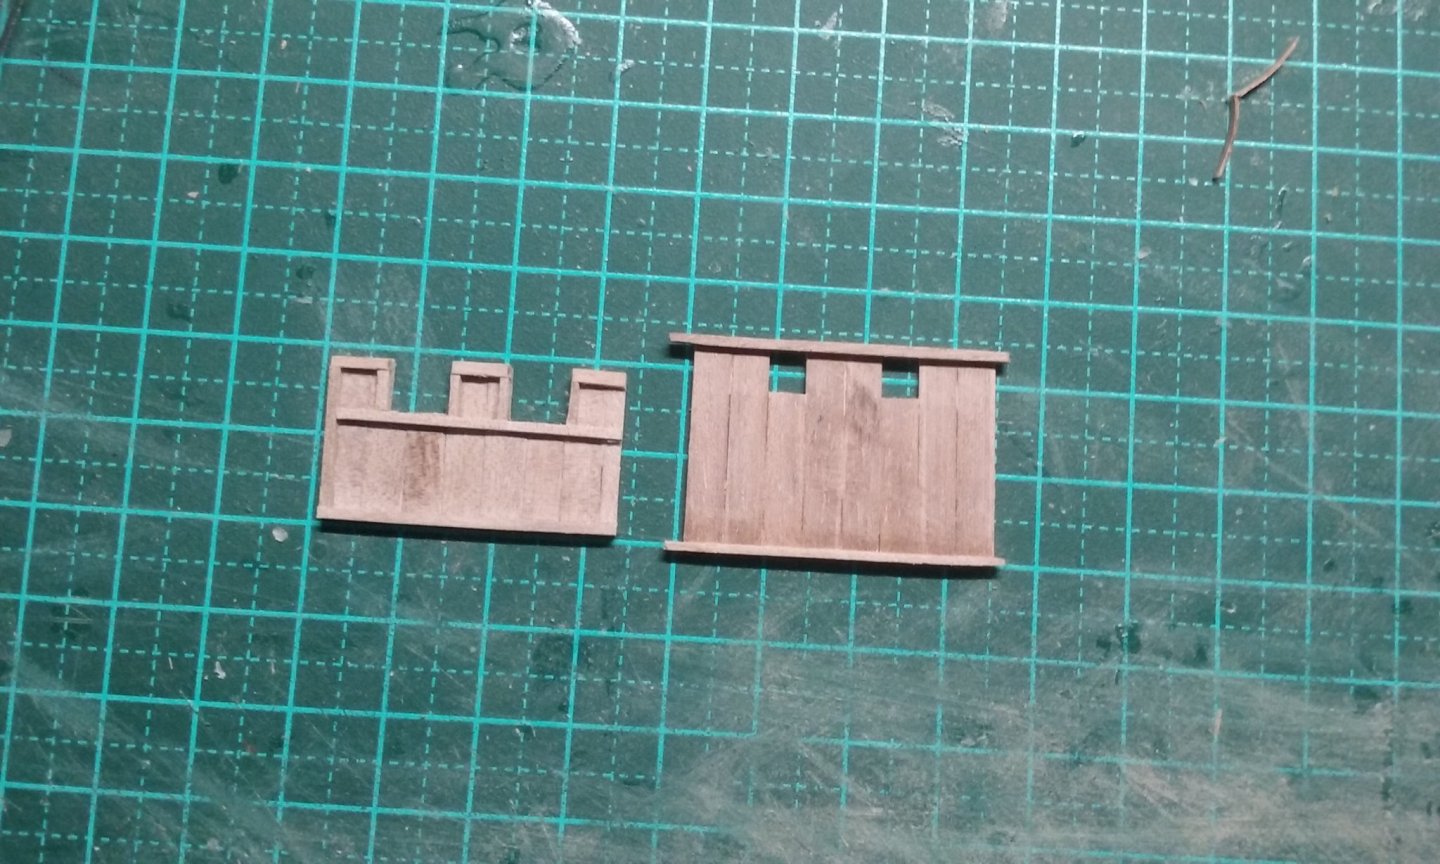
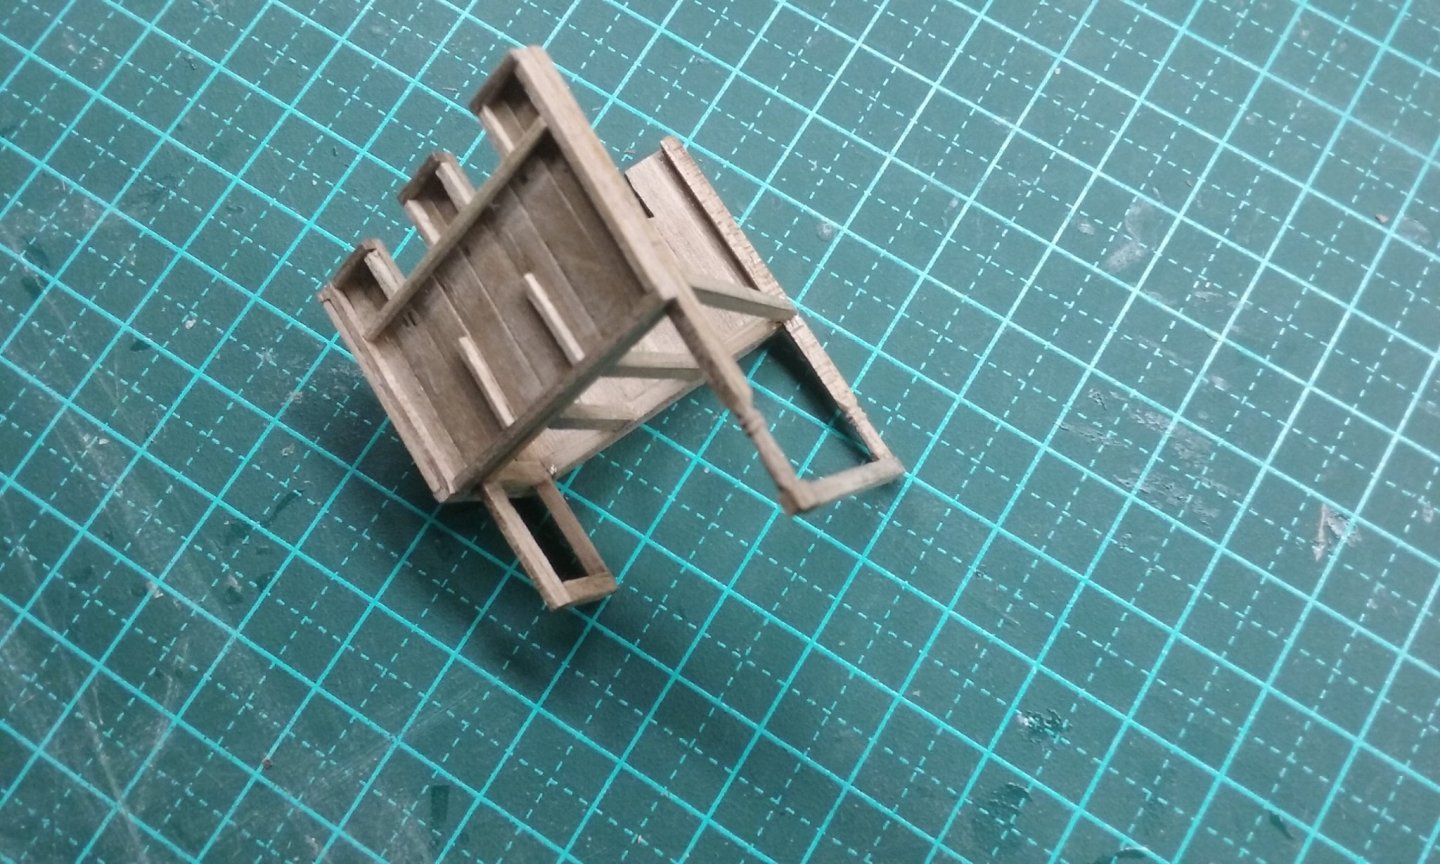
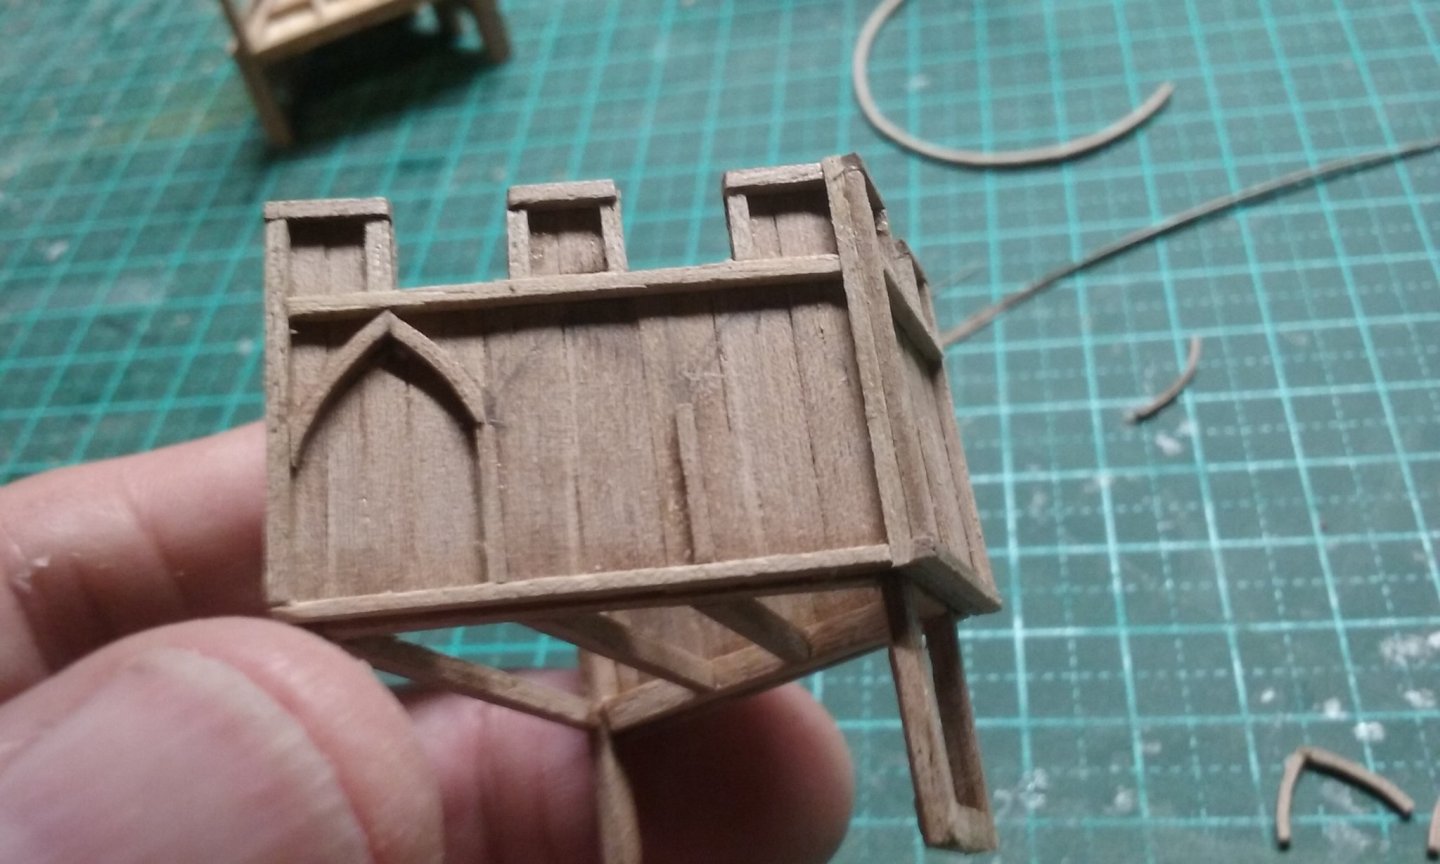
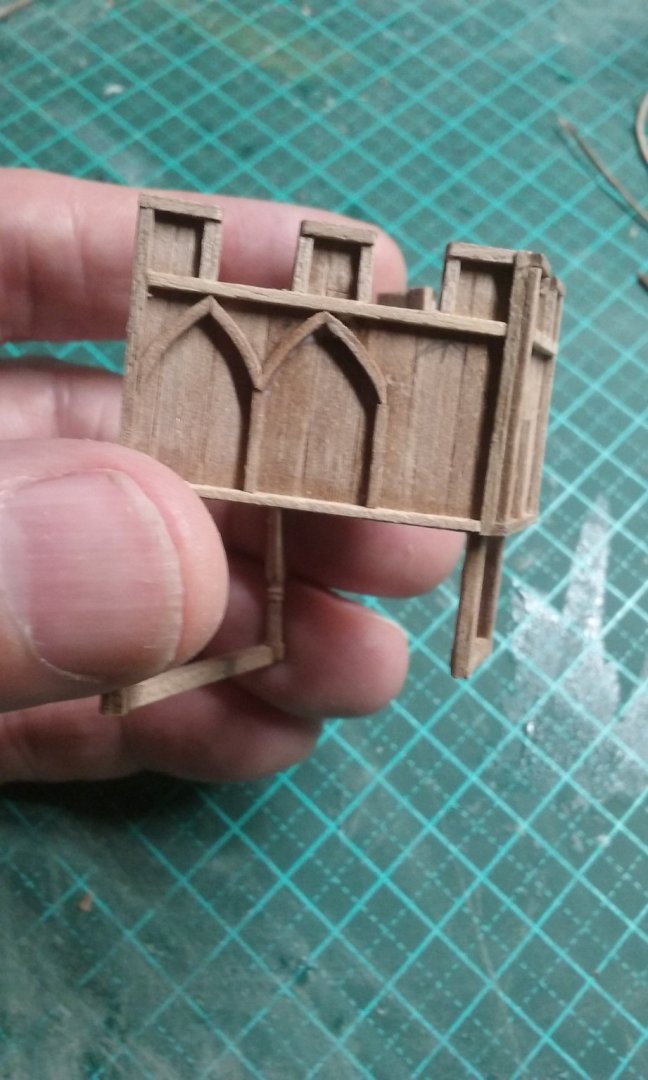
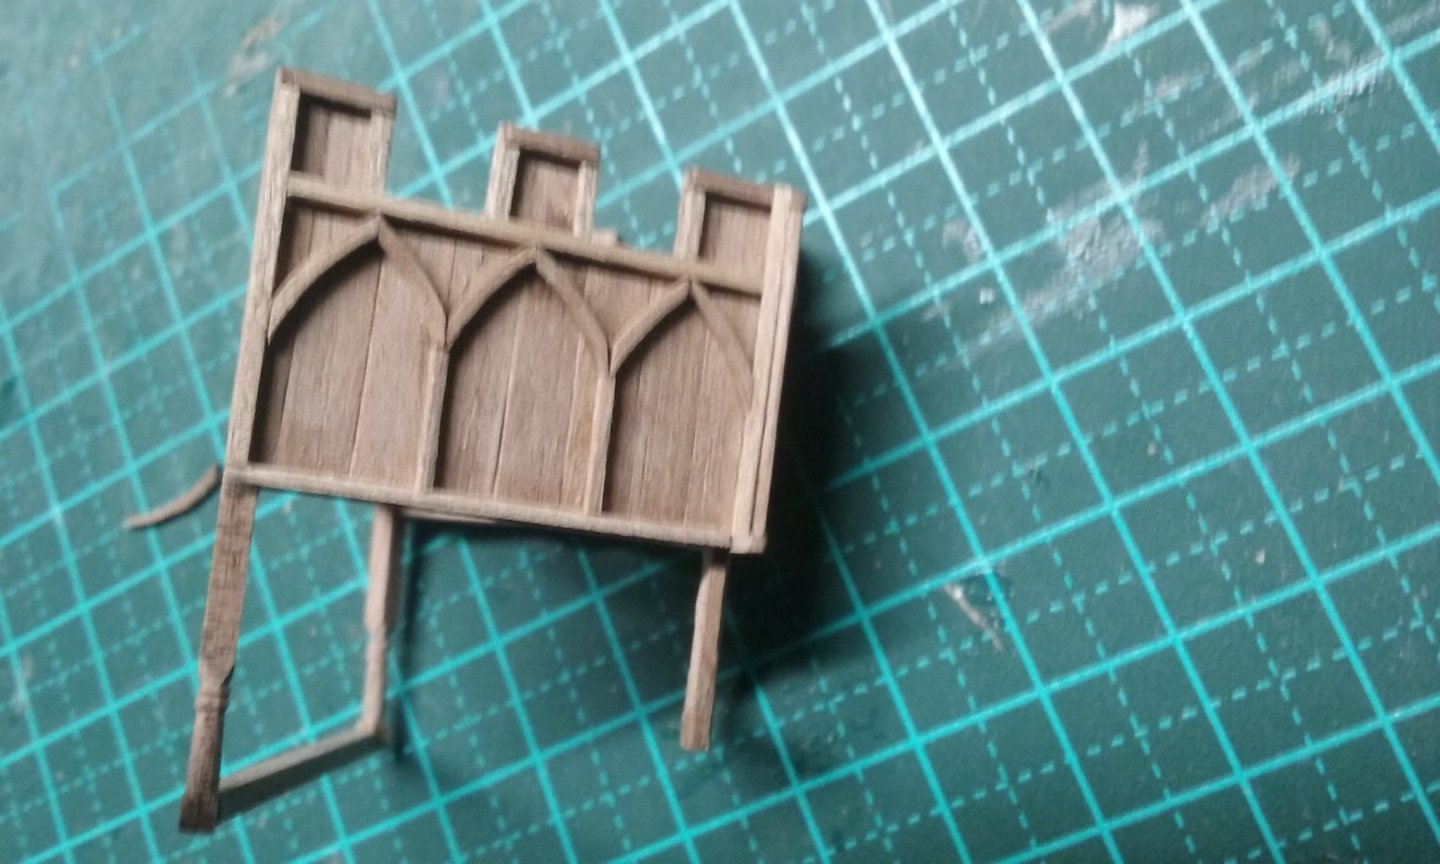
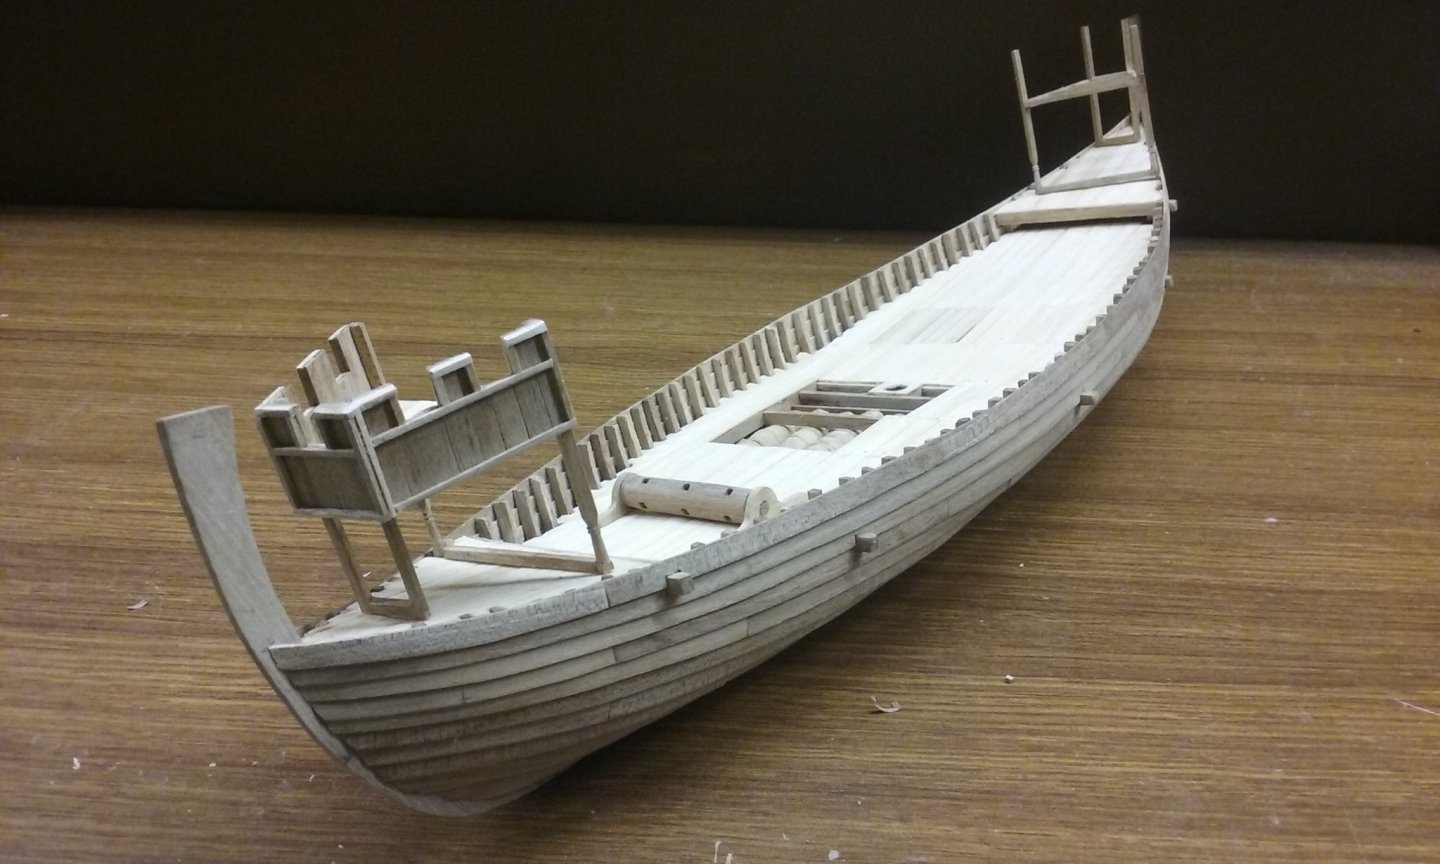
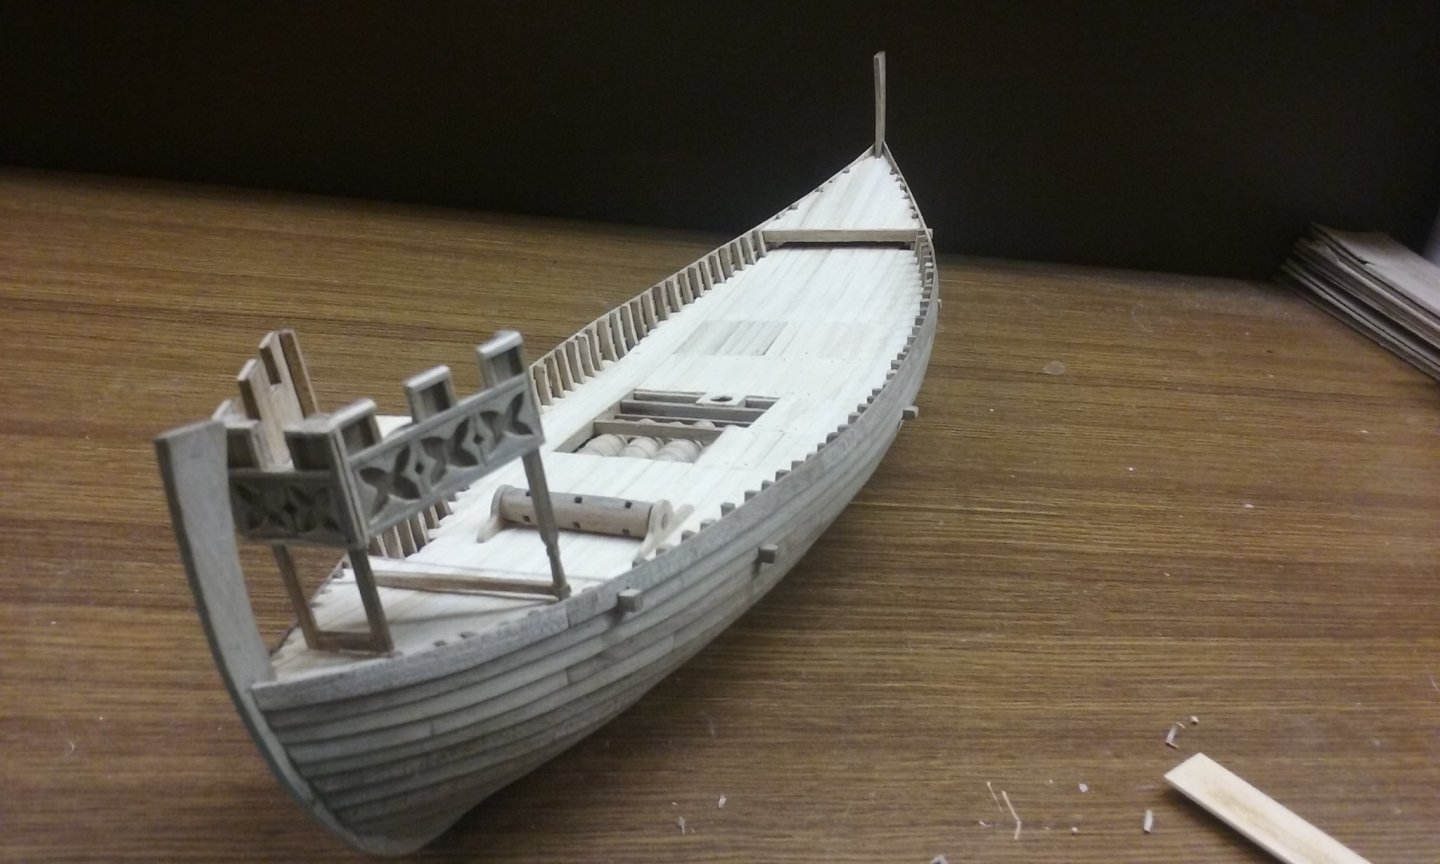
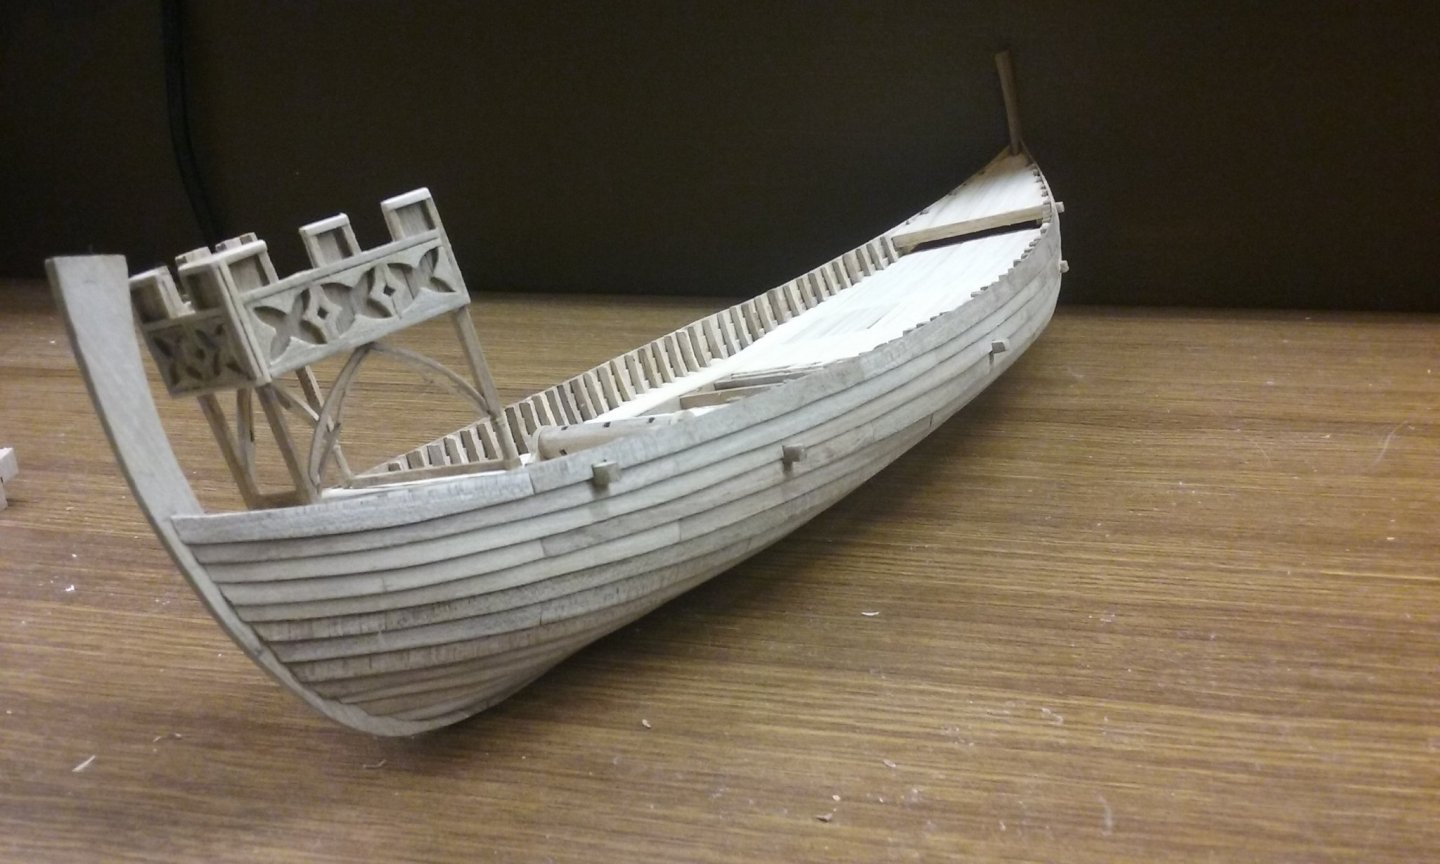
Thanks for the likes and comments. I've been working on the new forecastle - Here you can see the height difference between it and the earlier iteration. Apart from that, the technique was the same as on the aftercastle, so I haven't included photos. However, the decoration is different - pointed arches instead of quatrefoils. I used the same technique I'd used to make the earlier arches, but as the arches were smaller I had to bend the wood in an even tighter curve. I made each arch a bit too long so I could trim it to fit exactly in situ before I glued it down. Here are the uprights: And the first and second arches The bottom of the right hand arc of the second arch is a little out of place in the photo, but I was able to gently push it into place at the top of the upright. Third arch complete I'd been thinking about access to the castles. Sure, use a ladder, but if the top of the ladder is at the edge of the castle, the base is right at the edge of the raised deck and would make access a little difficult. Landström has the ladder coming up right in the middle of the castle, but that seems a bit wrong to me - you'd always be worried about falling through the hole. So I did what I thought solved both problems - put the hole right at the inboard edge. This is the aftercastle - the forecastle isn't decked yet. I worked out that a 600 mm (2 feet) gap would be wide enough - it's the size of a small doorway, at least here in Oz. At 1:75 scale, that's 8 mm. You can see there's a deckbeam supporting the inner edge of the decking, and the distance between it and the next deckbeam is enough for someone to get through without too much difficulty. So here she is with both castles dry fitted. I still have to add the deck of the forecastle and also the arch between the legs on each side (though they're simpler than on the aftercastle). Note the rope around the windlass. I'm just checking it out against how they did it on the Harald Fairhair replica ( see 0:32 at And I discovered the drum of my windlass was too close to the deck so the rope got stuck underneath . I've had to take the whole assembly off and glue a spacer under each of the side brackets to raise the drum. Just waiting for the glue to dry then I'll trim it all to shape and glue the windlass back in place. Steven


- 327 replies
-
- 19
-
-

-
Firing a replica 18th century naval cannon - damage
Louie da fly replied to Louie da fly's topic in Nautical/Naval History
I was thinking that, just by looking at the size of the gun itself. Too small to be an 18 pounder, but probably bigger than a 9-pounder. But I have to confess my abysmal iggerance on this subject. Steven -
Seeing the splinters is pretty scary. No framing, though not sure how much that would change things - "Old Ironsides" was famous for framing so solid that balls were supposed to have bounced off the sides. But if the ball went through the space between two frames, it would presumably have the effect shown. Does anybody know the thickness of planking on a First Rate? Or even a fourth or fifth Rate? And can anybody estimate what weight ball that would be? Steven
-
Yes, apparently they were all drunk and the ship hit a rock leaving the harbour in France. Matilda (or Maud - see 1066 and All That) was King Henry's daughter, the sister of the drowned heir, but unfortunately she was a woman, and though the feudal lords swore allegiance to her, when her cousin Stephen decided he should be king, a lot of them changed sides. Unfortunately he was a very lackadaisical war leader, and so the civil war dragged out for a very long time, with terrible results for England. https://en.wikipedia.org/wiki/Empress_Matilda The Cadfael books are set during this period, if you're interested in that kind of thing. Steven
-
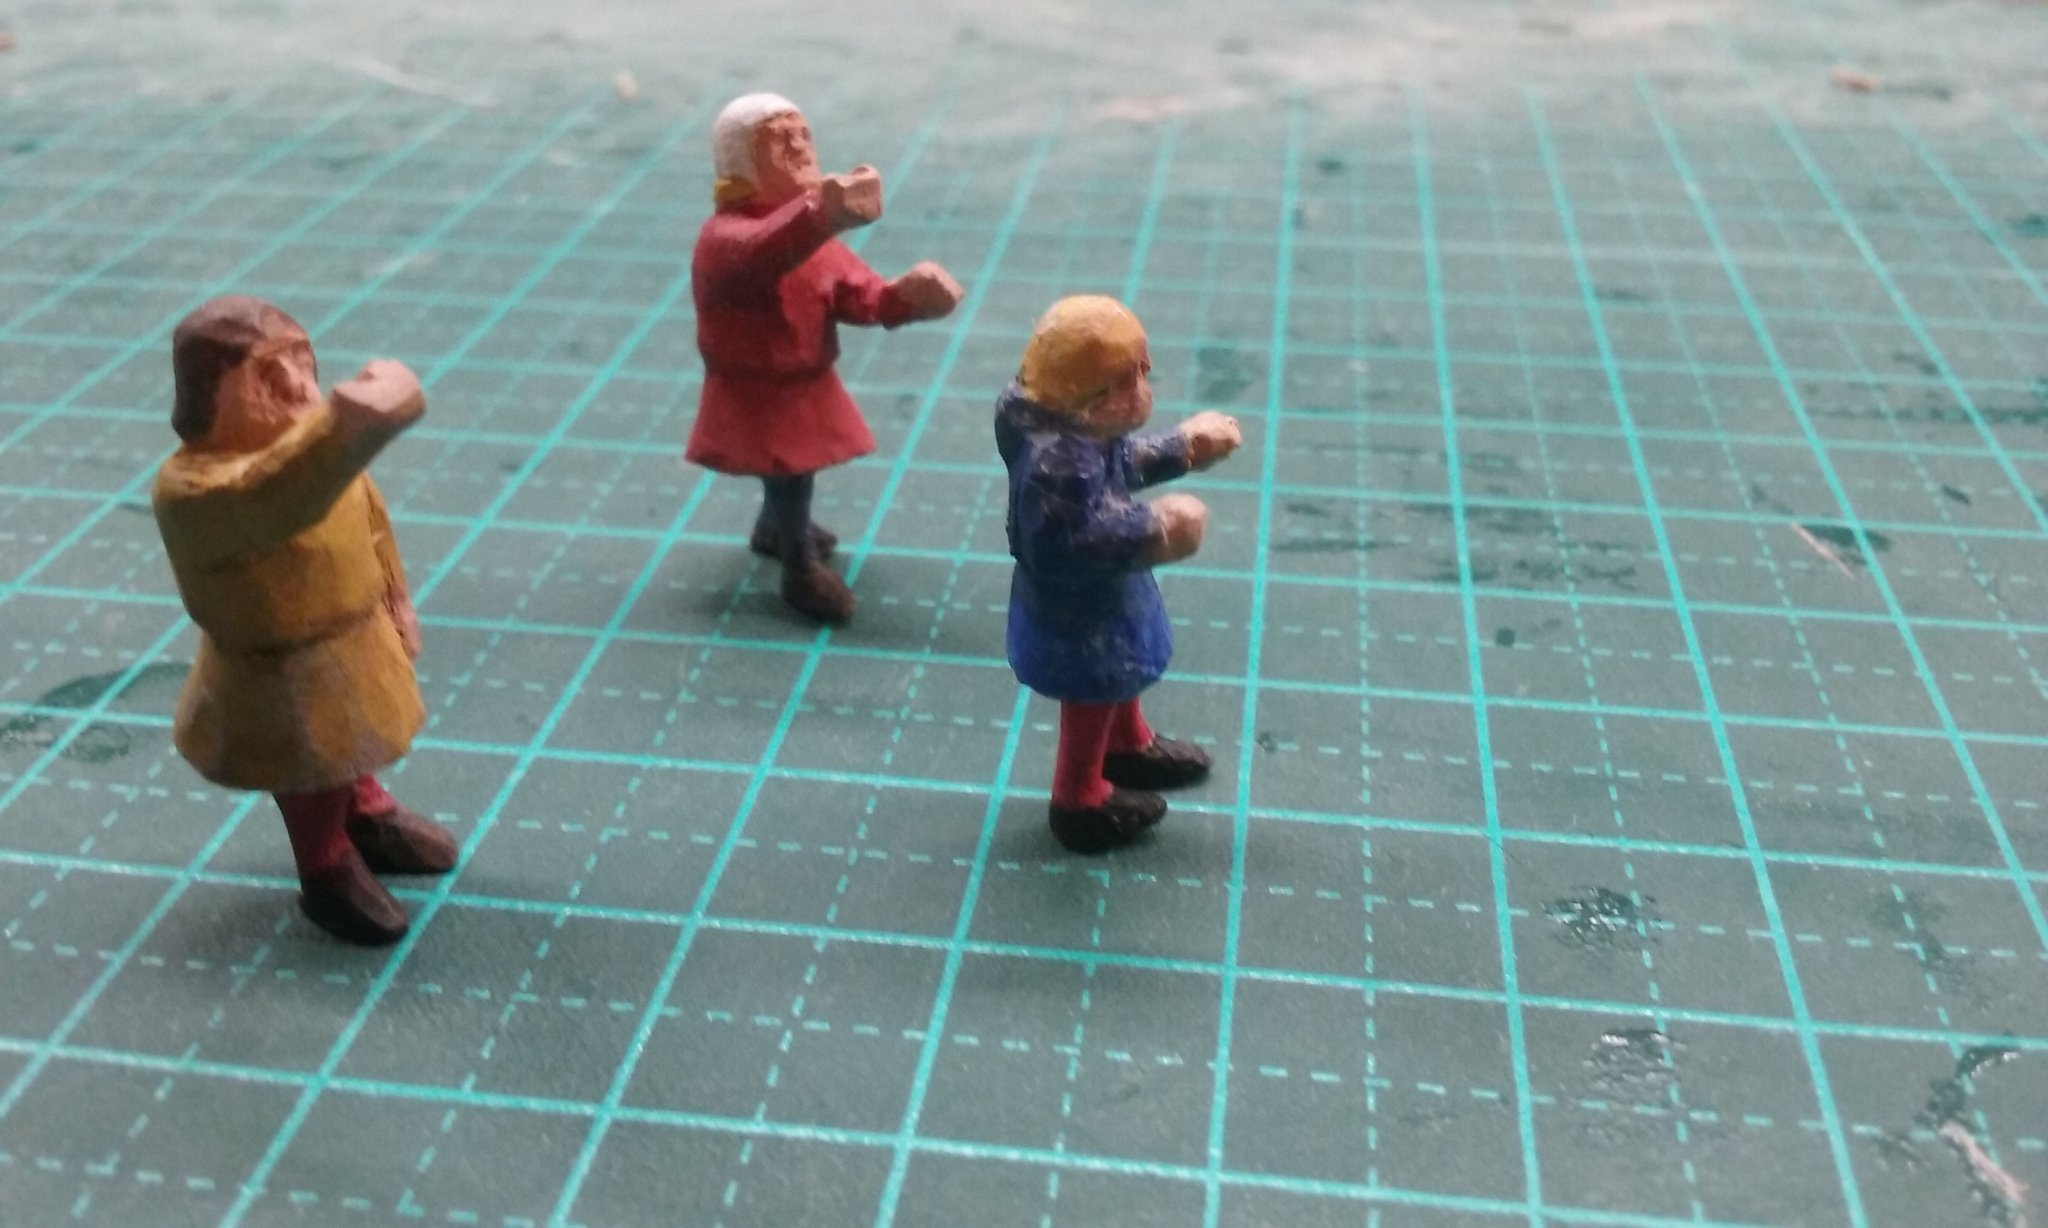
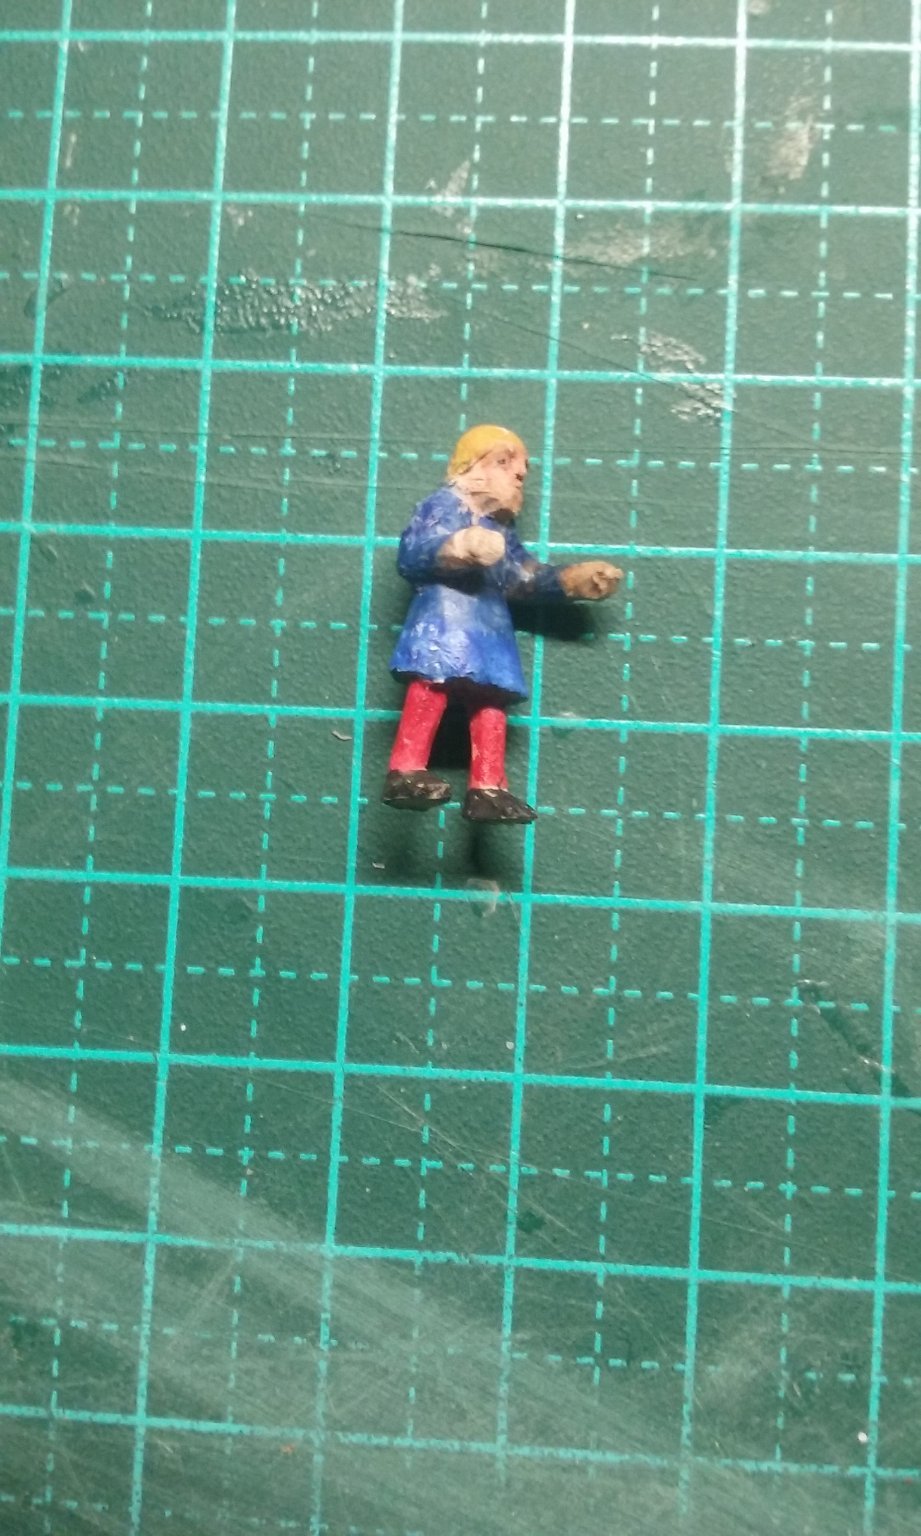
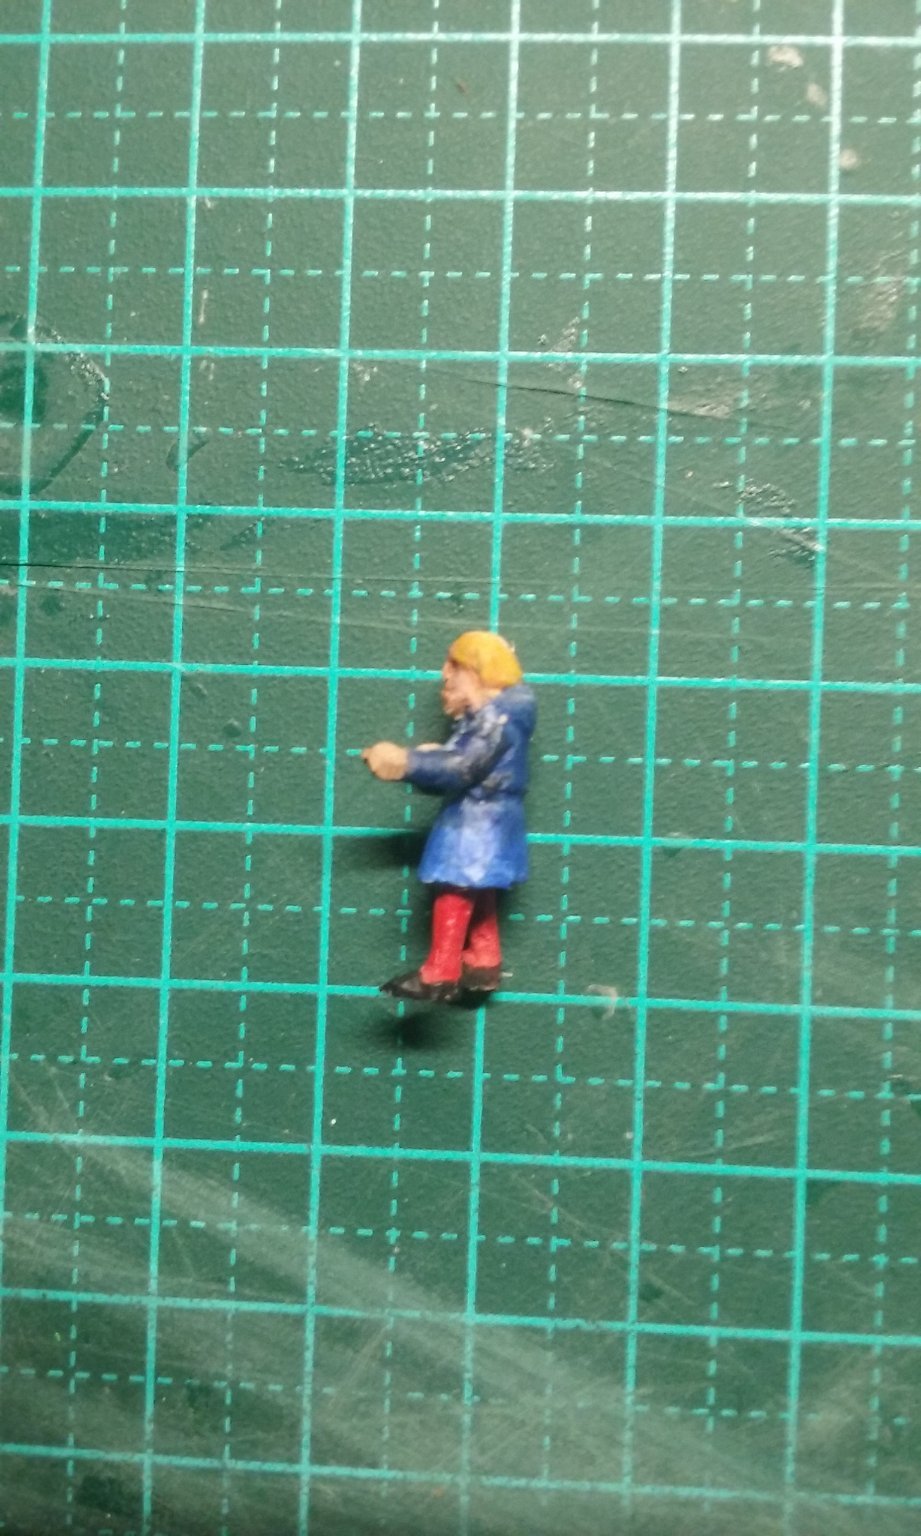
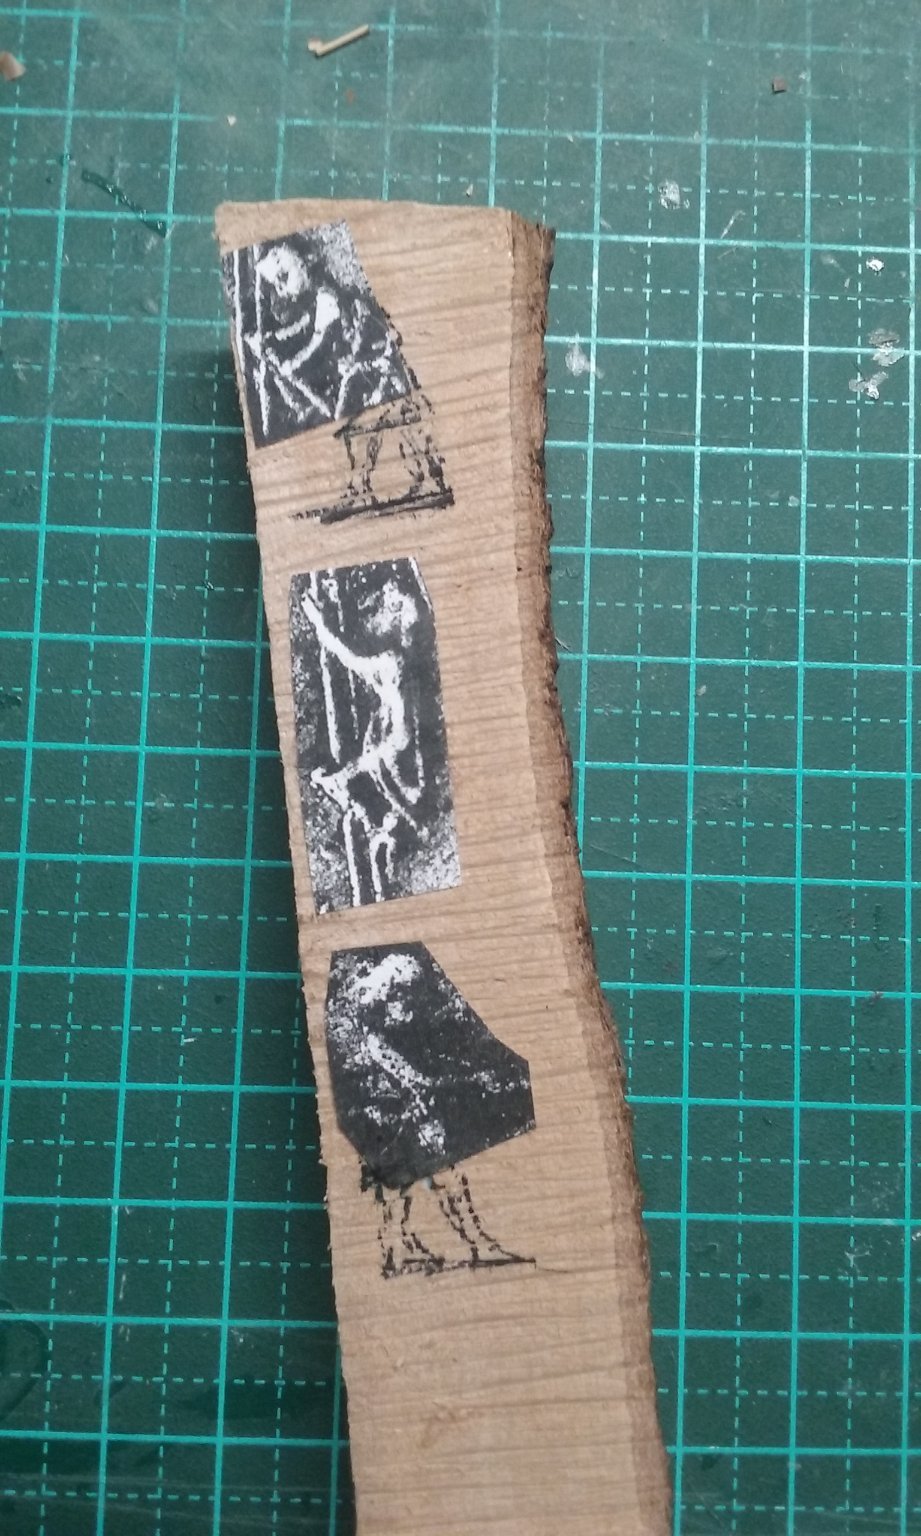
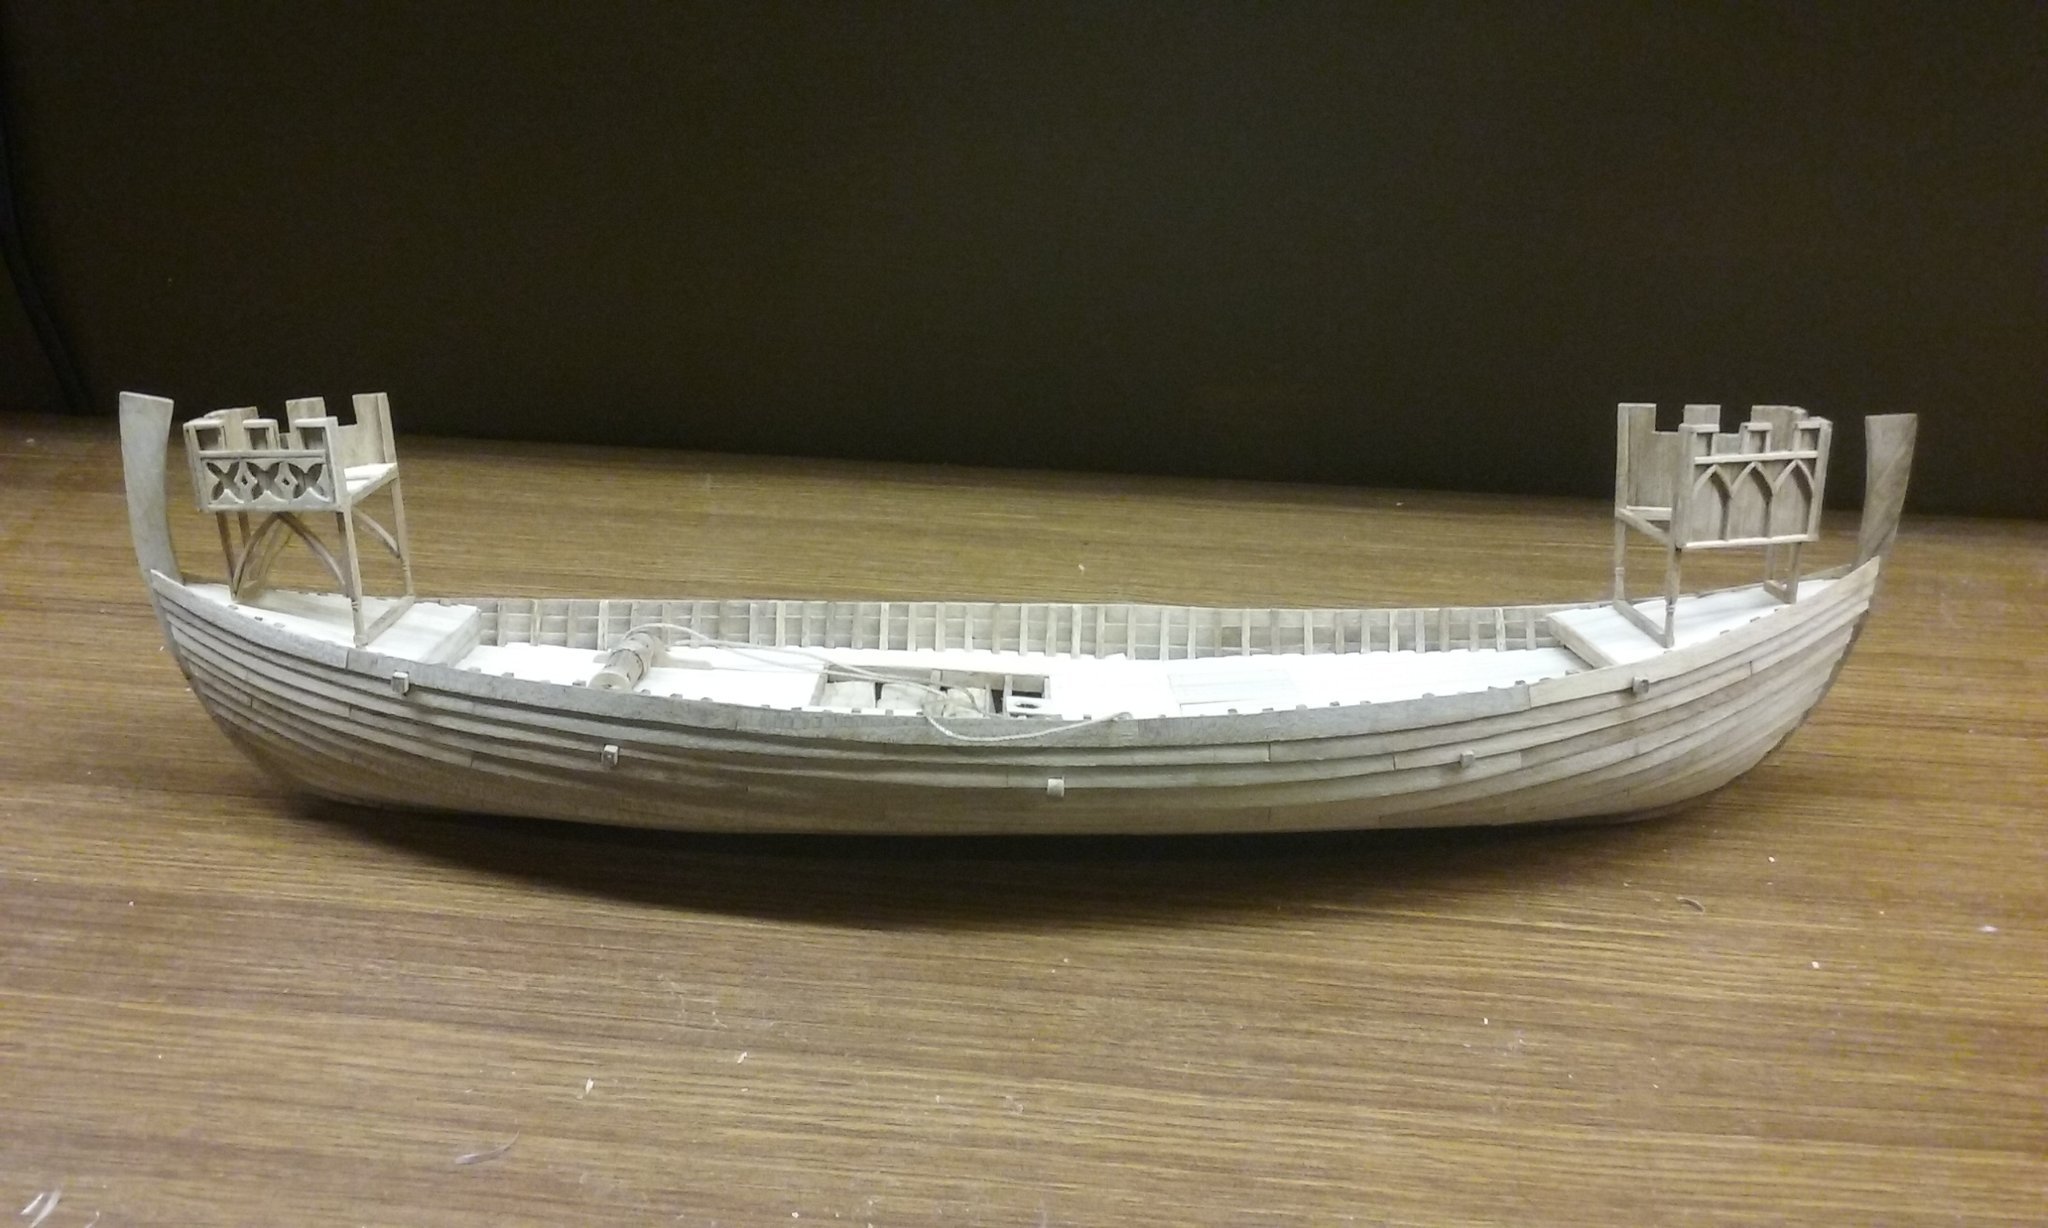
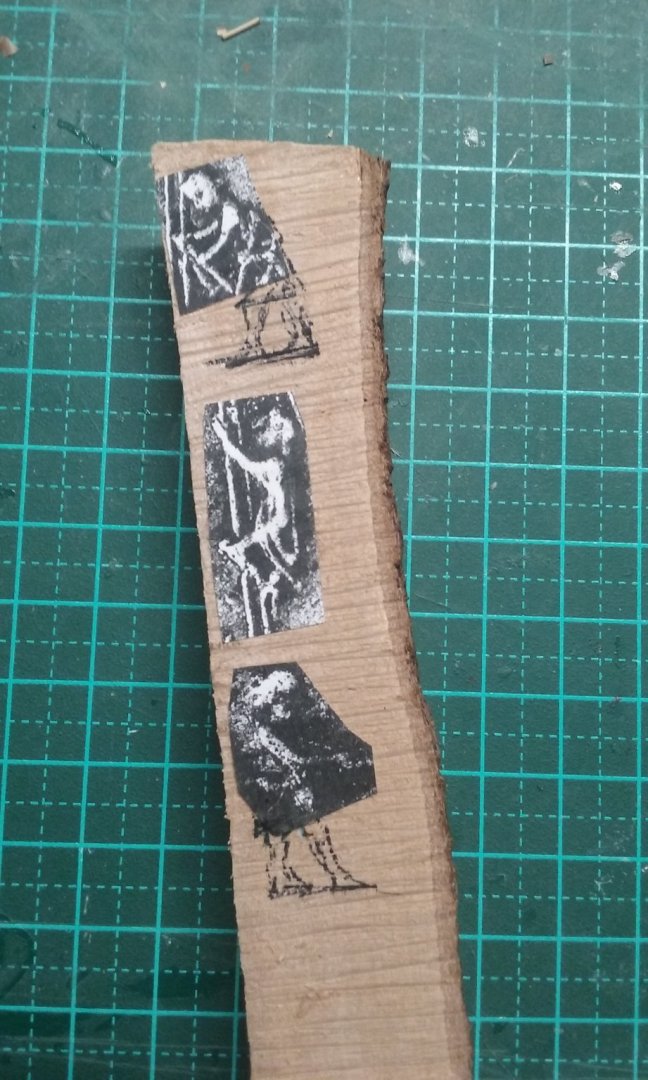
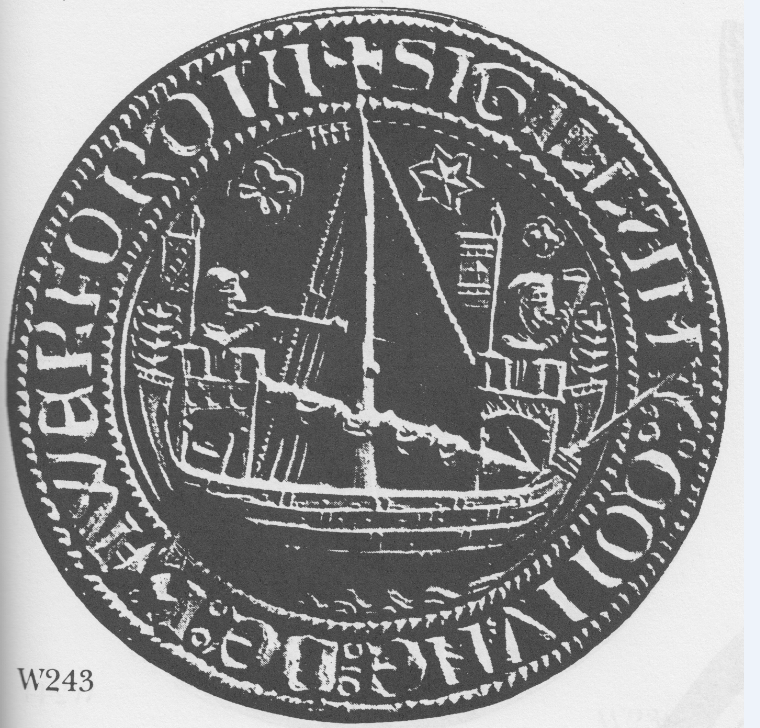
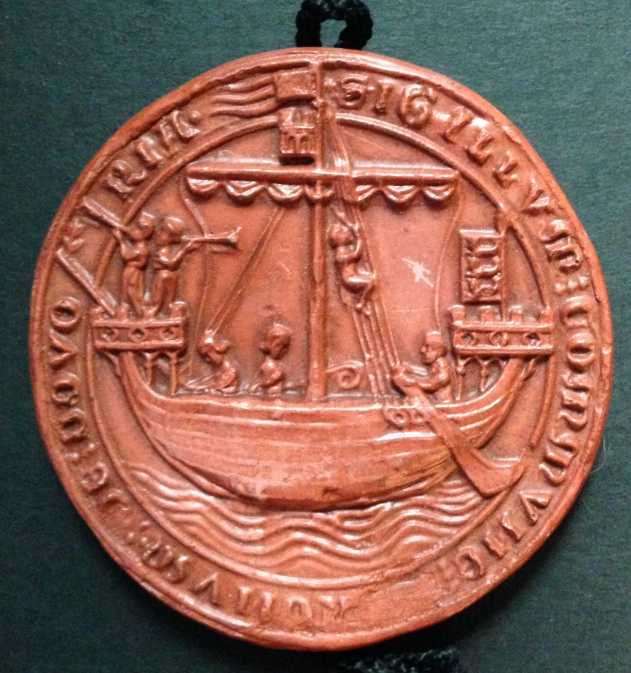
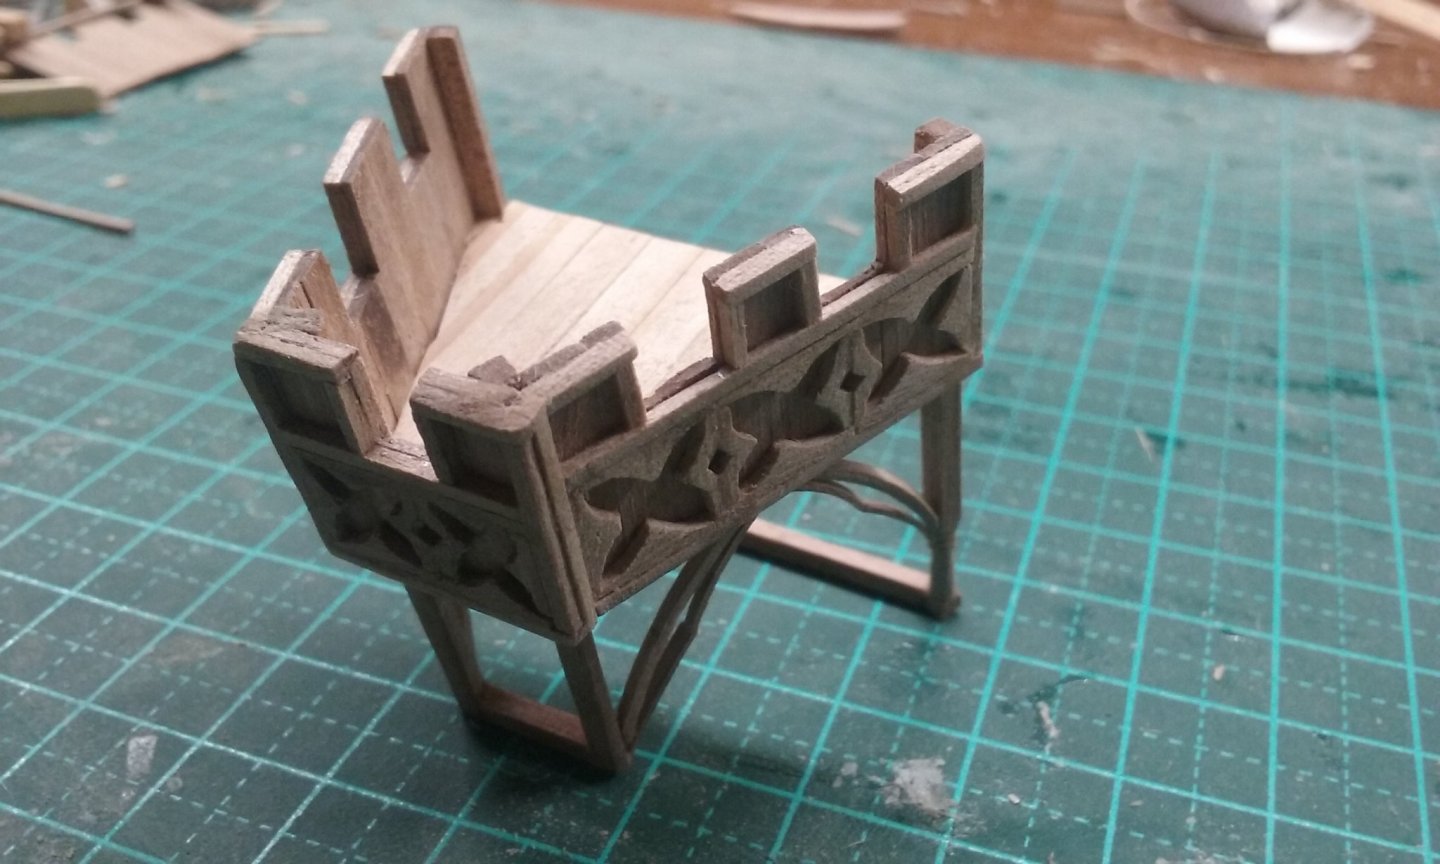
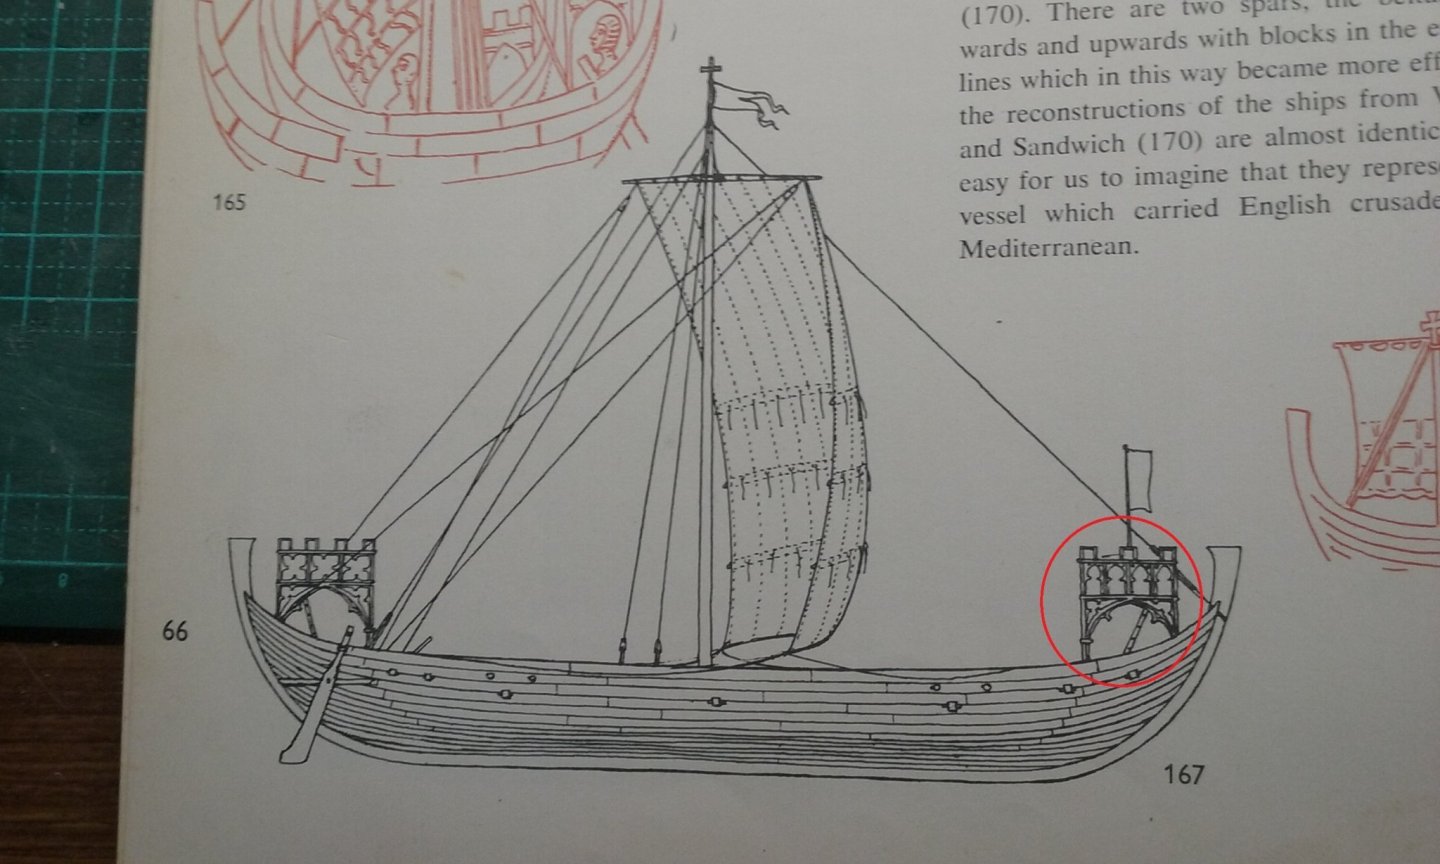
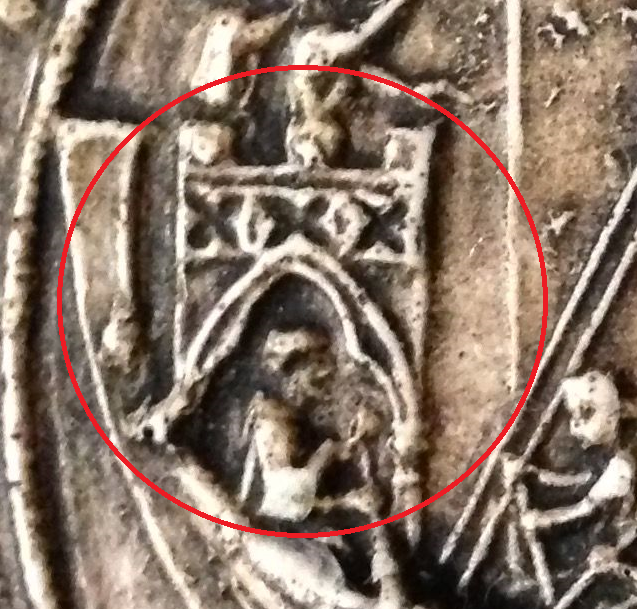
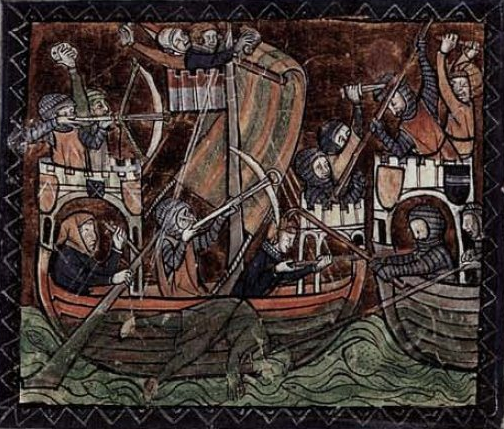
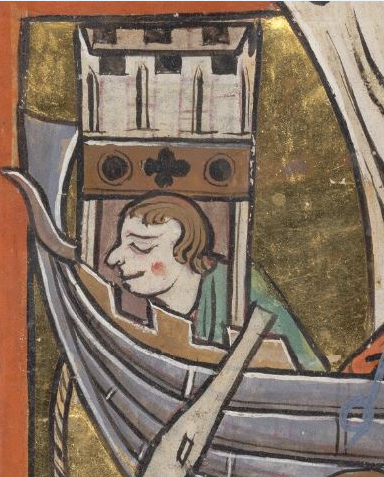
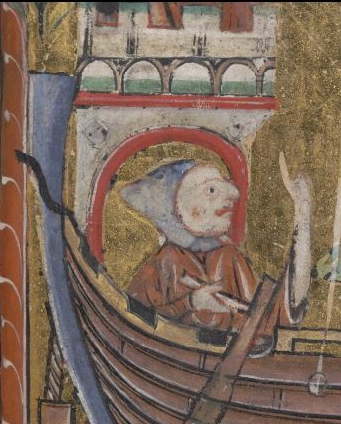
Thanks everybody for the likes and comments. I must say I'm pretty pleased with what I've done with the aftercastle. I think it's the best marquetry I've ever done, and I've found myself becoming more careful and painstaking in this build than in previous ones - while, strangely, getting more progress in a shorter time than before. While researching what flags I should be putting on the model (as on the town seal shows them blank), I just came across a fascinating document on the Net relating to the port of Winchelsea itself - https://www.winchelsea.com/wp-content/uploads/2016/07/WinchelseaTown.pdf Among other things it indicates that the original port of Winchelsea had risen to prosperity in about 1200 with extensive fisheries, shipbuilding, royal dockyards, extensive salt pans and overseas trade, and was regarded as in the second rank of ports, behind only London and Southampton. But by the time this seal was made in 1274 the old town was in its last days. A series of violent storms occurred throughout the 13th century and the sea encroached further and further, eroding the harbour defences. By 1280 the town was described as "for the most part submerged by the sea". And then in 1287-88 three great storms occurred within the space of 14 months, effectively completing the work of destruction. But by that time the old town had been abandoned in favour of a new one on the high ground overlooking the old port, under the auspices of King Edward I who provided land and finance to build the new town. I also discovered that though the town had been granted by Canute in 1017 to the abbey of Fécamp in France, it was taken back by Henry II in 1247, along with the nearby port of Rye, as "it was undesirable at that time to allow the French to have the command of two English ports." So in 1274 it was a royal possession, which is probably why on the town seal bears a shield with the three royal "lions passant gardant". Further, "by 1190 [Winchelsea and Rye] had joined the association of Cinque Ports" (a group of ports on the South cast of England charged with coastal defence), so the ship would be entitled to fly the Cinque Ports banner. So, that pretty much covers my question regarding the flags to be flown. The seal shows one at the forecastle and one at the masthead. I'm still figuring whether to put the banner at the forecastle in the very centre of the forecastle as shown on the seal. Doesn't seem to make a lot of sense - wouldn't it get in everyone's way? Checking other town seals I find that though some have their banner at the edge of the castle, Haverford West town seal Sandwich town seal quite a few others have them in the centre, Dover town seal Dunwich town seal so it looks like that's the way I'll have to go, even though it seems a bit dumb. I also have some thinking to do - was a ship entitled to fly the royal flag if the sovereign was not on board? I dunno, but probably not. Steven

-
This is looking very good, Phil. I'm glad you're going to be checking a more reliable source than Osprey. I'm loving your research process. This is becoming a very interesting project indeed. Nice that you're allowing yourself the time for it while you're finishing your Victory. It means there's no real rush and you can take the time to dot all the I's and cross all the T's before you actually start building. Steven
-
I know this is a very old thread, but I just came across this, which I found very interesting. Quite a different build technique from a Waka, and using modern tools of course, but nonetheless fascinating. https://www.facebook.com/DIYCraftsTV/videos/970100217184642/ Steven
-
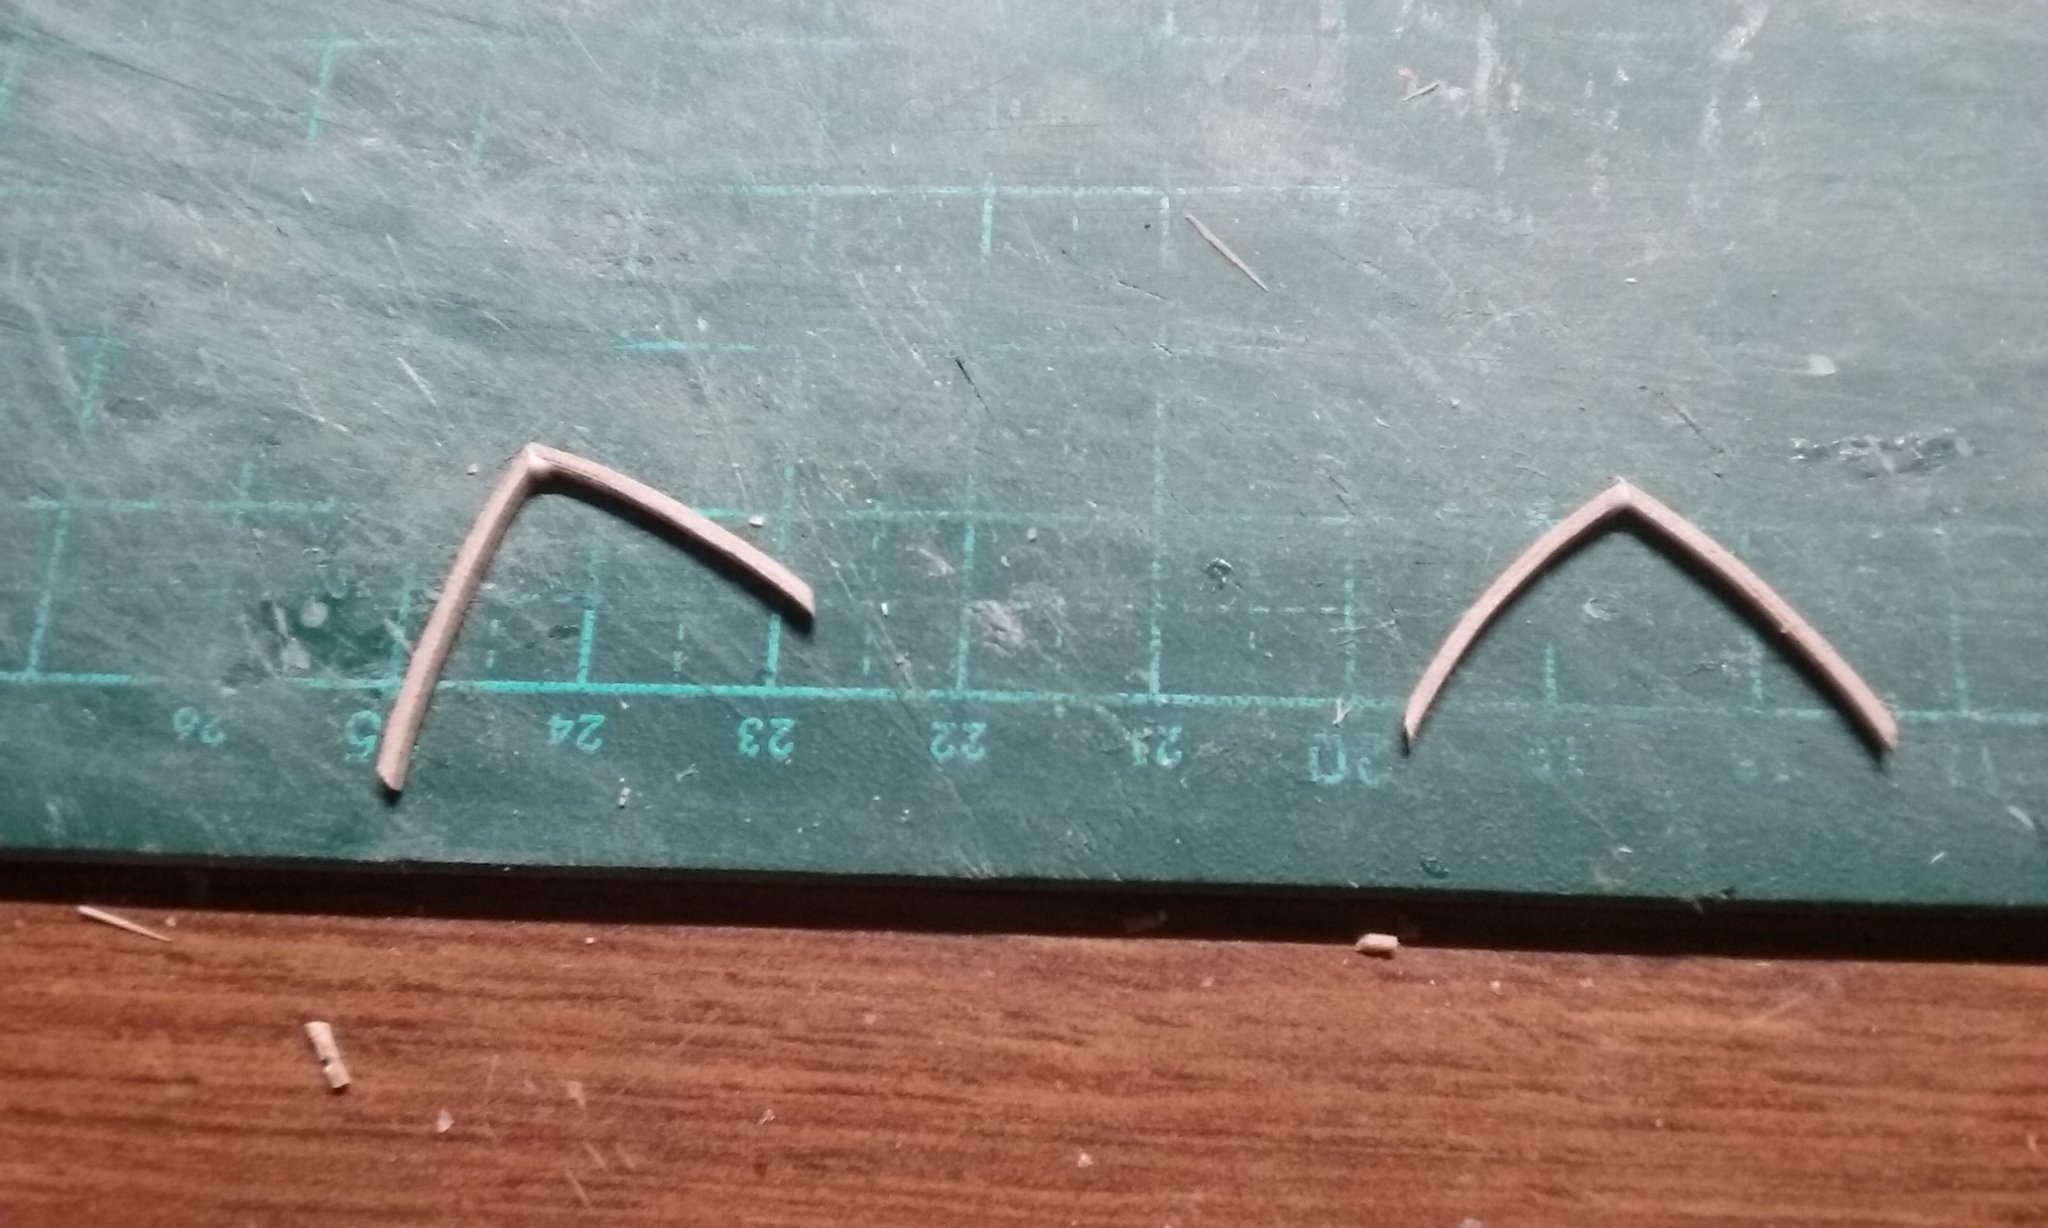
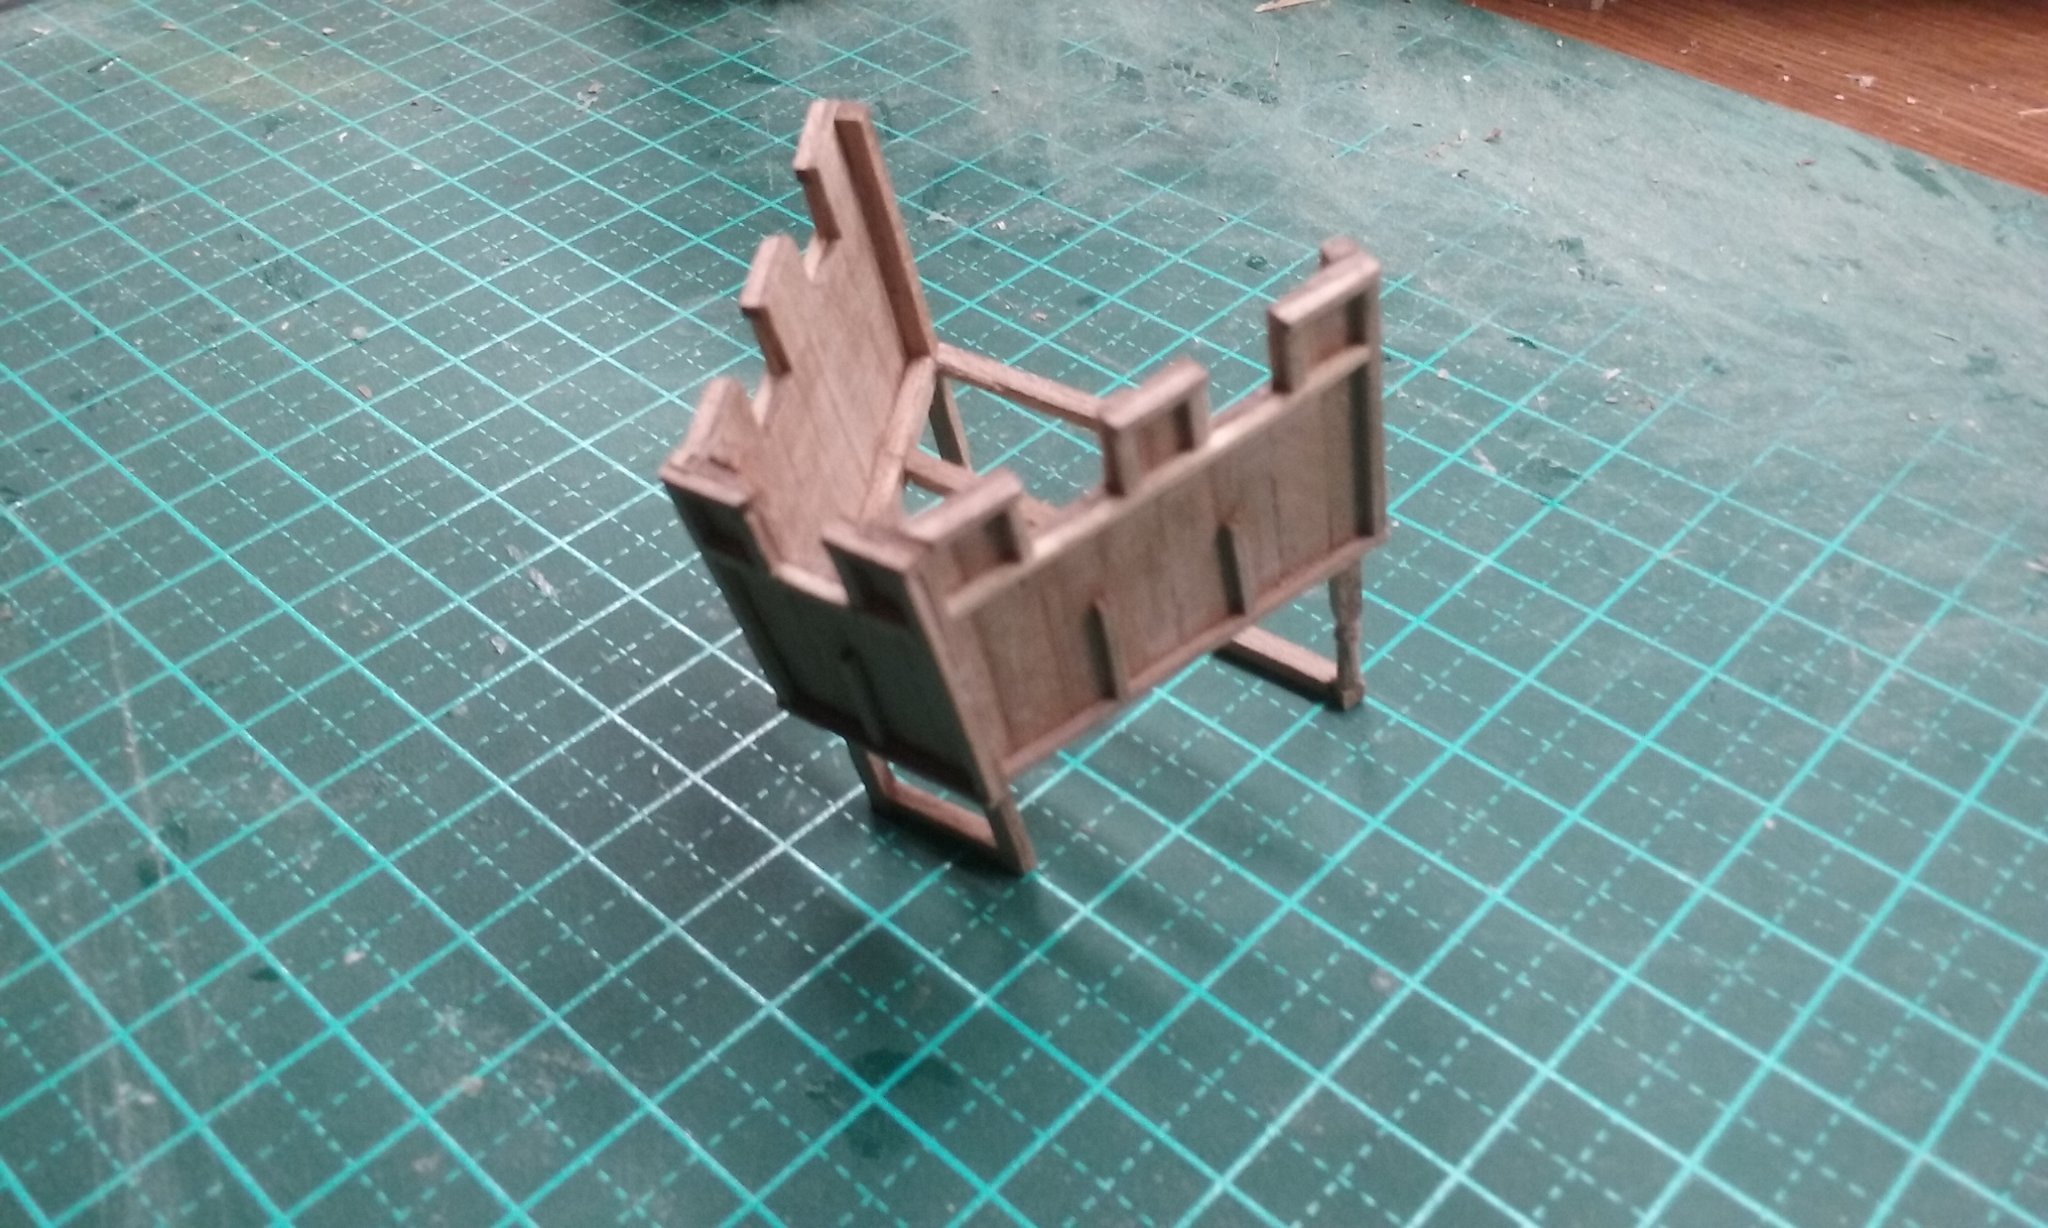
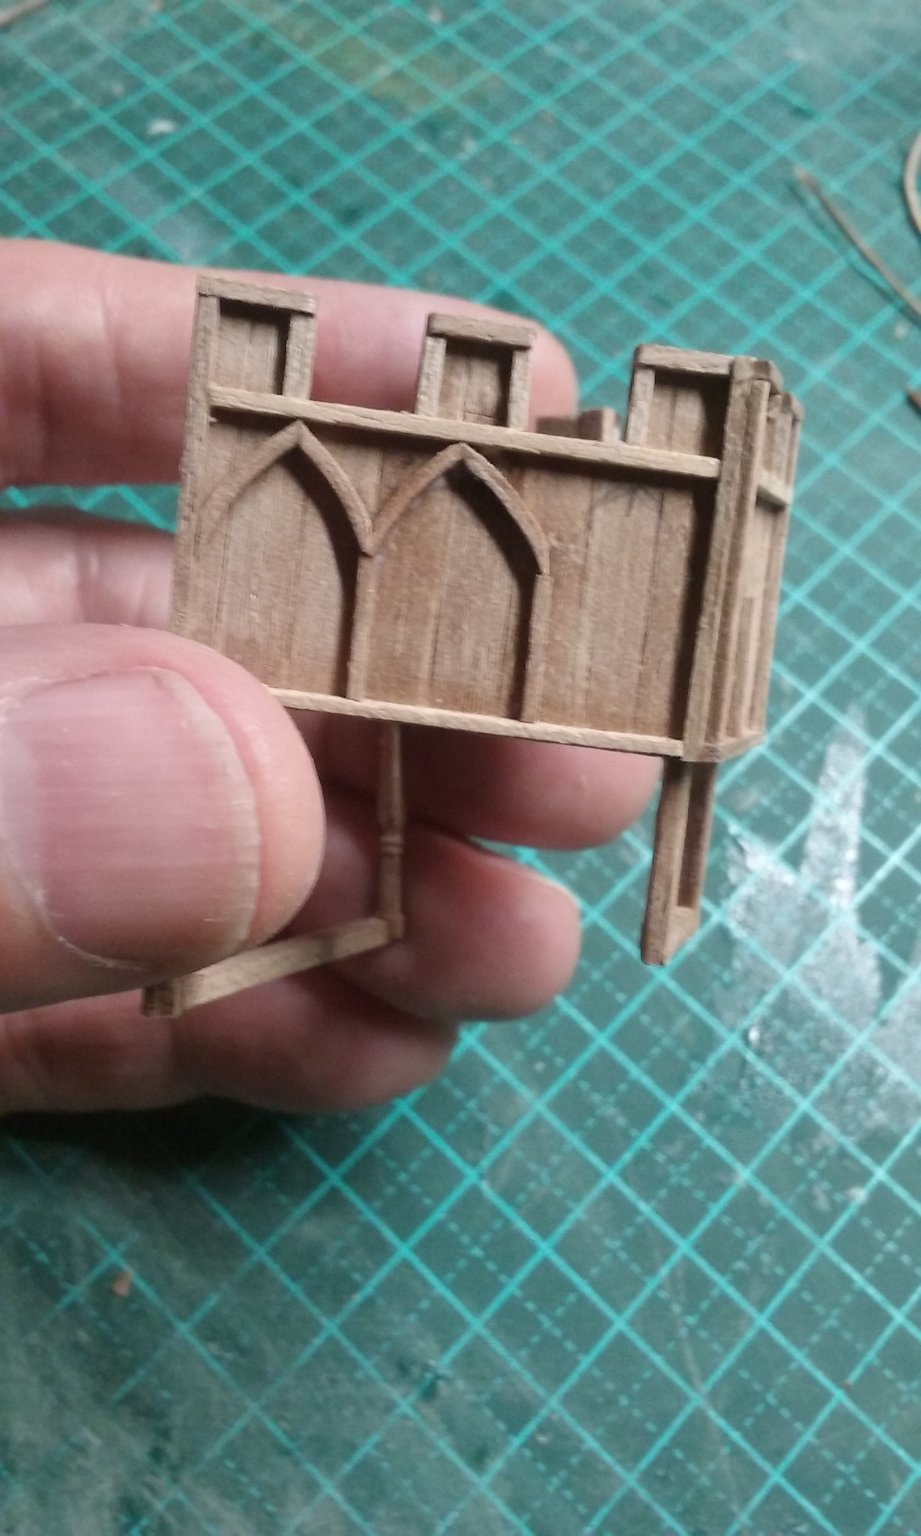
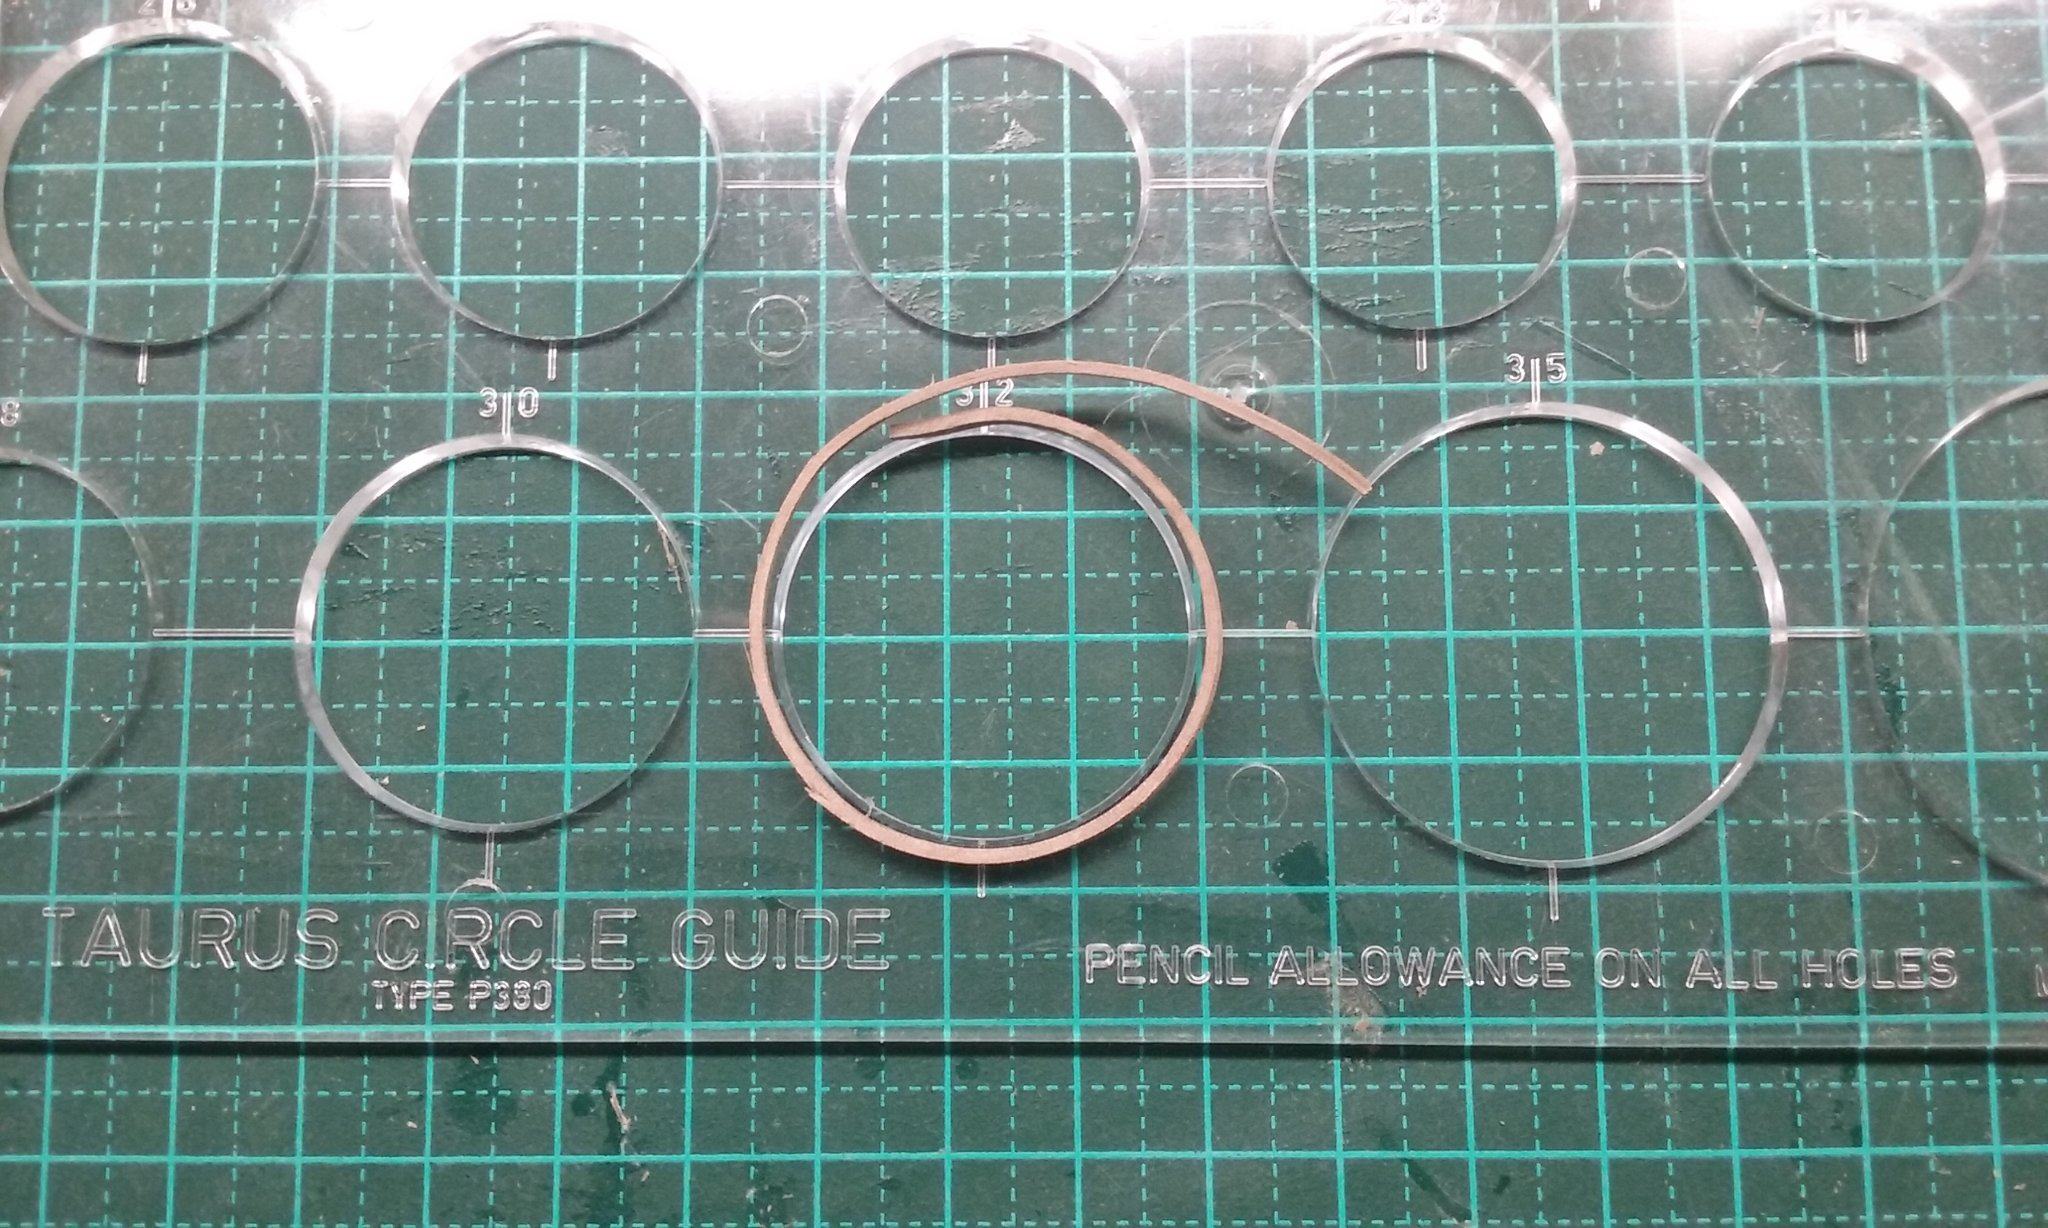
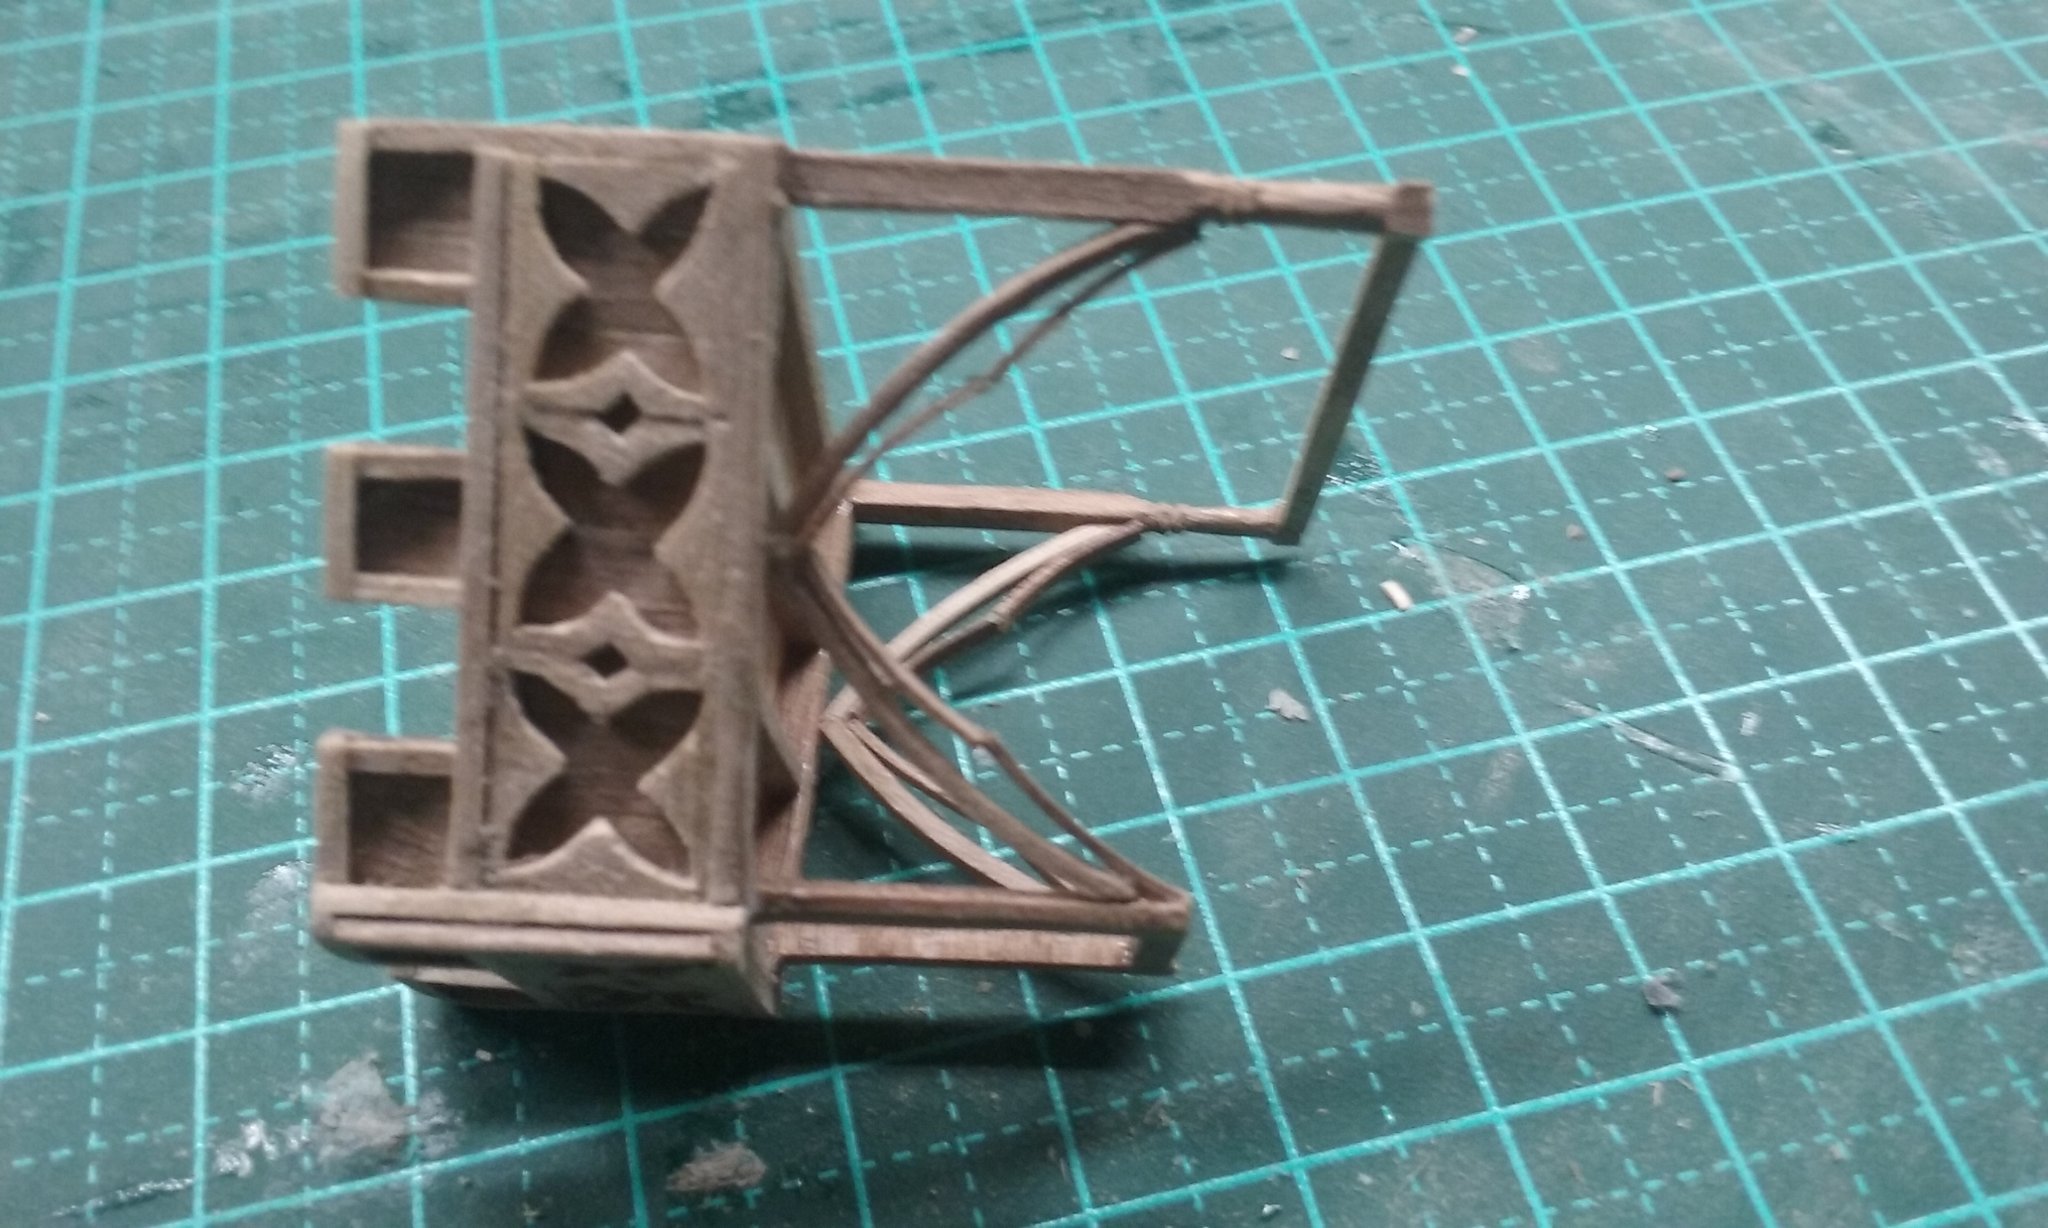
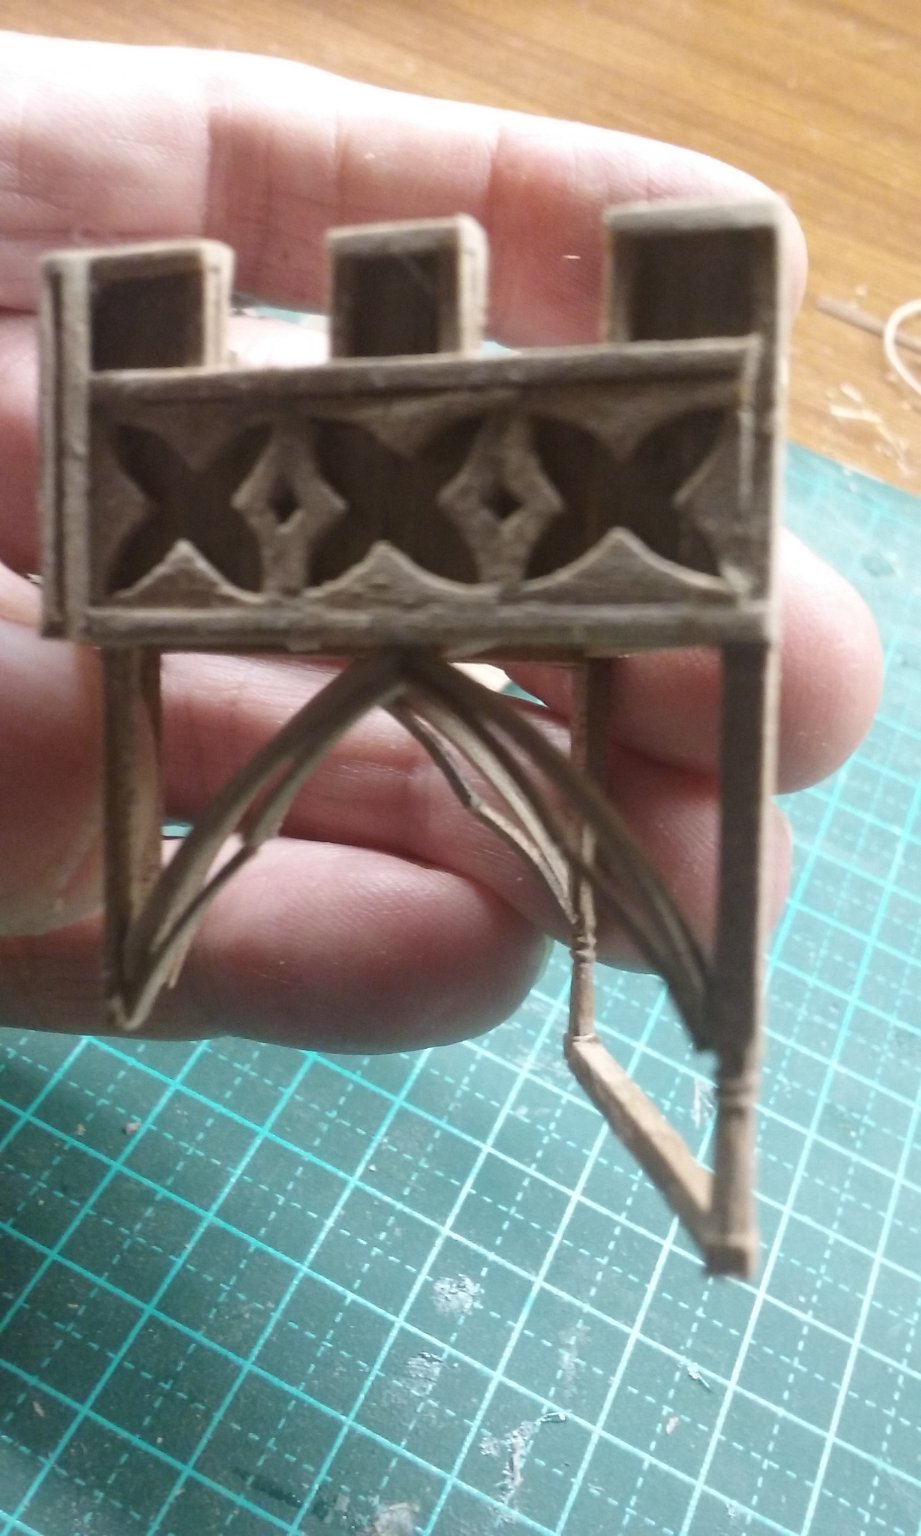
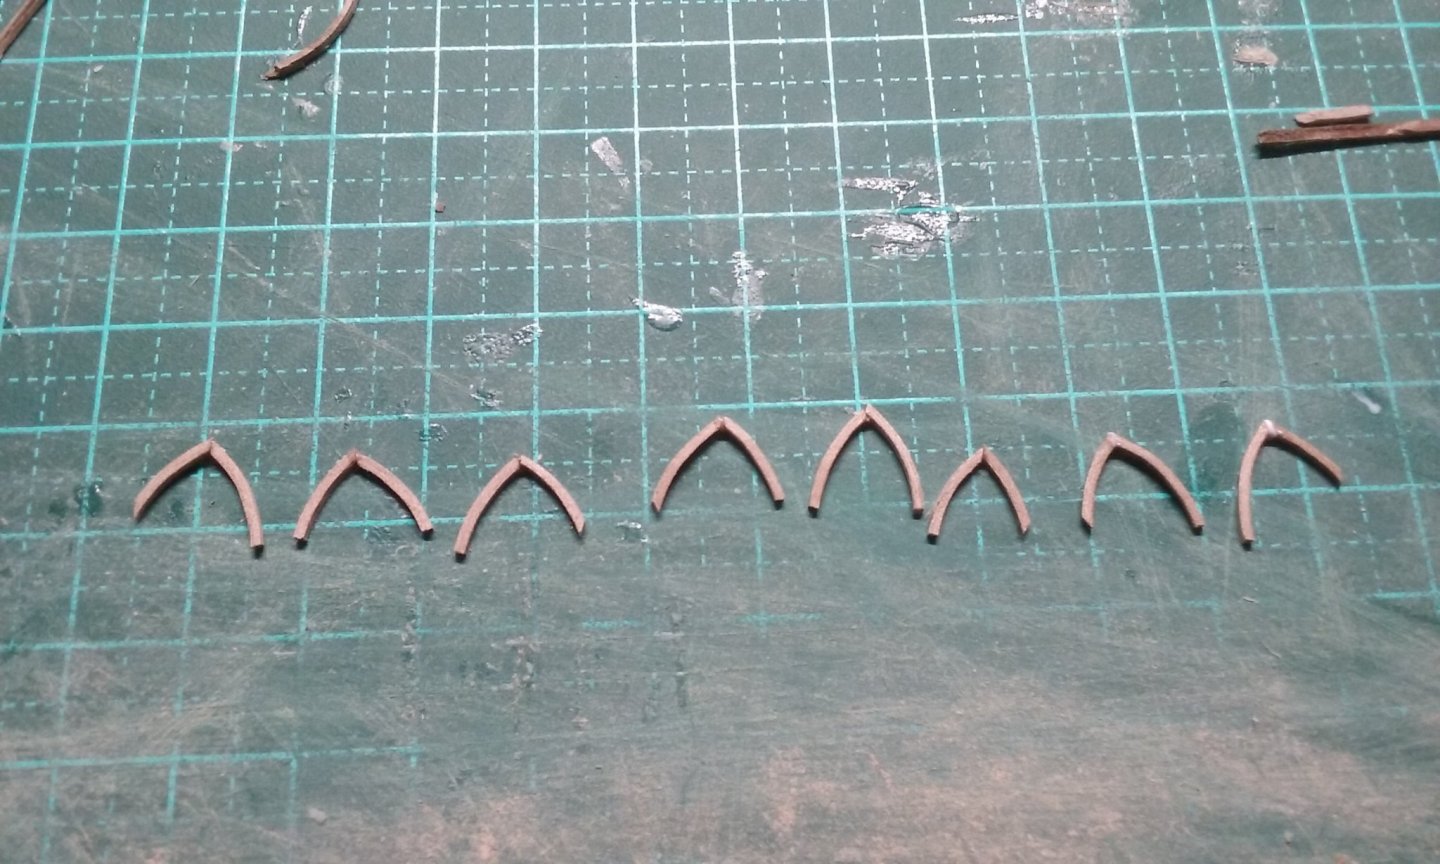
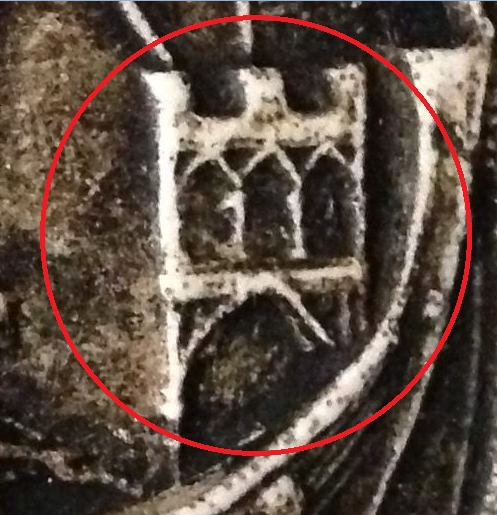
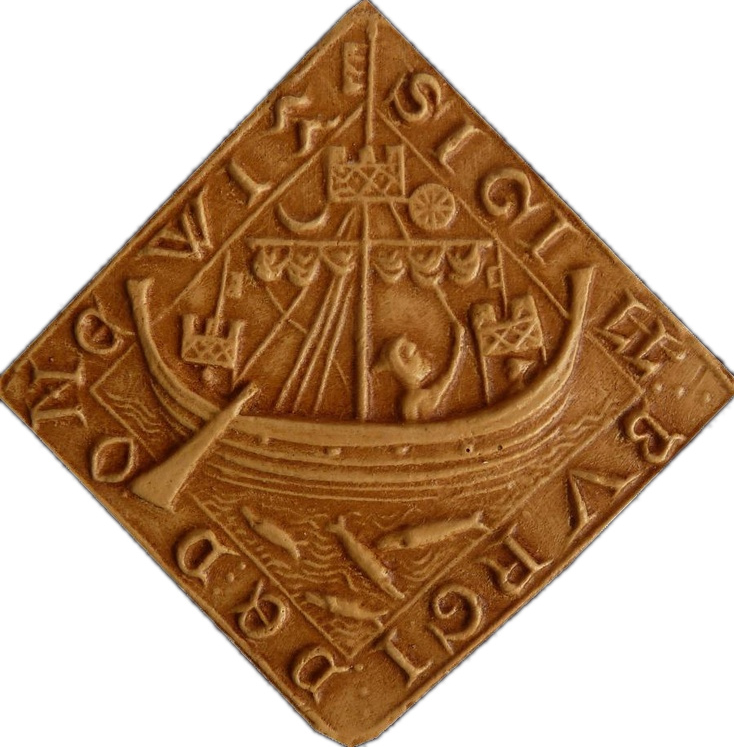
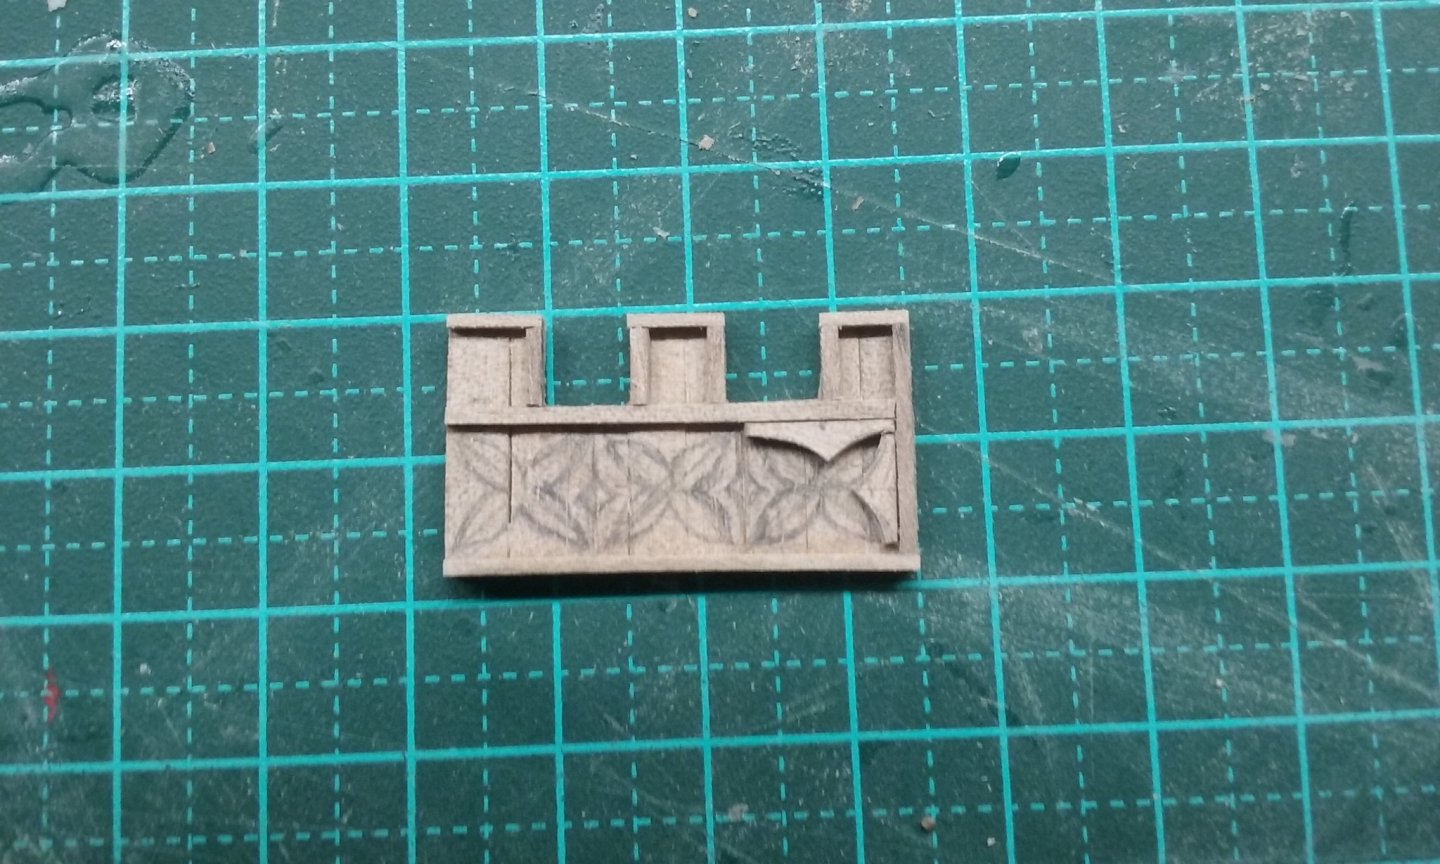
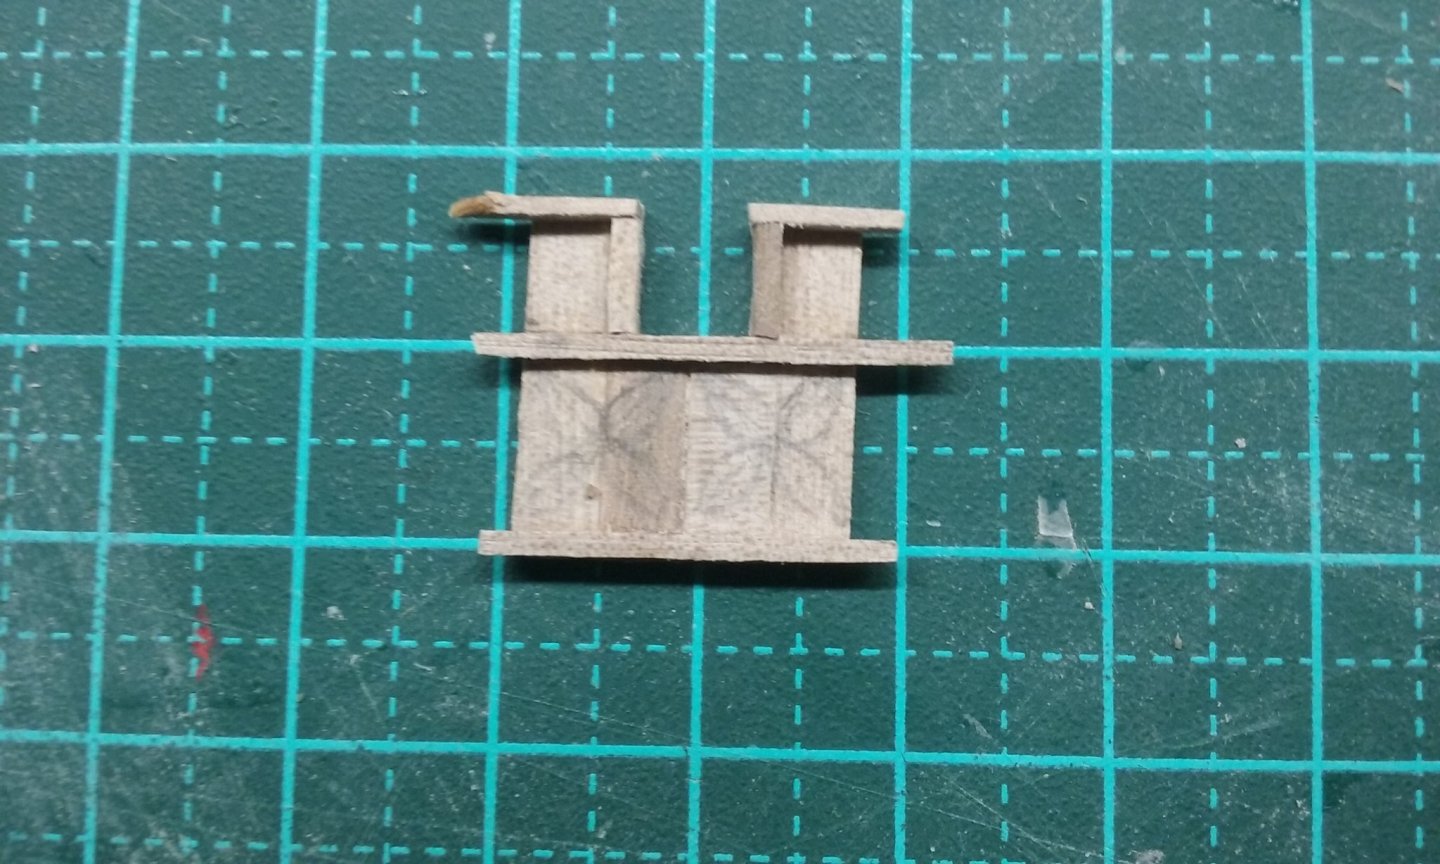
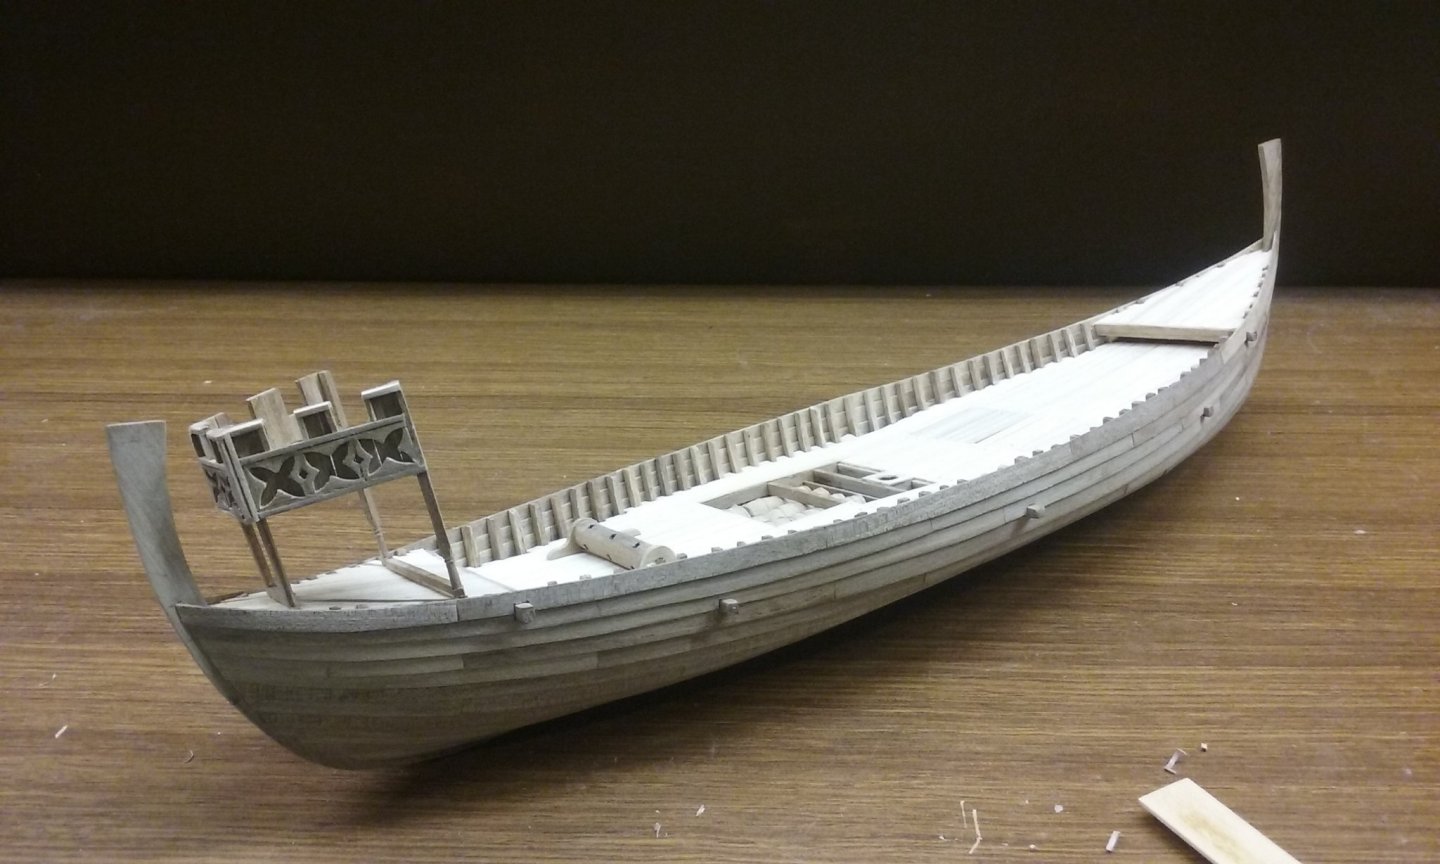
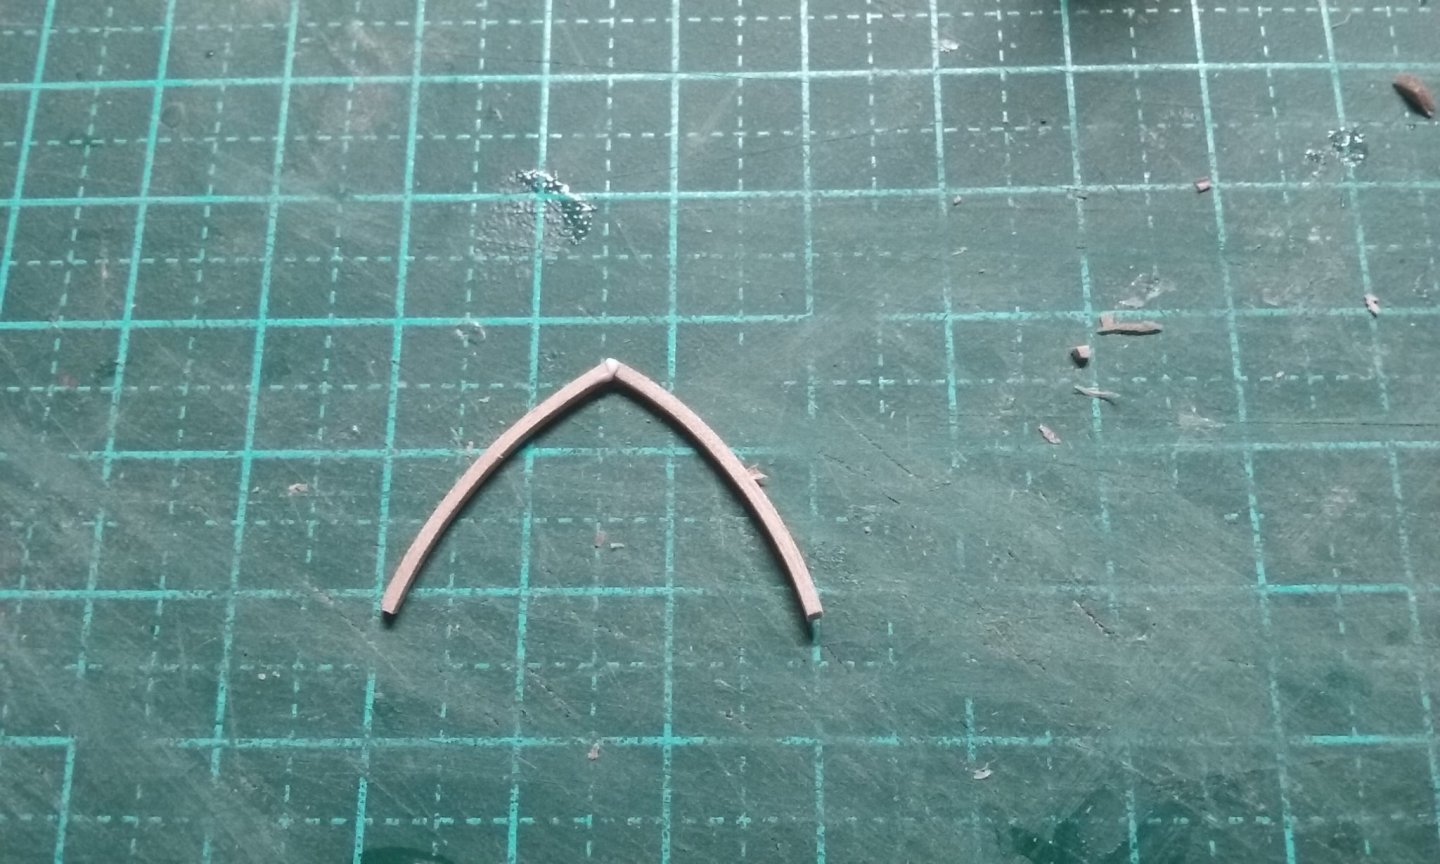
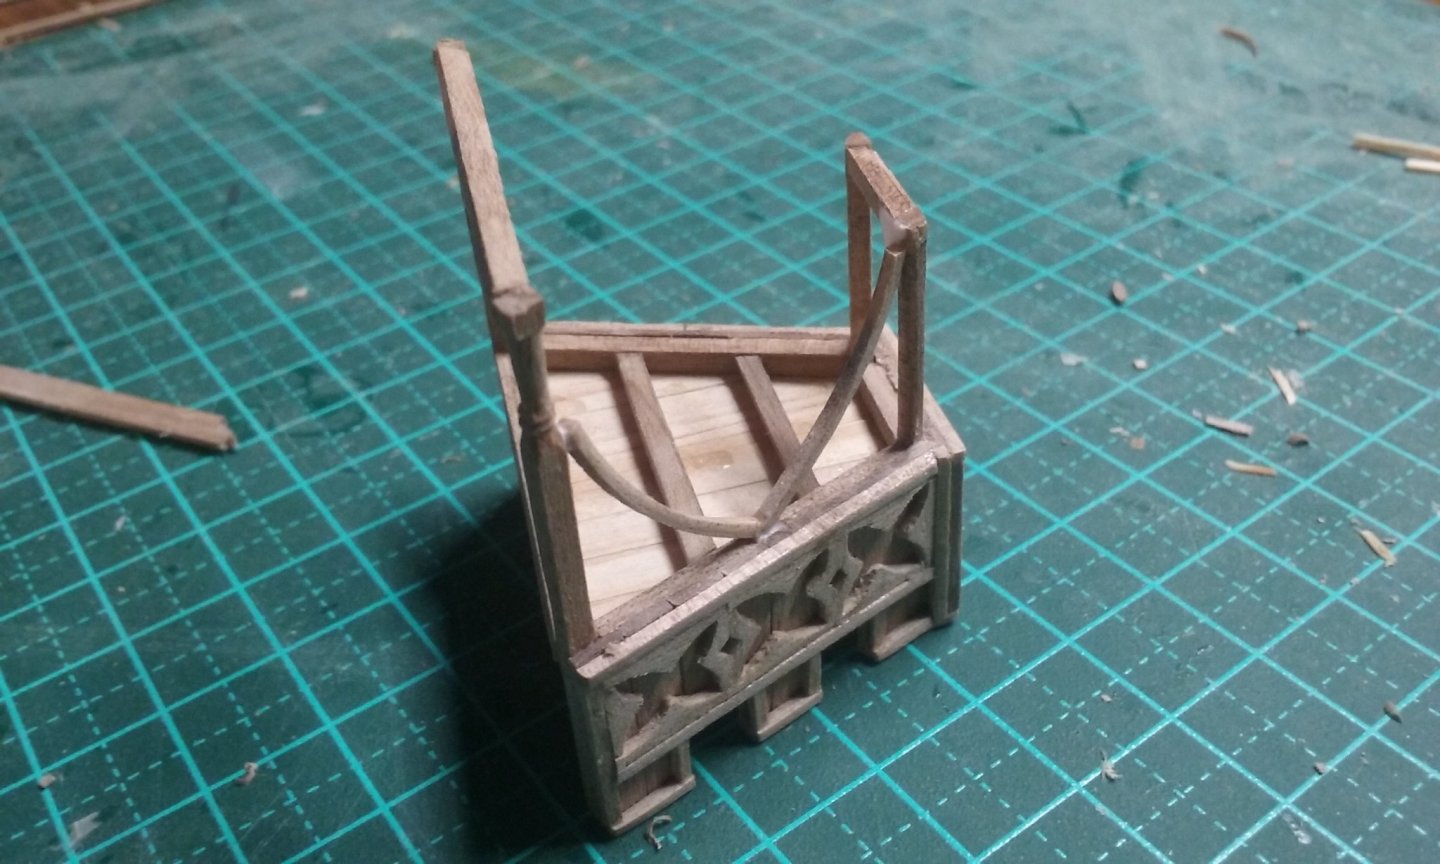
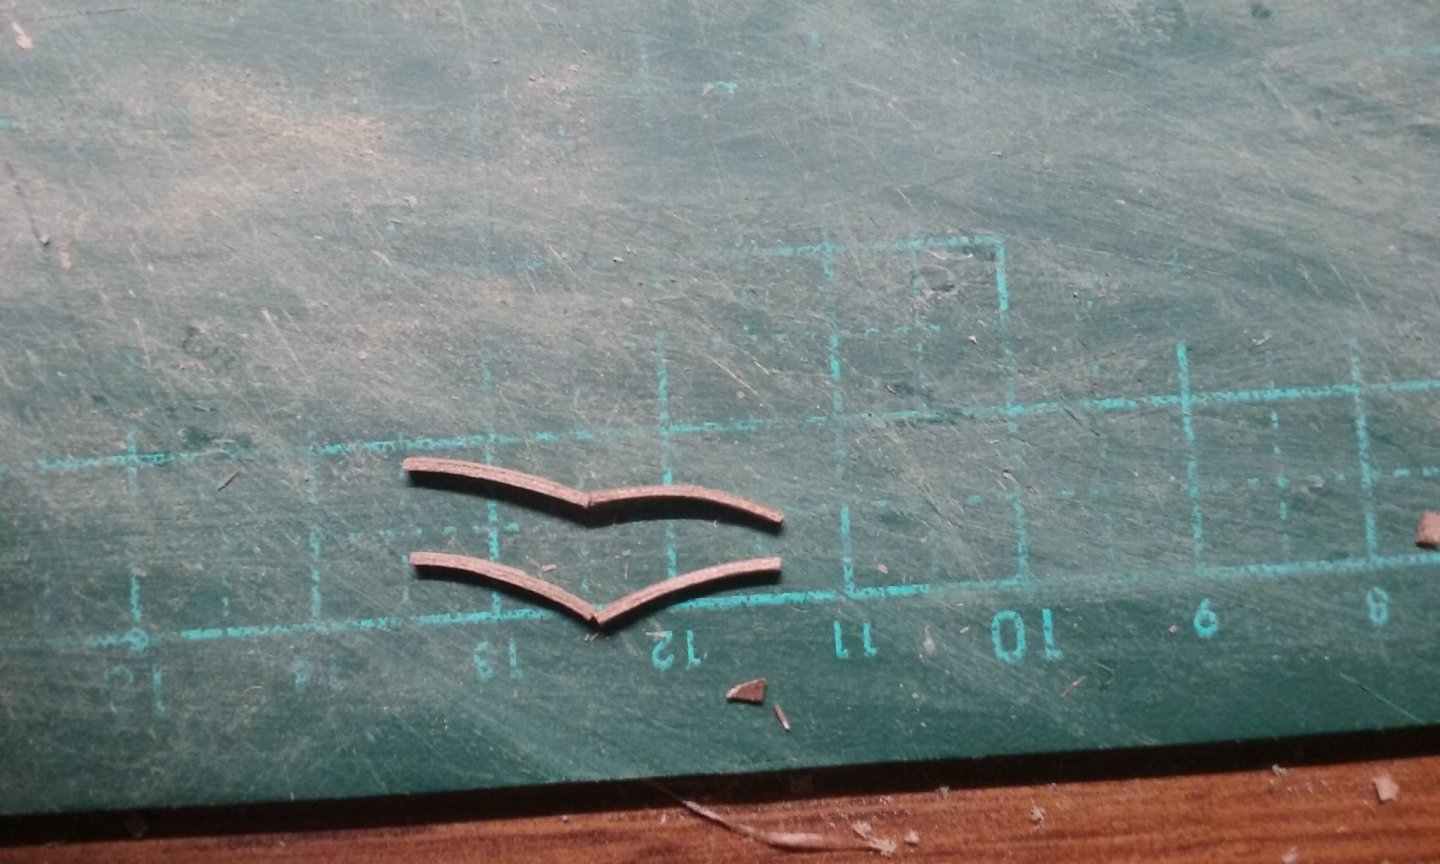
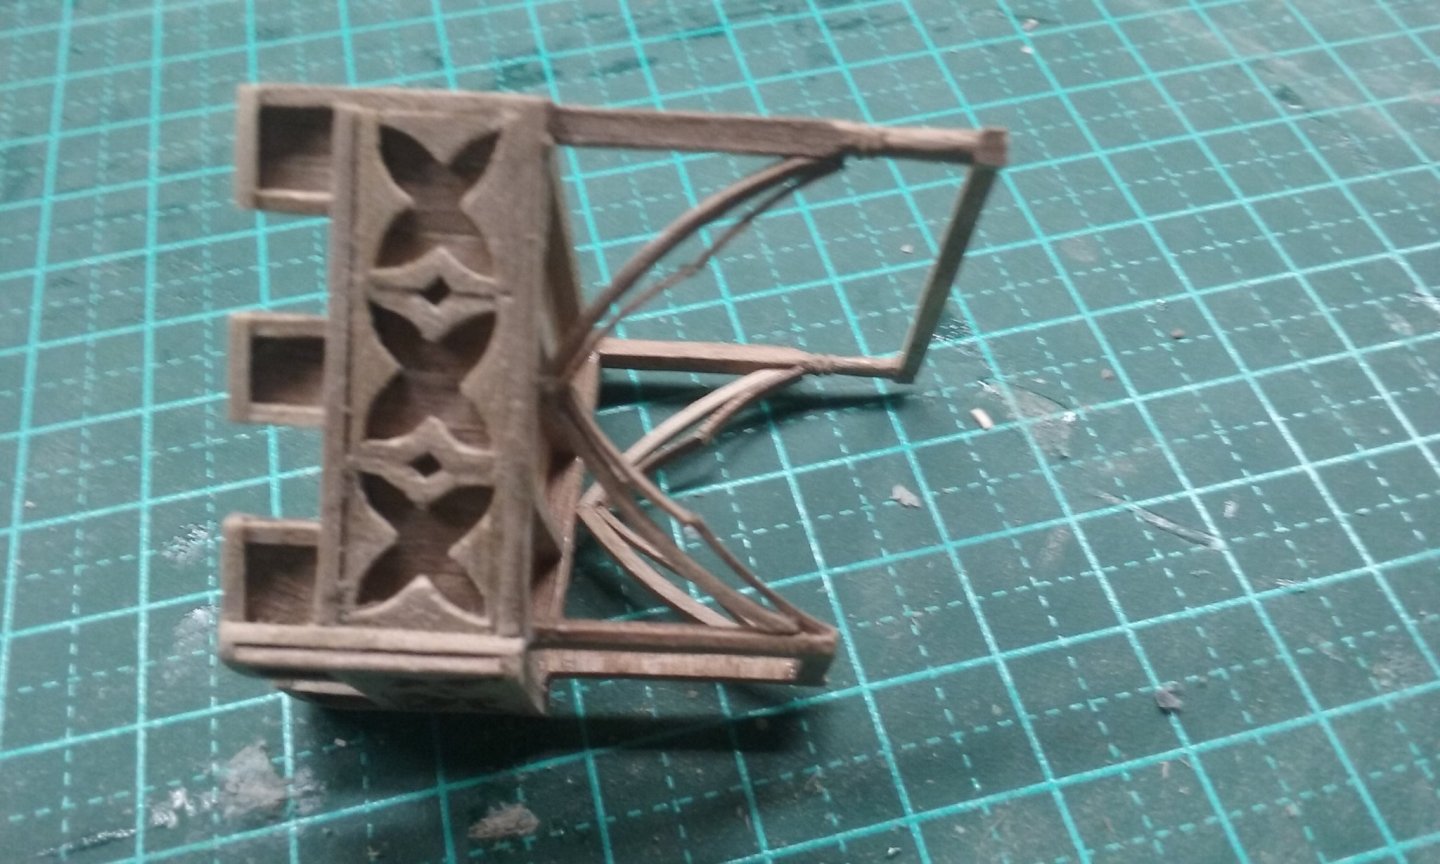
Well, fun and games. I've added the decoration to the aftercastle. Took a long time and some patience, but I think it was worth it. There are three quatrefoils (four-petalled flowers) along each side plus a rather complex pointed arch beneath. So I had to figure out how to make them. These decorations were usually inset rather than standing proud of the background, so after a bit of thought a series of cusped triangles in the "negative space" seemed to be the best way to go. So we go from this to this The decoration would probably extend around the front, so I extrapolated the pattern to take this into account. And then onto the arch. Using my trusty soldering iron as a heat source, I bent strips of wood in a circle to make the arcs for the main body of the arch. That's a 32mm (1.25 inch) diameter circle. That soldering iron is amazing. Here's the beginning of the arch. And in place: I had to do a little adjusting where the arch met the uprights to get it to sit more smoothly (not photographed). And then the really fiddly bit. There is a complex secondary arch shown on the Winchelsea town seal: So I had to get thinner strips of wood and curve and cut them to shape. Quite a lot of trial and error involved to get it all to fit and look right. And le voila! The castle dry fitted in place. I have yet to choose a colour scheme. The only coloured pictures from the time show these castles as often being brightly coloured, but with a base of white. Next we get onto the forecastle. I had been merrily just making a duplicate of the aftercastle till I took a good look at the Winchelsea seal again. It appears that though they both come up to the same height, the fore "castle" is deeper than the aftercastle. Landström obviously noticed this discrepancy and thought about it. His solution was to make the fore "castle" the same depth as the after "castle", but to keep the proportions right, he increased the number of decorative arches on the "walls" from three to four. That's certainly a possible solution and I did consider it, but though most ships with two castles depicted on seals have them the same depth, the ship on the far left of the three coloured pictures above has castles of uneven heights. The height under the aftercastle is "fixed" by having to allow headroom for the helmsman, but this isn't the case with the forecastle. And I checked the height of the castle "walls" if its floor was lower. Allowing for a 1.65 metre (5'6") crewman, the top of the merlons ("battlements") was high enough to hide behind, while the embrasures (openings) were deep enough for someone to look out and shoot a weapon. Which is the whole point of battlements, isn't it? So with tears in my eyes (to misquote Arlo Guthrie) I took out the deck substructure I'd put in with such care and attention and moved it downward. And I discarded the walls I'd made for the forecastle and made new ones. Here's a sample just starting out. Will the walls work out? Can Steven make beautiful decorations for the forecastle to match the ones aft? Will tall thin Jones be able to rescue Sweet Sue from Salty Sam? Tune in for our next exciting instalment. Steven


- 327 replies
-
- 14
-
-
I have found Osprey books to be unreliable. If you can get a better source it would be good. Steven
-
Interesting article on wreck of "Gribshunden"
Louie da fly replied to Ian_Grant's topic in Nautical/Naval History
Thanks very much for this. The most comprehensive information I've seen so far. Very useful for us carrack freaks. There have been several threads which mention the Gribshunden, mostly in passing. I found them by typing in the word "Gribshunden" into the search function. Steven -
Just add my vote to the hope that you'll be able to pick up tools again soon. It's a very interesting build, with the family connection making it even more fascinating. Steven
-
Thanks everybody, and thanks Druxey, though I sort of feel they're more a triumph of patience over lack of planning . . . But I think the structure is much closer to what would have been done back in the day than the ones I did on the dromon, which were very heavily influenced by my experience as a building designer in modern light timber (stud) framing. Once the castles themselves are clad, I'll have to work out a means of doing the decorative woodwork, as seen in the second-last pic of my previous post. I've had a few ideas and I'll just have to see how well they work - or if they work at all. Steven