Louie da fly
-
Posts
7,989 -
Joined
-
Last visited
Content Type
Profiles
Forums
Gallery
Events
Everything posted by Louie da fly
-
 (See my recent post regarding the mast step for the nef I'm currently building. First result pretty bad - second one, totally ok) Steven
- 17 replies
-
- 2
-

-
- windlass
- Dutch model
- (and 2 more)
-
Nice to see the de Lorean - must have attained 88 m.p.h. to have got there. Sailing ships were still in fairly common use before (and even during) the second world war, so it should all work nicely. Steven
-
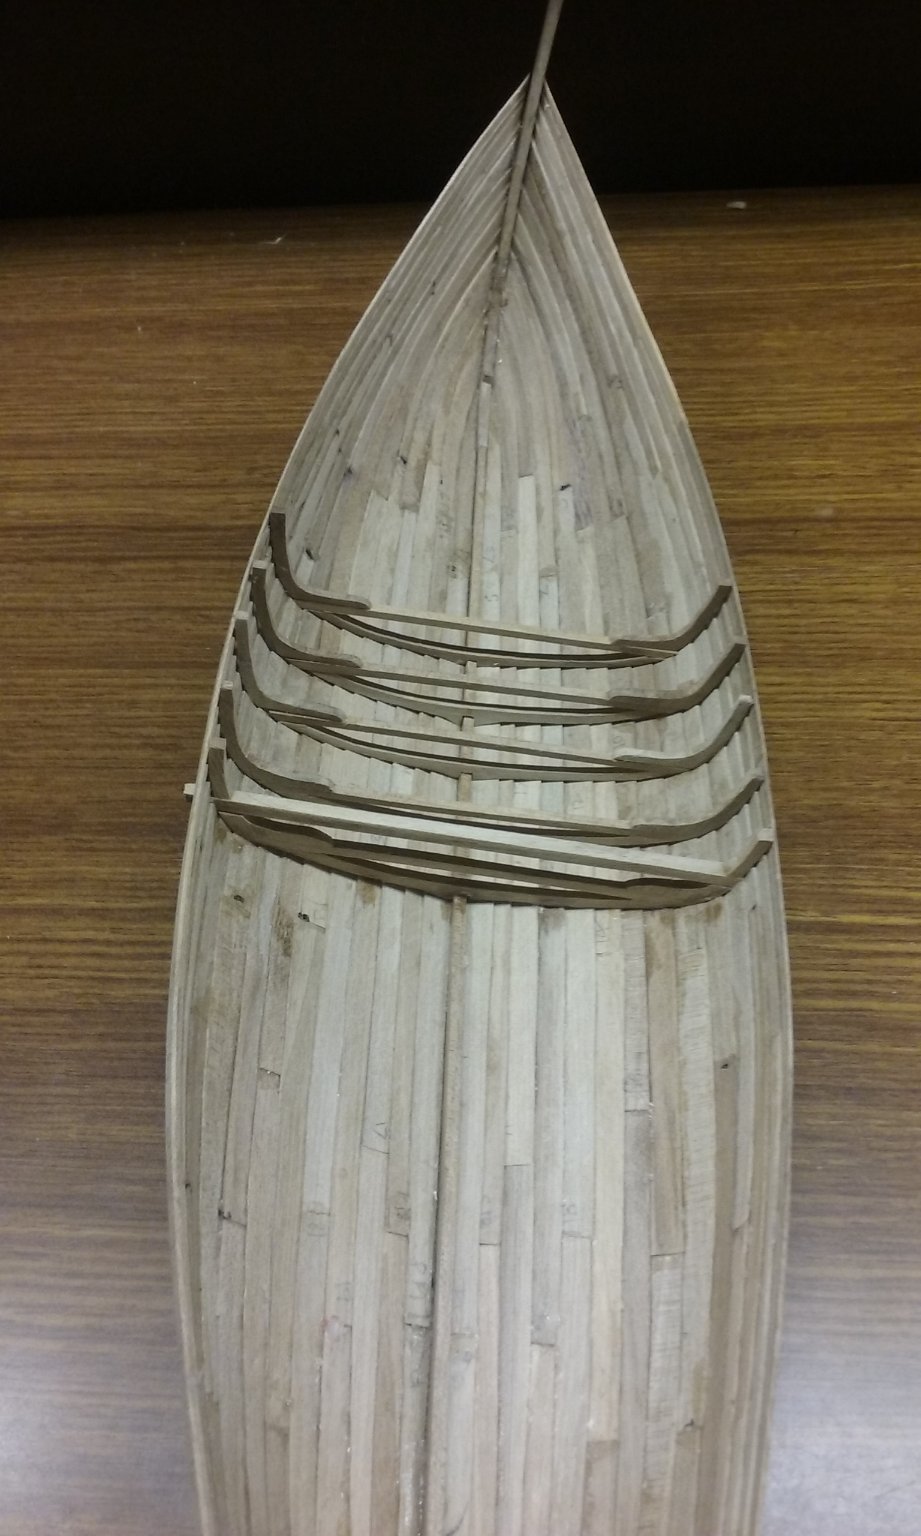
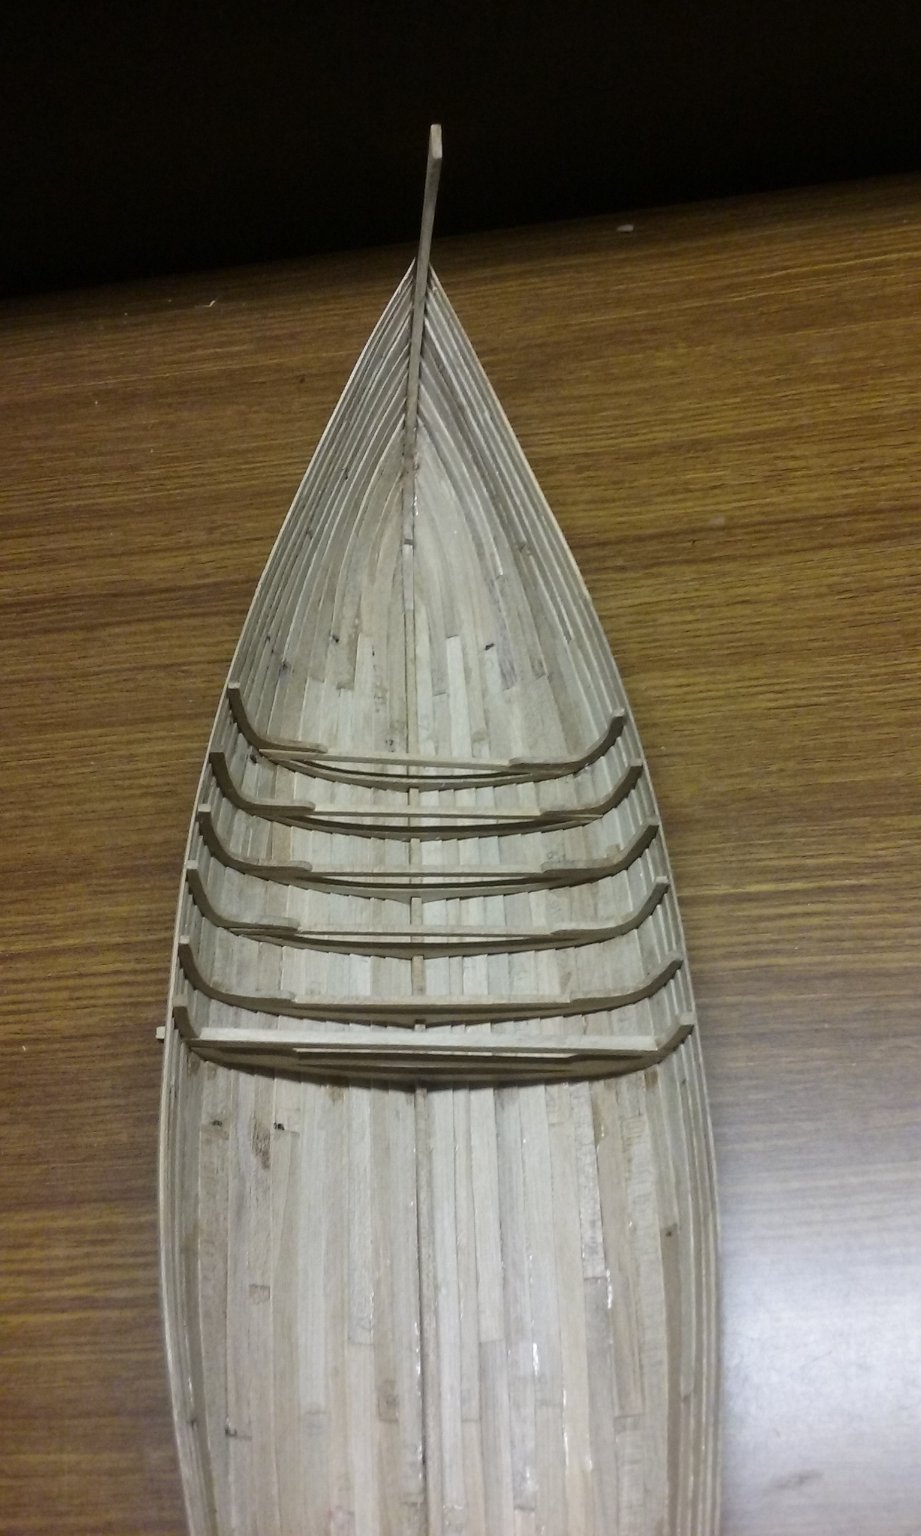
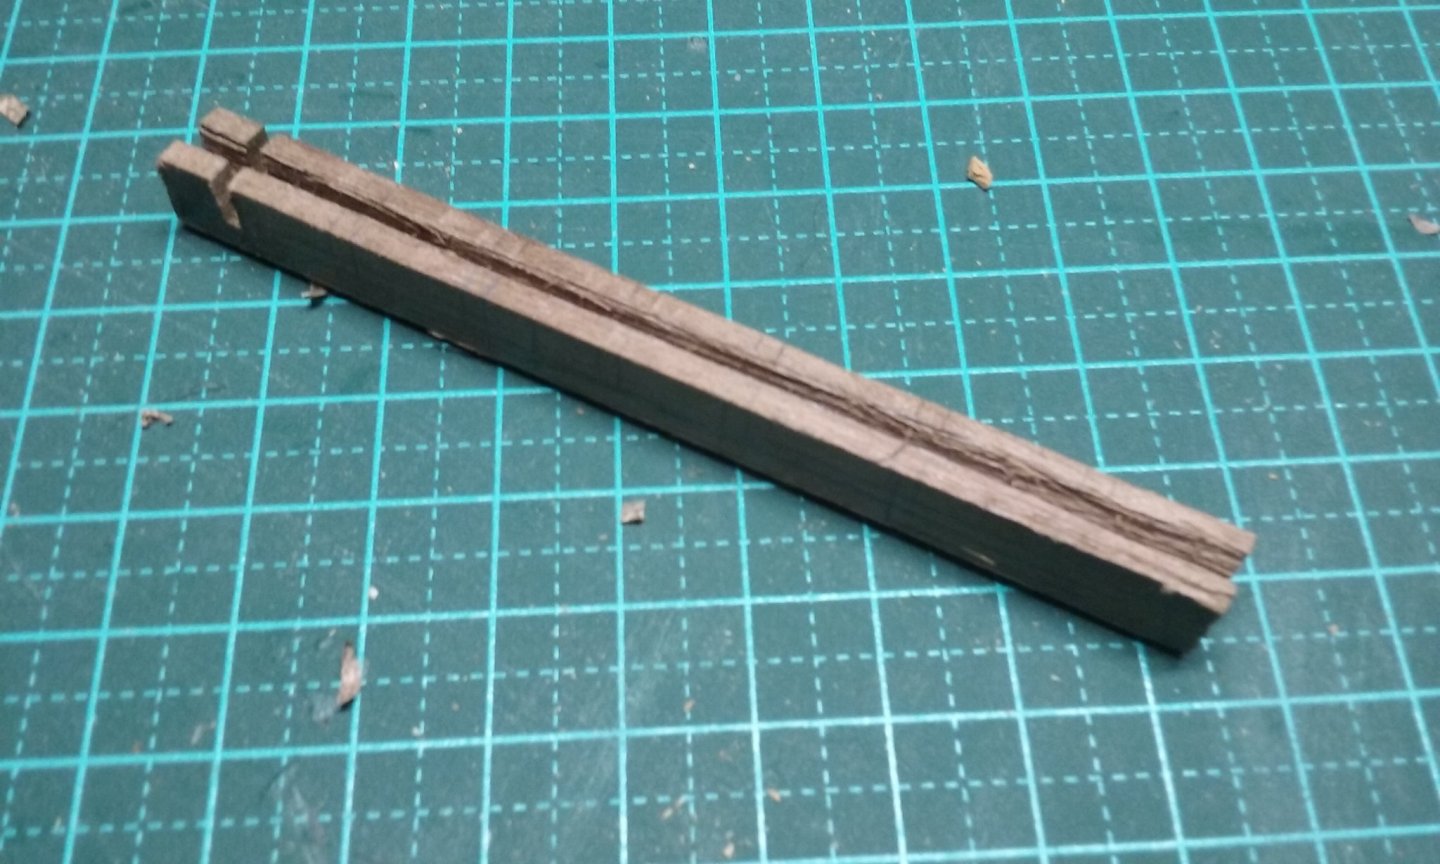
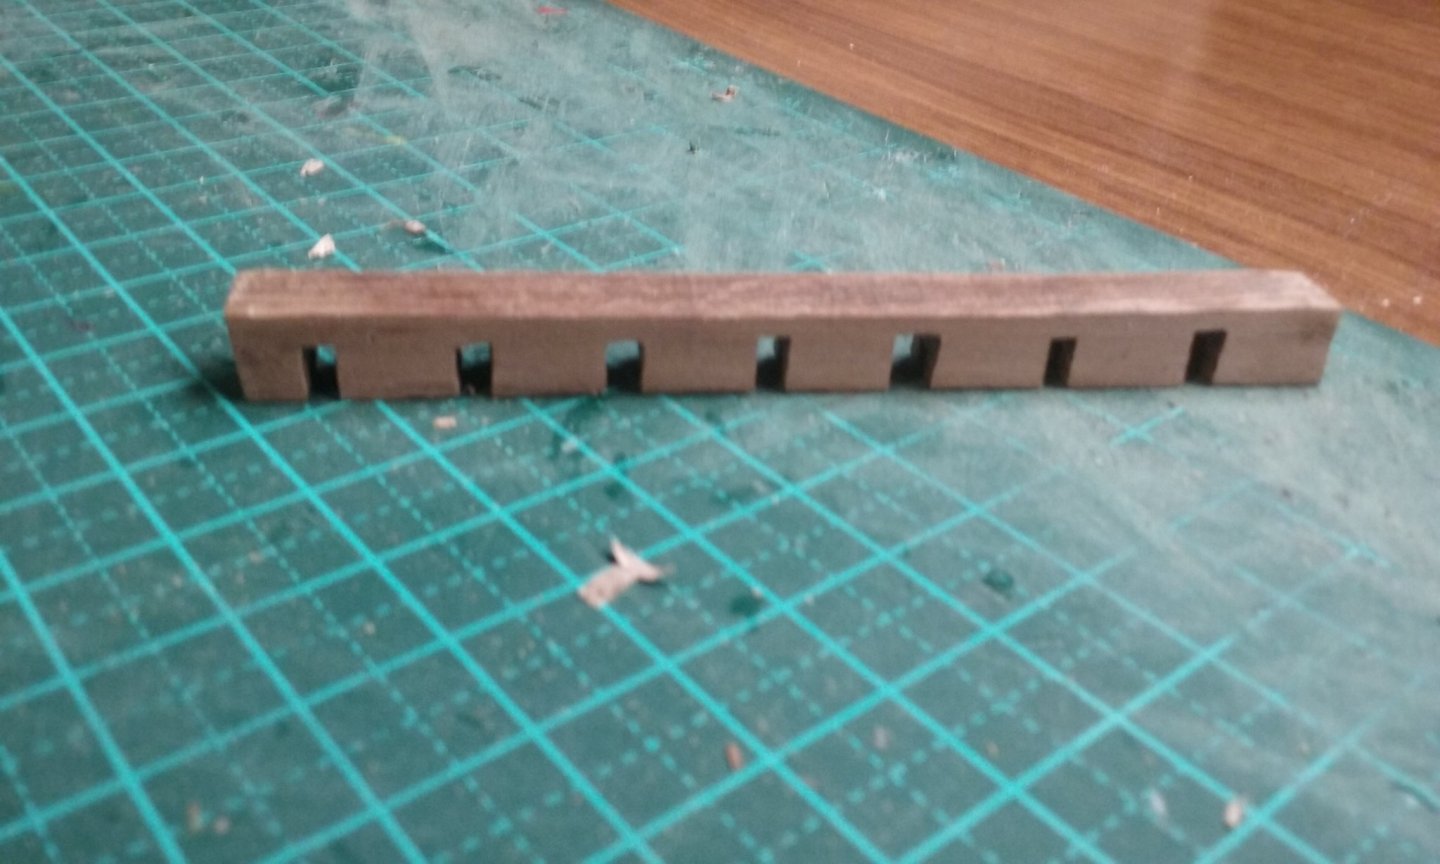
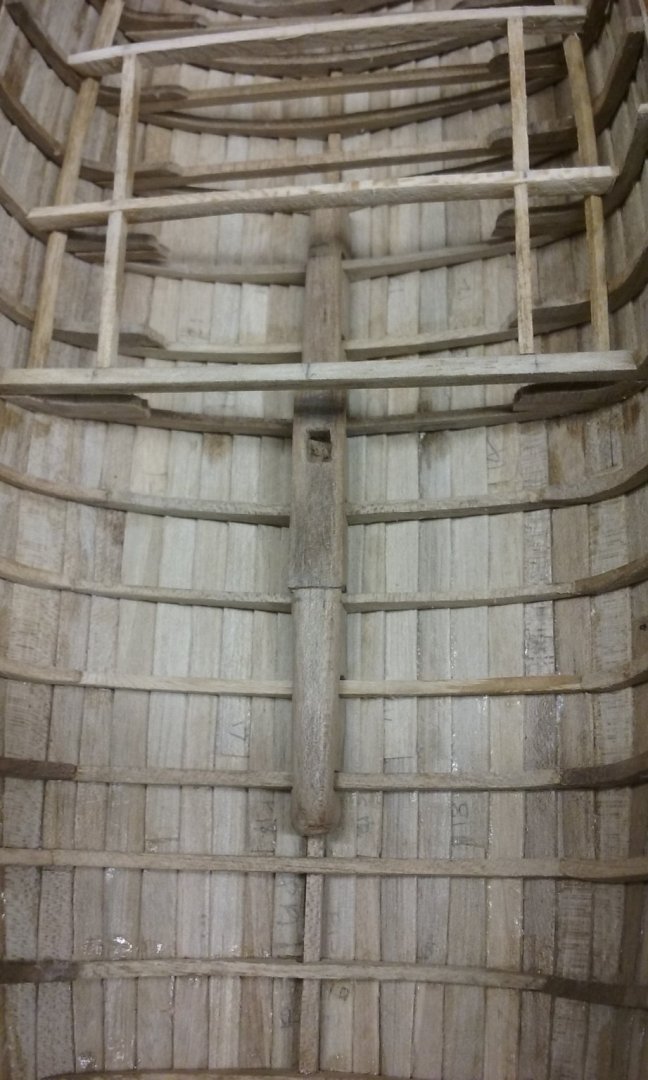
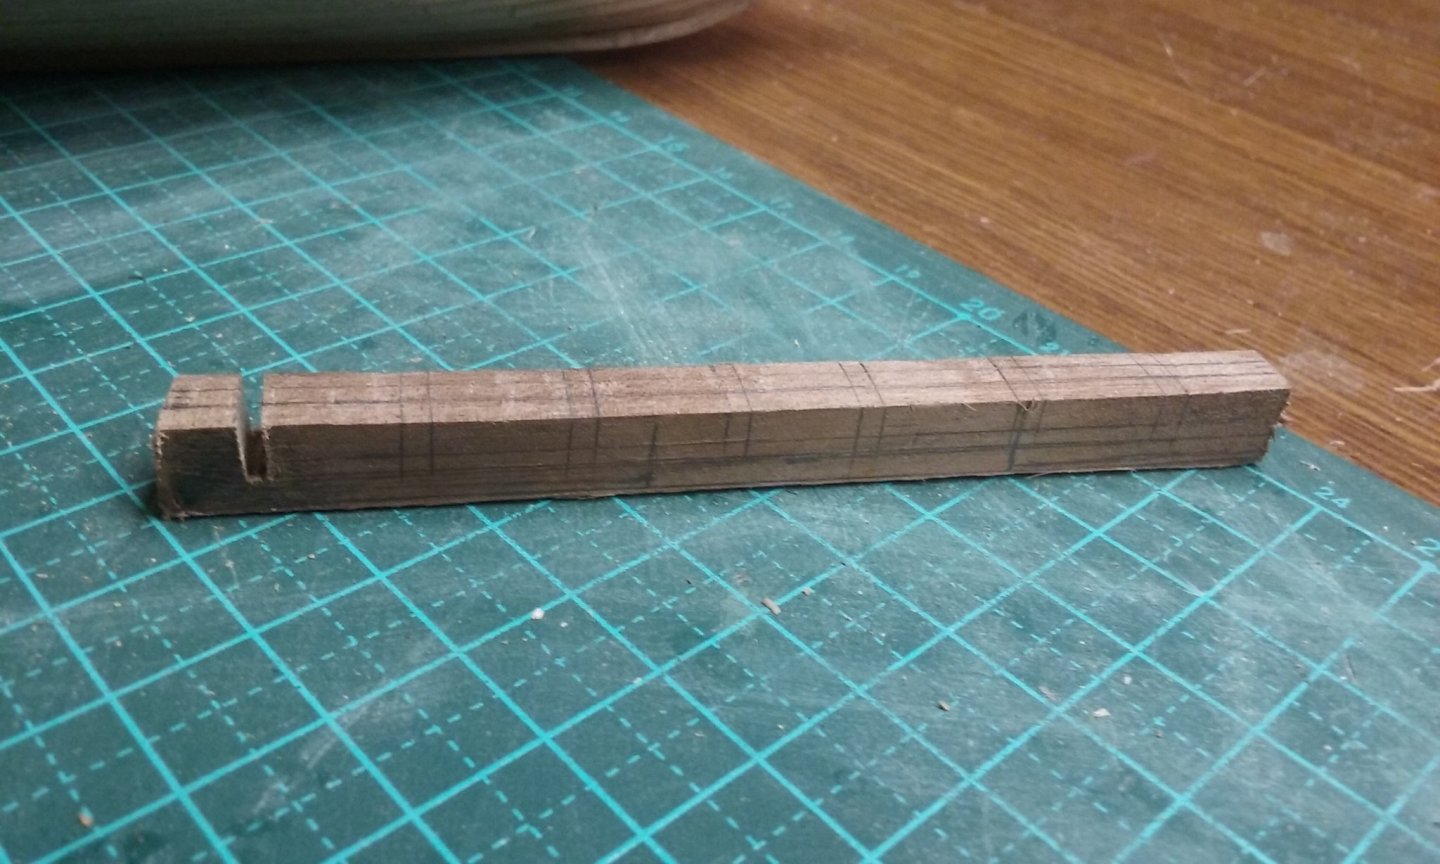
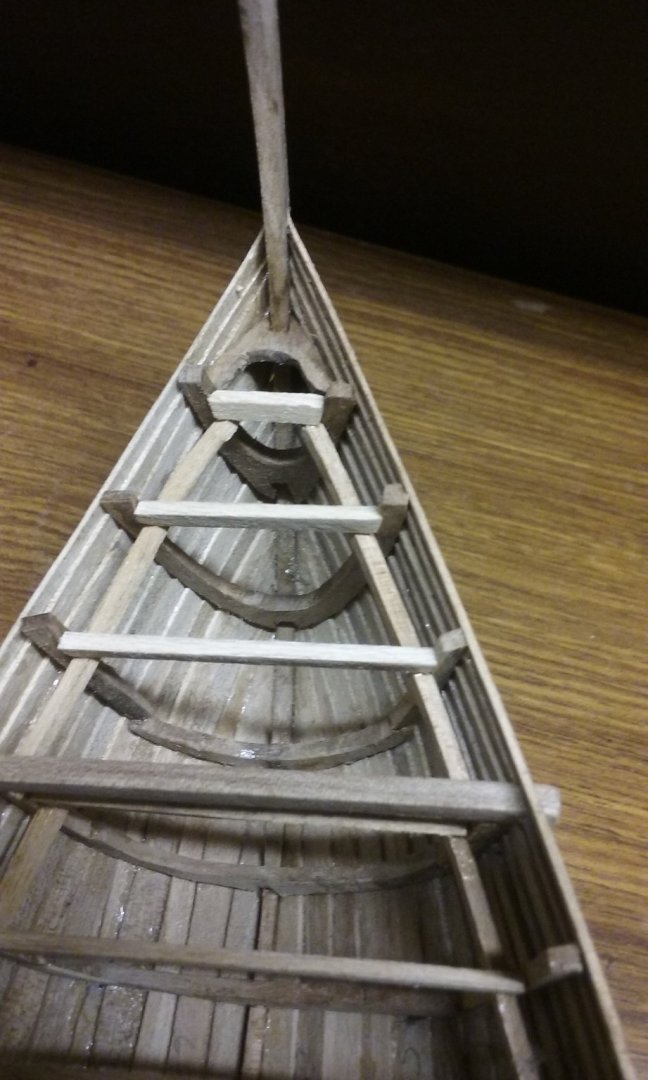
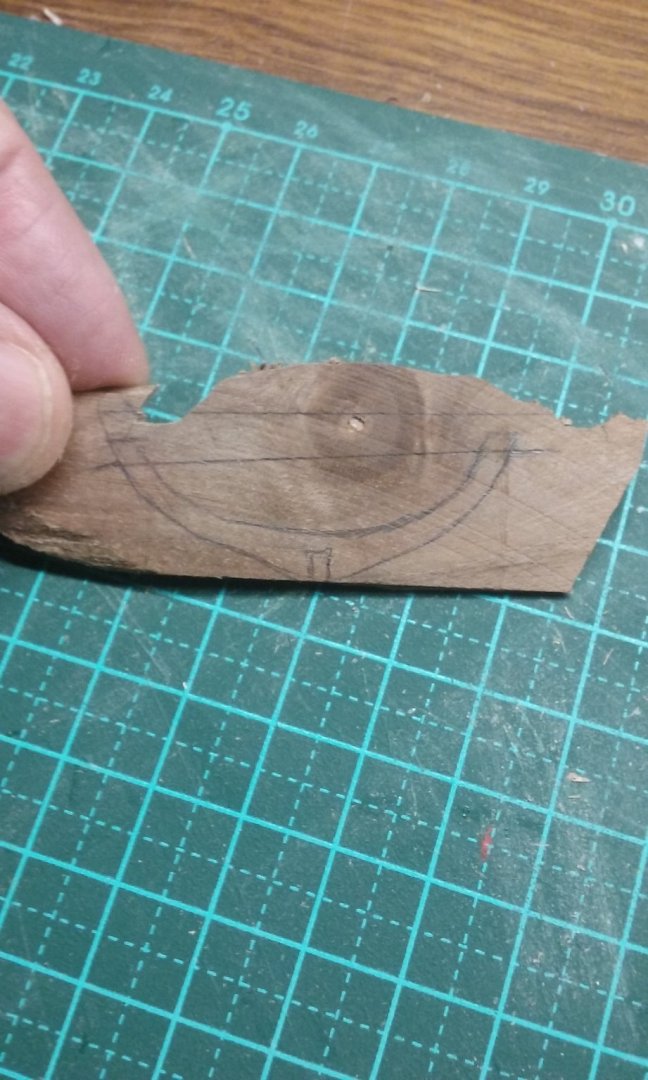
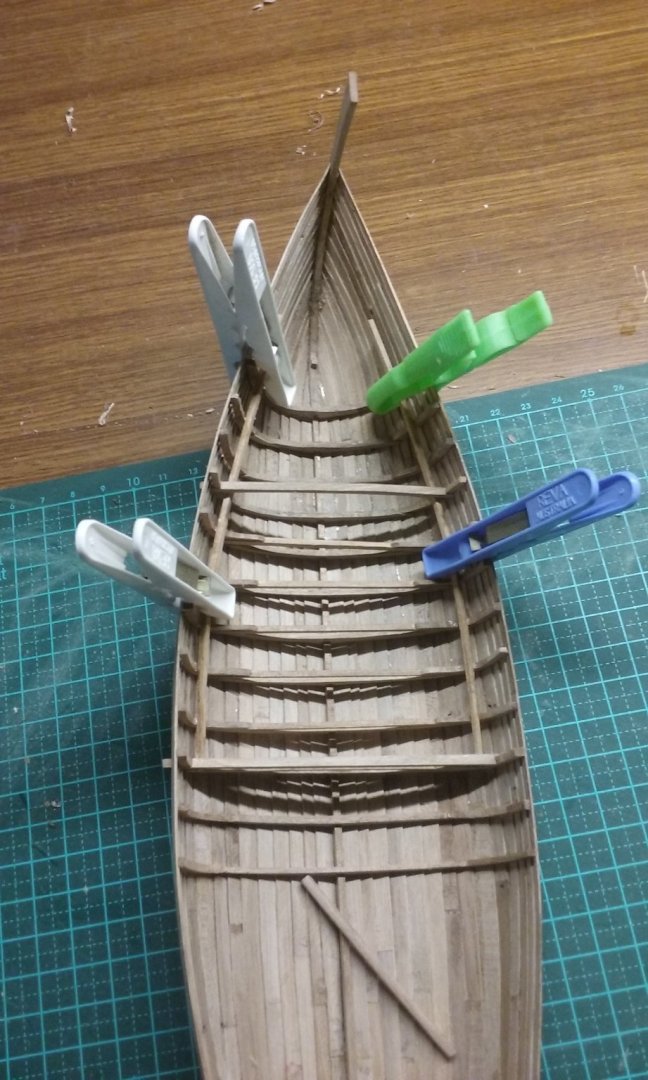
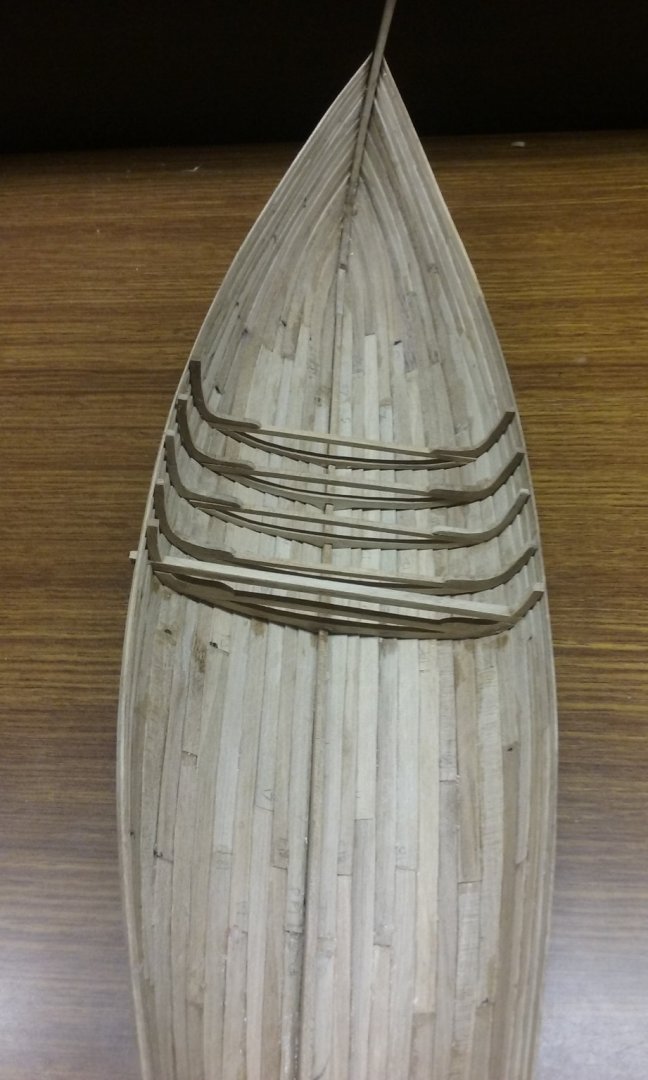
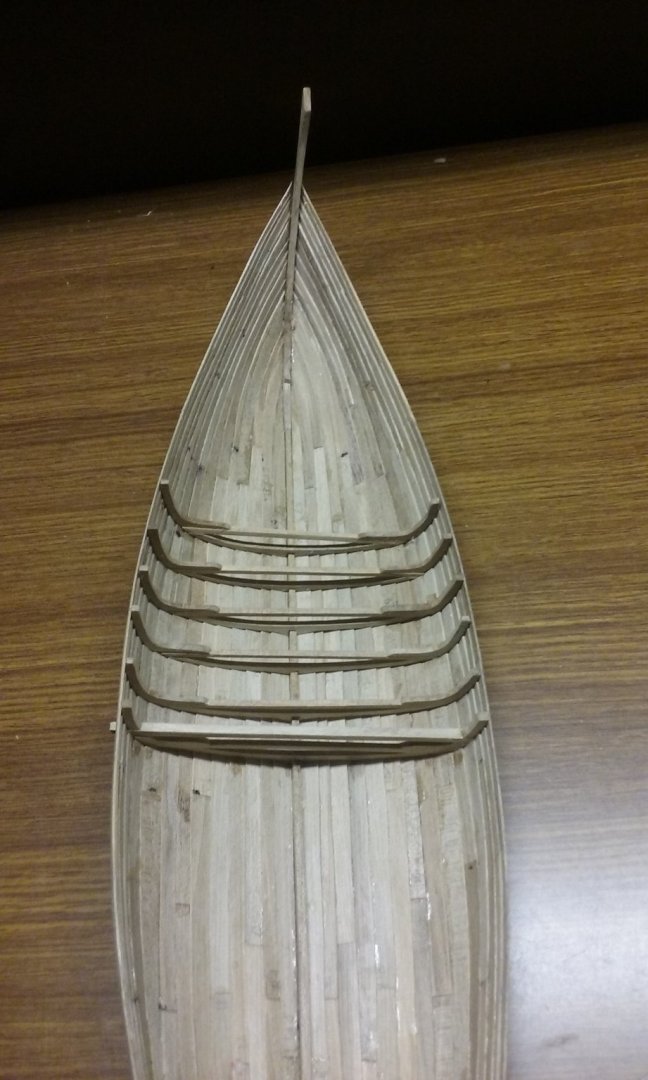
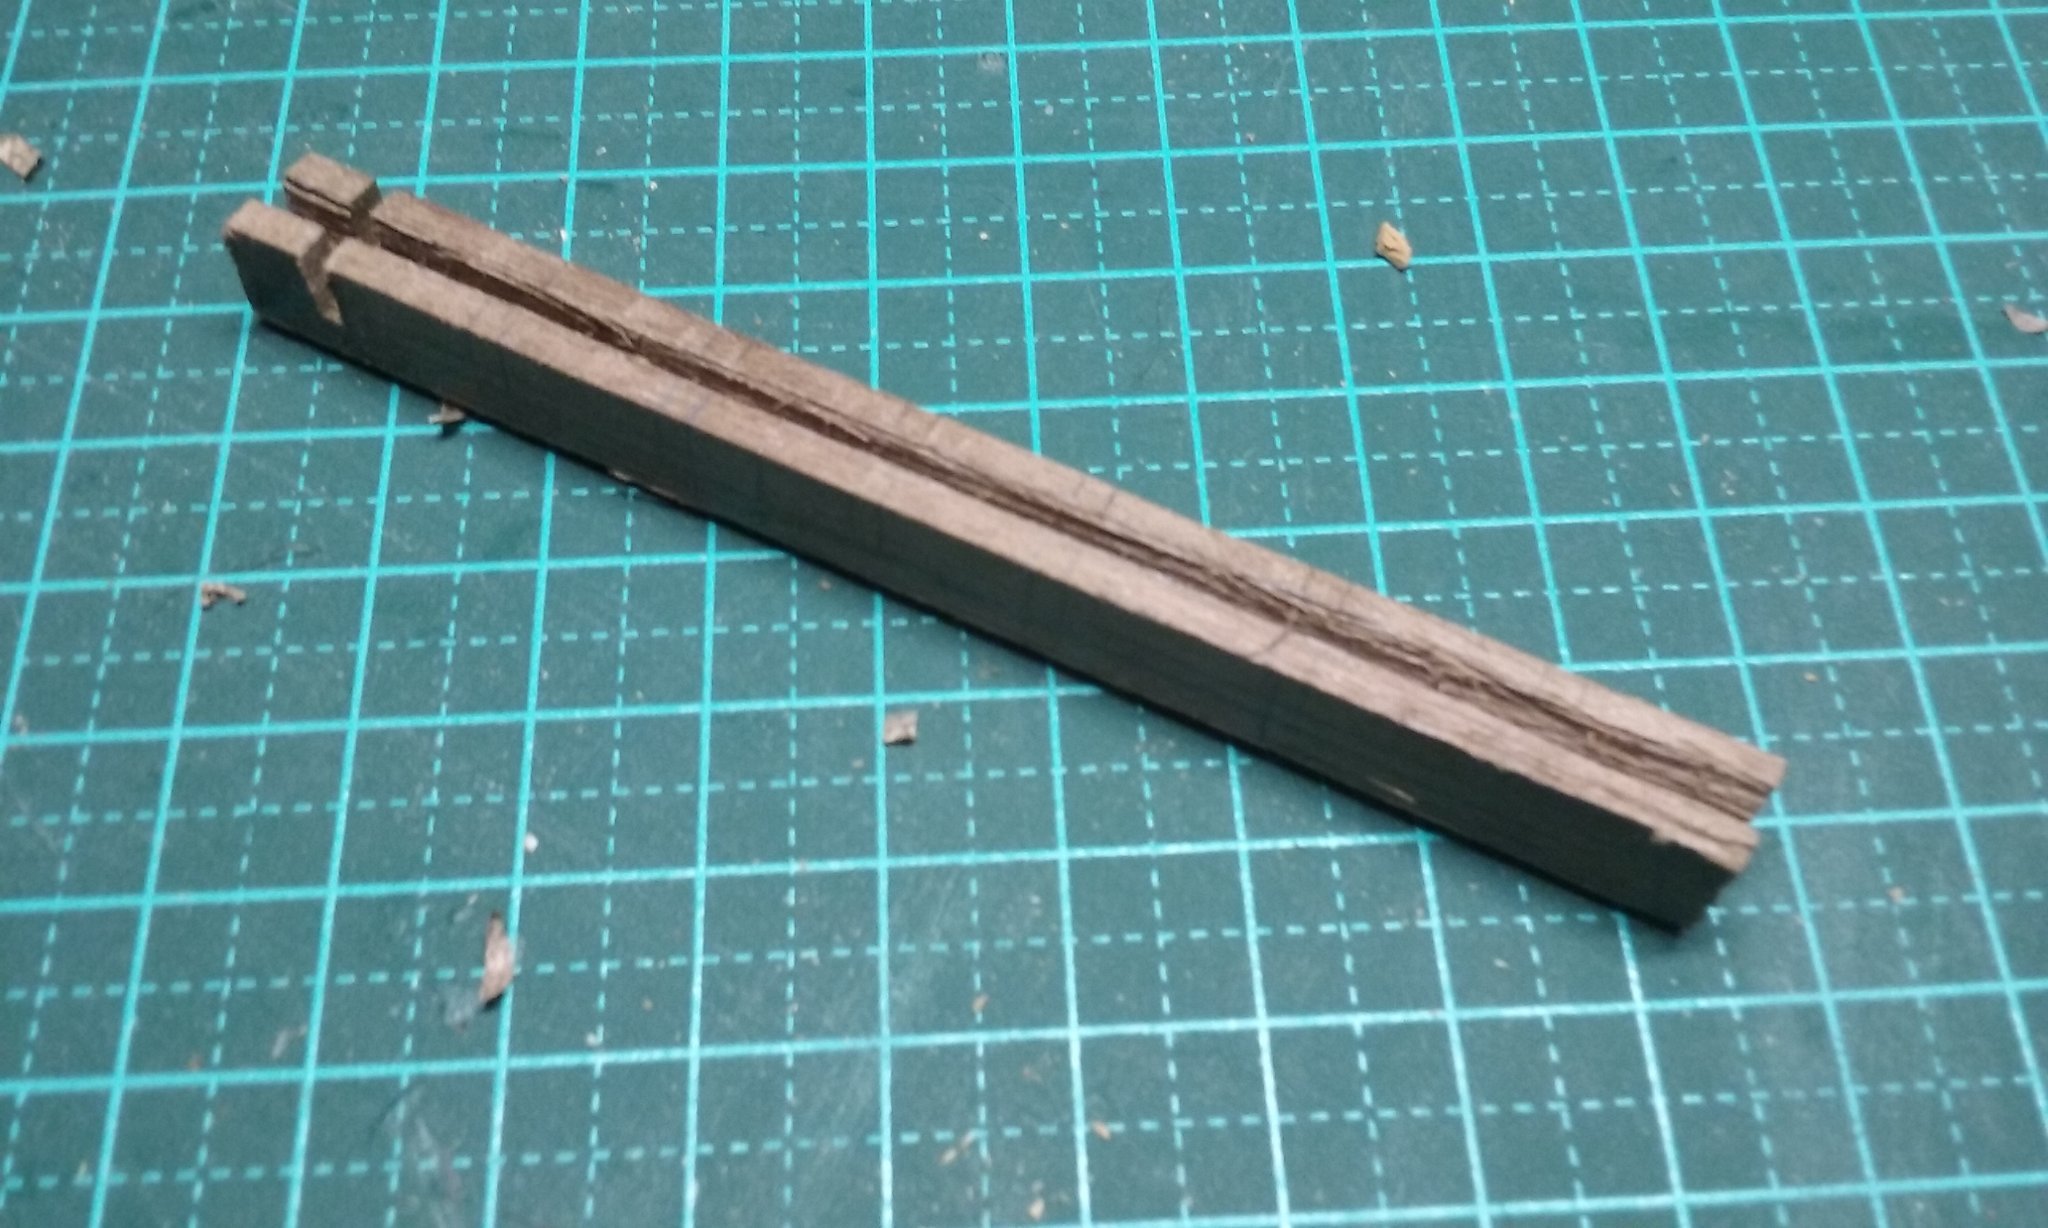
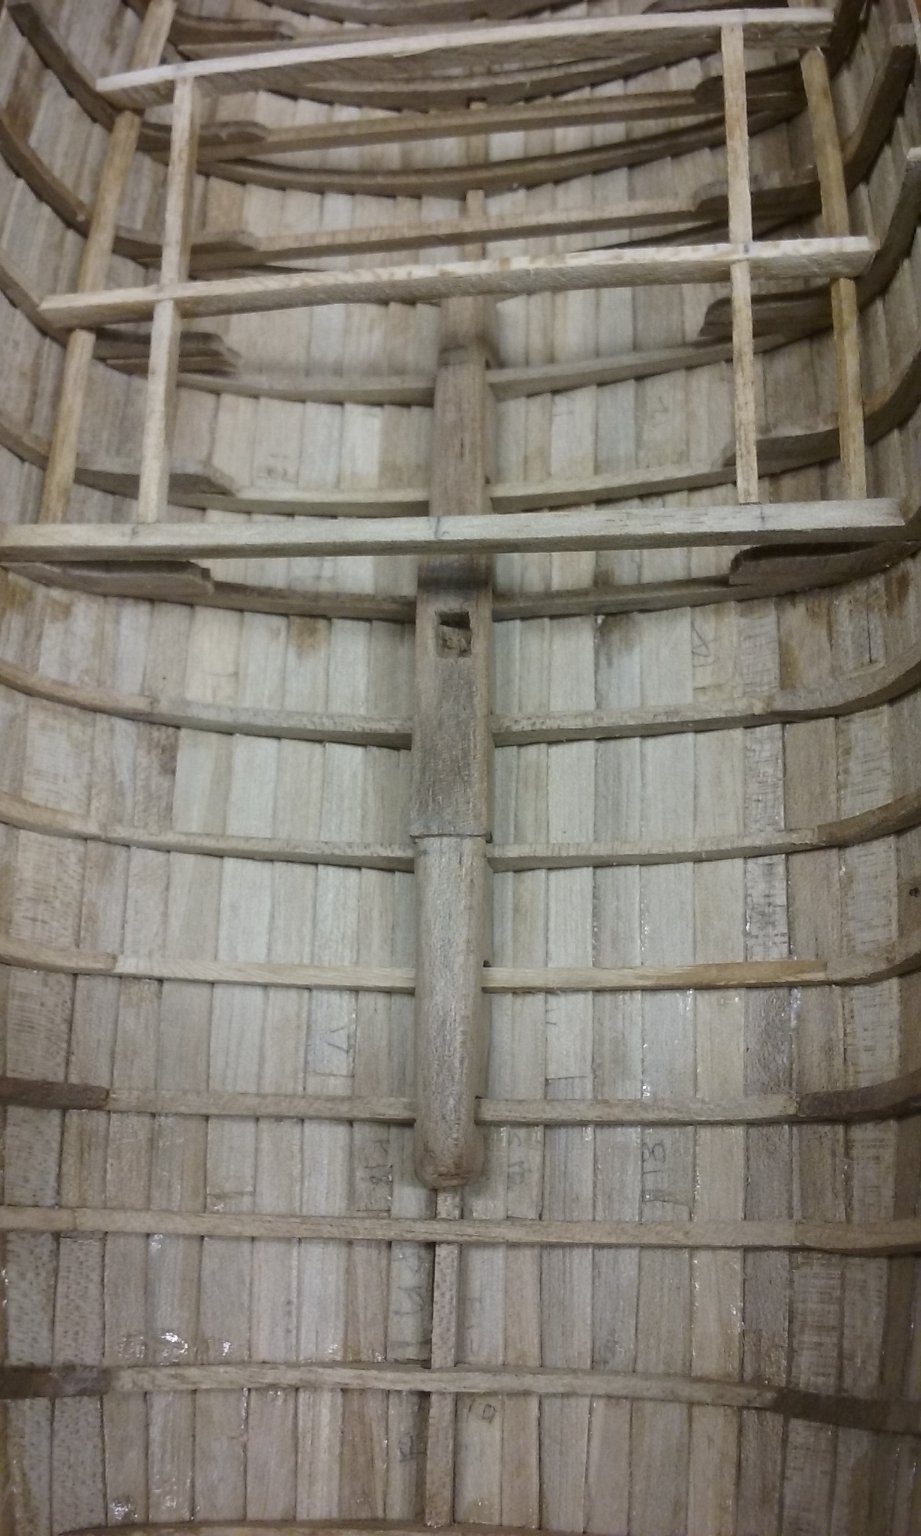
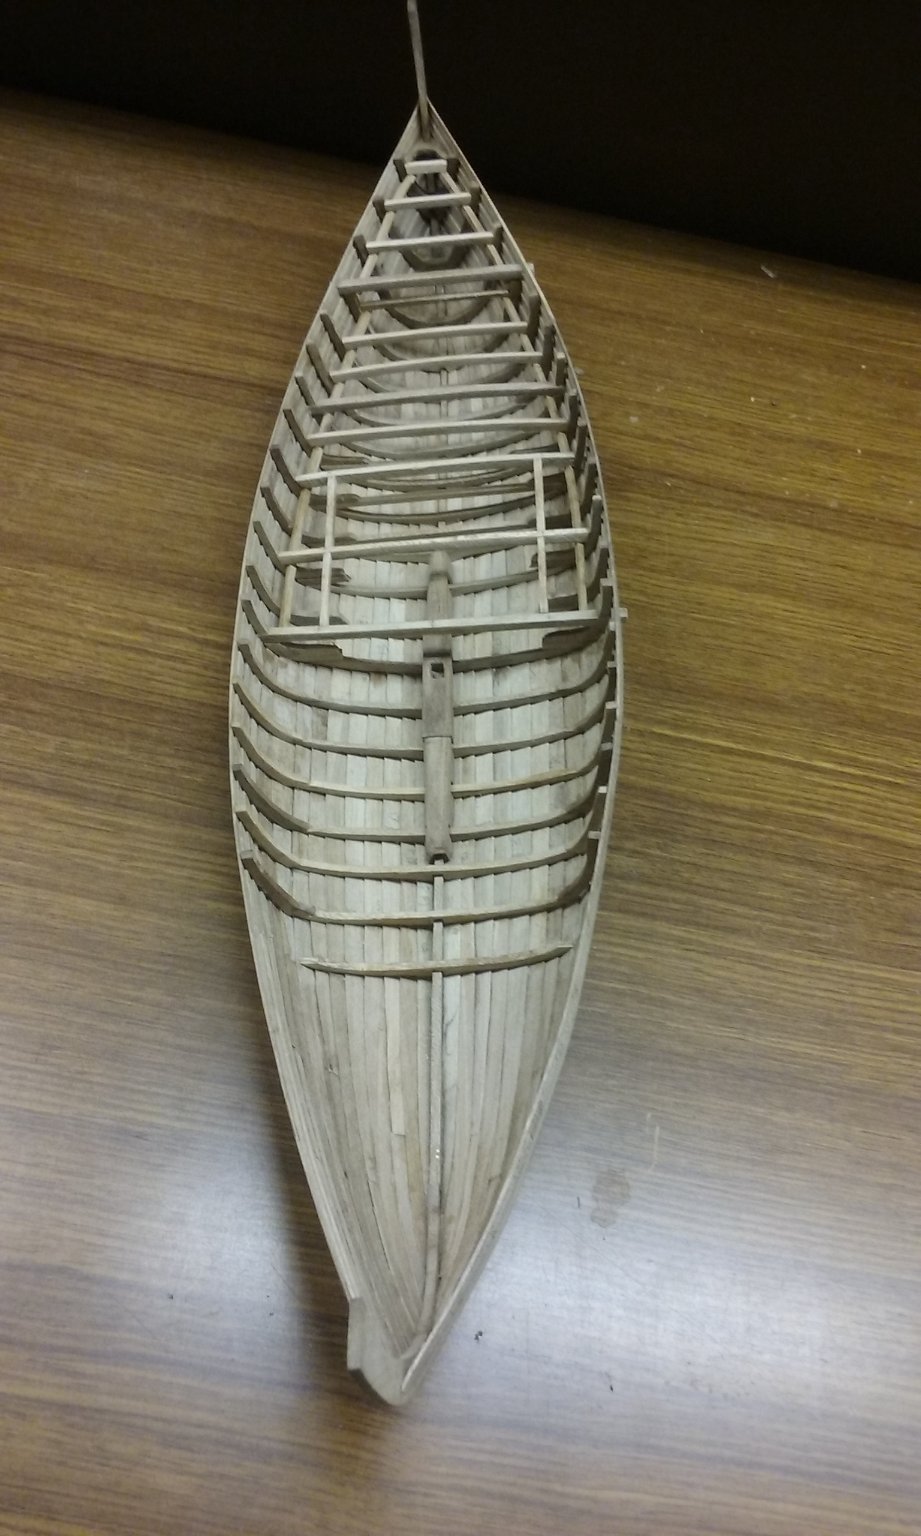
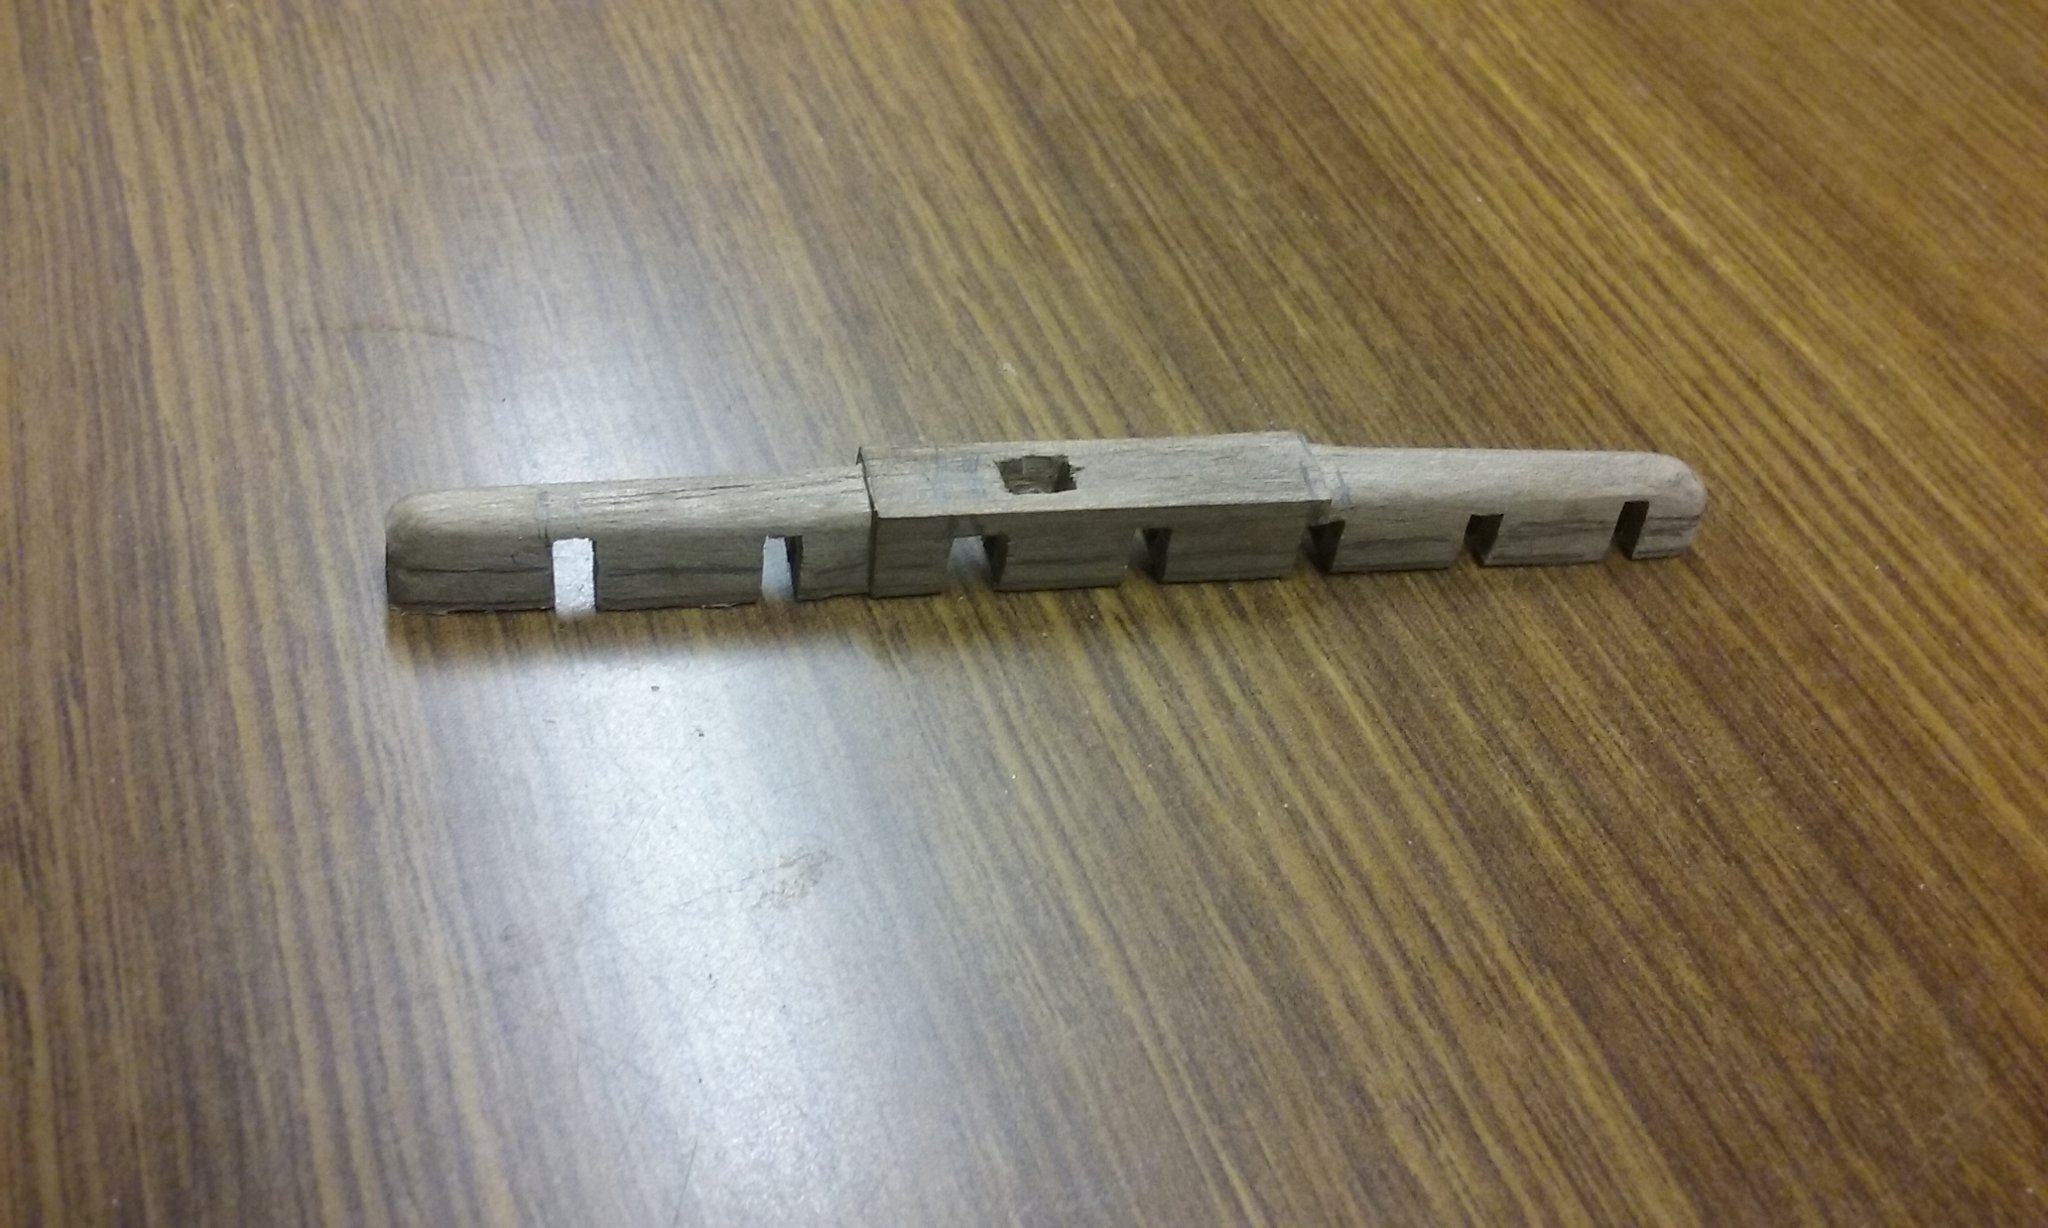
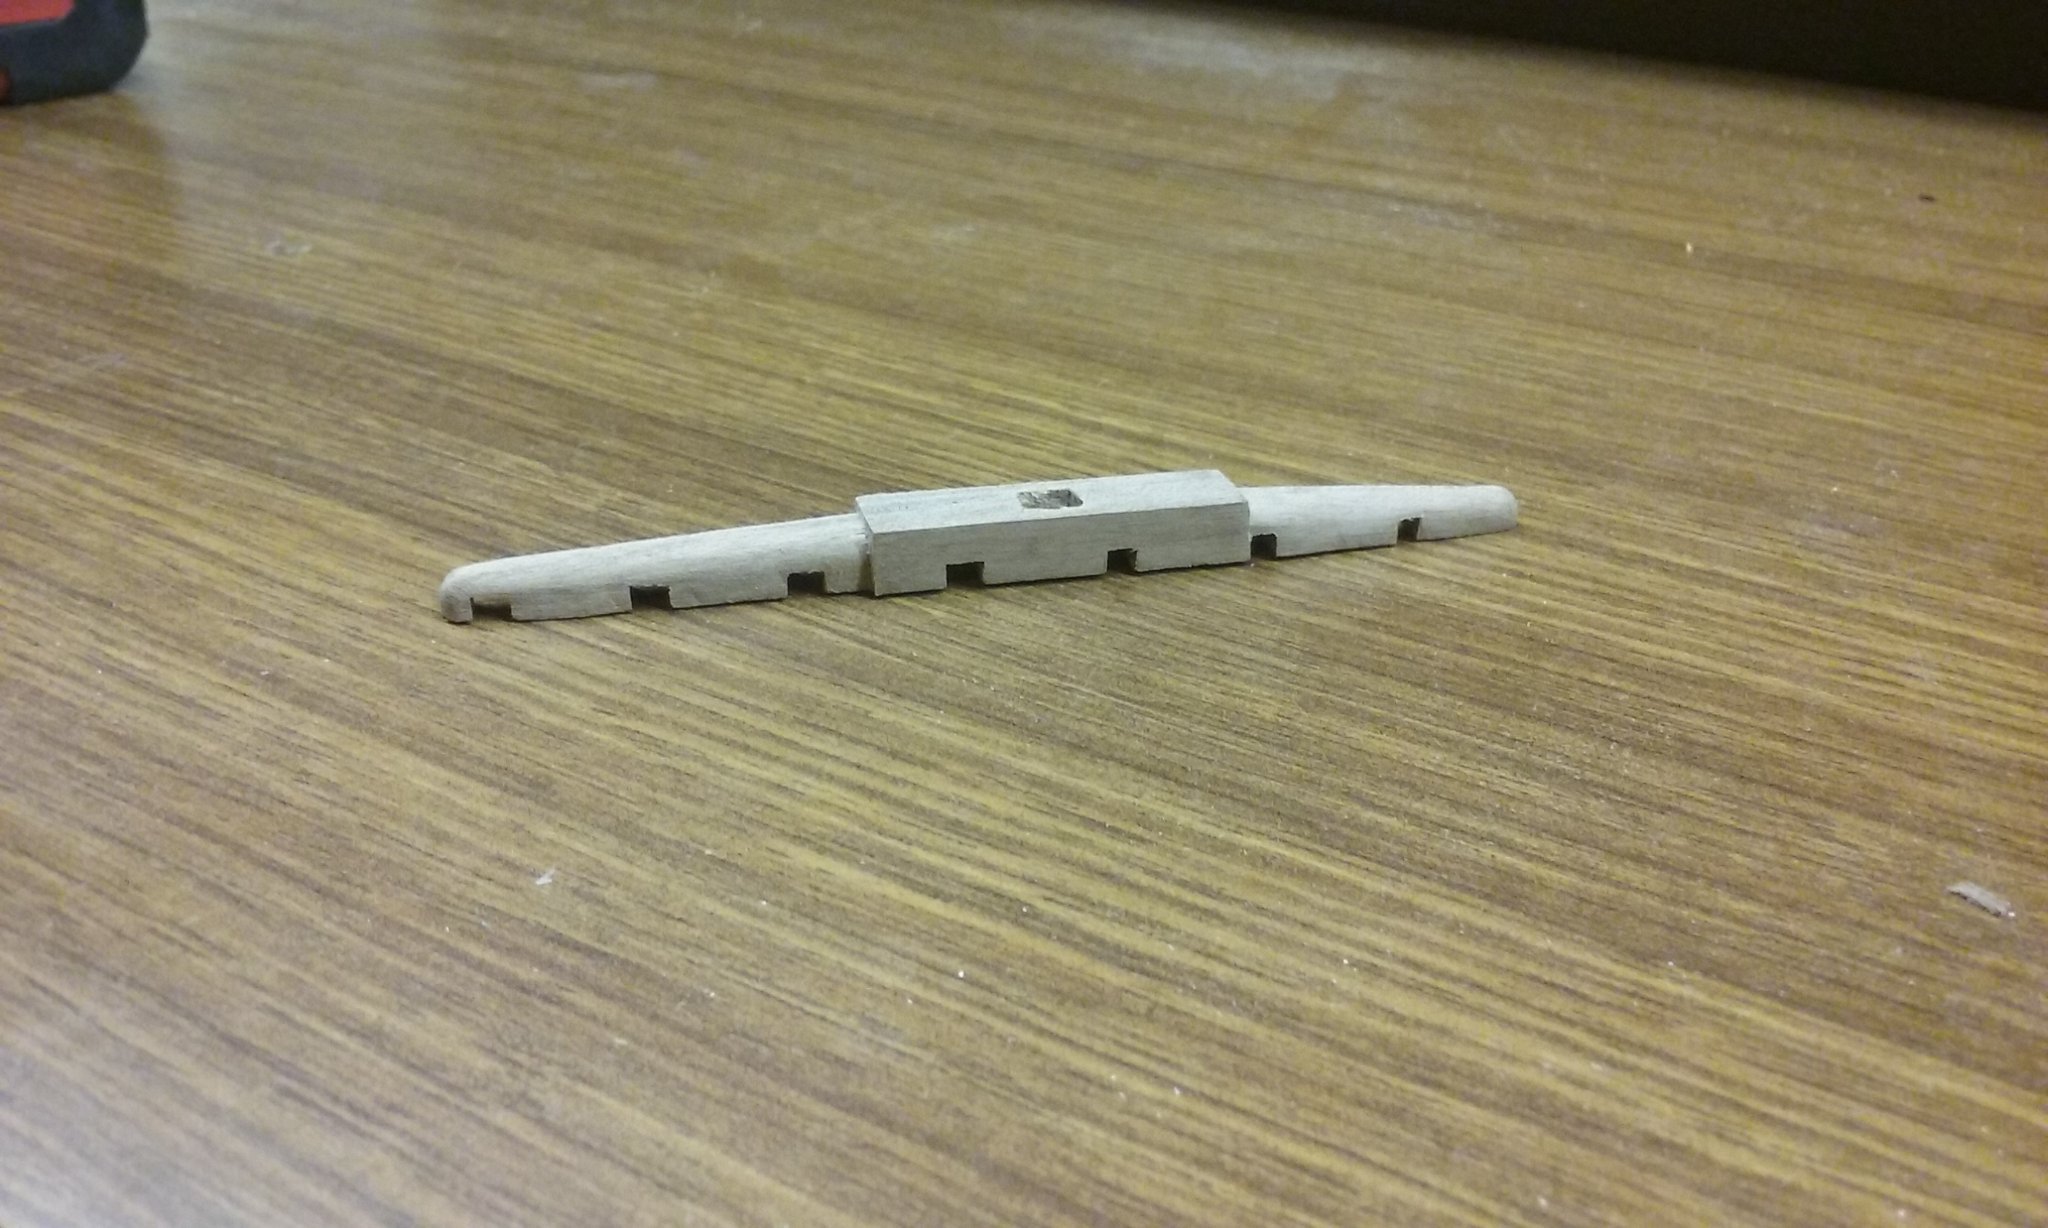
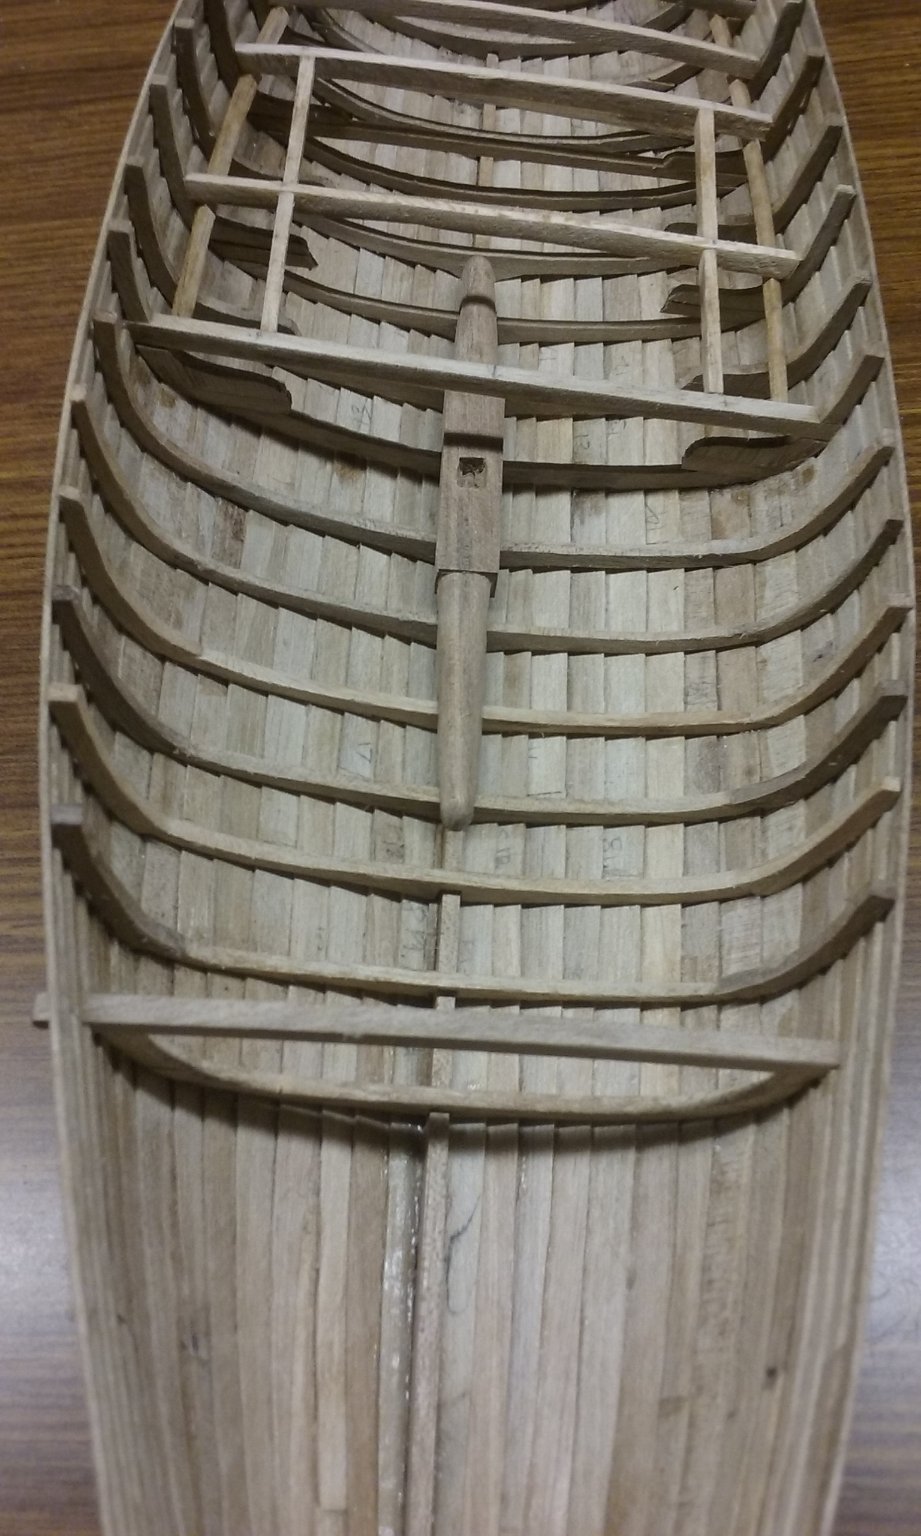
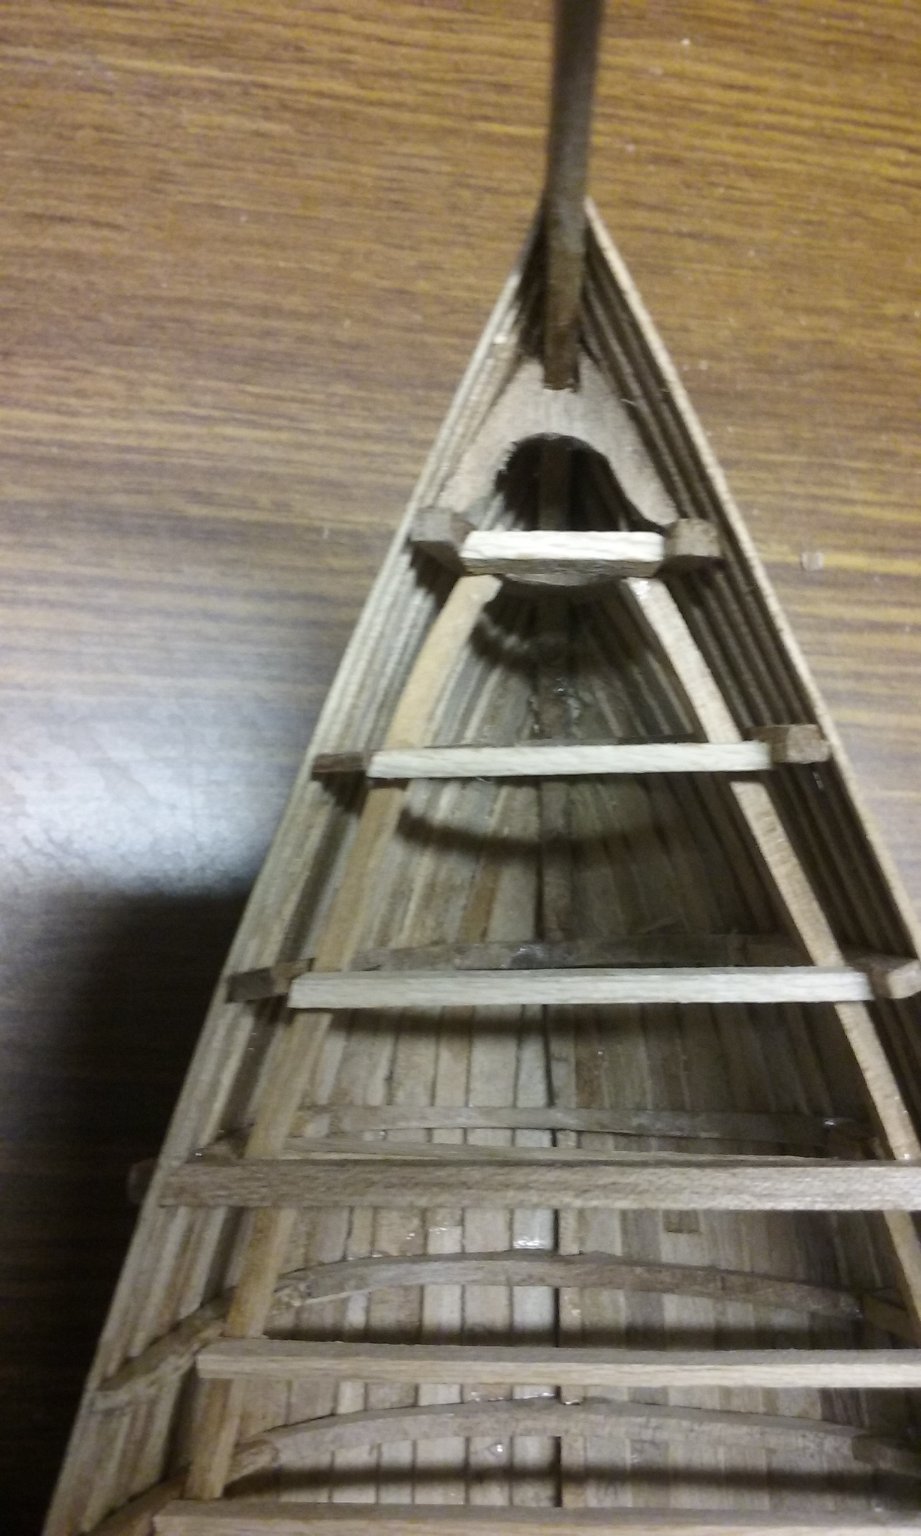
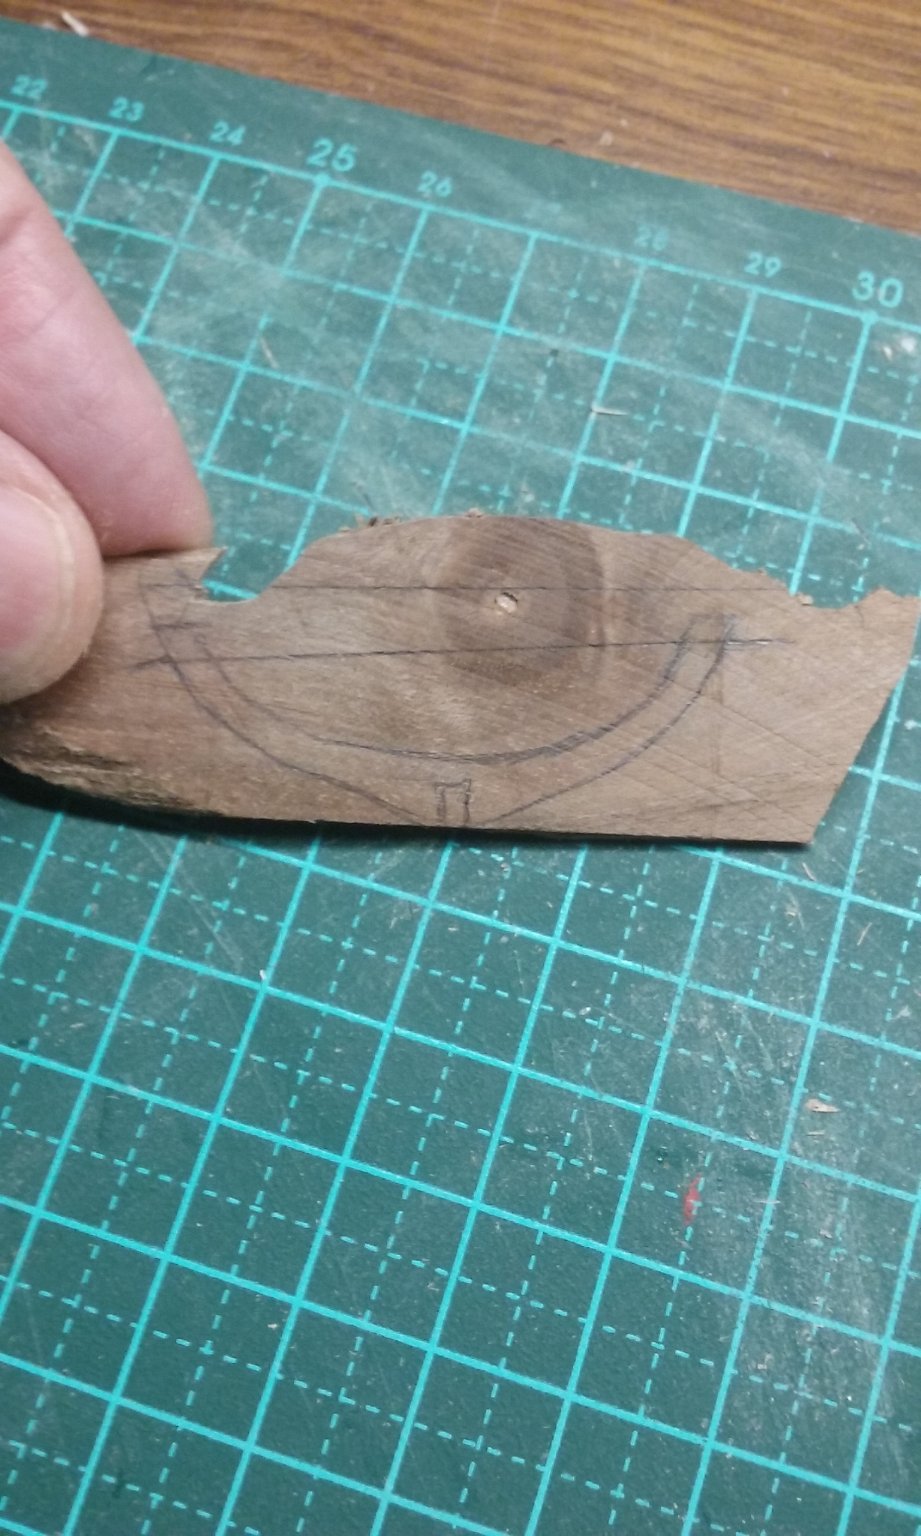
I've been working on the mast step. Here's my first attempt. The longitudinal groove is for the keel to fit into. And the crosswise slots are for the frames. Note that some of them are wider than others, due to inaccurate transferring of frame locations from the ship to the mast step, and one in particular I seem to have just got completely wrong. Shaping and putting in the socket for the mast tenon. And in place. Not terribly bad, but really it just wasn't good enough. Somehow I got the whole thing wrong so the socket for the mast was way off centre. I may have got the whole thing turned backwards, so the fore end was aft - that's the only explanation I can think of. And looking back at the cog's mast step which I was using for a model, I realised that the mast step body wasn't supposed to go all the way down to the planking - it was just to be supported on the frames, with fairly shallow grooves cut in the underneath (see the reconstruction drawing in my previous post). Where I'd gone wrong was not to print the diagram off, and just rely on memory. Bad idea. So, here's version 2. Much better. Moving right along, I've made the next through-beam and glued it in place. Next I have to make all the rest of the frames and put them in place, then add the beam clamp and the crossbeams to mirror the ones at the other end. Coming along. Steven


.thumb.jpg.810848187fb861417f803bd8cc5354a4.jpg)

- 327 replies
-
- 20
-
-
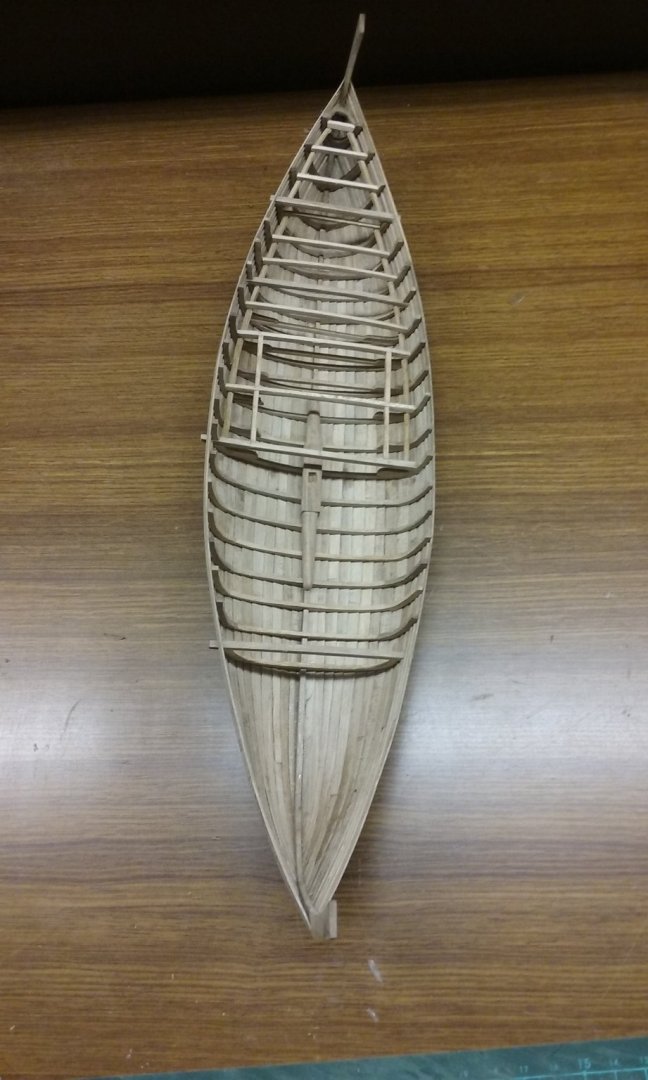
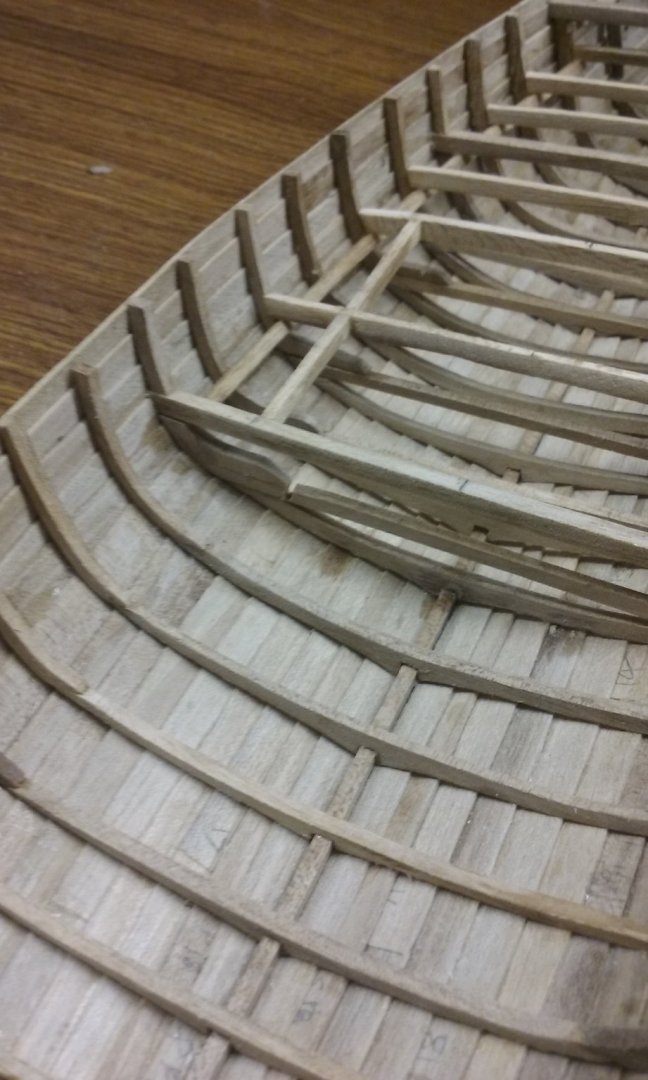
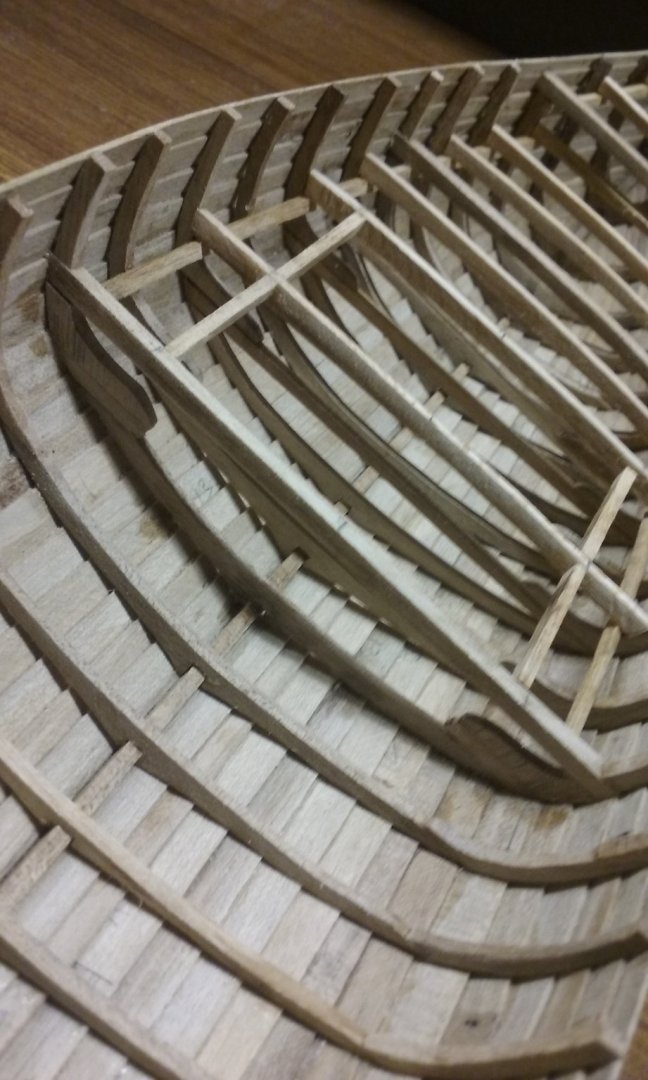
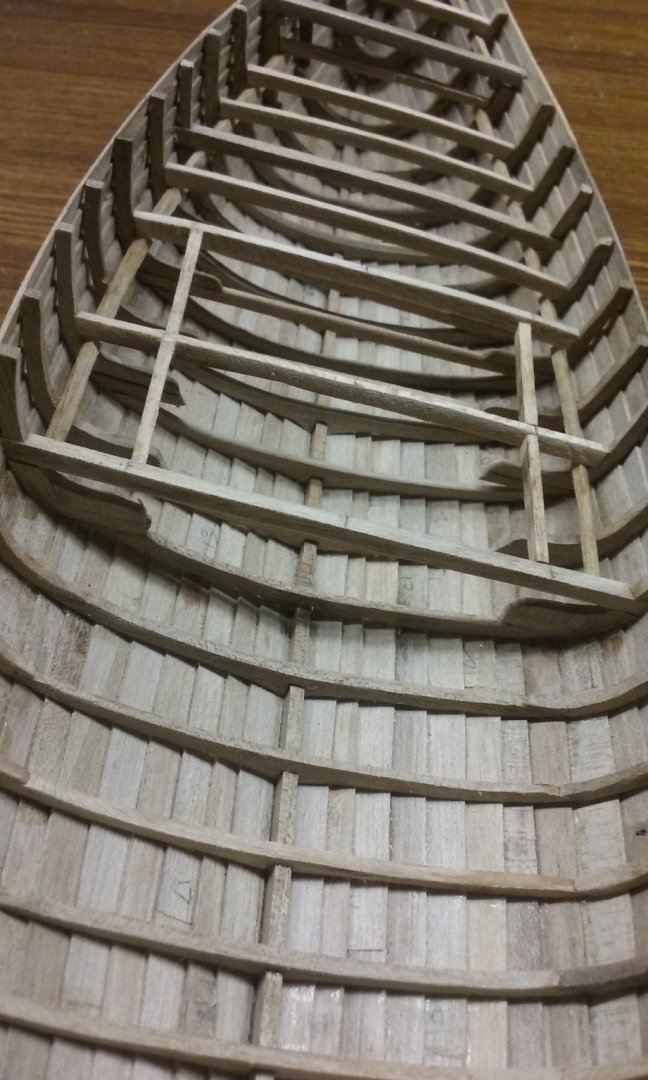
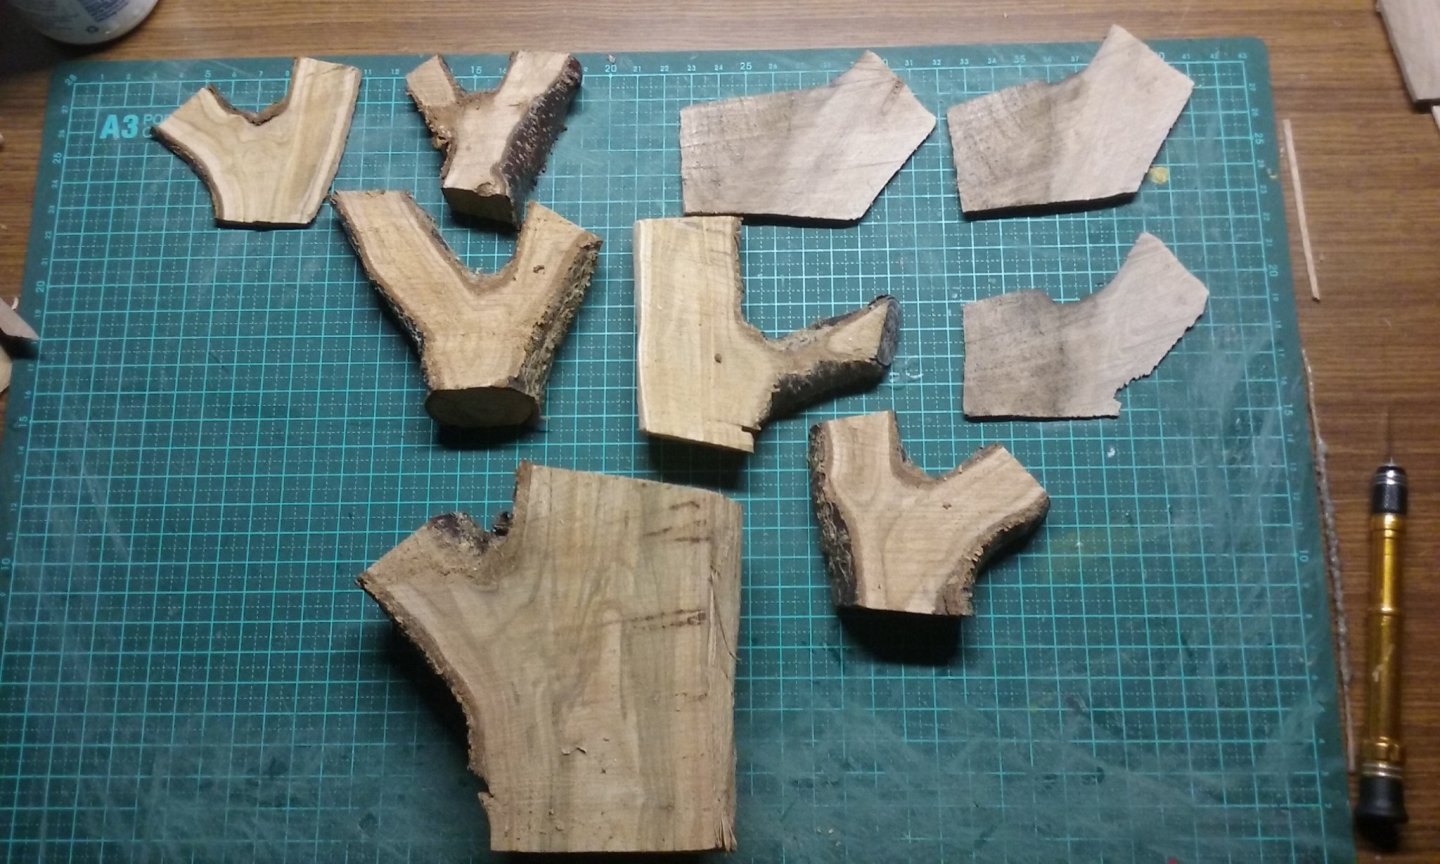
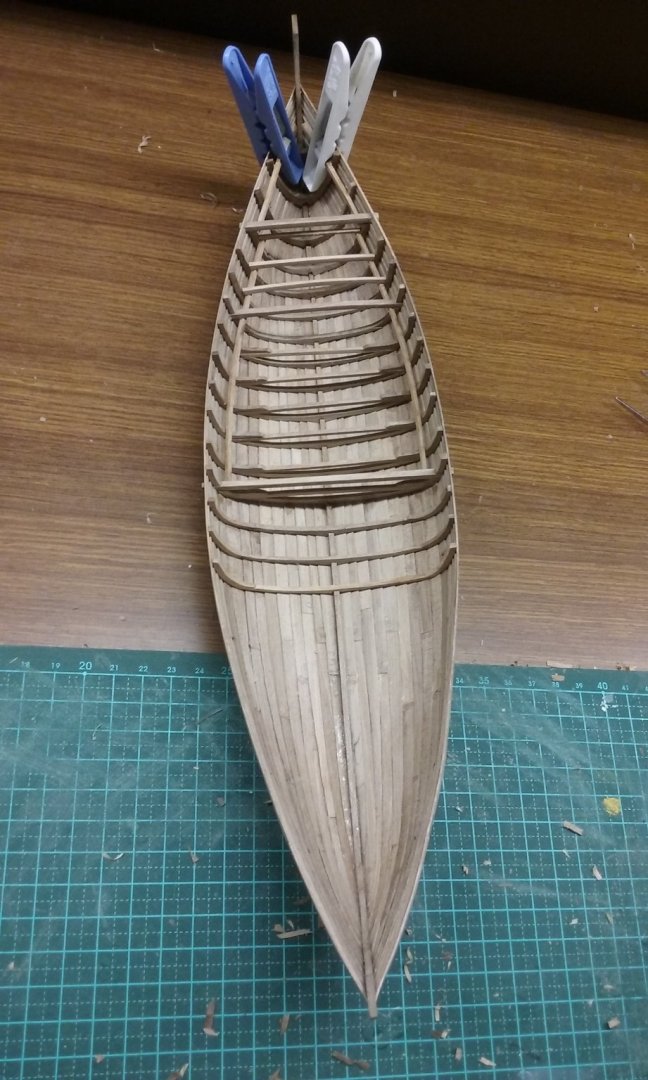
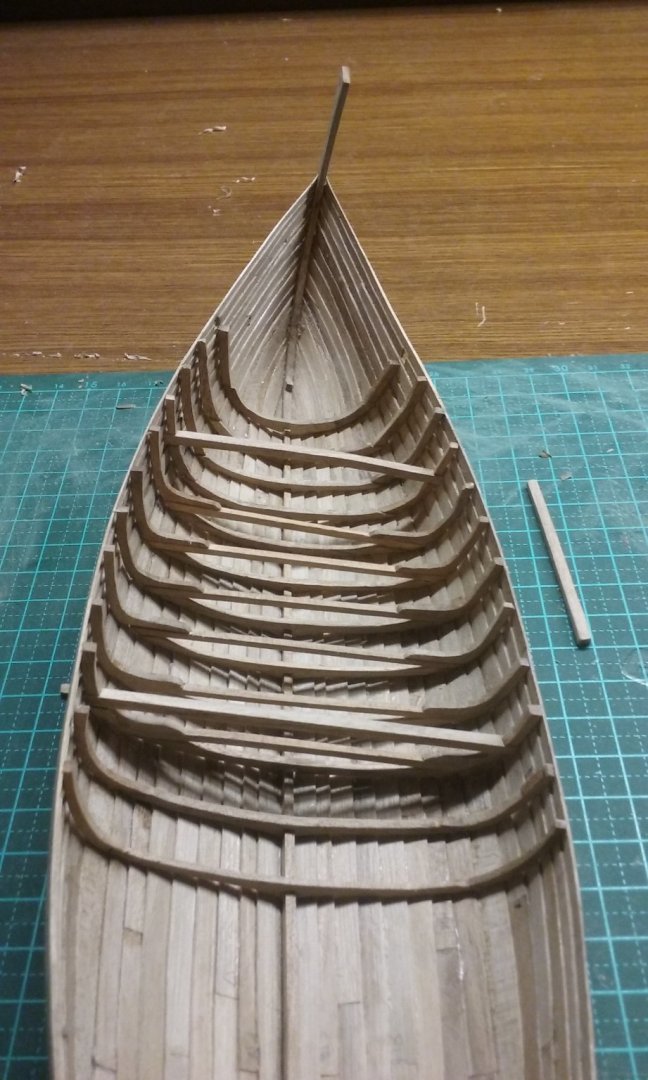
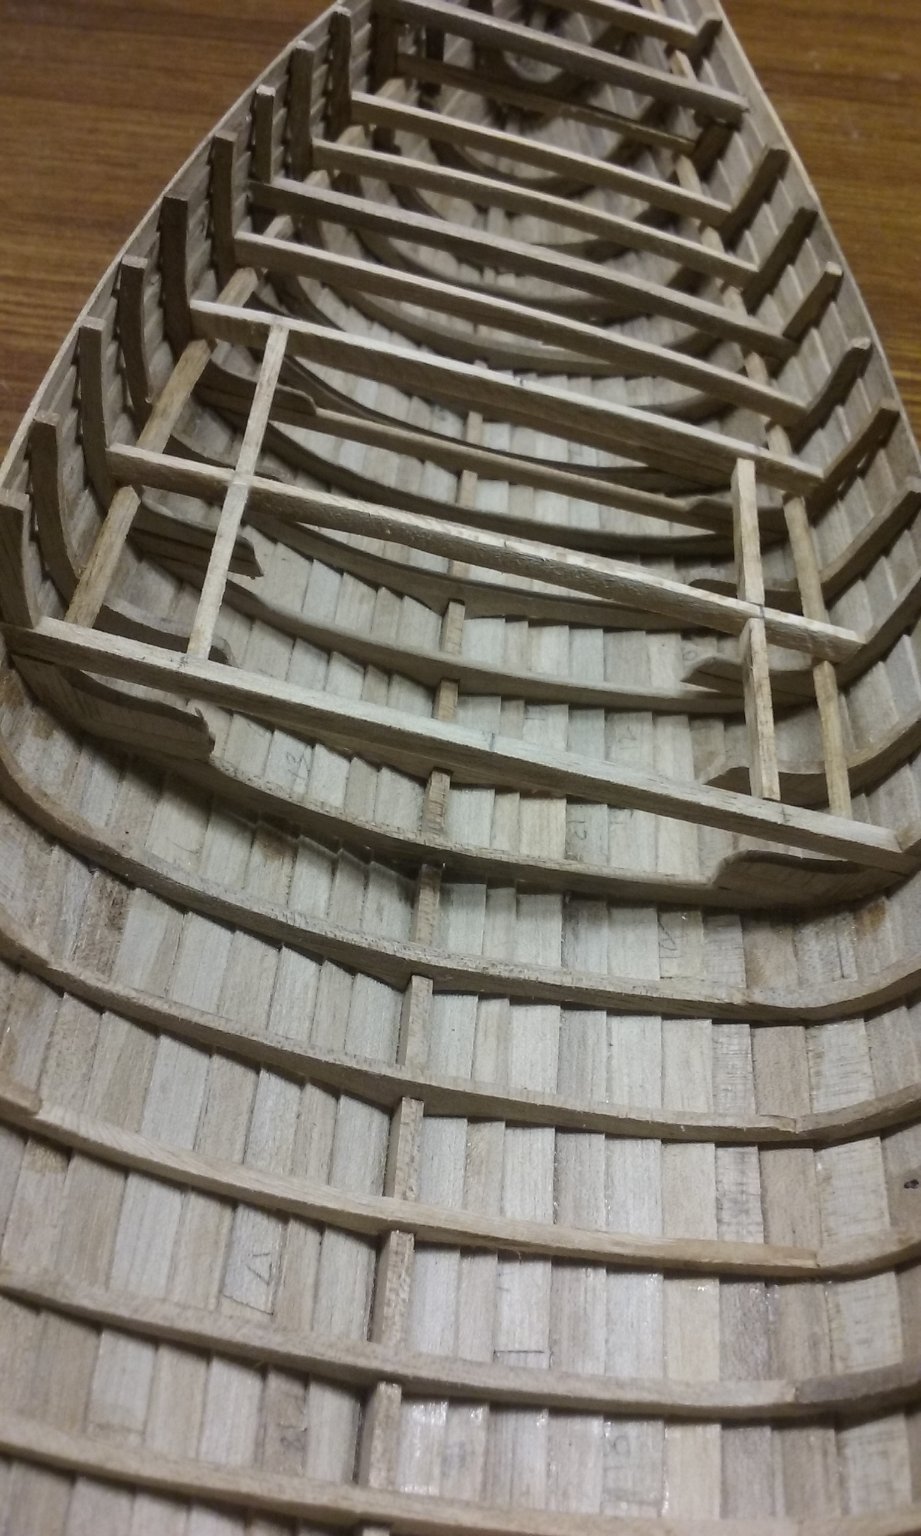
More framing. And for those of you who may be interested in how I'm making the frames to insert in the planking, here's an example of a partly made pair of floor timbers, showing how I carve the "blank" to fit in place. The I'll cut along the pencil line to finish shaping the frames. I'm getting into researching the mast step and the windlass. The windlass will be based on those of the Bremen cog and the Ijsselcog, and that of the Kalmar ship from the mid-13th century (referenced in an earlier post), which is very similar. It'll have to be shorter than those of the cogs - unlike them, there just isn't room for one that long in a ship with pointy ends like the nef. I'll be basing the mast step on that of the Ijsselcog, as being closest in time to the nef. Here it is (pictures from the Ijsselcog archaeological report referenced above) And here's mine just getting started. Right side up And upside down - the slots are for the frames. As I originally built the frames with a crossbeam near the bottom as in knarrs, I'm having to cut several of them off to accommodate the mast step which is different from those of Viking ships. I've still got a bit of tidying up to do to make it all smick and merge the cut-off bits into the shape of the frames. One last thing. I'd been lamenting that I didn't have any wood with a forked grain (as you get at a branch), suitable for the frames of the bow and stern and the breast hooks. I realised I was wrong. The yellow(ish) ones are from an apricot tree in the garden which went to meet its maker. Still needs time to season. The three at top right are old seasoned walnut from the guy next door's dead tree which he let me have the timber from. Nice to have this. Steven


- 327 replies
-
- 13
-
-
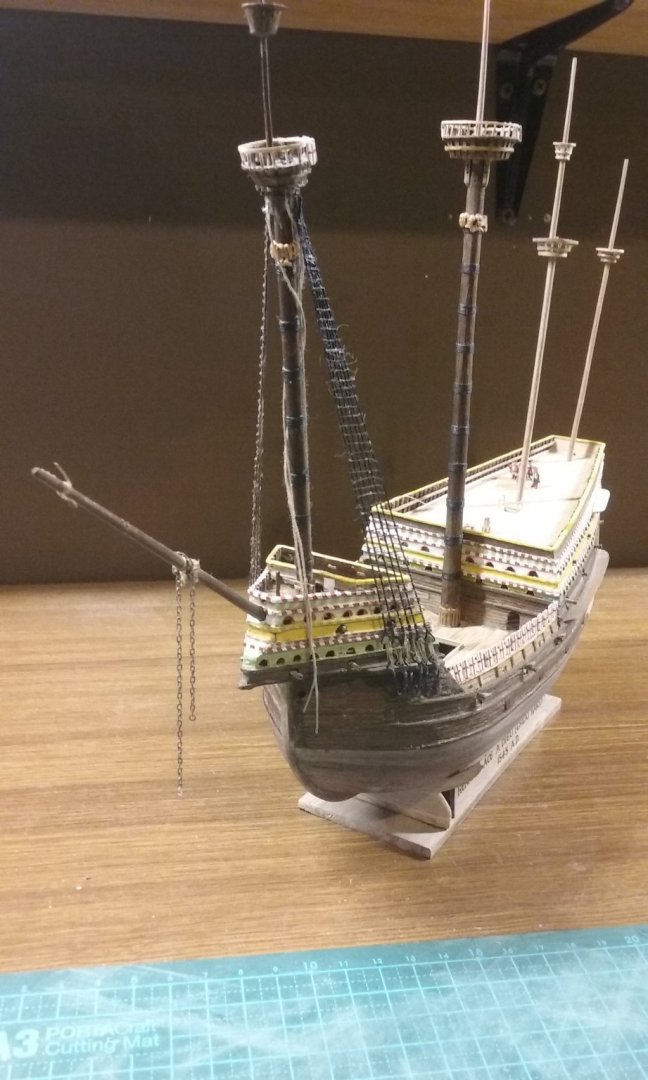
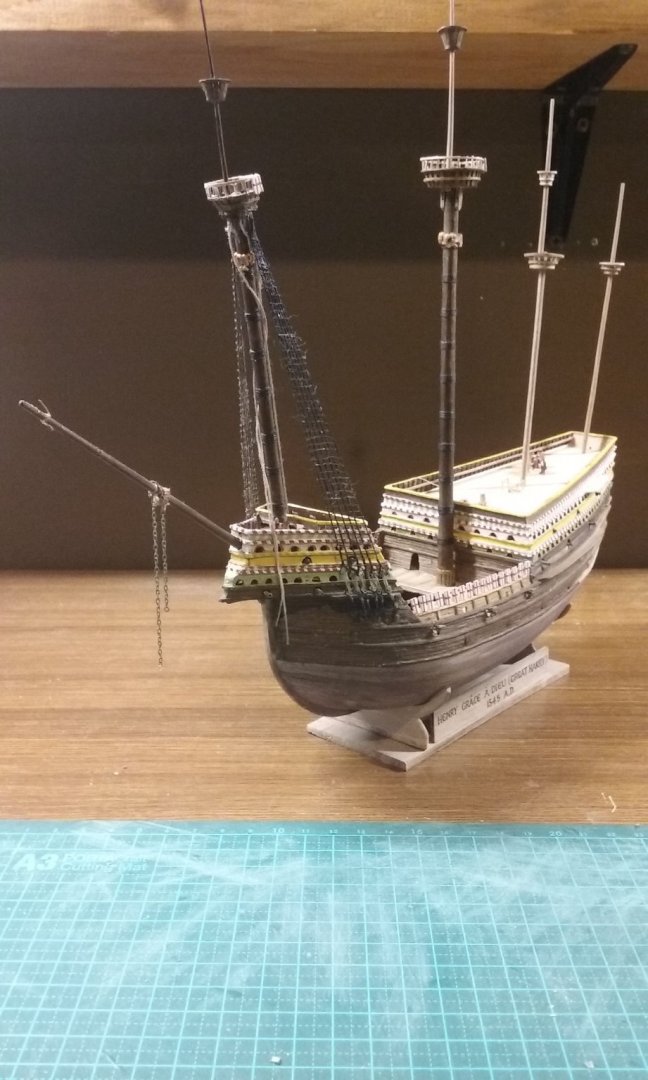
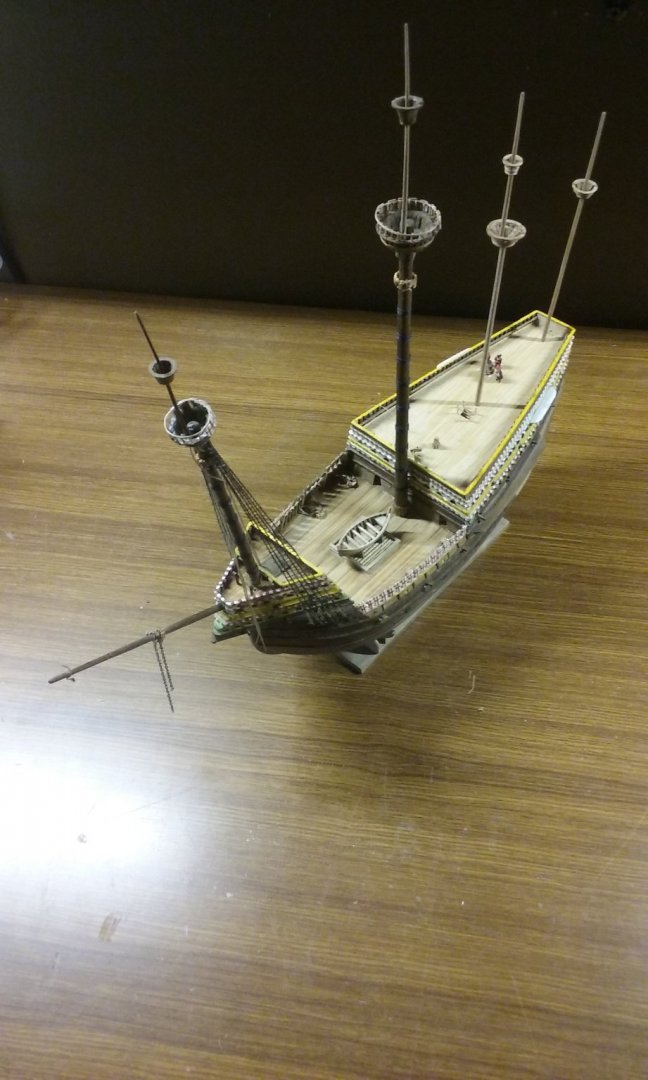
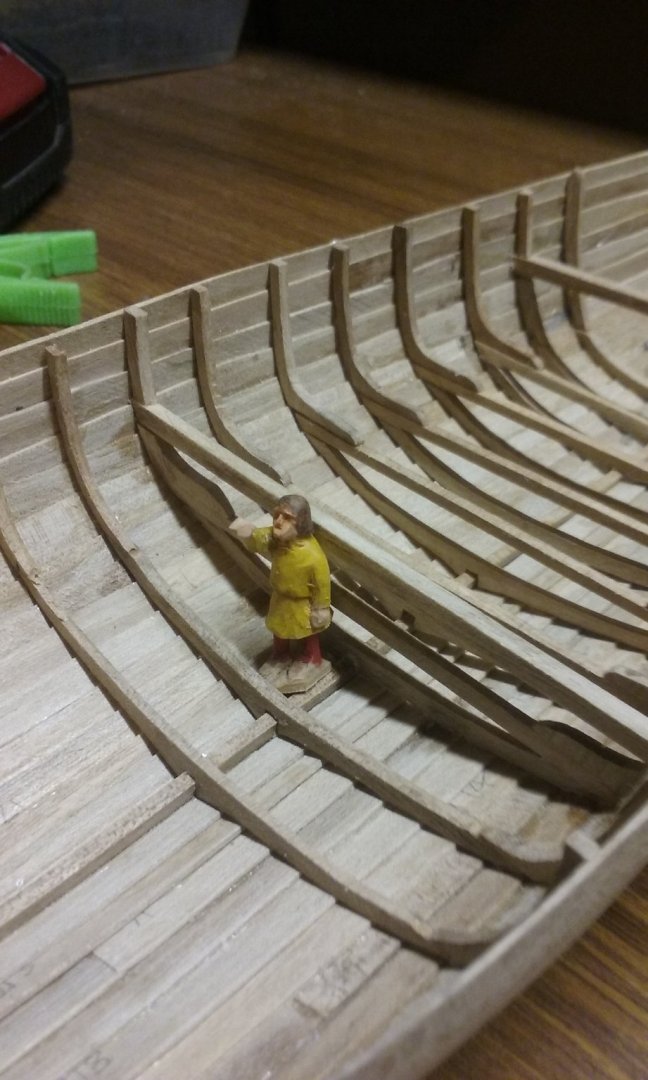
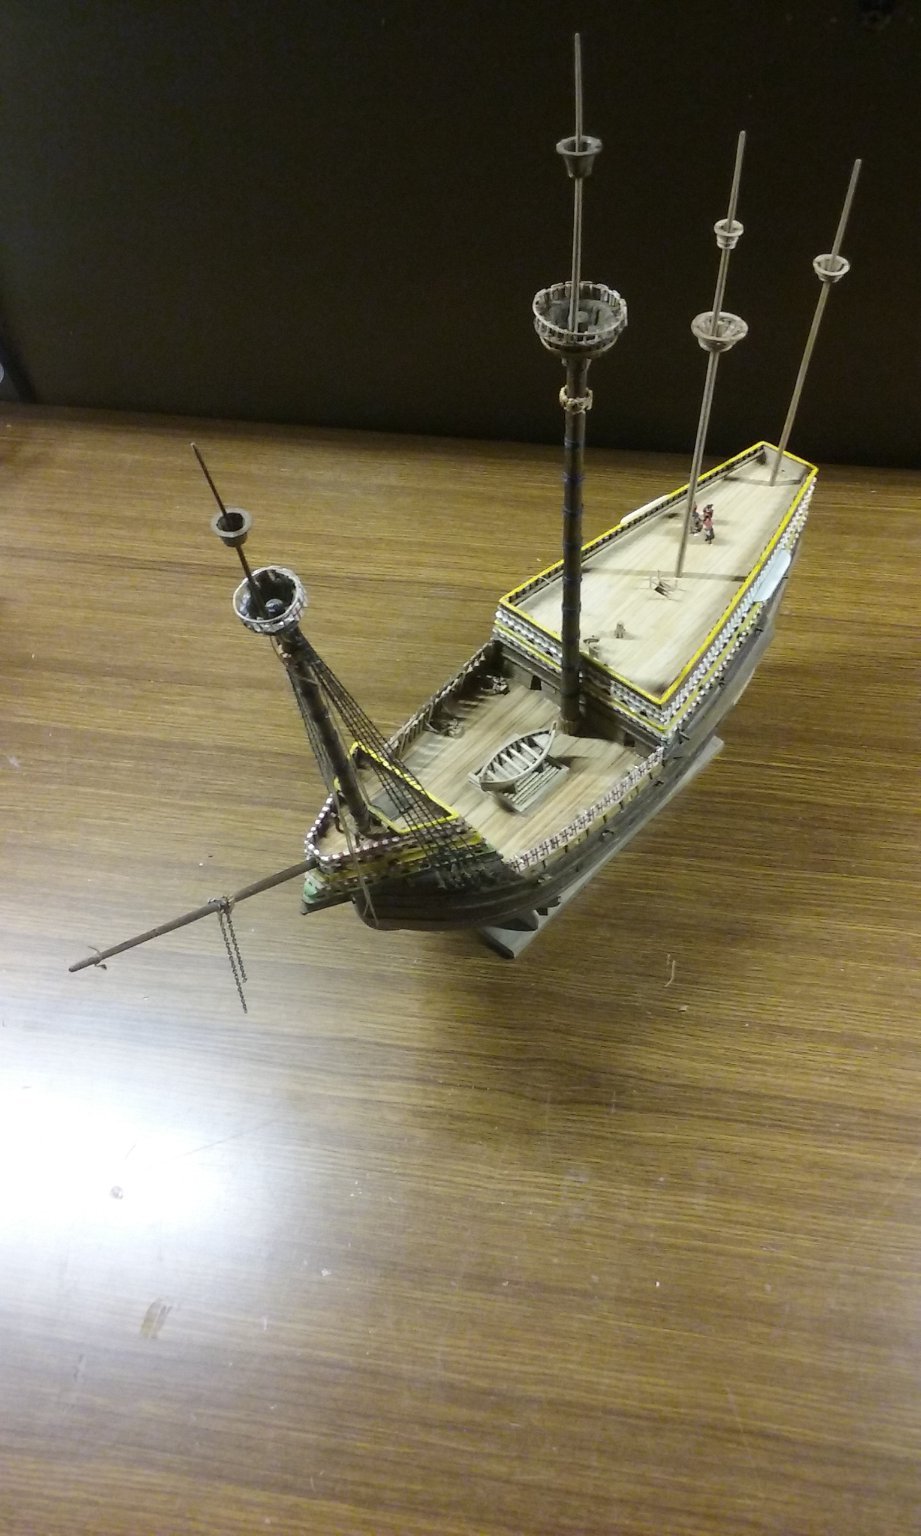
Just thought I'd post this picture of the model with dry fitted masts, while I waffle on and summon up the courage to get onto the upper shrouds with the tiny deadeyes. I realised I hadn't taken any photos from the bow, so here they are. PS: I WILL get onto the shrouds, I promise . . . Steven

- 740 replies
-
- 9
-
-
- Tudor
- restoration
- (and 4 more)
-
Frank J H Gardiner Painting
Louie da fly replied to michaelpsutton2's topic in Nautical/Naval History
Aha! I knew it was the Victory just by looking at the escutcheon figurehead, before I saw the title (maybe because I've previously built two plastic Victory models). Beautiful painting. Wish I was that good . . . (sigh). Steven -
Beautiful work, Patrick. And thanks for the step-by-step photos of the bonnet connection. I'm planning to do bonnets myself on a future build, and this will be a valuable resource to me. Steven
- 756 replies
-
- 4
-
-
- galleon
- golden hind
- (and 2 more)
-
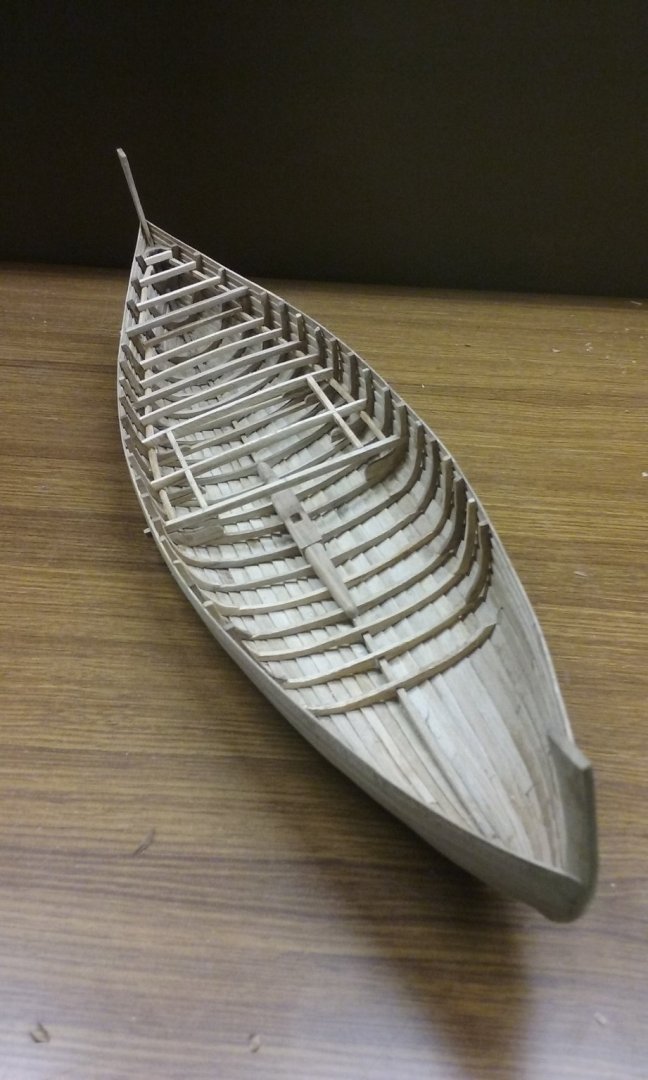
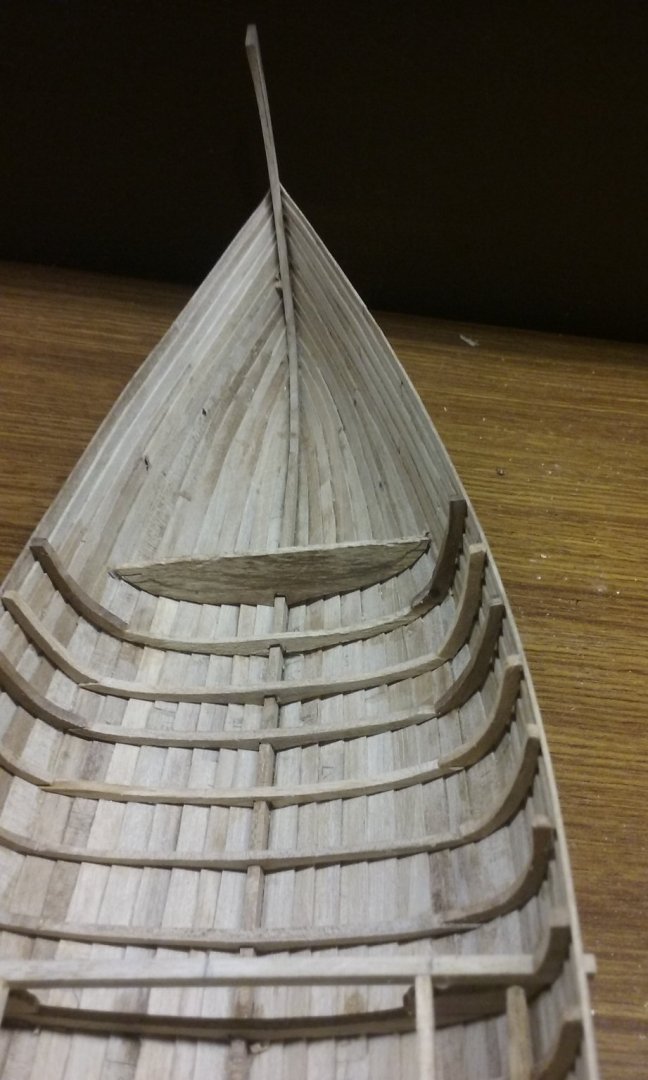
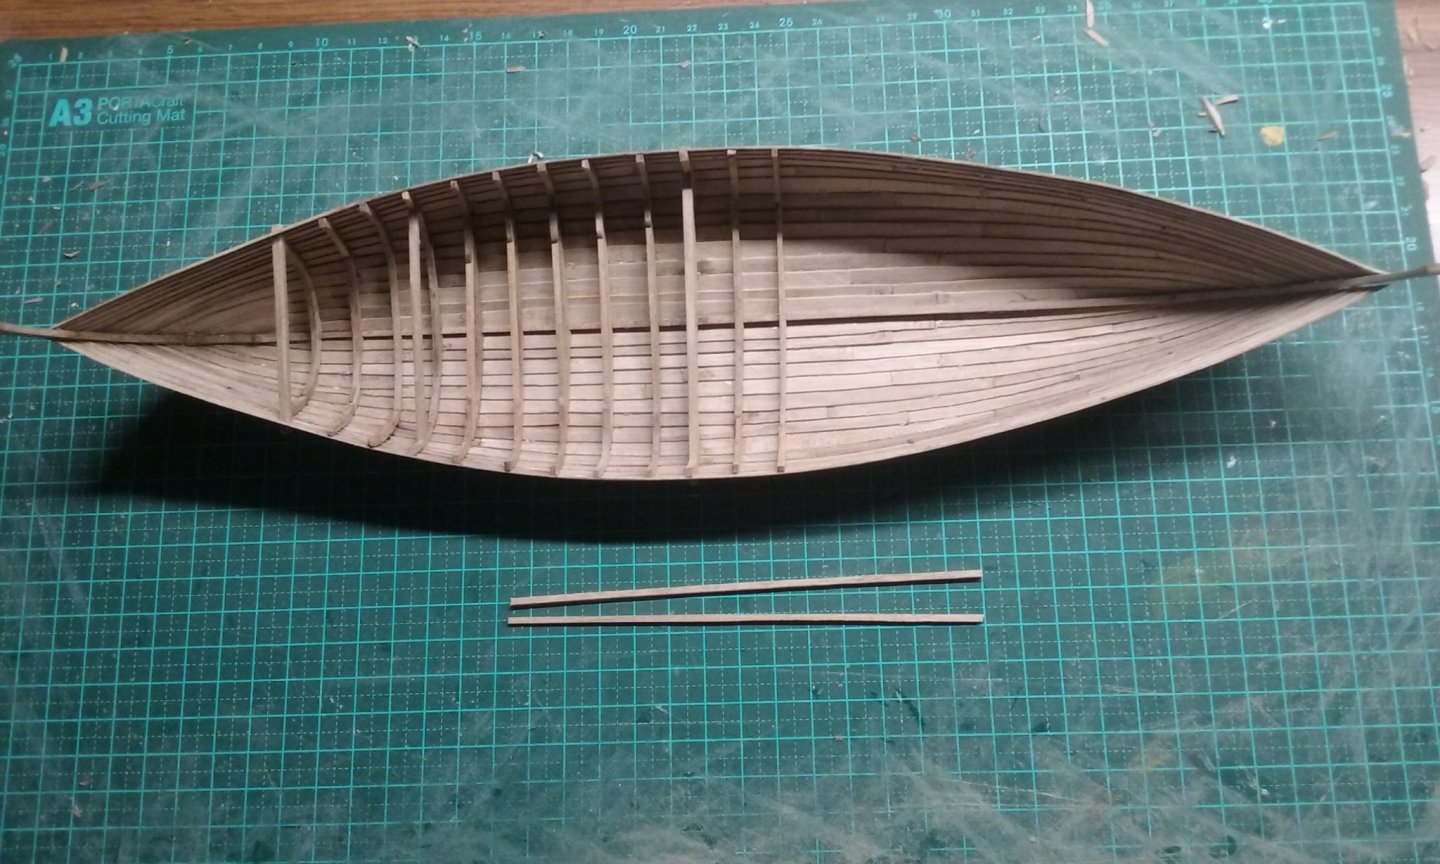
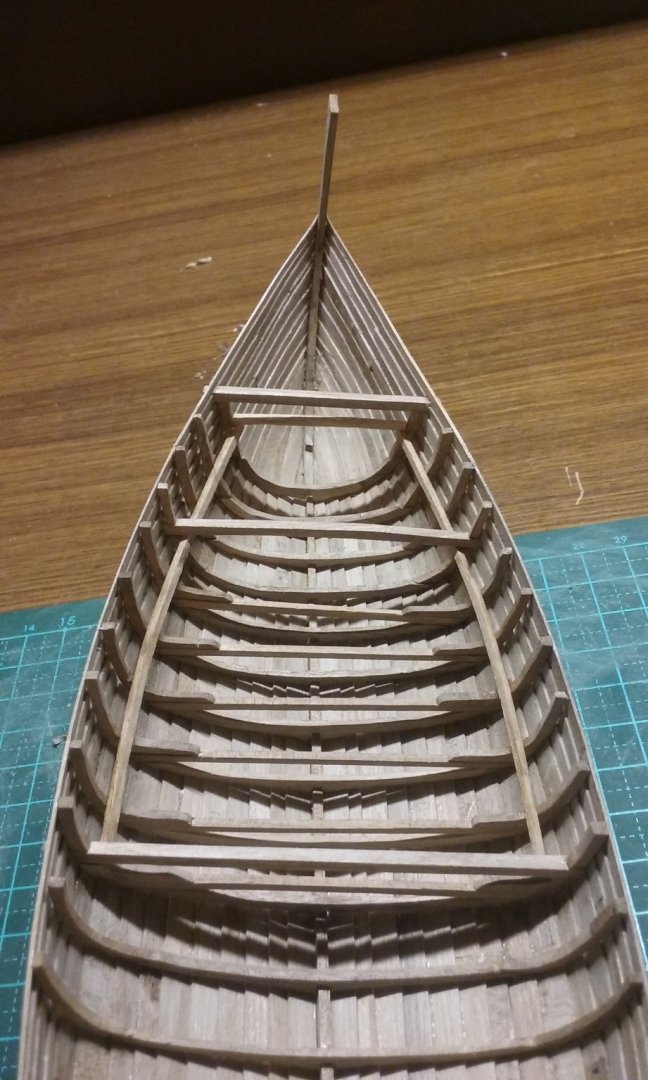
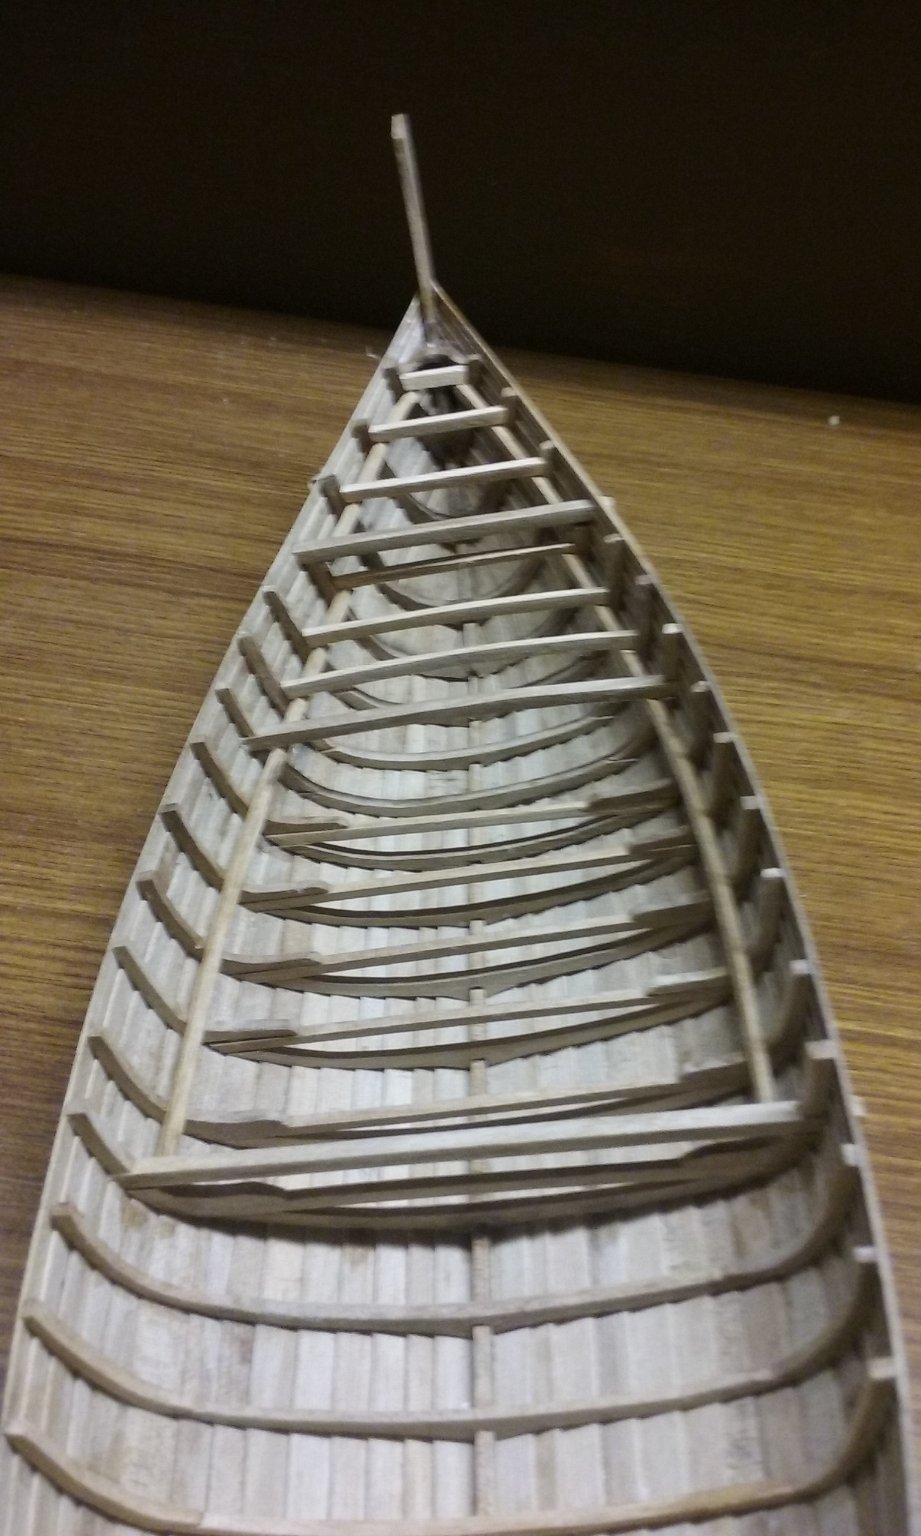
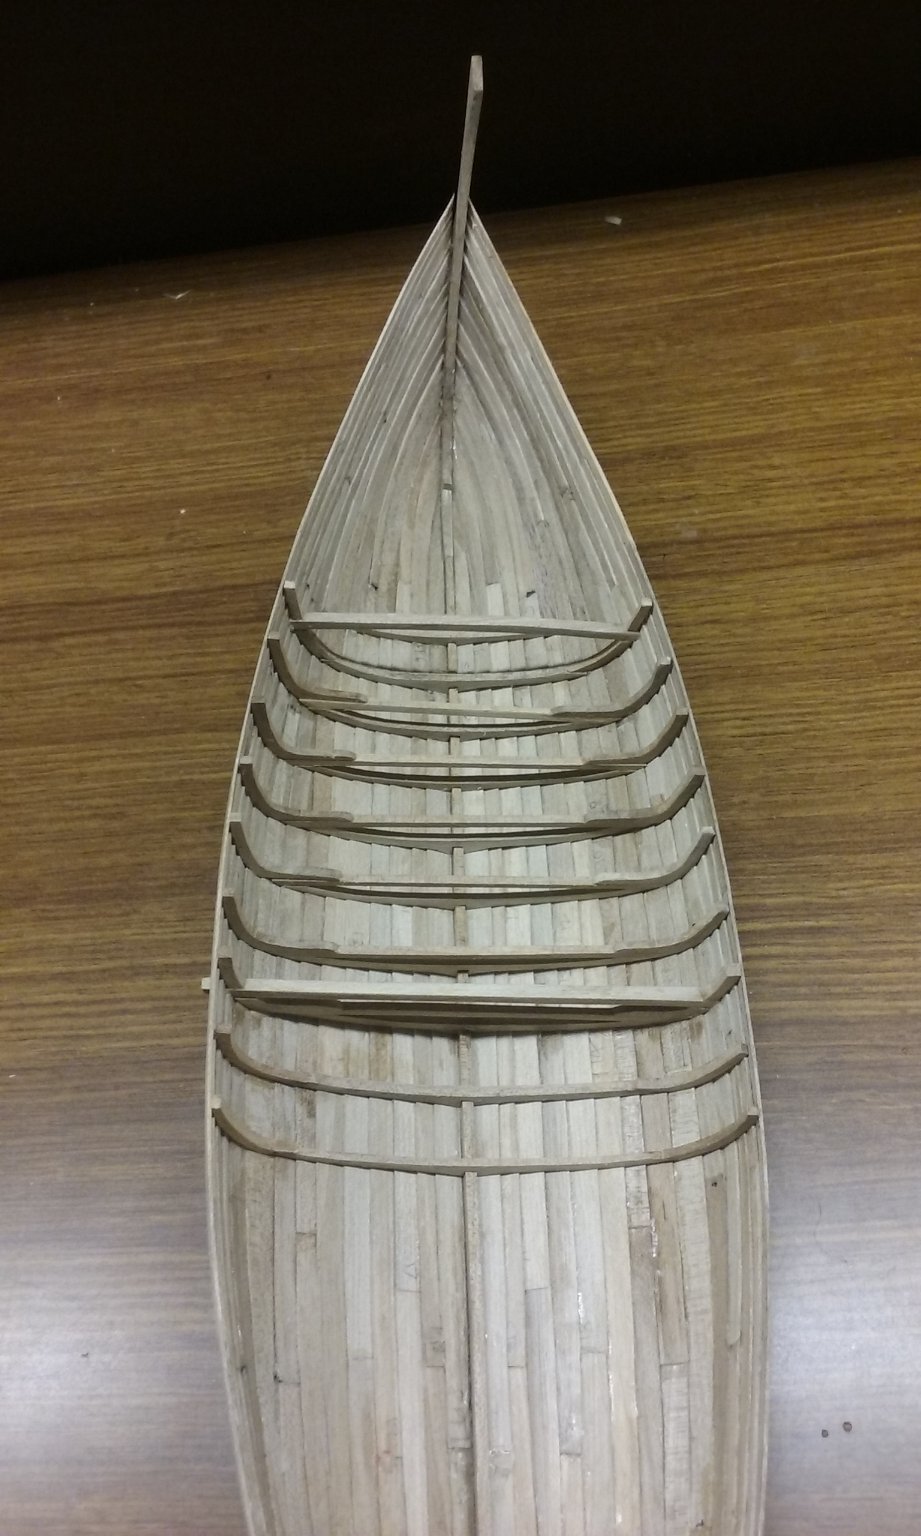
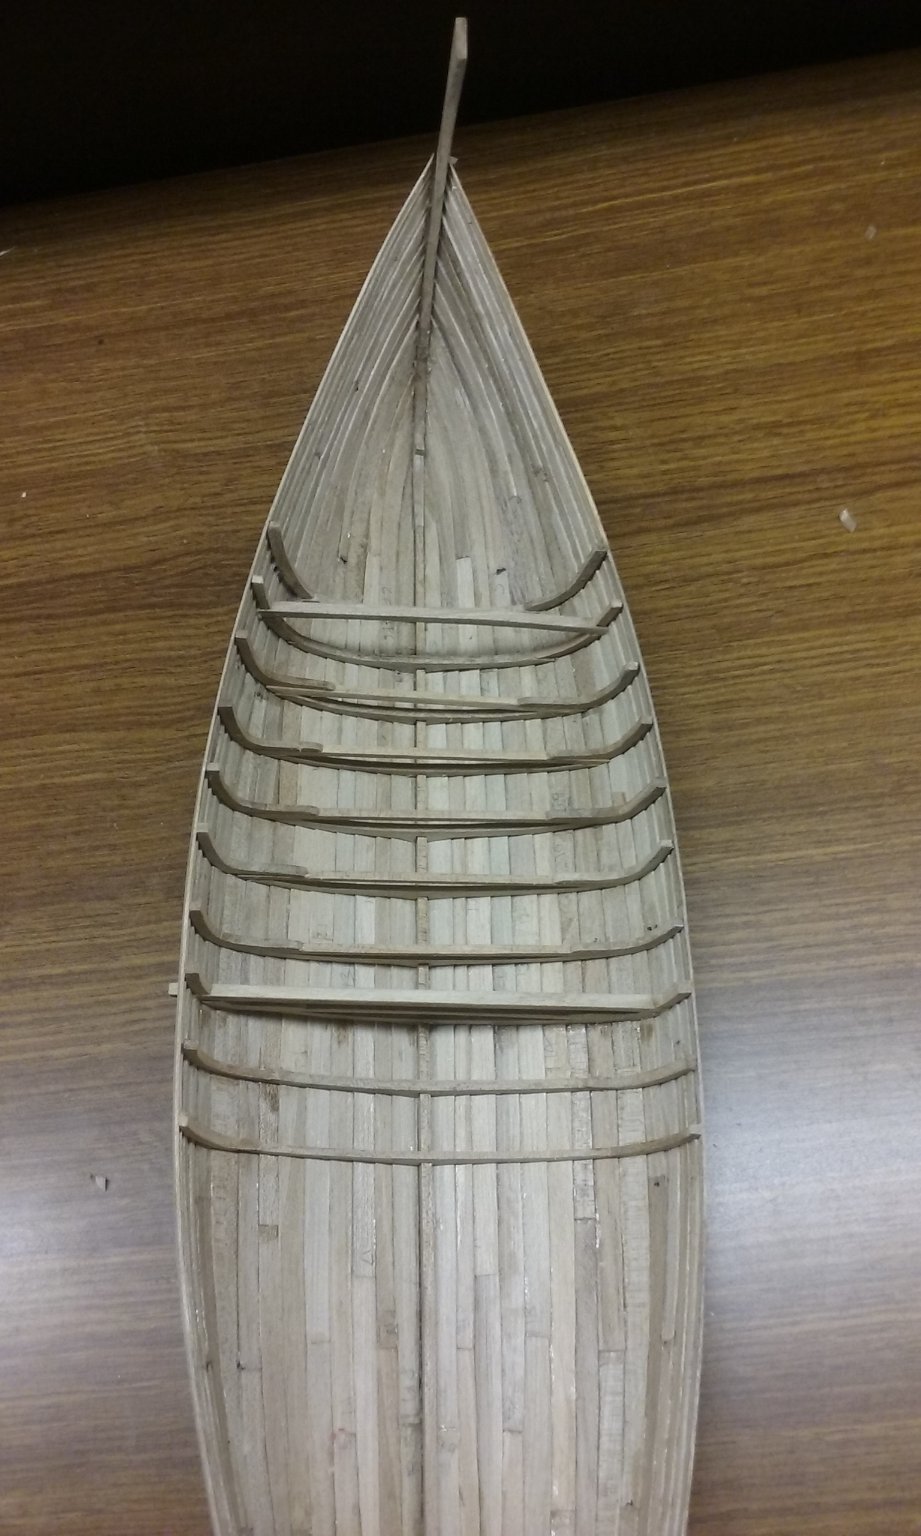
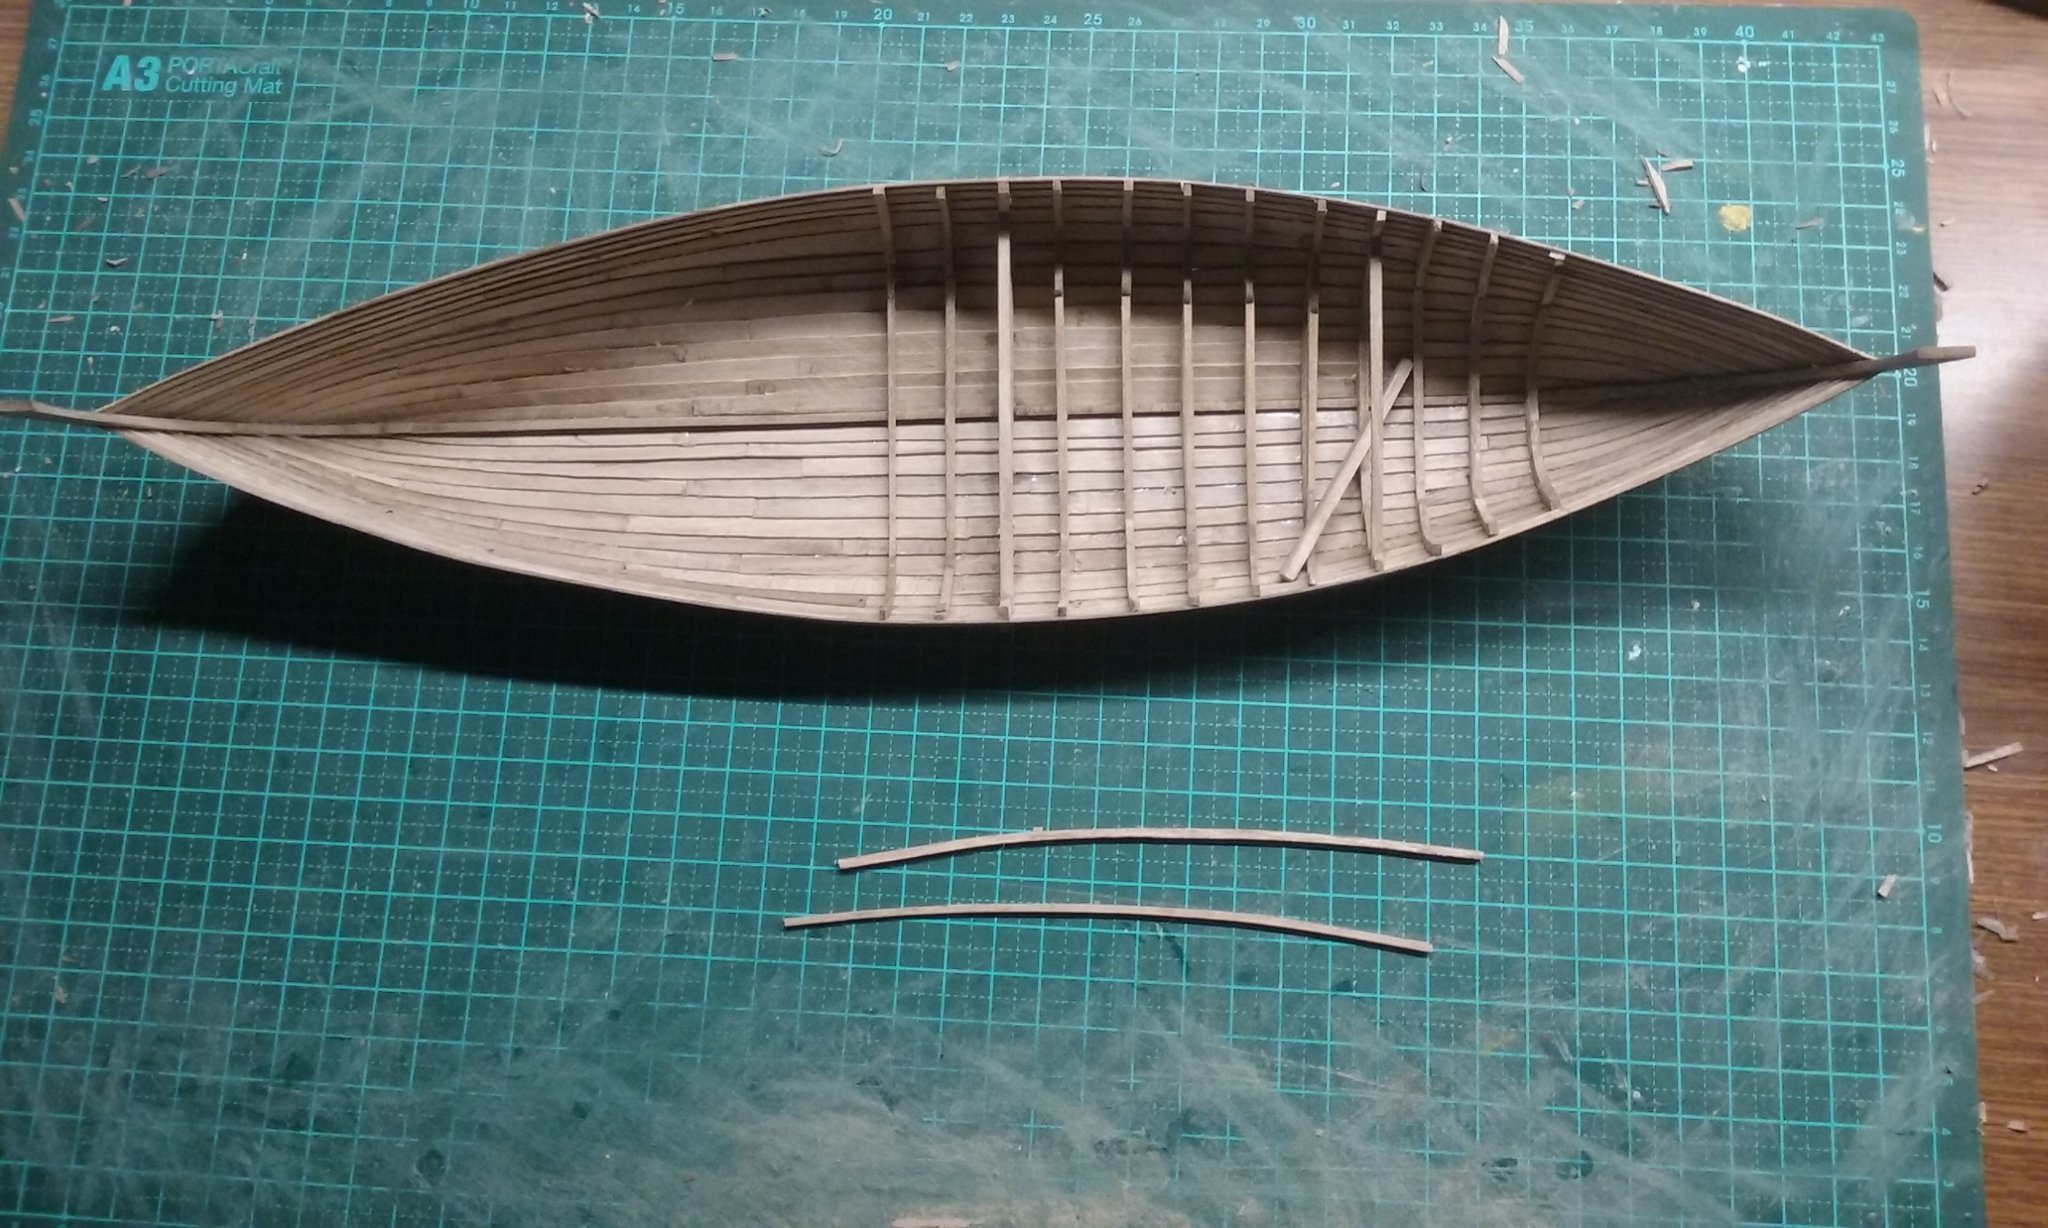
More framing. Here's where she was at the end of the last post. Framing for the foredeck done and now adding beam clamps. And glue dried - slightly wonky beam clamp because it's recycled from what was going to be a frame. And adding the deck beams for the foredeck, level with the through-beam nearest the bow. And about here I realised I was going to hit problems - I'm getting short of walnut sheet that's the right thickness. Plenty of stuff suitable for planking, but not for framing. So I got out some European plane wood that was left over from the dromon build. Not exactly the same look, but in places where it's not going to be visible it's ok - and anyway, the difference isn't all that obvious. The middle of the three frames in the photo below is plane wood - the others are walnut. I'll be using plane wood for such things as deck beams and floor timbers where they are hidden by decks. I'll try to keep all the upper futtocks in walnut because they're visible at the top ends. Adding the breast hook. All the deck beams added for the bow half. Note that two beams seem to be missing, but that's where the hold is - it will have a catwalk each side and removeable floorboards above the hold, each spanning over the gap between the deckbeams. And a nice view from the stern. Steven


- 327 replies
-
- 19
-
-
Hi Blair, and welcome to MSW. Judging by the jalopy it looks like your layout is just the right time for the Chaperone - she was in use until she was burnt in 1922, so she sounds like just the vessel for your railroad. A river steamer is on my own wish-list, but as an Aussie I'd be doing an Australian one (they're quite different from the American ones). But it's very much on the back burner - I've got so many models I want to make, I doubt I'll get all of them done this lifetime. Yes, start a build log. You'll find it very worthwhile - the members here are very friendly and helpful. Good to have you aboard. Steven
-
Yes, I realised overnight that I'd been thinking in terms of my own builds, where the deck furniture is much smaller, due to smaller vessels at a smaller scale. Steven
- 17 replies
-
- 2
-
-
- windlass
- Dutch model
- (and 2 more)
-
Marcus - surely that windlass is 11 mm, not 110 mm? Though in my own case I did use walnut, because I had a piece that was already round, from a mast that hadn't worked for me, usually when I make anything like that I use pear wood - something hard with a fine grain - the finer the better. Mine was simpler than yours - but the principle is the same - sharp tools (I use a No. 11 craft knife and replace the blades often), and don't hurry. And if it goes wrong, do it again till you get it right. I've had to do that any number of times with stuff I've been carving. And I don't wear gloves at all (I do occasionally cut myself, so I'm not necessarily recommending it, but I find it gives me better "feel" for the piece). But yes, I'd recommend you put the thing in a vise to carve it. It stabilizes the work (and reduces the chance of getting your hands cut). Steven
- 17 replies
-
- 2
-
-
- windlass
- Dutch model
- (and 2 more)
-
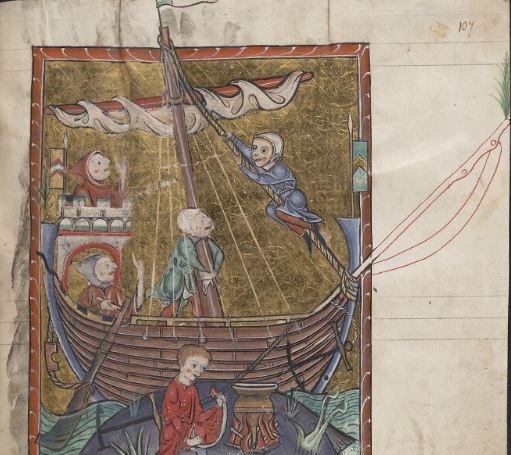
I'd agree with you, Mark, though there are certain things they all seem to have, such as those beautiful stem and sternposts, which I haven't seen in any other type of vessel, including Viking ships which are otherwise very similar. Some have "bowsprits", others don't, some have a single "castle" (always at the stern), others have two, some masts have a "top", others don't. And many pictures show some kind of leafy branch at one or both ends - no idea why. Another interesting thing is how the town seals have so many features in common - such as guys up on the yard unfurling the sail. Steven
-
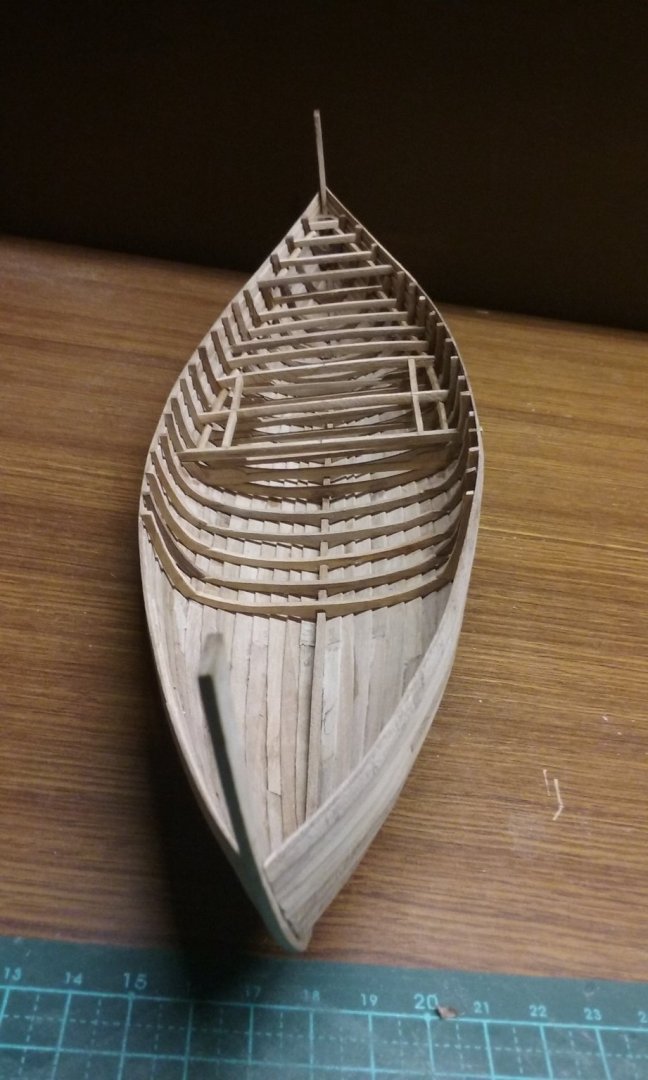
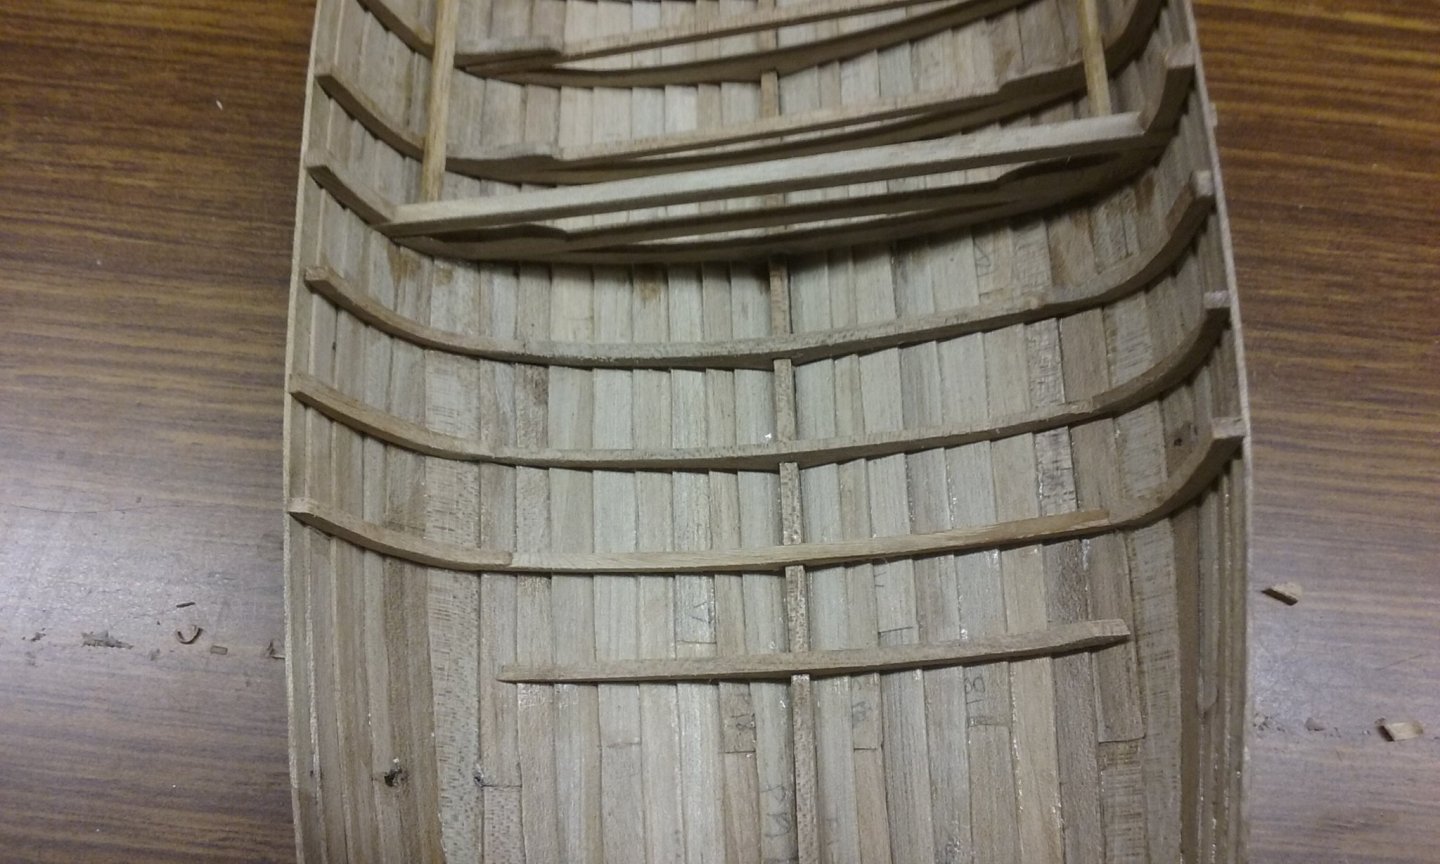
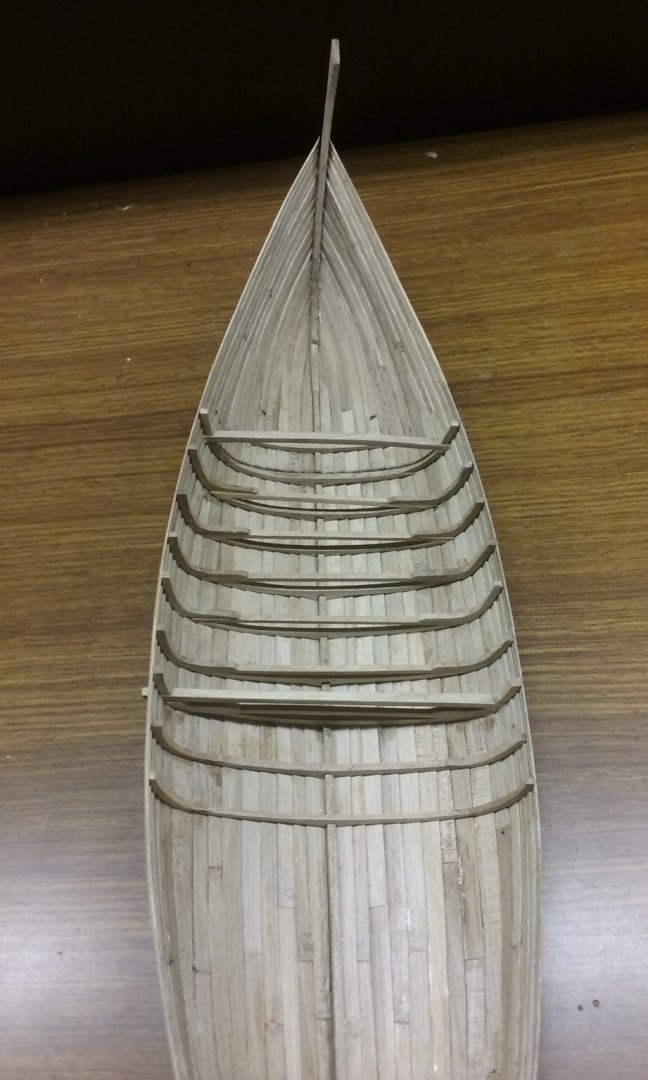
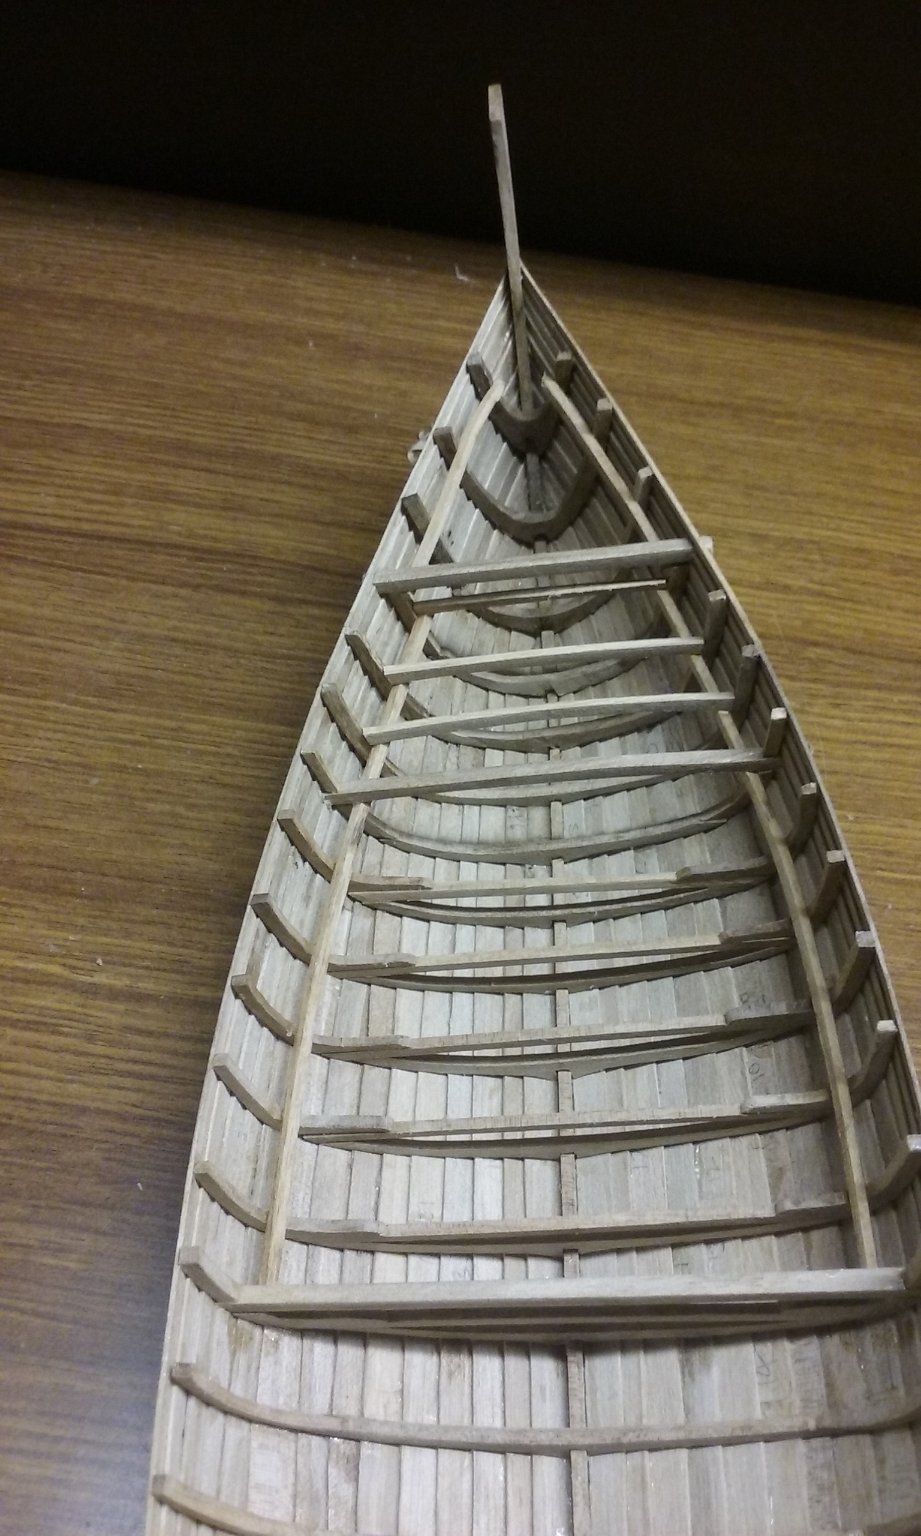
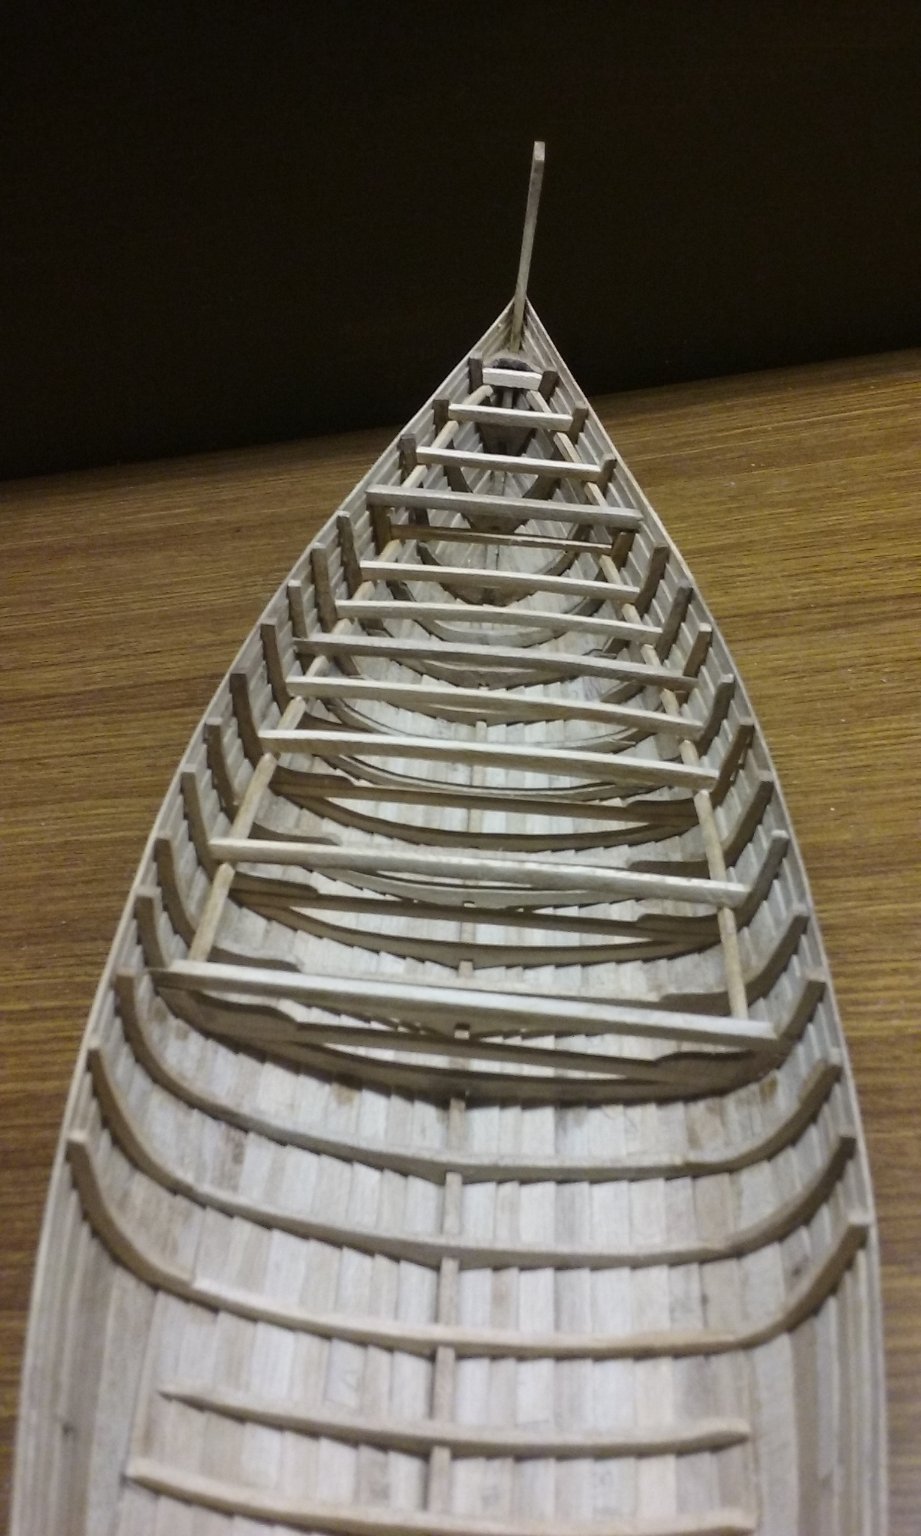
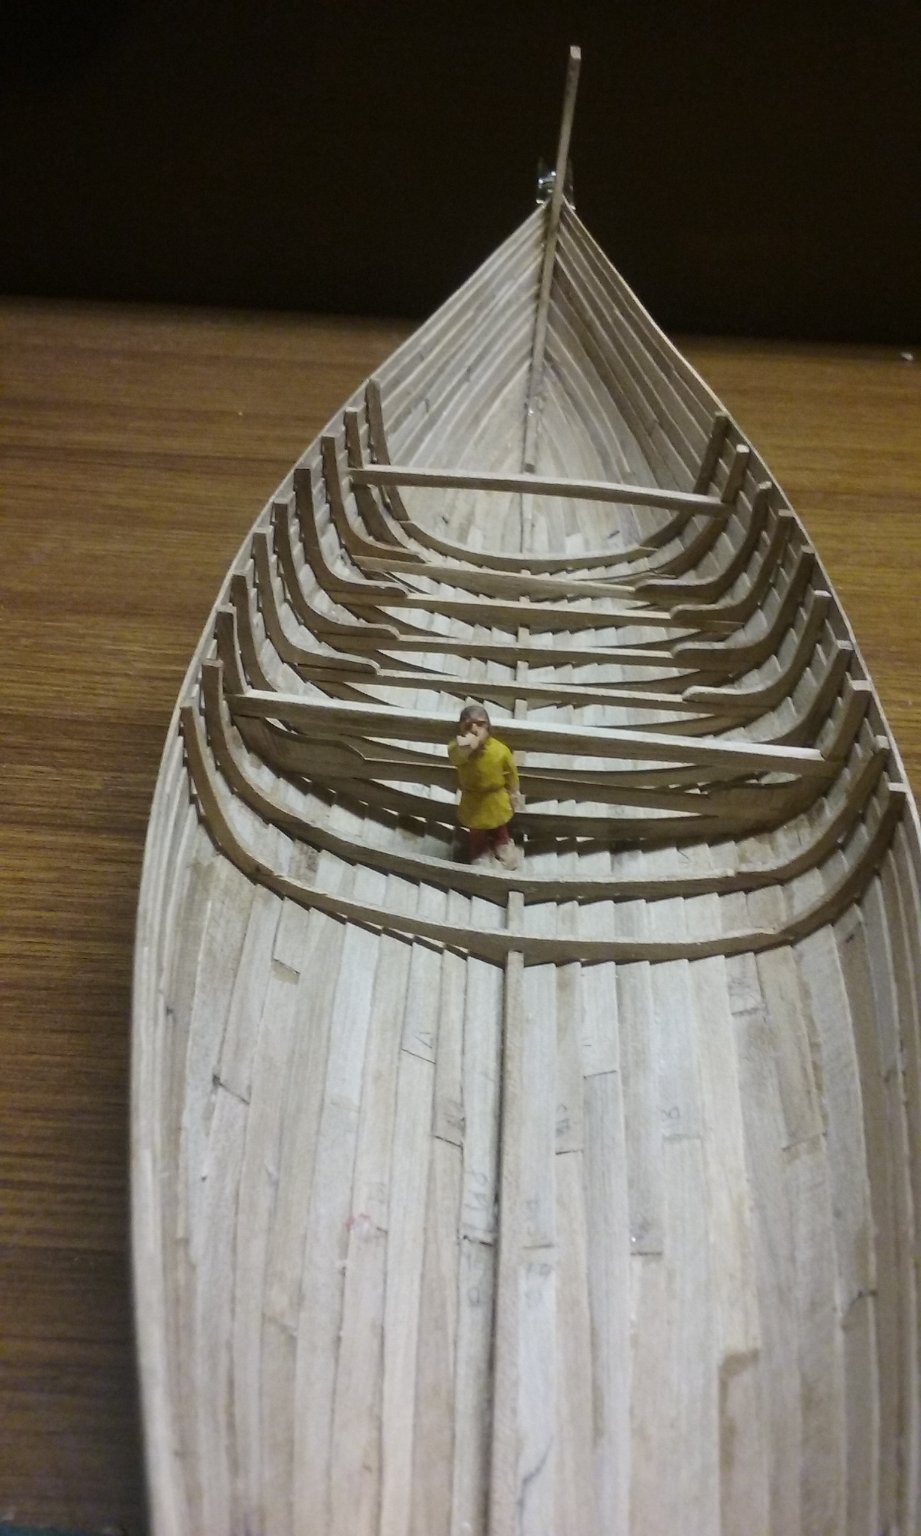
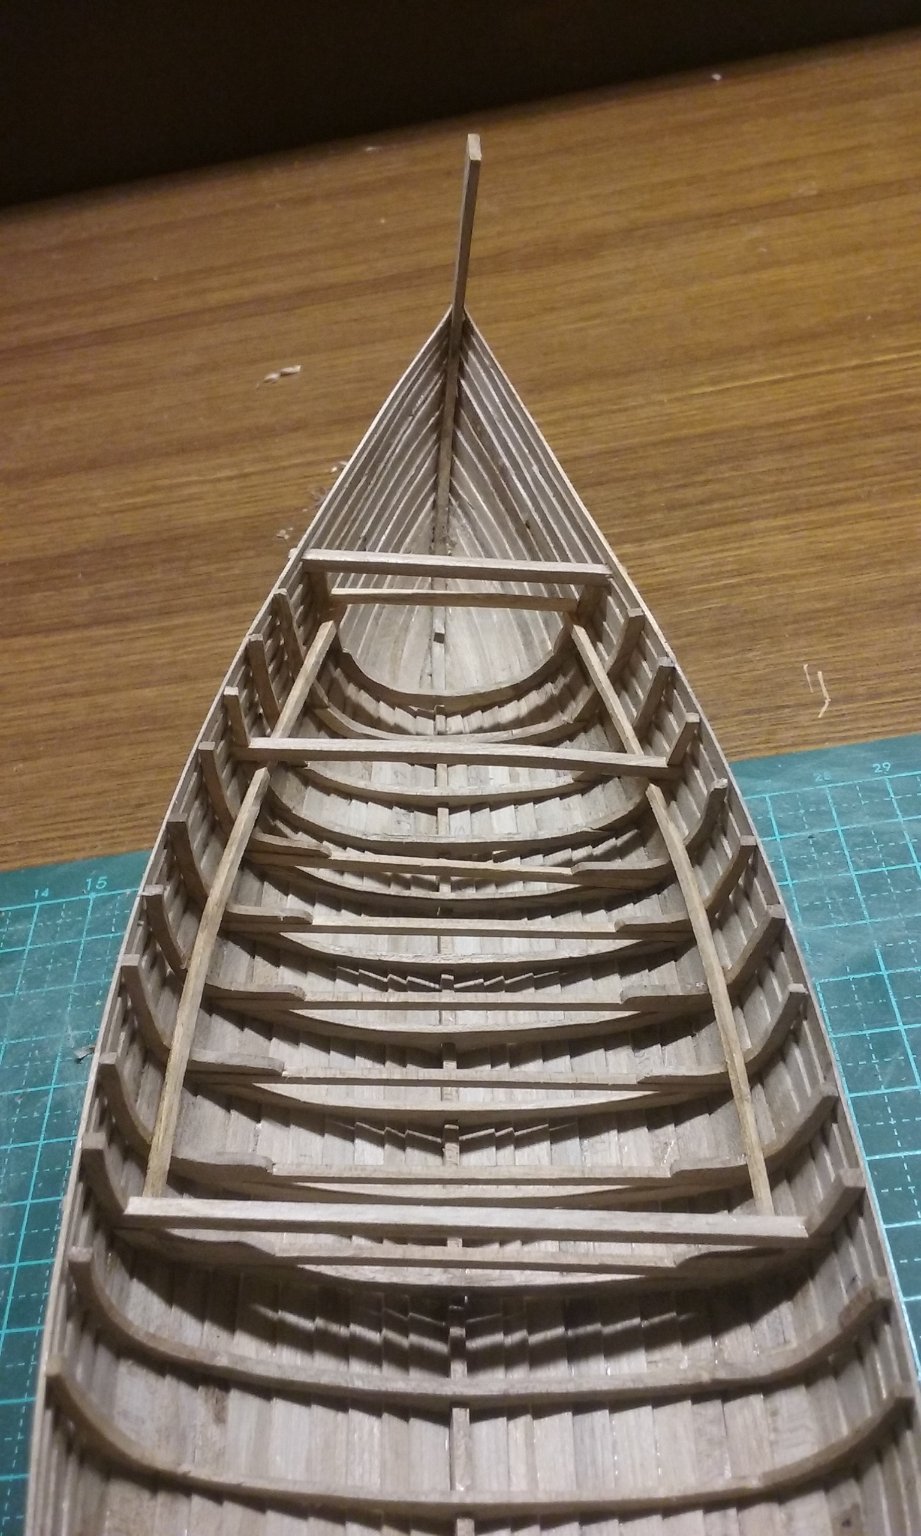
And more frames, and the second through-beam is in place. Note the new frames don't have the lower crossbeams. And I occasionally get to cut the floor timbers with the grain following the line of the frames. And here we get to see the amount of room there is in the hold of you omit those lower crossbeams. Cutting the holes for the through-beams for the forecastle. And making beam clamps for the deck beams. Beam clamps bent to follow the ship's hull. And glued in place. Forecastle through-beam in place - and deck beam below it. Next job is to add the beam clamps for the forecastle and rest of the deck-beams at this end. And then repeat everything at the other end. Steven


- 327 replies
-
- 19
-
-
Like this? Hellenic ship, mosaic (ca 1st century BCE-CE). Steven
.jpg.af533e2525ad93104c4701cc6e32d9d8.jpg)
- 62 replies
-
- 4
-
-
- amati
- greek bireme
- (and 1 more)
-
Looking good, but I think the ram looks a bit small. Check out the rams at (which are, admittedly Roman and/or Carthaginian) and also do a Google image search on the Athlit Ram, which is Greek (they think!). Steven
- 62 replies
-
- 2
-
-
- amati
- greek bireme
- (and 1 more)
-
Sounds like a good plan, Antony. I find that when I don't do that, I end up regretting it. Main problem is not a broad enough scope of imagining what could go wrong - nature always seems to find an extra way . . . Steven
-
And here's what Wikipedia, the source of all knowledge, has to say about traverse boards - https://en.wikipedia.org/wiki/Traverse_board Looks like the same thing. The "renard de présence" is a fairly common item in businesses etc, but I have no idea what its right name is in English. But I'm assuming the "renard" part is just a sort of carry-over from the name of the traverse board. Steven
-
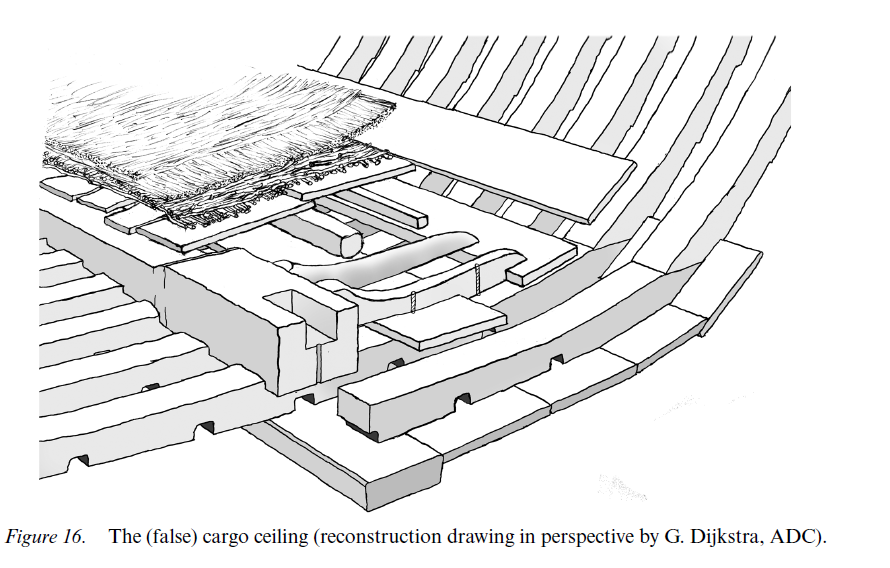
Yes, probably - though the Ijsselcog had what looked like grain that had been in sacks. However, (if I read the archaeological report correctly) they found "ceiling planks", which I think means there was a deck above the hold. And also slots for deck beams within the hold that indicate the hold was actually on two levels (page 476 of the archaeological report I linked above). Of course a cog is a lot deeper than a nef, and I'll be happy if I just get a single level in the hold. Steven
-
That's beautiful work, Antyronnen. A clever solution to the carved stem, and I like the way you've organised the joint between the keel and stempost. Looking forward to further progress! Steven
-
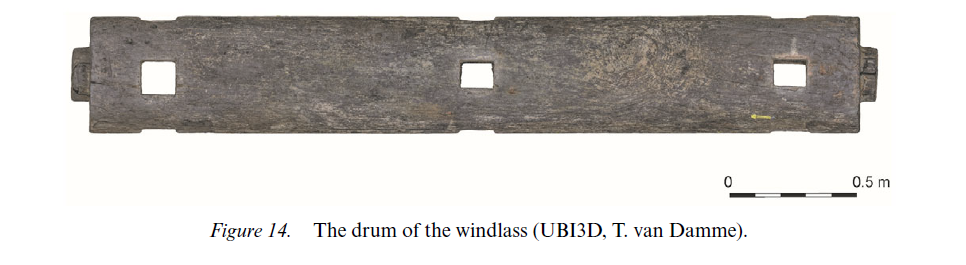
Thanks for the input, Chuck. I think we must have been writing at the same time as each other. I don't suppose they have to be on what is in effect an open boat, especially as they can be removed to bale her out. I really don't know if pumps were in use at this time - though Woodrat put them on his near-contemporary Venetian Round Ship, I don't know of any evidence of them being used in the Atlantic. Time to have another look at the archaeological reports on cogs - nah, no mention of pumps at all. Yes, this is confirmed by the windlass barrel from the Ijsselcog. The Bremen cog has not only a windlass but a capstan as well, and though the best photo I've been able to find is a bit equivocal, it looks like the holes go all the way through on this one too. An easy way to stop it unwinding without ratchets and pawls. Oh, and I've found some earlier representations of cogs - dating back to 1267 and 1280 - exactly contemporary with the Winchelsea nef. Steven
-
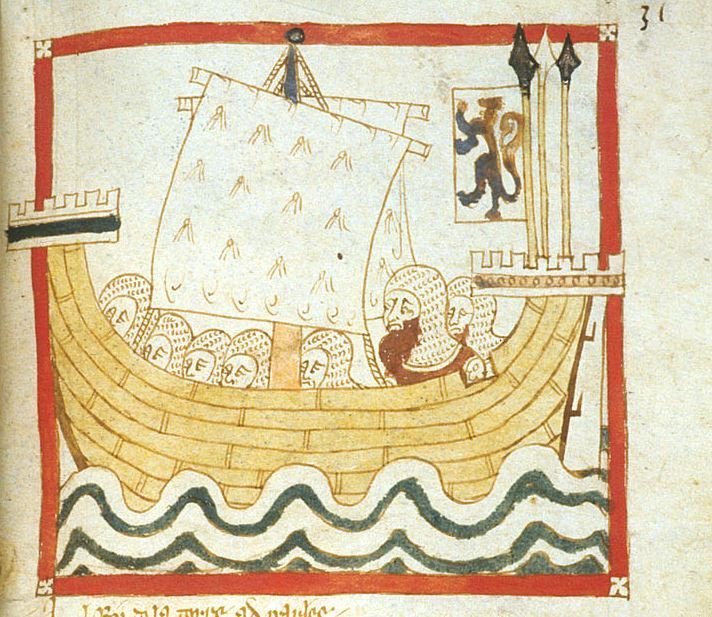
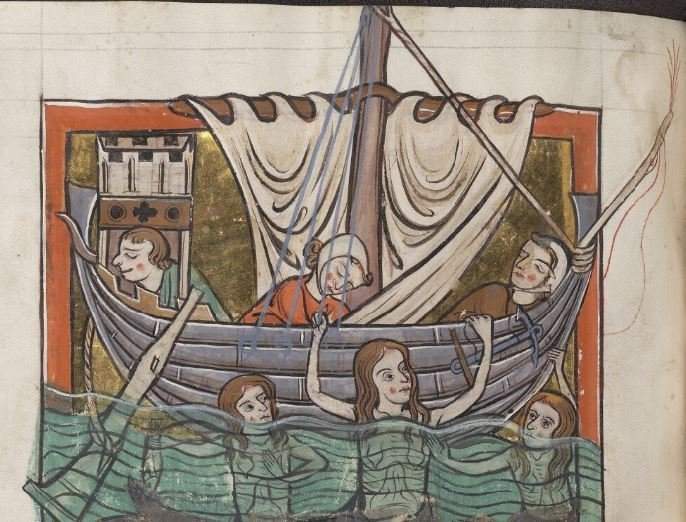
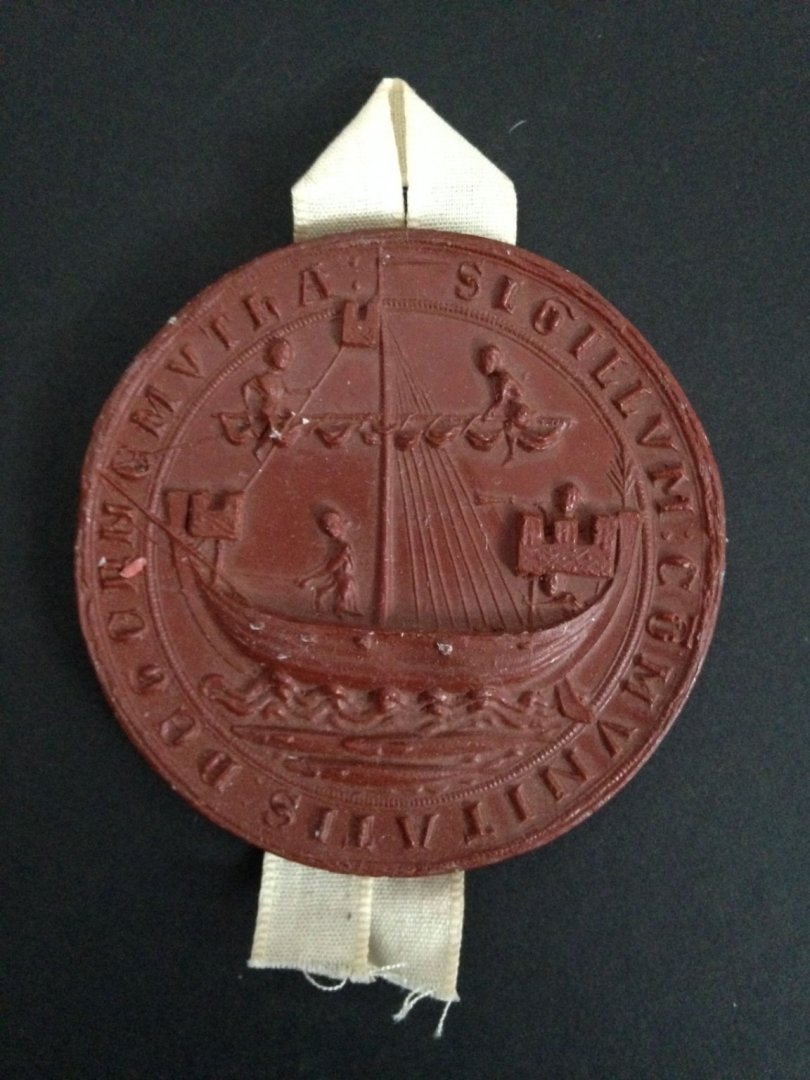
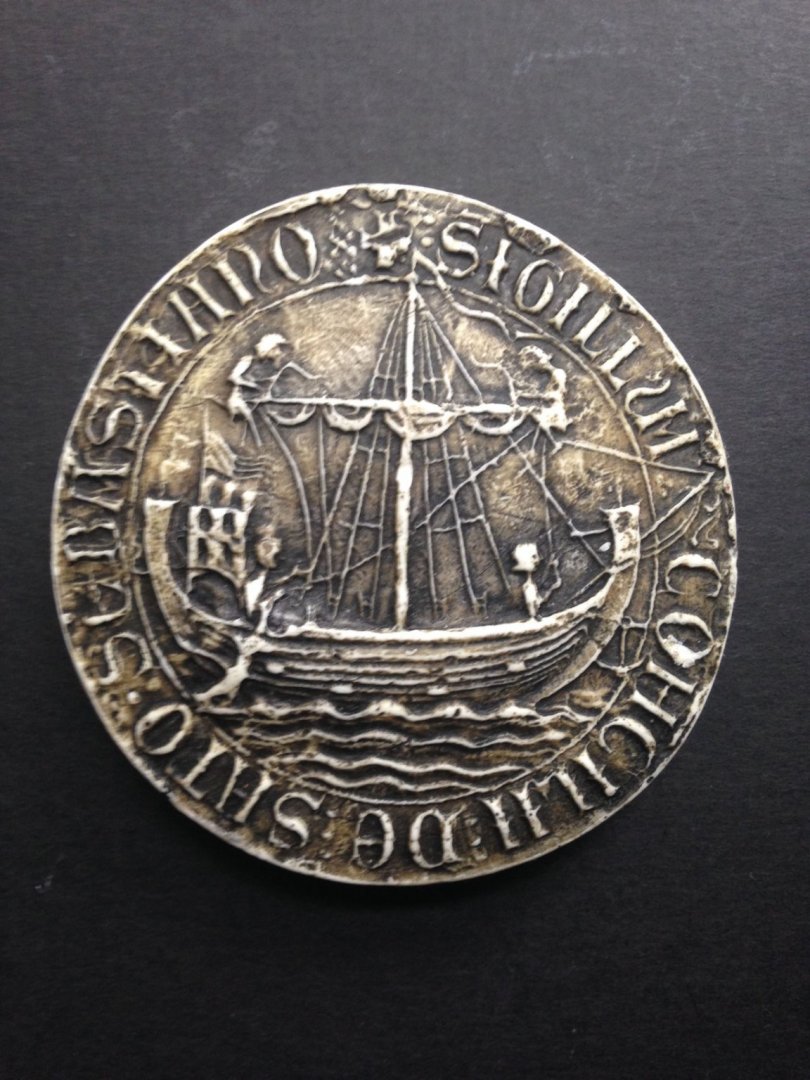
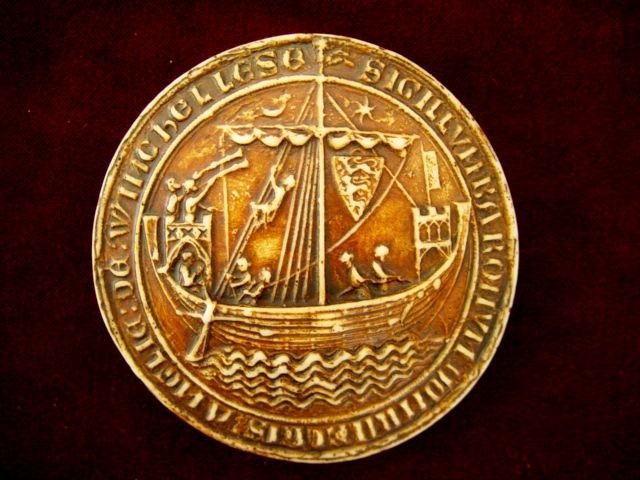
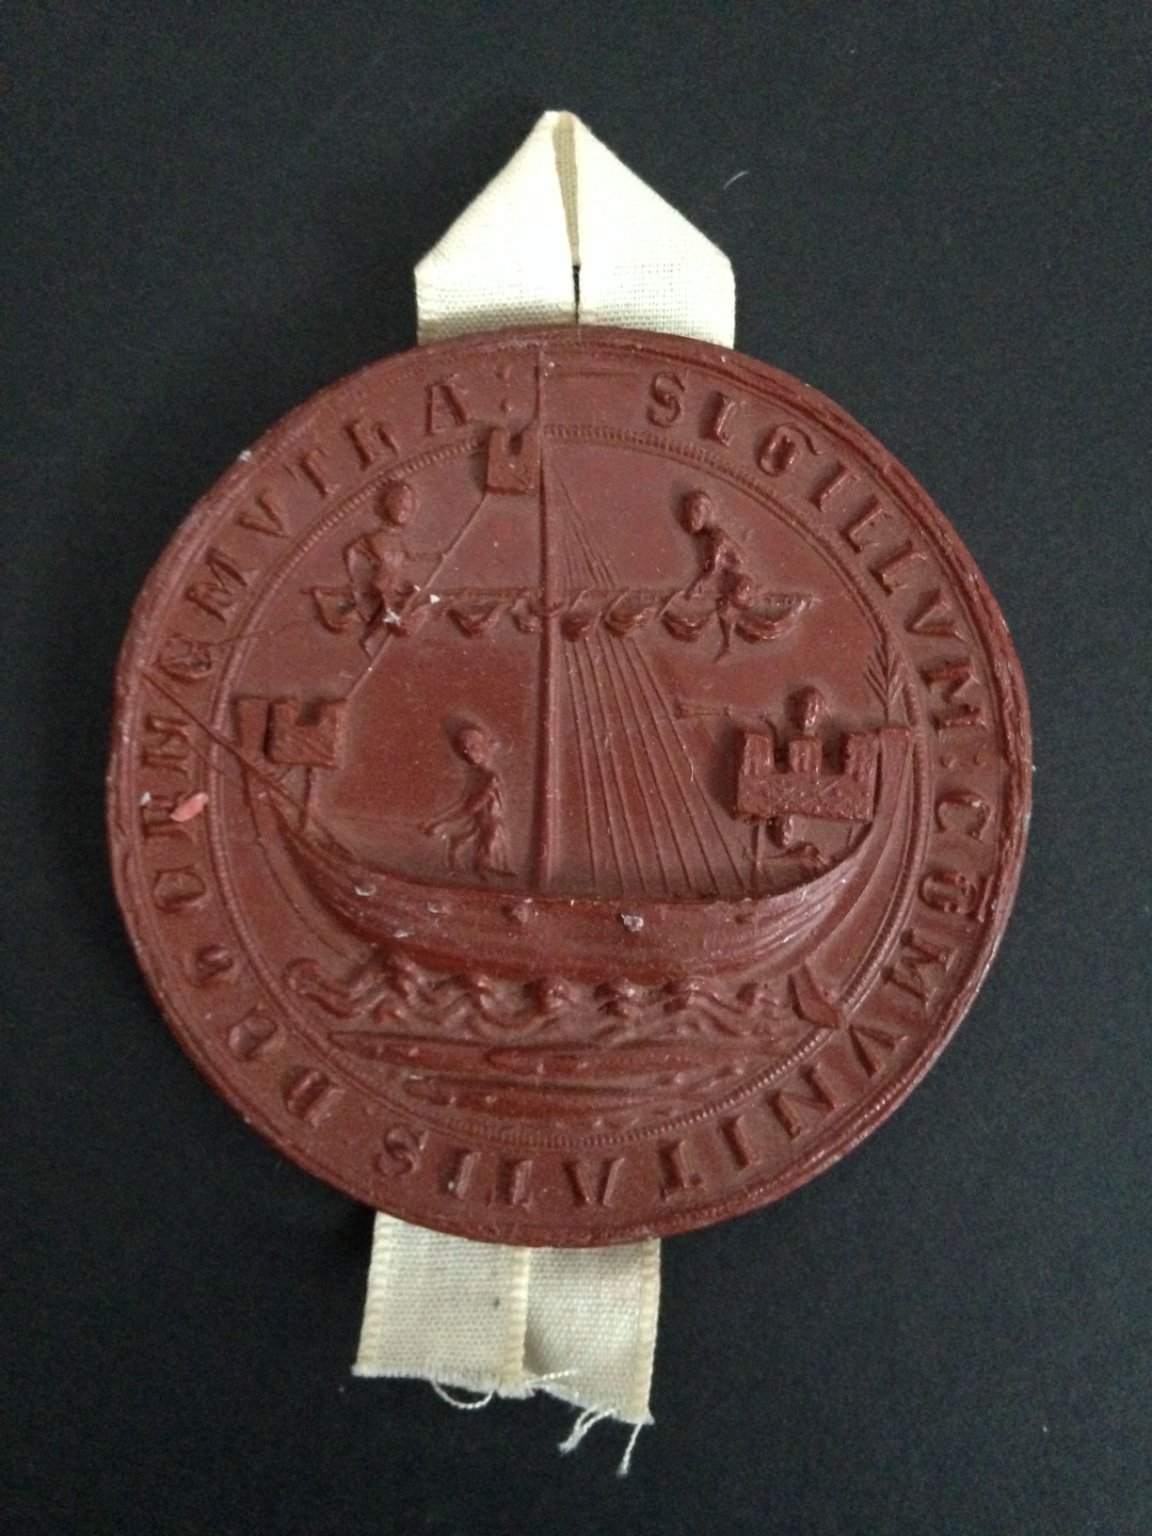
Just going through some more info. The evidence whether nefs had a raised deck (level with the top of the through-beams) is a bit contradictory. I've already shown the Winchelsea nef in my previous post, and the crew certainly seem to be standing on a raised deck. This is supported by the seal of Yarmouth St Nicholas and an illustration from the Bestiary of 1225-1250, MS Bodley 764 supports this idea. However, another illustration from the same source contradicts this, as does an illustration fro BL Egerton MS 3028 Unfortunately, most of the other town seals could be interpreted either way - plenty of crew members shown, but their feet may or may not be standing on a raised deck. Here are the seals of Sandwich and San Sebastian. It's quite possible that both types existed. In any case, I'm still going with the raised deck for my model, as it's pretty evident that the ship on the Winchelsea seal has one. Steven
.thumb.jpg.cc116b09f04353d0b30c1077baf7ac2b.jpg)
-
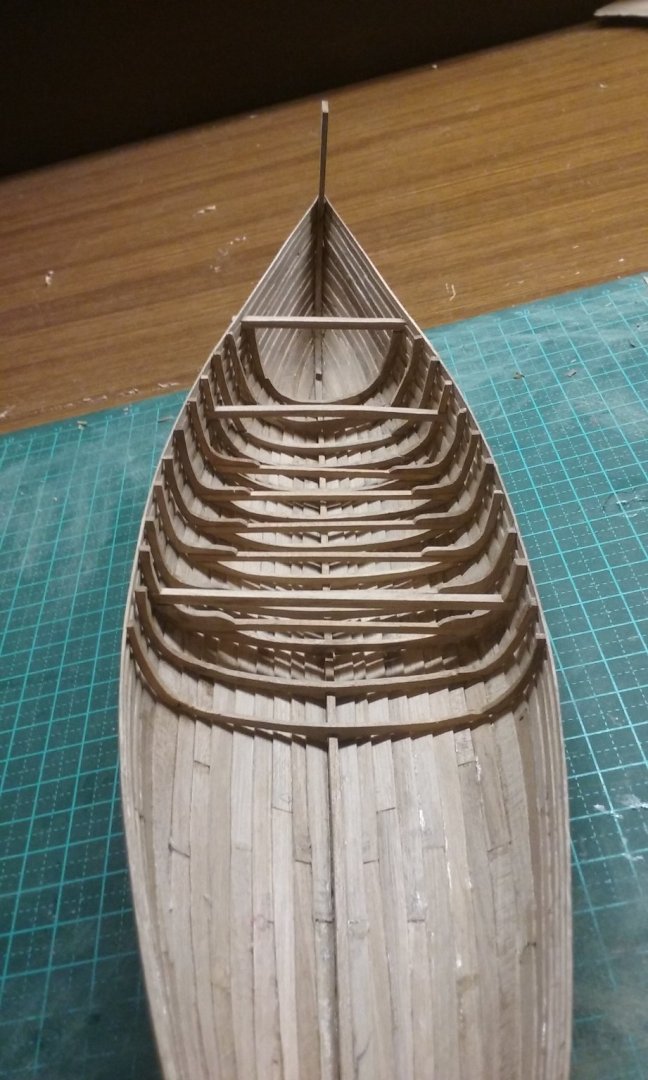
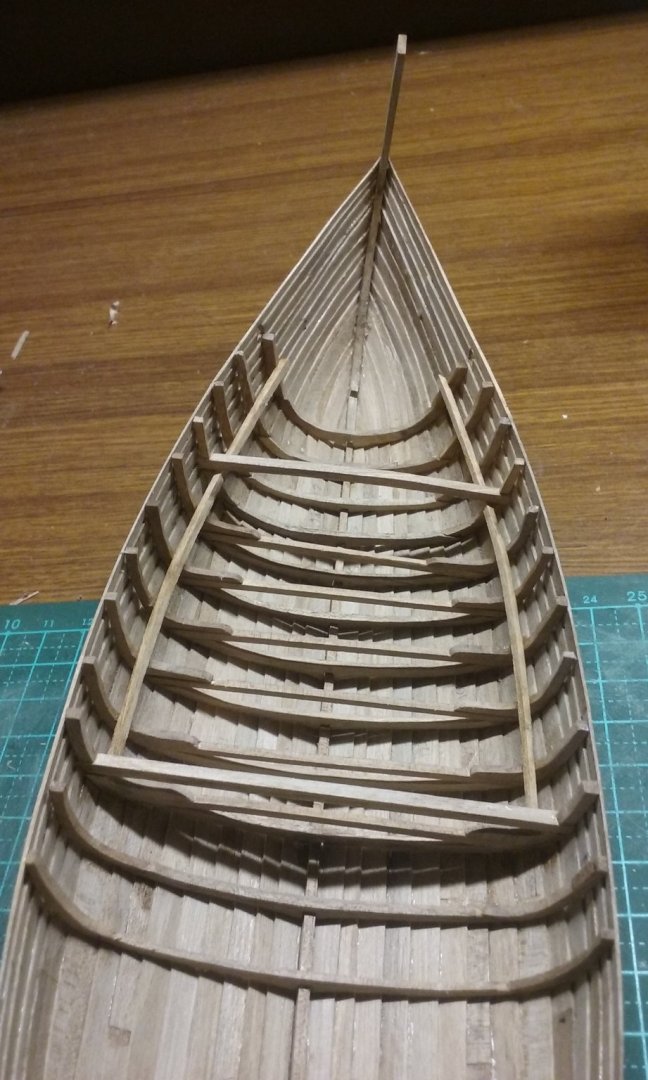
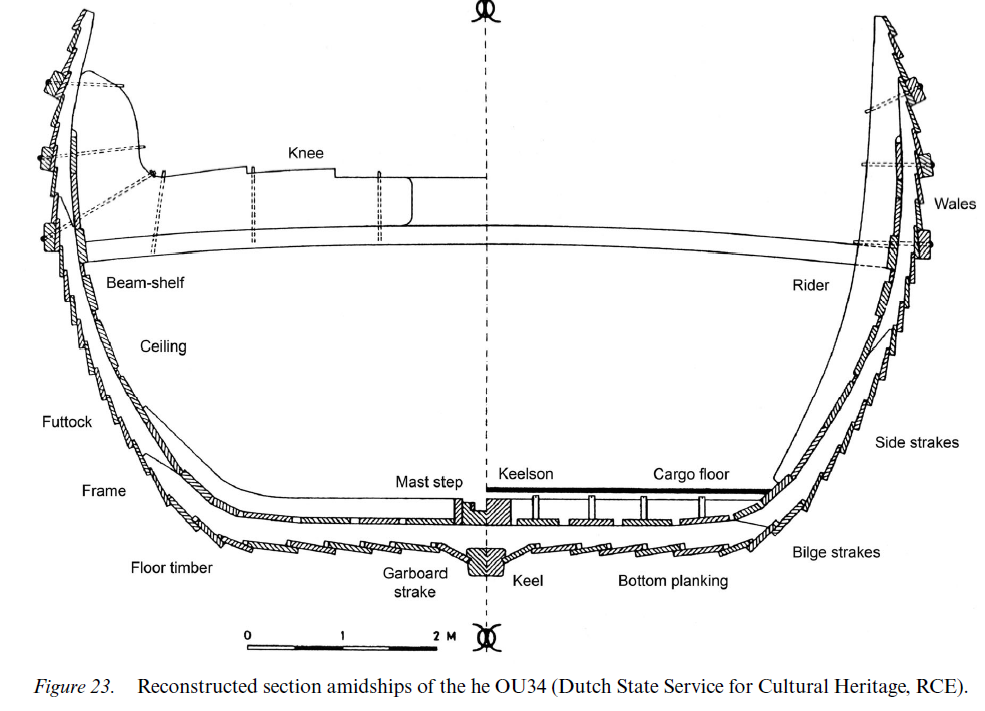
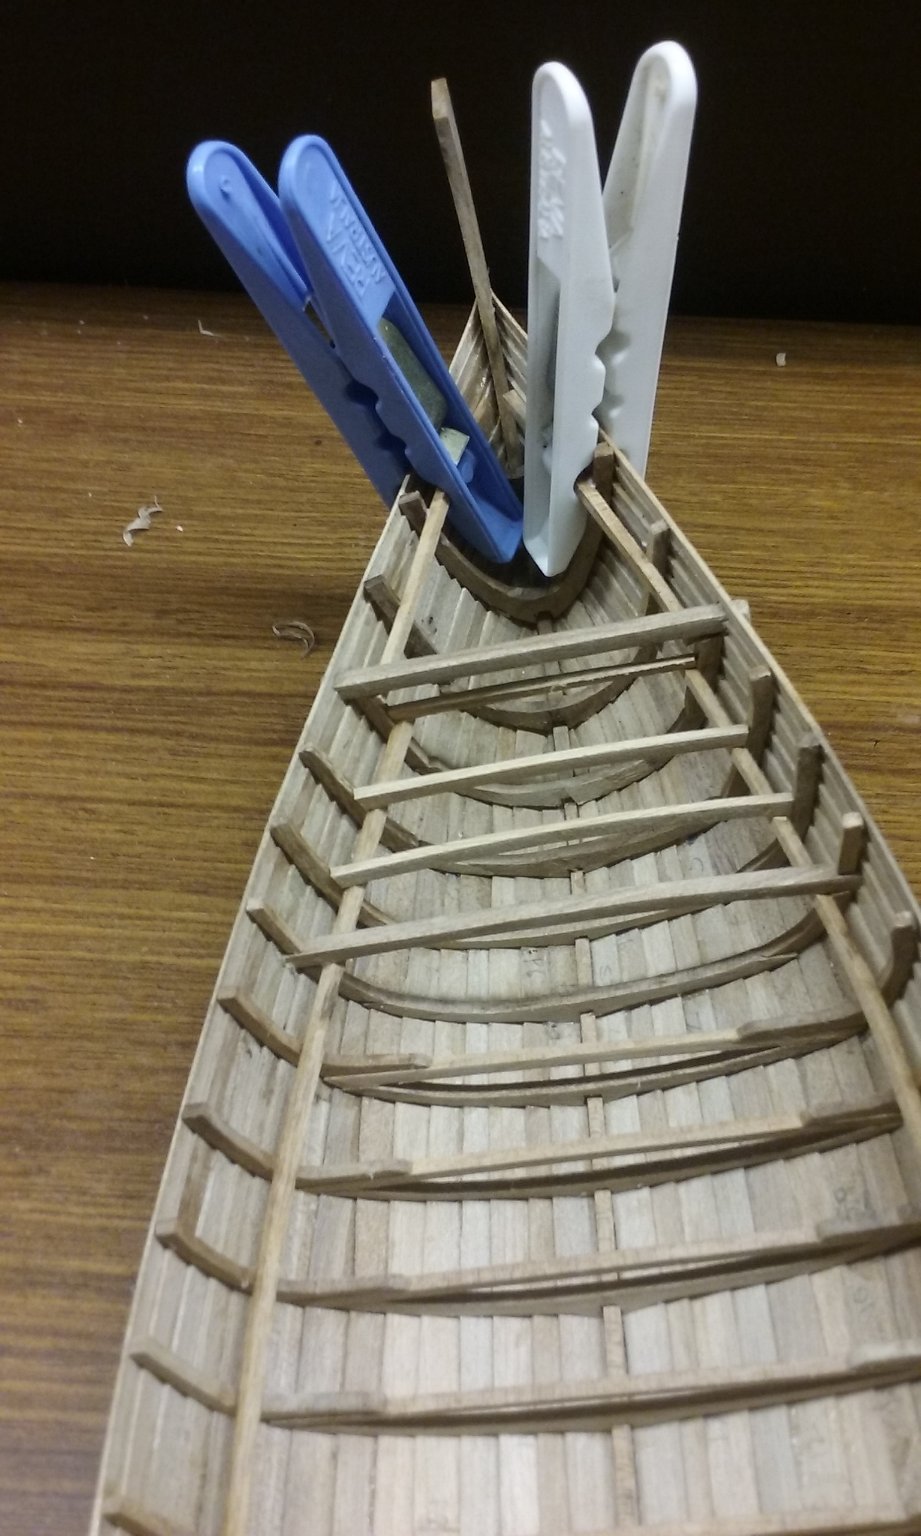
I've added some extra frames; the next one in sequence will incorporate the second through-beam. But I've come across a problem that is going to plague me unless I do something about it. With the crossbeams the way they are, the hold of the nef isn't going to have enough vertical room in it. The knarr I'm taking most of my structure from seems to have its hold open to the sky - there's no evidence of deck-beams above the hold - but the town seals of nefs show figures obviously standing on a raised deck. And the combination of this deck and the crossbeams below restricts the height available for cargo to an unacceptable level. In the real world if a person was standing on the crossbeams, the deck would only be up to his waist. I'm looking more and more at cogs for a model to work from with this. Yes, they're a later vessel, but as I've found from looking at town seals, not that much later. Though the Bremen cog dates to 1380, there are contemporary representations of them as early as c. 1310, only 36 years later than the Winchelsea seal. The construction of a cog doesn't have these crossbeams down in the bilges - in fact they are quite lightly constructed. In fact, checking on the Ijsselcog find, (see https://www.academia.edu/40371597/The_IJsselcog_project_from_excavation_to_3D_reconstruction ) I've found my suspicions about the construction method confirmed. The frames are made up of three futtocks, connected simply by scarph joints - one of which is at the sharp corner at the turn of the bilge, though there is a knee there to reinforce it. And I think this is why they have those hefty through-beams; they're needed to compensate from the lightweight construction. I note also that at least some of the through-beams are reinforced with hefty knees (see fig. 23 above, and the photo of the Bremen cog in an earlier post). In the Ijsselcog these knees are fixed through the planking to wales on the outer surface of the hull. This form of construction allows for a very considerable amount of room for cargo, whilst being strong enough to cope with wind and wave. I'm not going to change what I've already done - apart from anything else, the upper deck will hide the through-beams I've already put in. But I think I'm going to follow the cog construction as far as I can for any future frames. I also need to consider those great big knees used on the cog, and see if they are appropriate to the nef. As it appears to be flush-decked apart from the small fore and after decks, I may have to compromise with smaller knees, to allow access fore and aft. Still a work in progress. On another subject, and getting a bit ahead of myself, I'd been wondering about the function of the windlass and whether it was used to raise the sail, and if so, whether there was anything in between (such as a bollard) the halyard was tied to once the yard was raised. I found some video of sail being raised on the Viking reconstruction Harald Fairhair - So yes, if this is any guide, the windlass is specifically to hoist the yard, and the halyard runs directly to the windlass and is held there by it, without any bollard or whatever. Steven
- 327 replies
-
- 13
-
-


.jpg.d82f89f366e9d4ef3d3d23d31292bb4e.jpg)


.jpg.48fe149e118f21e8eb6b21ac6950e261.jpg)