
MORE HANDBOOKS ARE ON THEIR WAY! We will let you know when they get here.
×


Louie da fly
-
Posts
7,985 -
Joined
-
Last visited
Content Type
Profiles
Forums
Gallery
Events
Everything posted by Louie da fly
-
Welcome to MSW BranPie (interesting name . . . ). You've already got the right idea with starting a build log and looking at other Polaris logs. That should help you a lot. Perfectionism can be a bit of a curse for ship modellers - you will make mistakes; we all do (the better modellers just make more interesting ones). Just remember that each model is a learning experience and each mistake will teach you something for next time. Also that wood is a very forgiving medium - if you stuff up totally, there's still hope. If all else fails, you can throw the kit piece in the bin and make a wooden replacement (though I hope that doesn't happen to you.) I don't think Cathead will mind me mentioning him like this, but he hit all kinds of problems with his Dusek Viking longship kit, but with persistence and ingenuity he overcame them and now his ship is looking magnificent. So hang in there - ask questions or for advice if you hit trouble. The people here are very friendly and helpful. And enjoy the journey!
-
Hi Dan, and welcome to MSW. One of the best things you can do is to start a build log - it's a great way to get feedback, advice, help and encouragement. The members are a pretty friendly and helpful bunch. The instructions are here: As you're already part way into your build, maybe you could star by posting any photos you already have of the early steps in the process to bring the log up to "today", and then continue from there, posting updates as you make progress. Have fun with it! Steven
-
Welcome to MSW, Bill. I'd also recommend you start a build log when you begin your build. A great way to get feedback, help, advice and encouragement. The instructions are here: Steven
-
Hi, Scott and welcome to MSW! There are quite a few member on MSW who are very knowledgeable on the frigates of the War of 1812. Use the search function (top right of this page) - maybe type in "Constitution" - and see what comes up. And for more advanced questions, look in https://modelshipworld.com/forum/13-discussions-for-ships-plans-and-project-research-general-research-on-specific-vessels-and-ship-types/ And when you start your build, make sure you also start a build log. It's a great way to get feedback, advice, help and encouragement. The instructions for starting a scratch build are here: https://modelshipworld.com/topic/8-before-you-post-your-build-log-please-read-this-starting-and-naming-your-scratch-build-log/ From your CV above you should do well in building this next model. But by all means ask questions whenever you need information or help.
-
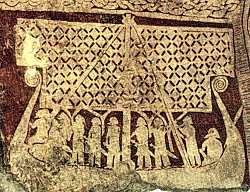
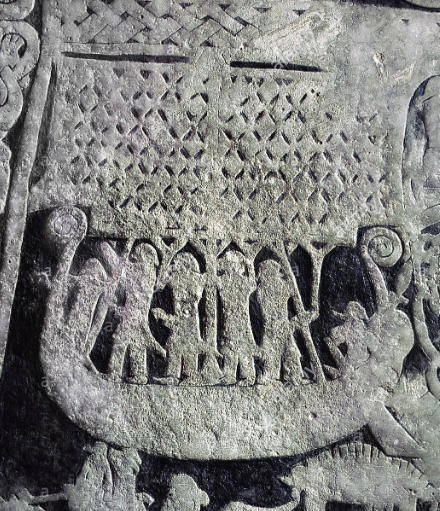
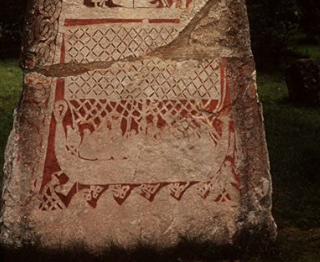
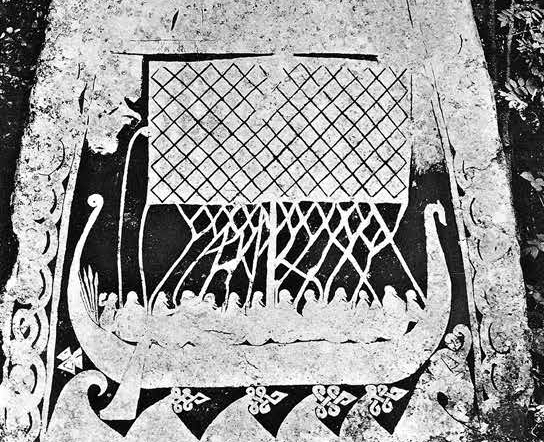
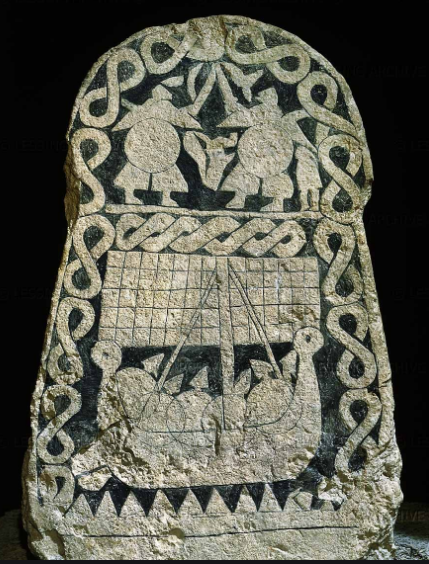
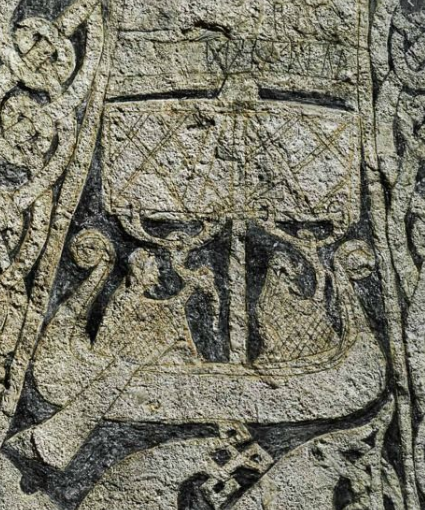
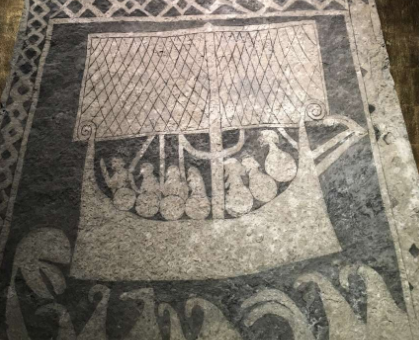
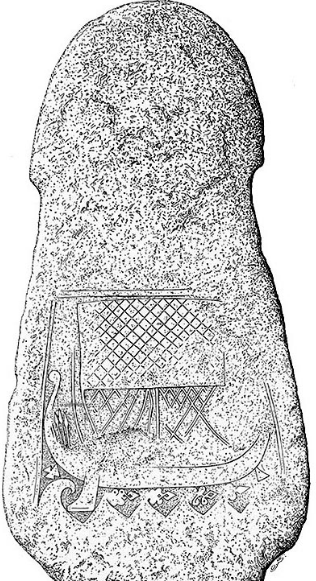
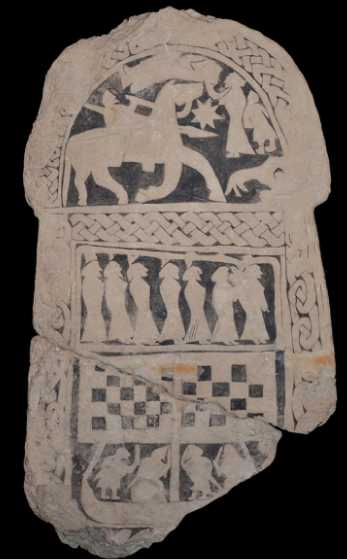
 It's my pleasure. In fact I've learnt a thing or two while doing this The only two contemporary sources I know that show sails on Viking ships are these runestones and Viking coins. And [almost?] without exception the sails seem to have these criss-cross patterns. Looking at all these pictures raises the question - were all Viking sails like this? I know the modern stereotype is for Viking ships to have striped sails, but where does that come from? Perhaps the sagas contain more information, and perhaps they mention striped sails - but that would be another study which I'm not prepared to chase at the moment. Another point to consider - were the Viking sails really made of homespun wool? Is there any actual evidence of this? I got it from a book, but it certainly didn't mention any evidence to back the assertion. The Vikings were fully conversant with making linen and even used stinging nettle fibre to make cloth. Why would they have used wool to make their sails if it stretched like that? Final point - the great majority of depictions on picture stones have this kind of rigging at the foot of the sail - some is a lot simpler than the example you posted, but nonetheless they're there - and perhaps the simpler ones (often a Y shaped arrangement) could give an idea of how the more complicated ones work. If you look at the middle picture on the third row in my previous post, perhaps that gives a hint of how it was done - a loop around the upper rope leading to the next rope down. I'm reminded of crows-feet on bowlines in 17th century ships which perhaps performed a similar function.
 -
No, but it will be very interesting to see it being done. As I understand it, the idea of all these ropes was to even out the forces on the homespun (wool) sails, which had a tendency to stretch. And in this picture and others, there are (usually diagonal) criss-cross patterns, probably reinforcements also to reduce stretching. Steven
-
Dafi, that's amazing! Thanks for showing this - really creates the scene.
-
A very interesting paper. I've only had time to skim through so far, but the proposition seems to hold together well. This was a period of transition, with quite major changes occurring over a fairly short time, and I was surprised to see such a late survival of a feature that I'd have thought had already been abandoned by the time this ship was wrecked.
- 1 reply
-
- 2
-

-
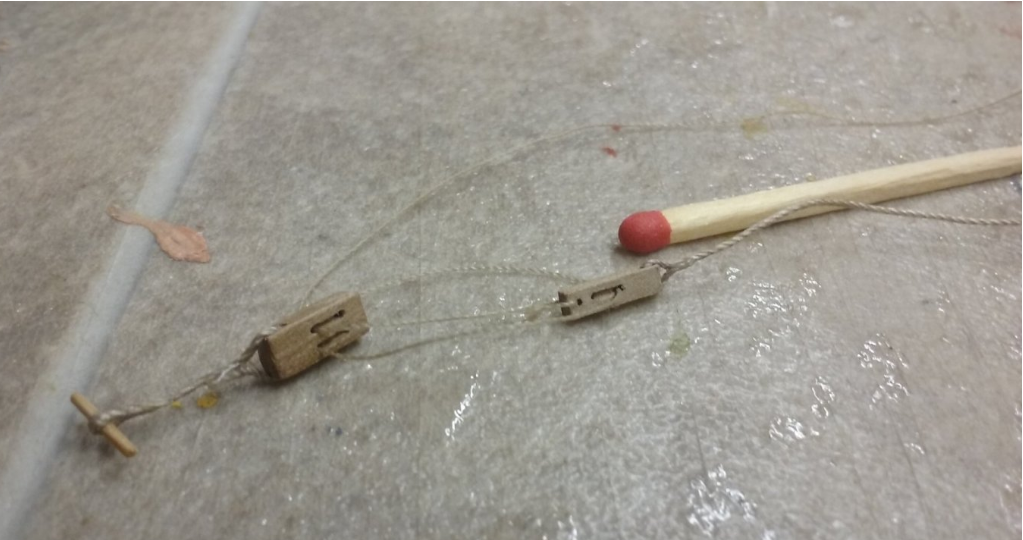
I have a giant matchstick that serves the same purpose . . .
-
What a wonderful model! I'm sorry I can't answer your question, but there are a couple of members here who've made junks who might be able to help. Perhaps if you put a question up in the "Masting, rigging and sails" section of the forum you might get some success. Steven
-
Greetings from Chestnut, Illinois
Louie da fly replied to Commander Bond, RNSVR's topic in New member Introductions
Welcome to MSW! Sounds like you've got your ideas planned out well in advance, with a minimum of 6 ships to do after you've finished the AVS. That should keep you going for a while Pequod is of course a fictional ship, and as far as I know nobody does a whaler kit - but I could be wrong. Whaling ships had some very interesting characteristics that distinguished them from other ships at a glance, such as "crow's nests" on the masts instead of a normal top. (see https://modelshipworld.com/topic/15552-what-is-a-crows-nest/?tab=comments#comment-483331 ). I'm not sure how much description of the Pequod is in the book, but you could certainly build a model that is as much like her as it is possible to get with the information available. The others are all real, and many have kits available. I think your first project, the AVS, is a great way to get back into modelling. You'll probably find it easier than the first time you did it, simply because you've done it before. And make sure you start a build log when you begin you model. The instructions are here: It's a great way to get help and advice - and encouragement - as you build your model. Best wishes with it, and have fun. Steven -
Welcome to MSW, Hugo! That's a wonderful project you're undertaking. I'd agree with Jim Lad - do no more than you absolutely have to. You might like to use the search function (top right of this page) for the word "restoration" to see what others have done in this line with much-loved old models. (I'm currently restoring a model I made when I was 17, and it's been quite a journey!) And start a build log - so we can all see your progress, and so you can get help and advice with your project. And ask questions if you hit problems - everybody's very helpful and friendly here. Instructions for a "scratch" build log are here: Best wishes with it, Steven
-
Hi John, and welcome to MSW. This sounds like a very interesting method of building. It's certainly unusual - I've never heard of it before. I wish you well with your build. You certainly seem to have the right attitude to getting it right. On the other hand, if you do make mistakes (which we all do), be prepared to forgive yourself for them - modelling is very much a learning process and you get better and better as time goes on. Steven
-
Welcome to MSW Martin. I can't give advice re kits, except to say start with something simple to allow you to build up your skills, and move on up to more complex and difficult models as you get more on top of the process. Don't start with the Vasa or the Royal Sovereign! And start a build log when you do begin your build. It gives you access to the great fund of knowledge available on MSW, and the members are more than willing to help and encourage you in your journey. Instructions for starting a build log are here: And have fun with it! That's what we're all here for.
-
Doc Watson Plymouth England..... Ahoy!
Louie da fly replied to Doc Watson's topic in New member Introductions
Hi Doc, and welcome to MSW! I'd second Mark's advice to start a build log when you begin your model. For scratch builds, the instructions are here: A build log is a great way to show your work, get feedback, and also get encouragement, advice and help when you hit problems with your build. And don't forget to ask questions - there's no such thing as a dumb question. I applaud you idea of using some of Victory's actual oak for your build. Oak isn't usually advised for ship models because the grain is so coarse and can look out of scale in a model, but a little judicious use should be fine. Sounds like you've already built up valuable skills that will help you with your build. And of course living in Plymouth, you're not that far from the old girl herself (at least in Antipodean terms - less that 12,00 miles!) - you should be able to go and check out any details you're unsure of by looking at the original. Good luck with it! Steven -
That seems about right, considering the fact that milk from the supermarket comes in 1 and 2 litre containers. By the way, that's a really beautiful bucket and bailer. The quality of your work on the accessories - barrels, tarpaulins, baskets and now these - is superb and leaves me awestruck. Steven
-
Beautiful, precise work, Bigpetr. It just keeps getting better . . .
-
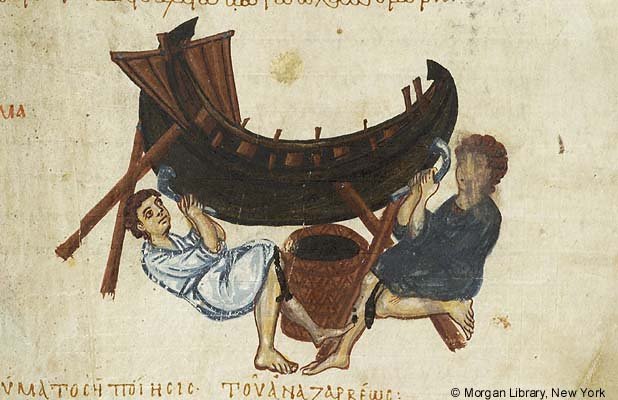
Sensible solution to the problem, Dick. And this picture backs you up: Caulking boat from de Materia Medica Constantinople mid 10th century. Morgan Library, m652.240ra Steven
-
Very good. I was hoping that would be your answer. You're definitely on the right track.
- 179 replies
-
- 2
-
-
- longship
- Helga Holm
- (and 1 more)
-
Fascinating paper. The principles in it relate not only to pictorial representations of ancient vessels but to any representation of a vessel that isn't photographic, no matter what its period. (And even photos can be misleading!) I found it very informative and useful.
-
What kind of joint are you using between the two planks?
- 179 replies
-
- 2
-
-
- longship
- Helga Holm
- (and 1 more)
-
Welcome to MSW, Rick! When you start your first kit, I'd highly recommend you start a build log - it's a really good way to get feedback, as well as help and advice. The instructions are here: The people here are very friendly and helpful - and don't get too intimidated by being a newbie. The experience level on MSW varies from total duffer to demi-god of modelling. I've been here for over five years and I'm still gobsmacked and overawed by the skill demonstrated by some of our members. The important thing ids to have a go, don't be afraid of mistakes (they're inevitable) but learn from them. And even the demi-gods make them - just much more interesting mistakes than we mere mortals do. And have fun with it, and ask lots of questions!
-
No, the ropes are at the wrong end of the slots. If the sheaves (wheels) were in place the ropes would be around them, and would emerge from the block at the other end of the slots. It should look like this: I didn't have sheaves, so I made fake "slots", with a hole at each end which went right through the block, and the solid part between them acted as though there was a sheave there. I hope that makes sense. If you have sheaves, then certainly use them. If not, you might like to try my method of "fake slots". Steven
-
Ah, Dick. We can always rely on you to ferret out the obscure historical facts to make a model that is just that much better . . .
