


GuntherMT
-
Posts
2,213 -
Joined
-
Last visited
Content Type
Profiles
Forums
Gallery
Events
Posts posted by GuntherMT
-
-
On 3/21/2017 at 8:16 AM, DocBlake said:
The footprint of the cross section at this scale is huge: 9-7/8" X 14-1/2"!
I think you made a typo or a mistake with your calculations here Dave, as it doesn't seem possible for the footprint to have smaller dimensions than the beam. Also based on the above picture, if that frame is only 14-1/2" across then you are a twig of a man with only an 11" or so wide torso!
")
Great fun watching this progress, it's going to be a really big cross section.
-
You can also use blue-tac to hold small parts while painting.
- Nirvana, thibaultron, Canute and 1 other
-
 4
4
-
-
1 hour ago, Worldway said:
Just curious, why would you want straight deadeyes if you're trying to produce an accurate model? As Tom stated they all have different tension on them therefore they would never be in a perfect line. In my opinion (as novice as it is) wouldn't it be easier and more accurate to just install the deadeyes "freehand"?
My parents taught me to "Never say Never".
Two things.
1) I am building the model for myself, not for some historical nit-picker somewhere, and I like how they look aligned and straight.
2) I just finished looking through all my photo's from two different Festival of Sail events in San Diego, and every ship that had deadeyes has them nicely aligned and straight. This even includes the HMS Surprise whose rigging is in terrible shape currently. I did a Google image search on the USS Constitution, and HMS Victory, as well as Pride of Baltimore II. All of them have neatly aligned and straight deadeyes, although the Victory does have some with a bit of a twist, the photo's also indicate that she's in a partially down rigged state in those photo's, no idea if that is status quo or not for her.
Here is a photo of the San Salvador, a replica of the Spanish Galleon that the Spanish sailed into San Diego Harbor on while exploring the West coast.
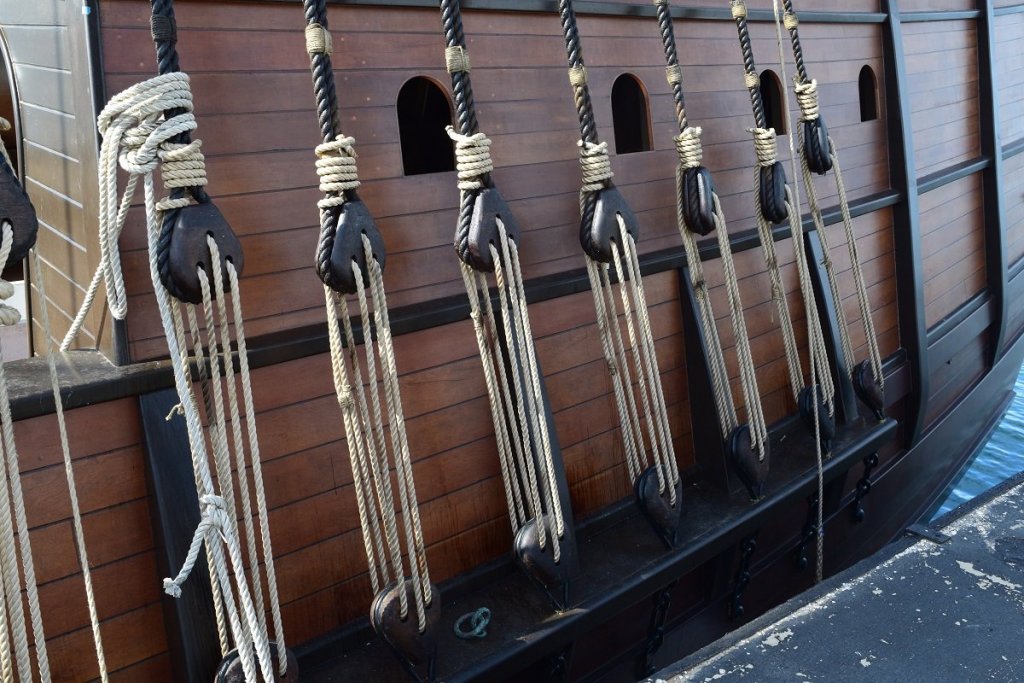
So, like everything else with our hobby, this isn't something that can be generalized and stated that 'they were all like this', as it no doubt varied from ship to ship, just like our photo's show two very different ships (but from the same era) as far as how the rigging and deadeyes are maintained.
- John Allen, thibaultron, mtaylor and 2 others
-
5
-
Glued the masts on my first model, on the AVS the rigging holds it perfectly securely and there is no glue.
- Ryland Craze and mtaylor
-
2
-
-
Interesting idea to do the complete assembly off the ship. I put the shrouds on completely and did as much of the standing rigging as I could before I did the ratlines on the ship. I'm afraid I'd finish the entire assembly, go to put it on the ship and discover that it didn't fit right.
How are you going to alternate the shroud pairs over the mast head left/right/left/right (or whichever way they alternate, I forget now)?
- zoly99sask and Ryland Craze
-
2
-
Catching up after a week away from the forum (trip out of town). Great progress Frank, and superb work as always. Sort of surprised you needed to use those reinforcements, I figured your wooden dowel placed through the joint would have been sufficient.
- Canute, mtaylor, thibaultron and 1 other
-
4
-
4 hours ago, Worldway said:
Hi Gunther, I read this build log for the first time today and you have given me the inspiration to build something similar as a side project. I would like to build something that I can put on display in my office and this looks like the ideal thing. However, I think I may build the canoe Peterborough as it was developed close to home.
So you need to finish this so I can see how you ended up applying finish to the canoe.
No pressure.

Don't hold your breath for that!
For how I was going to finish it, look for the build logs on those Chris Craft kits, that is what I was going for with multiple coats of resin sanded down to a mirror finish with progressively finer material.
4 hours ago, vann said:Thanks Gunther - Exactly the pointer I needed. I believe these are the videos mentioned... Good news is that a hair dryer should be easy to acquire.
That is the correct thread Vann. The video is on edge bending, but the same principle works perfectly for hand-holding twists and bends and curves. If you need a bend real close to the end of a plank, hold that end with a pair of flat-nose pliers with smooth jaws.
- CaptainSteve and mtaylor
-
2
-
Vann, I pre-shape all my planks using heat. For very difficult bends I will add some water and heat. There is a video in the planking subforum by Chuck that shows how heat bending works. I would link it but I am on my phone right now.
Basically you use a heat gun or blow dryer to heat the wood while holding the bend or twist, then keep the wood bent or twisted until it cools. There will be some spring back depending on the wood and severety of the bend.
Good luck.
- mtaylor, vann and CaptainSteve
-
3
-
-
On 3/3/2017 at 6:15 AM, Chuck said:
Basically it allows you to select if you are a full NRG member or an MSW member only. If you are a full member of the NRG, you can enter your membership #. Your membership number can be found on the label of your Nautical research journal. It is usually four digits.
I'll enter the number if I remember to look for it the next time I get a journal, but (and maybe I'm strange for this) I certainly don't keep the plastic wrap that the journal comes in, and which the label is on, so I have no idea what my number is! I even checked the email from when I renewed, but that doesn't have it either. I also can't find any way on the NRG home site to find a membership number.
Perhaps I got something when I first joined a couple years ago and didn't keep it. In the mean time, other than the label that gets thrown away with the wrapper when I get my journal, I don't see any way to find my number.
-
Precise work as always Frank.
I don't see anywhere mentioned - what wood are you using?
- Elijah, mtaylor, thibaultron and 3 others
-
6
-
Having seen the drawings that you are creating to make this build, I am really looking forward to seeing you execute it in wood. Going to be good!
- Mahuna, Omega1234, thibaultron and 5 others
-
8
-
-
-
I recommend using something other than Model Expo paint with an airbrush. The pigment size in their paint is quite large, and will likely gum up your airbrush a lot and cause spitting and anguish.
I'd personally recommend Vallejo Model Air, or some other acrylic designed for airbrushing, or at least a good high quality paint with fine pigment size.
-
On 2/21/2017 at 10:02 AM, philo426 said:
Ok thanks!I do not like posting a question and not getting replies.Makes me salty!
27 views in less than 2 hours, out of over 20k members I think? That's really a tiny fraction of the members here, so expecting a response that quick from someone about a single specific kit builder might be expecting a bit much, since it's highly unlikely that more than a fraction of 1% of that member list has any experience with Woody Joe.
-
The biggest problem with them is inconsistency, so you have to thin then test, thin and test, and each color (and each jar) will me markedly different than the others. I used them on my AVS and got good results, but I won't be using them again. Also they are completely unsuitable for spraying if you ever go that route, they'll gum up your airbrush with rapidity as the pigment is not fine enough for airbrushing.
Since you already have them, I'd say give them a shot, and if you just don't like them, it's not that much money to replace as needed with Vallejo or something else higher quality.
-
-
Kit blocks (in my very limited experience) are definitely oversized in general (especially the small blocks like gun tackle), which means it will be difficult to find an accurate sizing for replacement blocks that are more in scale.
My system was a pretty simple 'that looks good' measuring system, starting with the size of the kit block and then going down until it just looked right.
Unfortunately there isn't a good way to do that in advance of the rigging stage on the model, so other than looking at completed builds of the Syren and 'guesstimating', your best bet might be to send a message to Chuck and ask him about it, since he designed the Syren.
- mtaylor, thibaultron, Canute and 1 other
-
4
-
Hola Professor:
Thanks for the explanation, I was not sure because if they included both pieces on the drawing, what is the object to mention it??
Saludos, Karl
No room for the note on the other side is all probably. You'll find lots of things with that marking "P/S" on most plans that I've seen, and some show the needed item other side, and some don't.
-
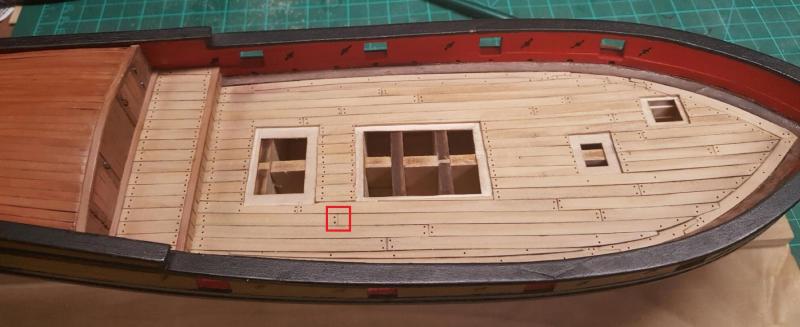
Looking good, make sure you pick up this spot with two more holes or it will bug you forever if you didn't already notice it!
- captgino, Elijah and zoly99sask
-
3
-
I'd love to get one of these kits, but just too pricey for me. Good luck with the sale, I'm sure there is someone out there that will snap this up when he (or she) sees it!
- zoly99sask and mtaylor
-
2


HM Cutter Cheerful 1806 by Erik W - 1:48 scale
in - Build logs for subjects built 1801 - 1850
Posted
Great work Erik, and wonderful milestone.