


GuntherMT
-
Posts
2,213 -
Joined
-
Last visited
Content Type
Profiles
Forums
Gallery
Events
Posts posted by GuntherMT
-
-
If you do a waterway, it is generally going to be thicker than the planking, and be beveled to match the planking level at the inner edge. If you are just wanting to create an edge plank for your deck planking to mate with rather than just going directly to the bulkheads, then that is a 'nibbing plank' and will be the same thickness as your deck planking. You can also do both, which I believe would be the typical fashion (it's how my AVS was done, both waterway and nibbing plank).
I think the nibbing plank is called differently based upon how the deck planking joins with it, as in some cases (like my AVS) there is not actually any nibbing done into that plank (it's a hook & scarph arrangement into the nibbing plank).
The AVS included the waterway and nibbing plank, but I didn't follow the plans at all for the planking, and it was my second build. I just followed a sort of 'standard' planking plan based on an arbitrary plank length that I decided on, starting at the centerline and working out. The nibbing plank was just faked by creating a pattern off of the plans, but leaving out the nibbing part, and then smoothing it to fit up against the waterway. The planking was then made to fit snugly against the nibbing plank.
It's actually easier than doing the hull planking, as the deck is almost completely flat so the only real challenge is making the outer edge fit well, and maintaining whatever pattern you choose to go with.
-
I'm not sure I understand why a museum continues to add models to a collection that are not on display. Why would they instead direct the model to another museum or location that *could* display it? After all, what purpose does it serve to simply file the model away in a large filing system where only a very few will ever be able to see it?
I'm sure there's a reason, but it's just never really made much sense to me.
- Landlocked123, mtaylor, Bobstrake and 4 others
-
 7
7
-
I believe the stern filler blocks are all set and were a success. This is my first experience using filler blocks at the bow and stern and used scrap wood that I had laying about to boot
 This is just one of those little problems I had to figure out that will get better in time with following kits in the future.
 I also fixed the little issue I had with the deck heights being a little off. This was actually a lot easier to fix than I initially thought. I cut out about an in or so on the high or low side of the deck, adjusted accordingly, then secured with fast drying CA glue. Easy peasy.
I still want to do a little bit more sanding on the false decks but I will leave that for tomorrow. The poop deck in particular looks a bit screwy but I am hoping some attention with a sanding block will do the trick.
It's hard to tell for sure with the angle of your photo, but it looks like the final bulkhead at your stern still needs work, as it looks like the planks are laying nicely across the filler blocks and other bulkheads, but only touch the very aft part of that final bulkhead.
It is very important that your planking lay completely flat across all the bulkheads, or you'll have problems later on and won't be able to get a nice smooth planking on and will have to use lots of filler and sanding, which will preclude leaving a natural finish if that's your goal.
Definitely looks like you are moving in the right direction though!
- Philthy, CaptainSteve, mtaylor and 1 other
-
4
-
-
-
San Diego is only a 5 hour drive for me. Will have a much higher chance of attending that one!
- Canute, Landlocked123, Chuck Seiler and 3 others
-
6
-
-
-
Good looking ship. Very similar in appearance (to my newbie eyes anyway) to the Pride of Baltimore II, or the Californian.
-
Looks great. I also have never done dry-brushing, but it's clearly something I need to learn and add to my skillset!
- Dimitris71 and Canute
-
2
-
I've never heard of this model, but just to let you know, there is no attached photo.
-
When or if you do choose to get chisel's, don't bother with the cheap ones, go straight for Swiss Made or other *good* chisels. The cheap ones are terrible and will make you think that chisels are terrible.
I believe the same is true of the files. Good quality files (like Vallorbe) are awesome compared to the 'hobby' files, but you can absolutely wait on those.
I don't see you mention an X-acto type hobby knife. Either that type (#11 blades typically) or a scalpel will be one of your most commonly used tools.
Tamiya masking tape is awesome and I highly recommend it.
Electric plank bender. I have a couple of them that I got during my first build, and I never used either one of them on my second build. Instead, when I need heat to bend a plank I use a heat gun (some people use a blow dryer even) instead of directly applying the heat to the wood with a bender. Some people like them though, I think that's one of those personal taste type of tools.
I agree with Chris on the paint brushes. I purchased a couple of different 'sets' from Amazon when I started, and they are now junk brushes that I use for applying glue, or blackening, etc. Really cheap paint brushes are fine for that sort of work, while for actual painting you'll want good quality brushes that you select from your local art store. I have no idea which type of brush the 'admiralty' brushes fall into.
For the drills, I suggest getting a set that includes sizes from #60 through #80. I use all different sizes for all sorts of different things throughout the build. Here is a pretty nice set that I got which comes with 5 of each size (they are fragile when this small, you *will* break some): http://www.amazon.com/gp/product/B002O0G0ZS?psc=1&redirect=true&ref_=oh_aui_detailpage_o07_s03
The Convulsion isn't what I personally would consider an 'entry level' kit, but if you take your time, start a build log here and ask for help (and read through the huge amount of resources available here including other build logs of the same or similar kit), I am sure it's doable!
-
Many people use tanks to supply their air brushes. As long as you have the proper regulators to handle the pressure and deliver a steady (low enough) pressure to the air brush, and moisture traps if needed, they work just fine.
I've used a small air tank designed for carrying in a trunk to fill up car tires, filled from my large compressor as well. With the low pressures that air brushes work at, the small tank can give an hour or more of air-brushing without any problem if filled to 130psi.
In the end though, I gave in to convenience and since I didn't want to install lines through the attic into my new hobby room from my garage, and since the compressor in the garage is noisy enough to be loud even inside the house, I chose to get a quiet hobby compressor with a tank to use in my hobby room. I went with an Iwata, but there are many good working options available.
-
-
Yep, that multi-heat solder is on my list of things to look into for my next build. For this one I was using 'Solder-It' paste. Not sure what temperature it melts at, but since it's the same on every joint, and the handle is really very close to the yoke on the swivel guns (1/4" or so?), it was a challenge for someone new to working with solder and brass.
I ended up attaching 2 alligator clamps between the back end of the gun and the mounting point, and another clamp forward of the mounting point, all to act as heat sinks to give me a little more time to work before the head migrated through the barrel and softened the other joint. Worked ok as long as I didn't mess up the joint I was working on and tried to keep heat on it too long.
-
-
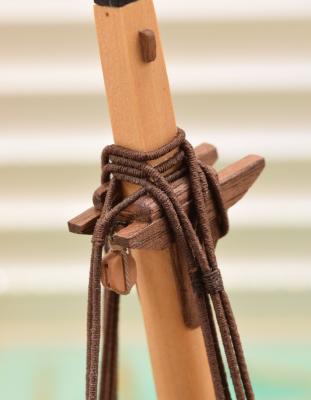
For future consideration, your shrouds should not be 'tied off' together under the platform. The shrouds are actually done in pairs that loop around the mast above the platform. You would do the forward pair on one side, then the forward pair on the other side, and work backwards. You end up with a series of looped wraps around the mast, from alternating sides, which are then seized together (in the pairs only) below the platform.
Here is a photo example to show what I am talking about, although this ship has a simple trestle tree instead of a platform. In your ship, that hole in the platform on each side of the masts is where the shrouds should be coming through I believe.
For the deadeyes and lanyards, you should consider trying to align them (the holes) like in my last post on the previous page of your log, and run the lanyards as shown there as well, I think those steps would sharpen up your final look considerably.
For future builds, consider building and rigging the masts in sections. You build all the masts and dry fit them off the ship, but don't glue them together. Then you put on the lower mast section, and put on all the shrouds and standing rigging before adding the platform so that you don't have to feed the shrouds up through that little hole, around the mast, and then back through it, and then try to seize the pairs in that tight space. Continue up from there by adding the second mast section, adding the shrouds, then adding the 2nd mast platform, etc...
When you've seen the picture, let me know and I'll delete it from this post so it's not cluttering up your log.
Take care,
- NenadM, mattsayers148, Jack12477 and 1 other
-
4
-
You have nothing to complain about your soldering came out great and looks good.
David B
Wasn't complaining, or certainly not about the final results, was just saying that the soldering was a new challenge for me. Attaching the yokes, pins, and handles was (in retrospect) a pretty funny 'keystone cops' exercise, as I was constantly getting the already soldered pieces too hot while trying to attach the other pieces. I probably ended up soldering about 3x more connections than I actually have because of how many times I had to redo things while trying to figure out how to keep the heat from making an existing connection fail.
In addition, there were at least two instances of me breaking off handles (in one case of three guns at once) while they were hanging to dry, just because of my clumsiness while working on something completely unrelated. I should probably learn a lesson from that about where to place drying parts.

- Dimitris71, GLakie and Canute
-
3
-
Thanks Sam & Hamilton.
Yes, it was worth it for sure. When I started I thought the swivel's would be ok, but when I got to that point in the build, I started trying to clean them up, and decided that even with a great deal of effort on my part, they still wouldn't be as nice and crisp looking as the main guns, so I put them aside and ordered the barrels from Chuck after printing out his PDF of his gun barrels and laying the cast guns on the smallest of his swivels and seeing they were almost a perfect match in size.
The real challenge of those swivels for me was learning to solder well enough to piece together the yokes and handles and get them all to stick together.
- Dimitris71, zoly99sask, Canute and 4 others
-
7
-
The CA glue(I used PVA, is that the same ?)
Dave,
CA glue is Cyanoacrylate, what most folks call 'super glue'.
PVA glue is Polyvinyl acetate - this family of glues includes most of your white (Elmer's) glues and white & yellow wood glues.
They are most definitely not the same!
-
Brian, I could see me getting crazy with that scale hardware if I were building something like a WWII warship! ORRRRRR.. the scratchbuild I have in mind of the BB16, New Jersey someday!
If you look at Dirk's builds, he uses the little rivets all over the place on what we build. I've started to use them myself, but just barely. I used them on my bowsprit foot strap, and the gannon strap on the AVS.
-
Scale hardware has miniature brass rivets down to a ridiculously small size of 0.3mm shaft and 0.4mm head - http://www.scalehardware.com/miniature-rivets-c-10
-
-
I forgot to drill the holes in my swivel gun posts too!
- DaveRow and Mike Dowling
-
2

how to work with teeny blocks???
in Masting, rigging and sails
Posted
I put together a bit of mini-tutorial showing how I strop blocks in my build log in this post:
http://modelshipworld.com/index.php/topic/8085-armed-virginia-sloop-by-gunthermt-model-shipways-scale-148/page-24#entry328294
Not sure if it will help you any more than all the information already in this thread though.