


GuntherMT
-
Posts
2,213 -
Joined
-
Last visited
Content Type
Profiles
Forums
Gallery
Events
Posts posted by GuntherMT
-
-
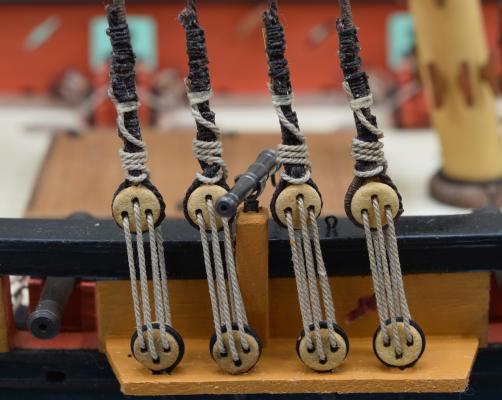
Looks much better. Final suggestion, if you lock the lower deadeyes in place, you can tighten up the lanyards (remember, on the real ship they are quite tight to hold the mast steady from side to side) which should pull the upper deadeye in line fairly well now that the lanyards are run correctly so that they won't be trying to force a twist.
- Mike Dowling, robert952, BobG and 2 others
-
 5
5
-
-
Why not use a seizing and avoid the knots altogether?
Also, instead CA glue to secure the knot or seizing, try using Matte Medium or Matte Glaze. Not quite as quick as CA, but works to perfection, and doesn't discolor your rope at all, and of course being a matte, leaves no shiny residue (or worse, white crystals if there is water present when CA is used). It also remains somewhat flexible, avoiding those 'kinks'.
-
-
Thanks again Gunther (or is it Brian?). Just in time to stop me from doing it wrong again. I wasn't actually tying knots, I was looping 'underneath itself' as you say to do. I just see that as a sort of half knot. Anyway, your's look great even with the slight mistake. I've been using a sewing needle to get the lanyard through. Otherwise, no way. I put a needle through even before I string the shroud up so to create the hole for when I do it with thread on the needle. Easier to push the needle through on the bench than hanging from the mast.
Brian, but Gunther is fine too, it's an old nick-name.
Your idea to thread the needle through is a good one. In my case I wasn't looking far enough ahead when I put the shrouds on the deadeyes, and thought I was being smart my making the shrouds so tight around the deadeyes. Later on I realized how the lanyards were supposed to run through the gaps, and was sort of kicking myself. I chose not to redo them because it would have required completely remaking the shrouds. I did everything on a jig, which you can see if you select my AVS build log link in my signature - I have an index in the first post which you can use to jump to the entry "Main mast standing rigging begins" which is where the jig is shown (or, just click there, since apparently copy/pasting the line in the log also copied the link).
-
Making a mast on a lathe can be frustrating. The easiest way is to use a plane and a fixture. You have better control and it is safer and more accurate.
A self centering 4 jaw is defeating the purpose. I have an independent 4 jaw that is used for irregular shapes etc.
David B
Why do you find it frustrating to use the lathe? I start with square stock in the lathe, make it all nice and round, then cut it down to the approximate size using cutting bits and then finish with sand paper. I made all the masting on my AVS this way with what I think are quite good results, so I'm curious what you find frustrating, and why a self centering 4 jaw defeats the purpose (given the purpose is to center the wood stock, which is what it does).
-
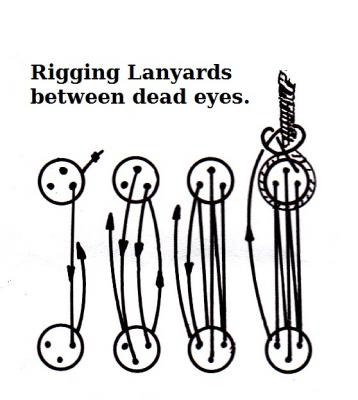
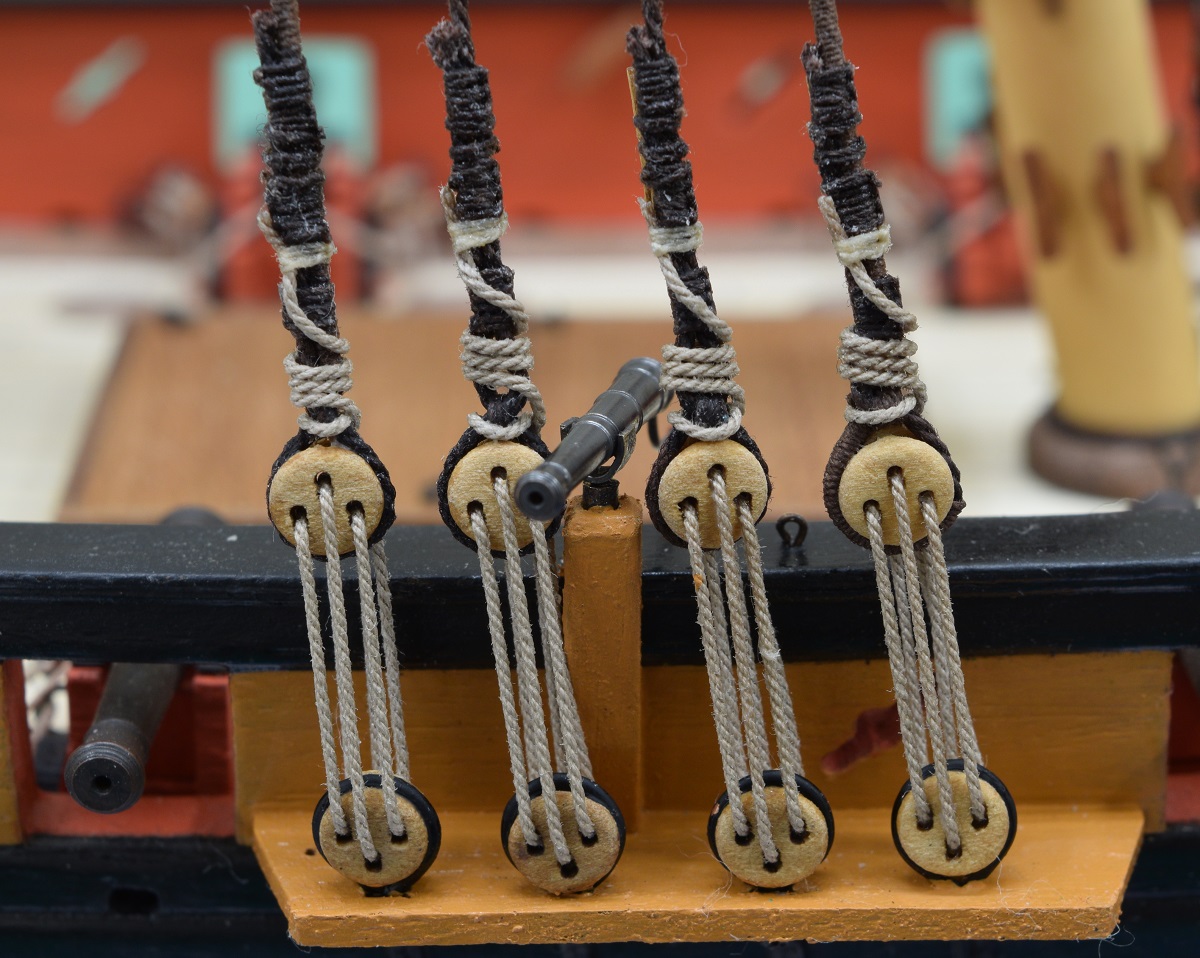
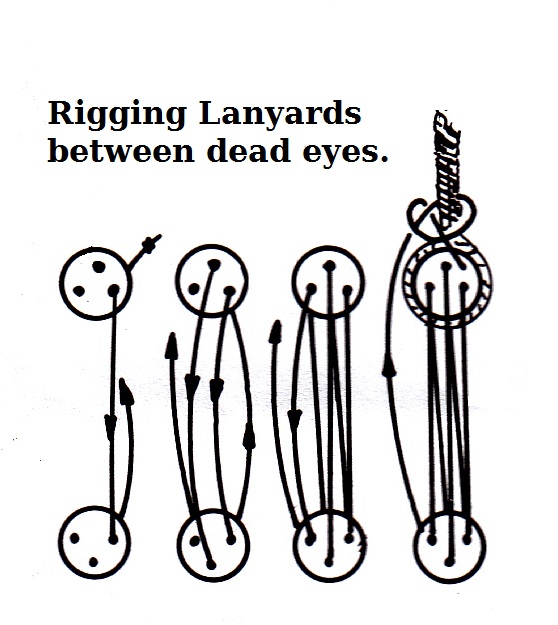
Ignore the first drawing I posted when looking to secure the lanyard at the end. Look carefully at the 2nd illustration. The lanyard comes up behind the deadeye from below, going FIRST through the gap between the deadeye and the shroud, then loops around and underneath itself, and then wraps around the shroud above. There are no knots, the very end of the line is seized to the shroud with a small seize.
The red arrow is pointing to the seizing. Notice that there are no knots at all. On my model I accomplished keeping this line fairly neat by the simple expedient of soaking everything thoroughly in 50/50 white glue/water mixture and just taking my time.
Mine are not quite done correctly either, as I did not leave enough gap between the deadeye and shroud to make the proper feed through from below, so mine just wrap around and under instead of going through the gap like they should. It would be neater and more secure with the gap though.
-
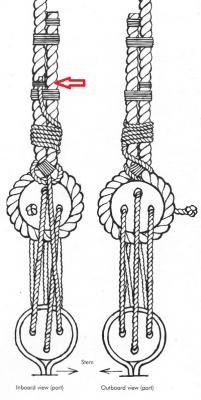
In the lower diagram the shroud is right hand lay. If the twist in your own shrouds runs mirror image to this, you have a left hand lay. Also, look at the orientation of the lower deadeye, Captain Al. It is opposite to the upper one. Looks like your photos show the lower ones oriented incorrectly.
The first picture shows the deadeyes oriented correctly, but the other three have the lower deadeye 180 degrees off. I think they are pictures of opposite sides of the ship, and on the one side they are fixed and the other they aren't?
-
I agree with the prior two posts, the lanyards are being run incorrectly, and that is probably where your twist is coming from. The lanyards should always run from outside face to outside face, never cross from front to back in the run from top to bottom, and when it comes up to the top on the last one, it should be behind the deadeye.
This drawing is wrong on where to start (should be on the left, not the right), but shows that the lanyards always go from outside to outside, and inside to inside. If you flip this left to right it's correct:
Here is another drawing showing it correctly, but without the 'step by step' arrows. You can see from the 'outboard view' (the one on the right), that the outside always goes to the outside corresponding hole in the deadeyes. You can also see how the final run comes up from below on the inside, and goes between the deadeye and the cross-over of the shroud.
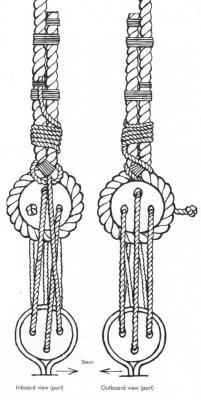
Be sure to click on the above drawing to see it full size for clarity.
-
-
Looking good! The effect on the cabin top is quite striking, it worked out very well (even with your 'mistake').
But what's up with that big round silver hatch next to the scuttle?

- DocBlake, grayarea and zoly99sask
-
3
-
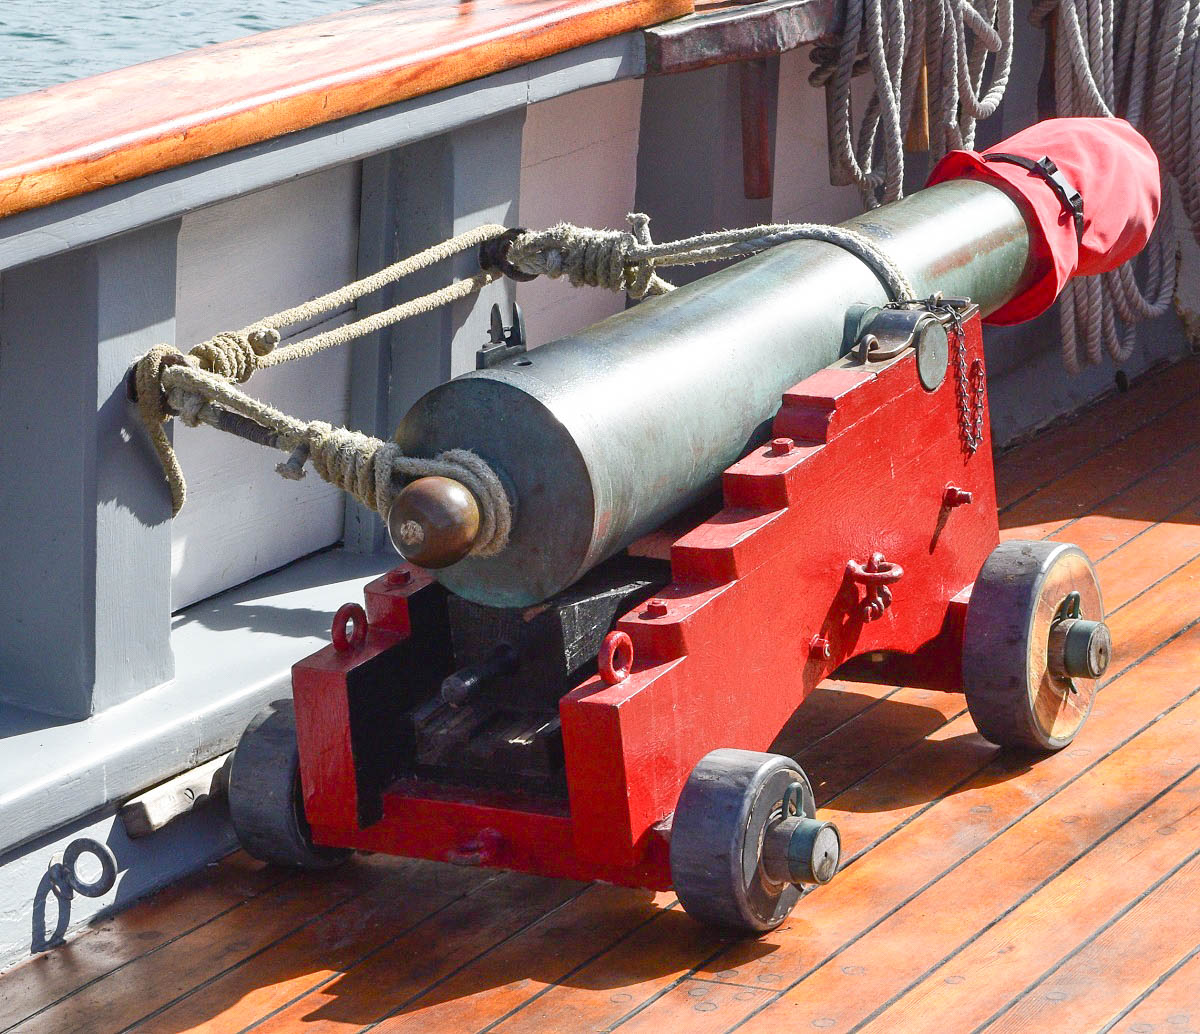
I've never seen a double in-haul arrangement like that, but goodness knows that my knowledge of the subject is extremely limited. I just meant to offer a possible alternative for the purpose of those eye-bolts.
The carriages for the guns on the Californian have that same pair of eye-bolts. Not sure when I will get back there, but I do plan on trying to get there sometime before the end of this year, and if I do, I'll try to remember to ask them about it. The Californian carriages also have the single center eye-bolt which shows obvious wear from use, whereas the doubles show no sign of wear on the paint at all.
Here is a picture of a stowed gun on the Californian showing this arrangement, but I never saw the guns in firing position. I've increase the exposure and reduced the shadows on this so that the center in-haul eye-bolt is visible.

-
-
Spectacular job Ken, and congratulations on finishing. I would never believe this was anyone's "first build" if I hadn't followed you along from the beginning, you've done a great job, and I've learned a fair amount of interesting things from your log.
You finished in record time too, almost half the time it took me for the much simpler AVS. Just amazing.
Looking forward to seeing what you do with the Constitution!
- GLakie, MarisStella.hr, Canute and 1 other
-
4
-
-
-
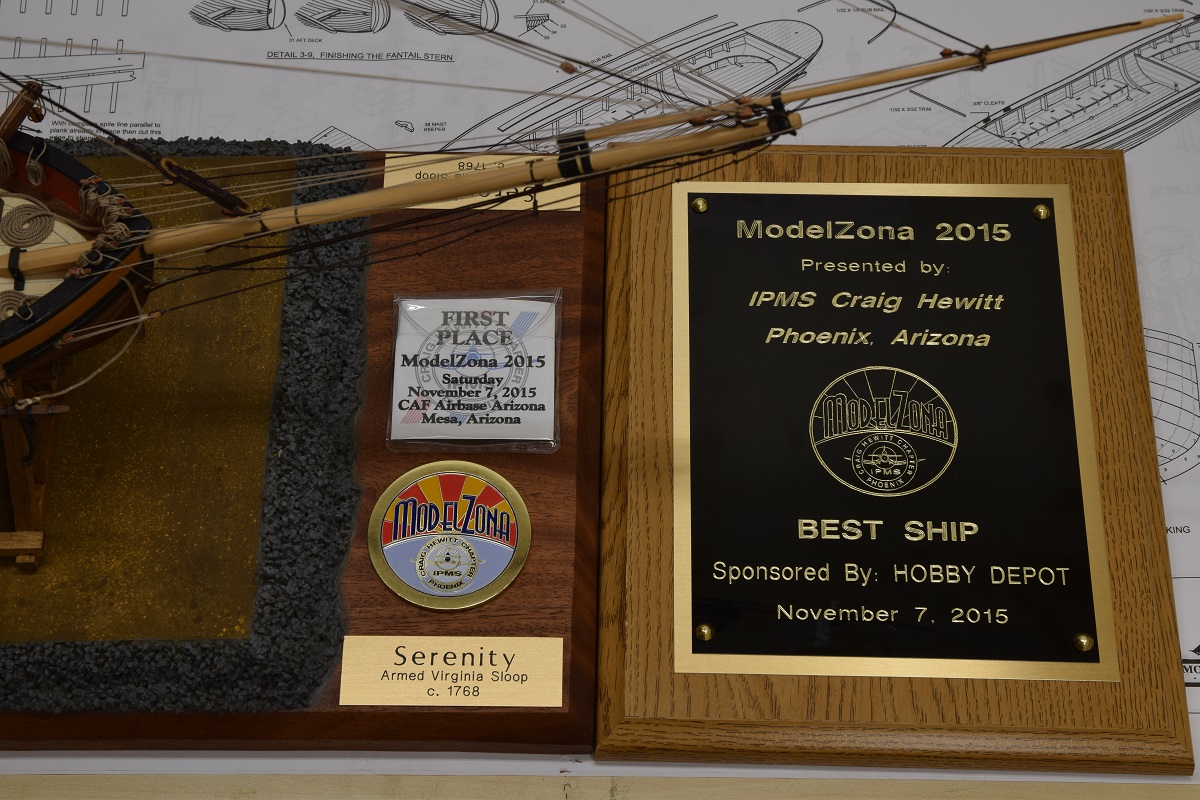
Less than a week after finishing the AVS, yesterday I got up far too early, and spent the day at the annual model show put on in Phoenix by the local IPMS chapter. The Modelzona show is one of the largest annual shows, this year it had 550 entries, with my ship as the only non-plastic entry.
 I entered the AVS into the Surface Ships class that included some pretty amazing entries, including a 1/700 scale Japanese WW2 carrier in the middle of launching a strike, that had 313 little tiny crew figures servicing the planes and manning the guns etc., as well as 4 different entries by a guy who is a professional model-maker as his day job.At the end of the day, the AVS did quite well. I took first place in Surface Ships, and also Best Ship (all ship/submarine classes).
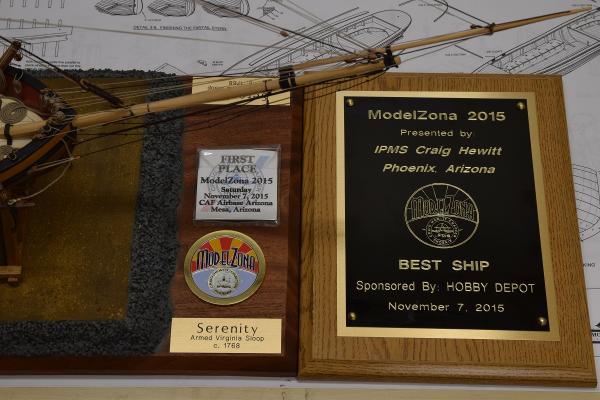
-
Thanks all.
Brian,
Totally unrelated to the ship, but your photos are so good--just curious what camera did you use? I also realize the photographer makes a difference

Thanks!
Marcus
Marcus,
I use a Nikon D3300 with the kit 18-55mm lens. I shoot with a tripod using longish exposures so that I can adjust the aperture for depth of field.
Happy to answer any questions you might have, but currently at your model show, so likely tomorrow before I can respond.
- Canute, zoly99sask and GLakie
-
3
-
-
Re: barely noticeable weave of Silk span
 . It 's weave is non existent as it is a felted product
  . I made a full ship set of sails for my Rattlesnake with Silk span. I have a small minipractium on how I make sails which I could send to anyone by email if you send me a PM request.
Why not post it and share with everyone?
- Keith_W, Julie Mo, Seventynet and 7 others
-
10
-
-
-
I hadn't thought of this before but how do you protect children, grandchildren from getting hurt? Do you lock up your sharp instruments when they're around?
Thank you, Davyboy for your comment.
My very simple system - Don't have children. This also prevents grand children as a side effect.
-


Simulated caulking
in Painting, finishing and weathering products and techniques
Posted
I see so many complicated, messy, and/or time consuming methods for caulking on this and other ship-building forums, yet the method suggested by Chuck and others that I used worked extremely well and doesn't require leaving gaps or mixing stuff etc.
#3b pencil blacken one edge, and one end of each plank before placing it. Use wood glue to affix as normal, lightly sand when complete and then seal with your finish of choice (I used min-wax poly).