


GuntherMT
-
Posts
2,213 -
Joined
-
Last visited
Content Type
Profiles
Forums
Gallery
Events
Posts posted by GuntherMT
-
-
The transom planking will be different on each ship, so it's really hard to say how it's supposed to work on this one since I'm not familiar with it.
As for the top planks being run without being tapered? That's highly unlikely. In the resource section of the site, you should find some planking tutorials that discuss a method using 'tick marks' or 'tick strips' and a planking fan to determine how wide each plank should be as it falls on each bulkhead. As a general rule, the only place a plank will be 'full width' will be at the widest point of the hull, and every single plank you place on the ship will need to be shaped/tapered to some extent.
Here, I'll make it easy for you!
The planking fan for Chuck's turorial - http://modelshipworldforum.com/resources/Framing_and_Planking/plankingfan.pdf
Chuck Passaro's tutorial for lining off the hull -http://modelshipworldforum.com/resources/Framing_and_Planking/Lining%20Off%20your%20hull%20for%20planking.pdf
I'd suggest reading all of the articles on this page: http://modelshipworldforum.com/ship-model-framing-and-planking-articles.php
The ones I linked are how I did mine, but there are other methods and something from these articles should work for you.
-
-
Looks fine to me. I made mine more difficult for myself, as I just left long tails on the tackle and created the coils on the deck in place with the same piece of rope from the tackle rather than the coils being a separate line like that.
- zoly99sask, grayarea, Elijah and 1 other
-
 4
4
-
I do have one question here:
I had no problems wiring the blocks that needed a 'becket' or ring twisted at the 'closed end', but with the ones who need a ring on both ends I always had a lttle piece of twisted wire left over as a result of closing the second ring (is that a clear explanation? I'll mark what I mean on a separate photograph... ); is there any way of working around that,
Looks like you've got a great start. I personally did the wire stropping on my first kit, but on my next I switched to using rope, as I think it works better.
In order to strop a becket at both ends, with the small wire you are using, the easiest way that pops to mind is to just double-strop it. What I mean by this, is just use two pieces of wire, making a becket at each end with the separate pieces.
The other method that might work, but I've never tried it, is to end the wire on the side of the block instead of the end, that would allow you to have a strop formed at each end with no 'ends', and the twisted wire ends would be folded down and glued against the side of the block where it would be less visible.
Good luck, and welcome to the hobby!
-
-
On the Flemish coils, as long as you are using thinned white glue (I used 50/50 water mix) you'll have plenty of time to work, and if you mess it up completely, it's easy to wipe everything off with a damp cloth and just start over later. Really no worries about messing up the deck at all, you can do it as many times and for as long as you need until you are happy with it, then just dab off any excess and let it dry.
For a few of mine, I set a small glass paint jar on the coil for weight while it dried because the inside end didn't want to stay down by itself, the thinned white glue doesn't bind well to the glass as long as all the excess is dabbed off with a cloth first.
- grayarea and zoly99sask
-
2
-
Nicely done, and great idea on how to pull them off!
- zoly99sask and grayarea
-
2
-
Metal is certainly usable to make the hoops, I just mis-read the earlier posting and for some reason thought you were going to solder bar (round) stock into the hoops. Using metal bar/strip stock would work, but should be painted so that it is not obvious it's metal. I actually used the kit provided brittania cast metal hoops (they are the correct shape, not round stock) on my AVS, and just painted them black, but if I were making my own I would try to use wood strips like I've seen used by some others on the forum, depending on scale.
Mostly just wanted to show you what all of the hoops I've seen on real ships looked like so that you'd be in a better position to decide what you wanted them to look like on your finished kit.
Good luck!
- mtaylor, Canute and zoly99sask
-
3
-
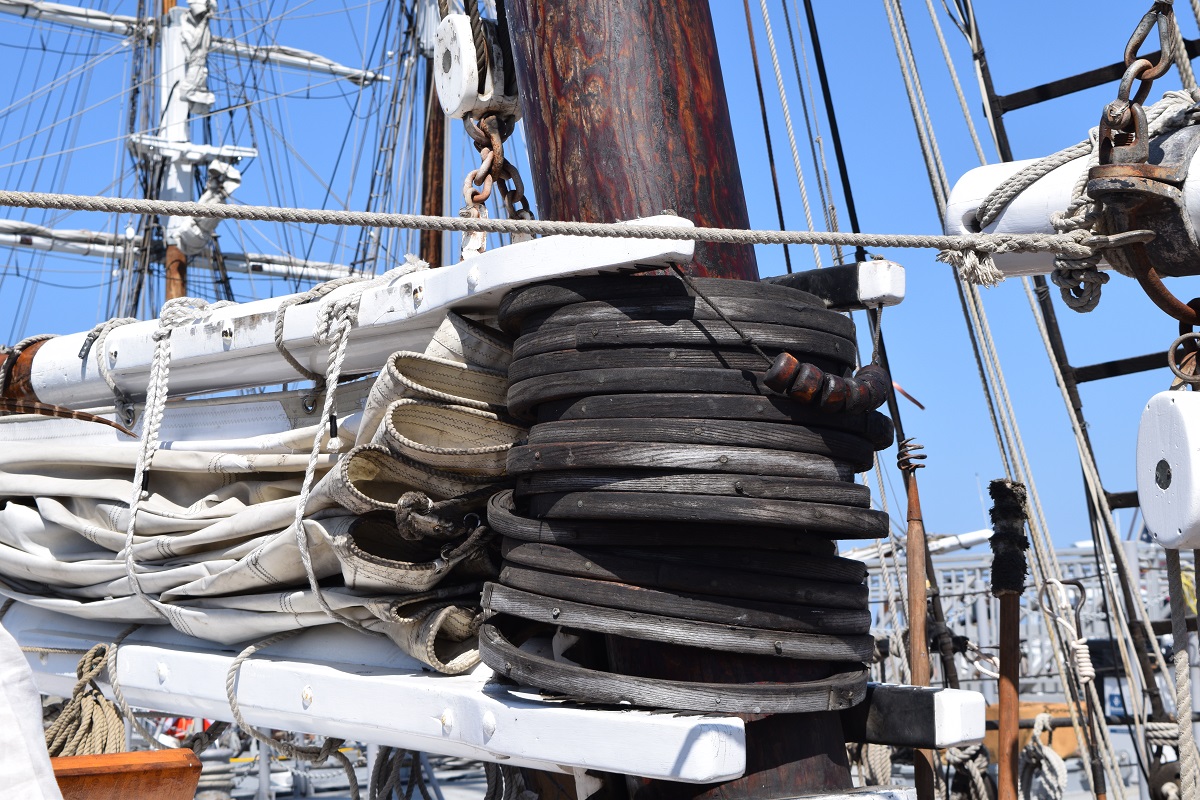
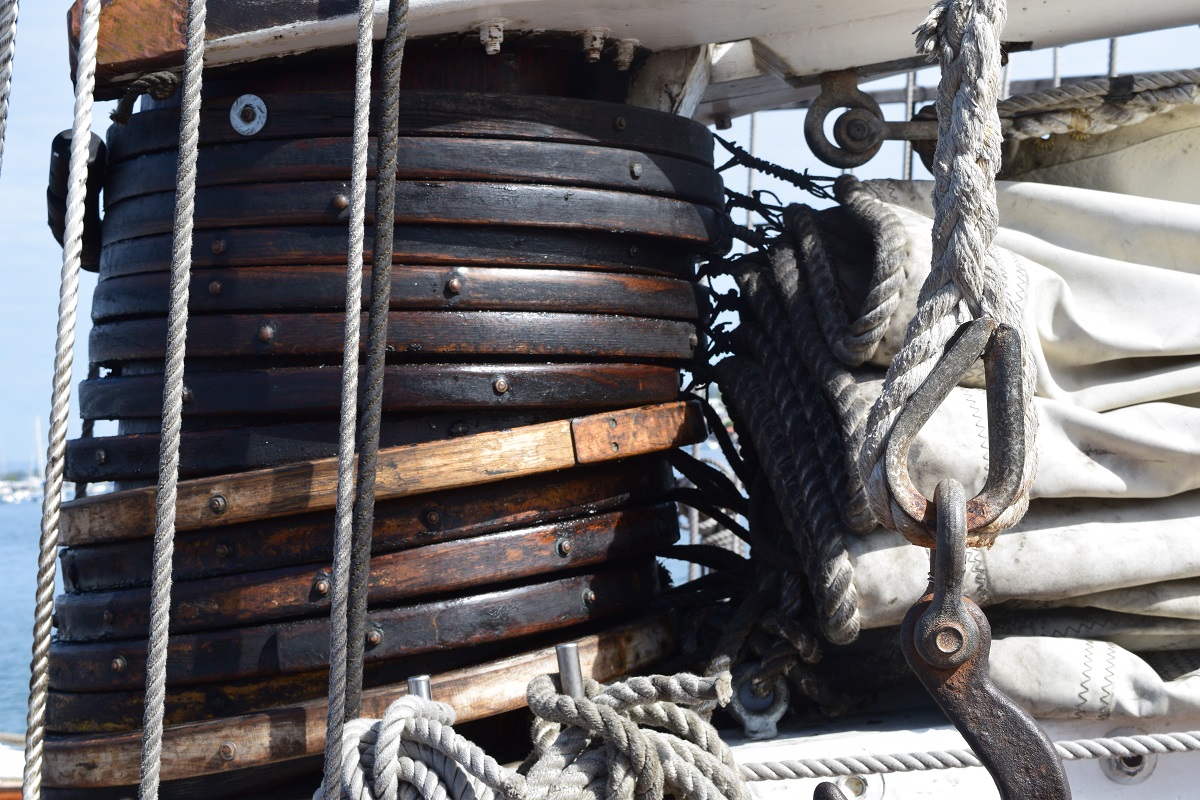
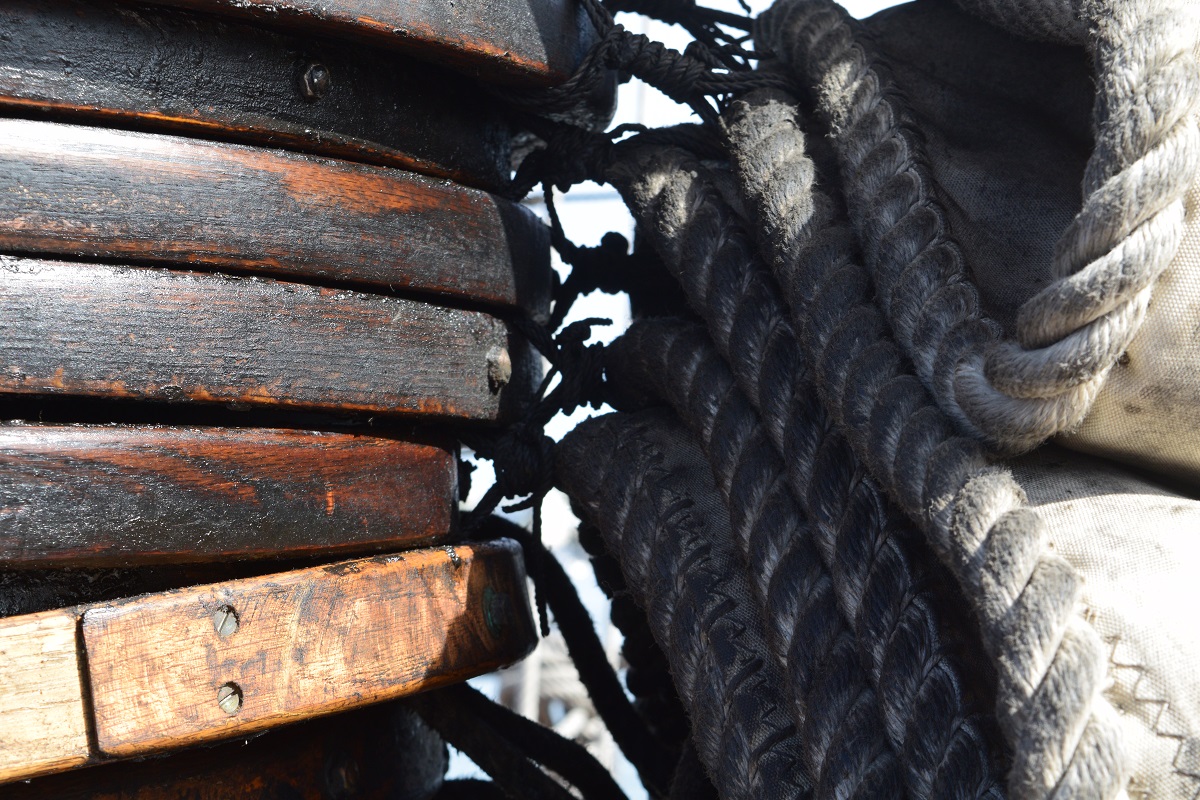
Consider before making them out of round metal, that in the real world, the hoops are not round, nor are they made out of metal.
Photos of mast hoops on various ships in San Diego last September:
America (replica) - Gaff schooner that won the Cup in 1851:
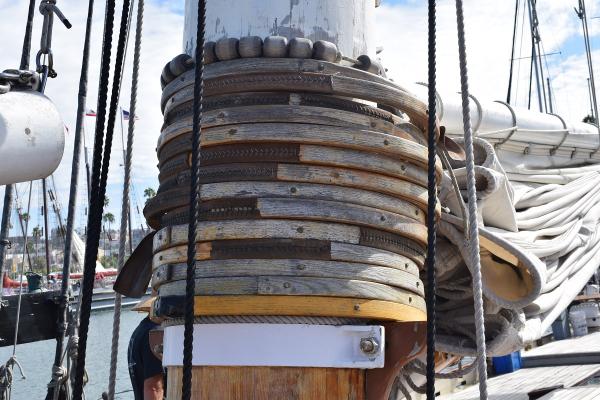
American Pride - 3 masted 130' schooner launched in 1941:
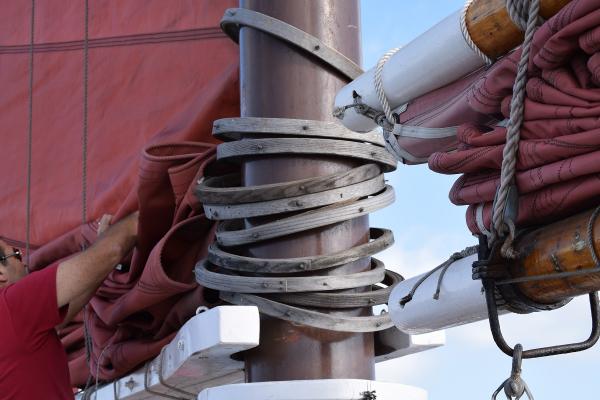
Bill of Rights - 136' gaff rigged schooner:
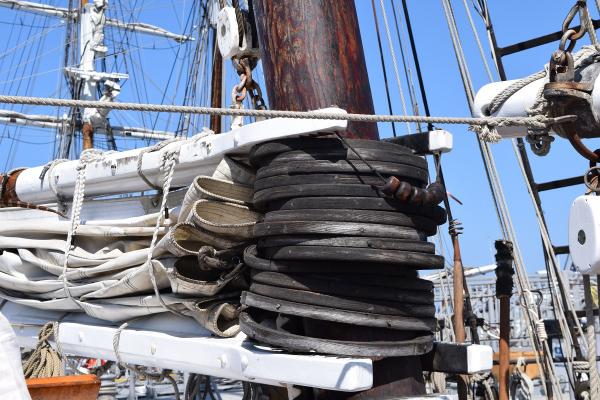
Californian - Top sail schooner built in 1984 as a replica of the revenue cutter "Lawrence" from the 1850's.

Detail where hoops attach to the sail:

- Canute, zoly99sask, allanyed and 3 others
-
6
-
You did a good job given the materials in the kit, but unfortunately as you have discovered, the kit materials for rigging are pretty terrible.
For line preparation, I threw it all out and used line from Syren. Same for the blocks, because as you said, they are completely and terribly out of scale.
For the coils on deck, I coiled mine in place using generous amounts of 50/50 white glue/water mixture, which both holds the coils in place, and allows them to be moved around until you are happy with placement. Dab the extra off when everything is finalized, and let dry. I think I try to describe how I did the coils in more detail in my log.
Good luck!
-
Hi everybody.....I am desperately looking for the instruction manual (not the plans) of the Constructo DosAmigos 1/50.
Constructo (Diset) does not respond........Also, if someone have a building experience of this kit, I would be very grateful to ask for some advise. Many thanks to all of you for your time.
If you don't have it, try this email address - mcarracedo@diset.com
That is Marcos Carracedo with Constructo, who responded to some questions I had about a Constructo kit back in September of 2014. Not sure if he is still there, but hopefully he is and can help you.
- BIGMAC, CaptainSteve, Canute and 1 other
-
4
-
-
-
Beautiful work Erik. Congratulations on a finished project, and one that anybody would be proud to display. Nobody will guess this is your first build, unless you choose to tell them!
Looking forward to seeing what you do next with 'quality' materials!
- Erik W, Seventynet, Canute and 1 other
-
4
-
Thank you for that information, I'm going to purchase the paste and give it a try. Do you use an iron or a torch?
I use a torch as I found that I couldn't hold both parts together while making solid contact with an iron also. The torch heats the metal much faster also. I use a small 'pencil' torch.
-
I had similar issues when I started playing with soldering very small parts using flux and solid solder. The solution for me was to switch to soldering paste. I am currently using this - http://www.amazon.com/gp/product/B000OVI0IY?psc=1&redirect=true&ref_=oh_aui_detailpage_o05_s02
There are a bunch of different soldering pastes, and different temperature pastes as well so that you can start with a 'hot', then do another connection near that one with a 'medium' temp paste, etc. so that the 'hot' bond doesn't break when doing the next one.
Since the paste has the flux mixed in, you won't have the issues with the flux boiling off prior to the solder melting.
-
-
I've seen this before, neat little 5 axis.......but...you would be shocked at the cost of a Cad/Cam program capable of programming 5 axis work, it will cost more than the machine for a good one.....and there is no realistic chance of hand coding a 5 axis machine.
You can certianly machine an engine block without all the wizardry of a 5, it just takes a little longer and does not look as cool doing it

If you look at their web site, you would see that the cost includes a 1 year subscription to Autodesk Fusion 360, so the software is included (for a year), but the computer is not. Also note that Autodesk has made the Fusion 360 program available free to hobbyists now.
Thank you for posting this Mark
 It is an incredible piece of kit,however the first thing that sprung to mind is what PriceMachine and design mentioned.The $4000 price tag is just a small chunk of what is required to get this machine up and running.
I am also very wary of the fact that the monies for orders placed are obviously being used to 'bankroll' the company to allow production.Spending that kind of cash,I would only feel secure purchasing a readily available machine from a well established company.
Kind Regards
Nigel
Note that they have begun delivering machines now, and the kick-starter is long since over, and all future sales are just normal purchase arrangements, with current delivery sold out through May, so current pre-orders are delivering in June of 2016.
I'm not in the market for this thing, and only found out about it from this thread, but found all this information from their website, provided in the links in the first post, and the information from Autodesk took a single Google search.
I hope they do well, as this is a cool machine and I'd like to see the people who developed it be rewarded with some success.
- src, GLakie, flying_dutchman2 and 4 others
-
7
-
-
If I was much sharper as a machinist (not even close), I might want one. What are the damages for that jewel?
$4000
- mtaylor, Canute, Dimitris71 and 1 other
-
4
-
I can only hope that my longboat (whenever I get around to it) comes out as nice as yours did Erik.
- Stuntflyer, RichardG, dgbot and 5 others
-
8
-
Wood on the other hand is much softer, let's say 500 SFM. So, 500 SFM X 3.82 / .25 equals 7,640 RPM. These are conservative numbers but you see where this is going. No hobby machine (nothing against hobby machines, LOL) will go this high.
Paul
Actually, Sherline sells a kit to allow their machines to run up to 10,000 rpm, and the Proxxon MF70 mill will go up to 20,000 rpm.
-
-
I'm considering building the Constructo Louise Steam Launch but I've never built a Constructo brand kit before. Can anyone offer any info on the quality (or lack of) of Constructo kits and/or the Louise Steam Launch in particular? Thank you......Milo
If you do a search on the forums here, there are at least two build logs that I'm aware of for this kit, and the one that was completed recently looked very nice. I'd suggest you look for those logs, and form your opinion based on the feedback provided from the people who built (or are currently building) it!
Good luck,


Virginia 1819 by gonzz0 - Artesania Latina - Scale 1/81 - US Schooner - first POB effort
in - Kit build logs for subjects built from 1801 - 1850
Posted · Edited by GuntherMT
You can use Chuck's method with the kit planks, and with double planking. It's a generic system.
You don't need to spile the planks, you can just taper them and edge bend them instead in almost all cases.
There is a video somewhere of how Chuck edge bends planks, but I don't know where a link is. Basically clamp the plank to a board on one end, place another clamp to act as a 'pivot point' midway along the plank length, and then a third plank to hold the plank in a 'bend' on the board. Then use a heat gun (or blow dryer) to apply heat to the plank. Let it cool, and remove the plank. It will have some spring-back, so you'll need to experiment to see how much over-bend you need to achieve a good fit.
Edit: To clarify the 'pivot' clamp isn't clamped onto the plank, but placed in a way that it prevents the plank from moving in one direction and allows you to bend the plank around it.