


GuntherMT
-
Posts
2,213 -
Joined
-
Last visited
Content Type
Profiles
Forums
Gallery
Events
Posts posted by GuntherMT
-
-
-
Strange. I find that the Jax Pewter Black works fantastic on copper, brass, and the cast 'white' metal from the kits. It does like to be brushed on though, and I use the Jax cleaner (also brushed). It can be brushed while immersed in the product, or just using a small brush separate, but just immersing it doesn't leave a very even finish, while brushing it on seems to work great.
-
Depends on the item, Skip.
I ordered a bunch of Vallejo paint that was back ordered, and it trickled in over about 6 weeks as they got it.
On a more recent order of two items the first shipped about a week after the order and the second at about the three week mark.
-
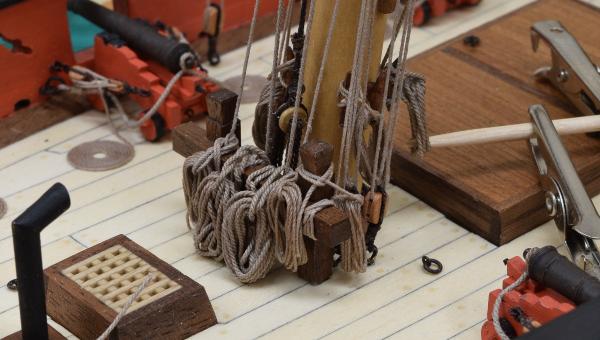
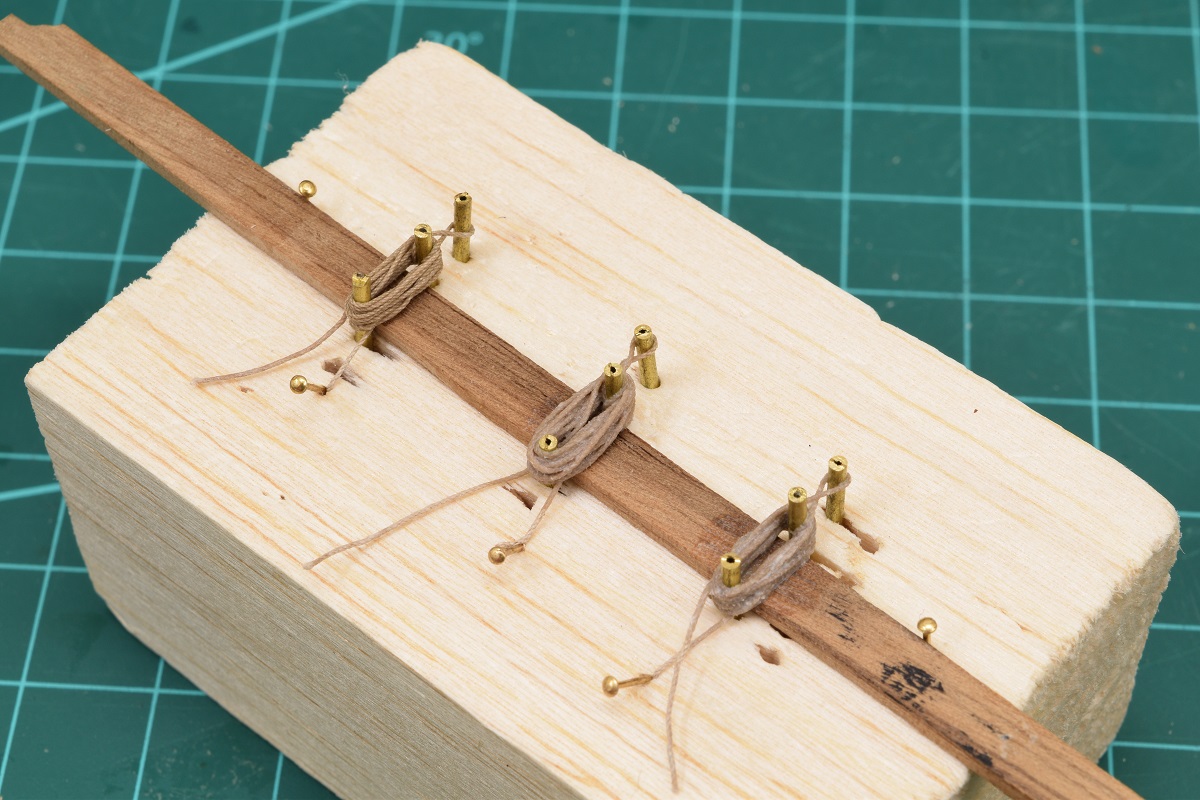
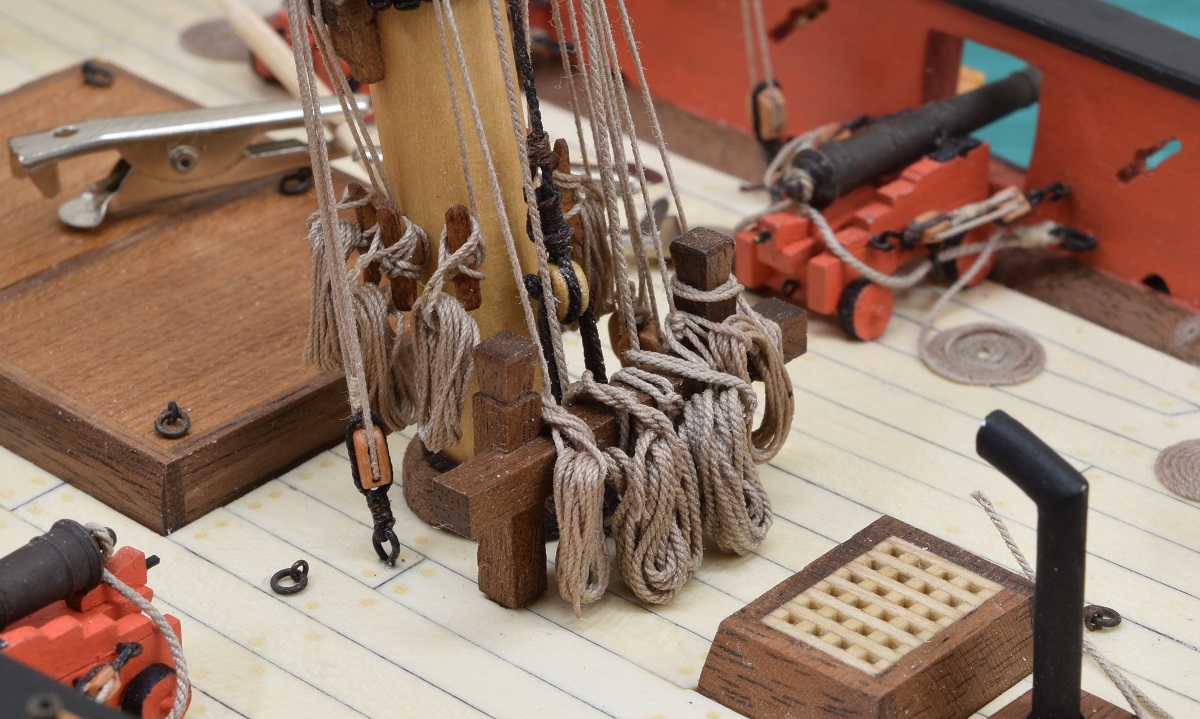
Ever so slowly I am working my way through the rope coils. I just haven't found a lot of time lately to work on them. I started at the stern, finished all the ones up to the mast (including the shroud cleat ones), then tonight, finally finished the ones at the base of the mast. All I have left is all the ropes at the bow now (going to be crowded!).
Here is a picture of the little balsa-wood jig in use with 3 coils in various states of the glue soaking in and drying, followed by a couple pictures of the way the base of the mast turned out. The tooth-pick with alligator clamps thing in the photo is holding that last coil in position while it dries, hopefully staying in position when I remove it!


-
-
If you are like me, you'd be really unhappy with yourself later if you'd left it, so I think you'll be happy about your decision.
I really don't like how the CA glue darkens the string when seizing the lines so Im going to try to minimize its use in effort to preserve the desired look of the string being used.
What I do when I do use CA to hold a seizing, is I make sure to use CA over the entire seizing on all sides, so that it's all the same color. At the end of the build I'll go over all the rigging with a bright light, and any that CA were used on should be slightly shiny, so I'll use clear matte varnish on them to get rid of the shine.
Mostly I just try to use 50/50 PVA/Water mix on the rigging, but on seizing CA is definitely something I use when I need to, just need to know up front that you'll want to do something about the shine at the end.
-
Prices are indeed on the website "ordering" page http://www.admiraltymodels.com/Ordering.html
Ah.. You should consider changing your 'Plans' page then ( http://www.admiraltymodels.com/Plans.html) as it currently says:
To order, e-mail the relevant plans list (with J references) with vessel name/date to the Picture Library: pictures@rmg.co.ukThey will explain the ordering process for plans, costs, payment methods and other details.So after reading that, I never even looked at your "ordering" page, which is certainly my bad, but the stuff on your 'plans' page made me think that was how I would have to do it!
Thanks,
-
The first two volumes of TFFM are a complete treatise on building a Swan class model. They are a step-by-step guide. They do not include the plans, which may be purchased from Admiralty Models.
Greg,
Can you give an approximate cost for the plans? I'm nowhere near ready to get into building something like this, but I'm curious as to the costs involved, and since there are no prices on your web-site for the plans, I'm wondering what they are. I don't want to email the link and initiate any sort of actual transaction, just looking for a general idea - i.e. $25 per sheet or whatever they might be as an approximate.
Thanks,
-
Interesting model B.E. I don't think I've ever seen a small ship like this that had a spreader at the cross-trees while carrying a square topsail. Maybe I just haven't been paying attention!
- Dimitris71, Canute, Elijah and 1 other
-
 4
4
-
It's certainly up to you, as it's your ship, and if you are happy with it, then great, but this is probably one of the simpler fixes that you'll ever have, as all you really need to do in order to fix it is remove the lanyards and re-rig them with longer ropes. Since they only run from dead-eye to dead-eye, and those are both secured to the ship or the shrouds, the replacement of the lanyards should be pretty straightforward and not cause any issues with the other parts at all. I'd guess it would take you less than an hour to re-rig all 4 lanyards.
I suppose it's all about the person building it. I know that for me, I'd be forever bugged by knowing they were wrong, but I'm more than a little bit OCD about that sort of stuff (I'm a QA tester by profession, so I guess it comes with the trade). If you are happy with it, then power on, and build the rest and keep on learning!
-
-
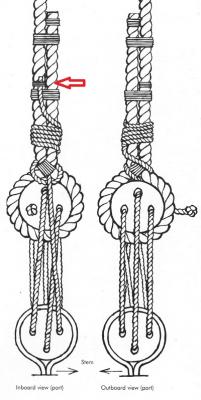
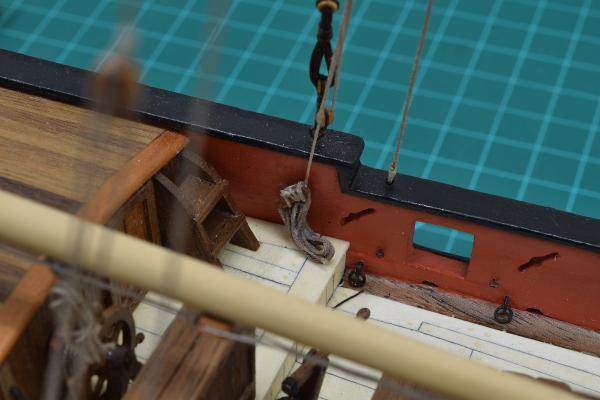
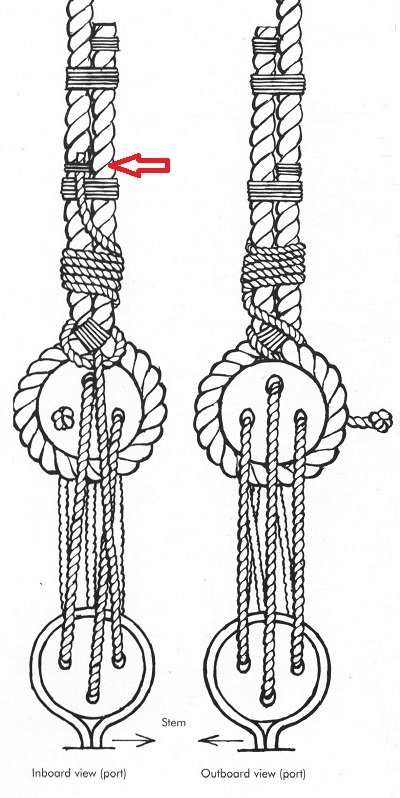
Your rope coils are nicely done, so I sort of hate to tell you this, but the lanyard coming out of the dead-eye is not secured to a belaying point or coiled, it wraps up and around the shroud and is seized.
Here is a drawing that hopefully will help - the red arrow is the end of the lanyard. After it comes out of that last hole in the bottom deadeye, it comes up to the upper deadeye (behind it) and through to the front under the rope (sometimes this isn't done due to not enough gap on a model. Mine doesn't go through like this as I didn't leave a large enough gap there). Then it wraps around and under itself in the back to tighten it, then wraps around the shroud 5 or 6 wraps, before the end is pulled up and seized.
The coils are for taking care of the loose ends of ropes that are tied off to belaying pins, cleats, or bitts.
-
-
I stick a length of wire that's just small enough to fit into the needle when I'm not using it for a while. (I have black coated copper jewelry wire in sizes from 18 gauge to 28 gauge) I've left it sit with the wire in it for a month, and pulled the wire out and worked just fine.
Worst case, a box of 100 syringes is about 8 bucks, and 25 tips is something like 4 bucks, so it's not a tragedy to toss one out.

-
I need more practice / studying when it comes to rigging dead eyes and securing lines.
I posted a mini-tutorial on how I rig blocks, but the 'seizing' part of that will work for every part of the rigging. For example, your shrouds can be seized using the exact same method I use on the blocks, but you just leave a loop where the tutorial shows a block, and drop the loop over the mast and into place. You can move the seizing up and down before you pull the ends tight and secure it.
See this post - http://modelshipworld.com/index.php/topic/8085-armed-virginia-sloop-by-gunthermt-model-shipways-scale-148/?p=328294
Just start around step 5 since you don't need to secure a hook to the block.
Happy to answer any questions you might have.
-
I understand your point so this topic is of no interest to you it is not a debate on how a model is built from collected wood or pre milled wood. This is a topic for those interested in collecting wood and processing it. Thank you for your input and your point of view, but it does not apply here.
I'm glad you know what topics are of interest to me on an internet forum.
You might also notice that I did not add anything to this thread until it left the topic as you list it above, and went into the "why doesn't everyone else do it this way" area, with more than a little bit of derision implied for those who are foolish enough to simply buy their wood to build a model, and the implication that their work will never "stand out", or they aren't an "artist".
I was simply providing some input from the (apparently) non-artistic side. I'll go back to building my ugly boats out of lego bricks now.
-
-
So I'll go one step further for those that still seem to think that I should 'collect my own wood' rather than purchasing what I need.
I have exactly zero interest in doing that. I like building models. I have no interest in acquiring the large tools needed to break down the parts of a tree into piles of wood that have to sit in storage for years before I can use it for modeling ships.
This is a hobby that I enjoy, and wood harvesting, cutting, and aging is not a hobby that I have an interest in.
For some people those are two facets of the same hobby. For me, that's like telling someone who makes plastic models that they need to make their own plastic and pour their own molds. It's two completely separate hobbies that just happen to flow one into the other, and in my case (and I'm sure the vast majority of ship modelers) that first hobby just isn't an interest for me.
If you think that my models are 'flat' or not 'artistic' or whatever because of that, well, that's perfectly fine, because I'm not building my models for you, I'm building my models for me, and I'm perfectly fine with buying my 'fake' boxwood or whatever else I deem to look nice for the model that I'm building.
-
I live in the middle of a city, in the middle of a desert. I think I'll just order my wood from suppliers, since cactus probably wouldn't make a very attractive model.
- Worldway, mtaylor, Landlubber Mike and 2 others
-
5
-
-
Great work Brian
I did say my method might not be accurate and you've proved it so! Despite the brilliance of your rigging I'll leave mine be and learn for the next time.
Cheers
Alistair
I certainly wouldn't change yours Alistair, this is a hobby in which we are constantly learning, and going back to completed projects just doesn't make any sense to me. I've seen plenty of models with coils done like yours, and I've seen photo's of museum models with coils done both like yours, and in other ways that don't make any sense at all (like open coils laying all around the belaying points on the deck to the point where it would be impossible to get to the belaying points without crossing two rings of rope coils).
If I hadn't gone to the Festival of Sail in San Diego, I'd probably be more than happy to do them by hanging the top of the coils over the belaying points, but since I saw them on both working ships, and the museum ship (Surprise) done differently, that's what my new goal is.
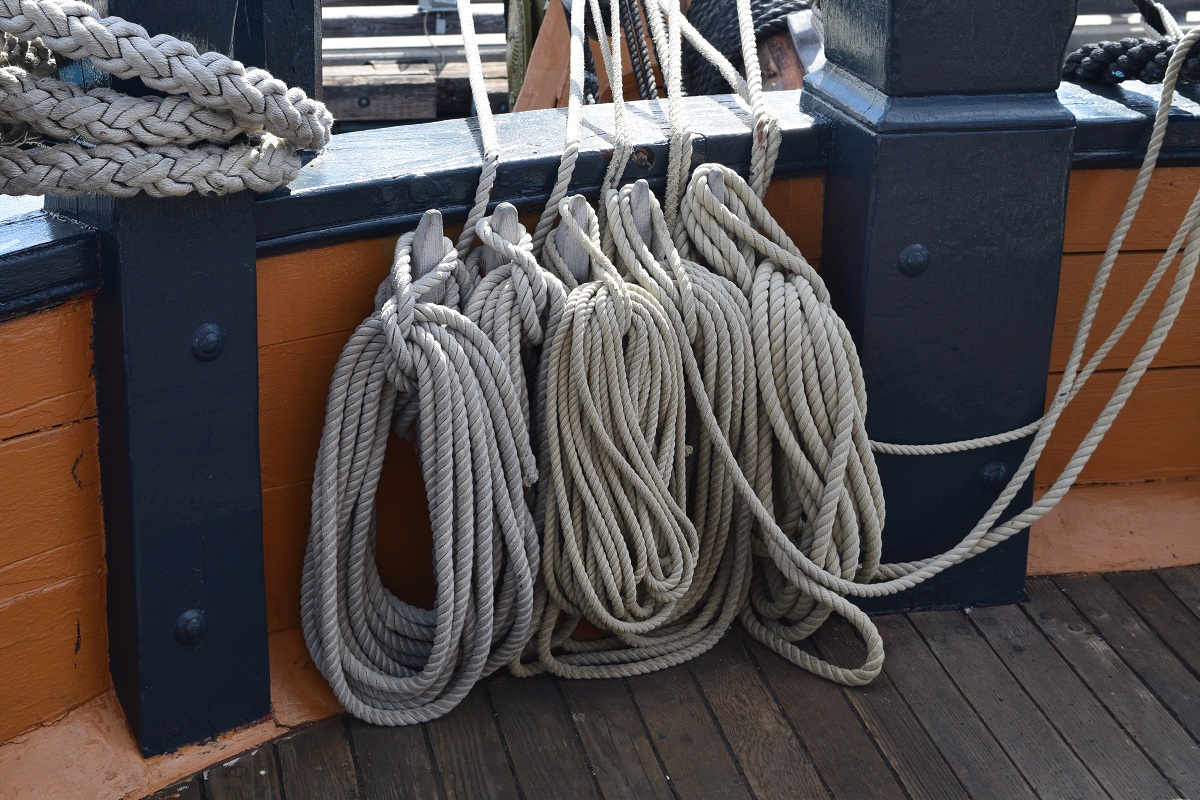
Here are some of the photo's I took while in San Diego that I'm sort of trying to use as a reference while finishing this up.
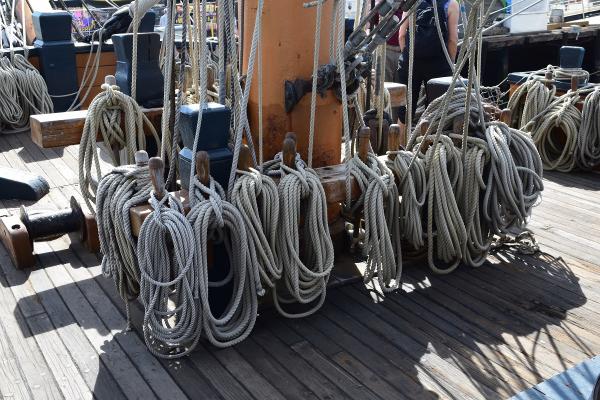
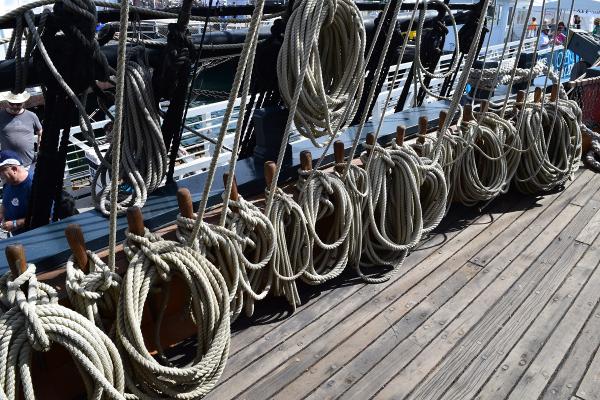
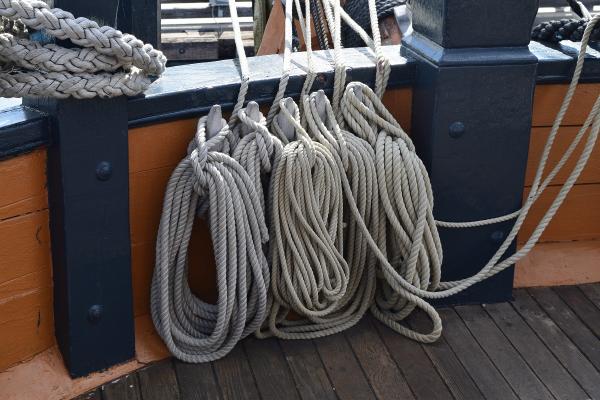
The method that they hang the coils from the belaying points is actually really simple. They make up the rope coil, then grab the line that remains between the belay point and the coil, pull it through the coil, twist the loop formed by that rope, and stick the end of that loop over the end of the belaying pin/cleat, and bam, the coil is hung!
I've been playing with methods of using the actual end of the line from the rigging to loop over the coil in the same way, but it's really difficult to get it to hang right, so I switched to making the 'hanging' loop from the coil itself. This method works much easier, but I lose the detail of the rope loop coming from inside of the coil and over it, but it's pretty likely that the only person that would ever notice that detail would be me.
-
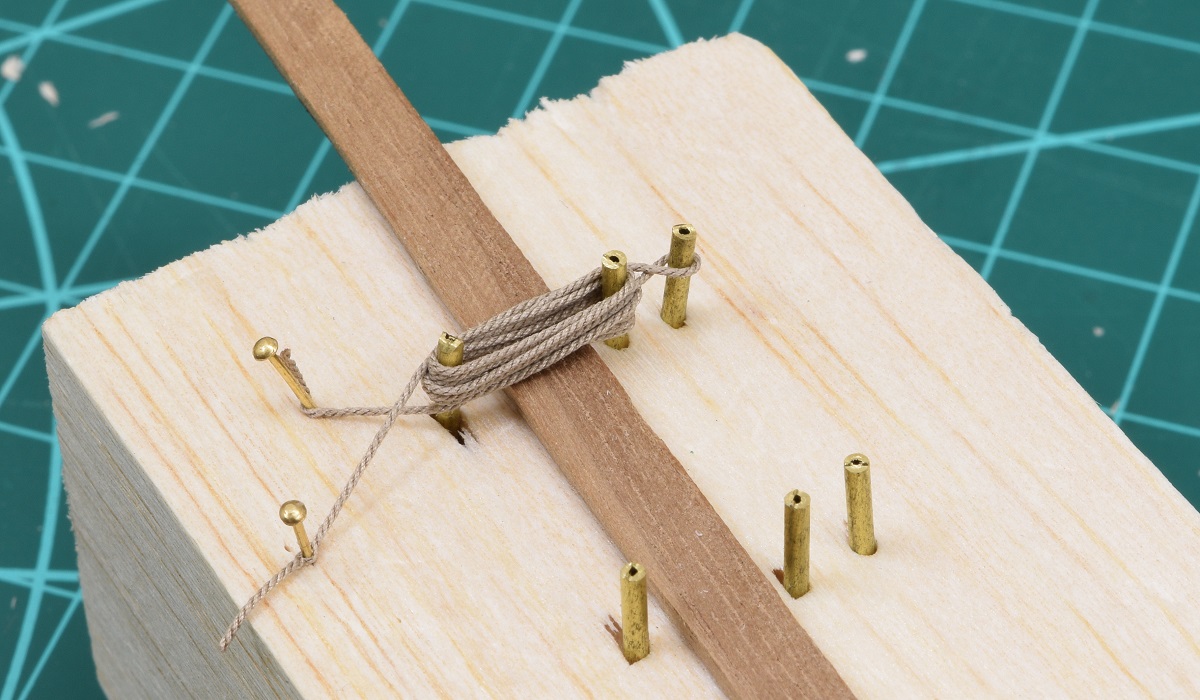
Ok, so I made one coil on the latest iteration of the jig.
The brass is cut at a 45 degree angle at one end and just stabbed into the balsa block so adjusting the size of the coils is a simple matter of moving them to different spots on the block.
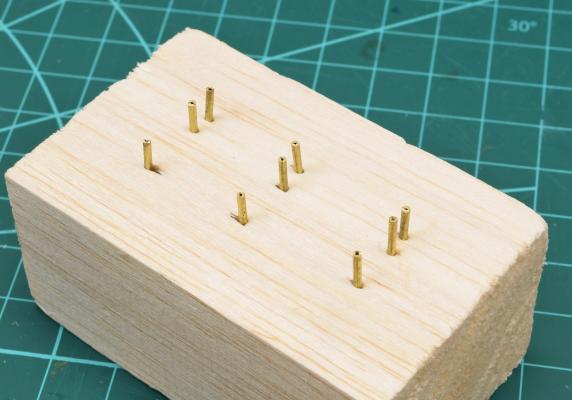
I put the scrap plank underneath to keep the rope off of the block for a couple of reasons. So that the rope doesn't stick to the balsa since it's so soft, it's easy to pull up pieces of the balsa that need to be cleaned off. The space underneath allows easy threading of the rope on coils that I want to tie off in the middle. Finally, the space makes it much easier to push the rope off the brass from underneath without messing up the coil.

This rope coil I made overly large on purpose to see how it would look sort of folded up against a bulkhead, as there were plenty of coils that were done like this on the ships I saw in San Diego, so I figured I'd try it. Easy enough to pull it off if I decide I don't like it.
-
Yep, that's Alistair's log, I've used it a lot on my build as a reference and inspiration. It's pretty much the same thing that I referenced from Dan Vadas, except that Dan showed the rope 'loop' coming out of the coils to use to hang the coil on the cleats, which is the way that all the ships I saw in San Diego hung their rope coils. It's a very similar jig, with an extra pin. I'll try to get in the other room tonight long enough to take a picture, had a very late day and just got home.
- GLakie and zoly99sask
-
2
-


USS Independence by Philthy - Artesania Latina
in - Kit build logs for subjects built from 1751 - 1800
Posted
Good luck on Number 3!
There is already a thread where a good number of work areas are shown here: http://modelshipworld.com/index.php/topic/3869-so-where-do-you-do-yours-then-model-making-that-is/
Mines somewhere on page 21.