
HOLIDAY DONATION DRIVE - SUPPORT MSW - DO YOUR PART TO KEEP THIS GREAT FORUM GOING! (Only 13 donations so far - C'mon guys!)
×


bigcreekdad
-
Posts
438 -
Joined
-
Last visited
Content Type
Profiles
Forums
Gallery
Events
Everything posted by bigcreekdad
-
Thanks Bob..I'll give it a go. BTW Jim...I planked first because I wanted the gunport paint color to include the plank edges around the port. However, before my next build I'll be touching base with you for some other important tips. John
-
One of my more recent activities this Covid crap has spawned is paint by number. Surprisingly relaxing, inexpensive, and they actually look fairly (IMO) good. You'd think that after doing a few of the above, with many minute shapes, that painting the inside of the gunport would be a breeze. Well, not for this cowboy anyway. I still end up with traces of the paint (red) on my lovely pear outer planking. Before I make it worse, any suggestions for removing it? Thanks
-
I suck ripping planks with my Byrnes saw
bigcreekdad replied to bigcreekdad's topic in Modeling tools and Workshop Equipment
Wow....thanks for all the feedback. I've got a bit of homework to do. -
I used to at least rip decent planks. Now, I van't get the width so be continuous through the whole cut. After 6 or so inches, it starts decreasing. Frustrated. Thoughts?
-
Are there any decent clamps?
bigcreekdad replied to bigcreekdad's topic in Modeling tools and Workshop Equipment
I may have misled....I only use clamps for planking above the wales, and for bending and drying a plank to fit the curve of the bow.....these are the times that I get the dents from bad clamps. I also use clamps on wood for many other tasks when ship building. I'm really just wondering if anyone has a source for good quality small and medium clamps. Thanks -
I'm sure everyone has seen, and maybe used, those red handled and tipped clamps. I'm sure many will agree they are junk. The protective tips eventually will either come off or west through. They also have varying degrees of tipping power....some much tighter than others . AS such, they become useless for things like planking as they end up leaving dents. Are there any really good small clamps out there. I would pay for quality, but haven't seen any. such thing. Any thoughts?
-
Lost clamp on Amati Keel clamper
bigcreekdad posted a topic in Modeling tools and Workshop Equipment
Not sure how, but I lost one of the two. Does anyone know if there are replacement clamps? -
Ditto on the folding table. I use two of them and they work fine. Don't go too cheap....sturdier the better.
-
Second planking with very nice kit supplied pear wood. Almost finished. I did some preliminary sanding and applied a coat of gun oil. This made a few imperfections stand out, and I will now repeat the process at least once. While I've seen tons of better planking jobs on this site, I'm kinda pleased with my efforts, and, as I stated in my initial post, I just hate to cover most of this with copper. And, likely will not. To each his own I guess. Also...keel needs lots of work yet. Might just use a dark stain...any thoughts?

-
Eugenio...just looked at build log....fine looking job!
-
Starting the second planking of my Speedy build. After that, copper plating is close. I've only coppered one ship (Pickle). and I just didn't like the look of it. I much prefer the unpainted wooden ship. I even mix woods a little for contrast. Another thing...I try to do my best (still a ways to go) on the second planking and to copper over most of your efforts is a bit of a downer. Finally, most of my hull will be planked with pear wood....a beautiful wood....why cover that up? But not coppering doesn't present a real ship of that period. What are current thoughts from the group?
-
Any opinions on this Proxxon DS 460
bigcreekdad replied to md1400cs's topic in Modeling tools and Workshop Equipment
I have that saw. It is far from vibration free, but for the money, it's not bad. This is my second scroll saw. Looking back I wish I'd ponied up for a true woodworkers one. -
This has been a great build log to follow. Especially because of the very clear and close photos. Great looking ship!
-
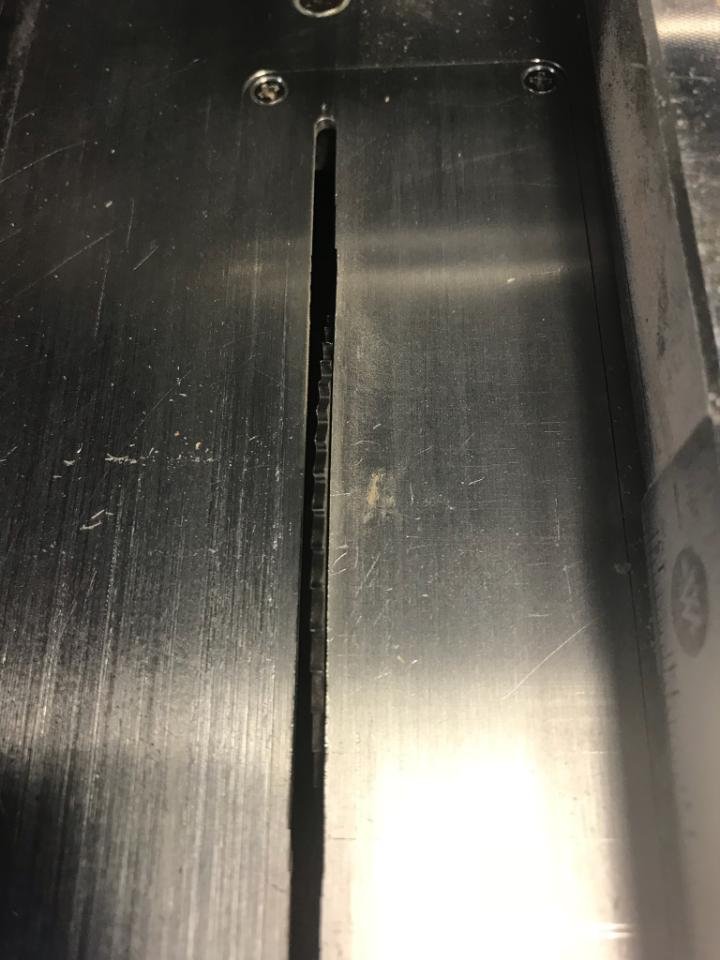
WAs intending to do a little heavier cutting and I installed the original blade. However it seems to be biting one side of the cover. When using slitting blades I also noticed the blade was very close to the cover on the right side (looking at it). Any thoughts? SEE THE PIC ATTACHED TO SEE WHAT I MEANT ABOUT BLASE BEING SO CLOSE TO SIDE> THIS IS A SLITTING BLADE.MY CARBON BLADE THAT CAME WITH THE SAW RIBS RIGHT AGAINST IT.
-
Agree with the pin advice. Just want to add to make sure your drilled holes are directly in the middle of each.
-
I received this excellent kit for Christmas, and you are doing such a fine job, I know I'll be referring to your build log often once I start it. It will be a little bit yet, as I'm just starting the second planking of my AVS. I always struggle with planking to try to get it right, and am still not where I would like to be. Adopting Chuck's method of bending has helped a lot, but I need much more practice IMO. I have been using a hair dryer, but it just doesn't seem to get quite the bend I would always like and I see you are using some type of heat gun. I wonder if that might work better than the dryer. Any thoughts?
-
Well done with all IMO.
-
Just what I was thinking of....Thanks!
-
I have a shop vac I use in the basement, which I can connect the hose to the byrnes saw, scroll saw, thickness sander and disc sander. Works well, but I do most of the actual assembly, including sanding, in my den. When doing so, I usually wear a protector. This protects me, but does nothing about the dust it throws into the air. I've been thinking about jury rigging a small shop vac, to which I can somehow fix the hose intake semi permanently to my bench and sand over the top of it. Anyone ever try anything similar?
-
Gregory Honestly, I did not compare the parts to the plan. However, I should think that if you scratch build from the supplied plans you will do fine. The plans appear quite detailed to me.
-
Brush painting hull ??
bigcreekdad replied to CPDDET's topic in Painting, finishing and weathering products and techniques
Hi Dave The Bluenose was my second ship, so I was far from experienced when building it. While I hand brushed the black above the waterline, I used spray paint for the red lower portion. I taped off everything but the target area, put it in a cardboard box, and sprayed it outside from a spray can. I did three coats and lightly sanded after the first two. Not only did it turn out great IMO, I have had several compliments on. Just a thought. If you'd like, I will take a few pics and send you if you PM me. John -
I decided to take a short break from my Cutter Cheerful build, and pulled the AVS off the shelf where it has resided several years. I'm just ready to start the first planking, and I have been amazed at the poor quality of the non planking wood. The kit supplied frame wood is terrible. Every single bulkhead slot had to be widened, and by quite a bit IMO...not sure how this tedious process adds to your skill set. After positioning them the lengths did not all have the same distance to the bearding line. The bulkhead tops also break very easily. The very thin and flimsy false deck broke constantly where notched. I have only built one Model Shipways kit in the past (Bluenose). As I recall, that kit wood was decent. What the difference is in the two kits I don't know, but in other completed builds ( 3 Caldercraft and one Occre) I do not recall this frustration with the keel, bulkheads, and false deck. Maybe it was the shock of just coming off building that much on the Cheerful build that kinda spoiled me....no comparison in the quality of the precut materials. In any case, the AVS is sometimes considered a new starter build. Glad it wasn't my first build.
-
YT...I did the same before I posted. I am looking for either sheets I can mill, or strips. I didn't see any. It doesn't appear the a wood supplier carries it, and same goes for Syren.
-
where can it be purchased?

