


ir3
-
Posts
321 -
Joined
-
Last visited
Content Type
Profiles
Forums
Gallery
Events
Posts posted by ir3
-
-
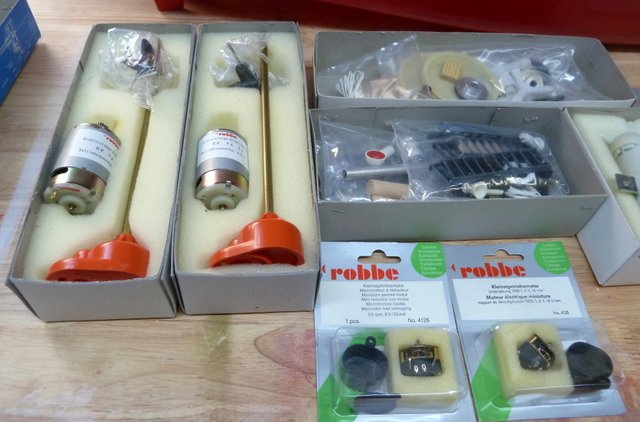
I have not been idle this last week. I am in no hurry to assemble the decks to the hull as there are a lot of little issues to settle about the various animated parts of the boat. I assembled the rear crane and am almost finished with the fore deck water monitor. The biggest problem is the Robbe miniature DC motors. There are none to be had anywhere. I had two in the kit. Unfortunately it was the only two. There was a 1000:1 motor and a 250:1 motor. The 1000:1 motor is used to rotate the crane and the 250:1 is used to raise/lower the boat hook. Well, the instructions call for a 500:1 gear ratio to raise and lower the hook. The 250:1 motor is described at 50RPM and I assume that is at 6V. I can reduce the voltage to reduce the RPM. It looks like the 500:1 motor is probably about 25RPM. There are a lot of miniature motors available of various RPM's but they will need some retrofitting to get them to work. It can all be done but it will take time. Especially getting the parts which take weeks to deliver. There are 3 or 4 other places for 500:1 motors in the model and they will be done as parts arrive.
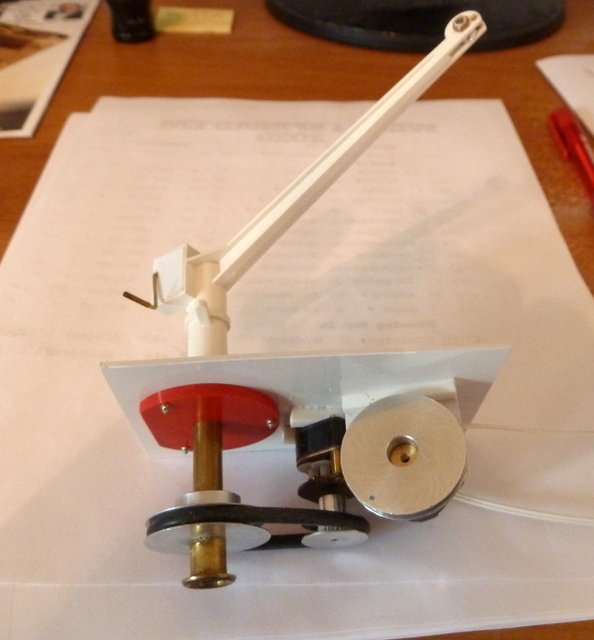
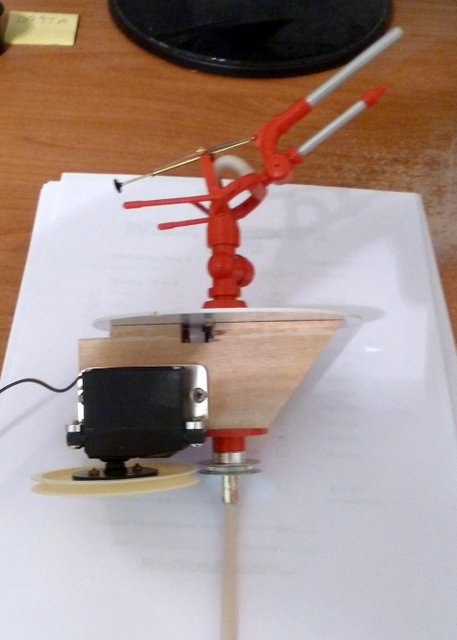
I also started on the Water Monitor for the Fore deck. Robbe did a very nice design here but it is not without its minor problems. There is a spring in the water line that keeps the hose from kinking when attached to the water nozzle. There is a spring on the top of the unit that holds the nozzle up. There is a fine nylon thread the runs down the inside of the support tube for the Monitor. Unfortunately with the spring in the water line, the spring on top of the unit is not strong enough to fully elevate the water nozzle. I will have to look for some other stiffer springs and see if it helps. For the most part, though, there is enough elevation change to make it look realistic. I have the servo installed for rotation but need to install the servo for controlling the elevation of the nozzle.
There are also going to be issues installing the electronics. The call outs are for old Robbe parts that are no longer available. I do have two Multiswitch Decoders and several Multi Switch modules to I can implement all the switchable items and rotation controls. The relays will be a problem but there is a good market in the robotics world for these kind of items.
So, a lot of work ahead with a lot of head scratching. If anyone know of a source for the Robbe miniature DC motors or Relay modules, please let me know.
Until next time,
IR3
- Old Collingwood, mtaylor and Jack12477
-
 3
3
-
Wishing to build one more period ship model I collected all the pieces from Syren to complete up through chapter 4. None of the parts has been started and still in original packaging from Syren. Time is moving on and with plenty to do on the models I am working on and on the shelf the I will not get to building this magnificent model. Included are the Bulkhead set, the Carvings set, and chapters 1 -4 done in Yellow Cedar. I am asking $400 shipped CONUSA for the complete package. I will be happy to split shipping costs for shipments outside of the USA. I can supply pictures but the Syren website and Chucks build thread tell the complete story.
This is an excellent opportunity for anyone thinking about starting this project. Certainly a very worthy project indeed.Thanks for looking.
-
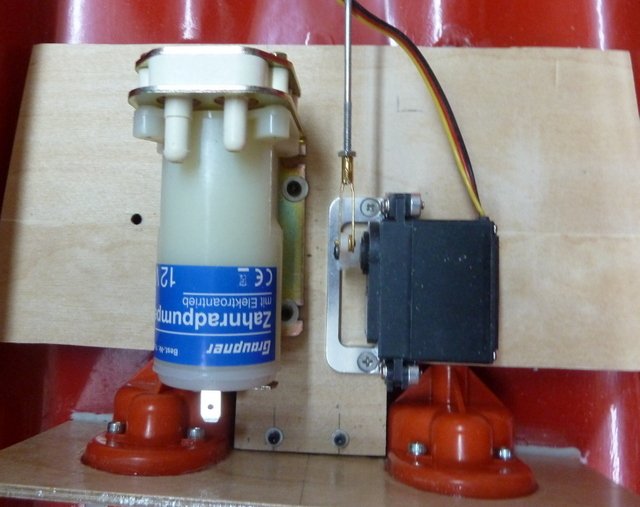
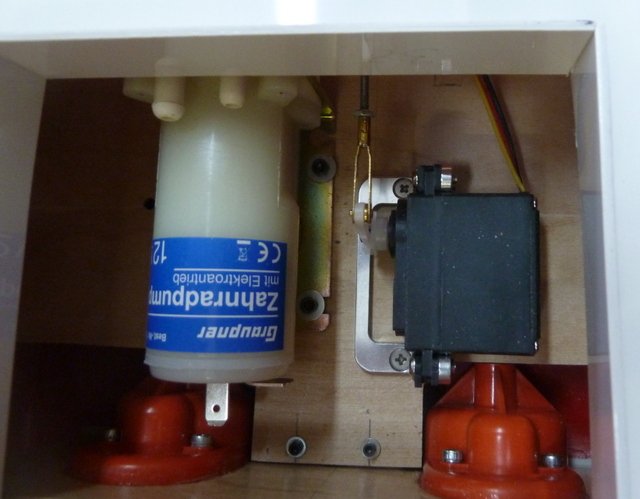
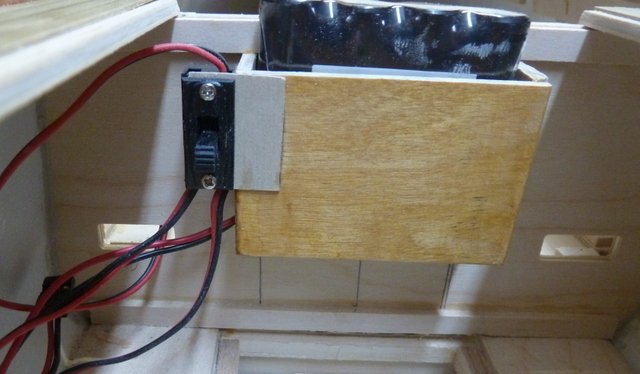
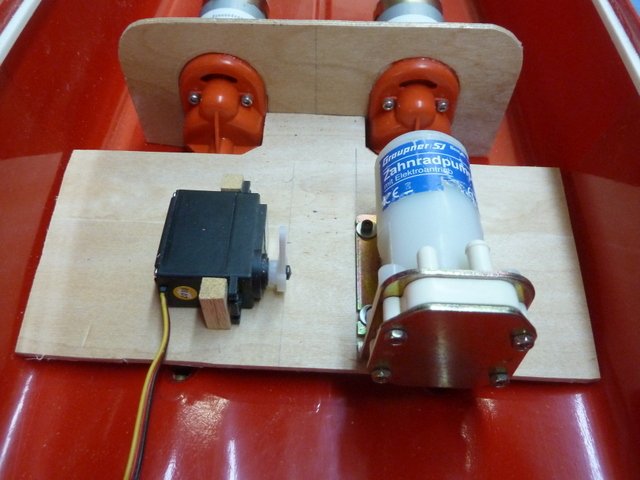
The original position of the rudder servo and water pump were OK as long as they did not need any maintenance. With the rear deck dry fitted there was no way to get at either the servo or the water pump. They have been repositioned. Because of the way the rudder servo was mounted I was lucky enough to find a vendor nearby that had some that would work just fine. The mount is held to the board through two T-nuts so removing the rudder servo will not be a problem. The water pump was moved so the mounting screws are accessible but with fender washers under the bolt heads, not easy to replace of the pump has to come out. With all 4 bolts quite loose, it just may come out without too much trouble. Of course, since the rudder servo was moved, I had to make a new pushrod.
Now that I have enough confidence that I can service these parts, next job is to glue in the aft deck.
Until next time,
IR3
-
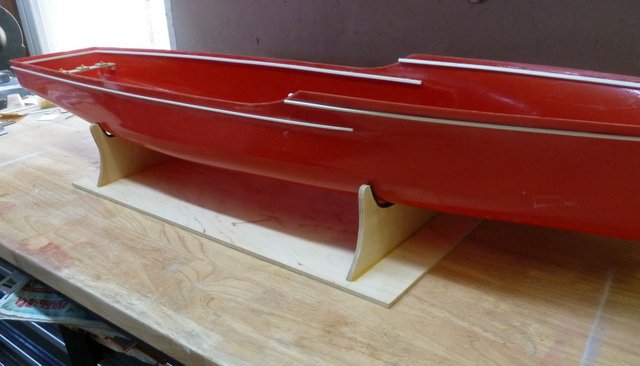
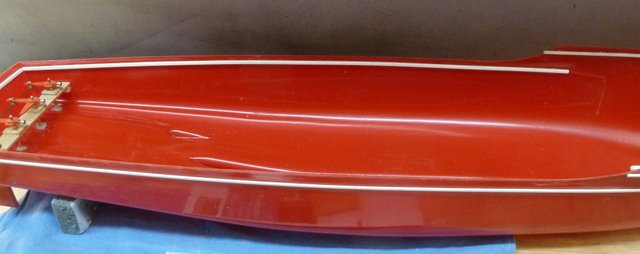
I had to step away from the shop for a while but now back to it. I decided to do more work on the Fire Boat and hold off on Steaming Project X for a while. I want to get the running gear installed in the Fire Boat first. The hull is painted and the rubbing strips are installed. The white stripe is Pactra striping tape. The hull will be getting several coats of Clear Coat today. Then off to running gear installation.
Until next time,
IR3
- lmagna, mtaylor and popeye the sailor
-
3
-
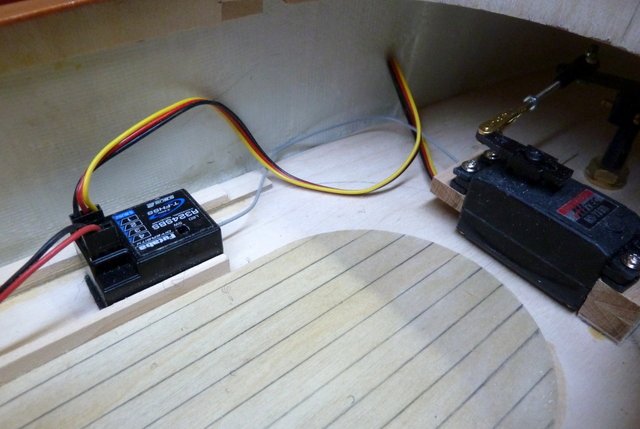
The rudder servo just arrived and has been installed. Preliminary radio installation has been laid out. I will be spending the weekend running the steam plant and familiarizing myself with its operation. Then it will be installed and the project will be near the finish line.
Pictures show initial installation of radio gear.
Until next time,
IR3
-
Hi Mark,
Thanks for looking in. Yep, full RC with all the bells and whistles. Operational Radar, Anchor up/down, fully animated fire monitors. It will be quite enjoyable implementing all the goodies. I was just commenting that with the boat moving at some speed, there may not be any water pickup.
I need to get back to Project X. The rudder servo just showed up.
Until next time,
IR3
-
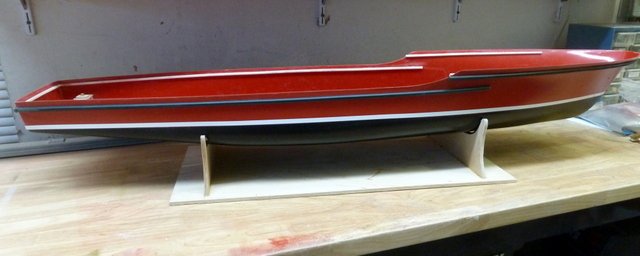
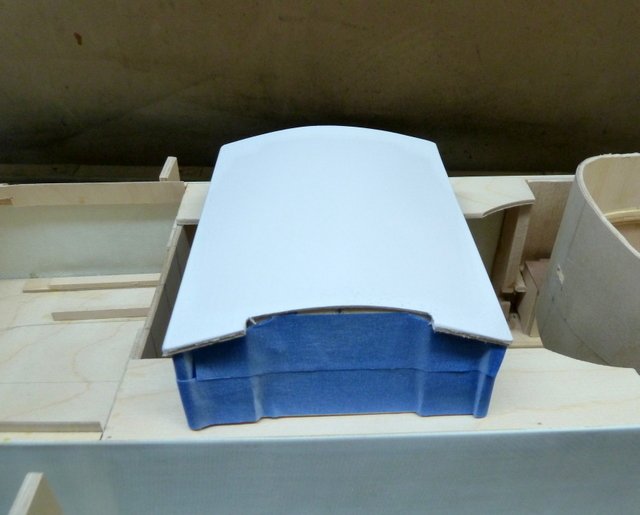
The cradle for the boat was finished this morning. It will be needed for the rest of the assembly and getting the water line in place. At the moment it has been sealed with sanding sealer and will be painted at a later date. Now it's time to sand the hull and get a waterline in place for painting.
Till next time,
IR3
- lmagna, mtaylor and popeye the sailor
-
3
-
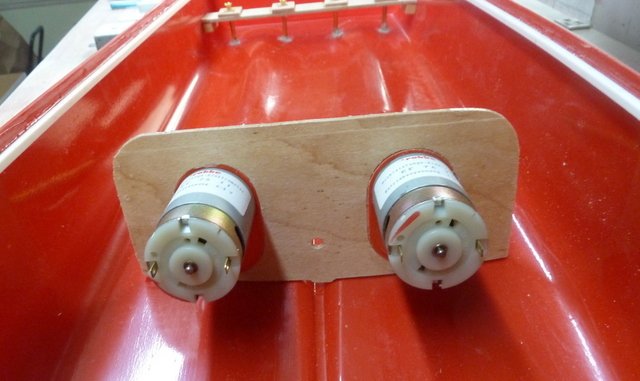
Starting the installation of the water pump and rudder servo. Barely visible between the tow motors is the water pickup tube for the pump. The tube exits at the bottom of the hull. This is how Robbe designed it and so I have to believe it works. But considering the water monitors are operating when the boat is standing still or moving slowly, it shouldn't be a problem. The board needs sanding sealer. This board is glued in but I am thinking of bolting it in just in case the motors have to come out for some reason.
Until next time,
IR3

-
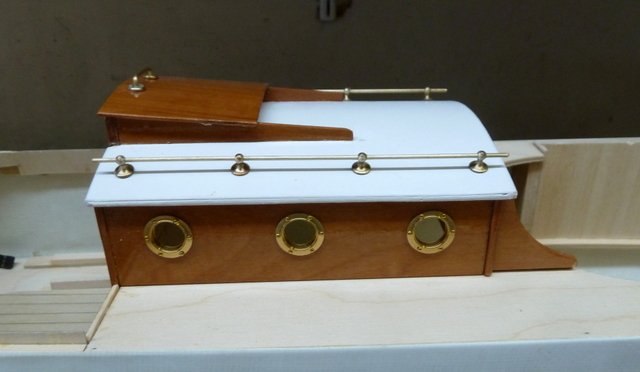
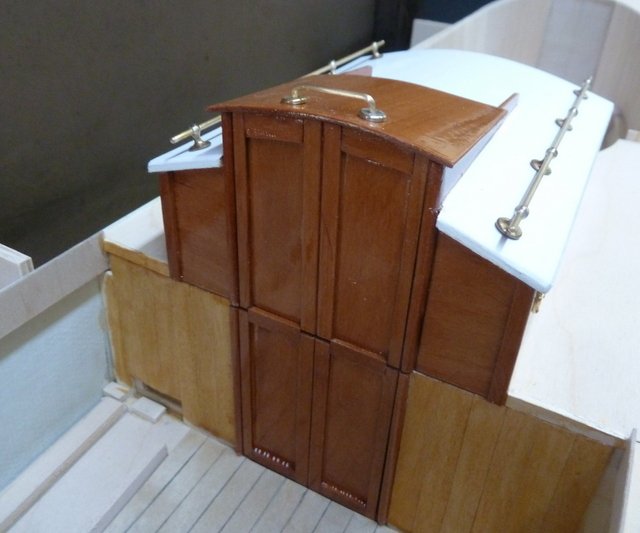
While waiting for some parts to finish Project X I started my next project. It is the Robbe Dusseldorf Fire Boat. I was lucky enough to find an old Robbe kit with almost all of the extras one could acquire for this model. It came with the Robbe Navy-Kompackt geared motors, the two accessory kits to embellish the model and animate the Fire Monitors, that were not supplied with the kit, the water pump, the miniature motors for the radar and anchor, and all of the sound generators. The condition of the rest of the contents is immaculate, no plywood warpage and in excellent condition. If I were to make one criticism, the die cut plywood sheets have just been lightly embossed with no cutting action at all. These parts are easily removed using the scroll saw. A real pleasure to become the owner. This will be a complete build with all the bells and whistles (LOL). For those who are familiar with the Fire Boat, the finished model is quite impressive. Most of the functionality is controlled using Robbe Multiswitch devices of which I still have a nice assortment. My F-14 has been converted to 2.4GHZ using the RIPMAX TM-24 module but I am disappointed with it in that there are very few receivers that will work with it. I am going to convert to the JETI TU2 TX module which is a perfect addition to the F-14. It will also be fitted with a JETI Box. It will work with most of the JETI R# receivers. Looking forward to this.
To get started, the hull was drilled with all the necessary holes for the anchor tubes, the rudders, motor stuffing boxes and water intake for the fire monitors. The usual deck support strips were added and 2 x 2mm strips added to the outside of the hull. These will hold the rubbing strips which have a 2 x 2mm groove cut in them for mounting. The two motors have been bolted to the support bulkhead and it has been placed into the hull for fitting only. Permanent installation after the hull is painted. Painting will be done in the next few days. With all of the detail and animation, this is going to be a fun build.
Until next time,
IR3

-
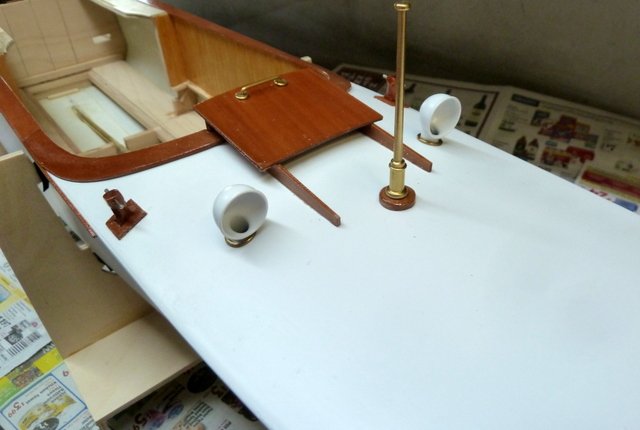
Nearing the finish line. I struggled with the cockpit capping and did the best I could. I could not seem to get the Pear capping to conform entirely but enough time spent. All of the details are on except for the binnacle which needs to be assembled and attached to the floor in the forward cockpit. Next step is to install the radio gear.
Until next time,
IR3
-
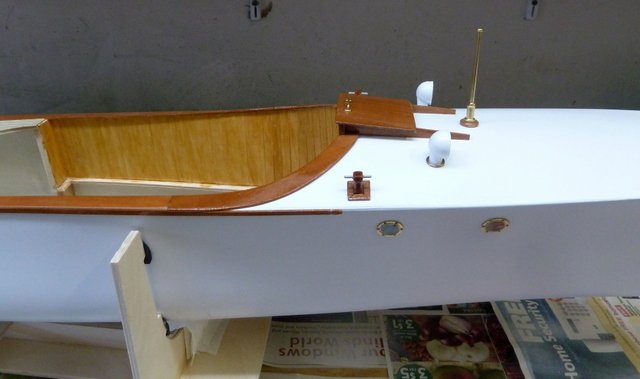
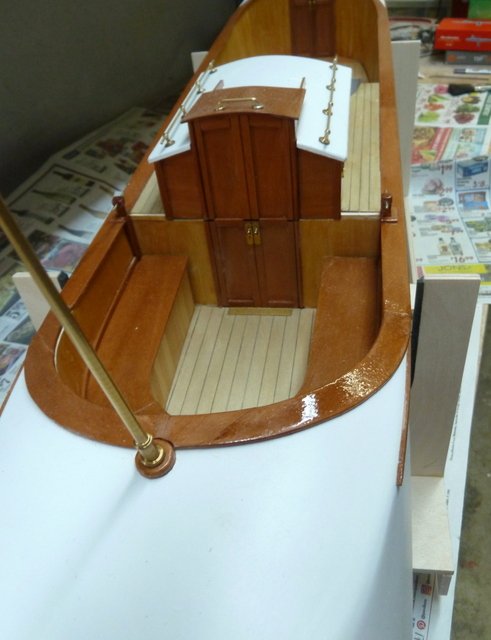
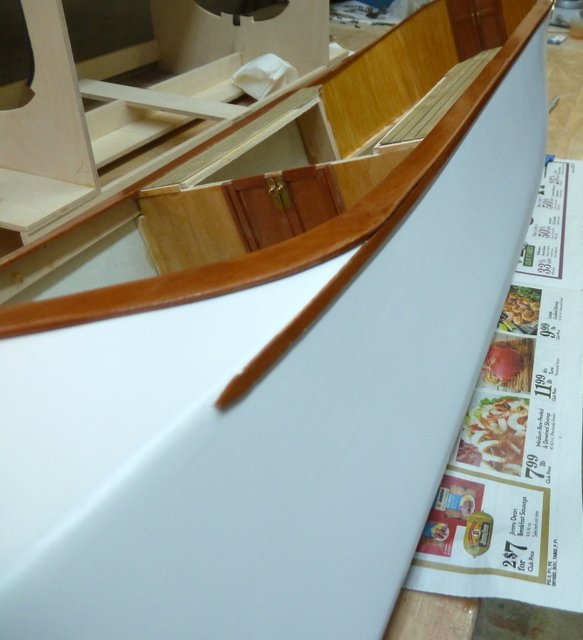
It's been a while since the last update. The weather has not been very friendly and so shop time has been limited. I managed to finish the cap strips and get some nice trim strips on the hull just below the capping. All of this was not without it's problems. This is actually the first model I have built where the woodwork needed staining and varnishing. I am not 100 percent happy with the results and so I must treat it as a very steep learning curve. Only so because the Vigilant, Topaz, and Seekadett have a lot of woodwork associated with the builds. I need to pay closer attention to making sure any joints are flush and nearly seamless. I also need to be a lot more careful on applying the varnish stain. I did not brush on multiple light coats and ended up with a lot of fine bubbling (as can be seen in one of the above photos). I will take greater care on the next few projects now that I have some idea of the rights and wrongs.
There is still a bit of work finishing the interior and applying some exterior fittings. Getting close to the finish line.
Until next time,
IR3
-
The installation of the cap strips has started. I did the forward cockpit first as the curves at the turtle deck are not too difficult to follow. The aft cockpit is a lot more difficult. The curves for the aft cockpit caps are compound and very difficult to form. With the forward strips in I can get the decking around the rear cabin lined and installed. Then it will be the aft caps. The varnish will need some fine sanding and a bit of touch up.
Until next time,
IR3
-
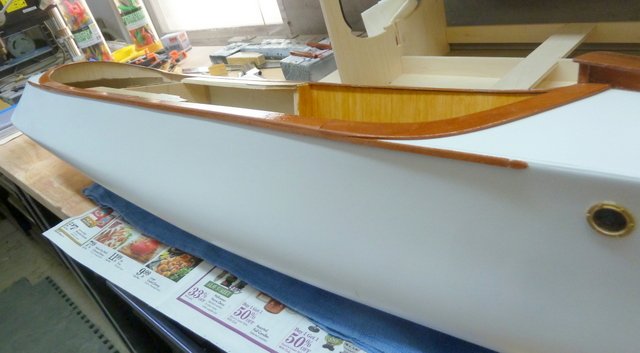
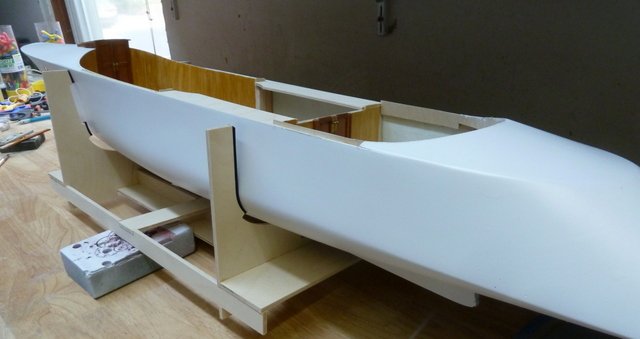
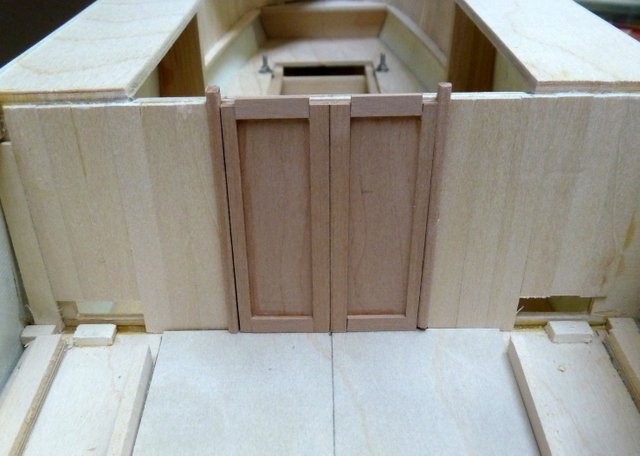
The weather has been very cooperative lately and I managed to get some work done. The hull is painted, a real nightmare for me (just showing the good side LOL). Not my strong suit. The forward cabin portholes are in and the forward cabin door/hatchway have been installed. The forward cockpit has been stained. The next items to install are the cockpit trims.
Till next time,
IR3

-
I'm still here. The kits are keepers but I just might reach the point where I can no longer do any building. Hopefully it is a long way off. The weather here has been brutally hot and no work in the shop for several days. We are finally getting back to semi normal weather here and I have started painting. It does not good to complete the forward door and hatchway until the hull is painted. I have put on and sanded several layers of primer. They take some time to cure. I just painted the top of the fore and aft turtle deck and there will be a good half day drying time. A very time consuming process to do what I hate the most "Painting AAAAAAArgh". I think by tomorrow afternoon, the painting of the hull should be complete.
Until next time,
IR3
-
They are quite rare. If one does show up it is gone almost immediately. There are just not very many kits left in the world. I purchased the Vigilant when it was still available. The Topaz and Seekadett were a stroke of luck as I was able to get to the sellers pretty quickly. I do a Marten Howes Bayliss search of the net every day.
-
Thanks for the comments. I am not trying to make this a commercial for MHB but the comments are very well deserved. Marten, Howes & Bayliss kits were produced with very high quality in mind. The fittings, wood selection, and steam plant design are tops. The best of everything. I have three other kits, the Vigilant, Topaz, and Seekadett and the quality of workmanship is tops in all three as I assume in all of the 10 kits that the produced. Project X is the tenth from Brian Marten and Liz Howes. Martin Bayliss makes custom steam plants for each kit. For the other three kits that I have I also have the steam plants so no headaches. Just plug and play. At my age, fitting steam plants would try my patience although I do have a Mountfleet St. Nectan but the hull is so big installing a steam plant would be quite simple.
If you ever have an opportunity to acquire a MHB product I am sure it will be pricey but well worth it. I am looking forward to the other three kits. They will be just as enjoyable as this one.
Cheers,
IR3
-
-
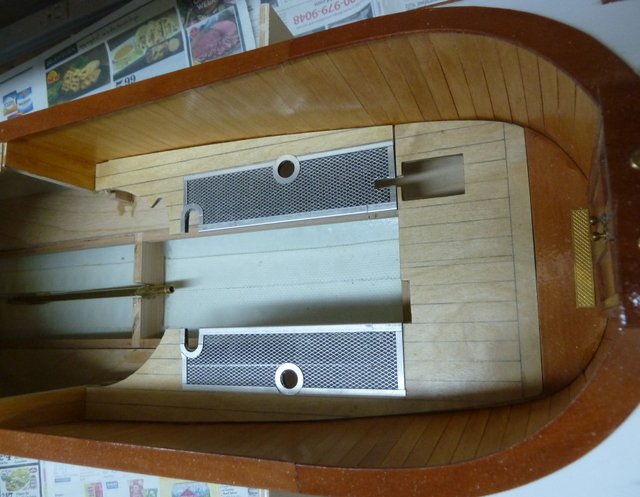
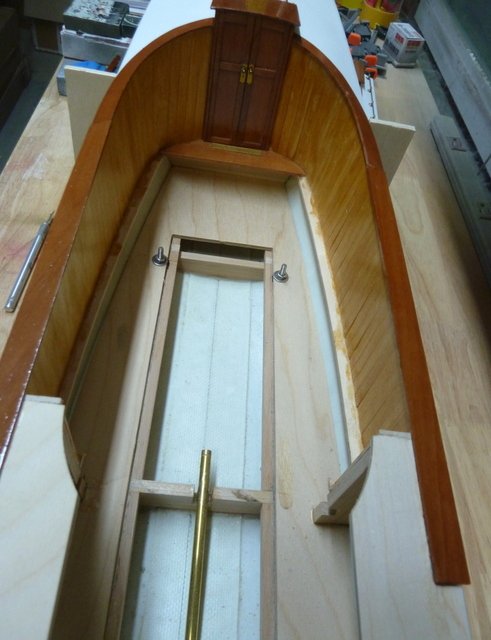
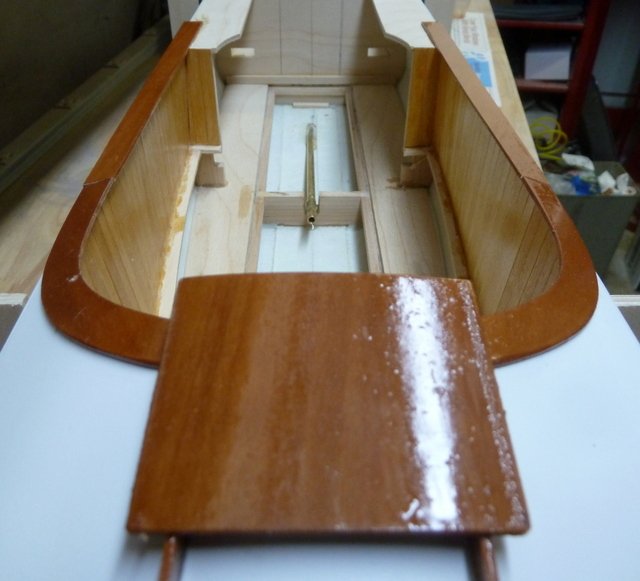
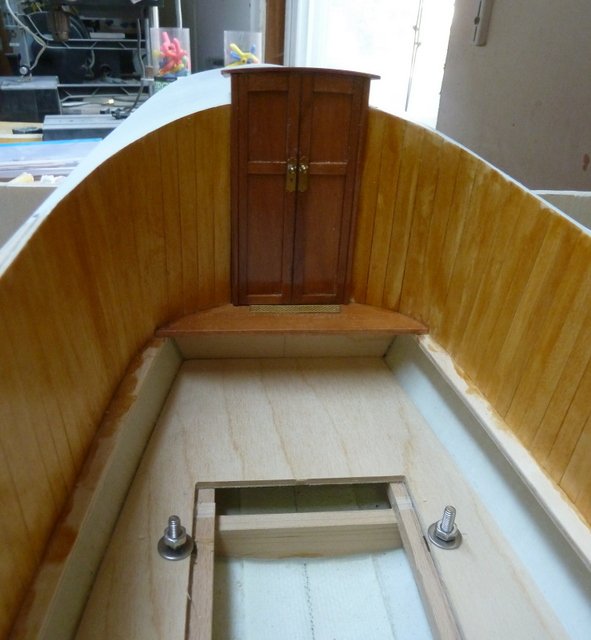
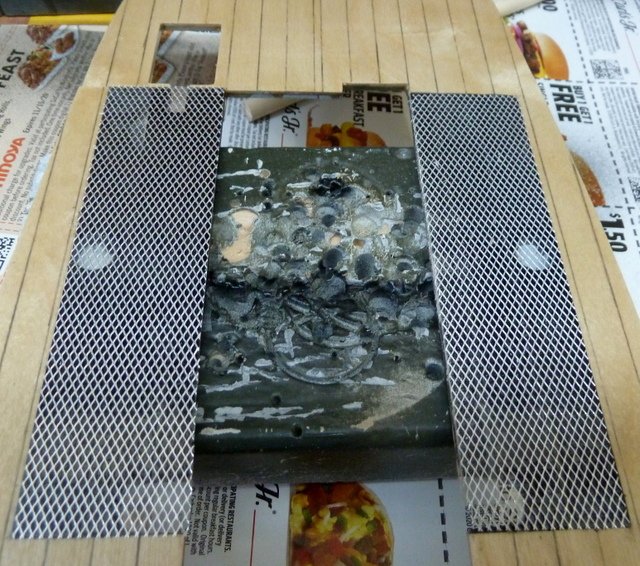
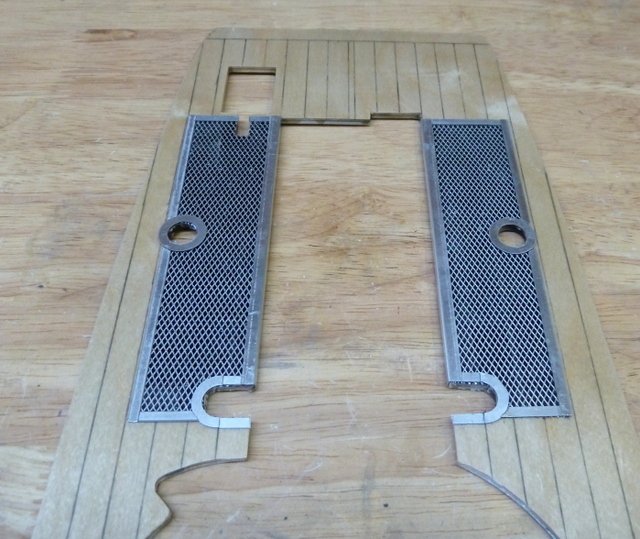
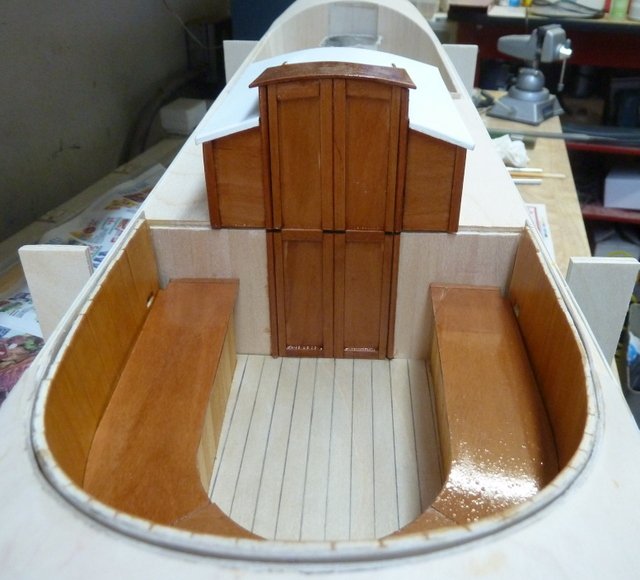
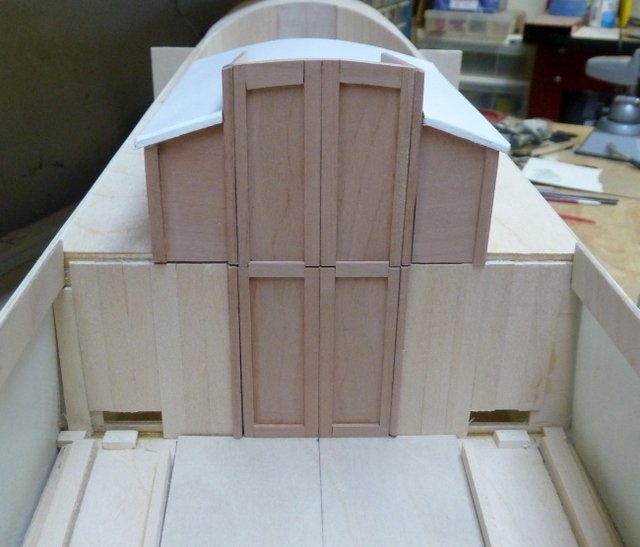
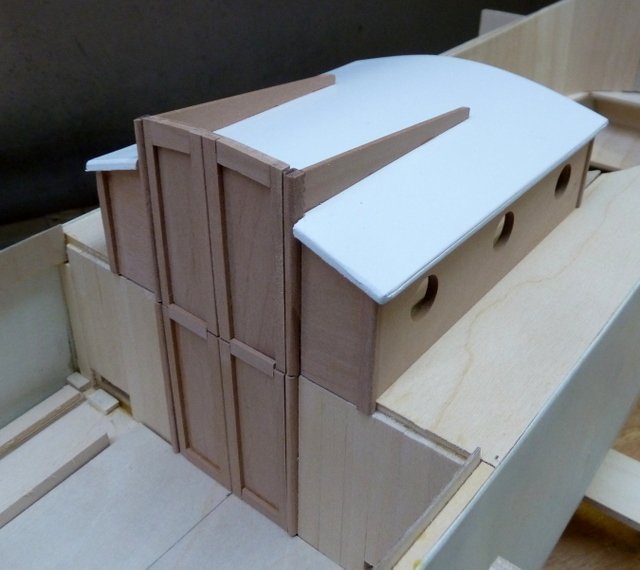
The fore cabin door has been assembled and the first coating of the Oak stain. The forward cockpit decks are finished. There are simulated grills to vent heat from the engine bay. First step is to paint an area black. Once that is done, two sided tape is laid down and mesh cut to size is laid on the tape and pressed to make a solid contact. Once that is done, various pieces of aluminum are cut and shaped to form a surround for the simulated grill.
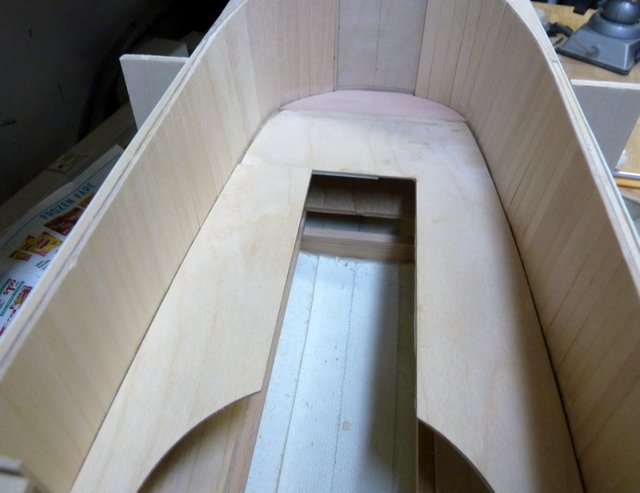
Next up, getting the fore cabin door in place and the deck next to the aft cabin needs to be installed. Also some details to finish up the rear cabin.
Until next time,
IR3
-
I have not been idle. I started getting some color on her. Painting and staining are my worst nightmares. My first application of the Oak stain was not good. To borrow a phrase from James Bond and a bit of juxtaposition, "Stirred but not shaken". I shook the can of Oak stain instead of stirring and had to sand out all of the bubbles and start over. It is a bit better now. I am not too happy about the stain on the aft cockpit paneling. It is a bit too dark and I might sand it out and try again. I was trying for the look of the bottom paneled skirt below the seat. The instructions called for pencil lining the aft cockpit floor and then some Satin clear coat. It is passable. The bulkhead paneling also needs coloring and hopefully I can keep it close to the skirt below the seat.
I also started fitting the forward deck and the buildup of the front cabin door and hatchway. The deck is a laminate of aluminum and plywood. The forward area gets a bit warm and the the laminate will keep the deck from warping. There is still a bit of fitting to do.
Till next time,
IR3


-
-
Not too sure how to title this question. I am building a Marten Howes Baylis Project X and a good bit of the woodwork is in Pear.
A question of finishes. Per the instructions the Pear wood is coated with Blackfriars Light Oak Gloss Varnish. Finishing wood is in another world for me so I try to get exactly what the kit manufacturer suggests. In Southern California the Blackfriars is weeks away if they will even send it. Any suggestions? I have searched the net looking for something local and am coming up blanks. I am trying to find a Gloss Varnish that is close in color but have not found anything as of yet.
I know that exact color matching is not necessary but I cant find a good example of Light Oak to compare with other Oak stains.
Thanks in advance,
IR3
-
Thanks Bob, will do.
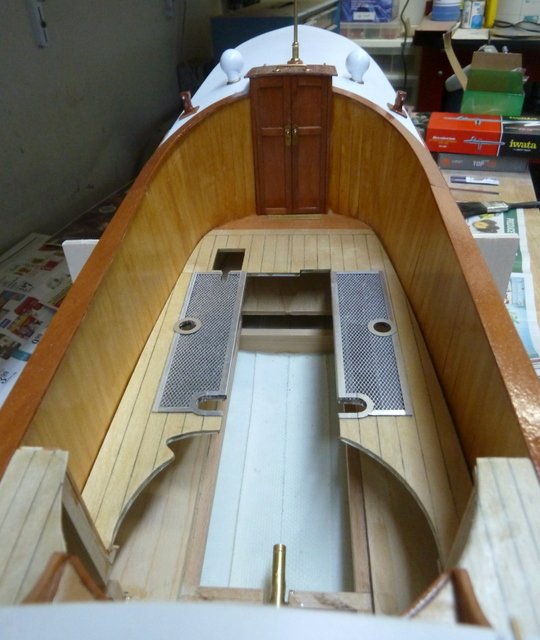
The top of the aft cabin door is almost finished. It still needs contouring at the top but I will not do this until it is glued to the cabin top. The hatch sides are in place. I have a spare piece of Pear that I need to make the hatch covers with. Then it is adding finish and installing the hardware.
Till next time,
IR3
-
Second coat of paint on the roof of the aft cabin. The bottom half of the cabin door is built and fitted to the aft bulkhead to be glued later. The cabin door framing is in place and the top half of the door is next followed by the sliding hatch cover.
A question of finishes. The Pear wood is coated with Blackfriars Light Oak Gloss Varnish. Finishing wood is in another world for me so I try to get exactly what the kit manufacturer suggests. In Southern California the Blackfriars is weeks away if they will even send it. Any suggestions? I have searched the net looking for something local and am coming up blanks. I am trying to find a Gloss Varnish that is close in color but have not found anything as of yet.
Until next time,
IR3

-

Dusseldorf Fire Boat by ir3 - Robbe - Radio
in - Kit build logs for subjects built from 1901 - Present Day
Posted
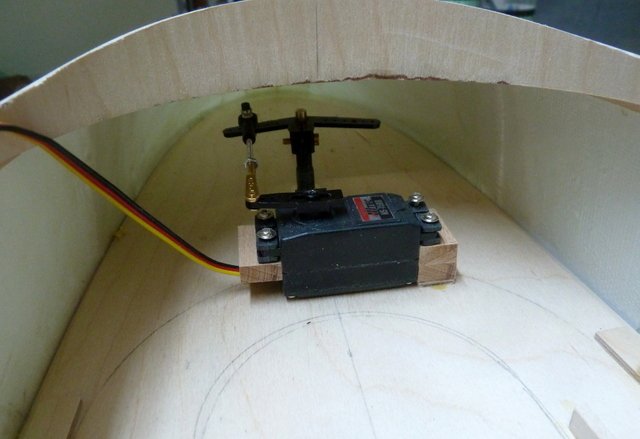
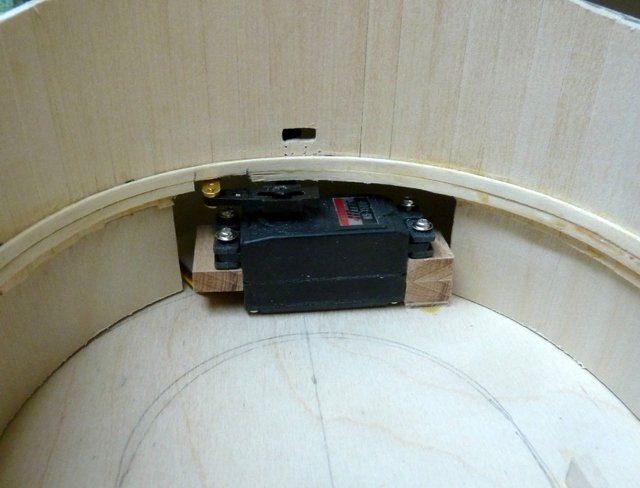
Always waiting for parts. Most of the pieces needed for the animation are not available at one's local hobby shop. The general layout for the anchor winch is finished. The motor is a 30RPM 6V miniature DC motor. This should closely match the Robbe 500:1 unit. My 250:1 unit is 50RPM at 6V so I figure it will be close. The anchor will not fly out of the water at 2 seconds per revolution. The motor is held on with M1.6 x .35 screws which are not available at your local Home Depot so it's order from a metric supplier as close to home as possible and wait. They came in today so the anchor winch is just about complete. I need to wire the motor and put on a suppression cap. The base is a sandwich assembly with the removable motor base sandwiched in. There is a clever latch that needs to be made to lock it into place. Just operating the latch will allow the motor assembly to be removed for maintenance. A final picture to follow.
Some parts to complete the forward Water Monitor are also on the way so that is close to being finished. I may start on the cabin. It is full of goodies including two Water Monitors, the radar, and a few other items. More on this coming.
Until next time,
IR3