


mattsayers148
-
Posts
685 -
Joined
-
Last visited
Content Type
Profiles
Forums
Gallery
Events
Posts posted by mattsayers148
-
-
Thanks Mark. I think my main reason to double plank is for coloring. But, as with my other builds, things could change at any moment.
- Elijah, Canute, CaptainSteve and 2 others
-
 5
5
-
Thanks Ken, Stubby, Sam and everyone for the likes and words of encouragement.
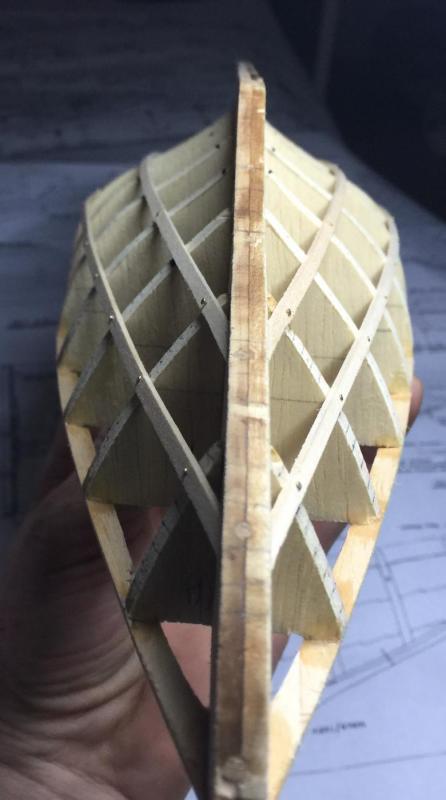
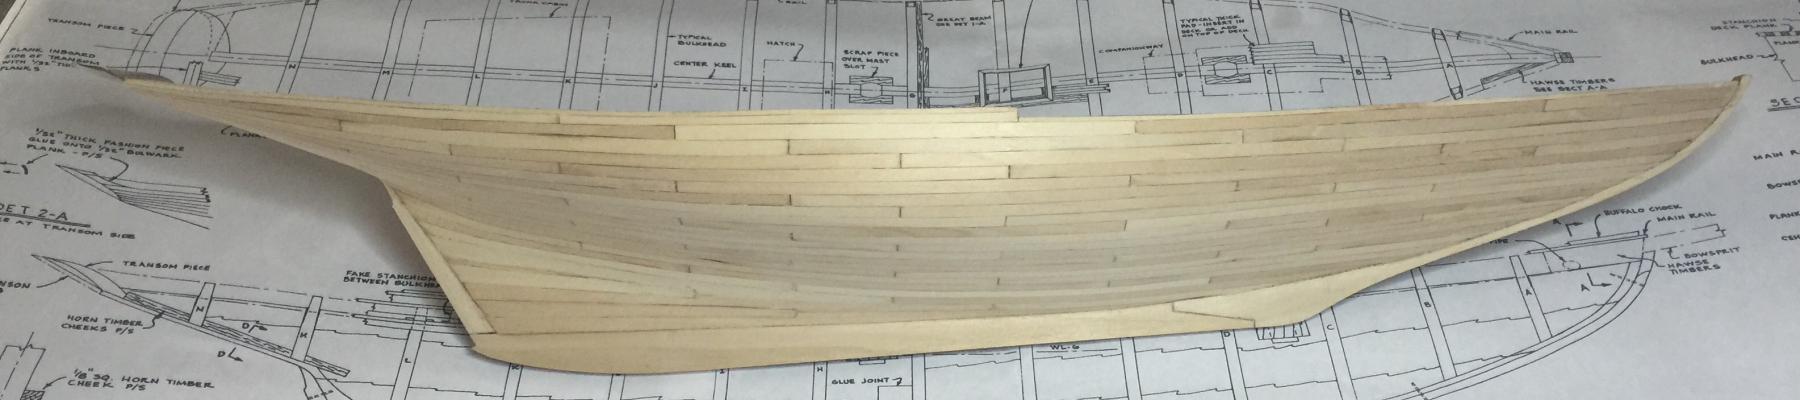
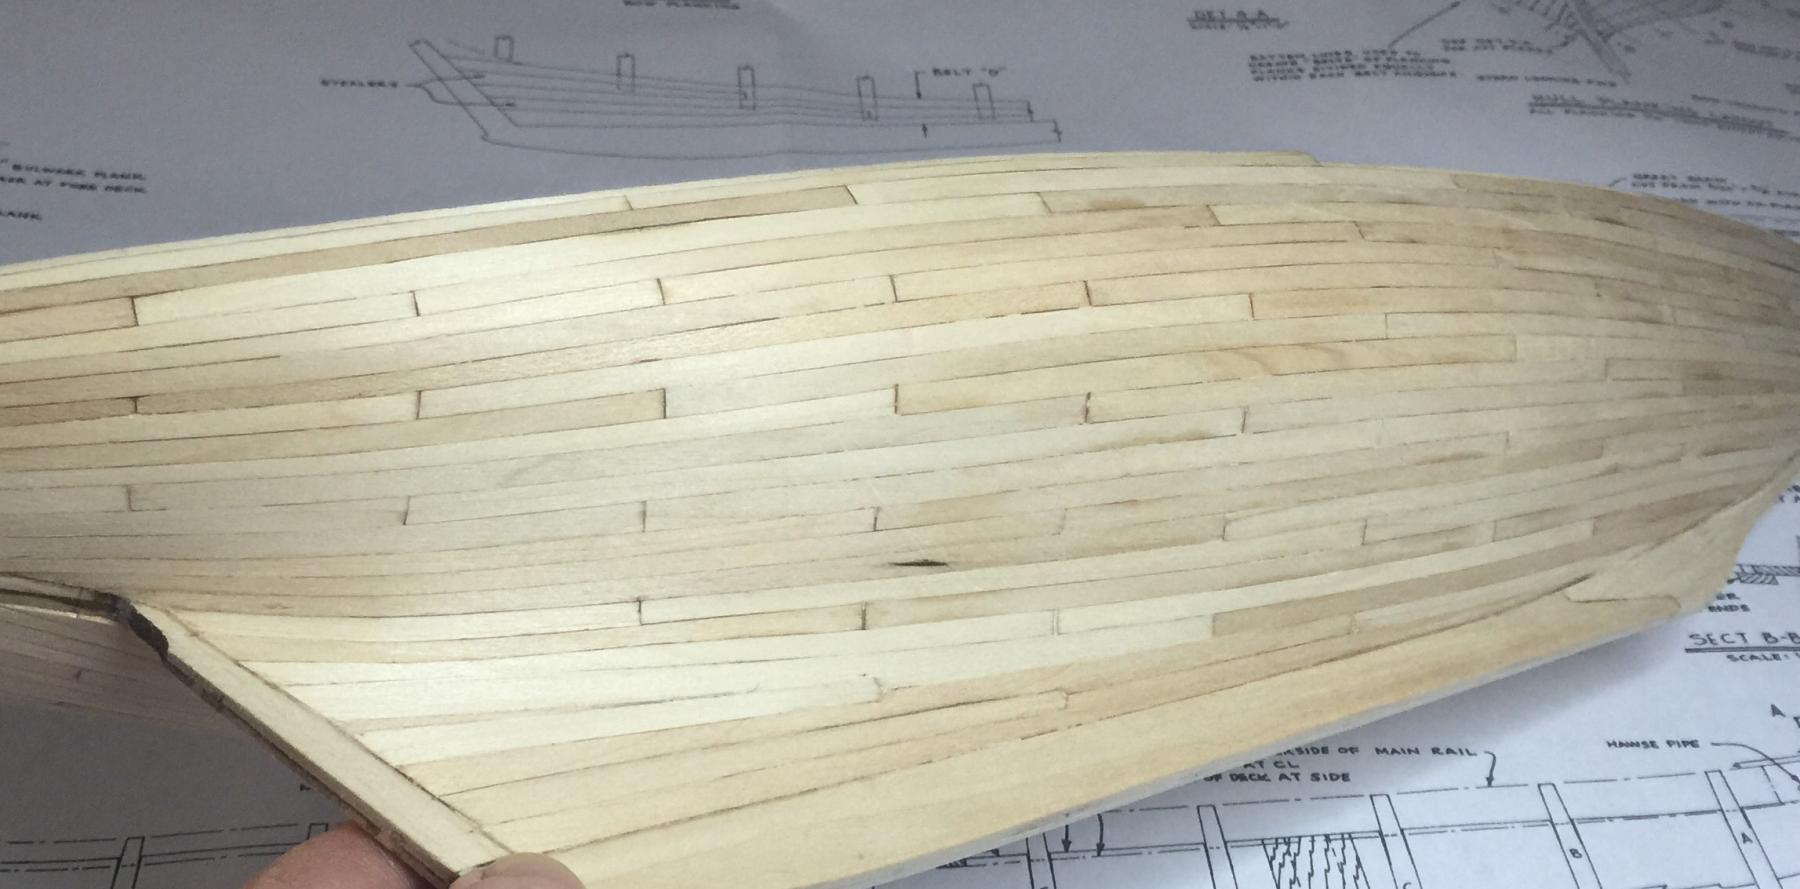
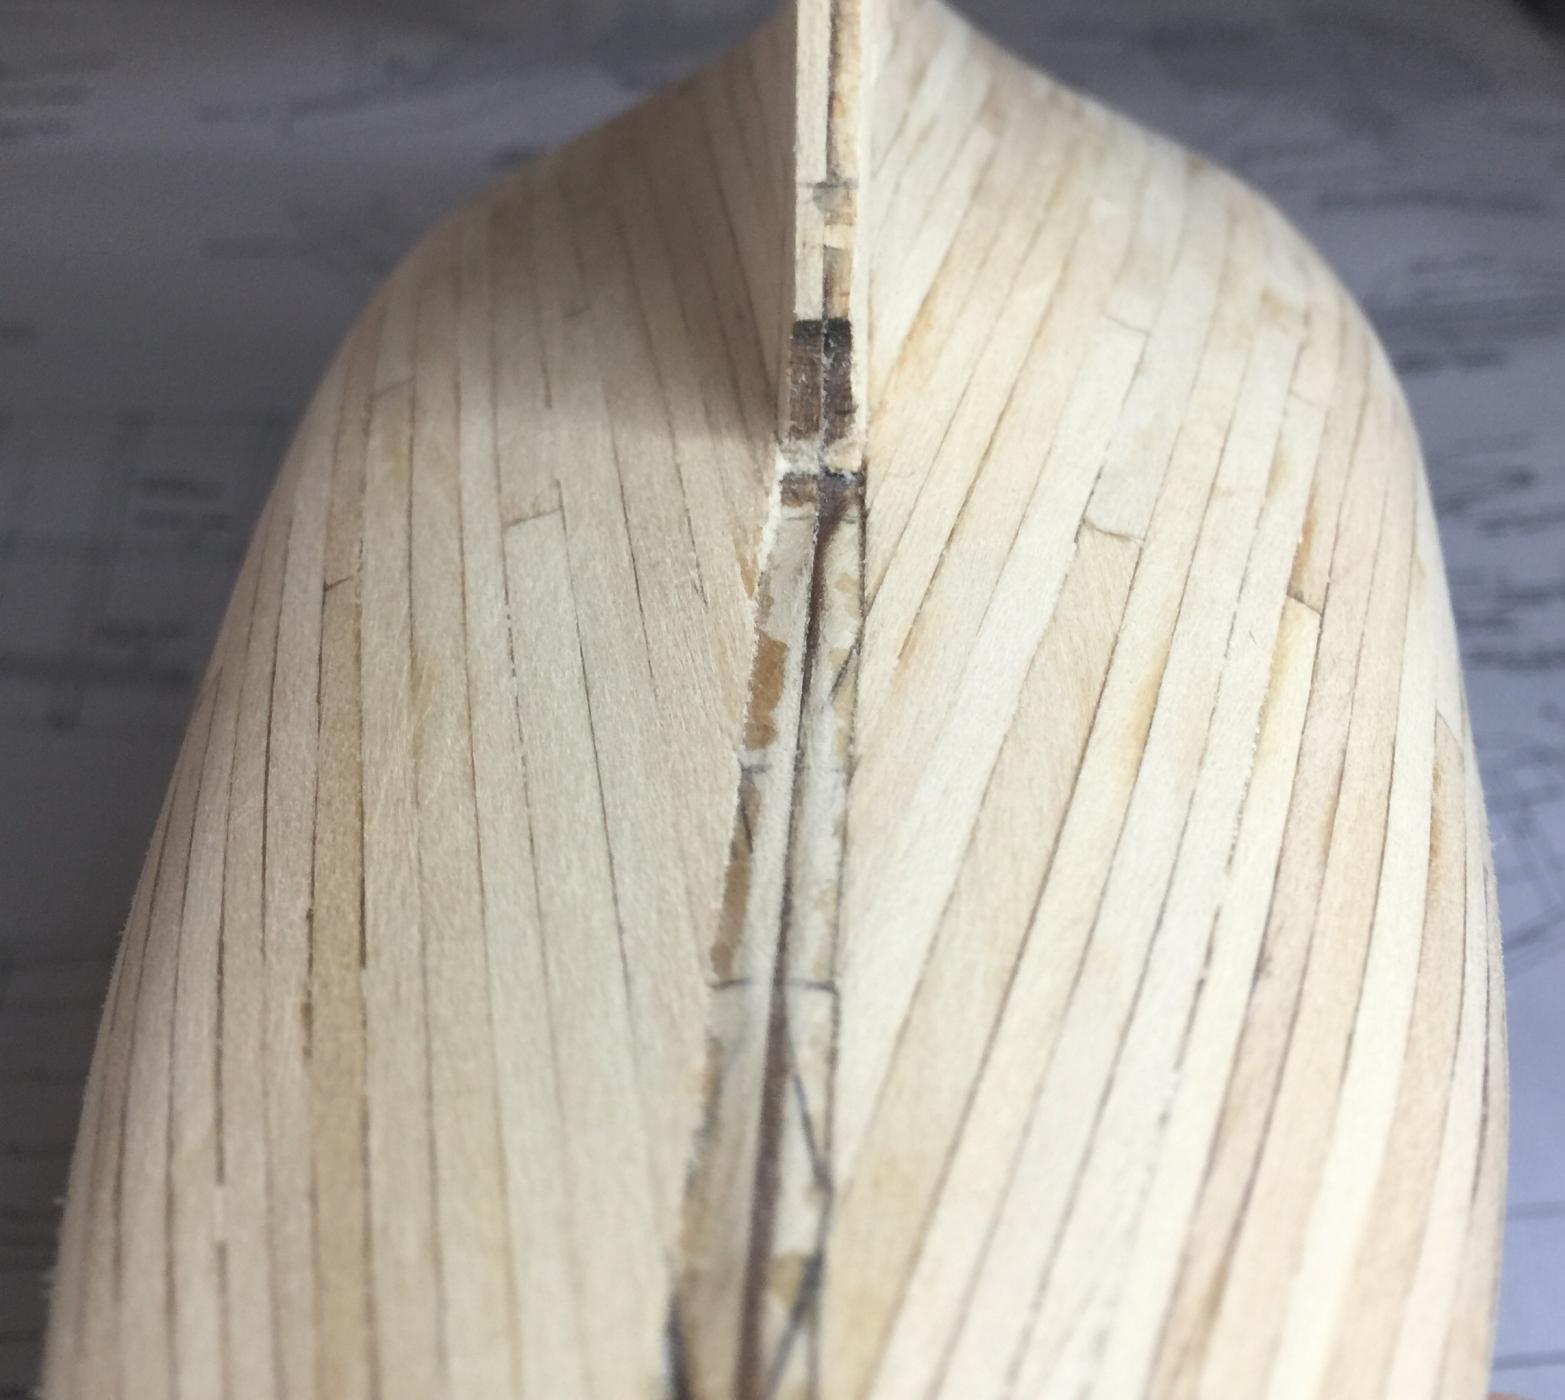
I know, I know...I broke the rules and used CA for the first planking. However, the lines of this ship are smooth and gradual. That, and making the planks more true to scale, made things so much easier.

Now I'm left with a very nice, smooth and flowing surface to double plank. I've been reading MS's book 'Planking the Built-up Ship Model', and I highly recommend it. Made my first stealers which turned out ok, except I should have done one more(note the sliver). But hey, that's what practice is for.
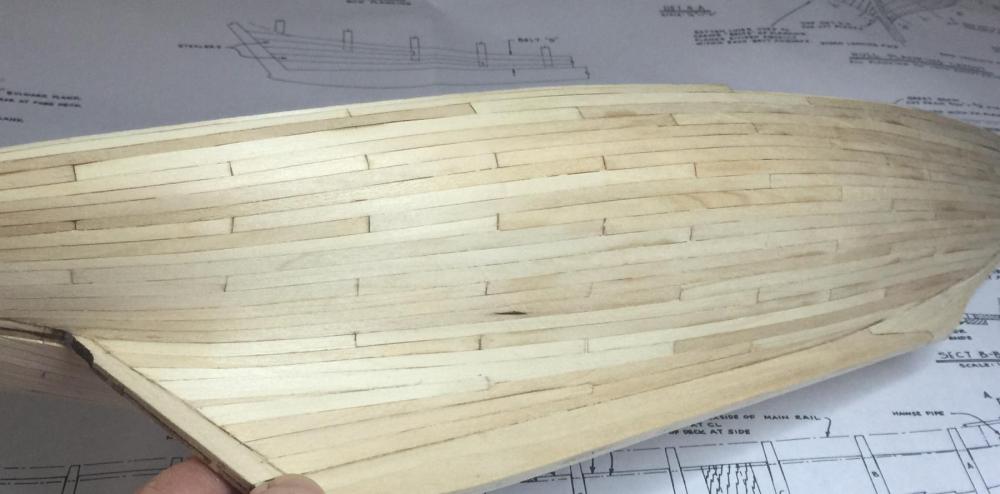
As I mentioned previously, instead of painting, I plan on leaving finished wood instead. I would like to use different materials to accentuate where these color changes are made. Next up, the decks.
-
Thanks Mario, Ken, CH, David, Stubby and to everyone for the likes and encouragement.
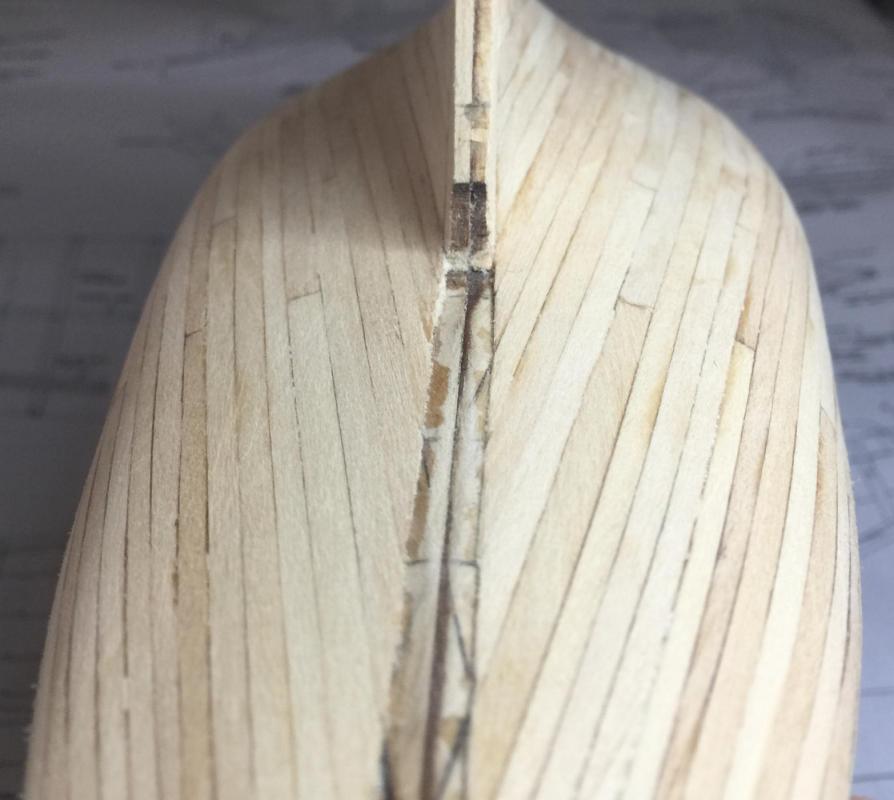
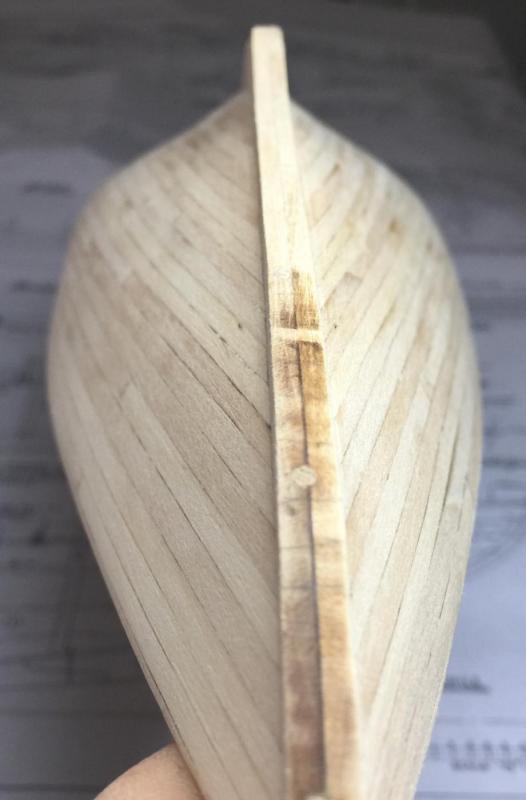
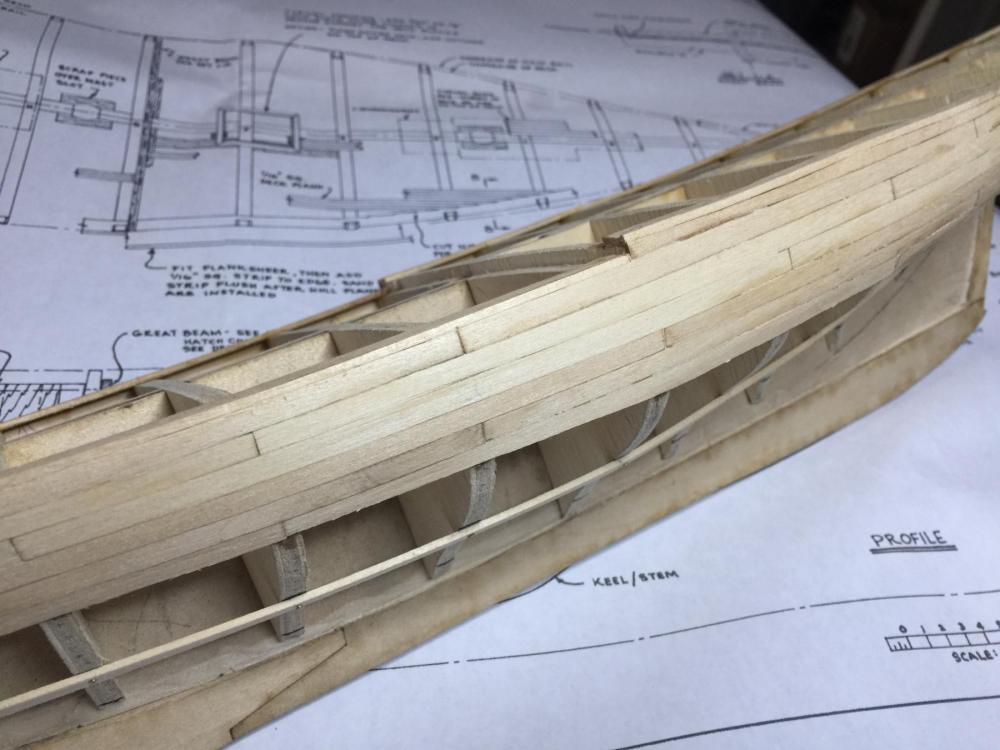
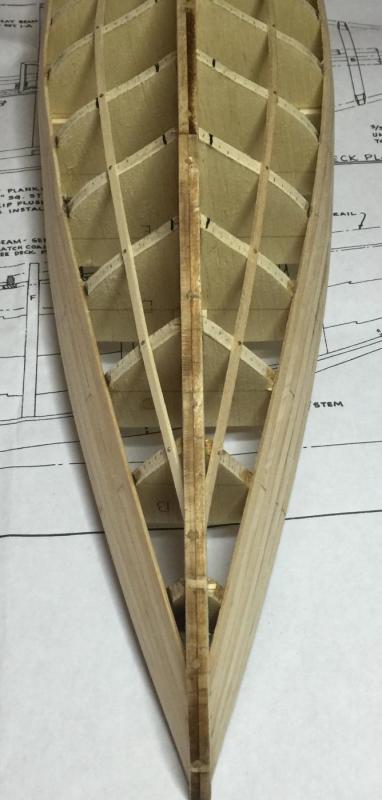
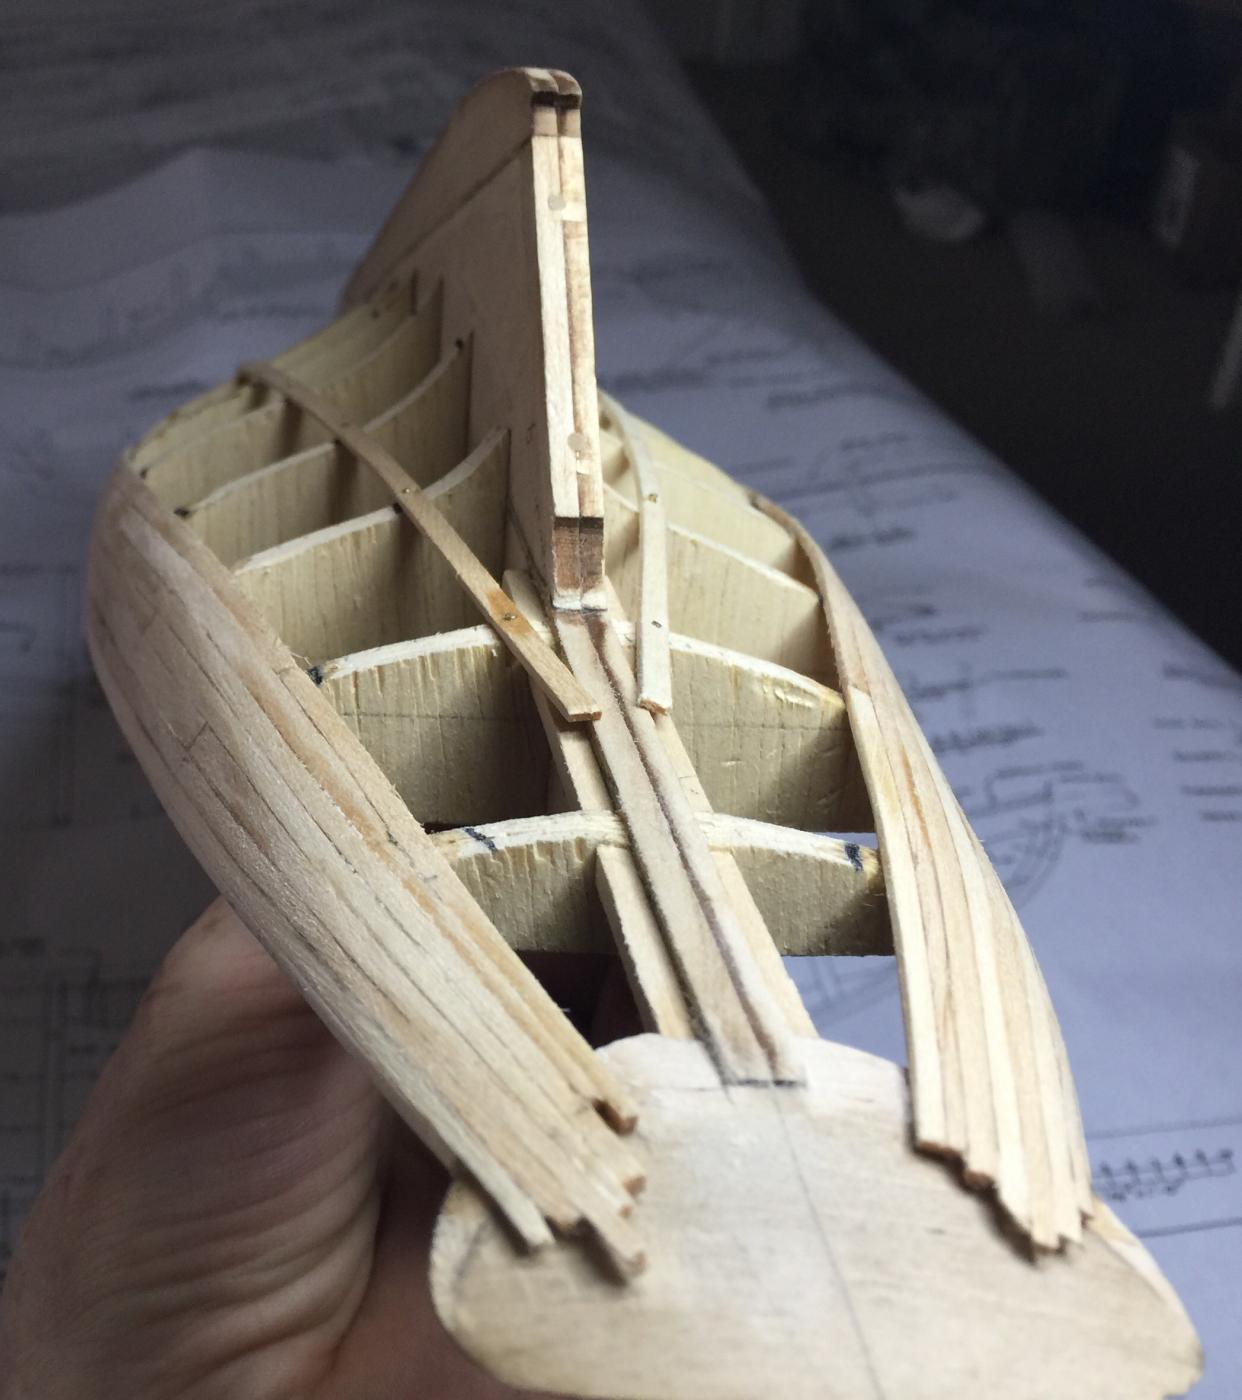
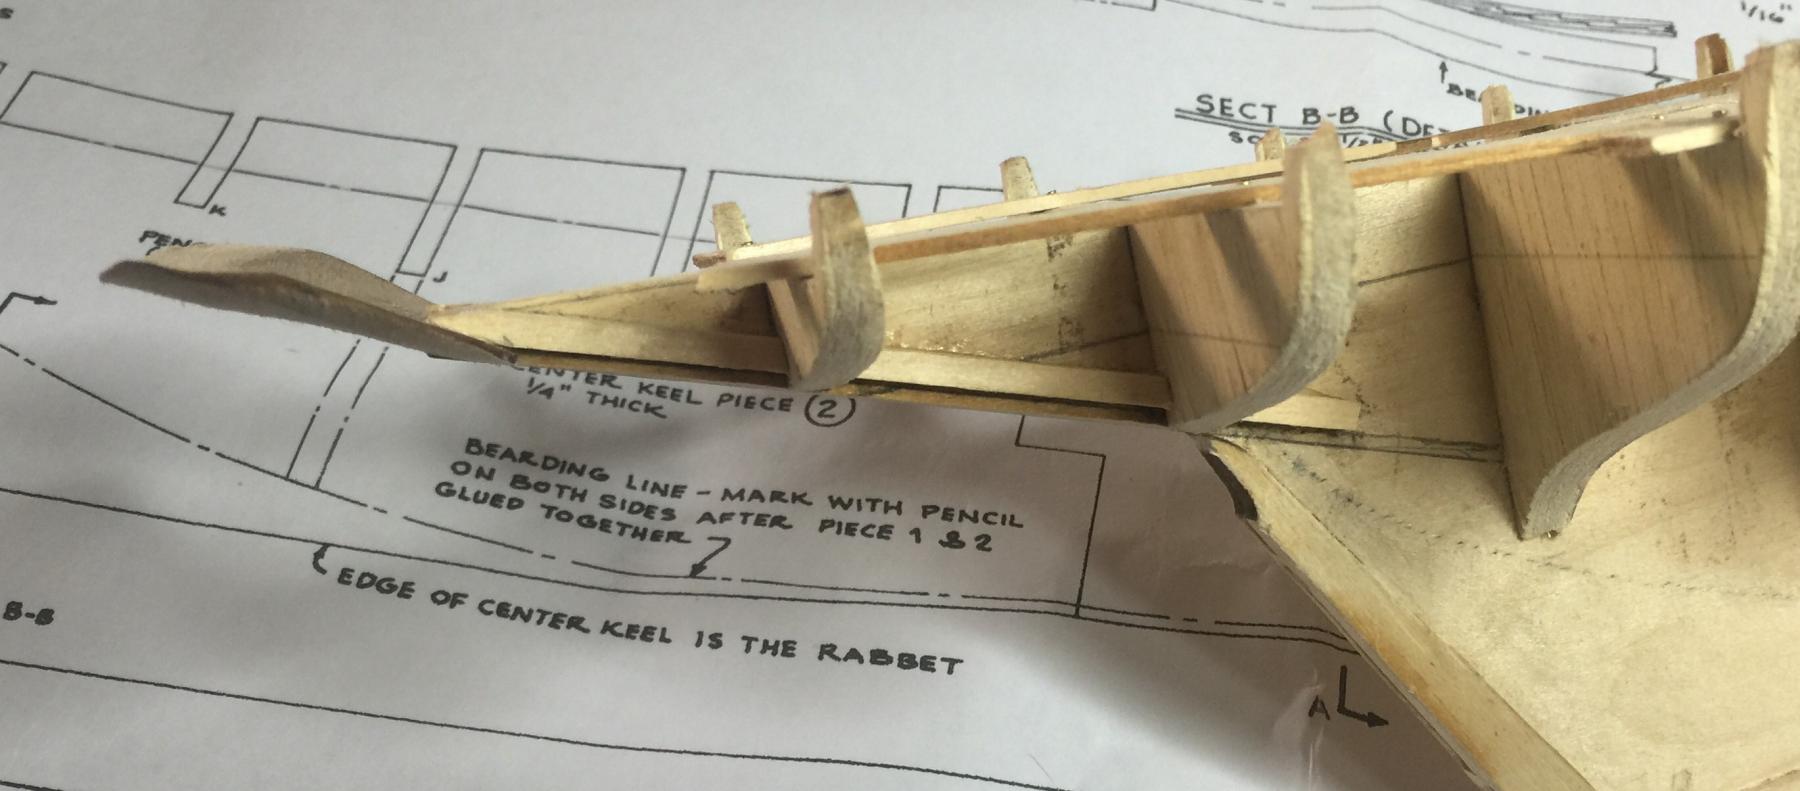
I'm definitely going to double plank, but I'm taking my time doing a decent first plank for the practice. I decided to hack off the bulkhead/stanchions points since I'm staining and they are ply, which doesn't look good when stained. I'll build all the stanchions and install them later on.
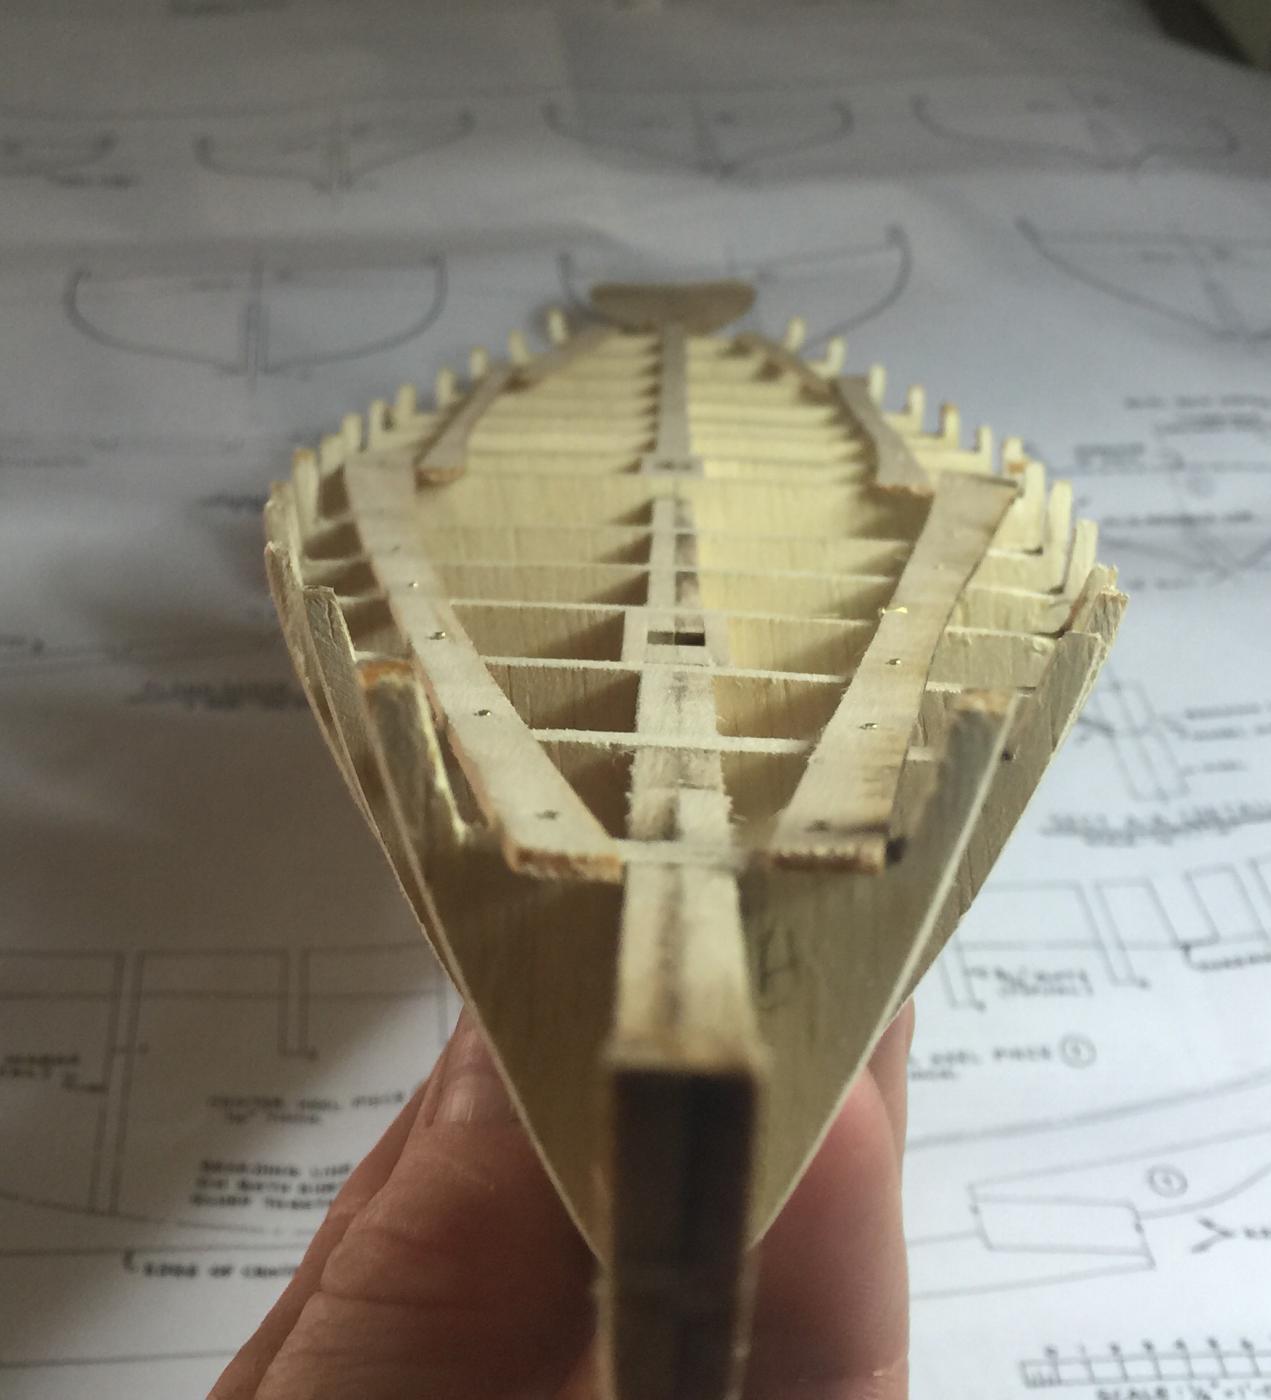
The next step was making a solid plank sheer since the models piece had cutouts for the stanchion points. It took a minute to visualize how the plank sheer met up to the transom.

Next was to divide the planking into belts and lay them out with battens. Measurements were taken at each bulkhead and evenly spaced ticks were drawn on.
The top six planks (7 at aft deck) were fairly simple to install since they were all close in size. I only had to spill a few of them. Now I'm off to the next belt of 6 planks,

-
Welcome a board CaptainSteve, Mark, Buck, Ken and Elijah!
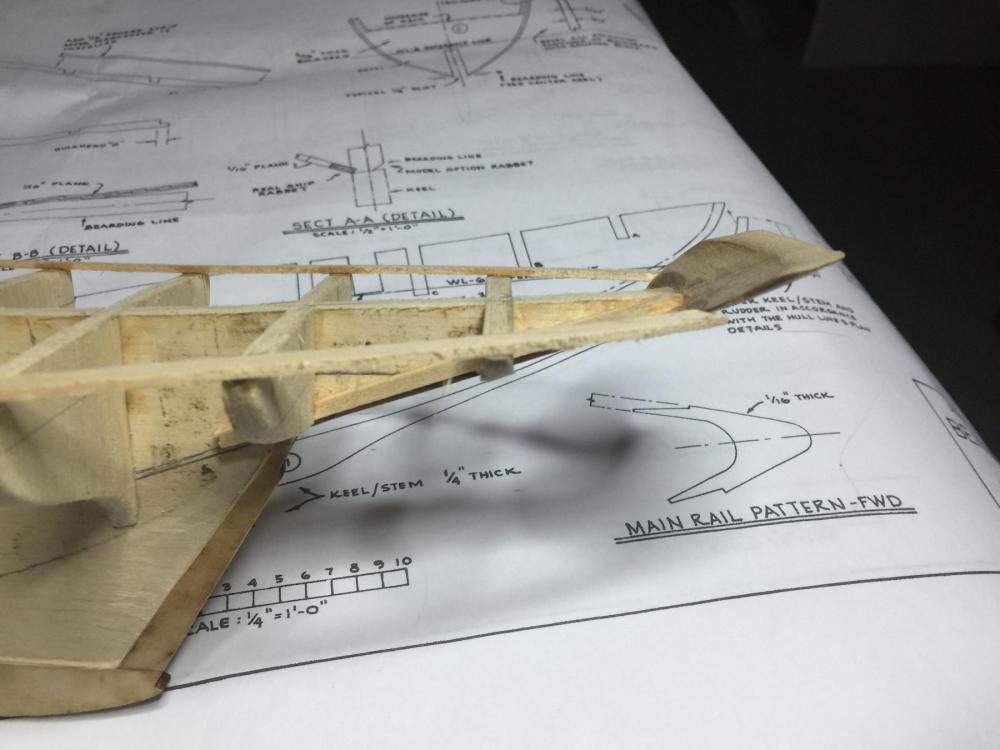
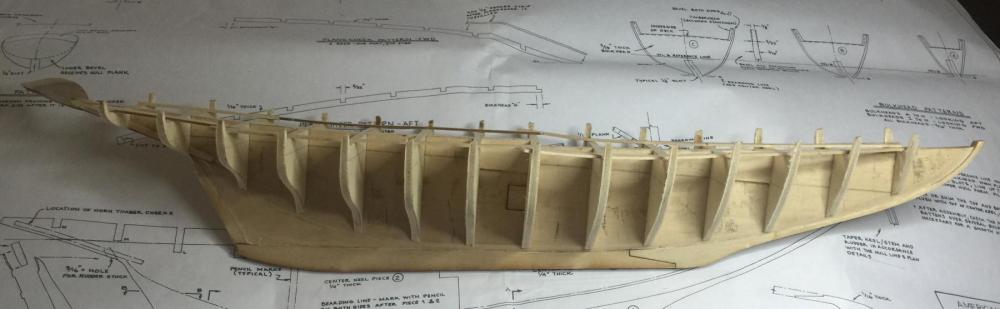
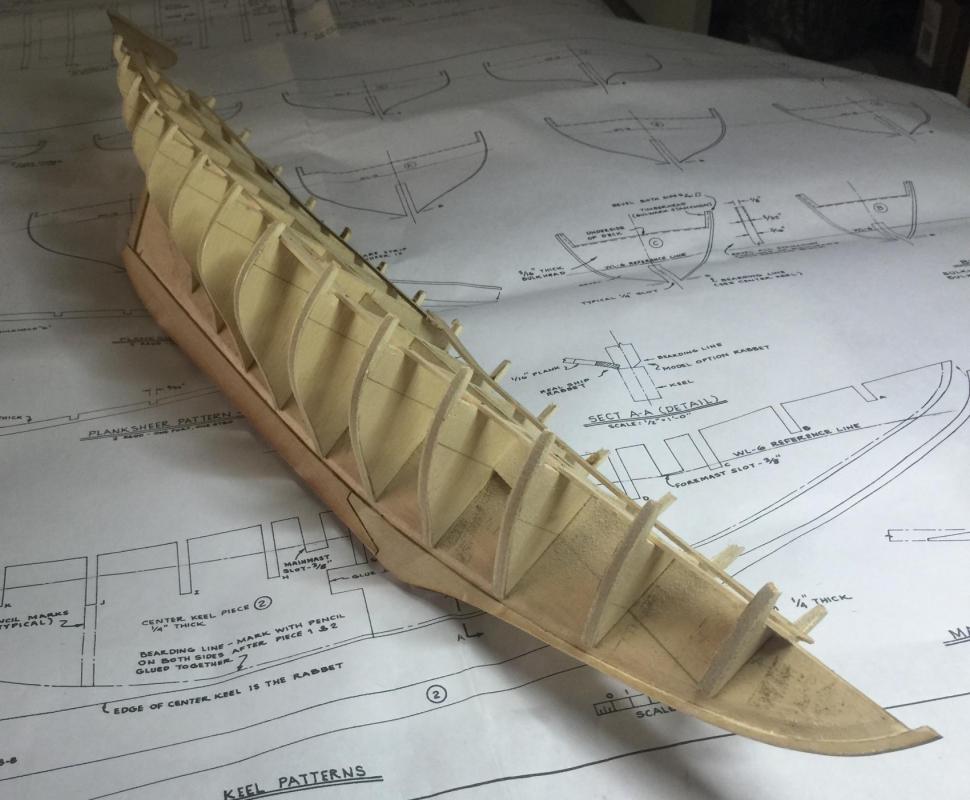
So we're off! Thankfully after a couple builds fairing ain't so bad. I got the keel-stem assembly(yep, that's the term they use) and bulkheads together squared and true. Transom turned out well, after a soak and steam. I got an idea from my son and used an old hair iron for bending. This worked surprisingly well.
So instead of jumpin right in I'm going to study up a bit and take my time on planking. I really like how the double planking turned out on my pirate ship so I may do this again. Since I'm staining. I'm considering using several contrasting woods to get a contrast. So I'm off to start this process.


- Salty Sea Dog, mtaylor, Cathead and 11 others
-
14
-
-
Well I added the pictures to my gallery. Thanks again to everyone for all of the encouragement that was given. I can be found at my new build log Benjamin W. Latham by Matt
- CaptainSteve, Cathead, mtaylor and 2 others
-
5
-
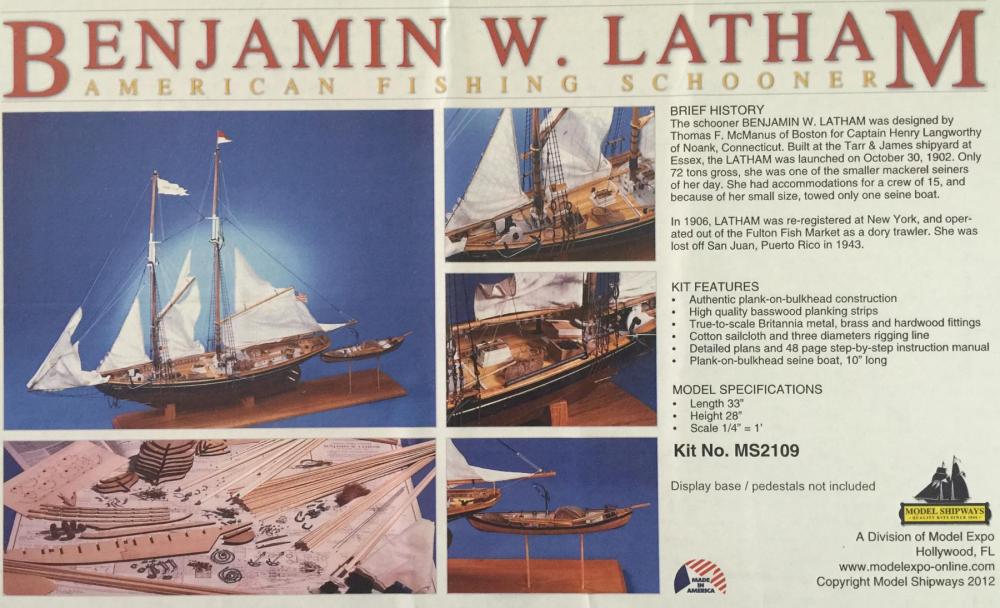
Welcome to my newest build log my friends. I picked the Benjamin W Latham because it's the largest model I have. It a 1:48 scale so I should have ample room for details.
With my Ranger bash there was virtually nothing left of the original model. With this bash I'm going to build most of everything, but leave it the same ship. I'm also going to take this one as far as I can with the details, adding any/everything that was on this fishing schooner. I like the look of real wood so I'll be staining, not painting, this model.
Launched on Oct 30, 1902, she was designed by Thomas F McManus(Boston) and built in the shipyard of Tarr & James(Essex, Massachusetts) for Captain Henry Langworth(Noank, Connecticut). She was built as a sailship and fitted with a 48-horsepower engine sometime during her 2nd or 3rd season. A 72 ton mackerel seiner, she had in tow one seine boat and accommodations for a crew of 15. As with most fishing vessels, most of her career was undocumented, finally lost off San Juan, Puerto Rico in 1943.
So take a seat and buckle up, we're going on a journey. I will attempt to make this build an intriguing one. Thank to everyone for all the help and encouragement I received on my previous builds, I welcome you all back again.
- Canute, Elijah, Cap'n Rat Fink and 12 others
-
15
-
Thank you Frank, Boyd, Mark, CaptainSteve and to all for the likes and continuing encouragement.
So the final chapter of the Pirate Ship has been written. The Nutz and Bawlz Clans are ready to embark on their maiden voyage. Once on the high seas, they shall bring terror to all who encounter them.
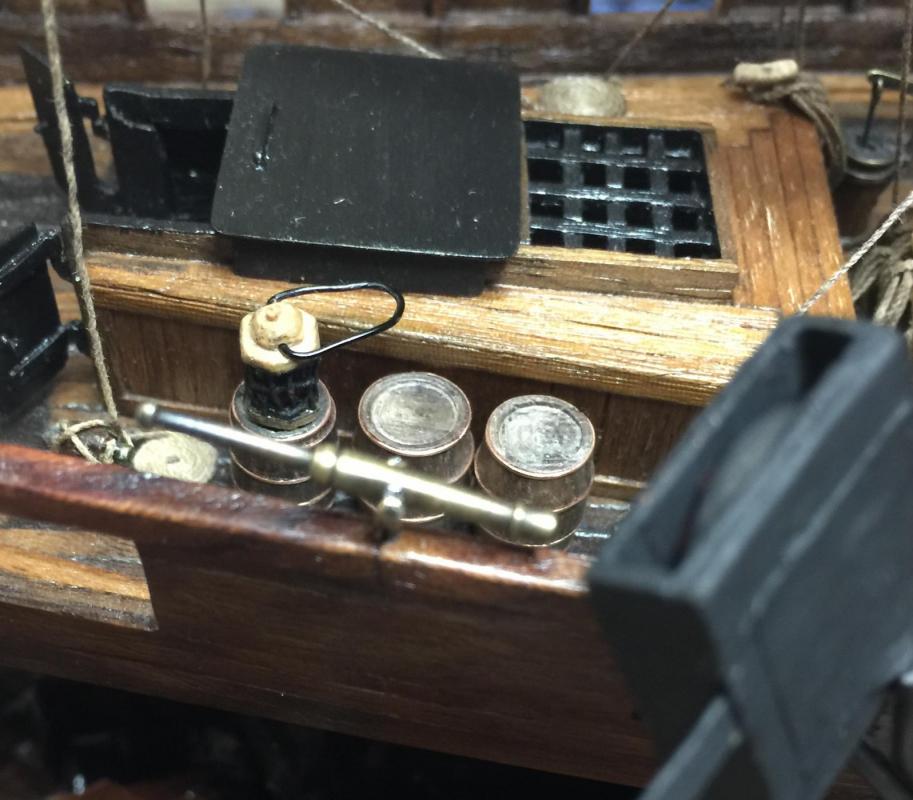
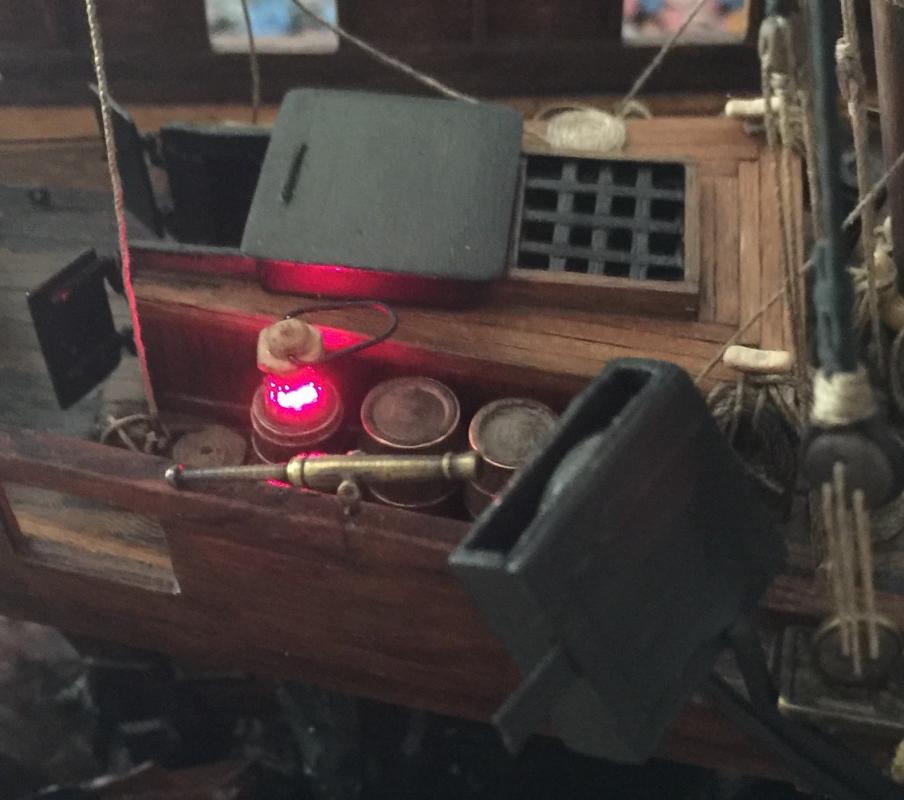
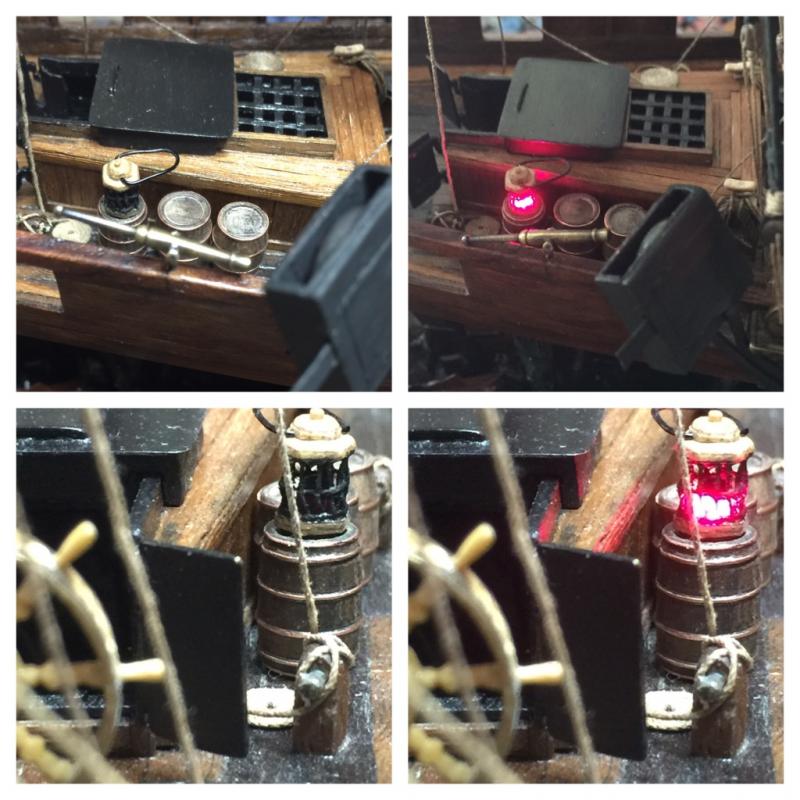
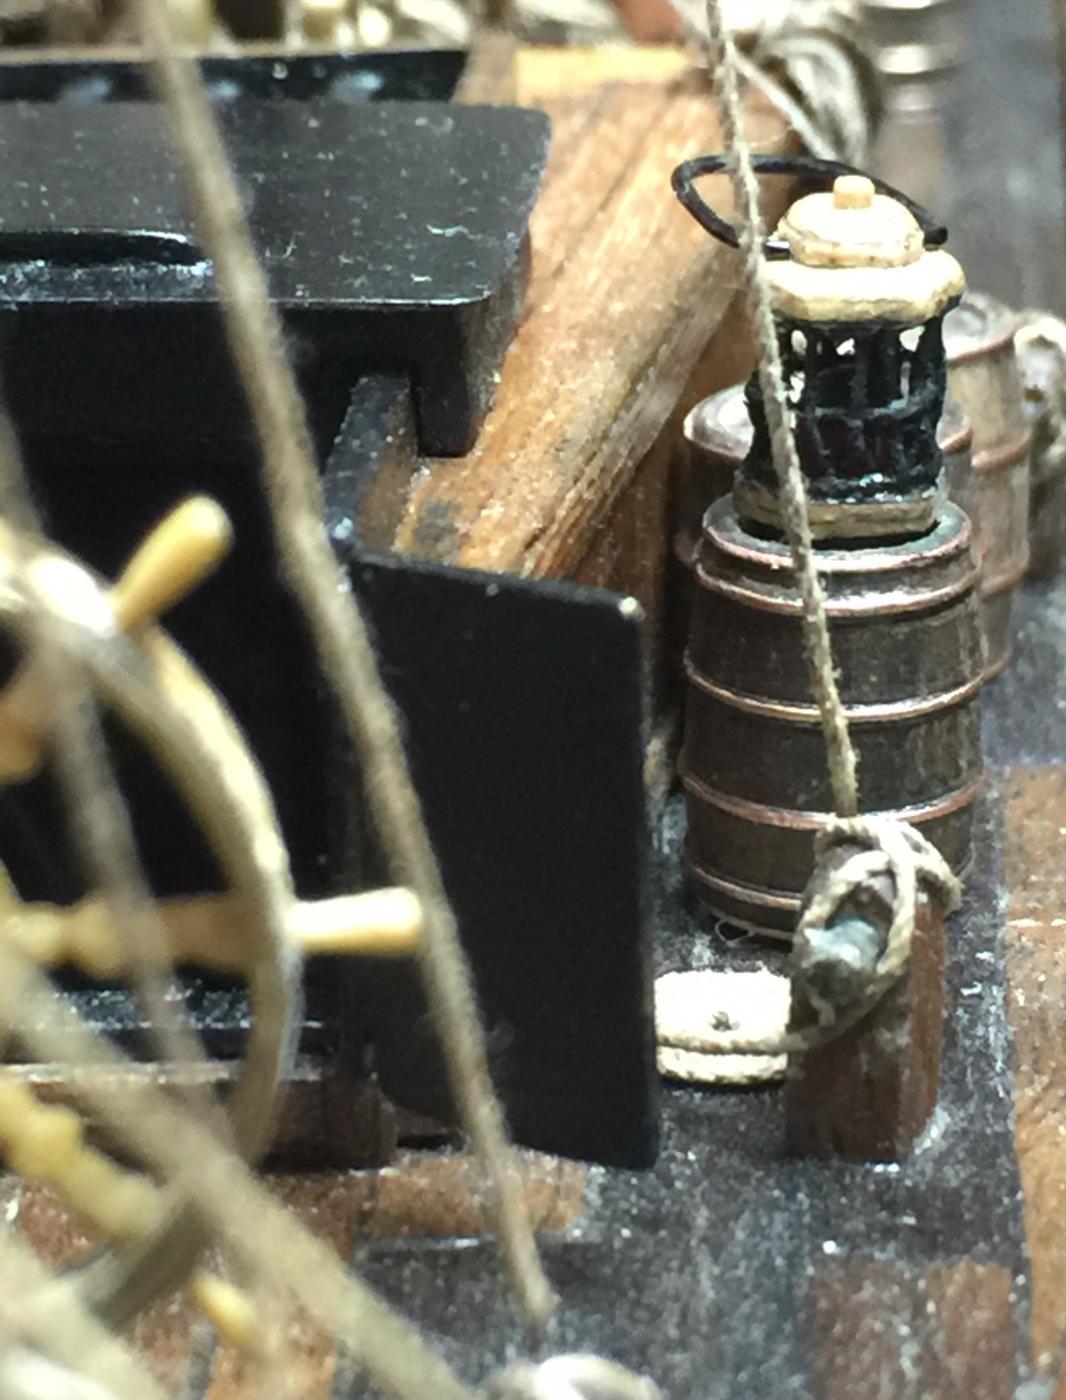
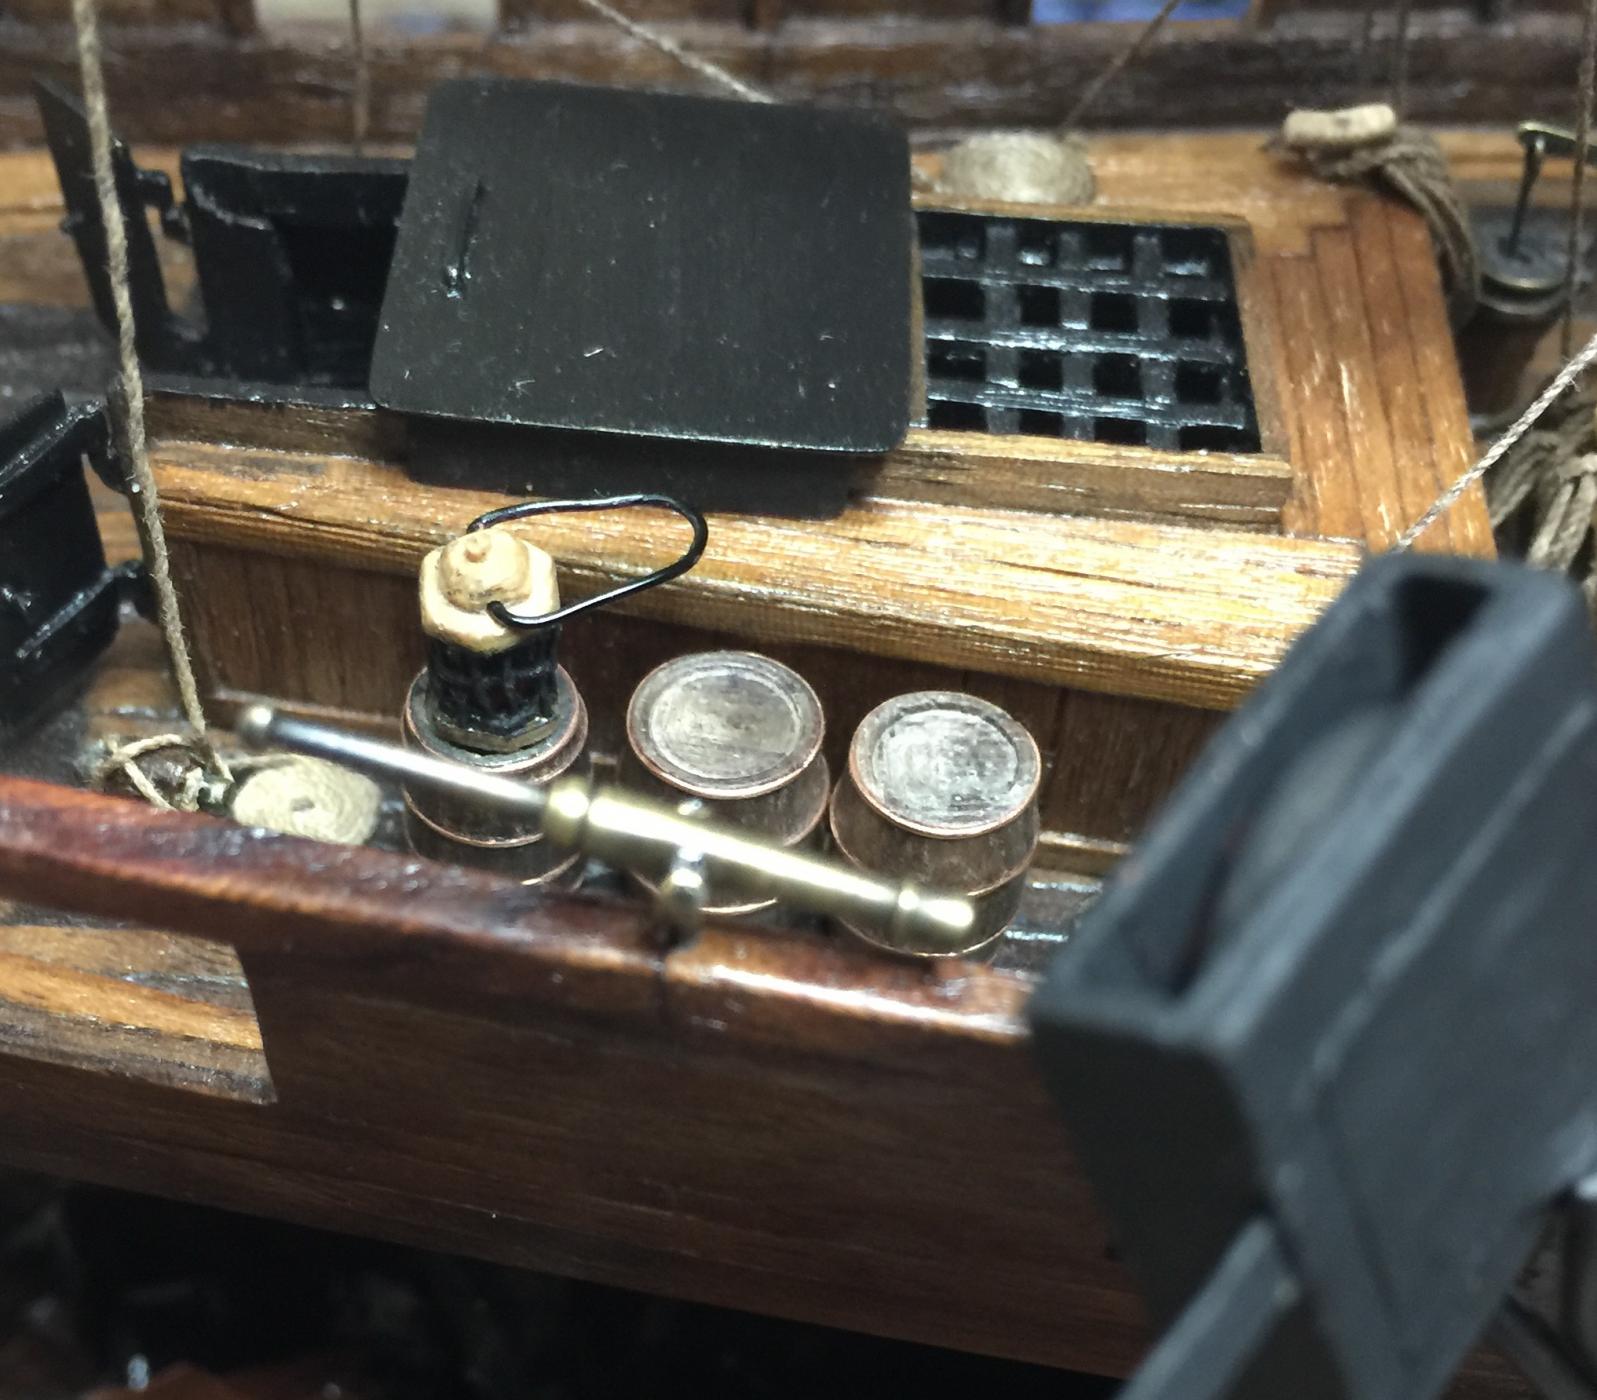
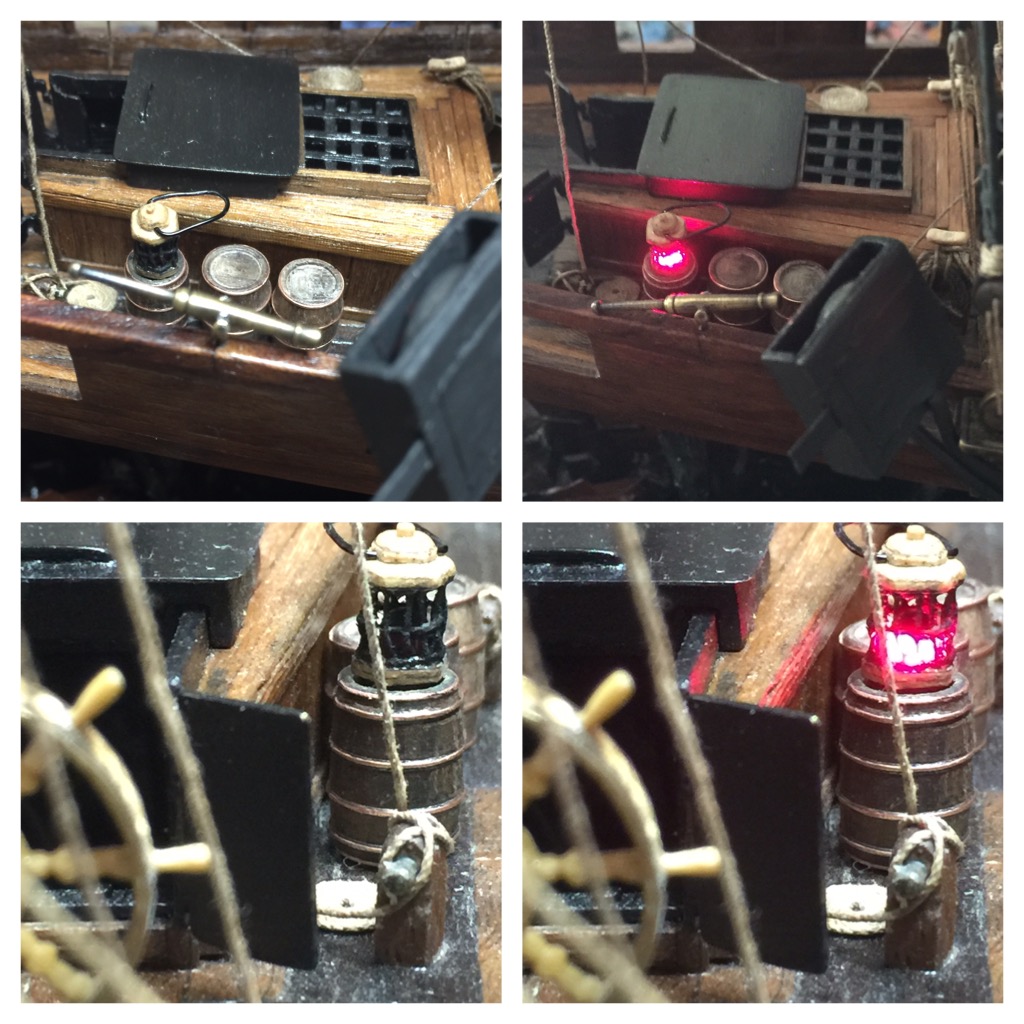
It's hard to pick an exact ending point to this build, but I think I've arrived. Early on I had the idea of adding lighting, but realized that I would need a lot of advanced planning to accomplish this, which I didn't do. So I settled on just one simple lantern. The inspiration for this came from the Syren Ship Model Company's stern lantern kit. I modified it to a hand held lantern and added a red LED, well, to add at least one light feature.
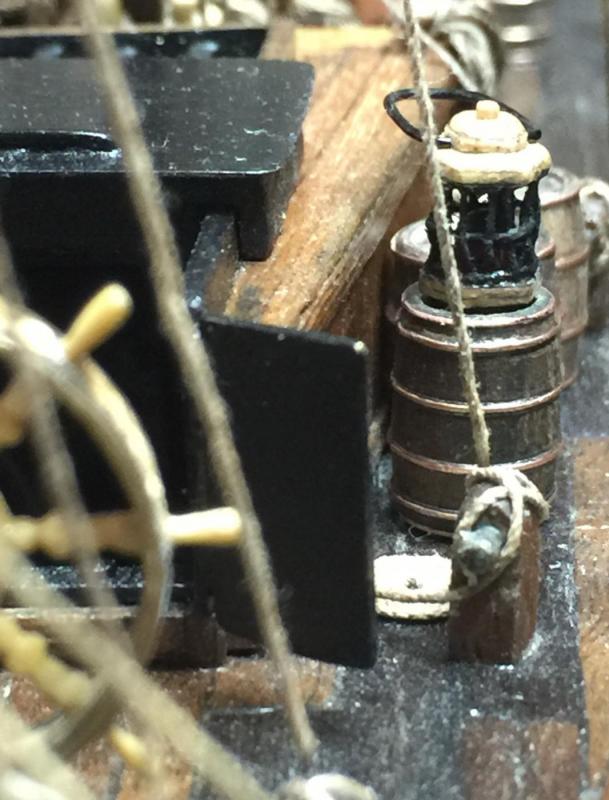
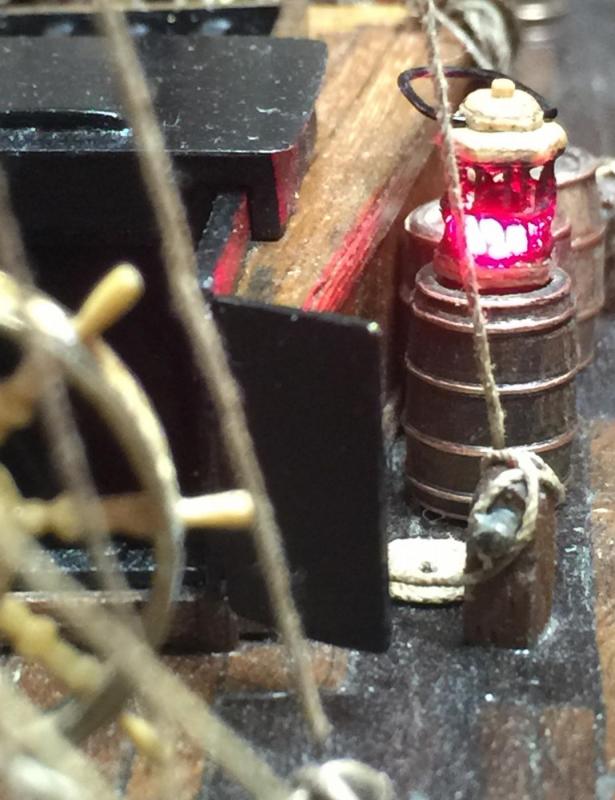
I came up with an unusual solution to disguise the battery and switch which I added to CaptainSteve's Kit Bashers Guide. I'll let those who are more proficient at electronics to correct any errors in this process. The battery and cables are hidden in the cargo hold.
It may take a few days for me to work up photos for the gallery, but I assure you they will come. I want to thank everyone so much for the continued encouragement and help that you've given me through this "flying by the seat of my pants" build. I wonder, as most have, on what comes next, so it's been a journey with many turns.
As it sits right now, my next build will be the Benjamin W. Latham American fishing schooner by MS. It's a nice 1:48 scale so there's room for a lot of details and a reasonable amount of bashing. Off to the Dark side!!!
- dgbot, Cathead, GrandpaPhil and 4 others
-
7
-
SELF-ADHESIVE COPPER STIPS & WOOD VENEER
Simple, custom battery holder with switch.
I have zero experience with electronics or model lighting so this made things easier. I picked a 3mm red LED and a 3V battery to light a lantern. Start with making a small box that fits the battery snug. Cut two strips of copper tape and adhere them to the inside surface of the box. Make sure you drill a small hole in the bottom to be able to insert a toothpick in and push out the battery. Next cut the copper on each side into an 'L' shape, leaving one side long and the other the length of the box. Add a thin copper strip to to the cut down side, making sure to not have any part of the two touching. These become the switch.
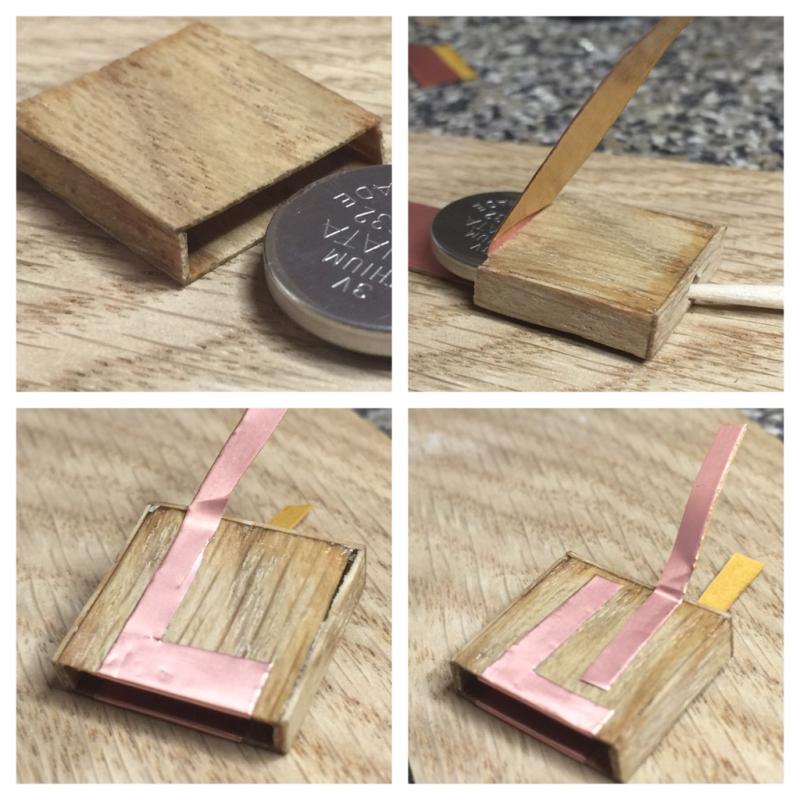
Next, cut a void out of another piece of veneer and glue it on top of the side with two strips, leaving two squares of copper exposed. Cut a thin strip of veneer that will easily fit in this void and put a piece of copper strip on the end. Make it big enough to contact both copper spots(the other part of the switch). Then glue another piece of veneer to sandwich on top. Bend over and glue the copper legs to the box face, scrape off the self adhesive and paint, if desired. Next, tape down the ends of the wire to each side of the box with copper tape. Paint, if desired. Make sure the copper on the strip faces the copper on the box.
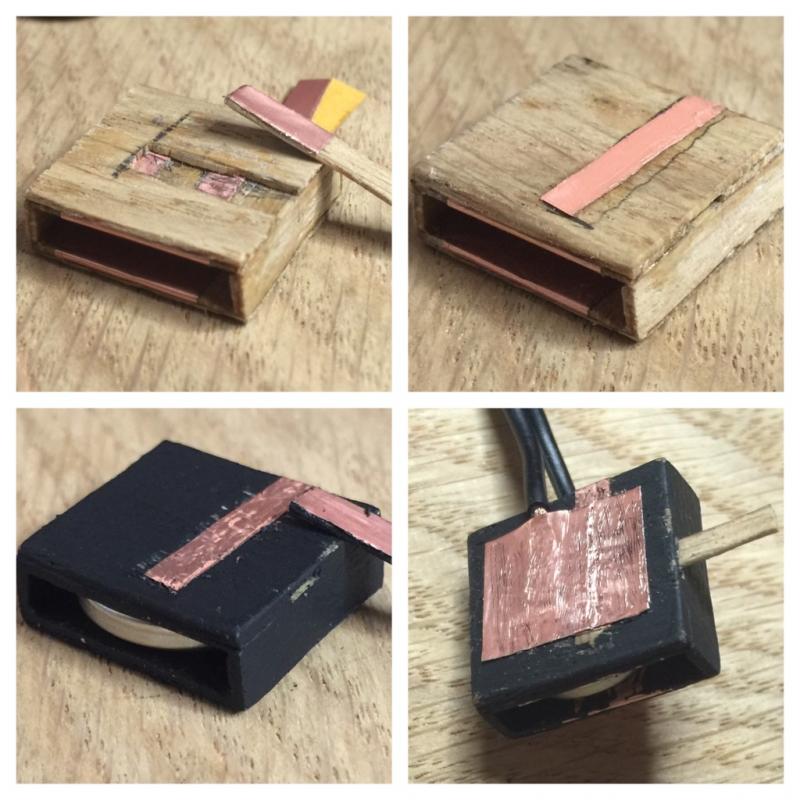
To turn on, simply insert wood strip, copper to copper. Pull out to turn off. This can be adapted to fit whatever size battery you need and can easily be disguised into a part of your model and/or stand.
- mtaylor, CaptainSteve, Bobstrake and 7 others
-
10
-
Thanks to everyone for all the likes and encouragement.
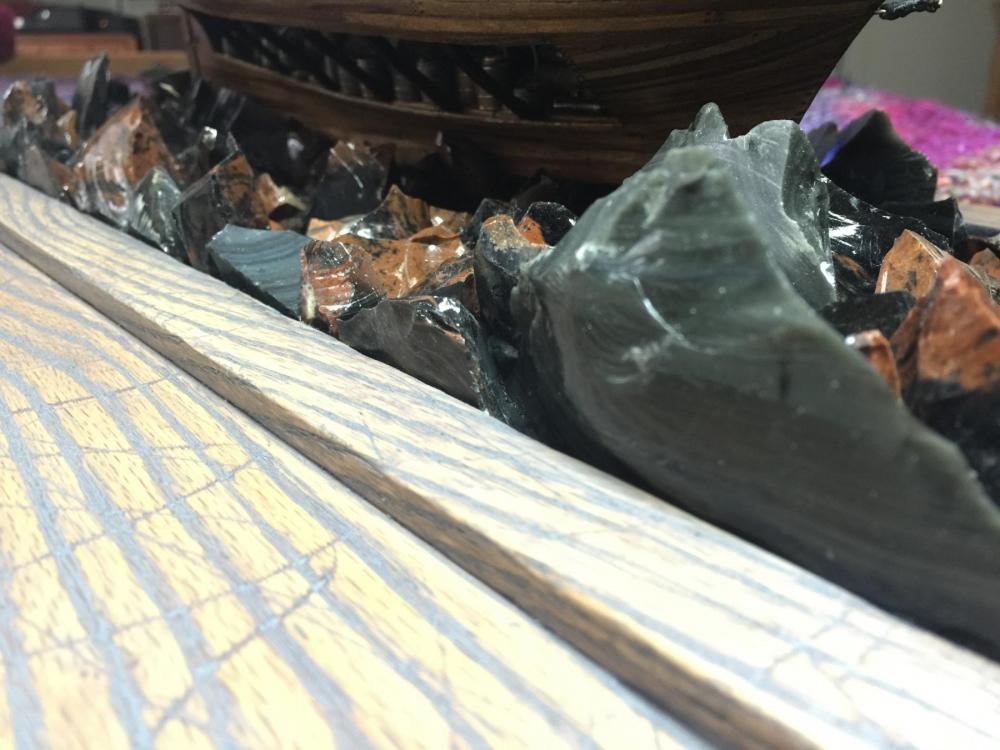
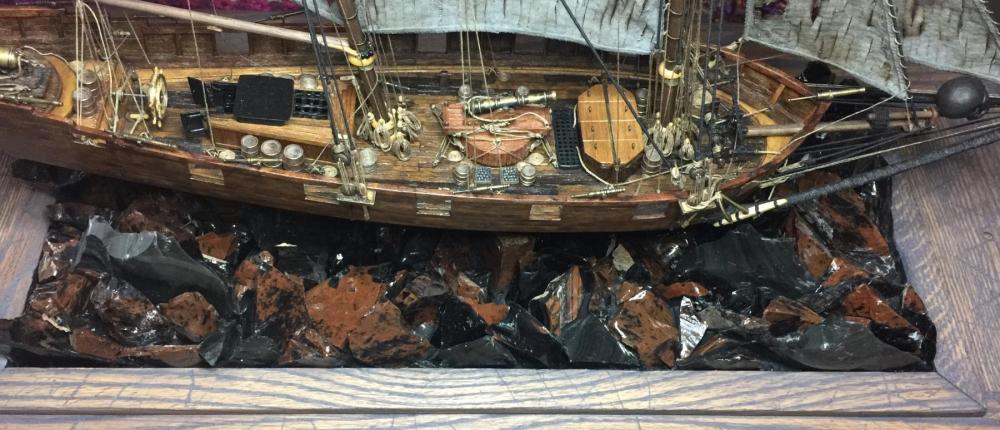
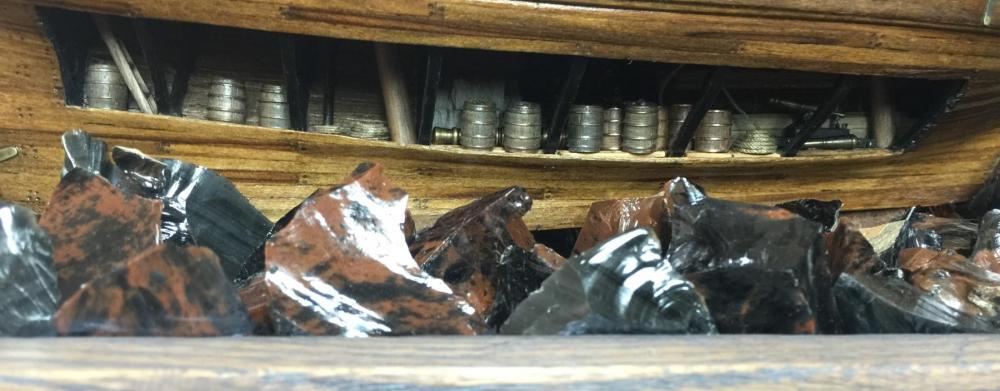
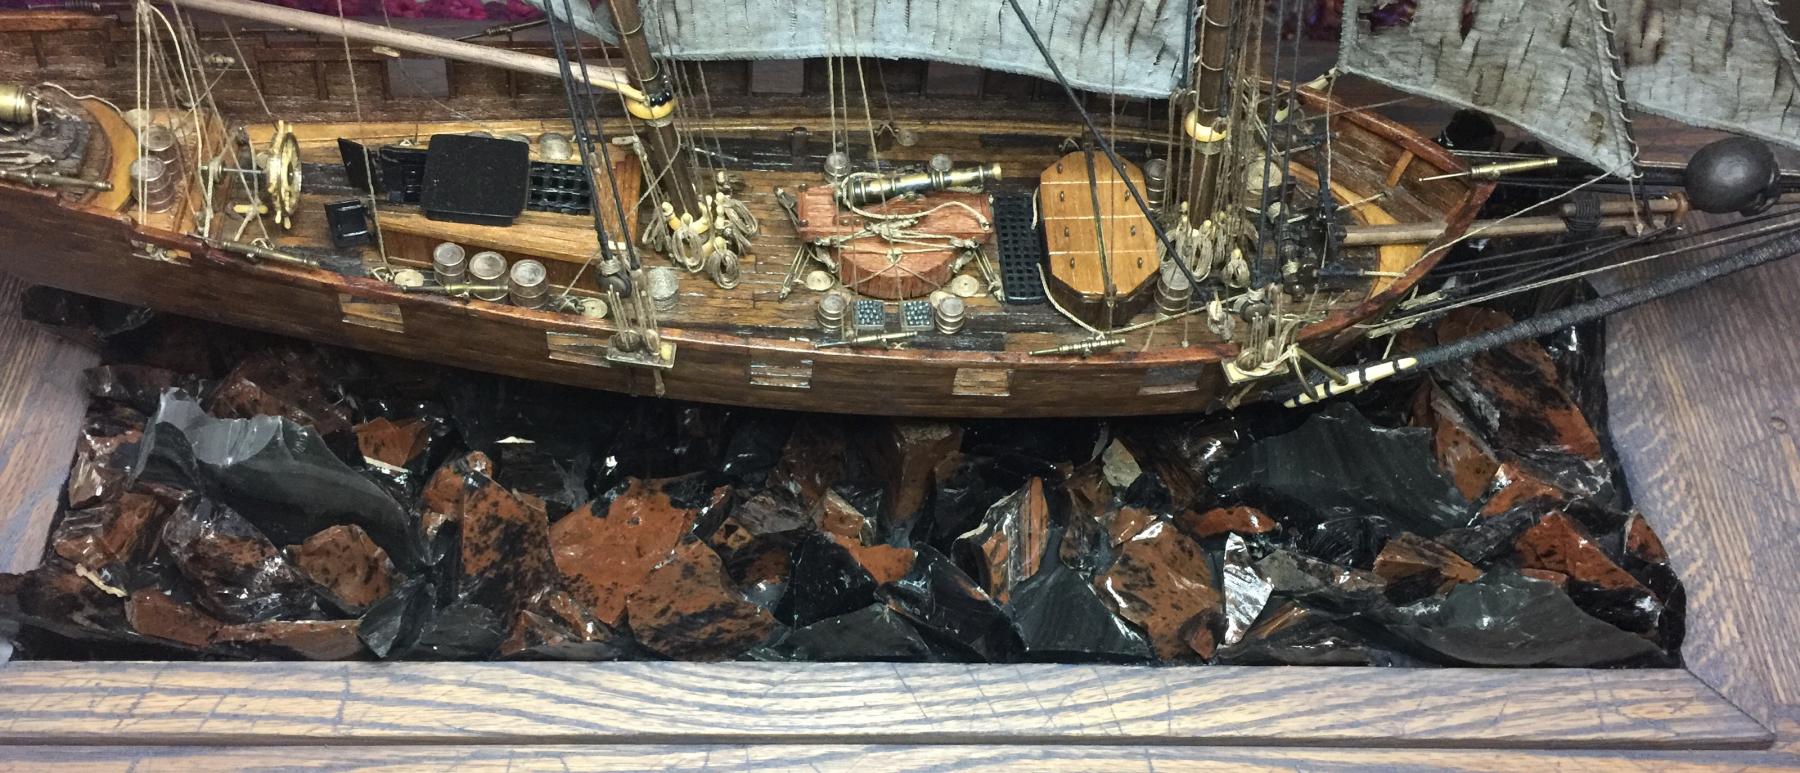
Things are finally getting close to the end. For the stand, I repurposed an old oak door I got from the rebuild center for $2. Last year a trip was made to an obsidian flow in eastern Oregon where I got both mahogany and rainbow obsidian. The volcanic glass was broken into shards and and set in cement patch to represent water. I wasn't really sure of the outcome, but it seems to look ok.
The door was distressed with alternating red mahogany and natural grey Minwax, hand scraping between each coat and finished off with steel wool.
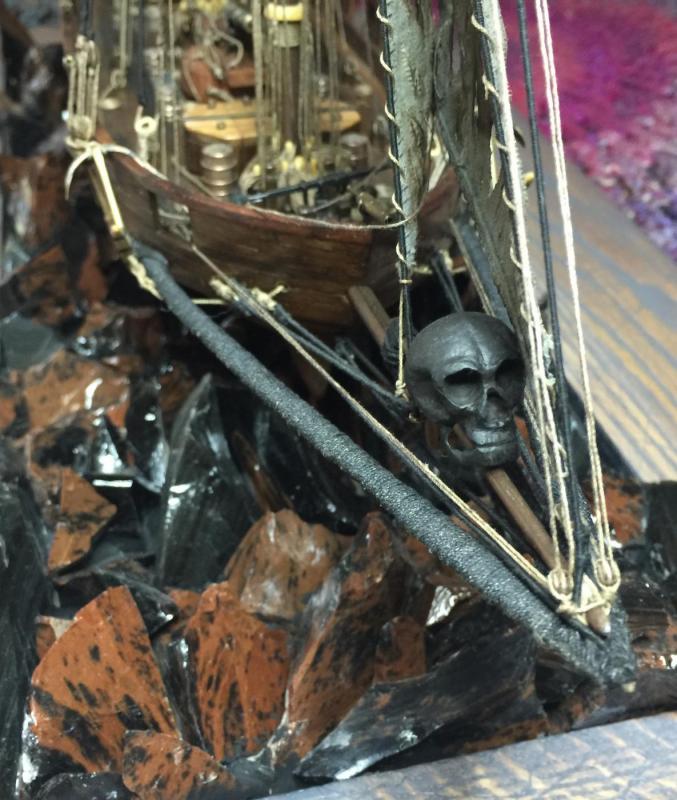
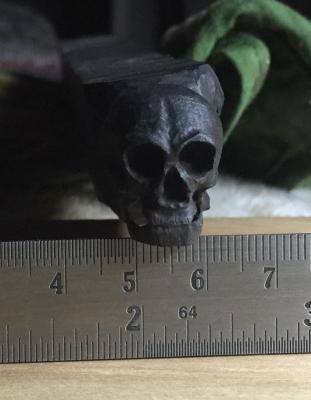
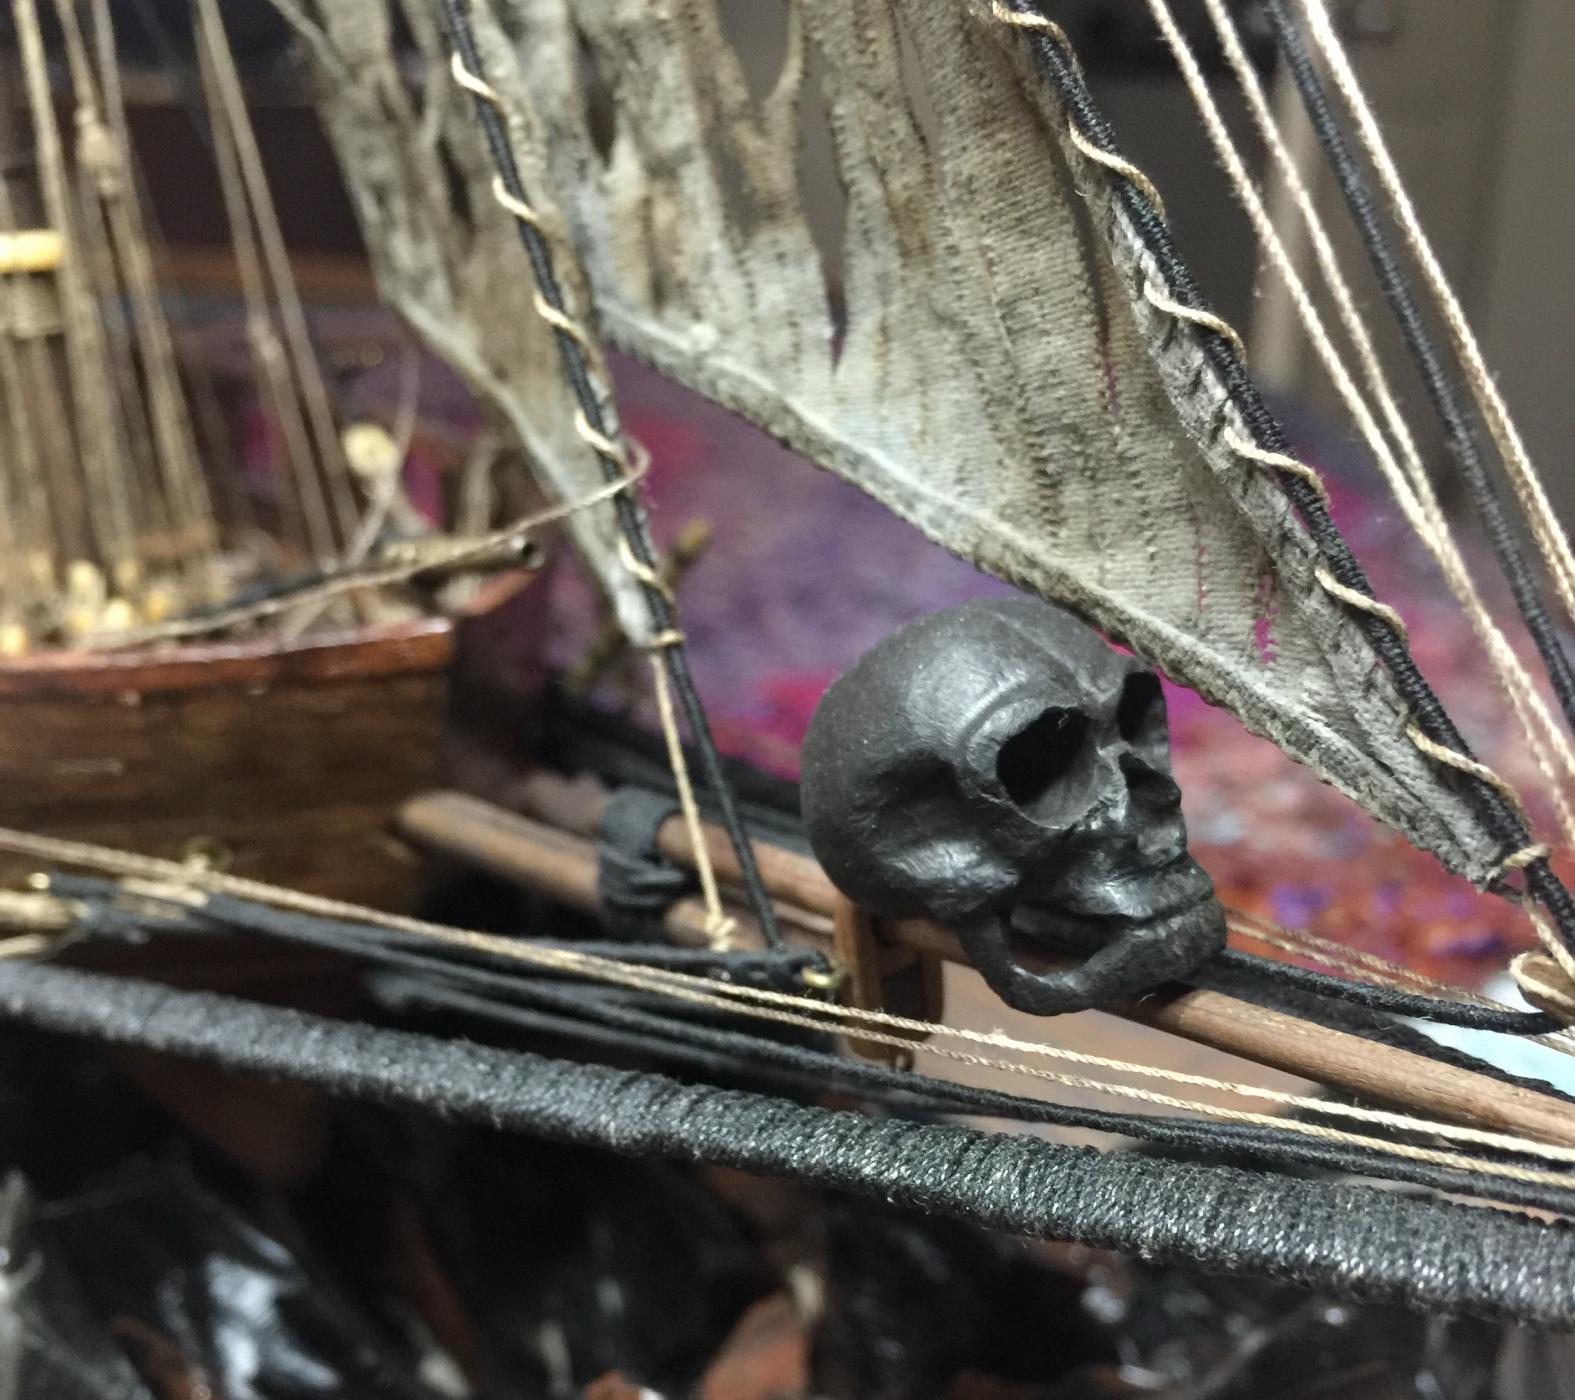
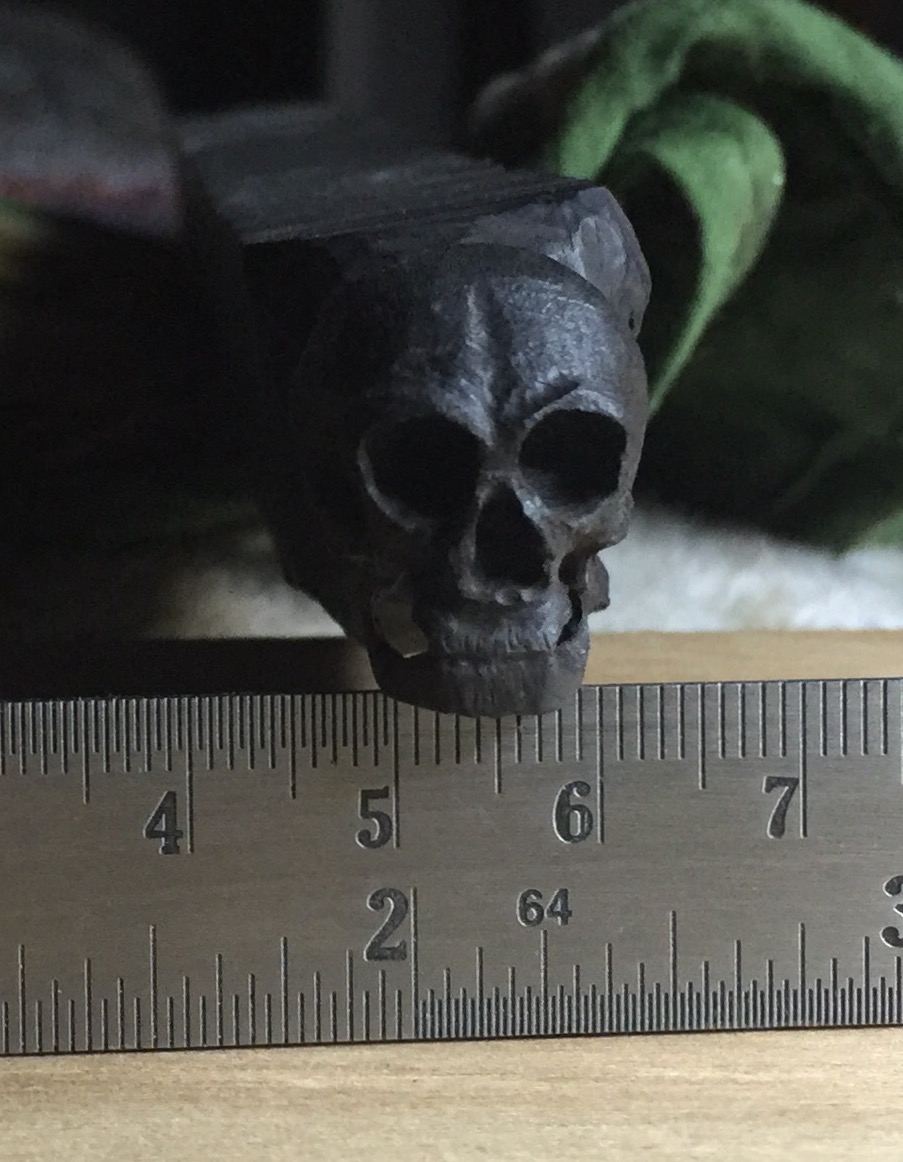
After much contemplation, I resolved on a location for the ebony skull. At first I thought of putting it on the point of the bowsprit, but it really looked out of place. This spot made it blend in much better.

I used my extra barrels, sailcloth, timber and botched cannons to fill up the cargo hold. There's still a couple minor details to work out, but overall it's mostly complete.
- thomaslambo, mtaylor, riverboat and 7 others
-
10
-
Thanks Boyd, Buck, CH and those who punch the like button.
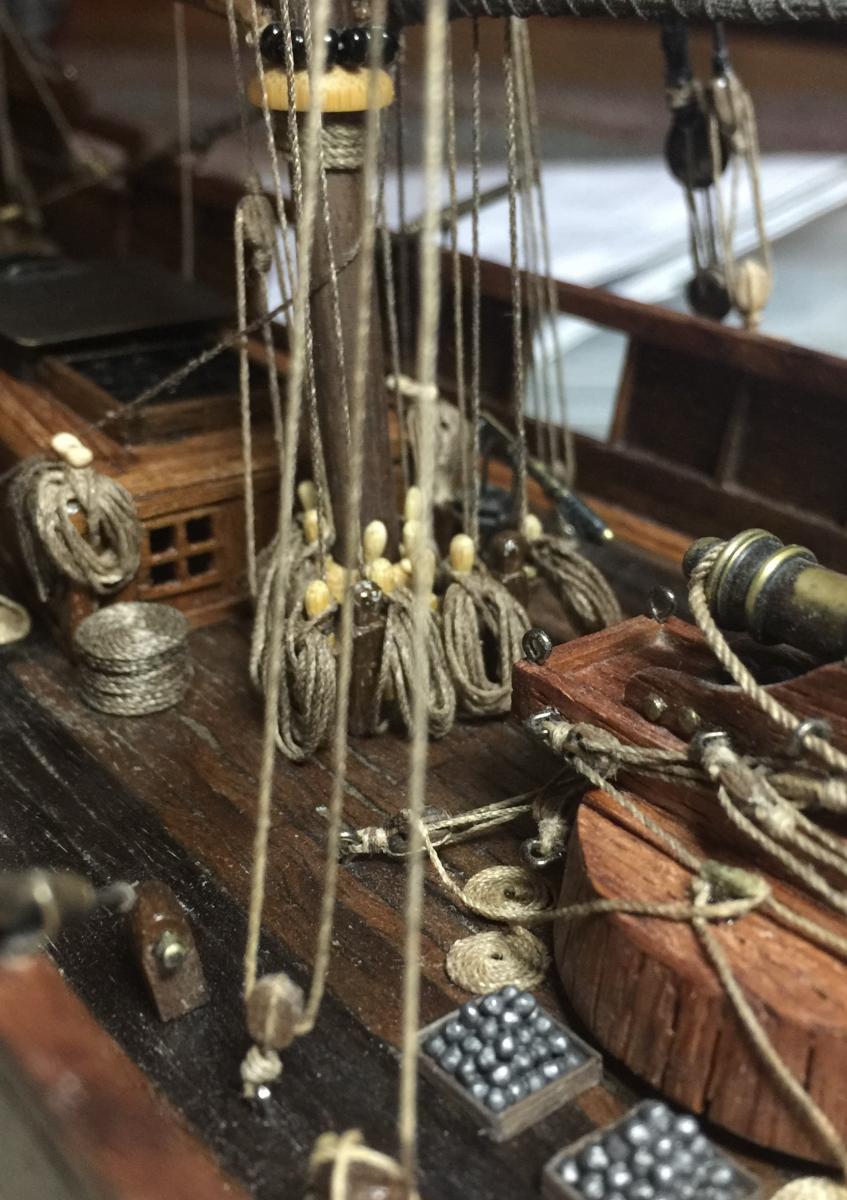
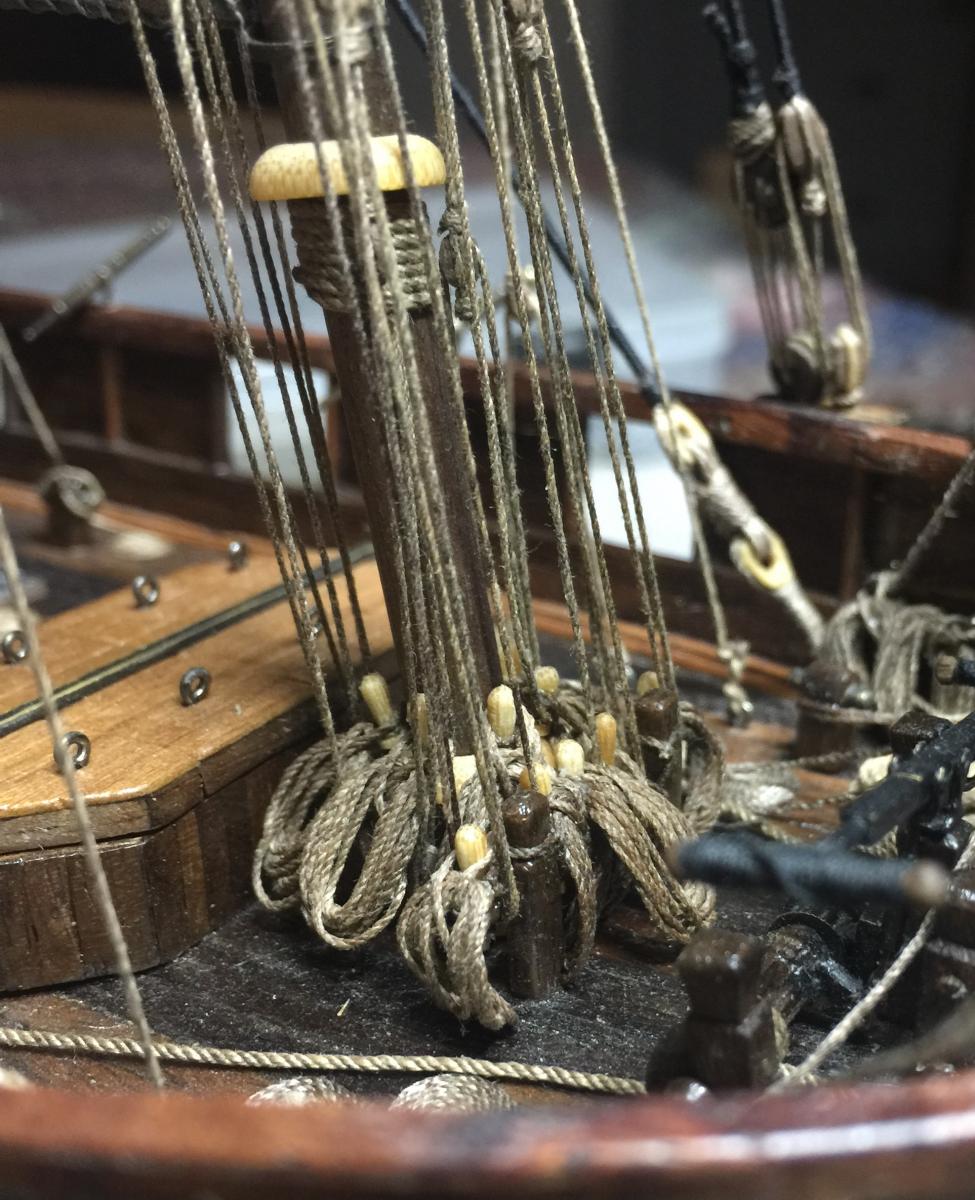
Work in the shipyard has been moving steadily. Starting to button up with all of the rope coils and other furnishings.
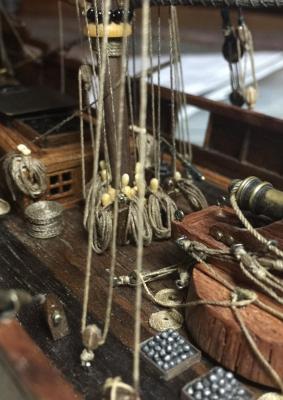
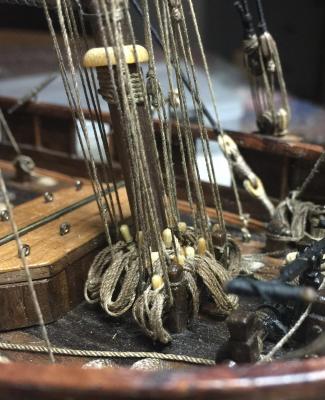
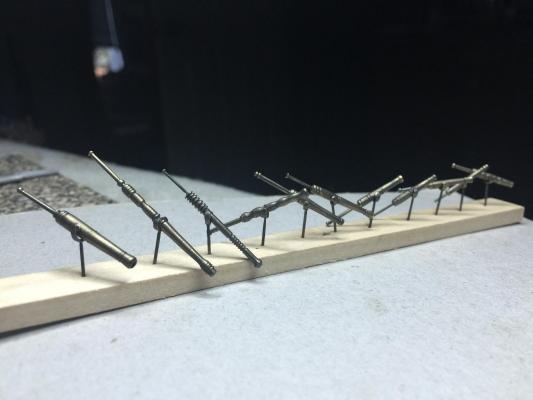
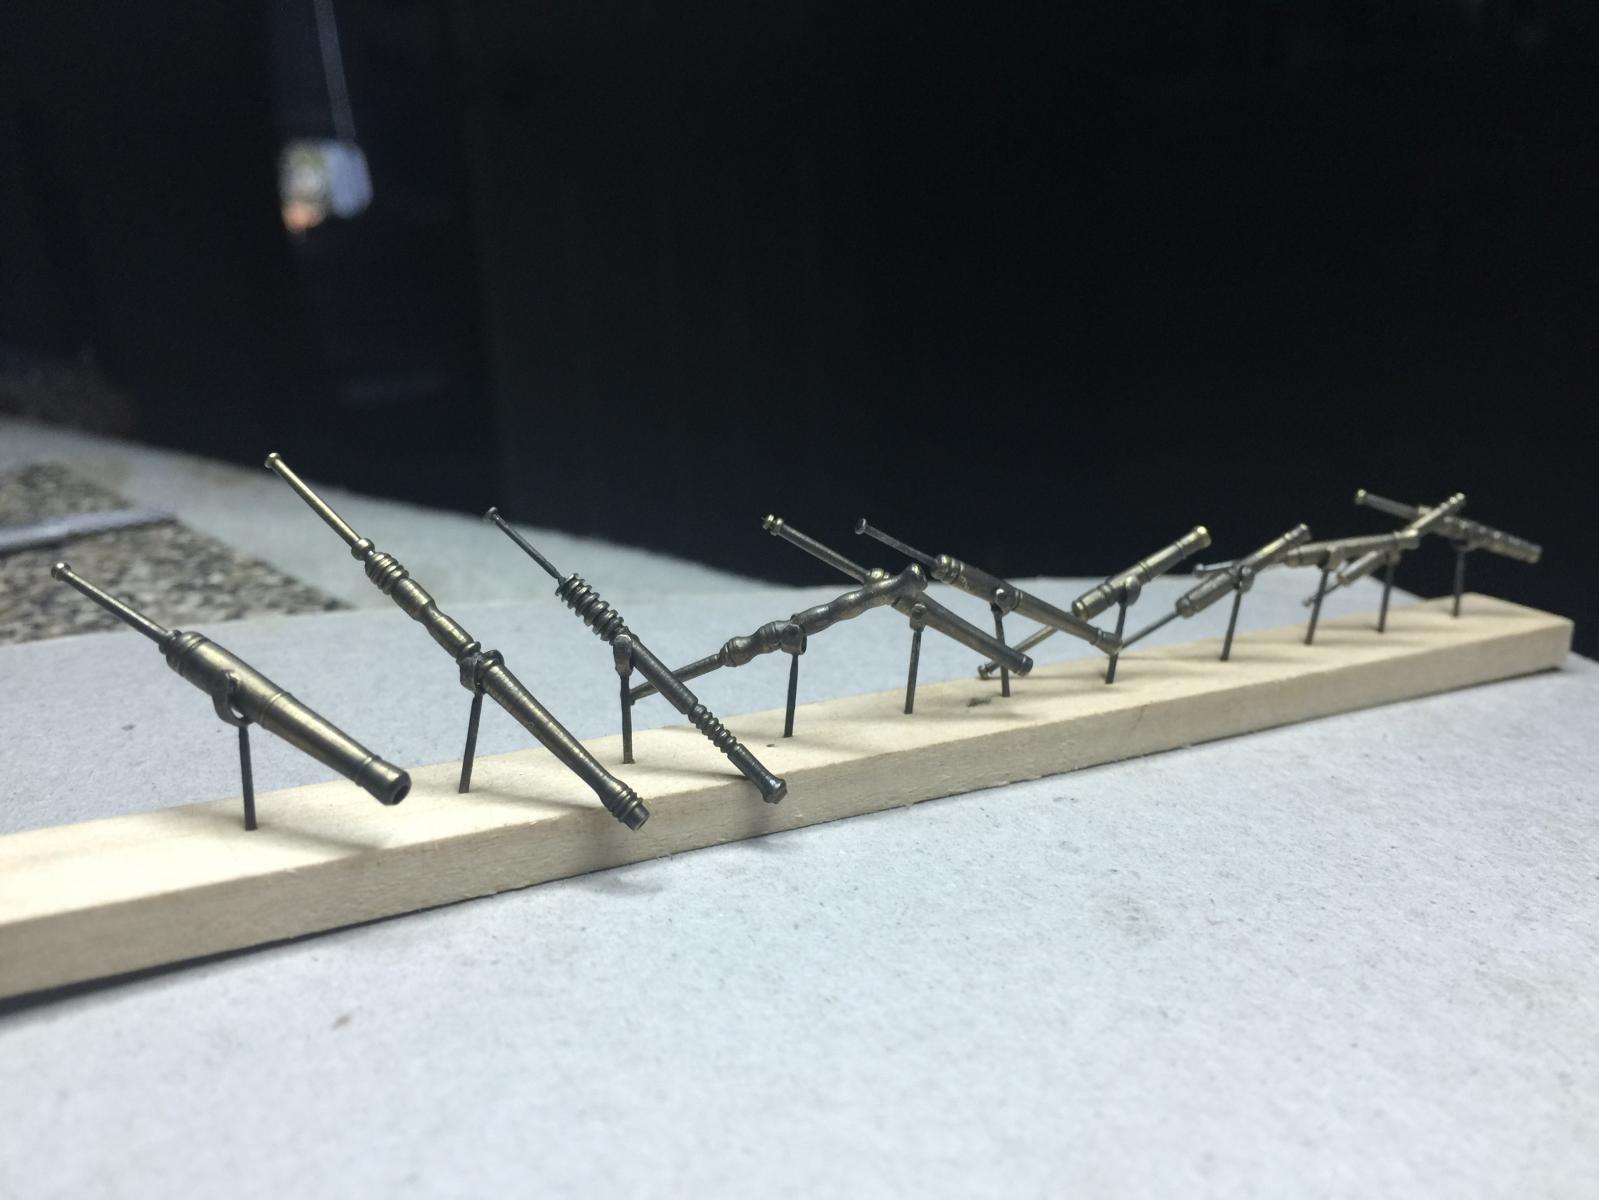
I search through many photos for culverins/swivel guns that were in use during this time period and came up with a lot. So I took the liberty of letting my mind wander through the ages. Not sure if there's not enough or too many. Wait a minute...can a pirate ship have too much artillery? Nope!
- CaptainSteve, src, UpstateNY and 10 others
-
13
-
Thanks George, CH and all for the likes.
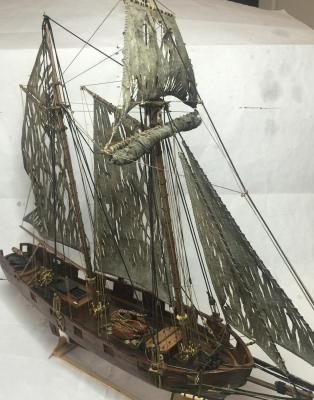
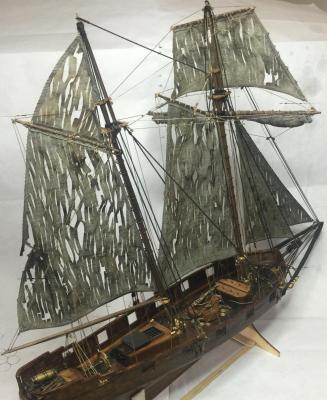
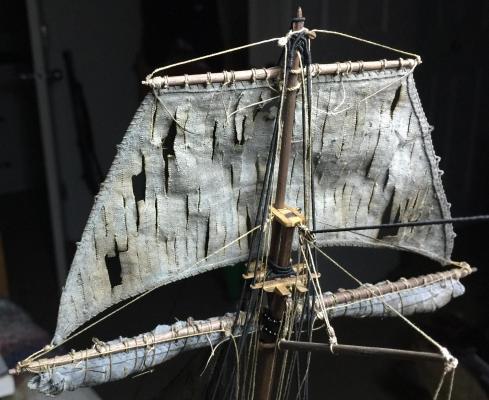
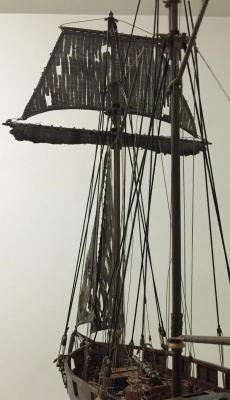
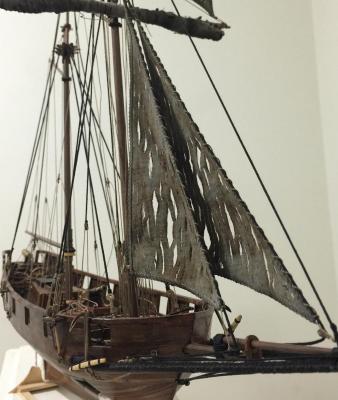
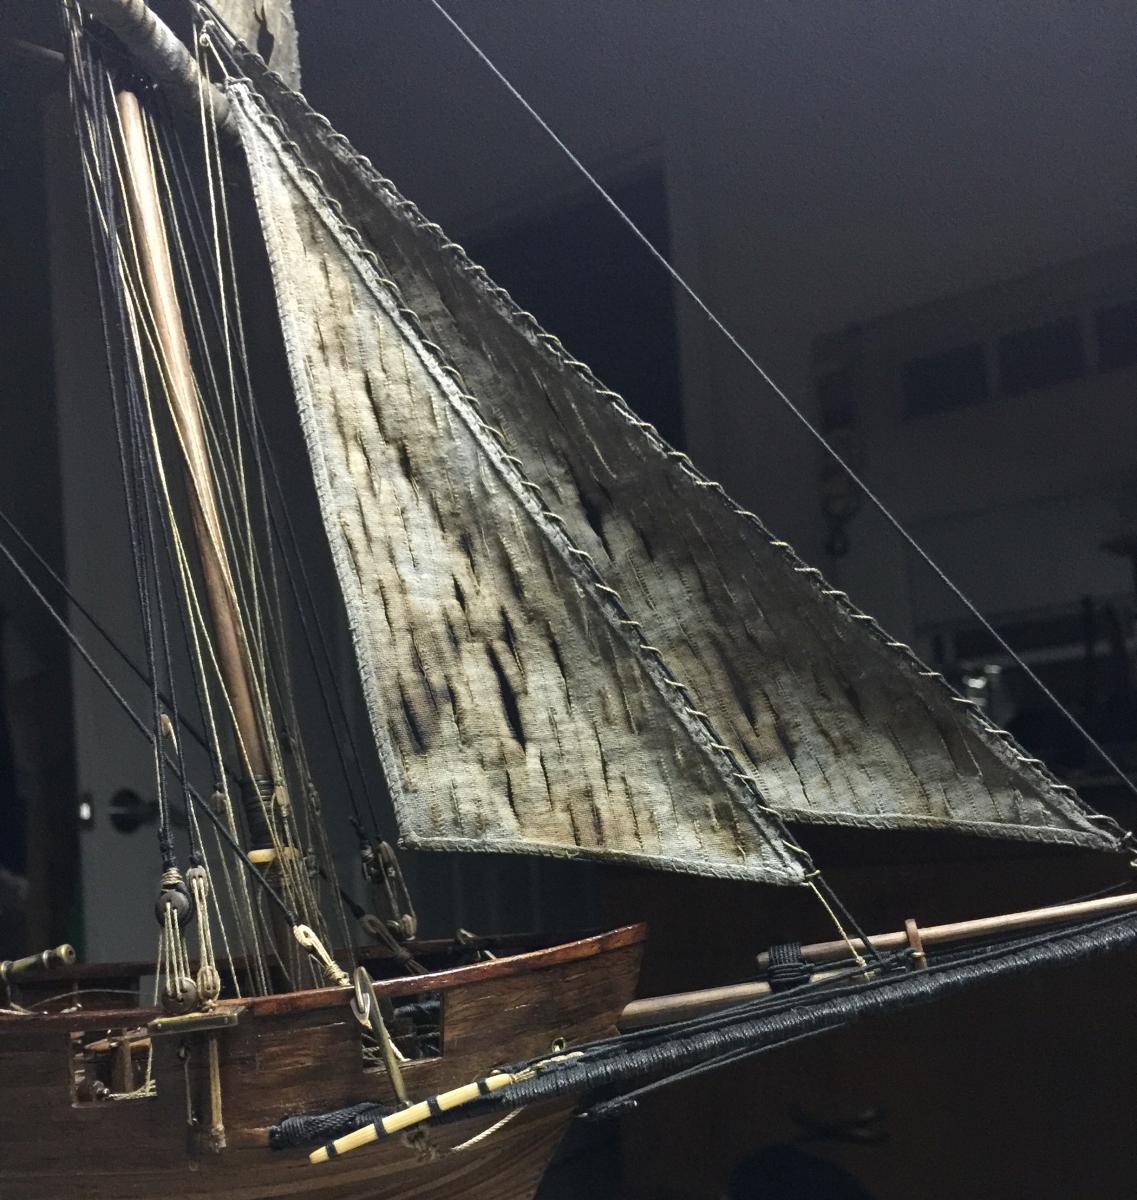
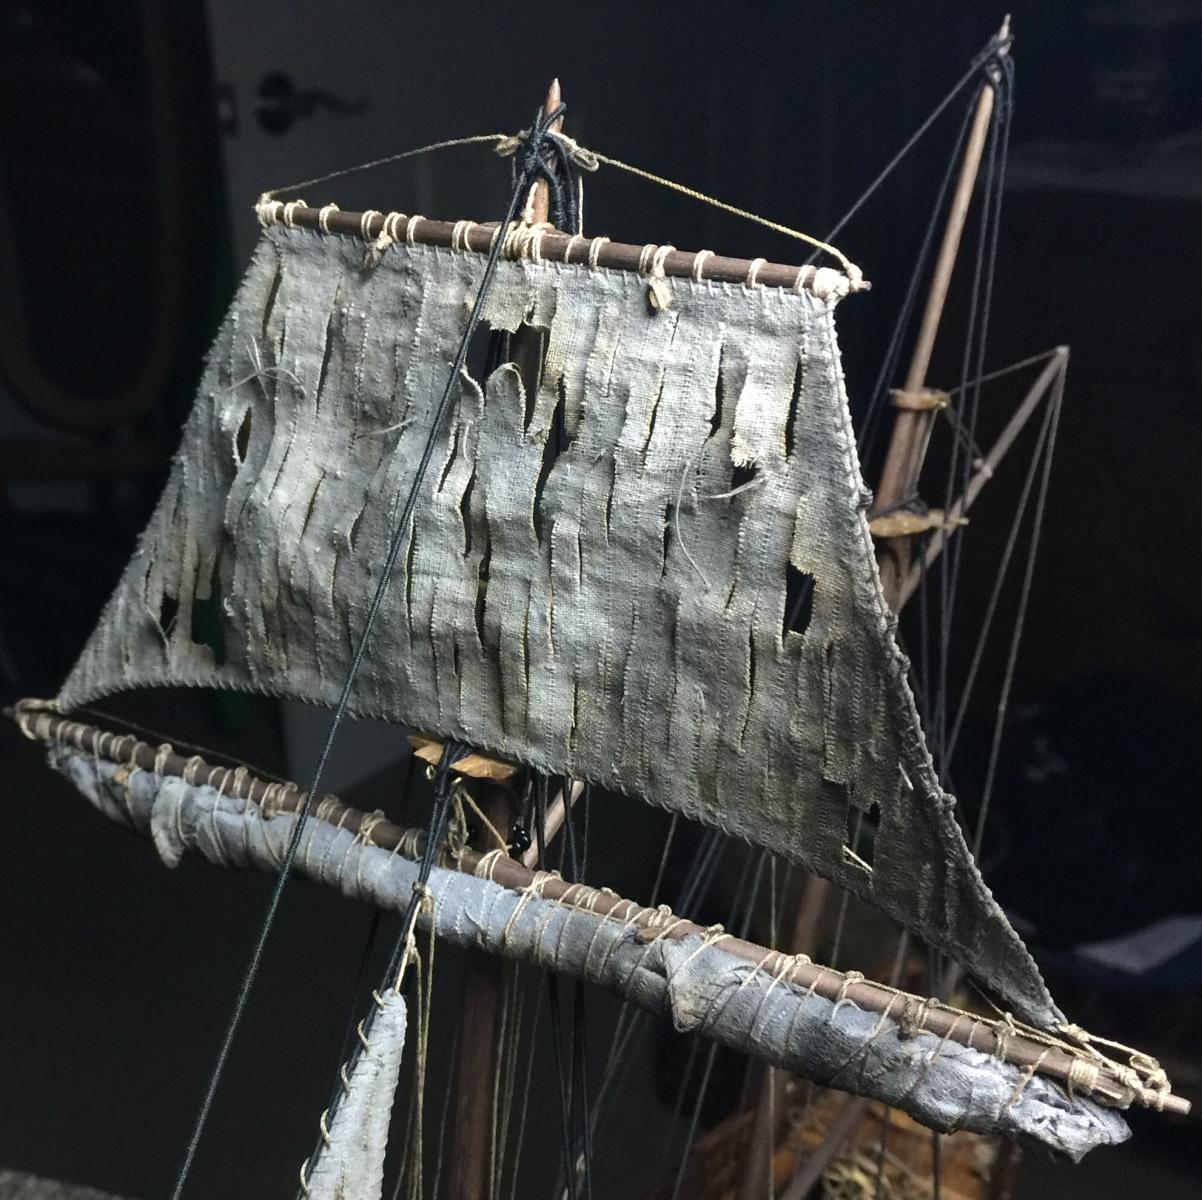
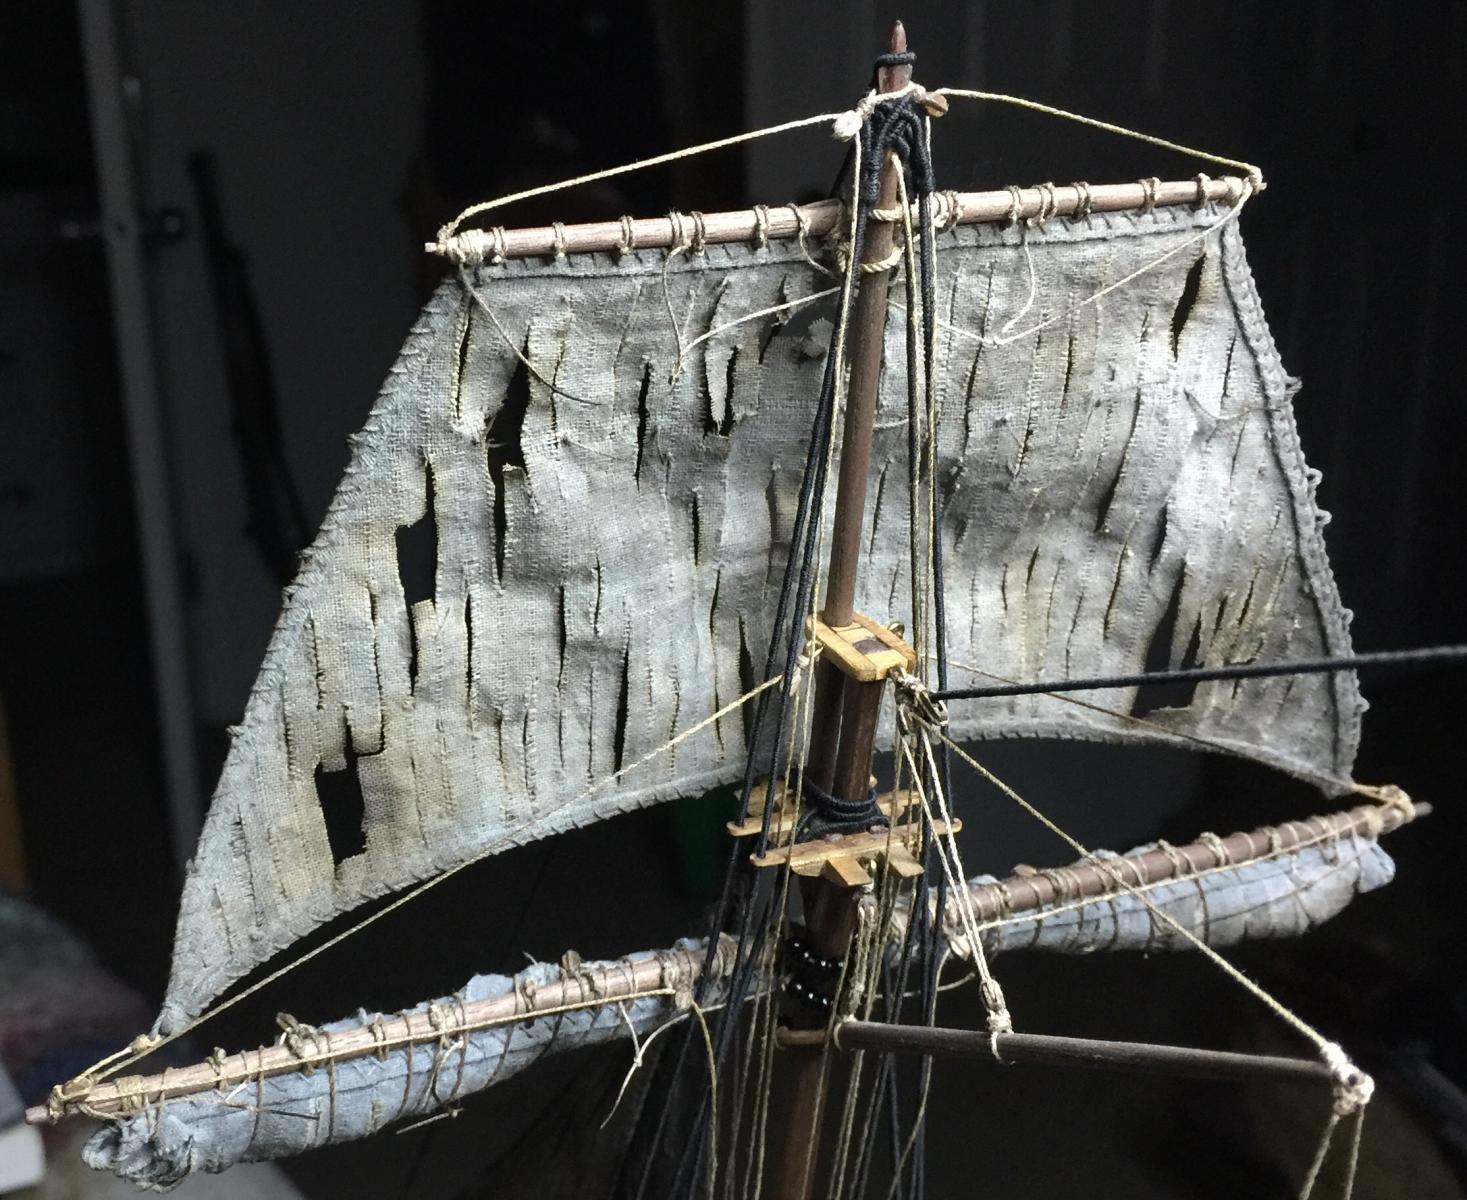
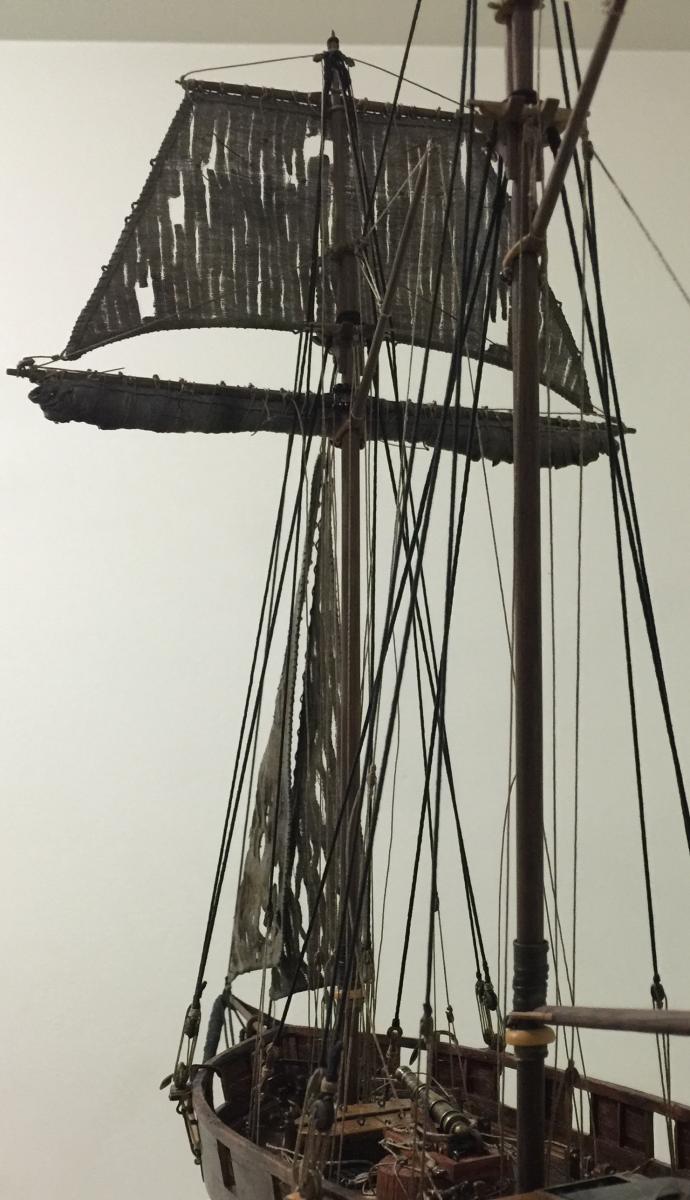
CH, the acorns were large and bountiful with the Nutz and Bawlz Clans. Burning the sails after they were in place was a white knuckle event. Many modelers leave the sails off or furl them so they don't block the view. I decided to go this route with the fore and aft main sails angled towards the port side. The square sail was, however, too much so it got furled.
I think you'd like this model, even though the instructions aren't the greatest.
- GLakie, src, Salty Sea Dog and 4 others
-
7
-
Thanks George, Frank, CaptainSteve, Mark, Ken, Boyd, gerty, CH, Sam and all those hitting the like button. You kind words are a great encouragement.
The sails are finally completed. Now I can focus on deck furnishings.
- GrandpaPhil, Cathead, dgbot and 8 others
-
11
-
Looking great as always Robb! Ahh the sails...well I've spent countless hours trying to figure this one out. I'm with Jesse on the "it depends." Wind, heading, size of ship, all come into play. I found google images helpful. Just typed in type of ship and then changed terms, full sails, furled sails, etc. Hope that helps. Also add 'aerial view' to get a better feel of the wind.
-
Thanks George, CaptainSteve, Frank, Mark, Cathead, Bug and everyone for the encouragement and the likes.
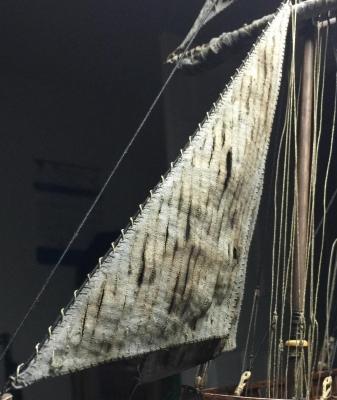
Well I've slowly made progress on the sails, finally! The process to get where the sails look worn and weathered was quite the expedition. I also chose to add a mixture of full and furled sails.
First, every tenth thread was removed to simulate sewn together sailcloth. I did them at 18inches instead of the typical two feet because it looked more aesthetic at this scale. Then the bolt ropes and edge sewing was done. I mixed 4 parts water, 1 part white glue and 1 part natural grey Minwax and applied to the sails on both sides.
At the location of the removed threads, cuts were randomly made. Then the sails were worked over with a wire wheel and any frayed threads were trimmed. After the sails were rigged and attached, then they were burnt, very carefully so I wouldn't lose the whole ship.
There's still a few lines that will be added once the rest of the sails are installed. If things go well, I hope to have the sails done in the next couple of weeks. Then there will be some of the finer detailed items to be made up and installed.


- Jack12477, Salty Sea Dog, src and 10 others
-
13
-
-
-
-
-
Well I didn't want anyone to think I fell of the earth. These sails are taking quite some time to achieve, what I feel to be, satisfactory status.
So here's a couple of photos of the figure head for Nutz Pirate Ship. I used ebony both for color and it's a nice wood to carve. Pocket knife and dremel diamond grinding bits were used to make this mediocre representation of the human skull. Unlike other figure heads, this won't be attached to the bow, but sit atop the point of the bowsprit.

- UpstateNY, Salty Sea Dog, mtaylor and 8 others
-
11
-
-
-
-


Benjamin W Latham by mattsayers148 - Model Shipways 2109 - 1:48
in - Kit build logs for subjects built from 1901 - Present Day
Posted
Thank you daddyrabbit1954, Ken, CH, Elia and all those who've pushed the like button.
Well Ken, no clue yet. I have piles of veneer, and no clue what most of them are. I've been spinning ideas through my head, maybe split the hull on the waterline with two colors, same thing on the deck.
I have to go through my supply and start cutting strips to see how workable they are. I want to make this one lighter than the ol pirate ship.