Cathead
-
Posts
3,550 -
Joined
-
Last visited
Content Type
Profiles
Forums
Gallery
Events
Everything posted by Cathead
-
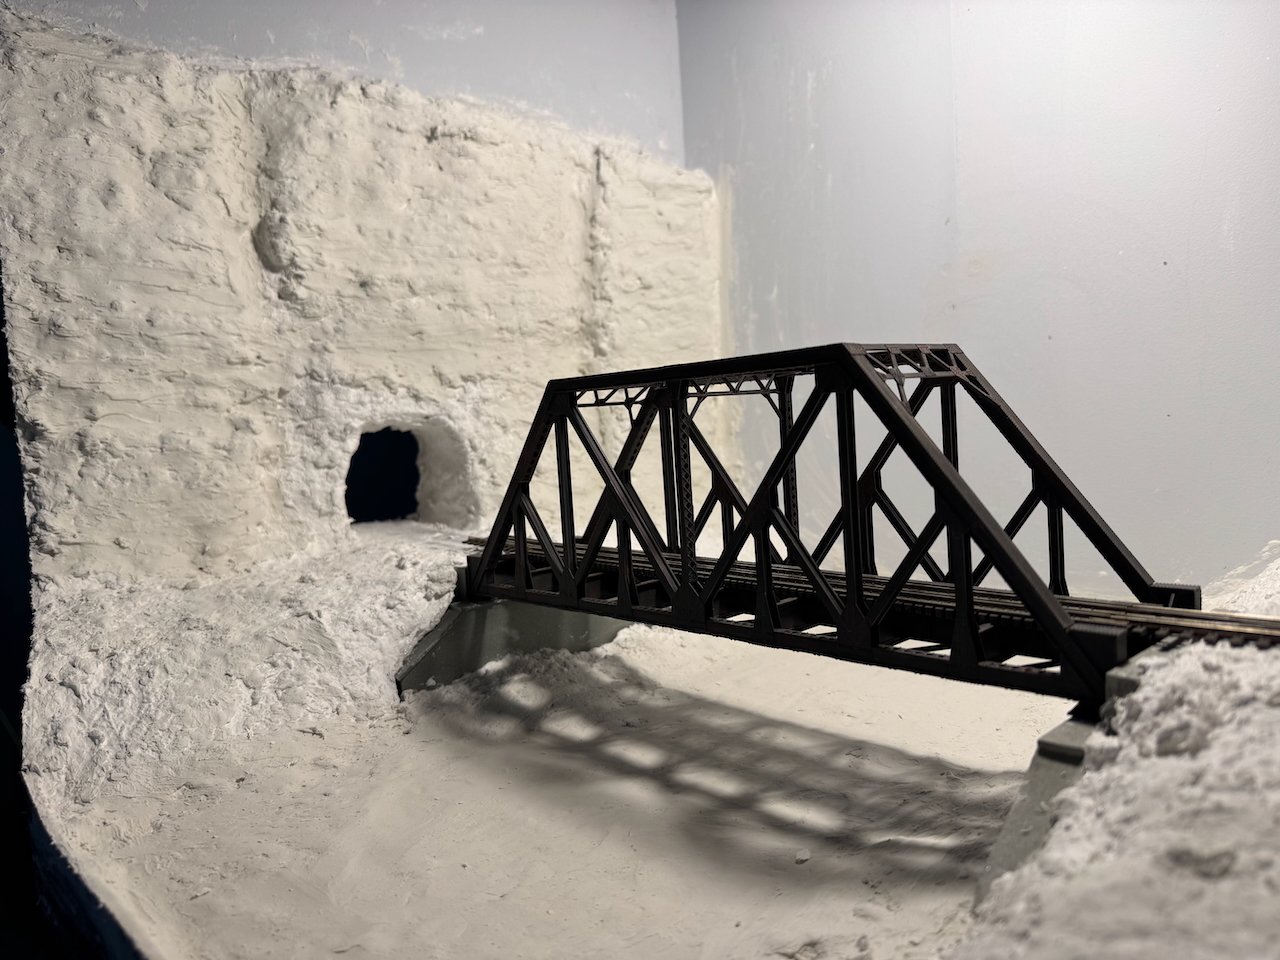
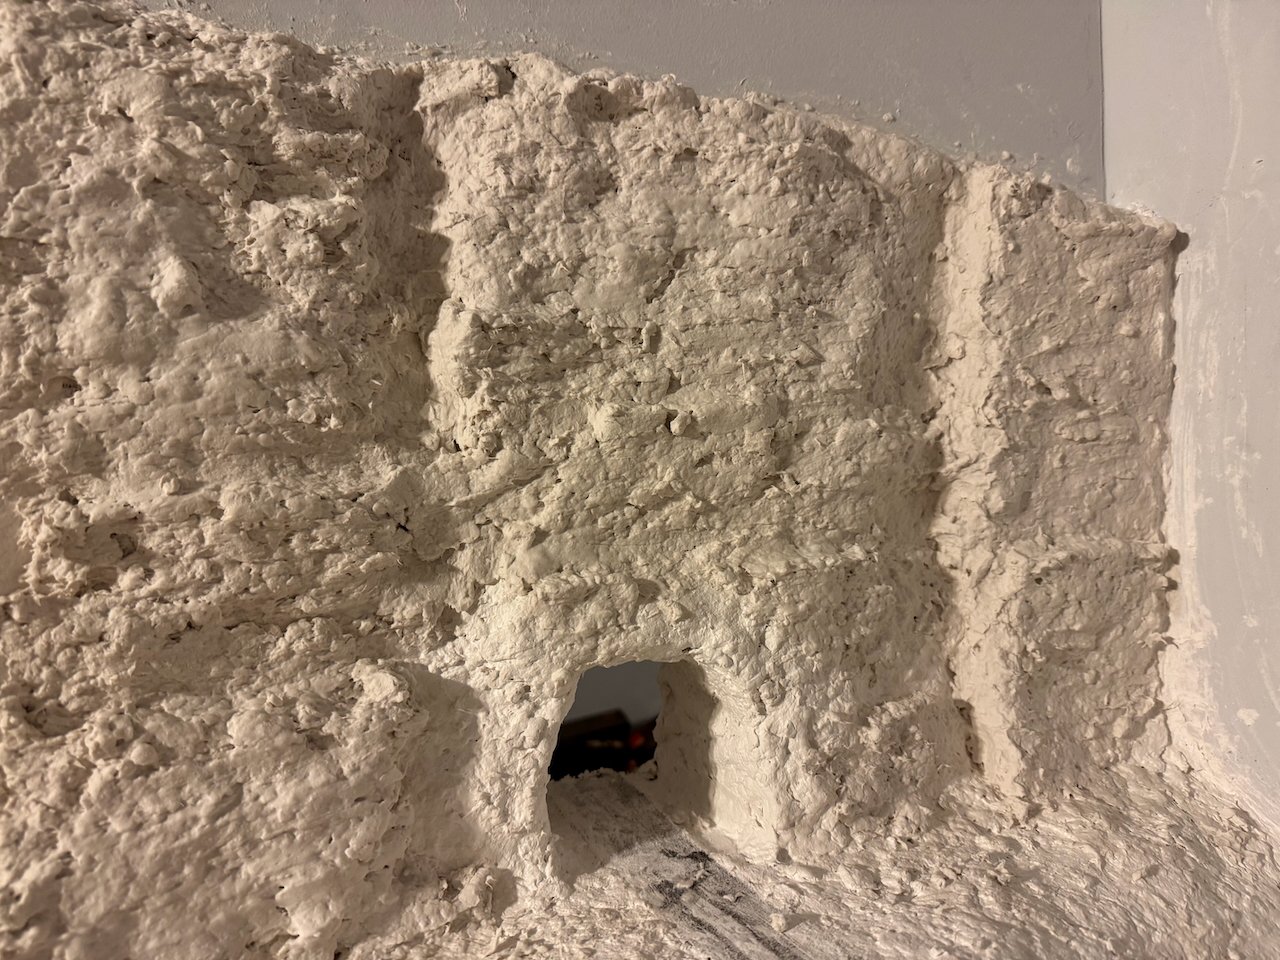
 I would agree, except that the tunnel isn't a dead-end, but will continue through to a new module. See track plan in post #61 and look at the right side of the area labeled Rocheport (viewing angle is from the top down). The other portal will be on the next module in that direction. What's beautiful here is that this tunnel changes partway through; it's bare rock on this (east) side but lined with brick and stone on the other (west) side. So when I build the next module, I'll build that half of the tunnel as brick and stone, then when they butt together the joint will naturally look right because there really is a transition in the middle of the tunnel. See the video part 2 linked above to really appreciate this. Here's a sneak preview of the western portal: Good questions! There is no faulting, though there are a handful of major vertical joints, which are already simulated. The ones on the model are a little more uniform top-to-bottom than the real ones, but I think they're close enough. Smaller "structures" you may be seeing are probably fracture planes where rock is locally spalling off the bluff face. I may experiment with using a dark pencil to draw in a few other fractures, but overall there isn't much in the way of vertical structural features crossing bedding planes. I don't intend to use any fixative on these surfaces, as they won't be touched or handled. I apply most of my pastels with fingers and find that skin oil does a remarkable job of binding pastels to most surfaces. I've never used fixatives even on my ship models; I'd only do so for things like actual railroad cars that will be routinely handled.
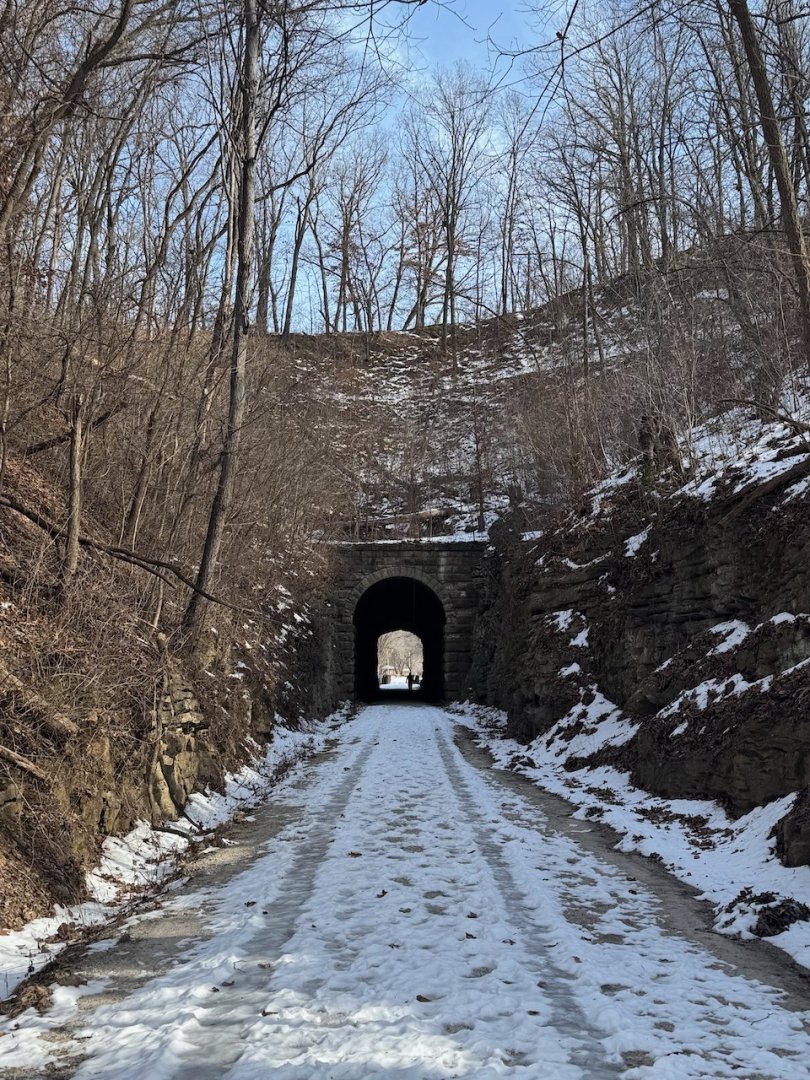
-
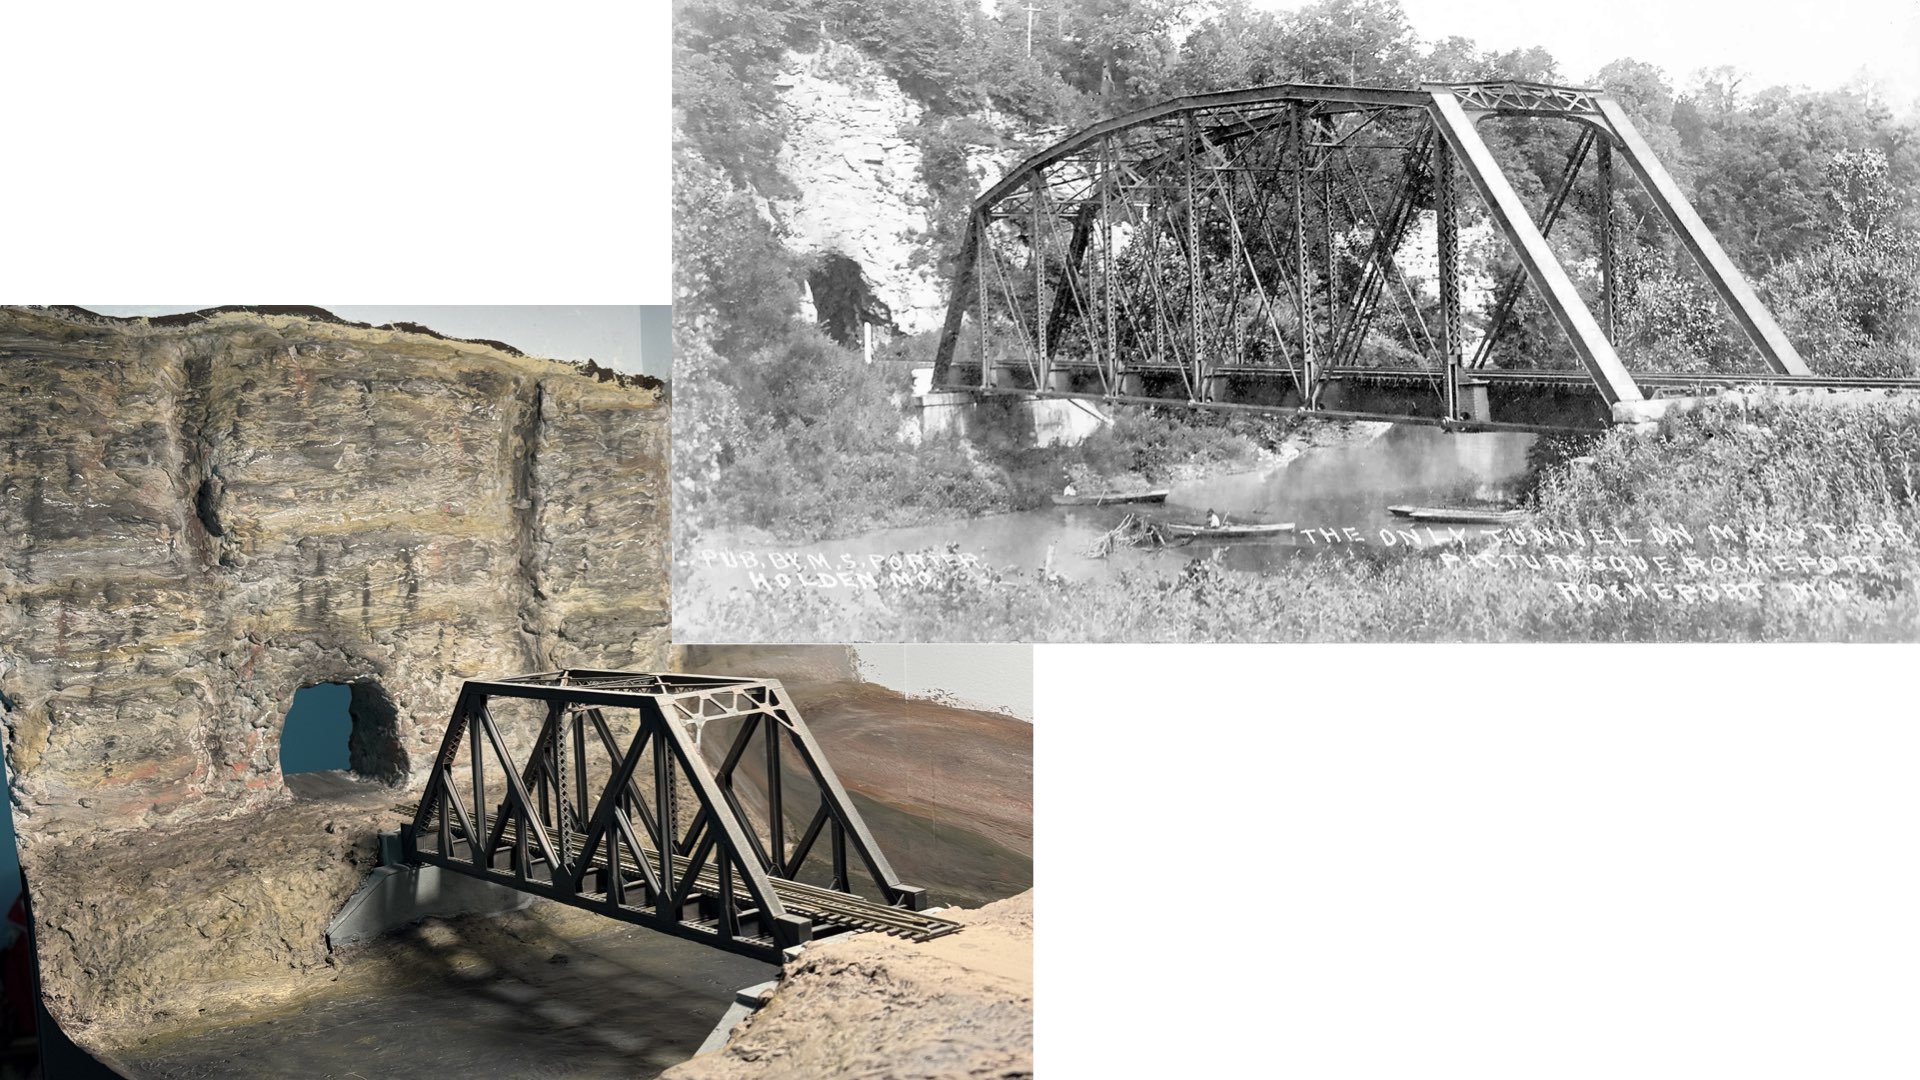
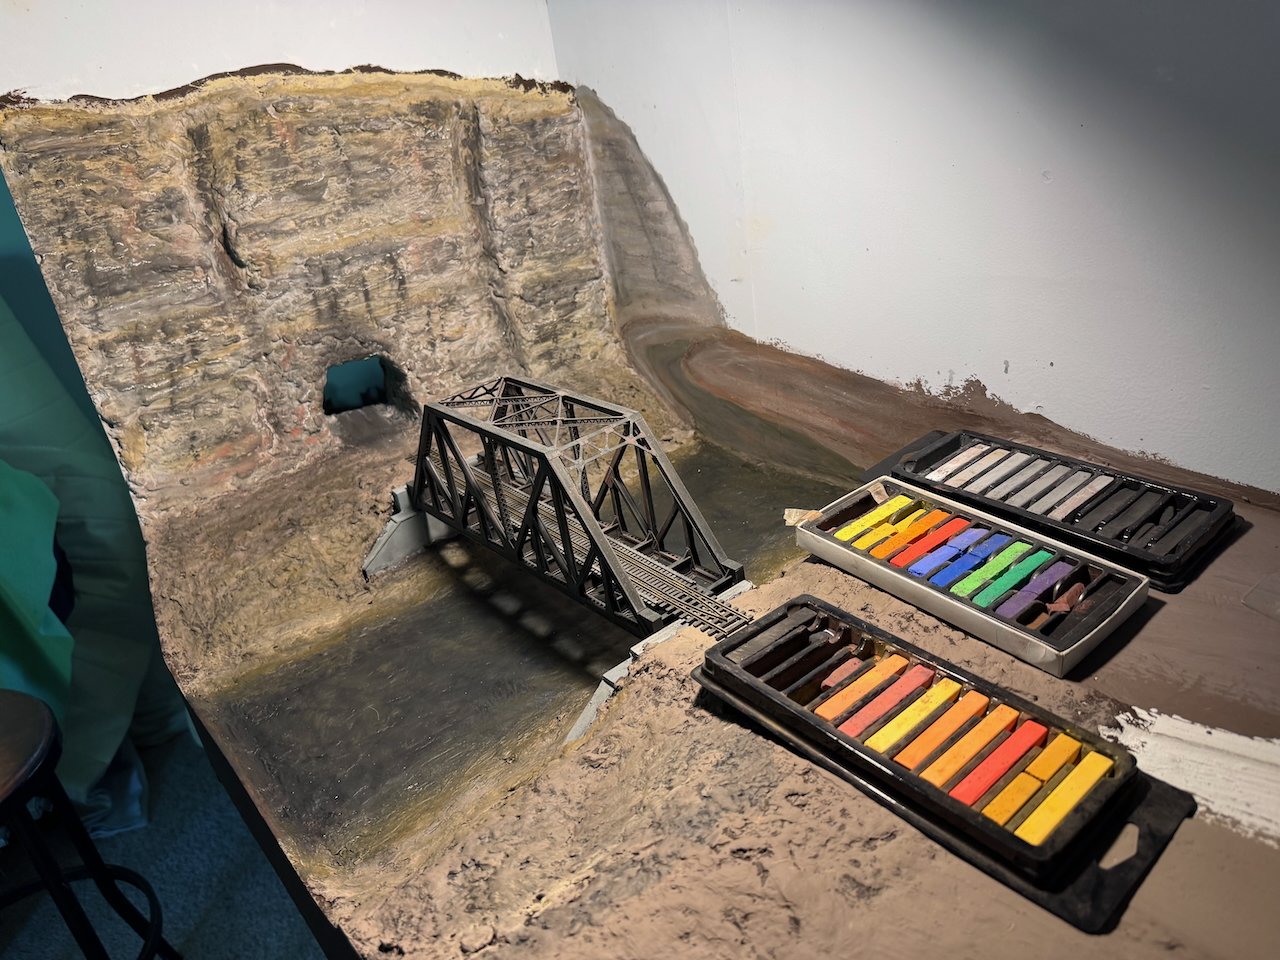
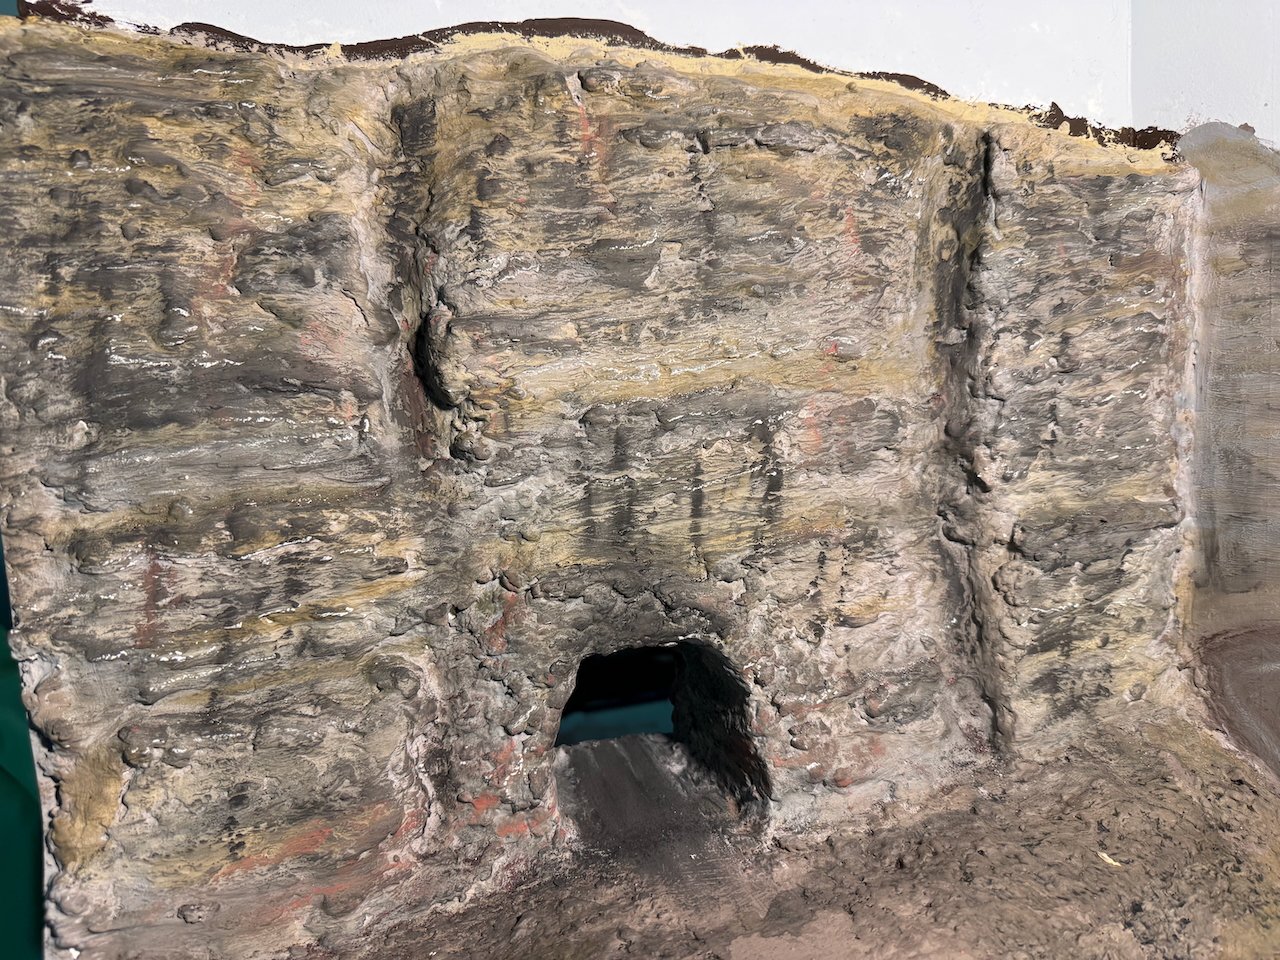
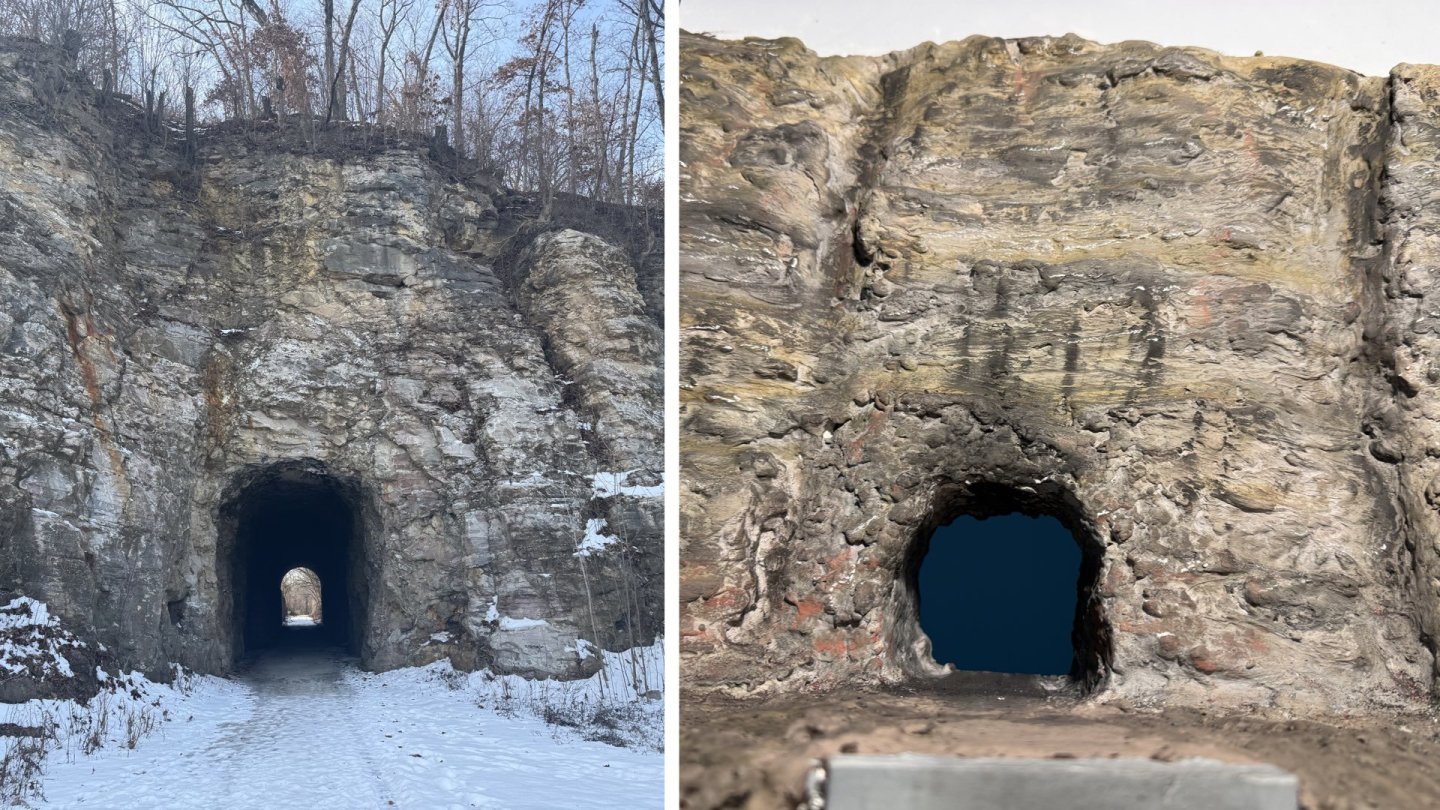
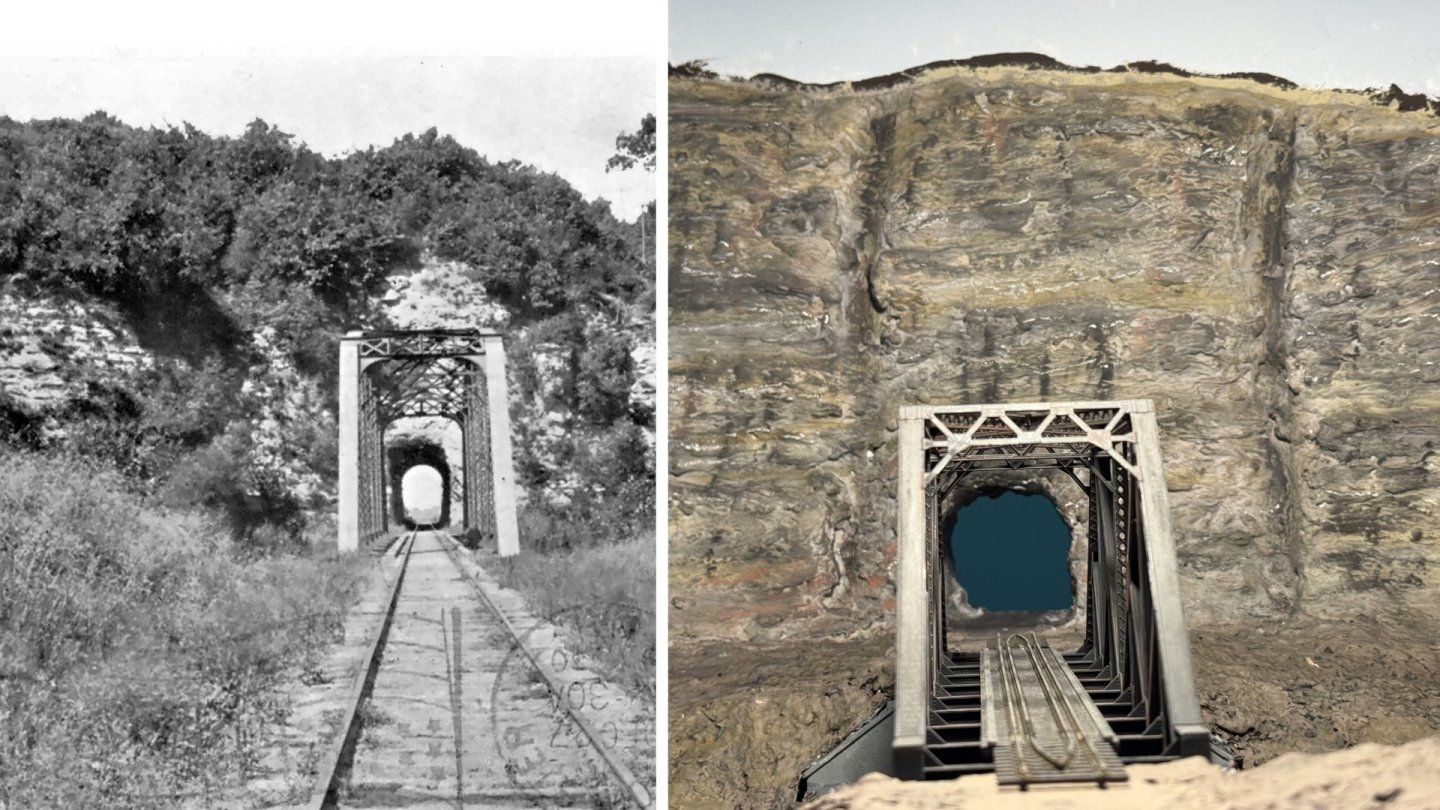
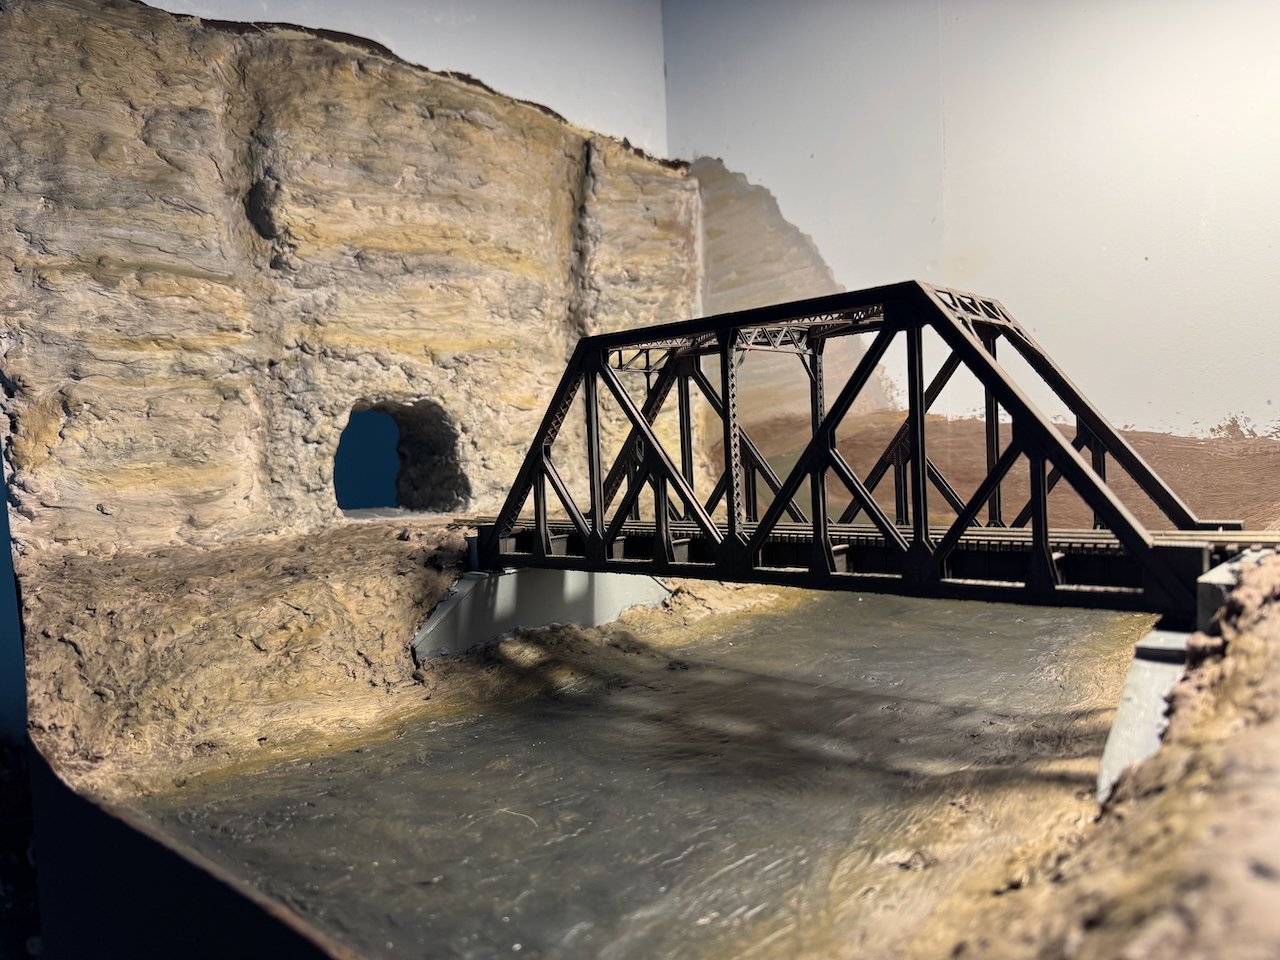
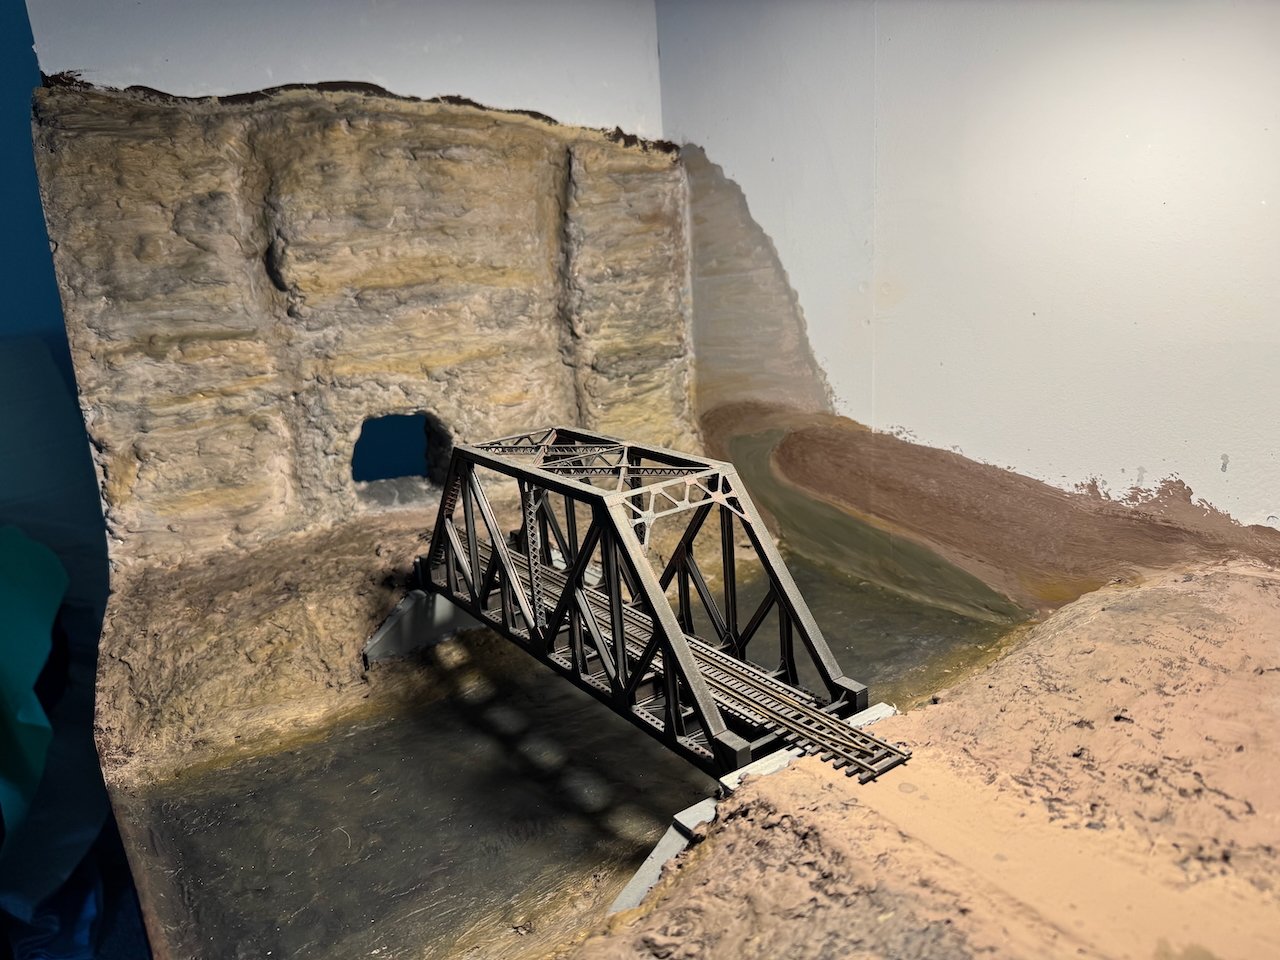
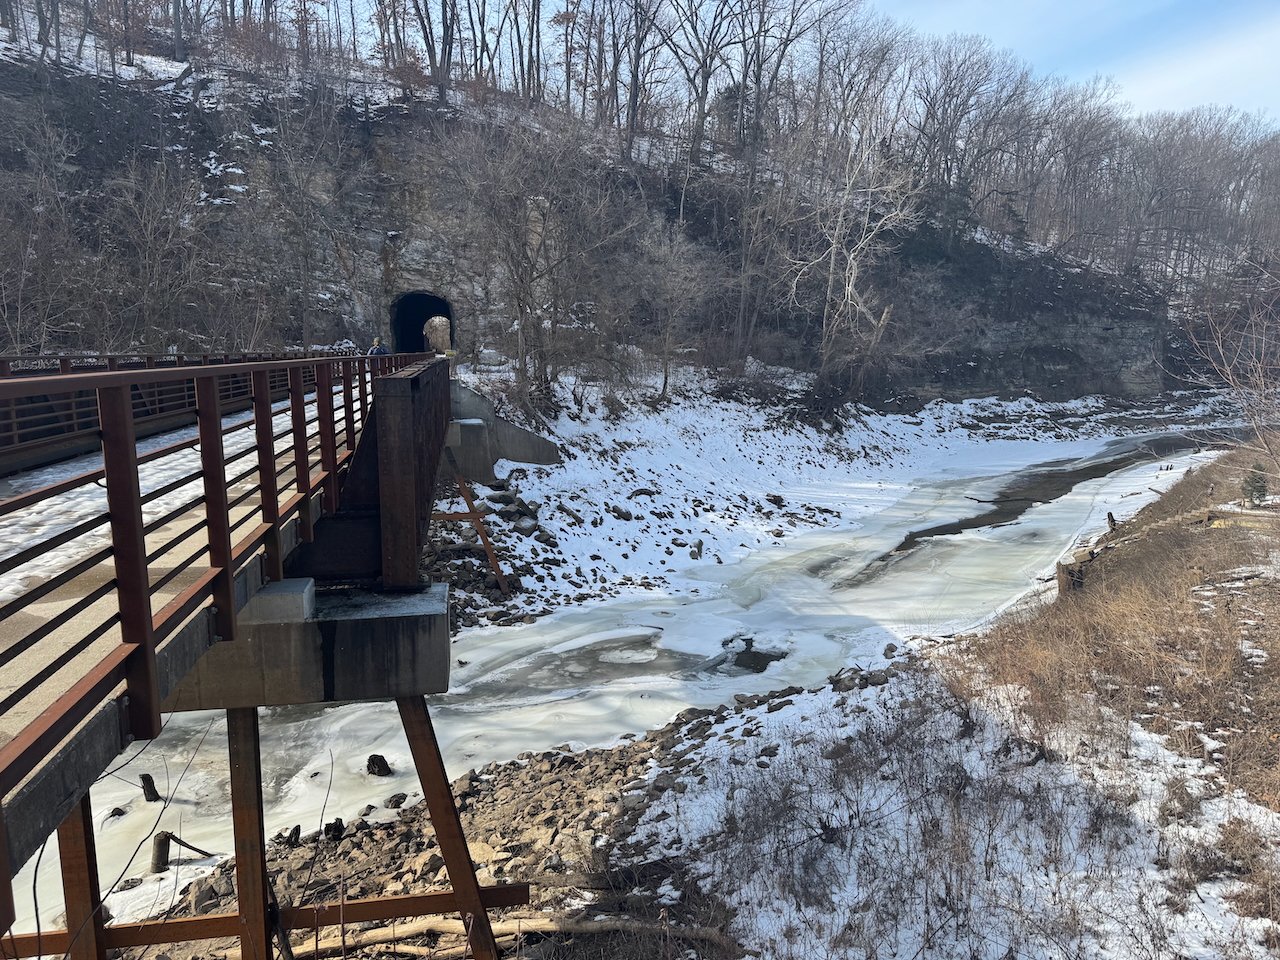
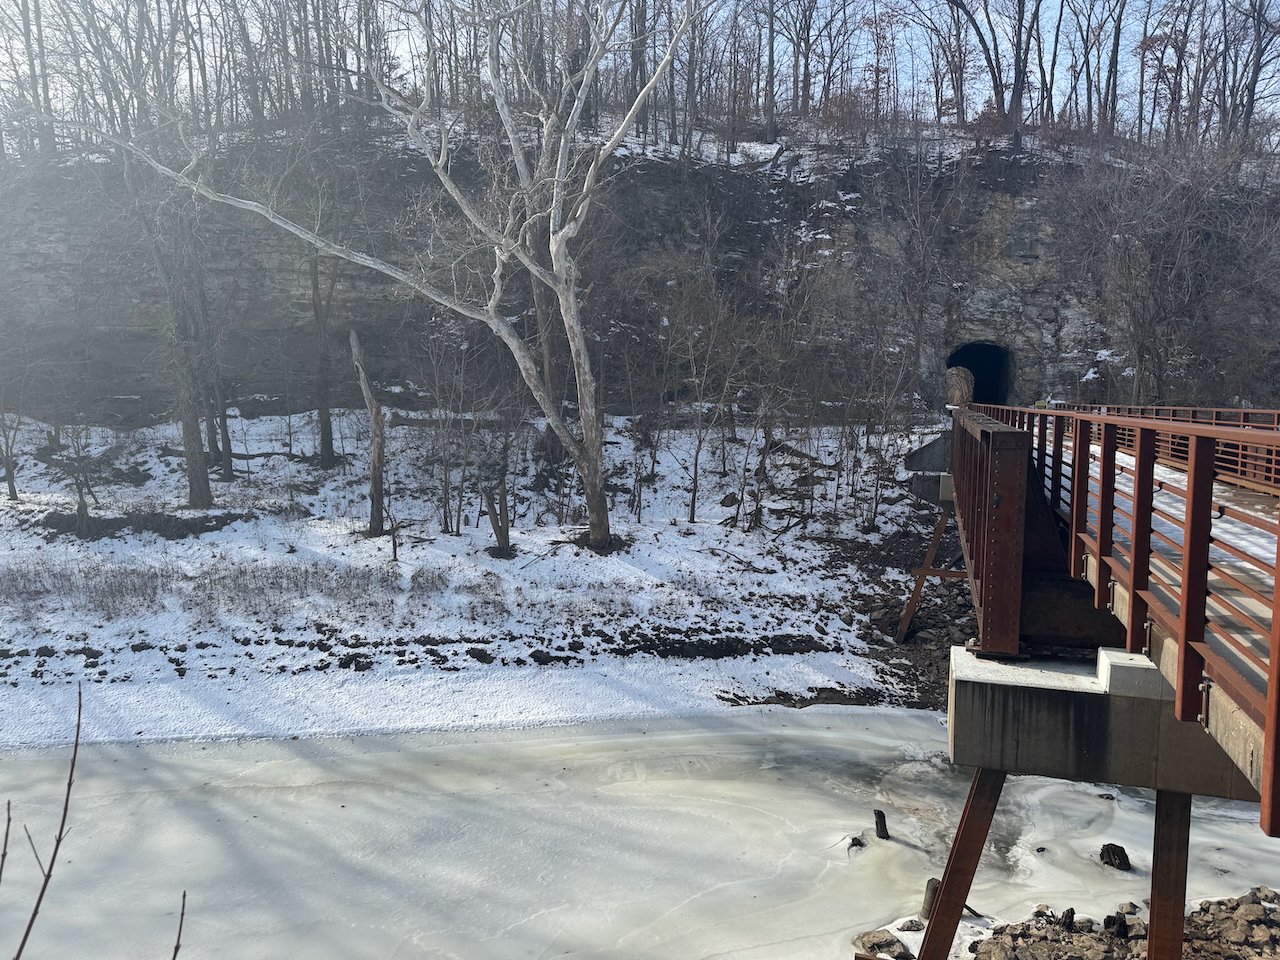
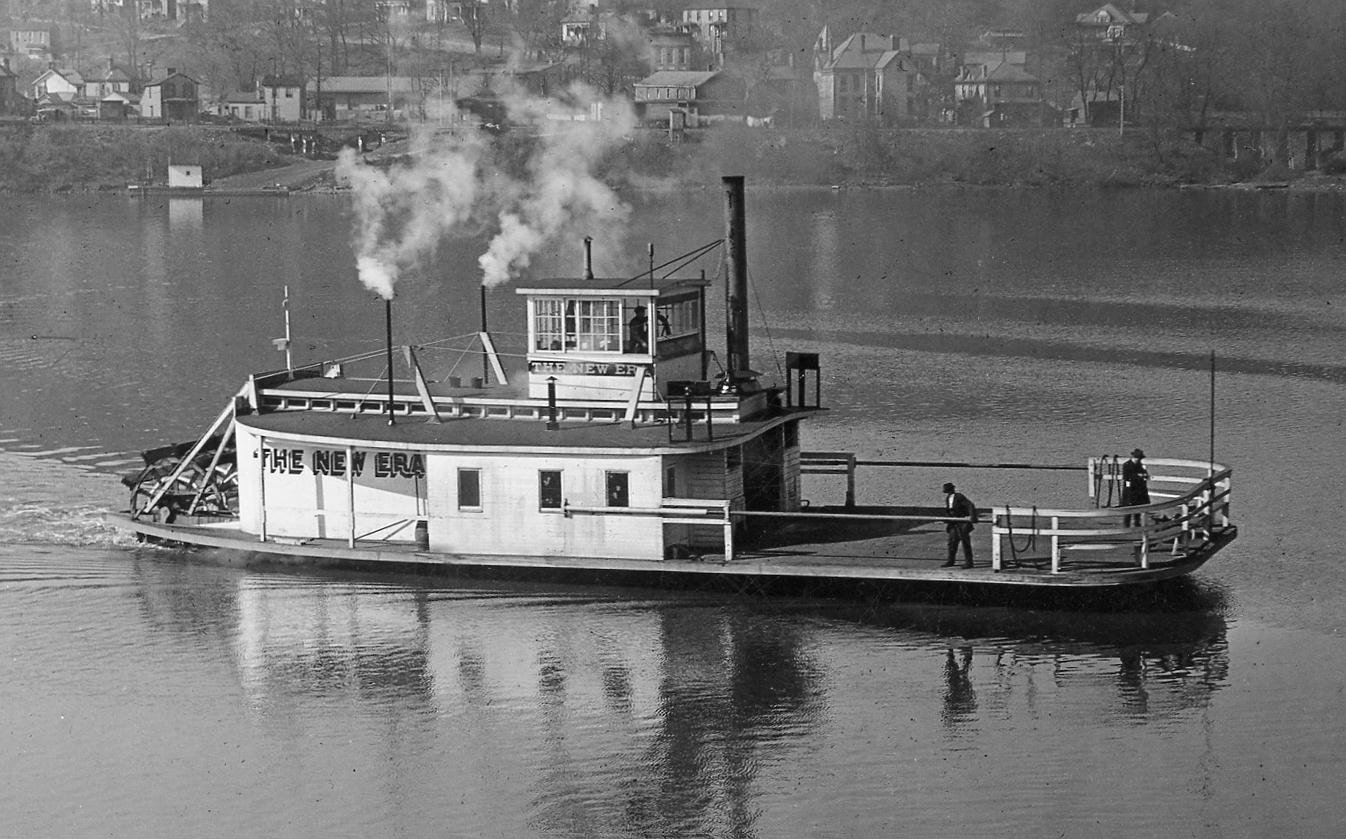
I spent some time this morning adding color & texture to the rocks using artist's pastels. I use these all the time for weathering models, and they're really effective at finishing scenic settings as well. They don't drip, and can be rubbed in with fingers or brushes (old toothbrushes work really well). Their powdered texture adds a "softness" to rock faces that paints don't, which helps them feel more realistic. I also touched up the backdrop with these, which again softens the painted took and allows more subtle textures than paints do. Here's a broad view: Here's a closeup of the rock face. The pastels let me add mineral staining as well as streaks of white that simulate the various layers of white-grey chert laced within the limestone beds. I also added smoke stains above the tunnel. And for further comparison, I made these three sets of photos with similar perspectives. First, modern portal and model equivalent. This shows one thing I didn't get right; it's becoming clear to me that my tunnel shape is a little too squat; it should be taller for its width. Can't change it now and it'll still clear trains fine. Second, historic photo directly down the tracks and model equivalent: Third, historic photo from side and model equivalent. I've mentioned this before, but I know the bridge doesn't quite match. For now I'm using a simple kit; someday I'd be happy to build a closer-matching bridge from scratch but it's not my priority. I think I'm happy with the coloration, so the next step is to move on to things like adding ground-surface texture, water, and eventually trees (so it stops looking like Wyoming). Thanks for following along!

- 303 replies
-
- 16
-

-

-
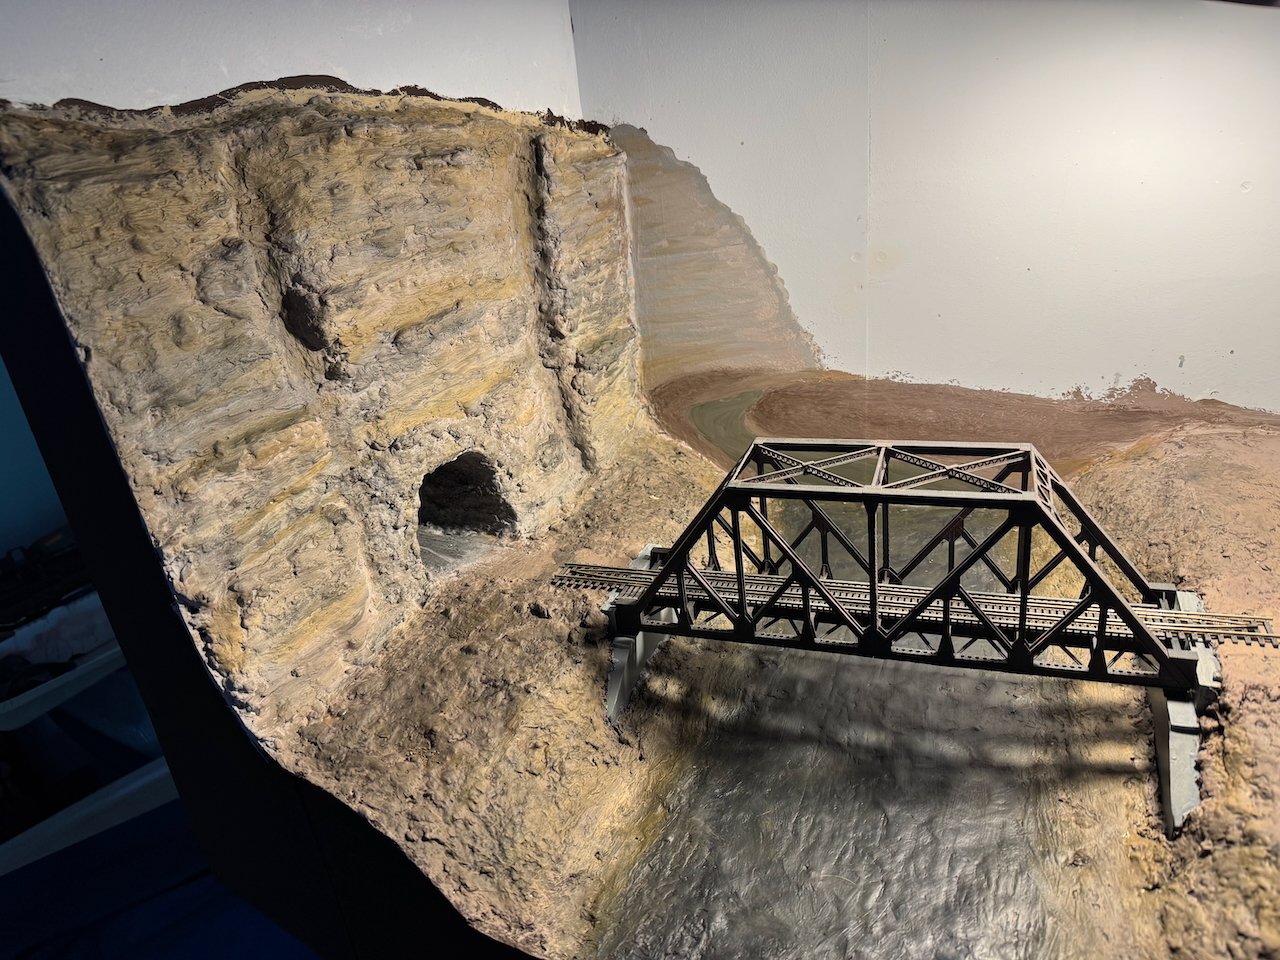
Made some progress on base-layer scenery painting this week, taking a few minutes over multiple nights to slowly build up layers of color. Right now, without any vegetation, it looks like somewhere in Utah or Wyoming. But that'll change. I also took a first stab at some basic backdrop painting, just trying to add a hint of hills/river extending into the background. This isn't meant to be photo-realistic, just enough to let the eye realize that it's not all backdrop sky back there. Also, the creek has been painted but I haven't added the model "water" yet, so it's just a dry surface. There will be multiple layers of "water" resin added, building up a sense of depth and a smooth surface. I also plan to tint the "water" some, as the real creek here tends to be pretty muddy, and this also helps fade the water into the painted "depth". Most of the ground surface will be covered in various scenic materials to add texture, so the painting there doesn't need to stand on its own, but just provide an underlying foundation. I'm not done with either the backdrop or the main bluff. Final touches on the bluff will include some more dark washes to bring out texture and cracks, and some vertical washes to simulate mineral streaking. The backdrop needs more texture, and the outer edges will be sharped up once I paint the sky (which I haven't done yet at all; that's just white primer). But I thought I'd share progress and get feedback. You can at least get a sense of where I'm going with this. Oh, and here are a few more winter context shots. I'm going for late fall, so no snow or ice, but otherwise the color palette is similar.
- 303 replies
-
- 16
-
-
-
This request is as good a time as any to point out that, in fact, I have already "nerded out" on this subject, as I have not one but two videos about the geography and geology of the Rocheport tunnel on the YouTube channel that my wife and I run, covering the geology, ecology, and history of the Ozark region. Part I sets the broader context and Part II deals with the tunnel itself, including the unusual geology of the eastern portal (what I'm currently modeling in this scene). Part 1: Part II: Enjoy!
-
Steam Dredge by Crow River Products in 1:48 scale
Cathead replied to Keith Black's topic in Plastic model kits
That manufacturer looks really cool...lots of neat engines and other mechanical/industrial stuff if you dig around in their catalog. Thanks for bringing it to our attention! -
That's some gorgeous detail!
-
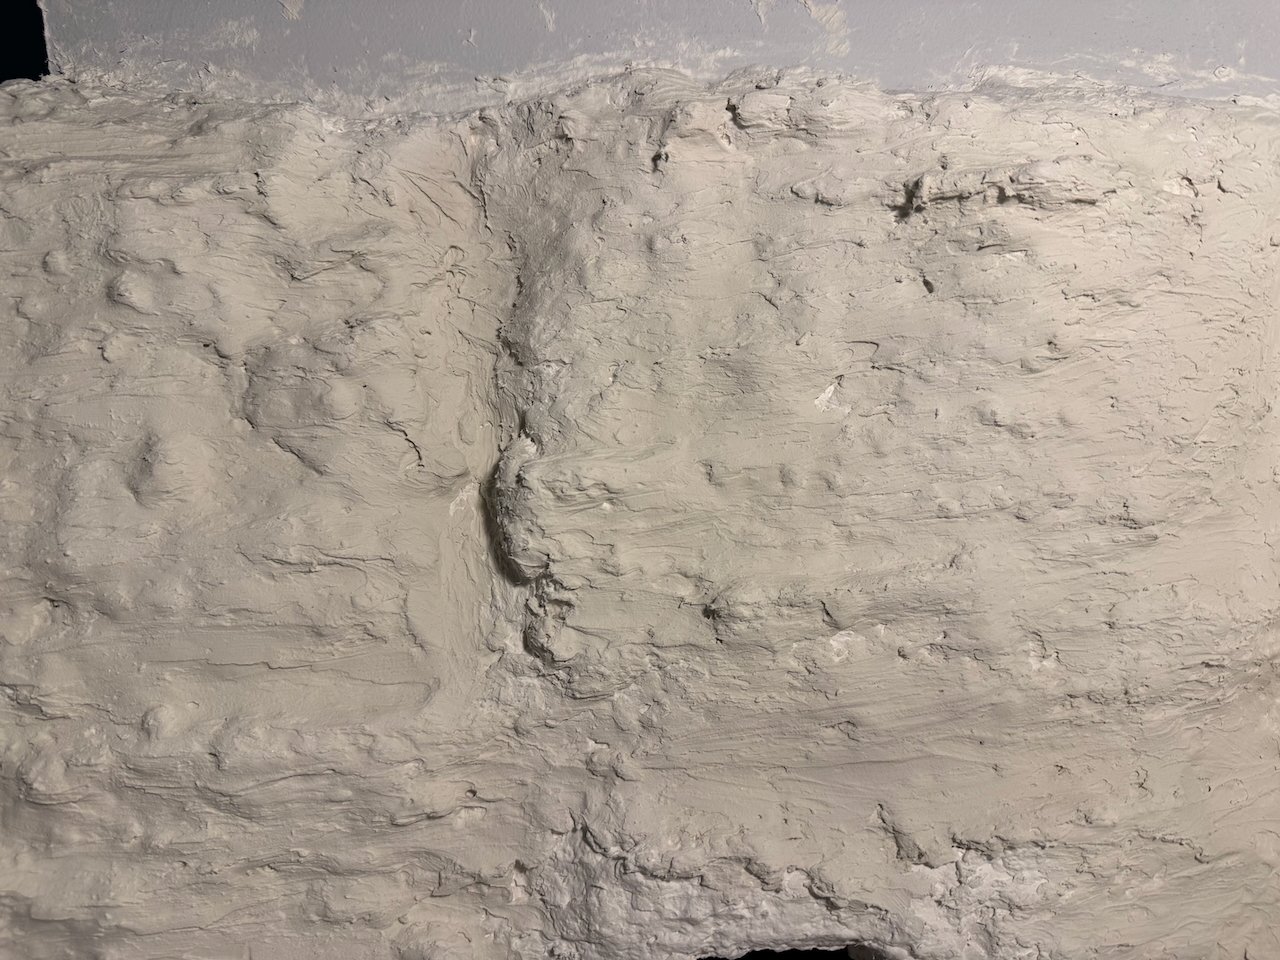
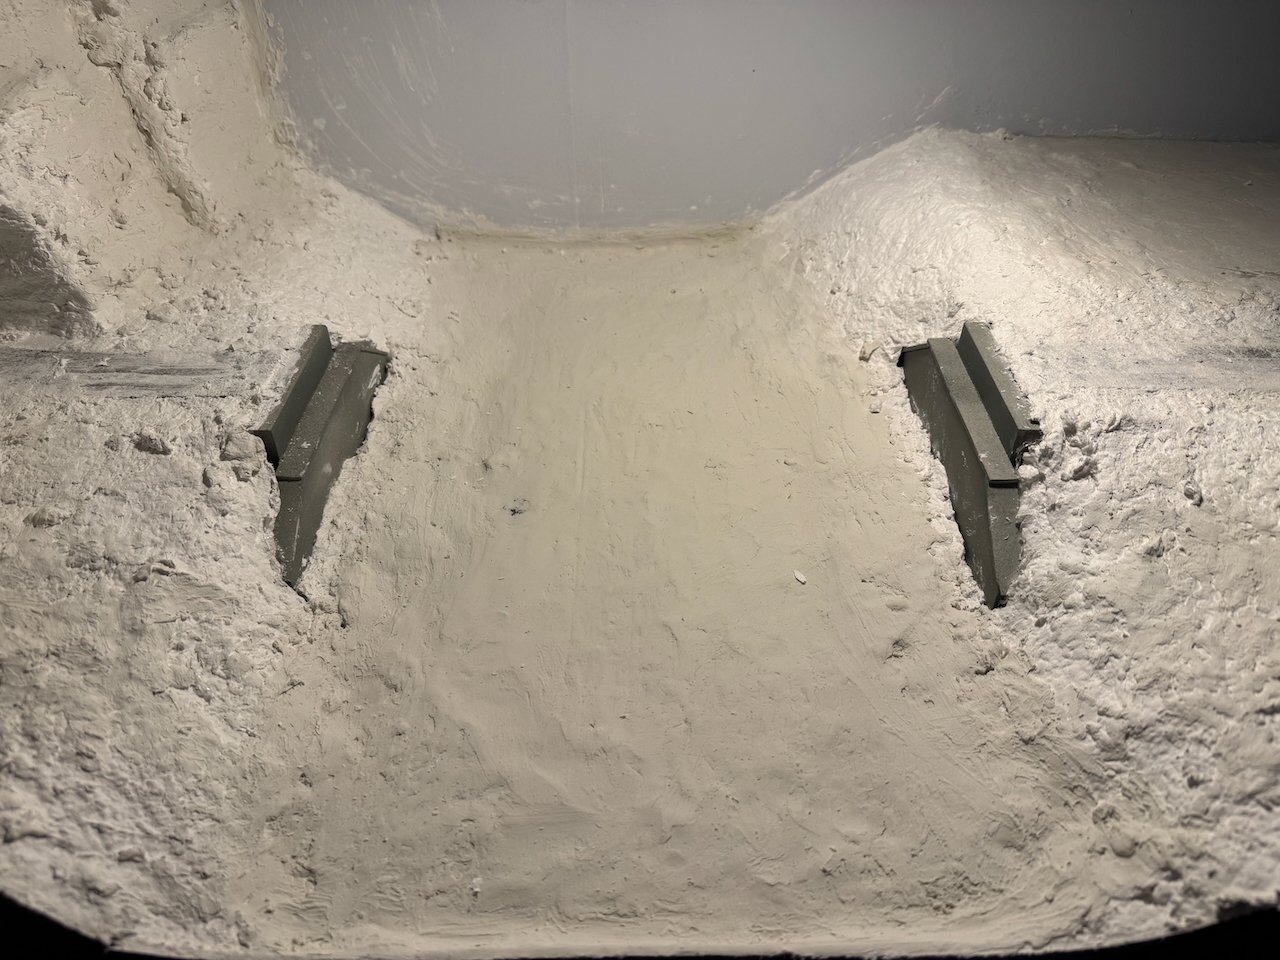
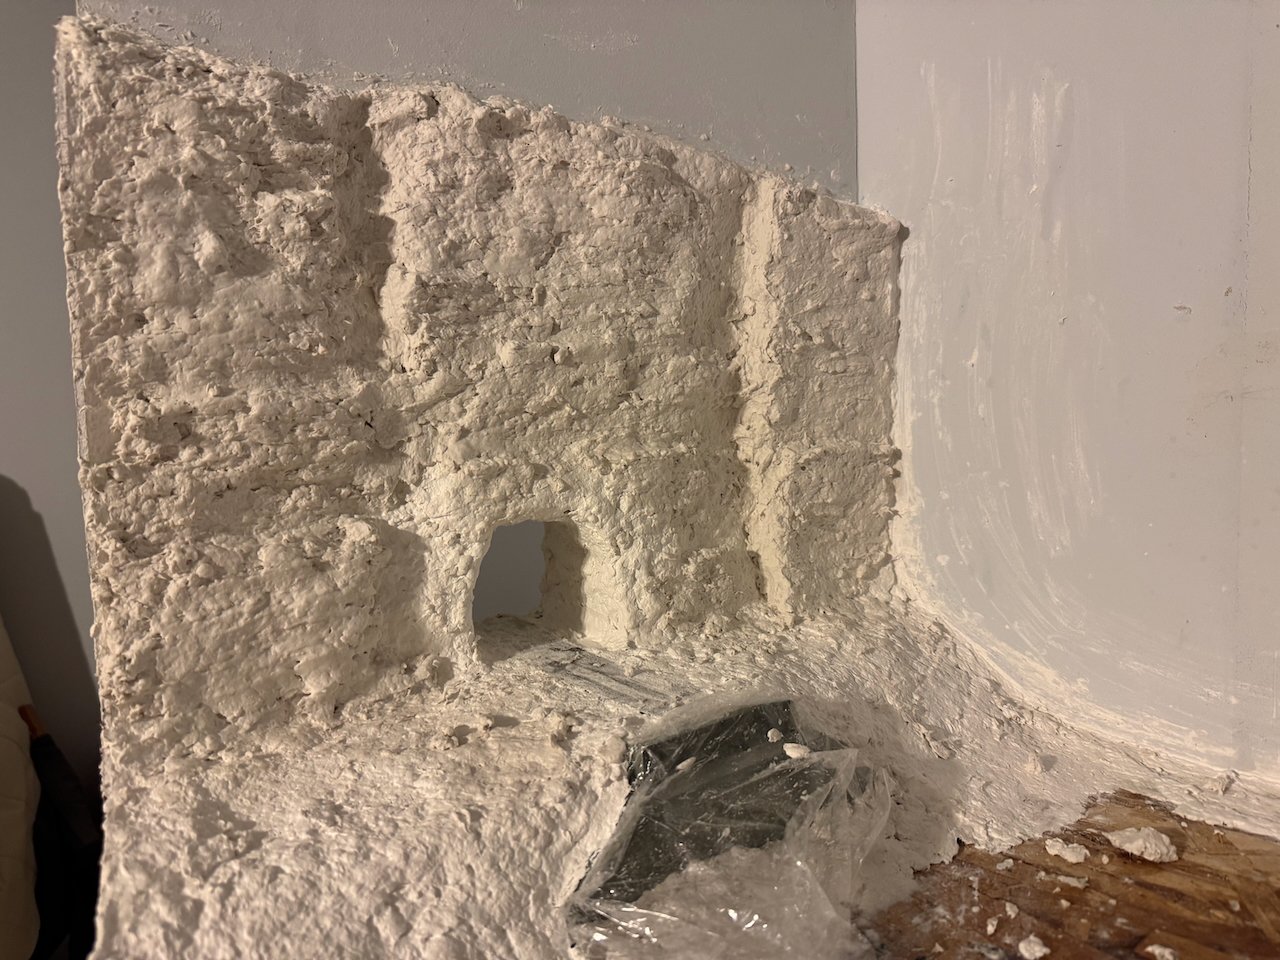
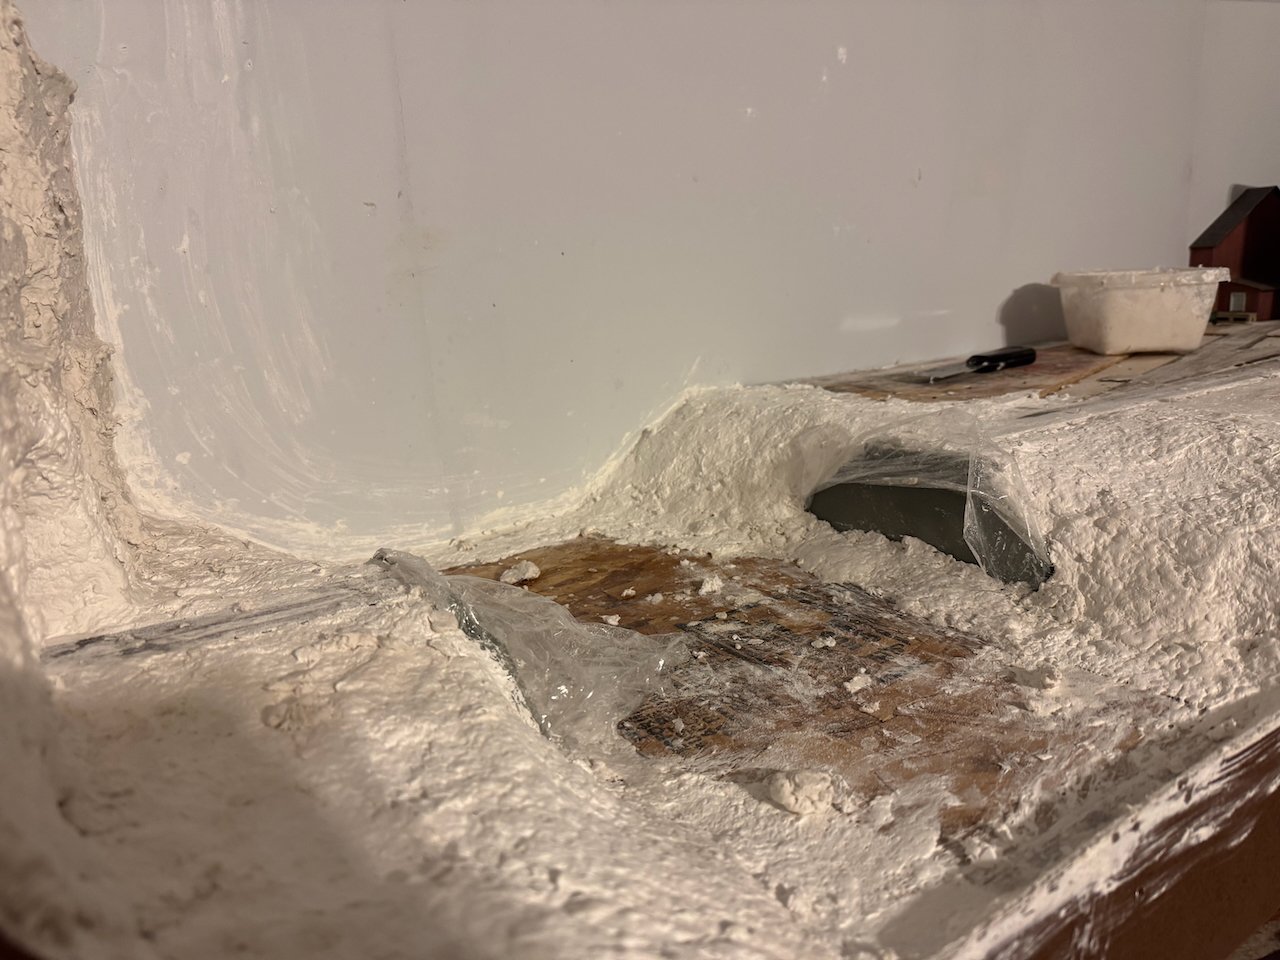
Found a bit more time this weekend for another round of scenery work. This time I used a patching plaster from the hardware store to spread a thin coating over the rock work, using my fingers and other tools to make a finer bedding-plane texture than the coarse plaster allowed. This smoothed out the surface a bit and gave it a more complex texture that I like, though I'm not sure it comes through well in the photo. It's meant to capture the finely bedded, pitted surface of this limestone. Once I start adding color I think this will really come alive. I also filled in the creek bed and some of the flatter area to the right. Once these areas are fully dry I'm going to go over them with a fine sanding block. Anything that isn't rock bluff will be covered by various scenic materials anyway. And here's one more view of this scene. Really looking forward to getting some color on this whiteout!
- 303 replies
-
- 13
-
-
That's lovely.
-
One thing I've learned over time is that small mistakes on models like this tend to be overwhelmed by the greater majesty of the complex finished product. This model certainly qualifies; it's gorgeous to look upon and any oddities you know about can be conversation pieces with knowledgeable visitors.
-
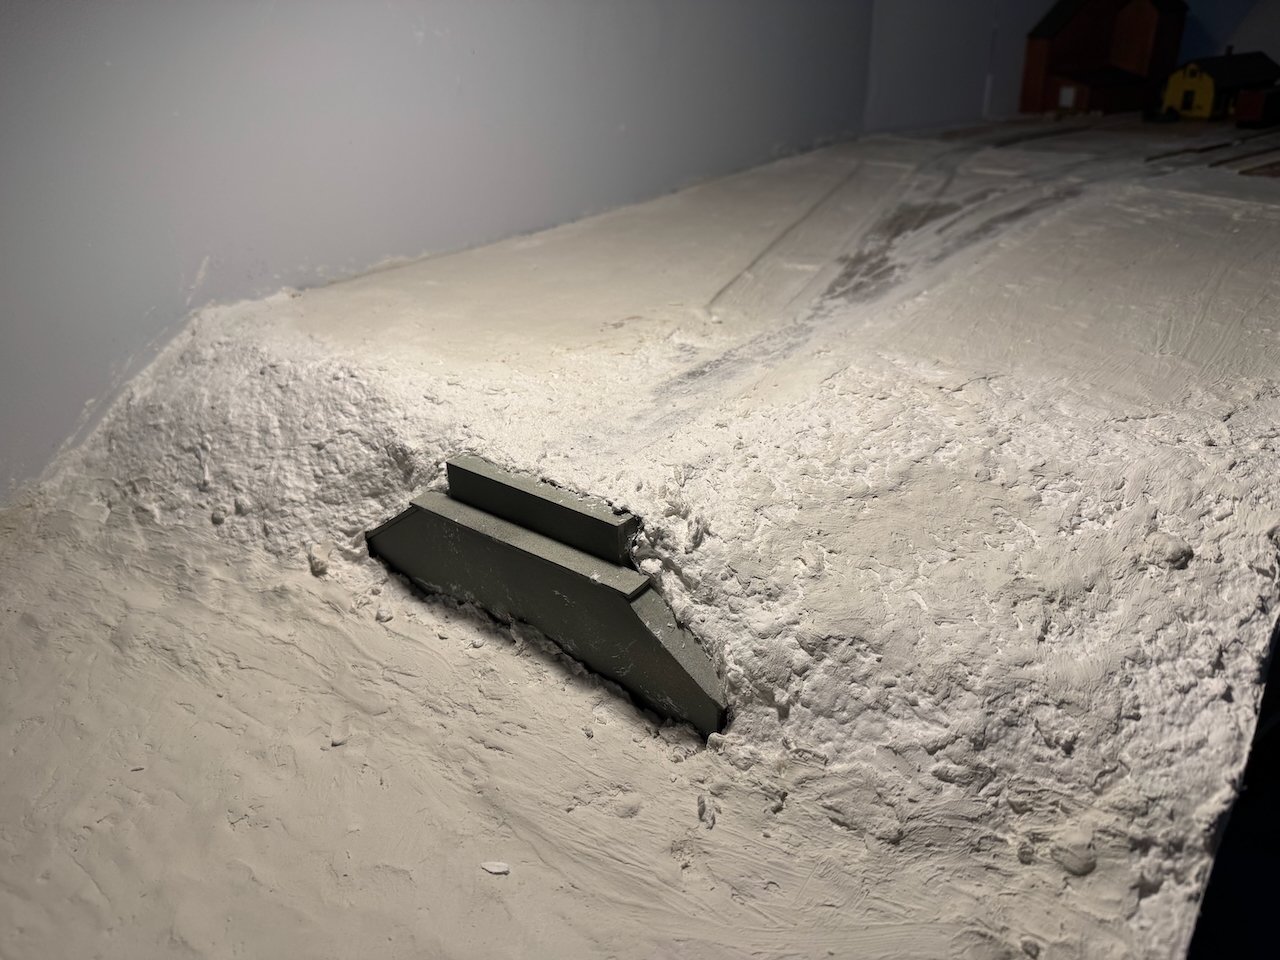
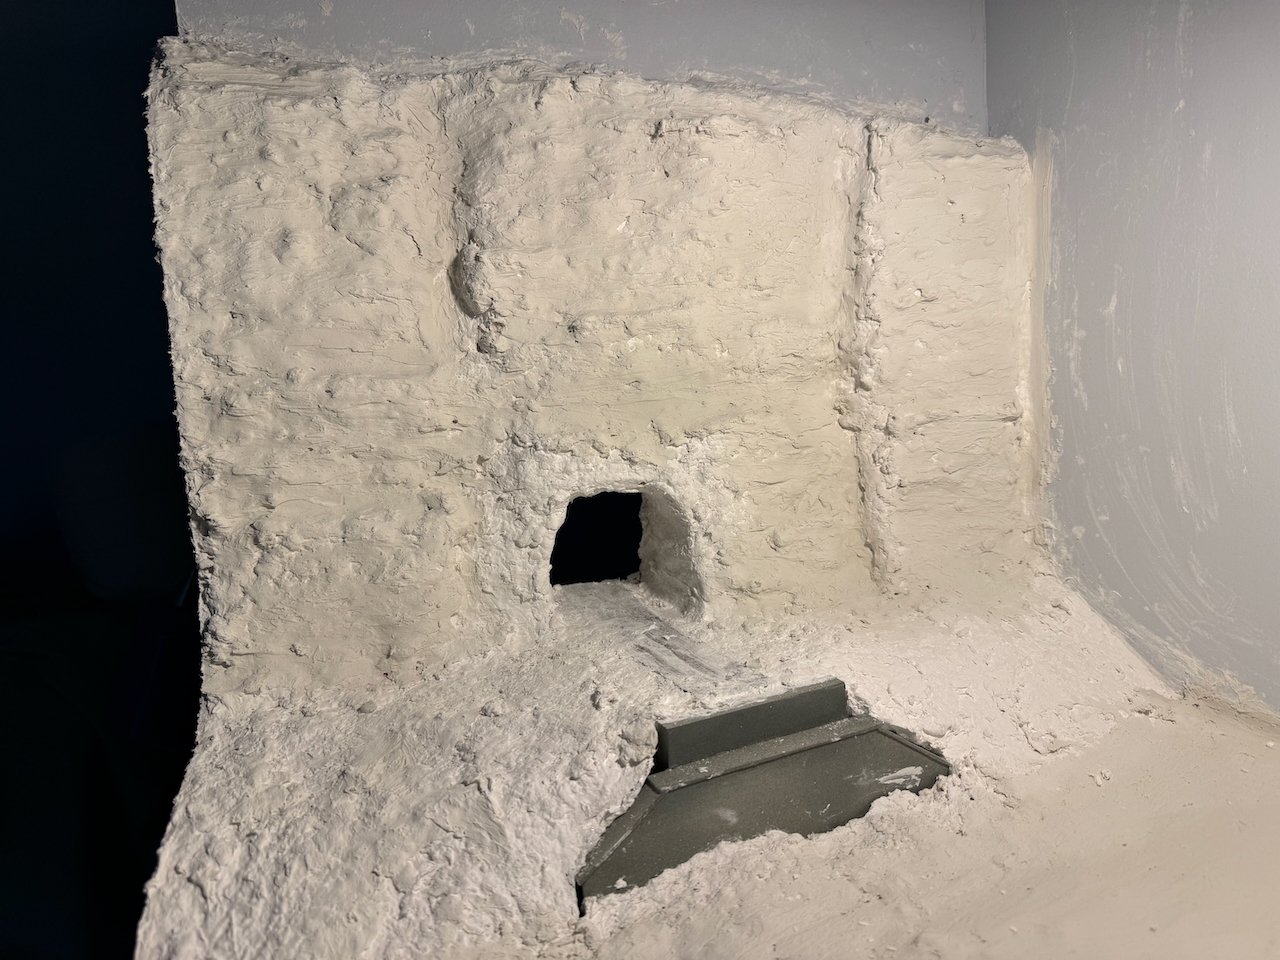
I managed to steal an evening and do a little scenery work. This is a first round of plaster on the bluff face hosting the Rocheport tunnel along Moniteau Creek. Here I'm trying to get the basic shape of the bluff in place with some underlying geologic structure, such as the roughly horizontal bedding, various vertical joints breaking up the rock face, and the more chaotic rock texture right around the portal (both because of blasting and because the nature of the limestone changes there for technical reasons I'll maybe nerd out about at some point). And the real thing: Also made progress on the creek's banks: Next step is to finish sealing in the creek bed and do some touch-up and additional detailing on the bluff face. When I'm comfortable with its texture I'll start first coats of paint. But this at least shows you I haven't completely stalled!
.jpeg.bf358e0b1f2013822bc916f7dd7bfc17.jpeg)
- 303 replies
-
- 13
-
-
Phrasing, my friend, phrasing...Don't type stuff like that where Maggie can hear.
- 732 replies
-
- 4
-

-
- Lula
- sternwheeler
- (and 1 more)
-
OK, now, here I'm going to up and say that you're flat-out wrong. That's a delightfully quirky little vessel, all the more so because she's truly quirky in that she's unique. Rather than just replicating another vessel's quirks, you made her your own. Cambridge English Dictionary: "Quirky: unusual in an attractive and interesting way". That's the very definition of your Lula. In all your prep work for the upcoming surgery, how long have you budgeted for training your sister to finish detailing and weathering for you? Not to mention keeping up with MSW on your behalf. Priorities are priorities, you know. I keep expecting to see a strand of spaghetti running between them...
- 732 replies
-
- 4
-

-
-
-
- Lula
- sternwheeler
- (and 1 more)
-
I love that you're doubling down on the #616 joke I started. Boat looks great.
- 56 replies
-
- 3
-
-
-
- Lindberg
- sternwheeler
- (and 1 more)
-
Keith, thanks for the update. I know it can be hard to share stuff like that and it's thoughtful of you to worry about US! Certainly the "it's your model" rule applies and no comments were intended as criticism, just ongoing discussion of the modeling process. It is and will be a fantastic model! I know it'll be extra hard on you trying to prepare for Maggie's welfare while you're under the knife, so hang in there. We're all pulling for you.
- 732 replies
-
- 6
-
-
-
- Lula
- sternwheeler
- (and 1 more)
-
Very nice job upgrading ol' #616. I love this kind of modeling!
- 56 replies
-
- 3
-
-
-
- Lindberg
- sternwheeler
- (and 1 more)
-
Keith, I have a question: do you have a photo of Lula from the front? The only one I can recall is the one from the starboard rear quarter, but you of course have far greater knowledge of the resources you're working from. The reason I ask, is that I'm interested in the idea that Lula had separate windows (whether three or four) on the forward wall of the pilothouse. Typical riverboat practice (which I'll openly acknowledge does not preclude any other practice) was to leave the forward "window" as either a full open area or with a bare minimum of visual interference (for example, no posts between windows). For obvious reasons of visibility. To my eye, when I look at your rear-quarter image, looking through the side windows, it kind of looks to me like Lula has the standard wide-open forward pilothouse. Like these examples on two other river ferries: So I'm just curious about your approach here, with the open acknowledgement that I may well be wrong in Lula's case because you know her far better than I do. Regardless, it's really fun to see her superstructure move toward its final shape!

- 732 replies
-
- 7
-
-
-
- Lula
- sternwheeler
- (and 1 more)
-
Hopefully in a few years you can!
-
Paul, great question. This layout will run up to three passenger trains and four freights each way during a single "day" operating session. If the staging was fully automated I'd need 14 separate staging tracks and at least that many locomotives, an expensive proposition in both space and purchases. Instead, this is designed as a "fiddle" yard, meaning that one operator is tasked with actively remaking trains by hand as they depart and arrive. This lets me reuse fewer locomotives and cars far more efficiently and creates an interesting job. So that duckunder is how the staging operator (essentially a dispatcher) accesses that area. It's hidden behind the backdrop and big enough to allow a standard desk chair. The out of sight setting helps create the illusion of distance, that trains are entering the main layout from locations far away. This lets me get away with five staging tracks instead of fourteen, which would be impossible in the space I have.
- 303 replies
-
- 10
-
-
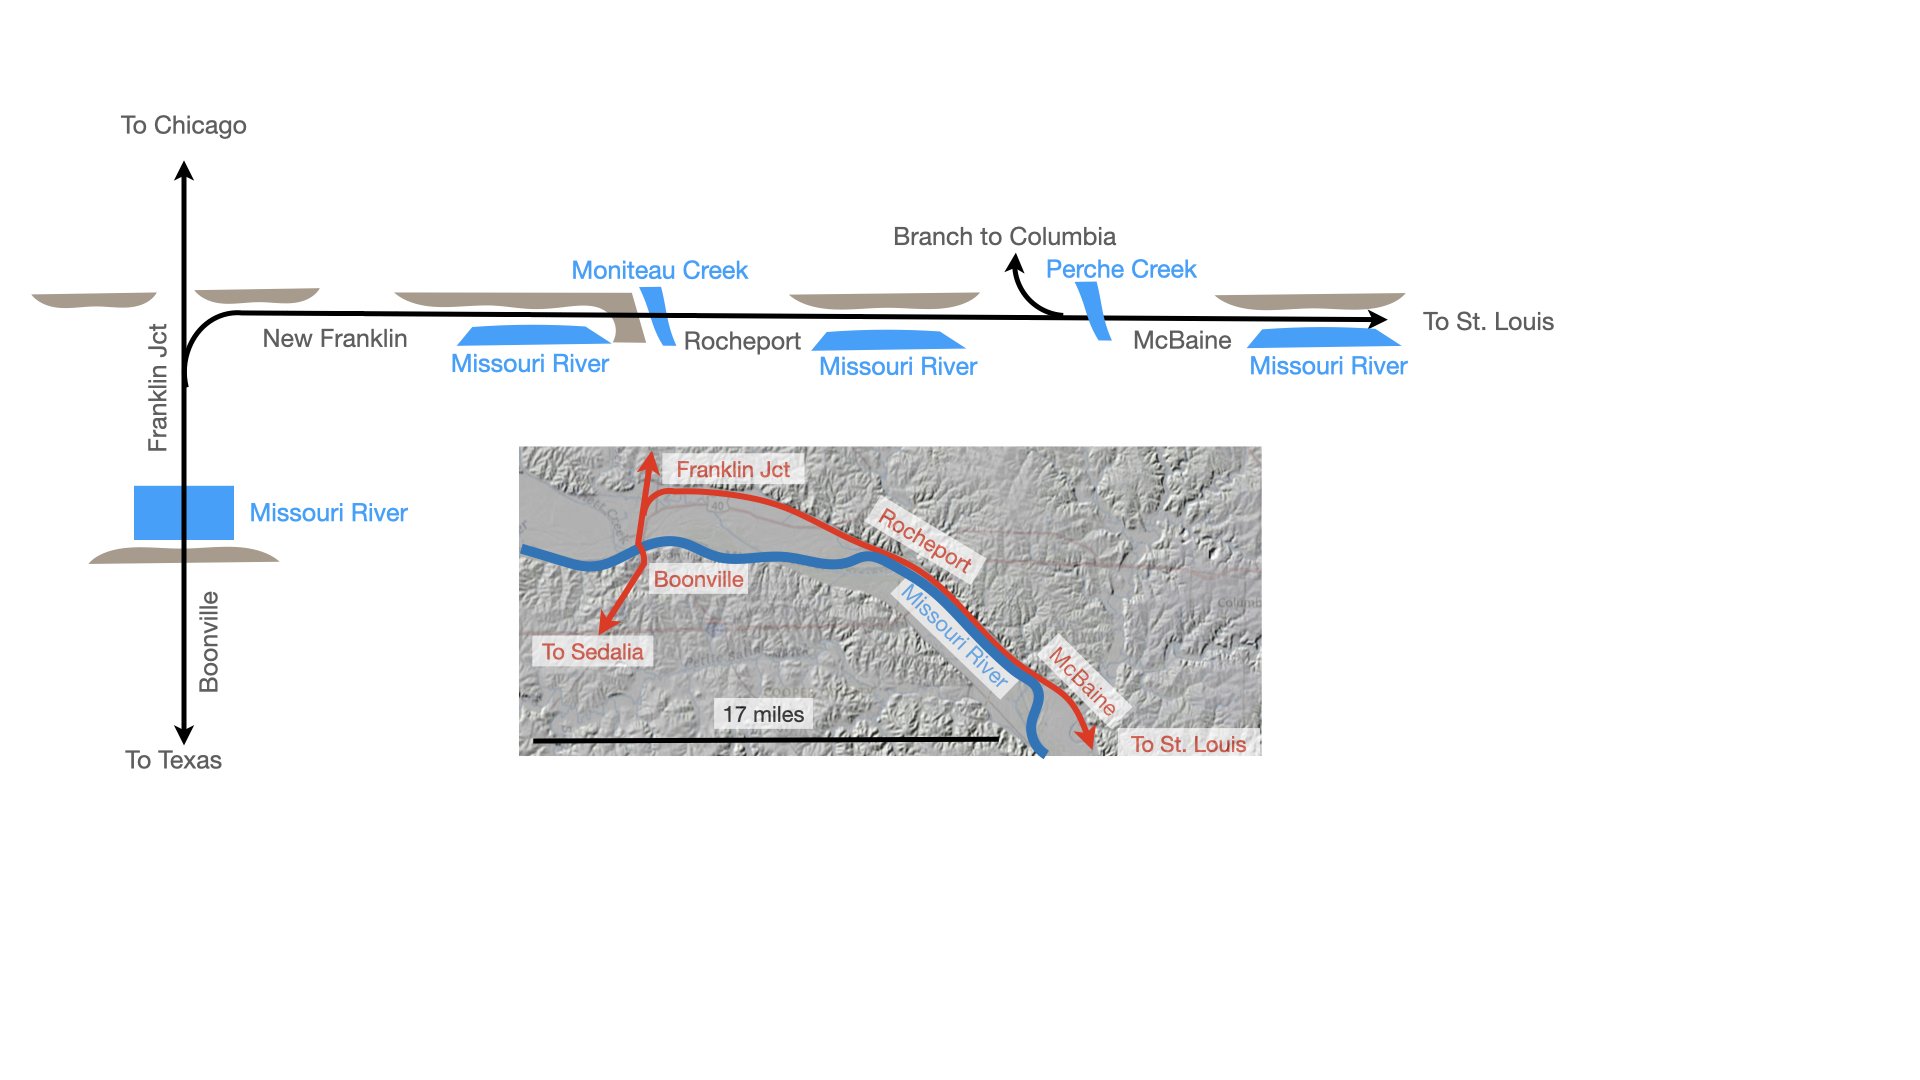
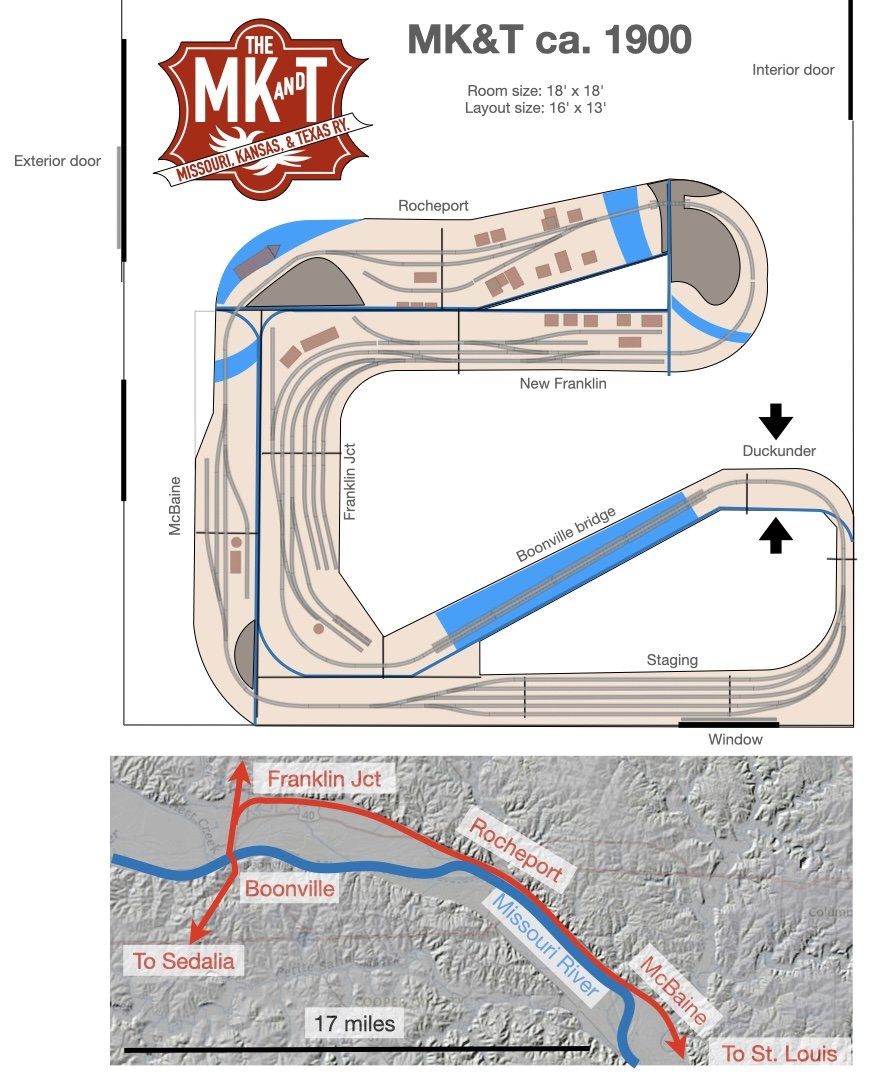
Here's another way of looking at layout design. There's a tension between pure operational interest (lots of active switching and industries) and pure scenic interest (lots of pretty places to run trains through). This region has both, but I don't have the space to do all the possibilities justice. So there were a number of different ways to organize the layout plan depending on what my priorities were. Here's a schematic view of the area in question. Every town sits in a small valley where some tributary to the Missouri River cuts through the bluffs, and these towns are separated by long stretches of scenic riverfront running with tall bluffs immediately behind the tracks. At the west end, the line makes a literal 90º turn to join the north-south mainline (great for a model railroader, we never get corners that neat!). At both ends of the north-south mainline, the line climbs through the bluffs to reach the high ground beyond. At McBaine, a ~9 mile branch climbed through the river hills to the larger town of Columbia. A pure operations layout could focus almost solely on a big version of Franklin Yard, where the railroad's two main lines met and where lots of switching happened along with a busy engine terminal and passenger depot. The next-best operational locations are Boonville (which had a lot of industries for a fairly small town) and the branch to Columbia from McBaine (Columbia had more industry than anything in the river valley beyond Boonville). A pure scenic-running layout would ignore these settings to focus on the Missouri River bridge, lots of river- and bluff-front running, and the Rocheport tunnel area. This would let the builder do the dramatic scenery justice with long stretches of track gently curving along the river, really bringing the scale and beauty of the setting into focus. My track plan is a compromise, because I want both. I think a pure scenic-running layout would be fun to build but eventually become boring because there's not much to do long-term once you've railfanned a few times. To me, realistic operations are one of the key attractions of model railroading (in contrast to, say, static ship modeling), and I was determined to allow for this. But as a geologist and naturalist, it was unacceptable to leave out the scenic setting; at that point why not just design a free-lanced operations layout rather than a version of the Katy that stripped out all the best parts? So through a long iterative process, I developed a way to include: a Franklin yard that was big enough to allow some basic operational switching while still being small enough to not dominate the room a Missouri River bridge that was big enough to convey the massive original span while still being small enough to fit three more mainline towns with minor switching, enough to allow diverse operations barely sufficient scenic runs along bluffs and the tunnel Reluctantly leaving out: Boonville and its many industries (if I were more purely operations oriented I could swap the big bridge for this town) longer runs along the river (again, I could swap Rocheport or McBaine for a nice long river/bluff run) meaningful operations along the northern line from Franklin Jct and the Columbia branch. In both cases, I'm allowing for cars to be switched into blocks as if they were headed for those destinations, and that has to be enough. What this lets me achieve (hopefully) is operating sessions that can host 3-4 operators, allowing for the fun social time that is such a key part of model railroading, with a diversity of jobs from through passenger trains to yard switching to local freights. While still giving fair play to the scenic setting and something of the geographic scope of this line. And including this many towns balances the operator jobs, so a local freight has enough to do to be worthwhile as an assignment, and through trains feel like they're passing through many different locations rather than just one stretch of the line. If I had just a bit more room the first thing I'd change is to add Boonville, it's such a fascinating town, but it just doesn't make the cut. Leaving it out also simplifies operations because I don't have locals going both directions from Franklin yard. Anyway, that's another brain dump but maybe it helps you see more of how and why I've been thinking through this project.

-
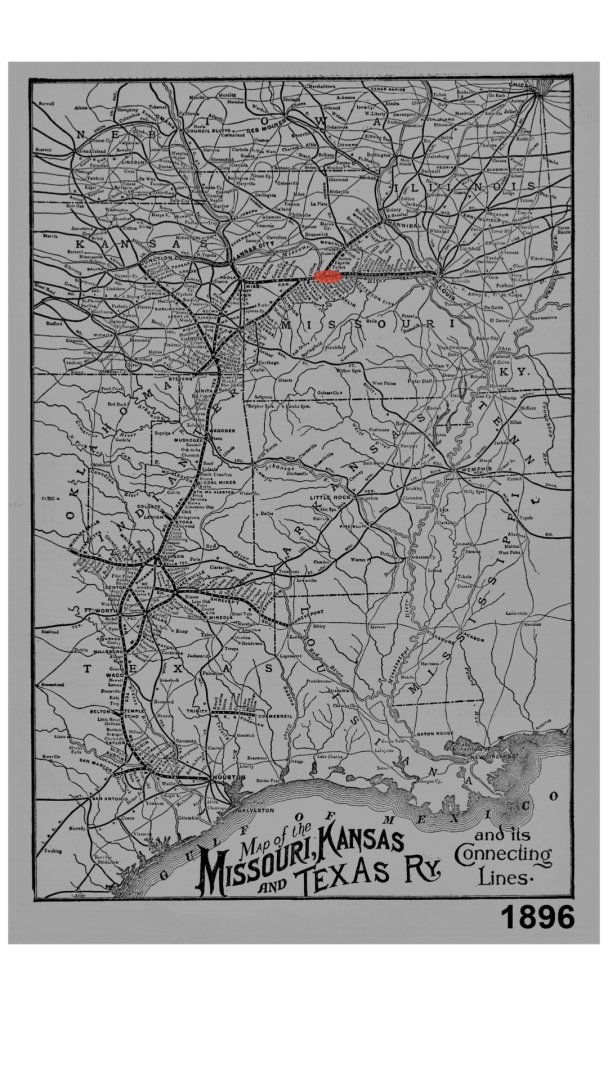
No further modeling progress has been made due to an overload of family visits, work deadlines, the onset of spring garden/orchard season, and more. So here's a little more background context to keep you all interested. Below is a rough track plan that will continue to evolve but is guiding my work. I've spent two years researching and adjusting this and it's pretty close to my final "ideal" design. The arrangements at Rocheport and McBaine are quite accurate representations of those settings with some necessary tweaks and compression. The depiction of Franklin Jct and New Franklin follow the general pattern of the railroad there but the literal track arrangements have been adjusted more heavily to match the requirements of space and operational interest. The bridge over the Missouri River at Boonville is nearly 8 feet long, but is only about a third the length of the real thing. I plan to go through all of these scenes in more detail to discuss how I designed the track plan for each and how they match up with reality but this at least gives a loose sense of the plan. This also shows the modular design I'm following. Below the track plan is a rough map of the real railroad's route through the modeled area, laid over a lidar elevation map of the terrain. This helps illustrate how the Missouri River valley dominates the setting, flowing through a valley over 2 miles wide at Boonville and lined on either side with tall bluffs rising 200' above the floodplain. The railroad's main line comes up across southwest Missouri from Oklahoma and Texas, through the city of Sedalia (off-layout), then crosses the Missouri River at Boonville. At Franklin Junction, the railroad splits, with the original main line continuing north toward connections with Chicago, while the newly built (mid-1890s) Missouri River extension headed east along the river valley to connect with St. Louis. You can see how the line hugs the northern side of the valley, pinched between the bluffs and the meandering river. And here's a full MK&T route map from the same era, originally from the Katy Railroad Historical Society. I've highlighted the modeled area in red: The layout's basic design is intended to provide two different but equally important (to me) operating goals: a connected loop allowing for continuous "railfan" running, but also a point-to-point design that lets trains be operated in a realistic manner from one staging yard, through the modeled portion, and back into staging again. For example, in the design above, trains leaving the staging yard to the right are heading north from Sedalia, while trains leaving to the left are heading west (railroad south) from St. Louis. When they re-enter the staging yard after transiting the modeled layout, they can simply be re-staged as a new train later in the operating sequence. Franklin yard is where freights are broken down and remade for various destinations down the line in all three directions, though I'm not really modeling the northern branch toward Chicago because I don't have space. Local freights also originate here to work the route through Rocheport and McBaine. The Katy ran three passenger trains a day each way on this line during this era, along with regular freights and livestock trains. That will make sense to the model railroaders reading this; if it doesn't to others, please say so and I can explain in more detail. Or ask any other questions; it'll still be a while before I can get back to real modeling work so this is as good a time as any to engage in the intellectual side of this project.
-
Apparently my sense of humor is far too dry...I thought it was obvious that was satirical and utterly made-up. Oh well. The best jokes are always the ones you have to explain.
- 56 replies
-
- 5
-
-
- Lindberg
- sternwheeler
- (and 1 more)
-
Actually, it was tradition for riverboat builders to carve "616" in the base of one skiff, as a tribute to the Grand Rapids, Michigan area where the steamboat skiff was first developed. Good on Lindberg for recognizing this little-known piece of American river history.
- 56 replies
-
- 5
-
-
-
- Lindberg
- sternwheeler
- (and 1 more)
-
I agree, this kit will turn out looking far more realistic to the casual eye than the absolutely toylike King of the Mississippi. The best kit by far remains the Model Shipways Chaperon, but that's one huge and I can understand why not so many people build it for that reason alone. Anyway, none of this discussion is or was meant to make you feel defensive about your kit choice; it was meant as just an honest discussion of steamboat design since you'd expressed interest in learning more about an unfamiliar topic. My apologies if any comments came off otherwise.
- 56 replies
-
- 6
-
-
- Lindberg
- sternwheeler
- (and 1 more)
-
Yeah, I was only referring to common practice on American riverboats. Obviously, for example, railroad locomotives were set up the way this kit is. My understanding is that steamboat fireboxes were normally placed at the front at least in part to allow for the extra draft needed to keep their very tall chimneys drawing. Ironically, this kit has especially short chimneys, making that less of an issue. And yes, in most steamboat boilers the fire tubes ran through the whole boiler to provide even heating. This was one reason it was very important to keep sufficient water in the boiler; quite a few boiler explosions happened when the steamboat's engineer let the water get too low, letting the firetubes get extra hot, causing an explosion when cold water came into contact with those tubes (either through refilling too late, or the vessel rocking from side to side). Ferrus, see what happens when you let steamboat nerds into your build?
- 56 replies
-
- 6
-
-
-
- Lindberg
- sternwheeler
- (and 1 more)
-
Yeah, as I said, I couldn't see from previous photos how the kit had things arranged. The angle on the box-cover painting makes the solid front bulkhead look like a post, or at least I assumed that's what it was showing since that's what "should" be there. Given what you've said, you've got the coal dust in the right place, even though the kit's boiler/chimney arrangement is wacky. I certainly wasn't intending to imply that you should do a bunch of scratchbuilding, I get that the appeal here is a simple kit that will look good when finished. Carry on!
- 56 replies
-
- 6
-
-
-
- Lindberg
- sternwheeler
- (and 1 more)