


Cathead
-
Posts
3,550 -
Joined
-
Last visited
Content Type
Profiles
Forums
Gallery
Events
Everything posted by Cathead
-
 Thanks for the support. I have some fun ideas for finishing/customizing this later on, just have to get through the slog of basic planking and problem-solving. I still think it's going to turn out pretty cool.
 -
Nice start. I think you mean stempost, as it's at the bow?
-
You're off to a nice start! I think you're describing the stempost there, not the sternpost, or did I misunderstand?
-
Congratulations on finishing! The relatively lack of rigging certainly can feel like a benefit of steamboats at times.
-
Chaperon by joep4567 - 1:48 - Sternwheeler
Cathead replied to joep4567's topic in - Build logs for subjects built 1801 - 1850
I just compared my original photos with those I included in the link above, and there aren't any others that are remarkably different. Your rudder posts look nice. -
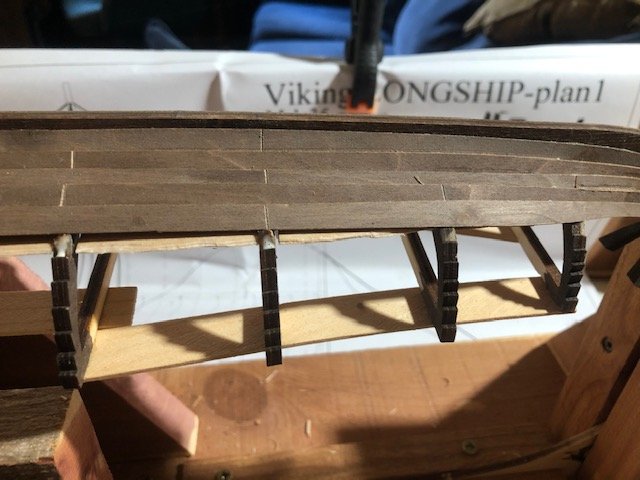
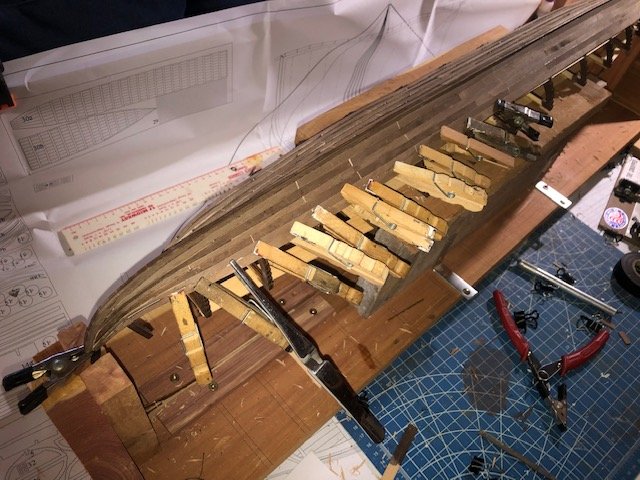
Slow progress on planking and haven't taken many photos. I am now reaching the level of the false deck, where another of this kit's quirks comes into play along with the very poor directions. If you're familiar with Viking ship construction, you may have been confused by the design of this model so far. It has frames extending from the keel to the uppermost strake, just like a normal ship hull. However, real Viking ships did not have framing like that; they were built shell-first and then small frames were fit inside the shell afterward. There was no one frame that extended all the way, and indeed the strakes above the deck were supported only by small braces. In other words, this is nothing like a typical longboat built on a skeleton. Yet the model has full framing, one assumes to give sufficient guidance for laying out the overlapping clinker planking as this would otherwise be rather difficult to do right. The instructions simply tell you to glue all the planks on until the hull is complete. Yet this would leave you with a wildly inaccurate hull interior full of thick ribs! So there is a vague followup-instruction that tells you to "cut off the parts of the ribs...which overlap the deck". After a private consultation with Binho (who has passed this stage on the smaller version of this kit; thank you!), I finally understood that you're supposed to finish the hull and then cut all the frames out that extend above the deck. Of course, this would be much harder to do if you glued all the planking to the frames, especially in clinker hull where you can't just slide a blade along the smooth curve between the planking and frame of a carvel hull! So essentially what you need to do, once the planking goes above the deck, is stop gluing the planks to the frames and only glue them to each other. This will make it a whole lot easier to cut out the extraneous framing afterward (as you just have to make once cut through the frame at deck level), but the instructions never mention this (indeed, there's a vague image of a knife carving the planking from the frame, which just sounds problematic in all sorts of ways). Given the curve of the planking, I'm at the point where the planks start to rise from below deck level to above deck leve at bow and stern. So in the image below, there is glue on the two left-hand frames and none on the two right-hand frames for this reason (glue on the overlap has not been applied yet). From here on up, I will not be gluing anything to the frames because they will need to be removed. This also makes it clear that I shouldn't have bothered staining the frames because they either get cut away or hidden beneath the deck. Didn't quite grasp that when I was starting. I'm also finding that, in some areas, the planks have almost no overlap even when they sit exactly as they're meant to in the pre-carved frames. This makes it really hard to get a good glue bond between strakes, which becomes ever more important once the frames aren't holding the planks in place any more. It's possible this relates to me not quite getting the planks aligned just as intended in the kit design, but it really does feel like these planks just aren't cut out quite right (as mentioned above with the obvious problems in length and layout). Just not that impressed; if all of this is due to my errors (which is possible), it still leads back to very poor instructions that made it impossible to understand how to lay these out precisely right in the first place. Earlier I mentioned that I might have trouble holding the planks in place once the deck started interfering with my normal clamps. This has turned out to be a non-issue, because this close to the deck things like clothespins and other clamps work great, and in fact make it easier to hold the planks together because you can now clamp all the way along the joint, like this: This couldn't be done earlier because the deck was in the way. I assume this is how planking will look from now on as the strakes keep rising above the deck. I'm also going to have to be more careful about glue drips in the interior, which up until now I didn't worry about because it would be hidden, but not anymore. I may abandon my building frame and just start working freehand, as the hull is now pretty stiff and I'll need to be turning the model back and forth to check on both exterior and interior alignment and appearance. So that's that. Planking can be pretty dull work and I've been moving slowly as life keeps throwing other things at me. Thanks for sticking with me and reading (or at least skimming) my blathering on. Although I work as an editor, I don't always reread my own writing here because it feels too much like work, so I probably take more verbiage than I really need to explain stuff.
-
Chaperon by joep4567 - 1:48 - Sternwheeler
Cathead replied to joep4567's topic in - Build logs for subjects built 1801 - 1850
Please do, we're all here to take ideas and inspiration from each other. I have several photos of the Arabia's original pumps if you want to work from them instead of the model version. There are a few in my planning thread, but I think I have other angles as well if you want them. Let me know if you want them posted here or shared with you privately to avoid clogging up the thread. I actually don't know what kinds of pumps Chaperon had or how they were arranged, given that she was built decades after Arabia and a lot had changed by then, but pumps are a fun detail. You could always ask someone like Kurt Van Dahm if you care. -
Can you explain what you mean here in more detail? I'd like to understand what you're doing but don't understand "erose".
-
Congratulations! It's been great to follow along on this and maintain inspiration for my own build.
-
Chaperon by joep4567 - 1:48 - Sternwheeler
Cathead replied to joep4567's topic in - Build logs for subjects built 1801 - 1850
If you're going to have a view into the engine room, a few more nice details would include a sturdy workbench and an anvil/forge, since these boats often had to be responsible for their own repairs (including metal work). Still looking great. -
I enjoy scrounging materials as well. There are many ways to judge a model, and they're not all meant for museums. Keep up the fun work!
-
2021 NRG CONFERENCE
Cathead replied to kurtvd19's topic in NAUTICAL RESEARCH GUILD - News & Information
Haven't been there, but definitely fits within the broader scope of attendee interests. -
Nice application of problem-solving skills so far, as John says that's half the fun. Of course, the other half is inventing new words when you discover your next problem to solve!
-
2021 NRG CONFERENCE
Cathead replied to kurtvd19's topic in NAUTICAL RESEARCH GUILD - News & Information
As long as I'm tilting at this windmill, I'll add in the amazing National WWI Museum, also in central Kansas City, which is a must for anyone even remotely interested in history. Can't believe I forgot it in my initial post. -
Lovely! A light bit of rust here and there would tone down the "shiny new engine" look, but that depends on how you want the model to look overall (don't rust the engine if the rest will be crisp and unweathered).
-
2021 NRG CONFERENCE
Cathead replied to kurtvd19's topic in NAUTICAL RESEARCH GUILD - News & Information
On the California accessibility issue, I'd just like to point out that California has excellent train service from LA up the coast. Many trains a day with stops in small towns all along the way, essentially European-style commuter rail. The last time we visited the Channel Islands, that's what we did, arrived in LA but didn't rent a car until we got off the train in Ventura. It's not difficult and traffic becomes a non-issue; just expand your mind from assuming cars are the only way to get around. We were planning to do the same thing this year before 2020 did its best Vasa impression and tentatively hope to do so in 2021. As as plains/midwestern resident, I'd like to suggest that the saltwater folks expand their horizons and be open to learning something new once a decade. A dark horse candidate would be Kansas City, much easier to get to than Toledo or Duluth (bigger airport), which has a world-class steamboat museum downtown (and another one a few hours upriver near Omaha, perfect for a day trip) and a lot of affordable convention/lodging options. There are plenty of us in the midwest and a lot of good models would show up at such a central location that's within a long day's drive of everything from Denver to MSP to Chicago to Memphis to Dallas. A special conference theme could be freshwater maritime history, not just of the interior US but all over the world. There's also a lot of access to less-well-known Civil War and American frontier history (including Lewis & Clark) that would complement the broader historical interests most of us have. -
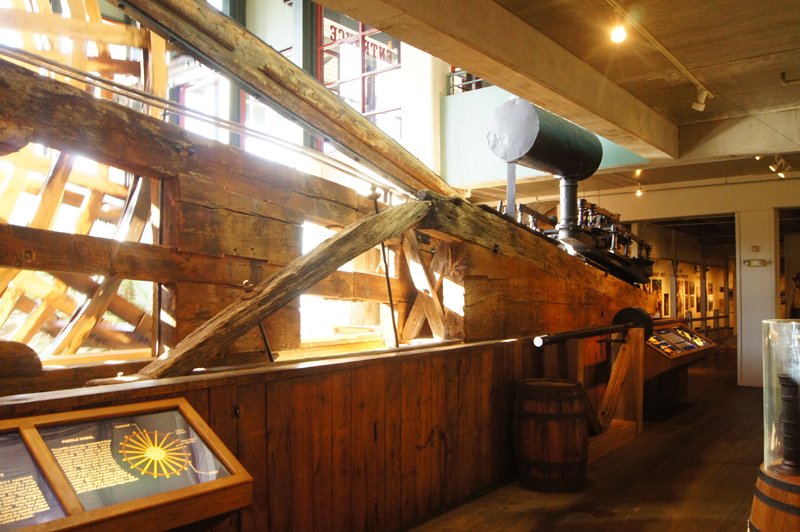
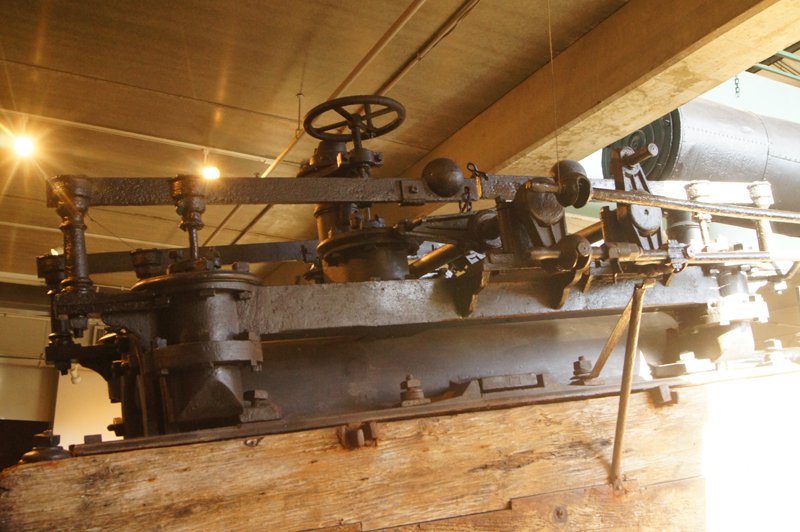
Looks so good. One detail I love in original steamboat engine timbers is the scarph joints between the timbers (both between the horizontal timbers and between the slanted timber and the angled surface below it). It'd be really hard to do right in a model and would barely by seen, but it makes a lot of sense for strengthening the original assembly for the pounding it took from engine operation. You can see these in your photo above and on the Arabia's timbers as well:

-
Yeah, my goal is just to make it as representative as I can, and if I ever show it to a real expert (unlikely) I'll have The Conversation about how it Isn't Right.
-
Chaperon by joep4567 - 1:48 - Sternwheeler
Cathead replied to joep4567's topic in - Build logs for subjects built 1801 - 1850
Those look great! -
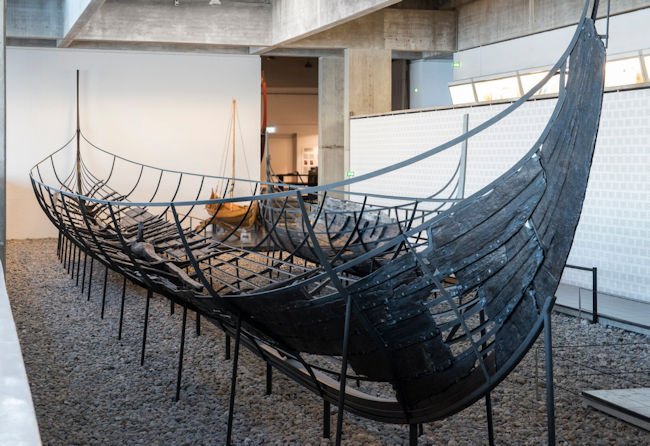
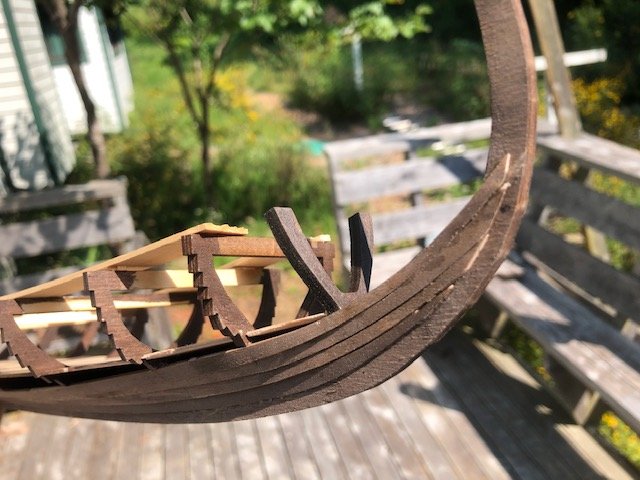
Petr, This is an issue with the kit, which makes no allowance for the "proper" formation of the stem and stern. It would actually be fantastic to have the carved stem/stern pieces for planks to fit into, but I can understand why the kit maker decided not to replicate that and I decided it would be too hard for me to fabricate. Here is a good image of the modern reconstruction showing the stem (source here): And here the original piece showing the precarved stem and the run of planking into it (source here): And here is the current model: On the real thing, the planks appear to blend seamlessly into the keel, growing ever thinner until their overlap vanishes into a single surface that becomes smooth before the tip of the keel (I say "appear" because the carved stem takes care of the most delicate part). On the model, there are four ways that I can see to handle the plank ends reaching the keel: (1) Bevel the planks ends at a fairly sharp angle, more like one would do with launch or bluff-bowed ship. This is what the Dusek kit images show and what most people seem to do. This is easiest but, I think, less accurate as the bow/stern has none of the smooth flow into the keel of the real thing. See, for example, this image from jack.aubrey's log of the similar Gokstad ship: (2) Carve a full stem/stern piece to accept the planks. This would be the absolutely most accurate but was beyond my skill set. (3) Sand all the planks down incredibly thin to achieve the right blended effect, which would make them extremely delicate (there's a reason the Vikings preferred shaping a one-piece stem instead!). I decided that this, too, was beyond my skill set and was also very risky. (4) What I chose to do: Attach the planks parallel to the keel (with a large gluing surface for stability), then once the planking is completed, carve/sand the planks to blend into the stem more like the real thing, and possibly even to mark joints that simulate the pre-carved stem. I felt this would be easier to do once they were thoroughly glued in place than trying to pre-shape each plank just right with very narrow margins for error. This does result in the planks going carvel a bit earlier than on the real thing, but I think the different will be pretty subtle once it's finished, and hopefully mitigated by shaping the final result to more closely mimic the real thing. This also supports my goal of using a bit of filler to mask the minor gaps between planks at the ends, as this is where it should look like a single blended piece anyway! I decided I was willing to trade a bit more carvel planking than the real thing for what I hoped would be a more realistic transition into the keel, as I think the latter will be a lot more noticeable on the final model. I hope I'm right and that it works out the way I want! Thanks for the observent comment that challenged me to better explain my thought process here. Does this make sense to you?
-
Gotta say, that sail display will look amazing. As do the rowers. Inspirational work.
-
Sure, you can always explain a given situation or appearance. You can have, say, a model railroad locomotive that's all shiny. The narrative may be that it's just out of the paint shop, but the eye will likely still see it as "wrong" if its surroundings are more weathered. Or a cannon that's too shiny because it was just replaced, but it'll still look out of place among grimier ones. The point it, if there's a concern that the anchor somehow feels "wrong", it could be because the eye unconciously sees it as standing out from the deck. Just a theory.
-
Just catching up on this, everything looks really nice. Haven't thought much about this kind of ship before, so this is a fun introduction.
- 179 replies
-
- 5
-

-
- shipyard
- wütender hund
- (and 1 more)