-
Posts
3,550 -
Joined
-
Last visited
Content Type
Profiles
Forums
Gallery
Events
Everything posted by Cathead
-
Petr, Thank you, I suppose I should retract some of my criticism. Although I note that none of those strakes appear to get wider as they reach the bow, unlike on the model. I reviewed photos of Skuldelev 2 (on which this kit is based) and there are some narrower strakes, though again they all consistently get narrow toward the bow rather than varying in width. But I will not worry about it too much. Thanks to the rest of you too.
-
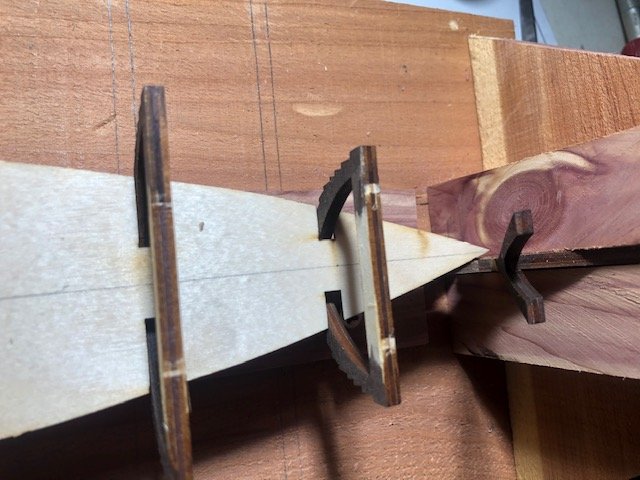
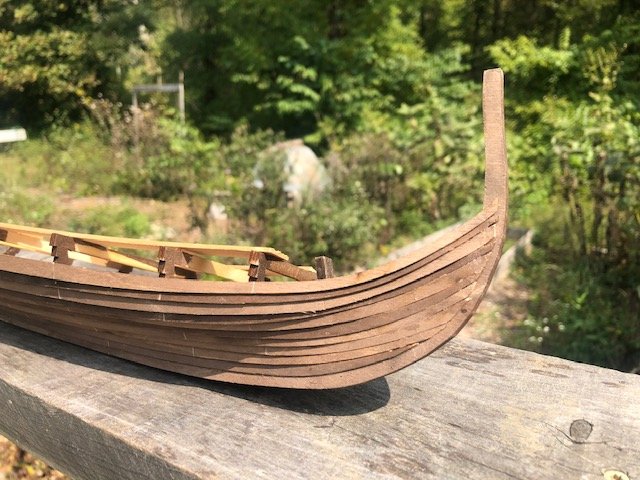
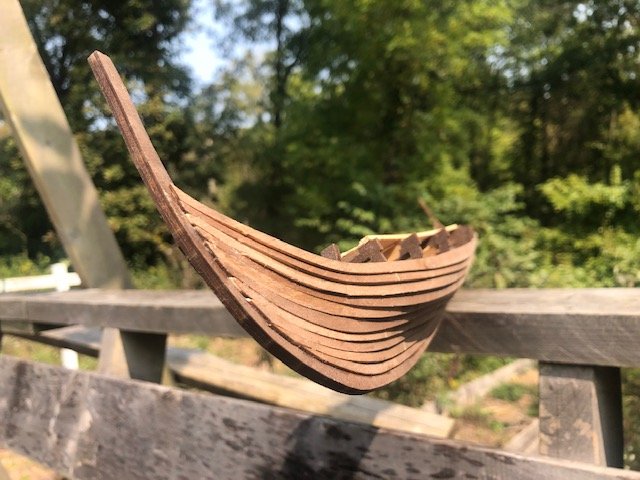
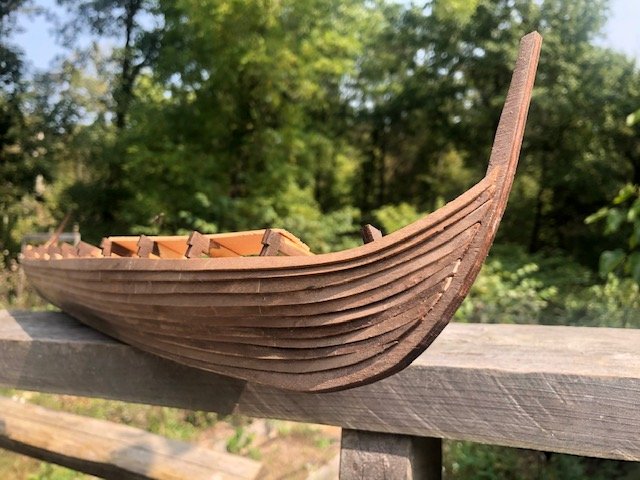
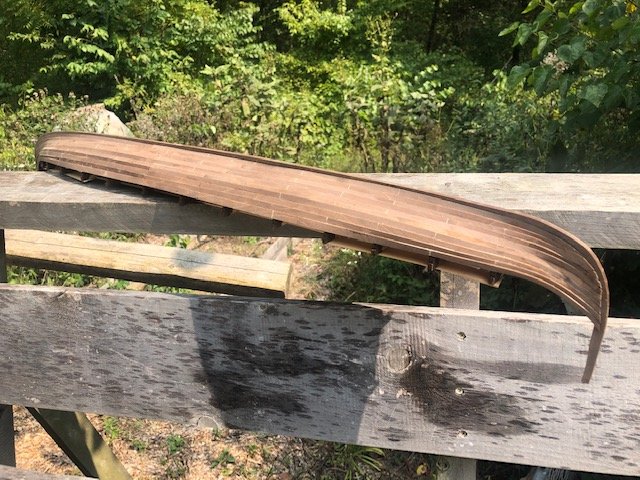
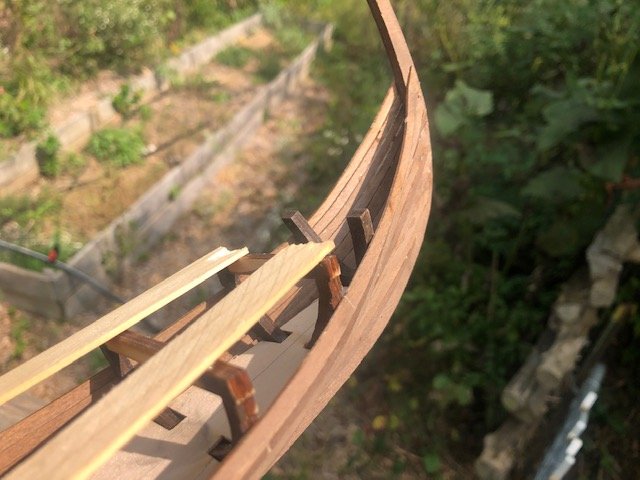
So I think I've figured out the basic reason for the planking problems I've been having; it's partly my fault and partly the kit's. Jump way back to the initial assembly of the framing and review this image: Most of the frames are pre-notched to help guide the clinker planking into place (these are the frames that will have to be cut away above the deck once the hull's shell is complete). But the last frame at bow and stern is NOT notched; these are Y-shaped and are meant to stay in place. You can clearly see the difference above. The instructions do not tell you how the planking is supposed to interact with these Y-frames. In the absense of any guidance, I assumed that (1) you were meant to glue the planking to them since they were permanent and (2) that their lack of notching meant the planks were supposed to lie smoothly against these (i.e. that clinker should transition to carvel by this final frame). Otherwise, why not notch it to accomodate the overlapping planks (laying clinker planks against a smooth frame provides almost no gluing surface and looks strange)? Assumption (2) seems to be the source of my worsening trouble with plank shape. I have been trying to bend the planks into a shape that becomes carvel by the Y-frames, as otherwise their design made no sense to me. I finally realized that, if you let the planks overlap each other until just before the stem or stern, they actually go back to following their design curves rather well. But that was not at all intuitive to me based on kit design and poor/vague instructions. Here's another view of the transition from notched to smooth frame at the hull's current level of completion: Once I realized that I needed to keep the overlap going all the way to the bow, things went back to planking smoothly, but there is an awkward looking transition between the two approaches. In the next two photos you can clearly see that the top three strakes have been done the new way while all those under them transition to carvel around the Y frame rather than right at the end: Although I find this rather annoying, I saw no way around it because contining to force the planks into the other arrangement was becoming increasingly problematic. I wish I could go back and redo all of this but I can't/won't. I'm planning on doing quite a bit of finishing work on the hull and think that the overall model will hide this to all but the most discerning eyes. I don't plan on submitting this to any contests. You can also see a rather obnoxious aspect of kit design. Look at the very ends of each strake, especially in the upper of the above two photos; these have widely varying widths that stand out like a sore thumb and look terrible. These strakes should all be flowing into a continuous, uniform final pattern rather than some being twice as wide as others and even widening as they reach their end. This isn't my fault, it's 100% how they're designed and laser cut. There was nothing I could do about this; trying to cut/sand the thick ones down would have ruined the pre-cut curves. As discussed a while back, I plan to fill, carve, and sand these plank ends into a smooth transition into the stems, which is also why I didn't worry too much about the current ragged curve they form. So I'm hoping this, too, will fade in the final model. The stern is worse than the bow; for whatever reason the Y frame there guides the planks better and this doesn't look so bad (though you can still see the different in plank end width): I have two strakes to go before the planking is done, but it's going smoothly again now that I understand what I should be doing. Here's the hull overall: So I'm rather upset at the poor instructions and kit design that led me astray, as well as my own poor judgement in not realizing sooner what the correct approach would be. I was so locked into the assumption that I had to fit those planks smoothly onto those Y frames that it took me far too long to come up with a better way. Live and learn. Anyone else who builds this, LEARN FROM THIS MISTAKE and you might get a much nicer hull. Anyway, almost there and then hopefully the more fun stuff starts. Thanks for sticking with me and for all the advice and ideas that helped me continue to think this through. I hope the final product is worthy of your loyalty.
-

Chaperon by joep4567 - 1:48 - Sternwheeler
Cathead replied to joep4567's topic in - Build logs for subjects built 1801 - 1850
I agree, this is beautifully done. Nice to see such a creative and unique interpretation of a standard build. -

2021 CALENDARS ARE GOING FAST!!
Cathead replied to ferretmary1's topic in NAUTICAL RESEARCH GUILD - News & Information
In fairness, it is mid September. That's early for calendars in any year, but this year 2021 is still a decade or so away. Hard to plan ahead when you fully expect an asteroid or something to show up between now and then. -

2021 CALENDARS ARE GOING FAST!!
Cathead replied to ferretmary1's topic in NAUTICAL RESEARCH GUILD - News & Information
Out of how many? Or is that classified? -
Fantastic. Have a great trip. Mrs. Cathead worked three summers at Yellowstone (like me, she's a geologist).
-
Fair enough, Andrew, no arguments there. Except for the Masterbuilder part, this one's not ending up on any calendars.
-

2021 CALENDARS ARE GOING FAST!!
Cathead replied to ferretmary1's topic in NAUTICAL RESEARCH GUILD - News & Information
Got mine today, too. Really well done. I hope these raise some good funds for the NRG. -
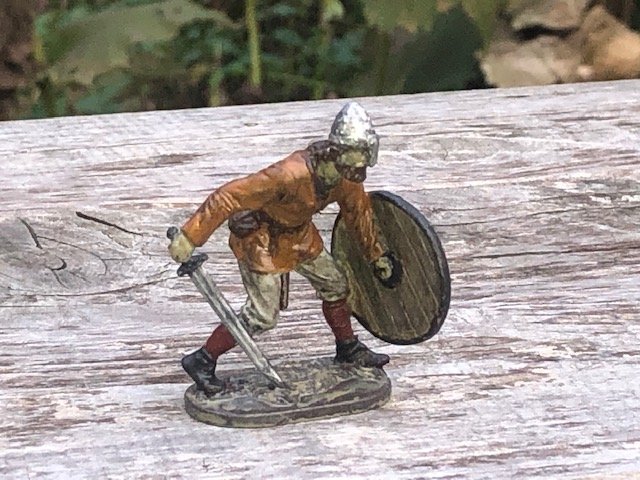
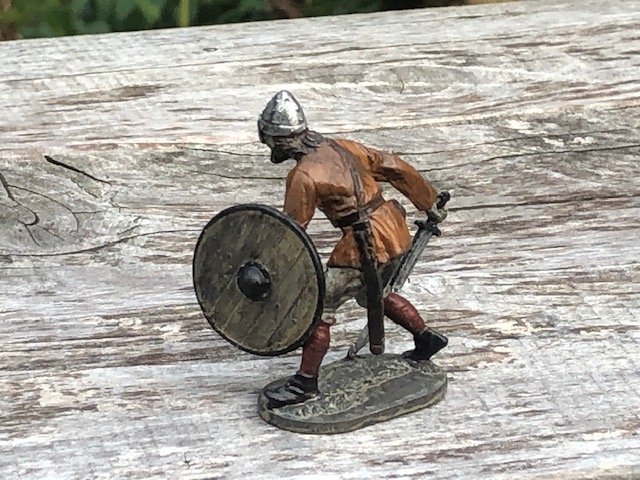
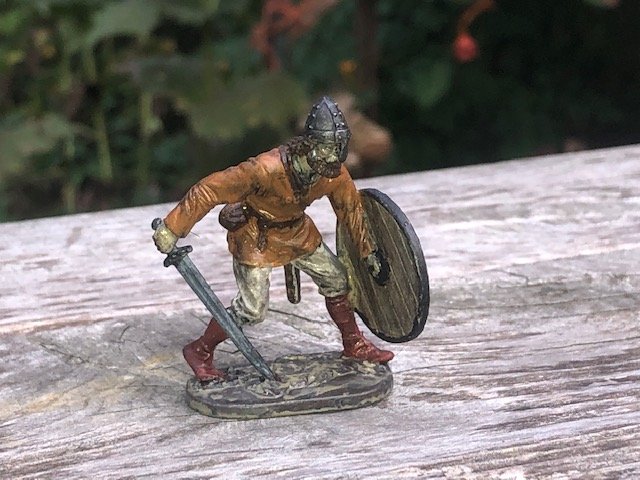
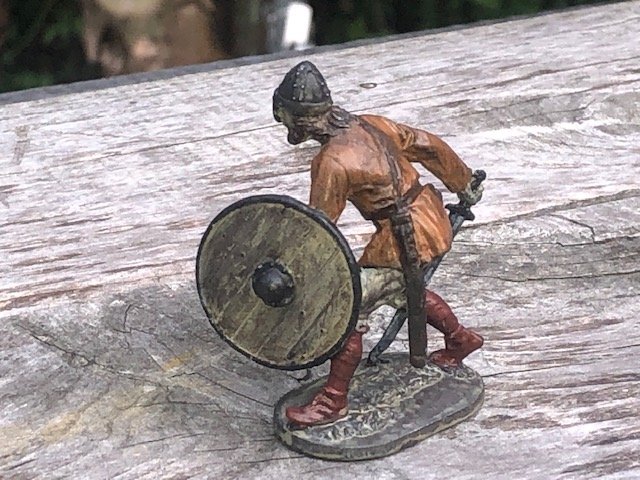
Sihtric v. 2.0 with silver applied to the helmet and sword, and darker boots. The helmet looks shinier than it really is due to my use of flash; I actually dulled it with a black wash to have the same tone as the rest of the figure. Louie, I quoted "English" because my mental frame of reference is fairly early on, before the idea of "Anglaland" really came into being and Anglo-Saxons primarily thought of themselves as being of Wessex, Mercia, etc. rather than a unified "English" culture. The argument regarding cleanliness isn't just based on that one account, but on the prevalence of things like combs, and various incidents recorded in the Icelandic sagas. I do agree that to Arab cultures of the time, everyone else was dirty and that only tells you so much. I mean, at least they had washing bowls! As for Sihtric, the name was very specifically chosen from a character in Bernard Cornwell's Saxon Tales series for precisely that reason; someone raised from unfortunate birth to a higher status due to exceptional service to his generous lord. The other two will have similarly representative names. Keep the insights coming. For the rest of you, I promise to get back to the actual vessel soon and not completely derail this thread with figures.
-
Interesting kit. I'm curious about pre-lashing the rudder to the sternpost. Are you planning on painting or staining these parts, and how will that affect the lashings?
- 28 replies
-
- Amati
- chinese junk
-
(and 1 more)
Tagged with:
-
Andrew, Most sources agree that Scandanavian cultures of this period were actually rather fastidious for their times, bathing regularly and giving high priority to grooming. Combs were standard possessions for both sexes. Saxon accounts seem puzzled by the Viking emphasis on cleanliness and appearance, with one source suggesting that "English" women showed a resulting preference for Viking men. So he might be dirty by our standards, but he's a neat freak for his time. That being said, I'm a strong believer in weathering things to "look" used, because in model terms an accurate level of cleanliness or shinyness often ends up looking fake even if it's "right". Louie, That's a good tip. I perused a bunch of reenactor photos and a lot of them seemed to use the same color for the wrapping and the boots, so that's what I did, but I'm happy to take your advice. I can shine up the helmet a bit, too. As for the shield, it's cast in pure wood while the other two figures have designs already cast into the shield, so I thought I'd leave his blank for a contrast even though I know that in reality he'd almost certainly have his jarl's design painted on. What I might do is wait until I decide on a shield design for the whole ship and then paint his to match. I wanted him to look more like a lowly warrior (perhaps, as you say, down on his luck) though I agree that the nice sword and helmet contradict that. This is partly because the other two are clearly wealthy jarls (mail shirts, magnificent cloaks, etc.), so I wanted someone who looked more like a regular warrior; maybe his jarl supplied the helmet & sword.
-
I'll have updates on the hull later, I don't feel like writing it all up at the moment, but I do have something non-complainy to post about! I tried painting my first figure today and don't think it came out too bad. First time I've done this at a scale above 1:87 model railroad figures. I'd love some feedback on realism, etc. Meet Sihtric: The one thing I know is true is that his skin tone is rather off; he has a sickly zombie warrior of the dead look. I'm working with what I have on hand and struggled to get a proper skin tone. I swear it looks worse in the photo than it does in person.
-

Chaperon by joep4567 - 1:48 - Sternwheeler
Cathead replied to joep4567's topic in - Build logs for subjects built 1801 - 1850
Good question. Some diagrams, such as the one below (from near the bottom of this page) show the mud drum being fed directly from the doctor, then transferring the water to the boiler, which makes sense as you'd want to get that river mud out of there as fast as possible. This also matches a diagram in Alan Bates' definitive book on Western River steamboats. Adam Kane's book mentions some boilers preheating the river water before sending it through the boilers, but doesn't explain how that related to the mud drum. I think you'd be safe plumbing the doctor directly into the mud drum; that's what I did on the Arabia. The side pump should have a thin feed line leading to the doctor, as it was used to prime that larger pump when steam wasn't up (the doctor was normally driven by engine steam). Now, I'm no expert on Chaperon so it may well be that the real thing had a different arrangement. You could private-message user Kurt Van Dahm, who is the authority on this vessel, if you want better details on her boiler setup. -

Chaperon by joep4567 - 1:48 - Sternwheeler
Cathead replied to joep4567's topic in - Build logs for subjects built 1801 - 1850
Yes, the first two decks would be planked. As I understand it, the third (hurricane), fourth (Texas), and fifth (pilot house roof) would be covered in something like canvas and sealed. The color would be light-medium gray. For greatest realism you would simulate the seams of the canvas rolls, but you could also just use a solid surface if you're going for a simpler representation as that would look nice as well. -

2021 NRG/MSW Calendar
Cathead replied to tlevine's topic in NAUTICAL RESEARCH GUILD - News & Information
February; the steamboat Arabia (see my signature for link). It would actually be really cool for someone in the know to post links here to the build logs or galleries (if they exist) for all of these models. -

Chaperon by joep4567 - 1:48 - Sternwheeler
Cathead replied to joep4567's topic in - Build logs for subjects built 1801 - 1850
Yep, it's a flywheel. Looks nice so far, way better and more accurate than what I cobbled together. -
LOL, I assumed you had a hand in it. You're right, now I feel even more dazed.
- 599 replies
-
- sidewheeler
- arabia
-
(and 4 more)
Tagged with:
-
Some really amazing news: the Arabia was chosen as a featured model in the NRG's 2021 calendar, now available in the NRG store. The timing of this announcement is particularly good as we just passed the anniversary of her sinking on September 5. Please go buy a calendar and support the NRG! I still can't believe this was chosen.
- 599 replies
-
- sidewheeler
- arabia
-
(and 4 more)
Tagged with:
-

2021 NRG/MSW Calendar
Cathead replied to tlevine's topic in NAUTICAL RESEARCH GUILD - News & Information
I am really honored to have a model chosen for this. What a great-looking product overal; can't wait to see the photos in full print glory. I hope these sell really well. -

Chaperon by joep4567 - 1:48 - Sternwheeler
Cathead replied to joep4567's topic in - Build logs for subjects built 1801 - 1850
Looks about right. One way to judge scale would be to create a rough human figure and see whether the arms are roughly at the right level for human use. Mine's too deep in the model to measure it, but I think it was 3-4' tall. As far as I know, these connected directly to the river and were used for two main purposes: to prime the doctor pump when steam wasn't available, and for light general hosing or any other use for riverwater. Note that the original has a line leading to the doctor and a connection on the front to attach a hose or pipe. I'm actually not sure how they dealt with water in the hold, as steamboats' flat bottom meant that there was no central bilge for water to collect in that could be reliably accessed by a pump. Maybe they ran a leather hose down there from one of the main pumps? -
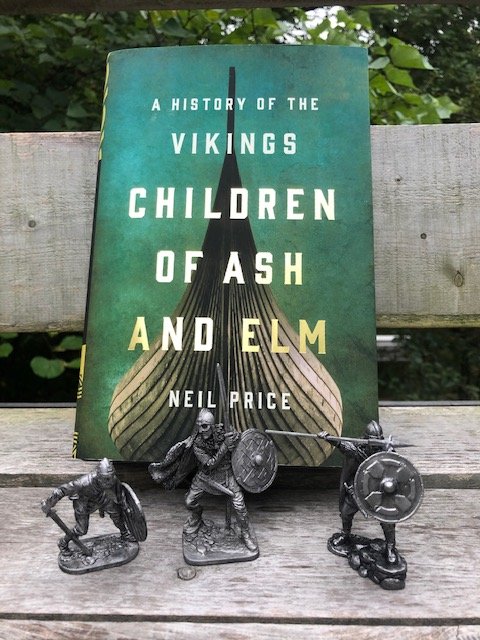
Yeah, I looked at a lot of options closely and this series struck me as quite good. I'm not an expert but saw no obvious flaws. These are from my mother; I gave her five options and told her to pick a few from those; my initial five were the most accurate and most appealing to me (for example, I left out archers as they were fairly uncommon). I also like that there's a range from the jarl in the middle (lots of mail, fancy shield, decorated scabbard) to the basic warrior on the left (leather jerkin, plain wood shield, etc.). Will show more details as I work on them. She must like swords as she left out both axe warriors. If I enjoy painting these I may have to add a few of those, as axes from this area are more unique than the swords at this scale (not sure I can fit "Ulfberht" on there). I don't have an airbrush. Any advice on brush-painting (other than get one)? As for the title, I wondered that too, but will fill you in when it gets there. Also, thanks again for all the above advice. I've started experimenting and will let you know what ends up working best. I've already figured out one lead that is promising.
-
I don't think it's a faulty part as it would have to be a flaw in the entire laser-cut sheet; also, as there are two of each part and each plank matches its counterpart, again it's not likely a manufacturing flaw. It's either a design flaw of some kind or some mistake on my part. Possibly a bit of both, if I somehow haven't been laying the planks out juuuust right then maybe the curves could be going off. But that's where the kit needs better directions if it's going to be that sensitive to minor user error. In any case, I'm going to try various fixes and see what I like best. In the meantime, today was my 41st birthday and some fun inspiration arrived: This is a recent book that comes highly reviewed. It seems to take a very comprehensive view, incorporating broader geographic elements, which is especially appealing to two geologists. The figurines are 1:32, close enough to the kit's 1:35 and a fun painting project (I've never painted figures at this scale before). So despite my frustrations, I now have powerul motivation to keep going.
-
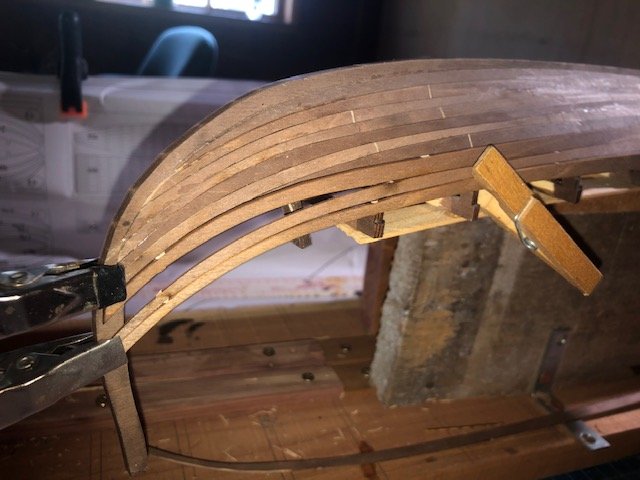
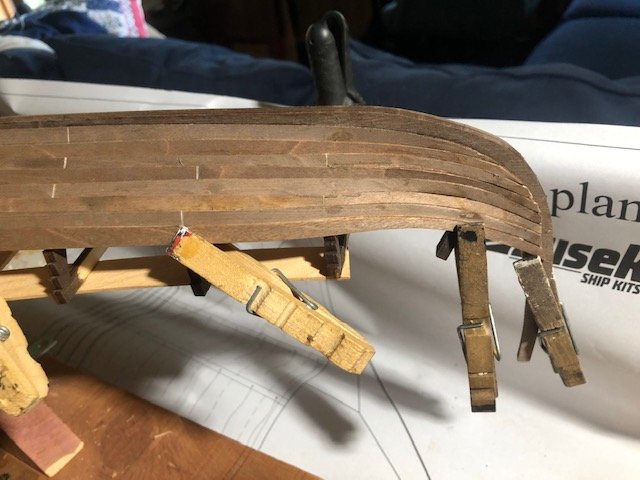
This kit just keeps getting weirder. I've done strakes 17-23 now (numbering upward from the keel, using the kit's part numbers). They've been fitting less and less well as I go up (especially at the stern) and I've had to do more and more bending and filing to keep things in place. The pre-spiled planks just don't want to follow the curves of their neighbors. Then, when I got to #24, the wheels just came off entirely. Here are strakes 24, 25, and 26 temporarily clamped in place (26 is the "uppermost" but lowest in the photo). Note that 24 doesn't even come close to the curve of 23, in fact it blends smoothly over it and fully overlaps it by the time you reach the stem. Then 25 and 26 follow a wildly different curve, matching each other but not the rest. They're sort of parallel to 23, but with a huge gap (24 would have to be at least twice as wide as the rest to fill that hole even if followed the curve of 23). All of these are in their "right" place as determined by the pre-cut notches in the frame (under the clothespin on the right). I tried shifting 25 and 26 down a place (butting against 23) but they don't fit like that either. I'm sure I'm using the "right" plank, having triple-checked the plans and even tried several other plank shapes in case the sheets are numbered wrong. Nothing fits, and once you start rearranging all the other planks everything just goes haywire. I have no idea what's going on or what to do. I've already tried soaking and bending 24 into some kind of conformation but it really doesn't want to match that shape, and when you do that 25 and 26 don't line up at all, so it doesn't really get you anywhere. I supposed I could try to trace out a pattern of what plank shape would fit this gap and try to cut it out of the edge of the leftover planking sheets? It'll look terrible, being at least twice as wide as all the others, but what else can I do? Also, returning to the question of whether I'm somehow using the "wrong" plank, the other end of 24 fits reasonably well (as have all the bow strakes): Ideas? I'm open to the idea that this is all somehow user error, but I'm a reasonably experienced modeller who has planked a number of hulls reasonably successfully and never had anywhere near this much trouble. And even if it is user error, I'm in too deep now and have to dig myself out. I'm really starting to dislike this kit. If I can just get the hull planked at a non-embarassing level, I think I can make the rest of it look pretty good, but man is it fighting back.
-
Maybe it hasn't fallen into the swamp, but it does have huuuuge....castles. Nice job on the fix.
- 179 replies
-
- shipyard
- wütender hund
-
(and 1 more)
Tagged with:
About us
Modelshipworld - Advancing Ship Modeling through Research
SSL Secured
Your security is important for us so this Website is SSL-Secured
NRG Mailing Address
Nautical Research Guild
237 South Lincoln Street
Westmont IL, 60559-1917
Model Ship World ® and the MSW logo are Registered Trademarks, and belong to the Nautical Research Guild (United States Patent and Trademark Office: No. 6,929,264 & No. 6,929,274, registered Dec. 20, 2022)
Helpful Links
About the NRG
If you enjoy building ship models that are historically accurate as well as beautiful, then The Nautical Research Guild (NRG) is just right for you.
The Guild is a non-profit educational organization whose mission is to “Advance Ship Modeling Through Research”. We provide support to our members in their efforts to raise the quality of their model ships.
The Nautical Research Guild has published our world-renowned quarterly magazine, The Nautical Research Journal, since 1955. The pages of the Journal are full of articles by accomplished ship modelers who show you how they create those exquisite details on their models, and by maritime historians who show you the correct details to build. The Journal is available in both print and digital editions. Go to the NRG web site (www.thenrg.org) to download a complimentary digital copy of the Journal. The NRG also publishes plan sets, books and compilations of back issues of the Journal and the former Ships in Scale and Model Ship Builder magazines.


