


Cathead
-
Posts
3,482 -
Joined
-
Last visited
Content Type
Profiles
Forums
Gallery
Events
Everything posted by Cathead
-

Chaperon by joep4567 - 1:48 - Sternwheeler
Cathead replied to joep4567's topic in - Build logs for subjects built 1801 - 1850
Yeah, I see what you mean. I've read that book how many times and never noticed that. Certainly, as always, you should make the model your own and not take anyone else too seriously. Another way to look at it is that there may have been heads and galleys on both levels to fully separate crew and passengers. A paying gentleman may not want to traverse the dirty, dangerous, cargo-laden main deck to reach the head, for example, or have the crew using the passenger's facilities (especially since the deckhands were usually of a much lower social class). Lots of ways to look at it and justify a given approach, certainly a good rule is that there was no one rule. Sorry if my post was pedantic, I should have asked about your reasons before lecturing. I just love talking about these craft and being involved with others who want to know more about them. But I'm still an amateur. Sounds like you've got plenty of justification for your plans. -
Chaperon by joep4567 - 1:48 - Sternwheeler
Cathead replied to joep4567's topic in - Build logs for subjects built 1801 - 1850
For what it's worth, latrines/heads on steamboats tended to discharge over the paddlewheel (at the stern for sternwheelers and along the sides for sidewheelers) rather than through a hole in the deck down through the hull. The idea was that the wheel helped dispose of the material. On most sternwheelers, the boiler deck extended just a bit out over the wheel to accommodate the structure needed for this. Chaperon appears to follow this design though I'm not 100% sure. The galley would also generally be located on the boiler deck, off to one side of the main cabin (in line with the passenger cabins), usually near midships. This allowed all cooking to be served directly into the central main cabin and for the stoves to vent out the hurricane deck, while leaving the main deck free for cargo and workmen. From the main deck, it'd be a loooong walk to the bow, up the main stairway, and back into the main cabin for any food. -
That instruction seems practical in a purely model-building sort of way, but rather problematic from a realism point of view. Odd that the model is designed for that to be the only way builders could get the planks to follow the hull's curve when the real thing managed without. Or am I missing something?
-
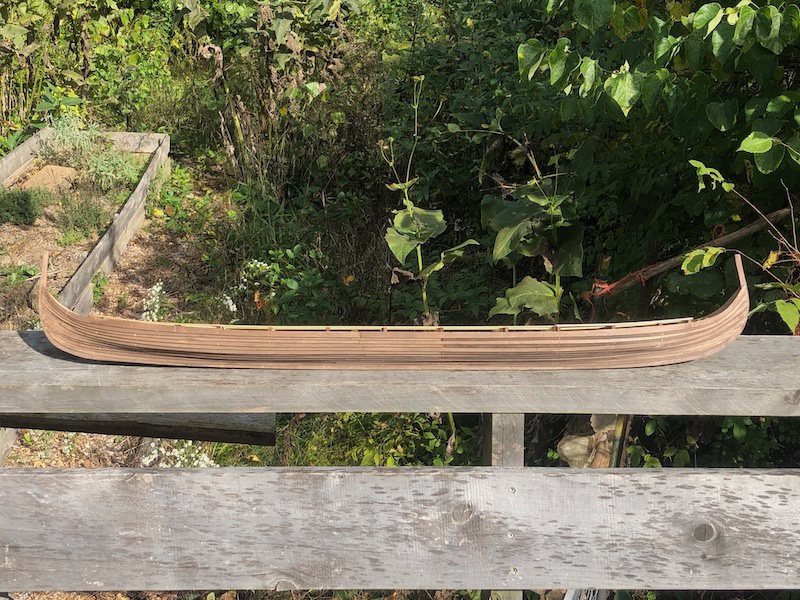
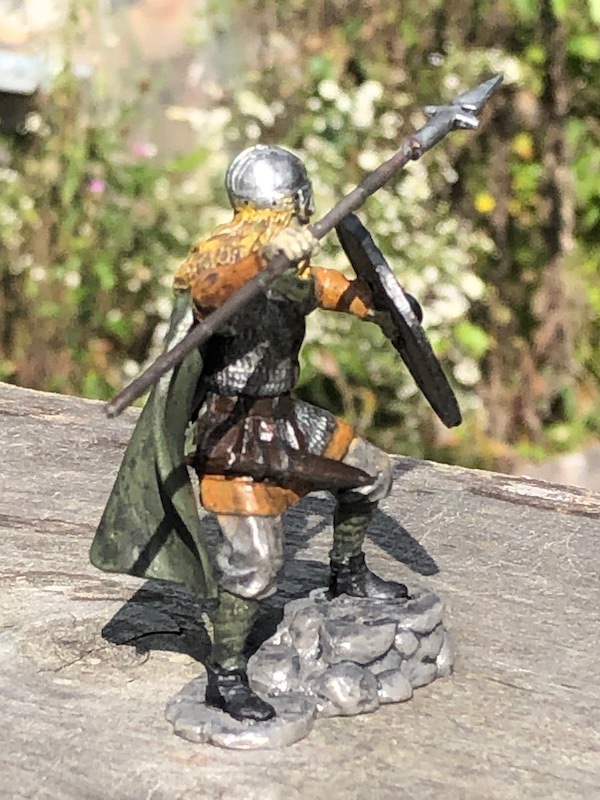
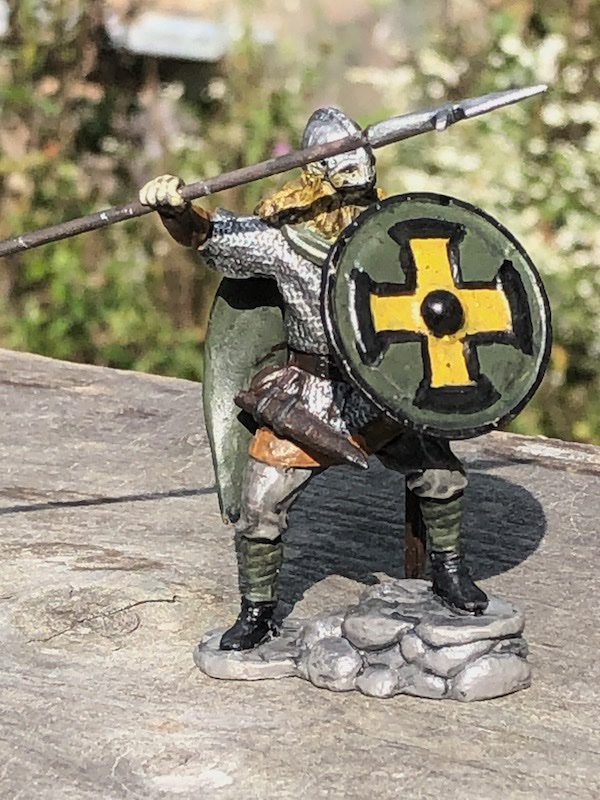
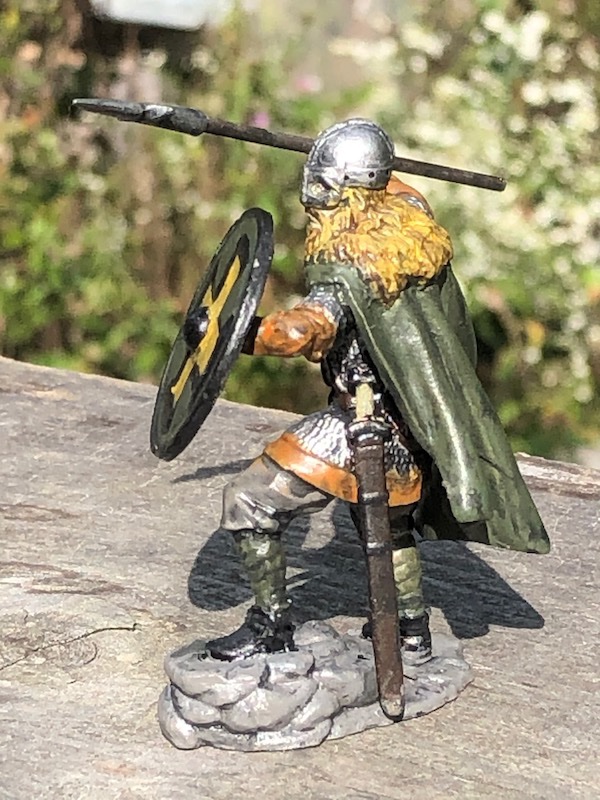
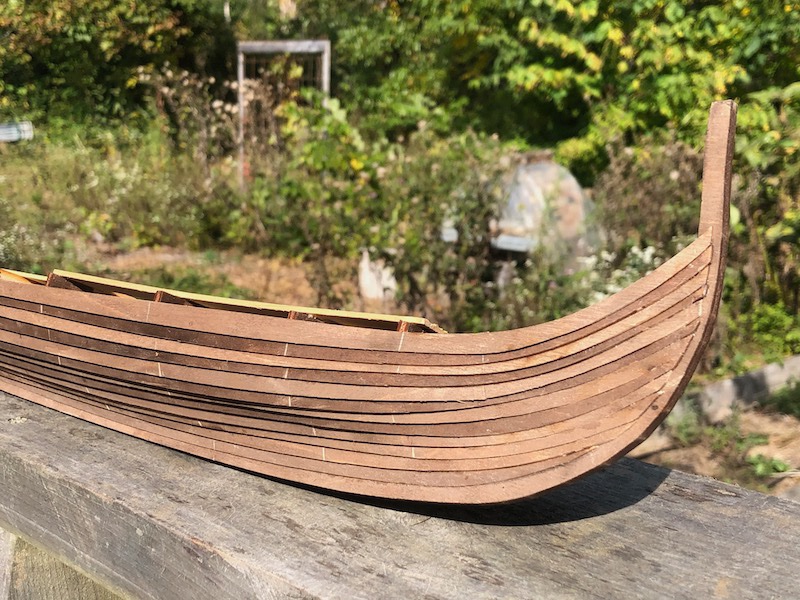
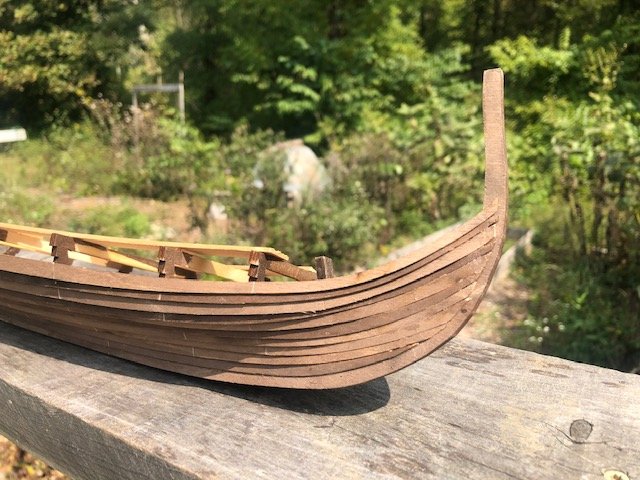
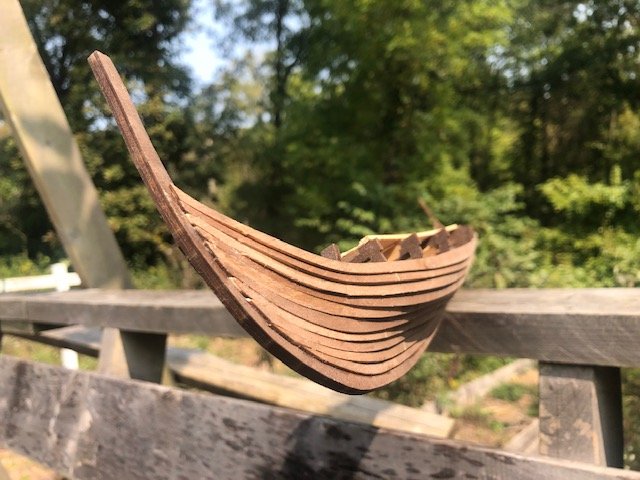
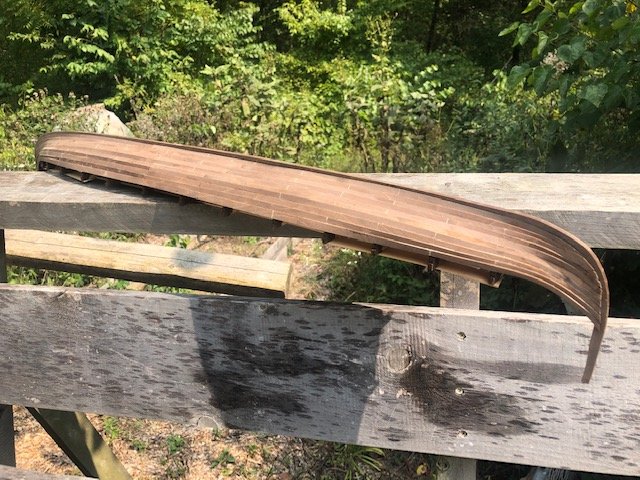
More progress: the hull planking is done: However, finishing it demonstrates some ongoing frustrations: Above, you can see that the planks don't follow the intended curve of the hull but bow outward. I clamped them to the frames every time I glued in a new strake, but they insisted on bowing outward as soon as the pressure was released (and keep in mind that they cannot be glued to the frames, which need to be cut out above the deck). And I soaked, bent, and dried each strake, so they conformed to the intended shape as much as possible. So instead of the final strake being nearly vertical, it bows out at something like 30 degrees off vertical. That'll make hanging the shields awkward. Also, if it wasn't clear from the above photo, the planking finished well short of the actual frame height by as much as a full plank width: I knew this was occurring but could do little about it. It happened because the notches cut into the frames to hold the planks in their intended position allowed for almost no overlap between planks (i.e., almost no gluing surface between them in the clinker overlap). They simply didn't hold together when placed in that arrangement, so I started subtly shifting each plank a little bit downward to allow for sufficient contact. This snowballed until, by the end, they came out a full plank short (which is why you can see the frames sticking up rather than being nicely hidden behind the uppermost strake). Proof that I needed the extra overlapped gluing surface comes from the fact that even so, several of the strakes have become separated and you can see daylight through them, even though I used plenty of wood glue and lots of clamping (I will need to do quite a bit of filing to eliminate various glue spots squeezed out from between the planks). So goodness knows how many planks would be popping loose if I used the kit's ultra-thin pre-arranged overlaps. Finally, remember my annoyance with the Y-shaped frames at bow and stern, the ones that don't get removed and that I assumed the planks needed to be glued to because otherwise why are they there? Well, here's what happened when I started letting the last few strakes following the natural clinker curve of the hull rather than forcing them into those Y frames: You can clearly see how that frame forces the planking into a sort of unnatural curve that messes with the natural flow of the wood, and how the last few strakes just don't match it at all. I would have been better off completely ignoring that frame and just letting the planks flow naturally from the previous frame to the bow/stern. As it is, it looks ridiculous because the lower part of the hull is contorted inward and the upper part doesn't even touch this frame. This is at the bow; the stern isn't quite as bad but still not good. As always, I'm open to the idea of user error here if the kit designer intended something else to happen, but I'm a reasonably experienced builder and the instructions and plans were of no help whatsoever in understanding what was supposed to be done here. I'm still sticking with the idea that this is the roughest the hull will look and I can improve it. Once I do a bunch of sanding and filling (especially at bow and stern), start painting the planking and detailing the interior, I think most of these issues will vanish from casual sight and I don't intend to win any contests with this thing. I have a clear plan in my head for how to make it look cool overall for most viewers. Speaking of which, I balanced the ongoing annoyance with the kit by having a lot of fun painting another figure. Meet Ragnar, again named for a character from Bernard Cornwell's Saxon Tales, this time a moderately wealthy jarl (no, not Ragnar Lothbrok). The shield design was premolded so I had little choice regarding its shape. Here are Ragnar and Sihtric together: Note anything odd? They're supposed to the same scale, but either Ragnar's a giant or Sihtric is about 10 years old (despite the beard). Sihtric is close in scale to the model (he works out to be around 5'7" (1.7 m), just about average for men of that era. Ragnar, on the other hand, is closer to 7' tall (over 2 m). I just won't place them next to each other. I'm finding that I really enjoy figure painting. Oh, before Louie corrects me, I know most shield rims were leather rather than iron. I like the visual symmetry of the black rim but am considering repainting it brown, torn between accuracy and aesthetics. Anything else that might be correctable, let me know!

-
Carl, That's a very generous offer. Unfortunately that river site is about 45 minutes from where I live, so it's not easy for me to pop back and take more. I wish I'd thought to take a few plain river views while I was there, it just did not occur to me. It is a site we like to go birding, though, so I think I'll be back there within a month and could try.
- 599 replies
-
- 2
-

-
- sidewheeler
- arabia
- (and 4 more)
-
Wefalck, I may play with that down the road, but didn't have the time currently and wanted to post them while the season was correct. It would be very neat to have a fully integrated shot.
- 599 replies
-
- 2
-
-
- sidewheeler
- arabia
- (and 4 more)
-
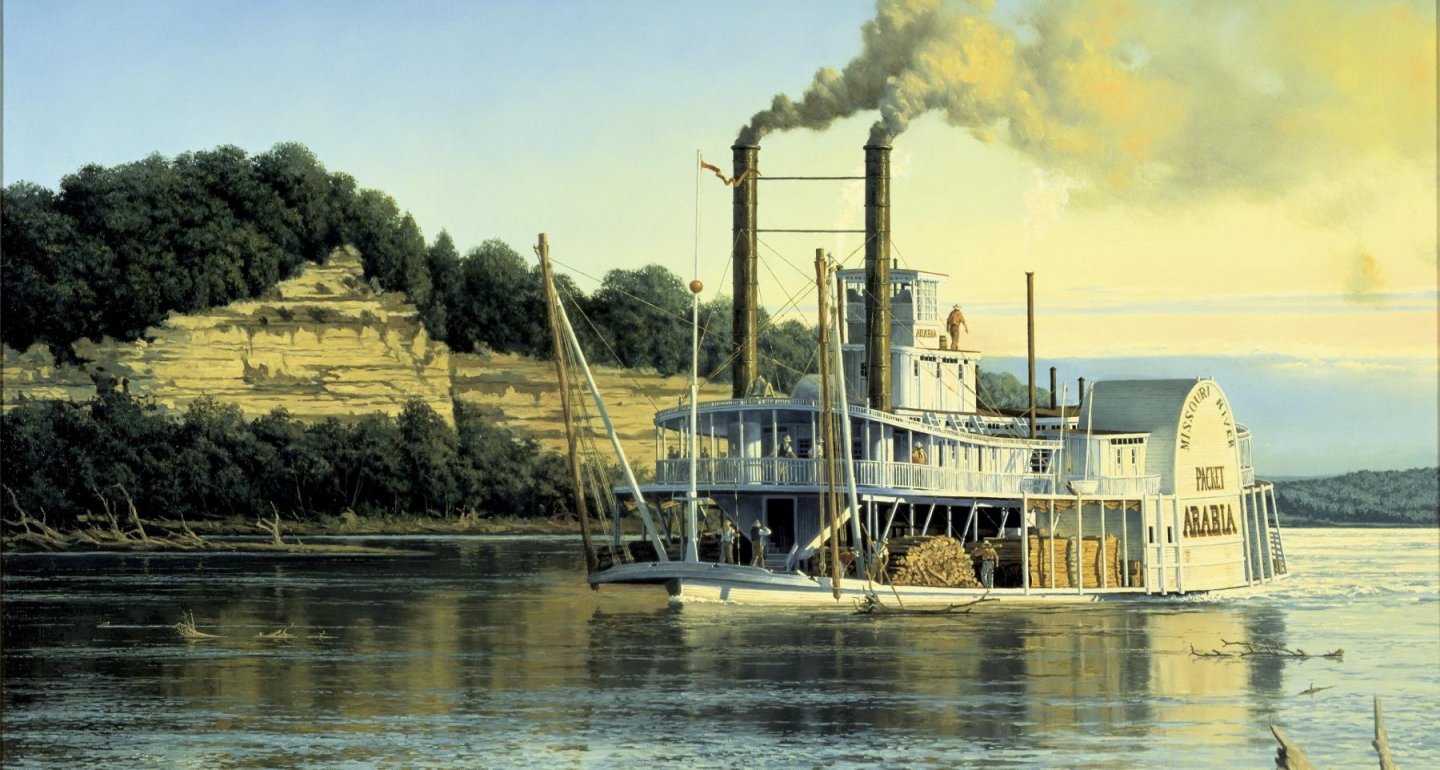
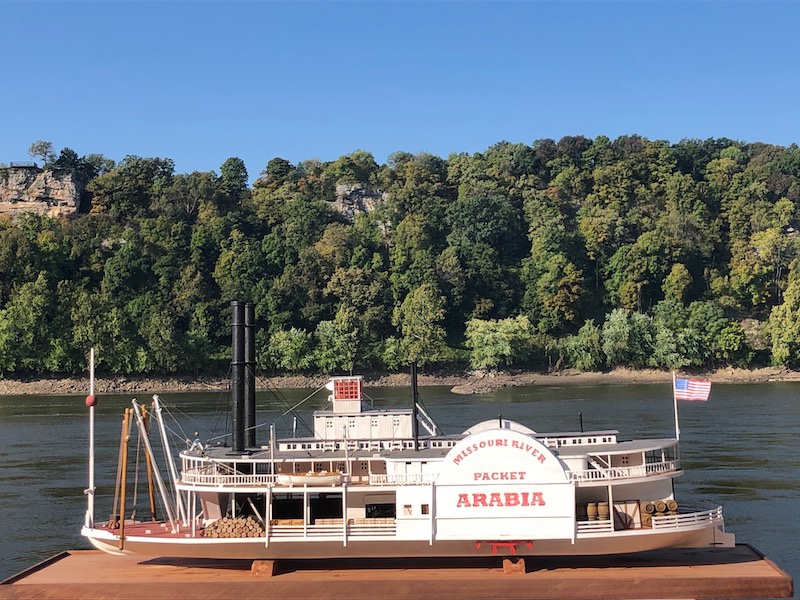
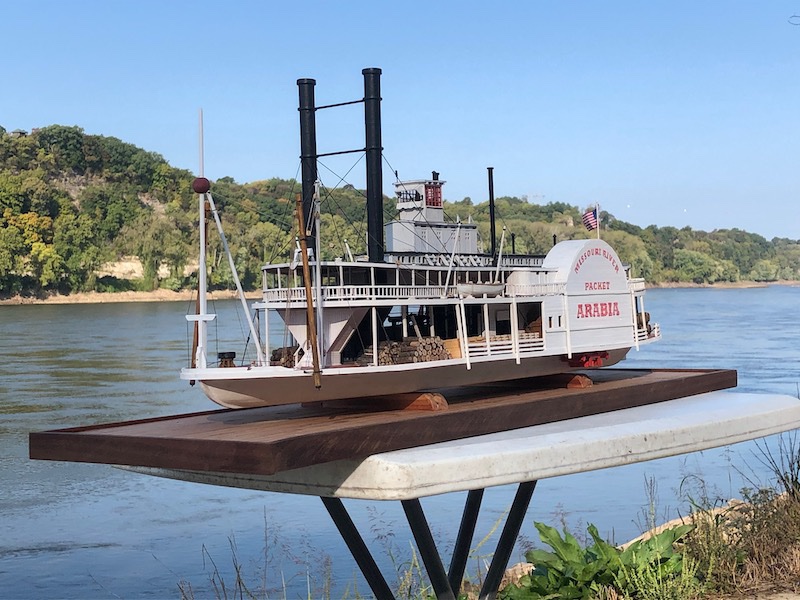
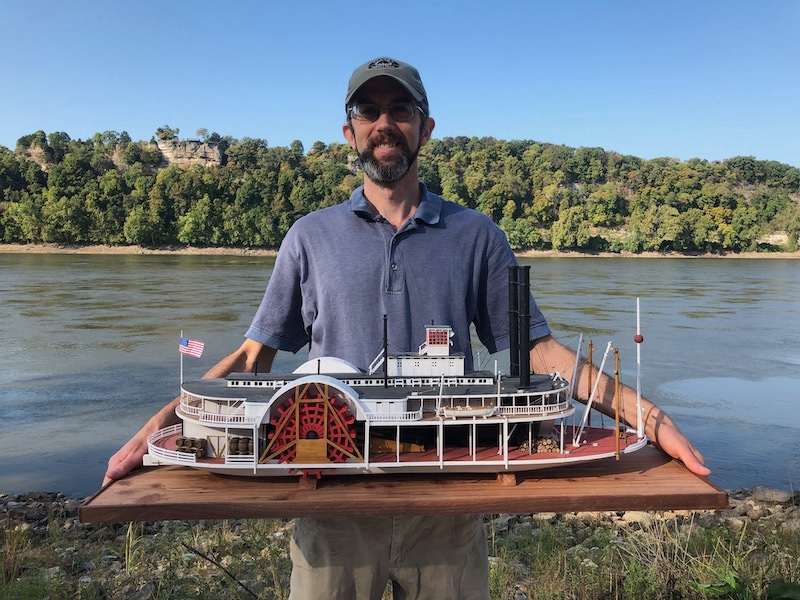
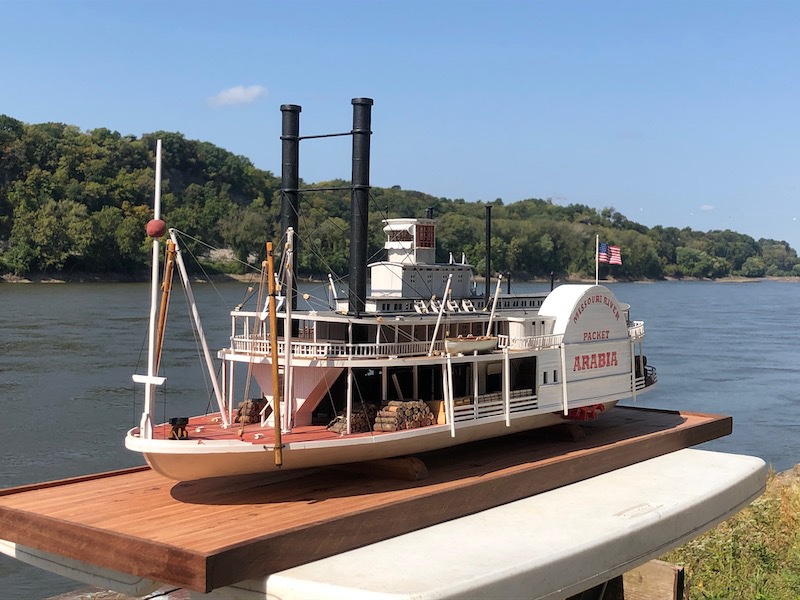
One more update: I finally made the trip down to the Missouri River for a photo shoot along Arabia's natural habitat. I had hoped to do this close to her actual sinking date of September 5, 1856, but this is only a few weeks off so conditions look pretty similar. I shot this at Eagle Bluffs Conservation Area, about 135 road miles downstream of her sinking location near Parkville, MO (just upriver from what is now downtown Kansas City); she would have passed this location many times in her service along the river. First, a reminder of the iconic painting used by the museum: And here are my two best attempts to recreate the setting and angle (try to ignore the stand): A few other shots at different angles: Me with the model: And for fun, a black and white shot as a what-if (she was never photographed, or at least no known photograph survives): The river itself looks very different than it would have in her time. Back then it would have been a broad, shallow, multi-channelled river full of sand bars and tree snags, carrying a lot of sediment and generally brown, always shifting across its mile-wide floodplain between bluffs several hundred feet tall. Now, it's been channelized for navigation into a single narrow deep channel that never moves, flows a lot faster, and carries far less sediment due to upstream dams. But the shape of the landscape hasn't changed much and she certainly saw that small bluff in the background. There are much larger and more dramatic bluffs in this stretch, but none that can easily be accessed for a photo shoot in this context. But I hope this gives at least a slight idea of how she might have looked churning her way up and downstream in service before finally hitting that snag in 1856,


- 599 replies
-
- 24
-
-

-
- sidewheeler
- arabia
- (and 4 more)
-
Having a similar problem on my build. The pre-cut notches in the frames were cut so that there was almost no overlap in the planks, such that I was forced to start shifting planks inward to get good gluing surfaces. This meant that by now, on the last strake, they don't line up at all with the frame notches and also display a distinct tendency to bow outward as you show here. I'm hoping that installing the internal cross-braces that come later in the build will help pull it back together.
-
Thanks for sharing this and letting us experience something new and different.
- 179 replies
-
- 5
-
-
- shipyard
- wütender hund
- (and 1 more)
-
Petr, Thank you, I suppose I should retract some of my criticism. Although I note that none of those strakes appear to get wider as they reach the bow, unlike on the model. I reviewed photos of Skuldelev 2 (on which this kit is based) and there are some narrower strakes, though again they all consistently get narrow toward the bow rather than varying in width. But I will not worry about it too much. Thanks to the rest of you too.
-
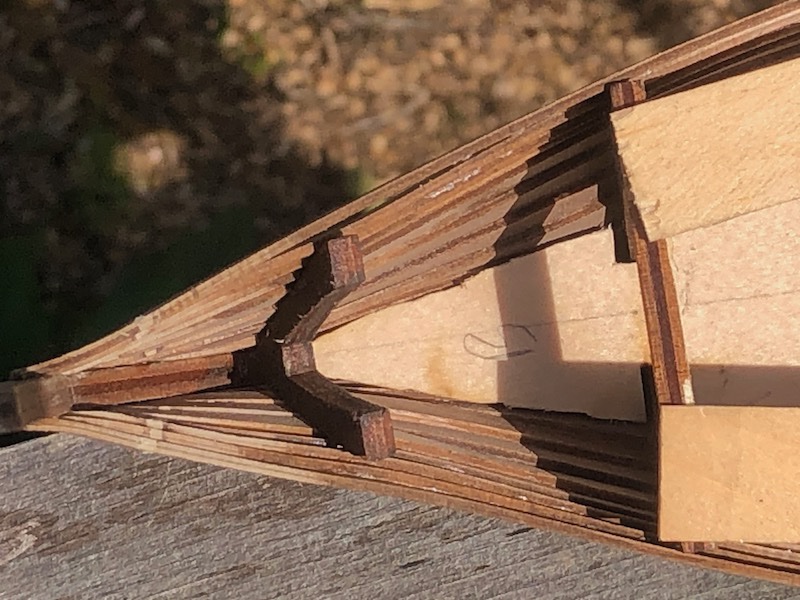
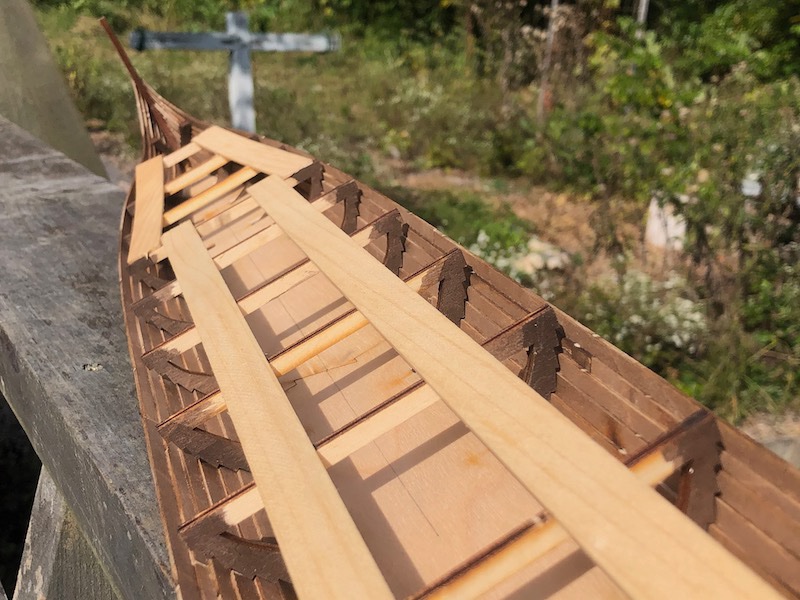
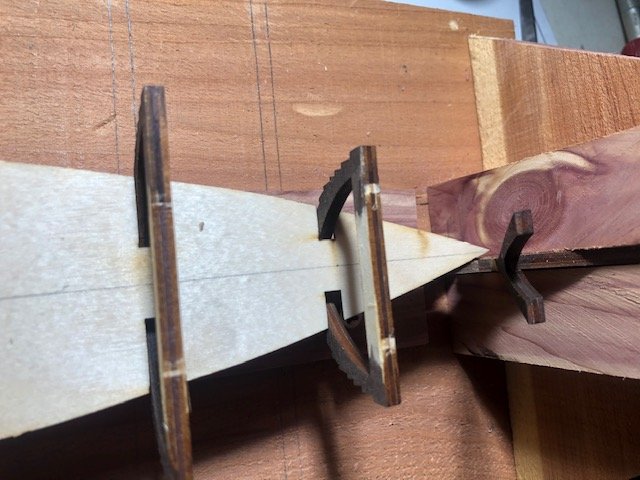
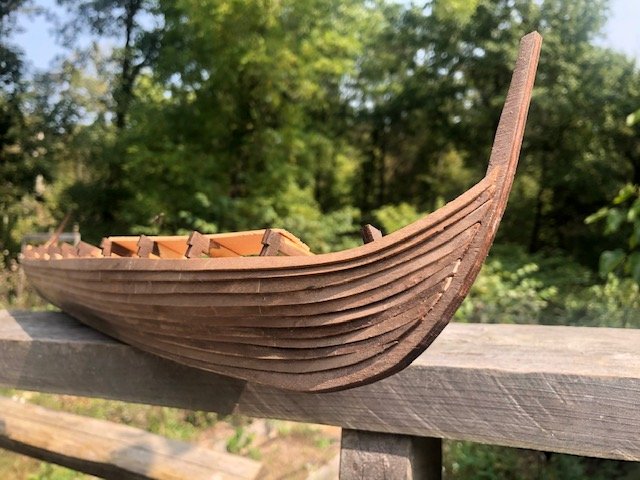
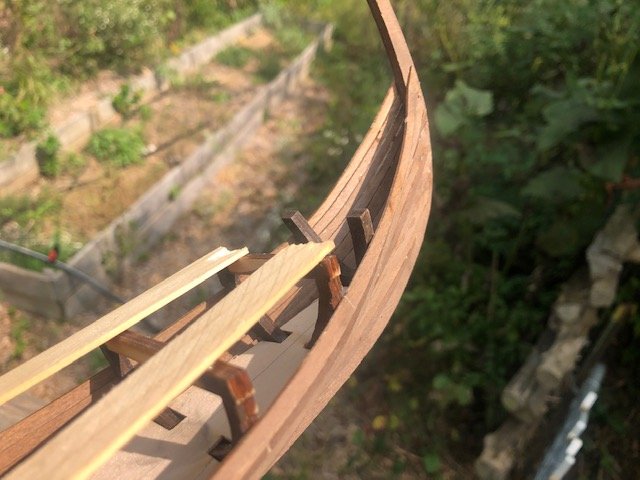
So I think I've figured out the basic reason for the planking problems I've been having; it's partly my fault and partly the kit's. Jump way back to the initial assembly of the framing and review this image: Most of the frames are pre-notched to help guide the clinker planking into place (these are the frames that will have to be cut away above the deck once the hull's shell is complete). But the last frame at bow and stern is NOT notched; these are Y-shaped and are meant to stay in place. You can clearly see the difference above. The instructions do not tell you how the planking is supposed to interact with these Y-frames. In the absense of any guidance, I assumed that (1) you were meant to glue the planking to them since they were permanent and (2) that their lack of notching meant the planks were supposed to lie smoothly against these (i.e. that clinker should transition to carvel by this final frame). Otherwise, why not notch it to accomodate the overlapping planks (laying clinker planks against a smooth frame provides almost no gluing surface and looks strange)? Assumption (2) seems to be the source of my worsening trouble with plank shape. I have been trying to bend the planks into a shape that becomes carvel by the Y-frames, as otherwise their design made no sense to me. I finally realized that, if you let the planks overlap each other until just before the stem or stern, they actually go back to following their design curves rather well. But that was not at all intuitive to me based on kit design and poor/vague instructions. Here's another view of the transition from notched to smooth frame at the hull's current level of completion: Once I realized that I needed to keep the overlap going all the way to the bow, things went back to planking smoothly, but there is an awkward looking transition between the two approaches. In the next two photos you can clearly see that the top three strakes have been done the new way while all those under them transition to carvel around the Y frame rather than right at the end: Although I find this rather annoying, I saw no way around it because contining to force the planks into the other arrangement was becoming increasingly problematic. I wish I could go back and redo all of this but I can't/won't. I'm planning on doing quite a bit of finishing work on the hull and think that the overall model will hide this to all but the most discerning eyes. I don't plan on submitting this to any contests. You can also see a rather obnoxious aspect of kit design. Look at the very ends of each strake, especially in the upper of the above two photos; these have widely varying widths that stand out like a sore thumb and look terrible. These strakes should all be flowing into a continuous, uniform final pattern rather than some being twice as wide as others and even widening as they reach their end. This isn't my fault, it's 100% how they're designed and laser cut. There was nothing I could do about this; trying to cut/sand the thick ones down would have ruined the pre-cut curves. As discussed a while back, I plan to fill, carve, and sand these plank ends into a smooth transition into the stems, which is also why I didn't worry too much about the current ragged curve they form. So I'm hoping this, too, will fade in the final model. The stern is worse than the bow; for whatever reason the Y frame there guides the planks better and this doesn't look so bad (though you can still see the different in plank end width): I have two strakes to go before the planking is done, but it's going smoothly again now that I understand what I should be doing. Here's the hull overall: So I'm rather upset at the poor instructions and kit design that led me astray, as well as my own poor judgement in not realizing sooner what the correct approach would be. I was so locked into the assumption that I had to fit those planks smoothly onto those Y frames that it took me far too long to come up with a better way. Live and learn. Anyone else who builds this, LEARN FROM THIS MISTAKE and you might get a much nicer hull. Anyway, almost there and then hopefully the more fun stuff starts. Thanks for sticking with me and for all the advice and ideas that helped me continue to think this through. I hope the final product is worthy of your loyalty.
-
Chaperon by joep4567 - 1:48 - Sternwheeler
Cathead replied to joep4567's topic in - Build logs for subjects built 1801 - 1850
I agree, this is beautifully done. Nice to see such a creative and unique interpretation of a standard build. -
2021 CALENDARS ARE GOING FAST!!
Cathead replied to ferretmary1's topic in NAUTICAL RESEARCH GUILD - News & Information
In fairness, it is mid September. That's early for calendars in any year, but this year 2021 is still a decade or so away. Hard to plan ahead when you fully expect an asteroid or something to show up between now and then. -
2021 CALENDARS ARE GOING FAST!!
Cathead replied to ferretmary1's topic in NAUTICAL RESEARCH GUILD - News & Information
Out of how many? Or is that classified? -
Fantastic. Have a great trip. Mrs. Cathead worked three summers at Yellowstone (like me, she's a geologist).
-
That's a cool idea, can't wait to see how it looks on the model.
-
Fair enough, Andrew, no arguments there. Except for the Masterbuilder part, this one's not ending up on any calendars.
-
2021 CALENDARS ARE GOING FAST!!
Cathead replied to ferretmary1's topic in NAUTICAL RESEARCH GUILD - News & Information
Got mine today, too. Really well done. I hope these raise some good funds for the NRG. -
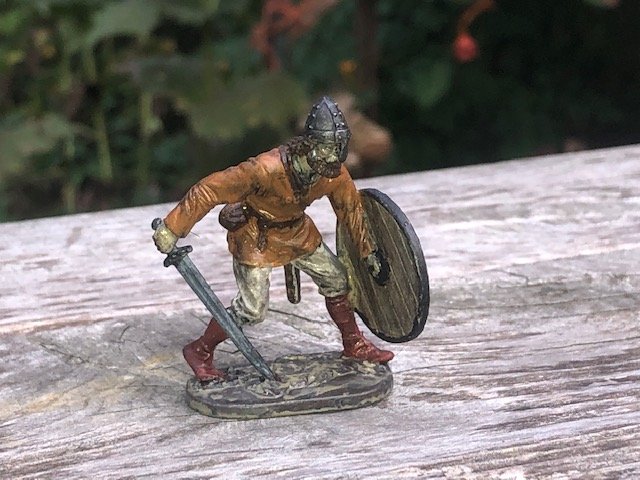
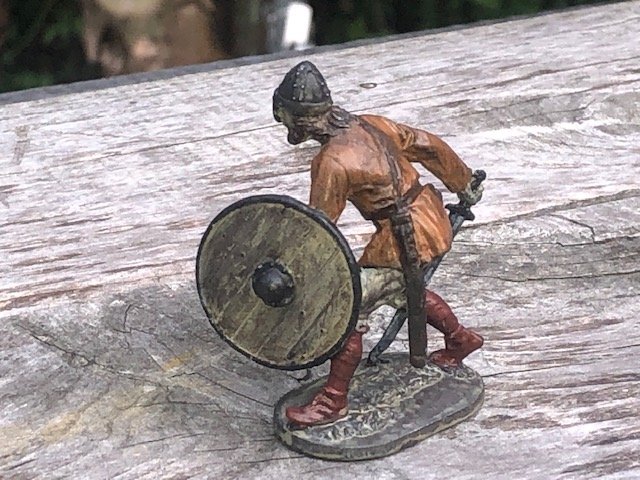
Sihtric v. 2.0 with silver applied to the helmet and sword, and darker boots. The helmet looks shinier than it really is due to my use of flash; I actually dulled it with a black wash to have the same tone as the rest of the figure. Louie, I quoted "English" because my mental frame of reference is fairly early on, before the idea of "Anglaland" really came into being and Anglo-Saxons primarily thought of themselves as being of Wessex, Mercia, etc. rather than a unified "English" culture. The argument regarding cleanliness isn't just based on that one account, but on the prevalence of things like combs, and various incidents recorded in the Icelandic sagas. I do agree that to Arab cultures of the time, everyone else was dirty and that only tells you so much. I mean, at least they had washing bowls! As for Sihtric, the name was very specifically chosen from a character in Bernard Cornwell's Saxon Tales series for precisely that reason; someone raised from unfortunate birth to a higher status due to exceptional service to his generous lord. The other two will have similarly representative names. Keep the insights coming. For the rest of you, I promise to get back to the actual vessel soon and not completely derail this thread with figures.

-
Interesting kit. I'm curious about pre-lashing the rudder to the sternpost. Are you planning on painting or staining these parts, and how will that affect the lashings?
- 28 replies
-
- 1
-
-
- Amati
- chinese junk
- (and 1 more)
-
Andrew, Most sources agree that Scandanavian cultures of this period were actually rather fastidious for their times, bathing regularly and giving high priority to grooming. Combs were standard possessions for both sexes. Saxon accounts seem puzzled by the Viking emphasis on cleanliness and appearance, with one source suggesting that "English" women showed a resulting preference for Viking men. So he might be dirty by our standards, but he's a neat freak for his time. That being said, I'm a strong believer in weathering things to "look" used, because in model terms an accurate level of cleanliness or shinyness often ends up looking fake even if it's "right". Louie, That's a good tip. I perused a bunch of reenactor photos and a lot of them seemed to use the same color for the wrapping and the boots, so that's what I did, but I'm happy to take your advice. I can shine up the helmet a bit, too. As for the shield, it's cast in pure wood while the other two figures have designs already cast into the shield, so I thought I'd leave his blank for a contrast even though I know that in reality he'd almost certainly have his jarl's design painted on. What I might do is wait until I decide on a shield design for the whole ship and then paint his to match. I wanted him to look more like a lowly warrior (perhaps, as you say, down on his luck) though I agree that the nice sword and helmet contradict that. This is partly because the other two are clearly wealthy jarls (mail shirts, magnificent cloaks, etc.), so I wanted someone who looked more like a regular warrior; maybe his jarl supplied the helmet & sword.
-
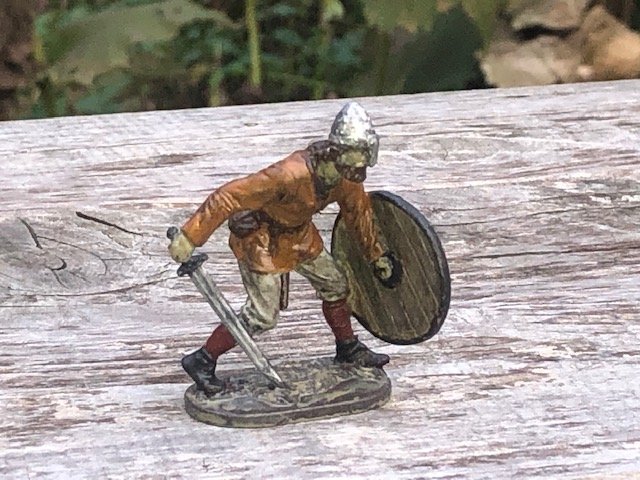
I'll have updates on the hull later, I don't feel like writing it all up at the moment, but I do have something non-complainy to post about! I tried painting my first figure today and don't think it came out too bad. First time I've done this at a scale above 1:87 model railroad figures. I'd love some feedback on realism, etc. Meet Sihtric: The one thing I know is true is that his skin tone is rather off; he has a sickly zombie warrior of the dead look. I'm working with what I have on hand and struggled to get a proper skin tone. I swear it looks worse in the photo than it does in person.
-
Chaperon by joep4567 - 1:48 - Sternwheeler
Cathead replied to joep4567's topic in - Build logs for subjects built 1801 - 1850
Good question. Some diagrams, such as the one below (from near the bottom of this page) show the mud drum being fed directly from the doctor, then transferring the water to the boiler, which makes sense as you'd want to get that river mud out of there as fast as possible. This also matches a diagram in Alan Bates' definitive book on Western River steamboats. Adam Kane's book mentions some boilers preheating the river water before sending it through the boilers, but doesn't explain how that related to the mud drum. I think you'd be safe plumbing the doctor directly into the mud drum; that's what I did on the Arabia. The side pump should have a thin feed line leading to the doctor, as it was used to prime that larger pump when steam wasn't up (the doctor was normally driven by engine steam). Now, I'm no expert on Chaperon so it may well be that the real thing had a different arrangement. You could private-message user Kurt Van Dahm, who is the authority on this vessel, if you want better details on her boiler setup. -
Chaperon by joep4567 - 1:48 - Sternwheeler
Cathead replied to joep4567's topic in - Build logs for subjects built 1801 - 1850
Yes, the first two decks would be planked. As I understand it, the third (hurricane), fourth (Texas), and fifth (pilot house roof) would be covered in something like canvas and sealed. The color would be light-medium gray. For greatest realism you would simulate the seams of the canvas rolls, but you could also just use a solid surface if you're going for a simpler representation as that would look nice as well.
