


Cathead
-
Posts
3,524 -
Joined
-
Last visited
Content Type
Profiles
Forums
Gallery
Events
Everything posted by Cathead
-
 Thanks for the clarification, John, I was having a hard time envisioning the three-dimensional nature of the interior. That's interesting that they pivoted the guns for each reloading; seems like that would lead to a really slow rate of fire and lots of wear on the deck. For coaling, is it geometrically or practically possible that they ran some kind of chute or even canvas tube through a port and down to the storage areas? That would allow bulk loading through a potentially twisty path.
 -
Steamschooner, your question triggered a thought process that I think leads to the answer, but I don't have time to explain yet. Stay tuned. Amateur, that's definitely a possibility. Proper compass timber was already becoming scarce in this period (for things like curved frames) but thick trunks were still available. My further answer to steamschooner may help answer your question above. Again, stay tuned.
- 599 replies
-
- 4
-

-
- sidewheeler
- arabia
- (and 4 more)
-
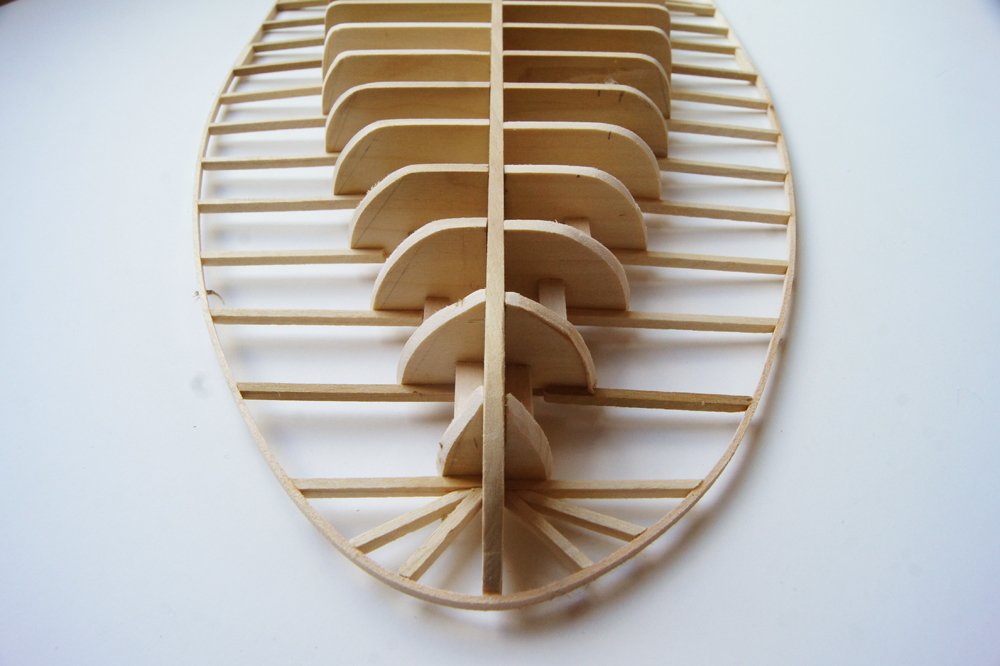
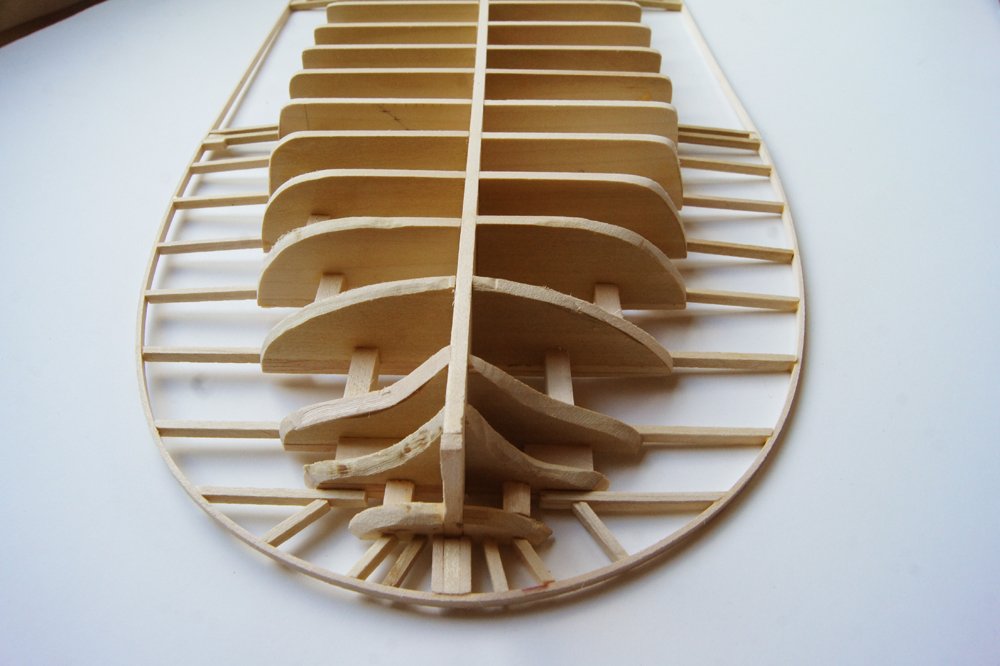
I've begun planking the hull, and immediately encountered a problem; I would love some advice. As I run the planking toward the stern, the natural lie of the planking really diverges from the line of the decking/guards. You can see what I mean here: If I try to run the upper plank flush to the underside of the guards all the way, it takes some major edge-bending, more than I suspect the builders would have done. Moreover, the effect multiplies as you go down and just doesn't work. Although the stern here superficially resembles that of a sailing ship, it's narrowing in far more, so the curves involved are really tight. My photos of the original stern fragment sure make it look like the planks ran parallel to the guards, but that isn't working for the geometry of my hull: Granted, the real fragment is very short so there may well have been any number of drop planks or something that I don't know about. In order to let the planking run smoothly on my hull, I'm going to have to drop the first two strakes and let the third one reach the actual stern (as shown above). But I have no idea whether this was a practice, or really much else about steamboat planking, as no sources I've read really deal with this question. It's also interesting that, on the real stern, the first few planks were relatively wide, followed by a bunch of tapered planks. This makes sense overall, but again I can't figure out how those wide upper planks are supposed to wrap around such a tight curve without extraordinary edge bending. If I were planking this without the visual references, I'd be tapering things from the start, but I was hoping to match (at least somewhat) what I saw in the real stern, which means a few wider planks first. Does my question make sense? Any thoughts?

- 599 replies
-
- 7
-
-
- sidewheeler
- arabia
- (and 4 more)
-
That's a fascinating question. Mark's answer makes some sense, but was there enough interior room to allow a gun to be withdrawn far enough to allow anything big to pass through a gunport? I was thinking back to my last visit in summer 2017, and found this comparable photo of the interior. You could certainly pull one of those guns all the way in, but estimating the barrel length, you'd still barely have room to manhandle a barrel or sack or something through one of those ports. Is it possible those metal gratings were removable for bulk loading? Given how much fuel even a regular steamboat burned (much less an ironclad), I'd sure like to believe they had a better coaling system than through the gunports, even accounting for cheap labor.
-
You're welcome! I'm happy to encourage interest in these fascinating craft; there's so many unique aspects to their design and operation. Thanks for reading.
- 599 replies
-
- 3
-
-
- sidewheeler
- arabia
- (and 4 more)
-
Gluing Planks When Wet
Cathead replied to mikiek's topic in Building, Framing, Planking and plating a ships hull and deck
Kurt's answer is what I do. Brief soak, shape, clamp, hairdryer, adjust and shape, glue. Works very well. Plank should fit its shape before gluing. -
Thanks, Jim! I'm afraid I know next to nothing about Australian steamers, but American river boats generally had huge wheels. Arabia's were about 28' (~8.5 m) in diameter. This gave them a lot of driving power, necessary for the high flows and rapid currents on inland rivers, but also allowed them to dip very shallowly into the water to adapt to the same rivers' ability to nearly dry up.
- 599 replies
-
- 5
-
-
- sidewheeler
- arabia
- (and 4 more)
-
Bob, Here's my answer; I'll be interested to see if others like Kurt or Roger agree. First, guards initially developed on sidewheelers as an essential structural feature to both support and protect the wheels; thus they had to be wide relative to the hull. However, they also contributed to lateral instability because although they increased the cargo capacity, they also acted as levers enhancing the effects of any weight placed on them. So when you're loading a sidewheeler, you need to be especially careful how you do it. There are stories of boats listing badly merely due to a mass rush of passengers to the rail to see some sight, given the lever action of those wide guards over a narrow hull. In comparison, sternwheelers had no structural need for wide guards, so their hulls could be built relatively wider and thus maintain more lateral stability. Narrow guards were sometimes added but in these cases it seems to generally have been considered not worth the tradeoff to go very far out. This was also affected by the era and the intended operational region for a given boat. Guards got progressively wider as the steamboat era went on, but were predominant on the lower (and wider) portions of the rivers where large bulky cargo was carried (like cotton or hemp bales). Further upriver, particularly on the Missouri, guards were seen as an impediment to navigation in the shallower, narrower channels because they could snag on obstructions; cargos in upper river areas also weren't as bulky (gold, tools, bulk foods, clothes) compared to lower-river cargos (raw crops). I've read that sternwheelers built for the Missouri generally didn't have guards at all, whereas boats built for the Ohio had narrow guards. Sidewheelers were generally used for bulky cargo anywhere because their inherent design allowed more space for such bulky but relatively non-dense cargo (compared to tools, metals, barreled goods, etc). That being said, anything was possible anywhere. The Arabia steamed all the way to Montana and even went up the tributary Yellowstone River, an amazing accomplishment for a wide, tipsy sidewheeler in that region.
- 599 replies
-
- 6
-
-
- sidewheeler
- arabia
- (and 4 more)
-
Congratulations on finishing! Your workmanship is very crisp.
- 104 replies
-
- 2
-
-
- king of the mississippi
- artesania latina
- (and 1 more)
-
My carronade (sister kit to this one) had a white metal barrel, I just checked my photos and the box. I'm almost certain my long gun did too, but I can't prove it. It somehow didn't register with me that your kit came with a brass barrel, I don't know how I didn't make the connection. I bought and built both last year. Moreover, the photo on the M-E kit page shows a white metal barrel and the kit description says "Britannia metal components". So how did you end up with a brass barrel?
- 82 replies
-
- 2
-
-
- naval smoothbore
- model shipways
- (and 1 more)
-
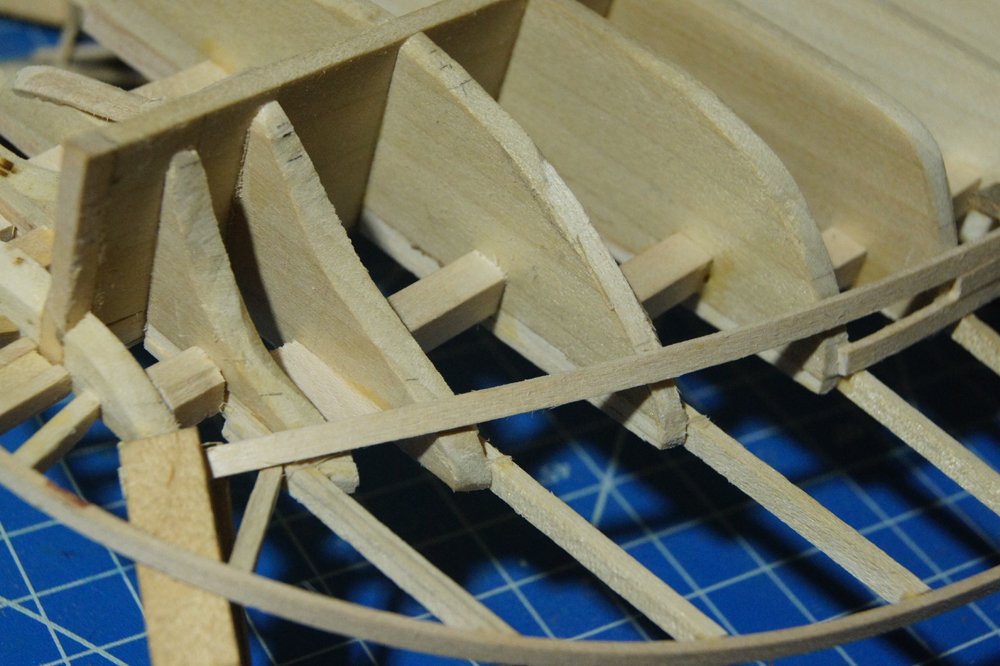
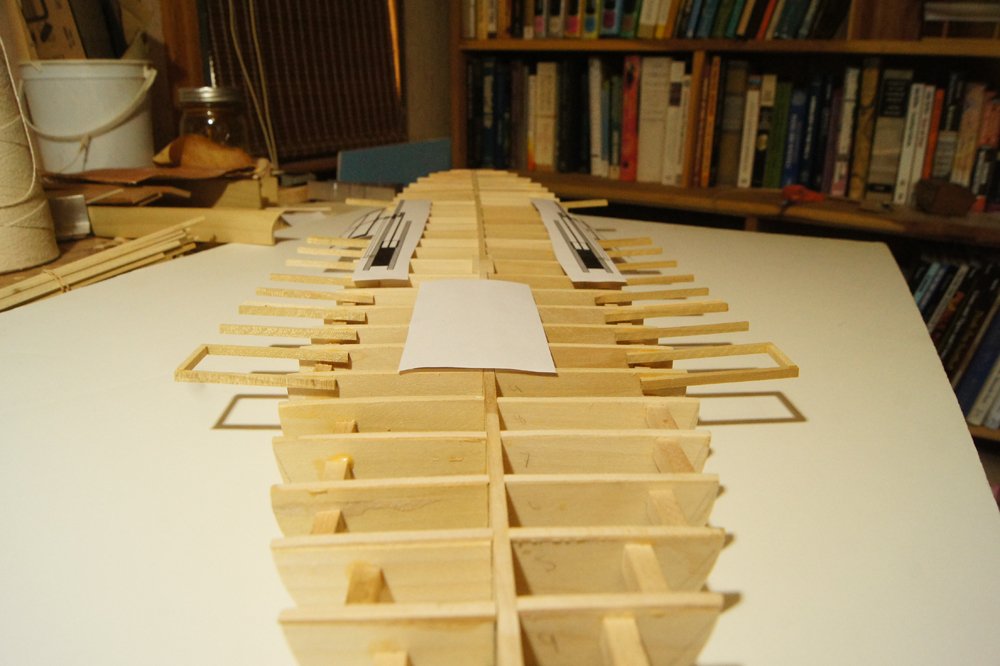
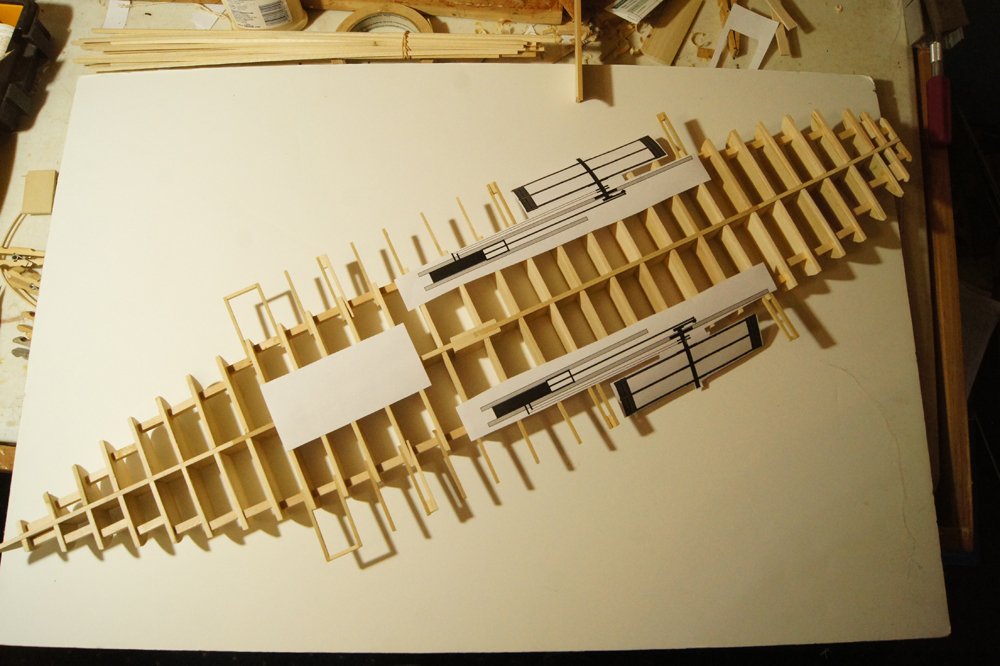
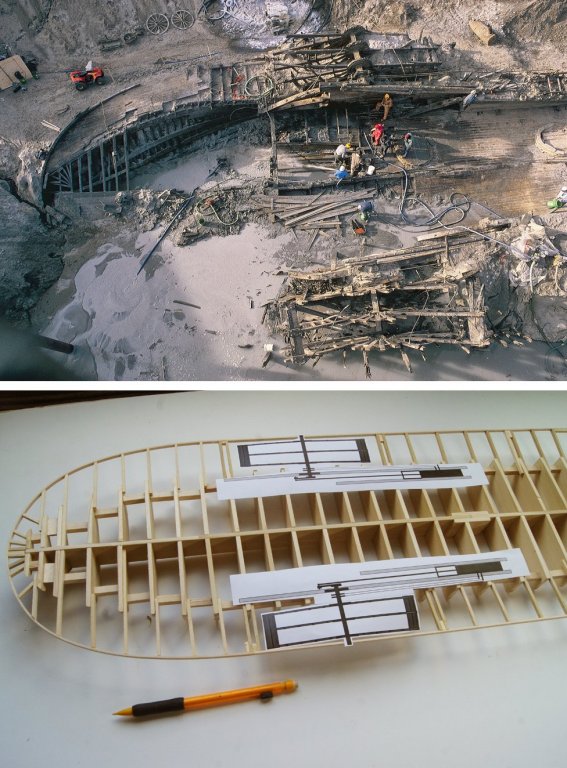
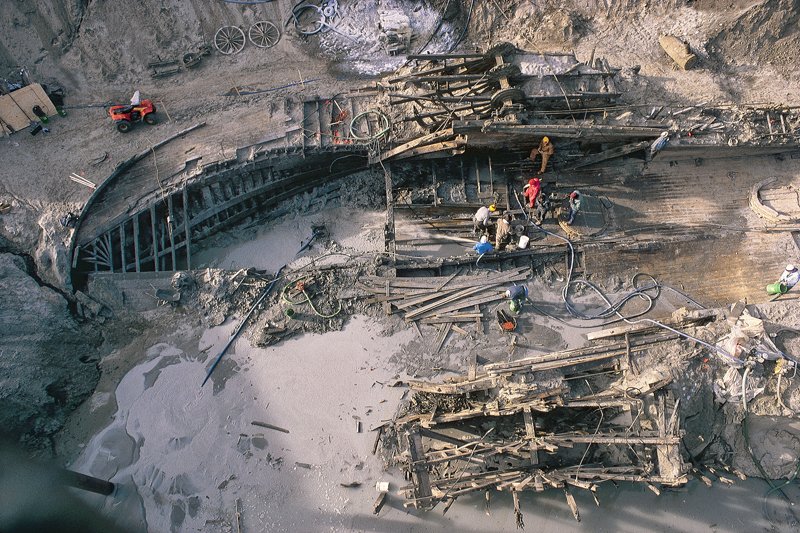
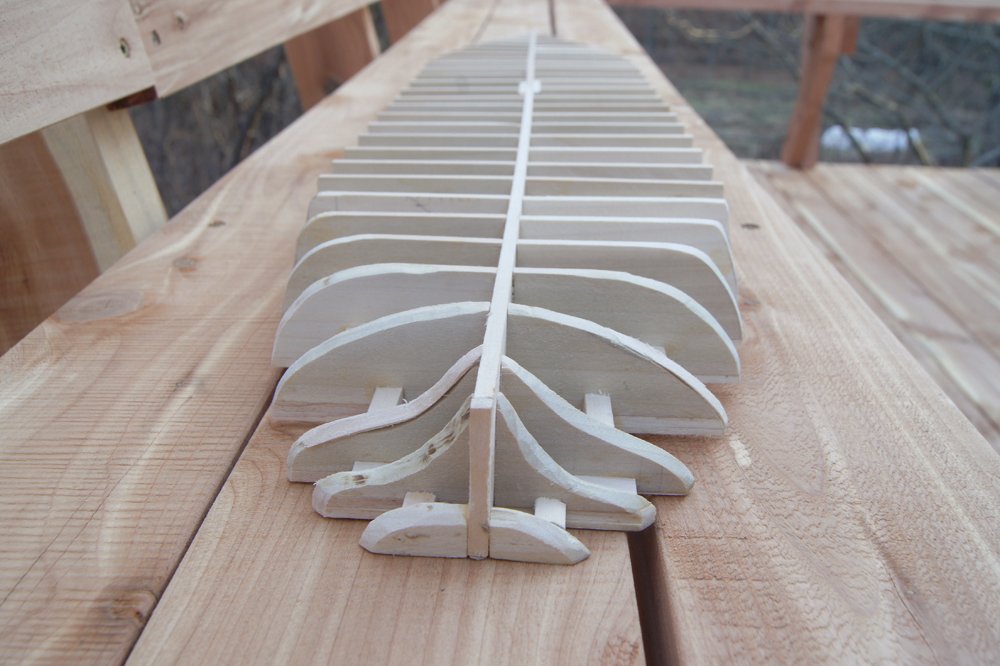
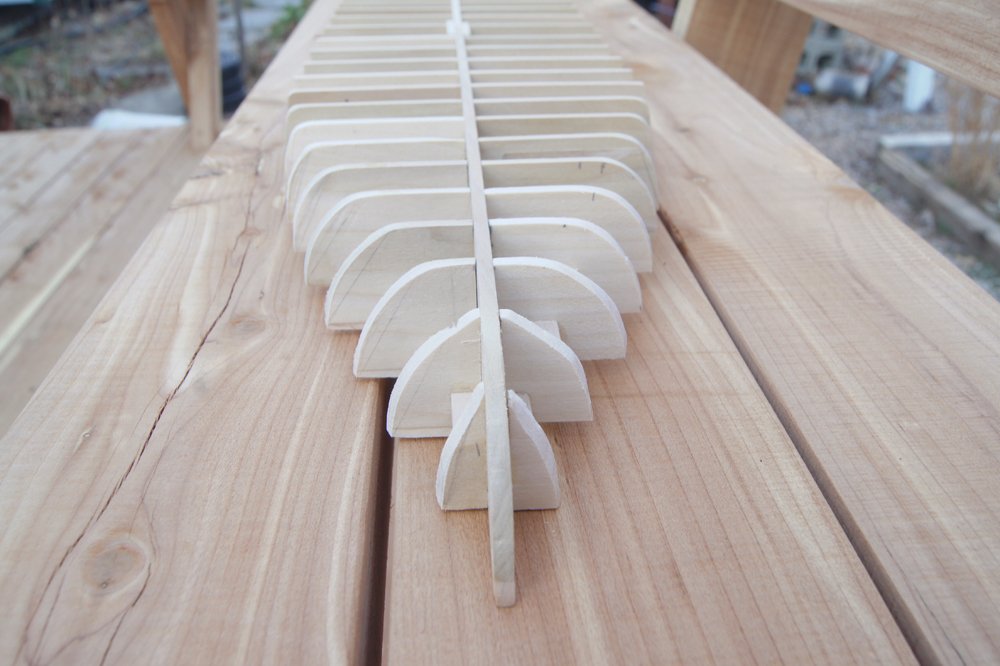
Adding the guards: Part II I built a foot-long jig to hold all the guard timbers at exactly the same length and angle from the hull, and got to work installing these (making sure to leave a gap for the wheels). My guard timbers are a bit thicker than scale, but they’re wood I already had on hand (scrap from my stepfather's workshop) and are the correct height. As budget is always a concern for me, and as these will be planked over, I didn’t worry about getting the thickness scale perfect. Plus, this adds strength to the assembly. In the images below, the paper cutouts are my scale drawings of the wheels and engines, with a blank rectangle for the boilers. Once the easy part was done (the guards along the straight sides amidships), it was time to lay out the curves around the bow and stern. I wet some properly scaled strips and bent them around each location, adjusting them to the natural curve I wanted using clamps and braces. I used a fairly even curve at the stern and a more elongated curve at the bow, following common designs for steamboats of this period. There are no images of Arabia’s bow, and only the overhead photo of the stern (shown in the last post and below). Once I had these curves clamped in place and parallel on both sides, I let them dry before fitting the rest of the guard timbers inside the curve. Whether or not to angle these toward the bow and stern is an interesting question. My understanding is that some boats’ hull framing (and thus the guard timbers attached to them) stayed square all the way along, and others followed the curve of the hull. In the overhead photo (and in person), Arabia’s guard timbers look fairly straight until the very end. Since neither the hull bulkheads nor the guard timbers will show on the finished model, I took the easy route and kept them all straight. Here's the hull with the finished guard framing, with a pencil for scale: Here are the bow and stern from below, giving a better sense of the interaction between hull shape and guard shape: And here is the stern from above, laid out for comparison with the wreck photo at approximately the same scale and angle: The next step will be planking the hull. This had to wait until the guards were installed, so I could be sure to nestle the top strake right up against the lower guard timbers. I felt it would be easier to build the guards properly with a jig and align the planking to them, than to plank first and try to create the perfect curve along the hull that would support a smooth run for the guards. With bitter cold already here and lasting through the coming weekend, I should be able to make a start on the planking. Thanks for reading.


- 599 replies
-
- 14
-
-
- sidewheeler
- arabia
- (and 4 more)
-
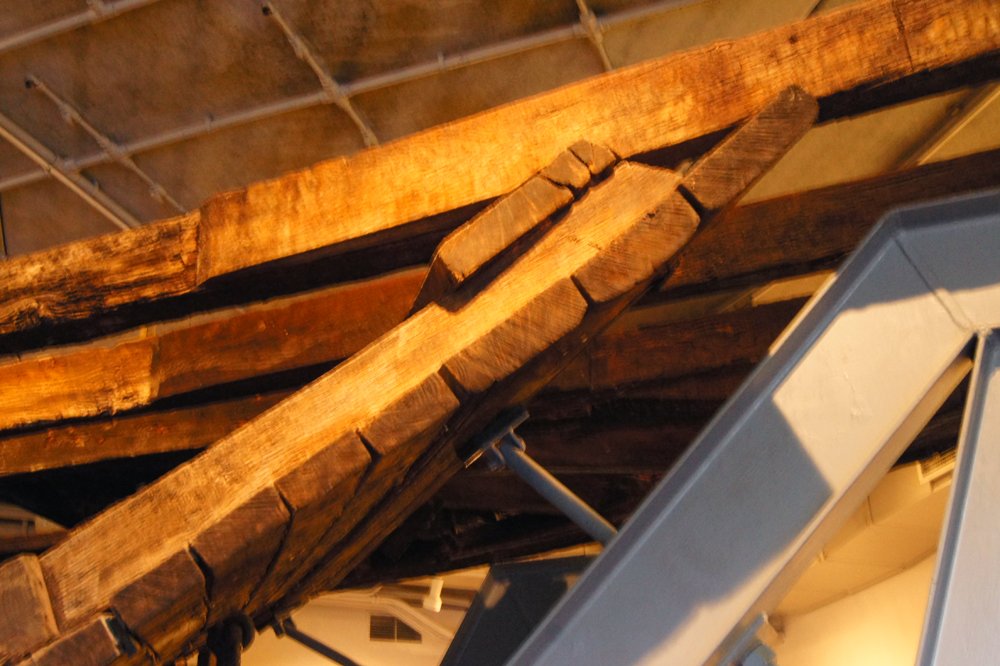
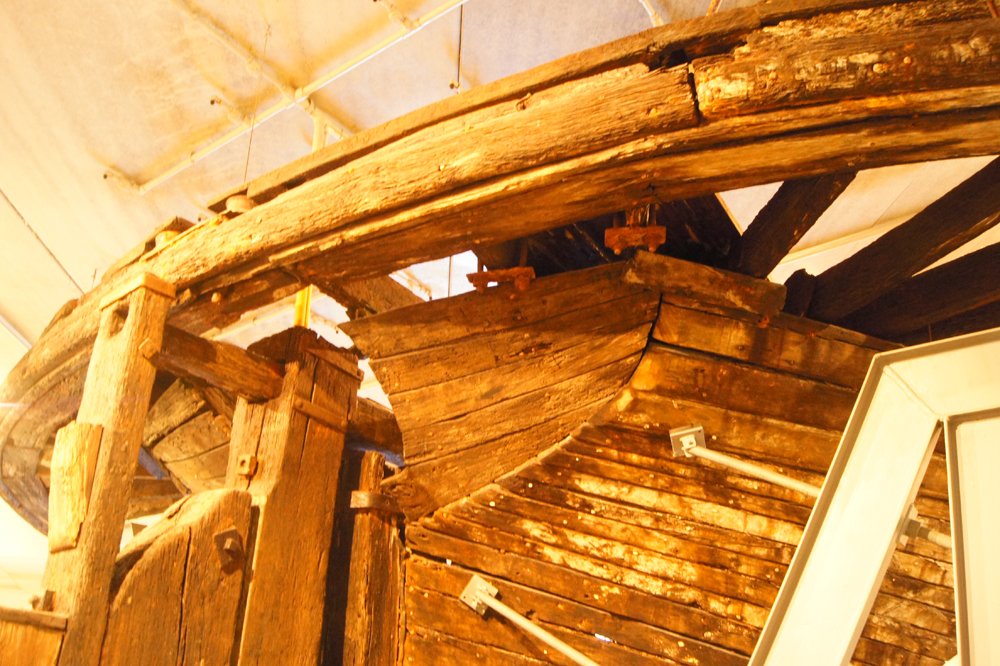
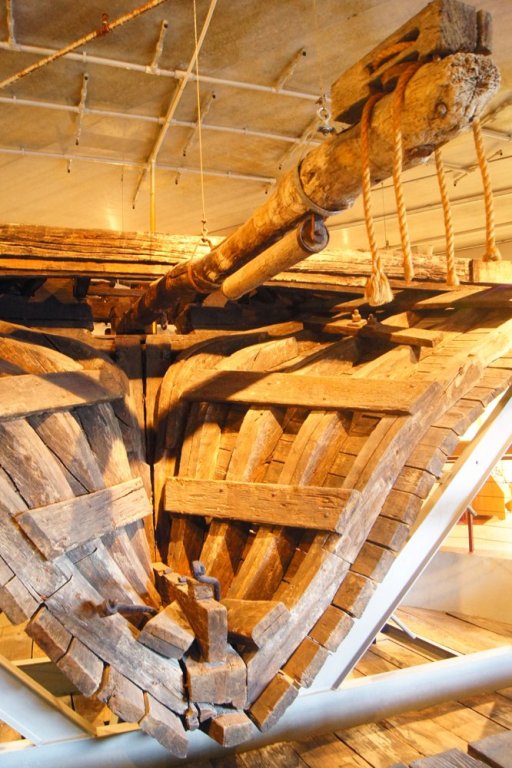
Adding the guards: Part I A quiet holiday weekend finally allowed me to make significant progress. With the hull reasonably faired for planking, the next step involved installing the guards. These are lateral extensions of the main deck that can nearly double the deck's width relative to the hull (see this cross-section for an example). On a sternwheeler, these were often either non-existent or relatively narrow. On a sidewheeler, they were far wider in order to accommodate the wheels themselves. Below is an overhead view of Arabia's hull during excavation, in which you can see the guards curving out from the stern to envelop the port paddle wheel. These guards were supported by timber extensions attached to the main deck timbers (i.e. the main deck was supported by different beams than the guards). Arabia's hull was roughly 30' wide and her paddle wheels were roughly 6.5' wide. Thus the guards need to be at least 8' wide to accommodate the full wheel and support both the outer end of the axle and the wheel housing, adding approximately 50% to the boat’s total width. To check this assumption, I scaled the photo to my 1:64 ruler and confirmed that the guards fit that ratio (allowing for the angle of the photo and distortion of the hull). Another question relates to the vertical angle of the guards. The cross-section linked above shows the guards essentially horizontal, but other references (such as Alan Bates) show guards with a noticeable inward angle (opposite to the natural camber of the deck). This latter style makes sense to me, as it (a) drains any water toward whatever scuppers were used to drain the main deck just outside the hull, and (b) allows an inward cantilever effect that would help support the significant weight carried by the guards (such as the wheels themselves and bulky cargo like cotton or hemp bales). There are no profiles of the Arabia available and the overhead view above doesn’t clarify this, so I invoked artistic license and chose to angle my guards because it’s logical and I think it adds visual interest. Here are a few photos from the preserved stern-most section of the hull that show a bit of the aft-most guards. First, a closeup of how the guard timbers interact with the deck timbers and the hull. The former are attached in parallel with the deck timbers, extending out over the side of the hull as described above. They're notched to fit over the upper strake of hull planking (the gaps between timbers would be filled with short pieces of wood): Below, you can clearly see how the guards extend the deck in a sweeping curve around and beyond the sternpost. The guard timbers only begin to angle away from the deck timbers in the very few aftmost feet. I love how the outer "bumper" of the guards (and thus the deck), a steamboat's equivalent of the wale, is just a series of split logs with bark still attached. How typically frontier! That's going to be an interesting detail to replicate. Looking inside the stern, you can see the slight camber of the deck beams as they curve outward to meet the guard timbers (at right). It's too bad I won't be able to include this log tiller (it'l be buried beneath the deck and the aft superstructure). These photos aren't great, but they show the only part of the hull that was preserved and the only clear show of the stern during excavation (there are no photos or drawings of the bow). So they're all I have to work with. In Part II, I'll build my version of the guards and the Arabia will start looking like a steamboat and not a cut-down battleship.
- 599 replies
-
- 7
-
-
- sidewheeler
- arabia
- (and 4 more)
-
Hah, Ken, you must be salivating. You're the biggest ACW brownwater navy fan I know!
-
I've completed the other half of the hull framing and done a preliminary fairing. As one might expect from a hand-cut set of bulkheads, there are places I need to shim or fix, but it's no worse than I've experienced in certain kit models. Below is the hull as it stands; there's an optical illusion making it appear to warp inward toward the center, but that's just because I didn't bother about lining up all the braces between bulkheads. It's actually quite straight along the sides. And views from fore and aft: I need to keep working on the fairing to be sure I've got it right. I'm amused that, as a whole, the hull right now looks quite like I'm building a waterline battleship in a different scale. It's going to change dramatically once the deck framing begins. Apologies for slow progress and updates, other commitments just keep getting in the way. Thanks as always for reading.

- 599 replies
-
- 9
-
-
- sidewheeler
- arabia
- (and 4 more)
-
Best wishes for your father, yourself, and your family. The model will be there for you when you need it.
-
John, While I can't speak to whether or not lead-based paints were used, it wouldn't have been to protect from rot or decay. First, only the wheels, and sometimes decks and other parts of the superstructure, were painted red. Hulls were generally white. Rot and decay also wouldn't have been the major concern, both as freshwater is more forgiving and because the lifespan and dangers faced by these boats generally meant that rot and decay weren't likely to be the cause of death (so to speak).
-
I did some research on American paint history, and came up with this narrative. Commercial paints really didn't come onto the market in a widespread fashion until the late 19th century. Before that, paints were hand-mixed (such as on a farm) or at least made in smaller batches locally using grinders. Red was commonly made from a base of linseed oil (produced from flax, a common farm crop), which had an orange tinge. To this was added milk for texture and iron oxide to deepen the color. As a geologist, I agree with Wefalck that iron tends to produce an orange-red rather than a deep brown-red. Several American paint companies offer "historic" collections that were developed with the help of various preservation trusts and other organizations. For example, this collection from Benjamin Moore is supposedly based on 17th-early 20th century colors (i.e. before modern paint chemistry). I was immediately struck by the fact that all of the red shades in this collection do, indeed, have an orange tinge to my eye that fits the narrative about linseed oil and iron oxide. My guess is that their "Audubon Russet" or "Mayflower Red" might be good matches for steamboat red. Given that the vast majority of riverboats in middle America were built on the upper Ohio River, close to extensive sources of iron in the mountains to the east and south as well as extensive sources of milk and flax in the farmlands to the north and west, it makes sense that steamboat red would have followed this palette. But I'm just theorizing based on internet research here, I'm no expert in this regard. EDIT: Mrs. Cathead just asked what I was researching, and pointed out that we have linseed oil, milk (from our dairy goats), and iron oxide (from our bedrock and soils as well as, you know, farm rust) on hand. I may just have to play with mixing up a small batch of "historic" paint to see what I can produce. It'd be pretty neat to color my Arabia with a historically accurate stain.
-
Everything looks good. Glad to see you back at work on this.
- 362 replies
-
- 3
-
-
- active
- revenue cutter
- (and 1 more)
-
Thanks for sharing. I agree that such times can make it hard to focus on a model, even if in theory it seems like a great escape from reality. I hope you'll be able to give thanks for good memories of your brother.
-
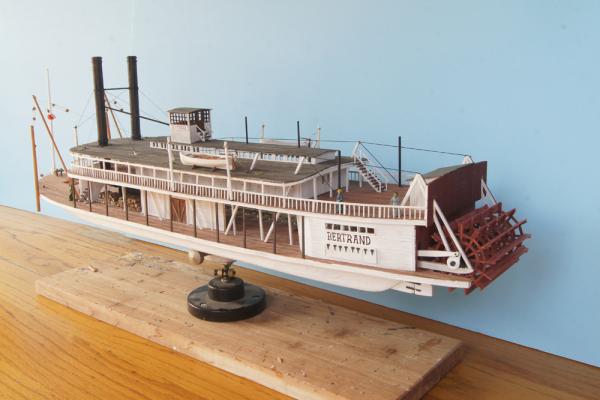
Cool! I hope you'll post that in the Riverboats general thread, too. Also, welcome, Scott! Nice to see another local on here. If you want to try a Missouri River boat, Kurt's link above contains plans for two very good ones, Far West and Bertrand.
- 599 replies
-
- 3
-
-
- sidewheeler
- arabia
- (and 4 more)
-
That's a great question, don't know the answer off the top of my head. Will do some digging (unless someone else knows for sure).
-
Here's my understanding. Some of the real experts like Kurt or Roger may well weigh in and correct me if necessary. Red was common in nineteenth-century America because it was one of the cheapest paint colors to produce in the era before modern paint chemistry (along with white). That's one reason it became the standard barn color as well. The fact that most American riverboats were red and white was primarily economic. Red also didn't show staining or dirt as easily as white, which is one reason it was used for decks, wheels, and often for the stern area upon which the wheel threw water and/or the outhouses discharged (such as on Bertrand, below). A white superstructure made the boat look clean and attractive, while a red wheel, stern, and deck were utilitarian. I don't think there was any connotation of danger or warning; there was really no way for a passenger to approach a stern or side wheel, and the boilers were more dangerous anyway.
-
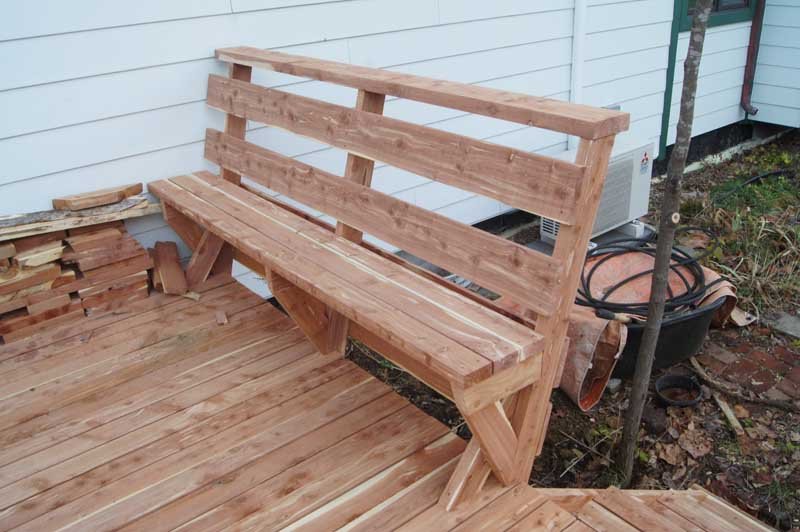
So, two weeks later, I finally get back to this. I consulted and experimented with both steamschooner's plans above and some I found for the sidewheeler Buckeye State (1850), and was convinced that I wanted a much narrower bow. I'm very happy with the half-hull approach I've been using, pinning each bulkhead temporarily in place, because it's been very easy for me to experiment with different hull shapes. Below is what I've settled on, a long, narrow bow that seems more typical of the era before spoon bows really came into use. I re-read Adam Kane's book and confirmed that the narrow "model" bow was prevalent until around 1870. We'll never know for sure just what Arabia's bow looked like, but this is a reasonable guess. You can compare this to the photos earlier in this log of the broader, more bluff bow I started with. I've also been working on fairing the stern frames, they're at least roughed in. Here's how she currently looks: The background to these photos is one reason my model work has been delayed; I've been replacing the deck outside our kitchen for the past two weeks (when I can find time) and that's both been taking up time and making me a bit less interested in other wood projects. I'm using all fresh-milled cedar from logs we cut last winter, cured through the summer, and milled this fall. It's nice to work with, and even though the color will fade over time, has a very pleasant aroma and look. I still have to build most of the bench-railings, only having done this short section so far. Next step on the model is fairing all the bulkheads to be sure I'm happy with the run of planking, then I'll duplicate these shapes on the other side of the model. Thanks for reading, and for being patient with my slow progress.
- 599 replies
-
- 8
-
-
- sidewheeler
- arabia
- (and 4 more)
-
That just looks fantastic. Weathered enough to look realistic but not overdone, and lovely detail. This has been really fun to follow.
-
Two planks a day? You must be retired, you're cruising right along! One thing I realized on my build was that the aesthetic effect was improved by ensuring that the planking on both sides of the stem lined up; it looks especially nice when each line of planking matches its opposite partner. I didn't always get it right, but it helps to keep in mind as you move forward. You're doing great so far.


