


Cathead
-
Posts
3,065 -
Joined
-
Last visited
Content Type
Profiles
Forums
Gallery
Events
Posts posted by Cathead
-
-
Here's another reason to be careful reposting pictures: those photos are still hosted on the original server. That means, whenever someone loads a MSW (or any internet) page with a linked photo, the computer goes and grabs it from the original server, creating traffic for that site. Sometimes, reposting a photo that a whole bunch of people see means really elevated traffic for the original site. Great, right? No. Because some sites, especially smaller or personal ones, have bandwidth restrictions based on what they pay for hosting. If a photo on that site suddenly starts getting a ton of traffic, it can bump that site out of its paid bandwidth, and either shut the site down for overuse, or cause the site's owner to get a bill from the hosting company for extra service provided. As someone who manages his own site for business purposes, and has a lot of photography there, this is a real potential problem.
The internet is often compared to a plumbing system. In this case reposting photos is a bit like tapping into someone's water line to taste their water. In small doses it often doesn't matter, but 1. it's still stealing, 2. if you add that straw and lots of other people start using it, you're really stealing and driving up their water bill, and 3. it doesn't benefit them because the other drinkers don't realize whose awesome water they're drinking.
We all do this from time to time, it's too easy not to. And sometimes it's from a site that really is public domain or otherwise not a problem. But thanks to Chuck for helping us all think about how and why we do it.
- robin b, mtdoramike, hornet and 12 others
-
 15
15
-
This may be a bad idea, but I've used a sharp knife before to initiate fairing in places where there's a lot of material to be taken off, like near the bow where it's a sharp angle. Using either burn marks or my own pencil line as a guide, I scrape the knife blade along to gently peel off the first wedge of material. With a steady hand it doesn't go too deep, and it saves a lot of initial sanding.
The other thing I like about this method is, I find it easier to get about the right initial angle with the knife than working down a sharp corner with sandpaper. There's less stress on the frame, and once the angle is roughly established, the sandpaper already flows across a somewhat smooth surface rather than grinding over a resisting sharp edge. But it's also riskier since you can take off to much with a slip of the hand. Just the two cents of a young amateur. Maybe try it on scrap wood first to see if you can control the knife to your satisfaction?
Finally, I found an adjustable stand really helpful. My hand is steadiest at certain angles, and such a stand meant I could position the model in whatever orientation let me hold my hand at its ideal orientation for cutting. I wouldn't want to try it with my wrist at an awkward angle to a static model.
-
-
Erik,
You're not the only neat freak, though I tend to work in cycles. Mess builds up temporarily while I'm in the middle of a step, then I go on a whirlwind of cleanup to get things trim again. It's about a weekly cycle. My work station, about the size of yours, is right in our living room, which helps motivate the organization.
In any case, I'm really intrigued by this new twist on "kits", and will happily learn from your experience. As another model railroader turned ship modeler in the last few years, we're on a similar trajectory! Similar name & age, too, didn't know I had a long-lost twin.
-
Where and how do you get a chance to look into any other model Kit and compare?
You make use of forums like this, and elsewhere, to research kits and manufacturers. There is a wealth of personal experience and testimony about the subject, here alone much less on the internet at large. You look for build logs for that kit, and read what experience builders had. You then contact those builders and ask their further opinion. You post a general question, if it hasn't already been asked, about a given manufacturer and kit. It's why MSW has this section:
General Ship Model Kit Discussions - Questions and reviewsThis is the place to discuss model kits in general and ask members questions relating to any such kit or kit manufacturer.
Particularly if you aren't experienced with kits, actually handling the kit may or may not teach you much (for example, misunderstanding the laser burn marks as a defect), whereas crowd-sourcing opinions and reviews from many builders will given you a better understanding of the kit or company overall.
I've purchased three kits, each of which I researched in this way, and each of them as been as I expected when I opened the box because I did my homework online.
In an ideal world, we could all also go to a nice local hobby store with floor-to-ceiling kit boxes to peruse, but almost none of this live in that world. The next best stage is learning from our peers, and I've found that I can trust the folks here to provide useful and accurate information.
-
If you're judging all possible model kits by the one kit you saw from one manufacturer, that's your loss.
- Jack12477, Ulises Victoria, Canute and 1 other
-
4
-
The value is partly intellectual property. What do you value a professional's time at? OK, consider all the hours you would put into figuring out how to scratchbuild a given model, add on more hours to figure out how to represent that process to customers, add on more hours to figure out how to design kit pieces to be easily/cost-effectively manufactured and useful to the customer, add on more hours for drafting accurate plans, and so on. That all has to be in the price of a kit. Most hobby builders (most hobbyists in general) ignore the intellectual cost of what they do, but any good businessperson can't afford to do that.
An example from my own experience. I'm a vegetable farmer, among other things. It drives me berserk when someone comes up to a farmers market stand and challenges me as to why X produce is so expensive at Y $/lb, when they easily grow it in their garden or neighbor Bob gives it to them from his garden. Well, those people are hobbyists. They aren't charging themselves a living wage for every hour they spend in the garden, they aren't counting the intellectual time it takes to plan out a full-scale farm, they aren't trying to support a family and health insurance and retirement savings from their fun little garden. It's not a fair comparison.
As for contents, those dowels may well be standard hardware store dowels. But the point of a kit, at least most kits, is that it's self-contained. People who buy kits don't necessarily want to open it, and see the instructions start with "now go buy these other things or you can't build the kit". Would you buy a lawnmower that didn't come with sparkplugs, even though they're easy to get at a different store?
Of course there's a markup. There's a markup on everything you buy. Pretty much any retail product has a markup of 30-50% from wholesale, because the retailer is an independent business that has to pay for everything involved in modern life from the profits of the business. Then there's a markup over cost to reach the wholesale price, because the manufacturer has to pay for everything involved in modern life, plus the cost of developing the product in the first place. So, yeah, of course the "value" of the kit's contents don't add up to $350 in terms of what's physically there. But only someone who doesn't value others' professional time would think it would.
None of which is to say there aren't better and worse kits out there. I know nothing about the kit mentioned above. But, boy, a great way to get under a businessperson's skin is to complain that you could do it cheaper and better yourself. Fine, go do so, and be proud of yourself. I'm in awe of good scratchbuilders. But most of them realize they're paying themselves pennies per hour, whereas everyone involved in designing, producing, and selling a kit is trying to make a living doing it.
-
Looks nice Paul, good work!
As for your question, I installed the floor first, before adding the thwarts or squeezing the hull. It worked well and I had no trouble with the latter, as you're really only changing the shape of the upper-most portion of the hull. And installing the floor after the thwarts would be a real pain. I did, however, wait to install the quarterdeck until after I'd squeezed the hull, as it meets the hull much farther up the sides and I was concerned it would be affected by the reshaping. So I didn't insert the second-to-last thwart (the one that covers part of the quarterdeck) until after I'd shaped the hull. It all worked out fine.
- mtaylor, CaptainSteve and Canute
-
3
-
-
-
Skipper, I don't see it as "justification", necessarily, but rather as an interesting exercise in how and why we make the choices we do. Sometimes, by judging or assessing others, we learn things about ourselves. There's certainly a line that can be crossed, but I don't think it's inherently unreasonable to question why something is done.
-
One aspect I haven't seen discussed (or possibly I missed) is mental. Now that I'm nearly done with my Bertrand scratchbuild, definitely the most complex model project I've ever tackled, I'm quite looking forward to building something with instructions. The biggest different between scratch and kit building is in your head; in the former you have to think everything through ahead of time, have a complete plan for order of operations, ordering parts, making sure items are ready when you need them, doing steps in the best order, etc. Even a kit with poor instructions gives you some sense of where to proceed next, and the comfort that someone has thought through how that project works (even if they thought about it in another language).
I'm taking on Chuck's longboat next, and can't wait for him to tell me what do to for a little while; it's going to be very relaxing after nine months of constantly thinking about the next ten steps in my build. I can easily imagine how many people would enjoy gussying up a kit while still wanting that basic framework of instructions and such. The mental leap to personally "designing a kit" is pretty large, in my opinion.
Added thought: I don't at all buy the argument that ship modelling is too expensive. It's only true if you have no sense of personal economics or self-control. If you buy a soda or a candy bar every day without even thinking, you've just spent the price of a good model kit annually. My Bertrand has cost less than $300 in materials and was built with basic hand tools. I'm self-employed and live on a very tight and careful budget, and I can afford to build models because I budget for them, and make choices based on what I can afford and justify, not what I want or dream about.
-
Thanks for the names. I asked so I could look them up in my copy of Way's Packet Directory, which lists most known riverboats from 1848-1994, and see if I could identify a boat the kit might be based on. Unfortunately, there are no listed boats with names anything like Matthew Spress or Bourbon (anything), so that was a dead end.
Regardless, I'm very interested in how you approach this kit. Thanks for the profile photo, there's definitely still some sheer there!
-
I'm excited to follow this build, as I don't know much about these kits and want to learn more about their content and quality. I agree, every steamboat kit I've seen looks foreshortened to me, like someone squeezed the plans in their drafting program. Do the included materials say anything about what they based the design on?
I can't tell from the photos, but does the main deck have any sheer to it? My understanding is that decks gradually flattened over time, as builders realized they didn't need to copy ocean-going vessels in that regard. It would certainly make various aspects of the kit easier!
-
It's not just the title, the log itself needs to be in the proper area (this thread is under news and reviews). You could either start a new thread within Kit Logs, just copying over the content of post #8 to start it out, or a moderator could move the whole thread over and rename it. Just starting a new one would seem easier to me.
-
Cap'n, thanks, I remember that now from your build and will go re-investigate. I'm reluctant to try the chisel approach on a nearly-completed model, especially on a surface which has overhangs on two sides. Perhaps I should have done it very early on.
Ken, my original plan was to order turnbuckles from Grandt Line along with all the windows & doors for this build. When I decided to scratchbuild all the latter, it threw that order out the window and now I'm reluctant to pay shipping for just one tiny item. I think, at this scale, I'm best off as you say just using a really thin piece of material to simulate the effect. I think they'd be rectangular rather than tubular, though.
Chborgm, Bertrand's wheel was estimated at 18' diameter and 28' across. I honestly don't know how much variation there was in wheel size among boats of different eras, builders, and intended regions of use. I will say, for whatever it's worth, that every steamboat kit I've seen "looks" generally out of proportion to me in the photos, and was one factor driving me to try scratchbuilding.
-
-
Chborgm, if you're starting a build log, may I kindly suggest doing it with a separate thread in the Scratchbuild Log section:
http://modelshipworld.com/index.php/forum/11-build-logs-for-scratch-ship-model-projects/
Once there, check the red-highlighted link for guidance on the proper way to title your log. MSW has been trying to standardize the way people present build logs, and you'll make the moderators' jobs easier by following the guidelines.
I'll happily follow this build, as I don't know much about steamboat kits.
-
Posted this on your build log, but figured I'd share it here too if anyone else wonders the same question:
Based on my experience, go straight at it with carpentry clamps:
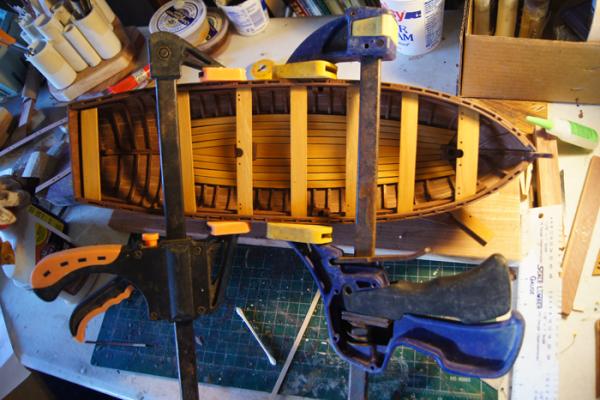
This issue scared me, too, until various nice folks on my log assured me that it was a common quirk and quite fixable. So I just tackled it head on and hoped for the best. I found that when the thwarts are glued in, they're enough to hold the hull in place without spreading, which made installing the gunwales easy as the hull was now stable and the proper shape.
-
Paul, go straight at it with carpentry clamps:
This issue scared me, too, until various nice folks on my log assured me that it was a common quirk and quite fixable. So I just tackled it head on and hoped for the best. I found that when the thwarts are glued in, they're enough to hold the hull in place without spreading, which made installing the gunwales easy as the hull was now stable and the proper shape.
- Canute, CaptainSteve and GrantGoodale
-
3
-
-
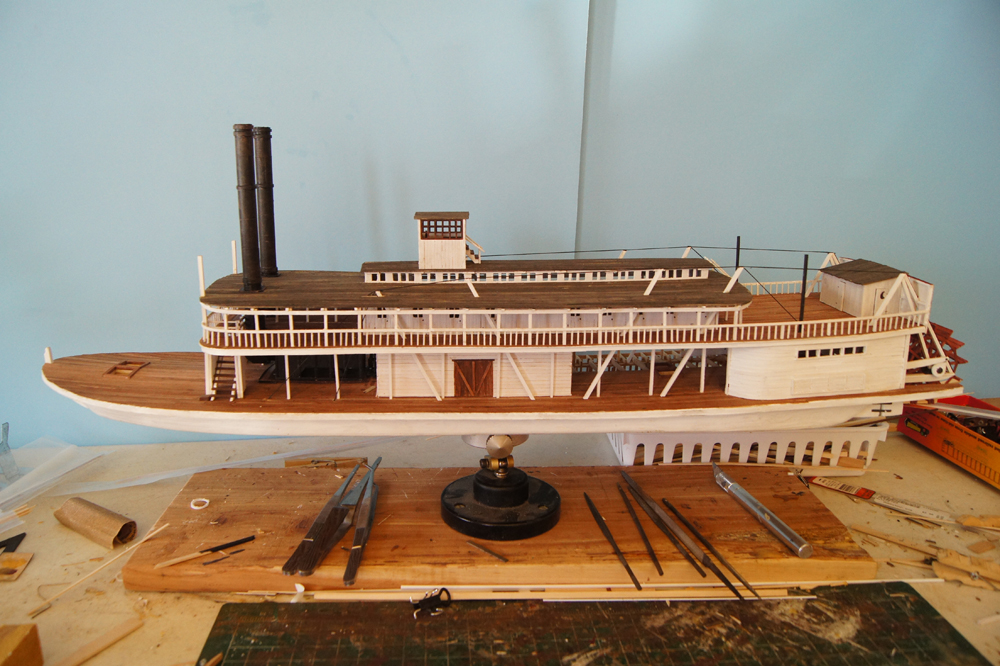
Lots of progress lately. By the end of this post, Bertrand will be ready for the final bits of rigging and details. The end is in sight! Here we go:
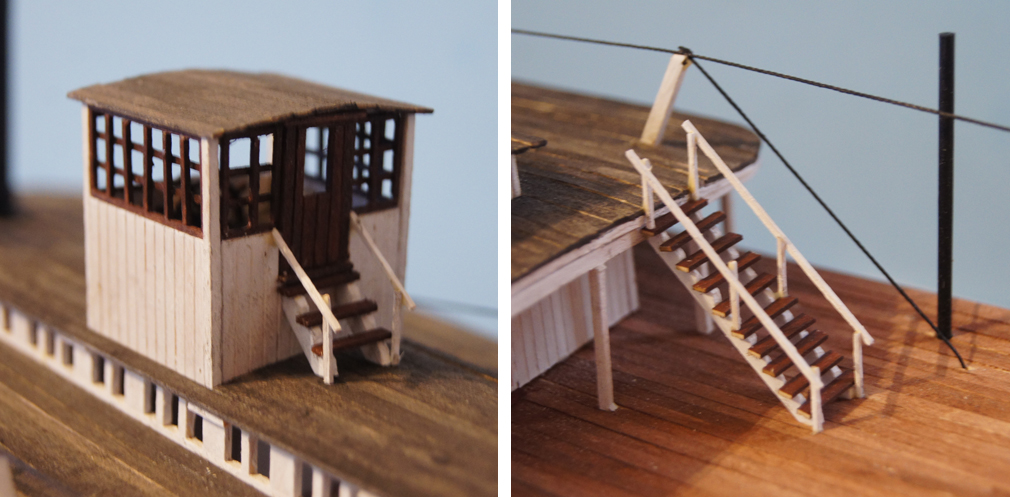
Pilot house

Here I'm laying out pieces for the pilot house. Like the cabins, this uses pre-scribed wood, though I'm cutting & staining the window & door frames individually. I didn't have anything that small on hand, so split each piece manually from wider strips, using a hobby knife.
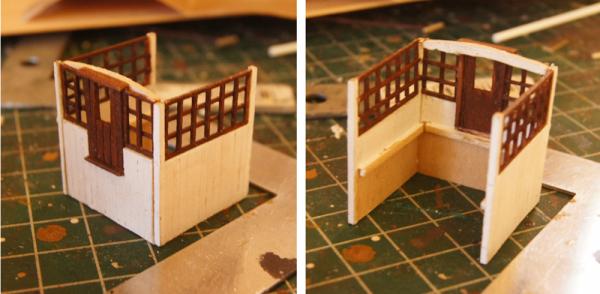
Here you see the pilot house partially assembled. You'll notice that I made the windows with two layers of wood, technically not accurate since a real window would have the panes and frames all in one plane. I decided that I didn't have the skill to make perfect square small-paned windows like these in 1:87, so went with the two-layer approach as a reasonable approximation. One reason I stained the windows dark, is to help hide their 2-D nature. The resulting shadow keeps the eye from seeing that, compared to if they were all white. And I think it looks nice. When you step back more than 6", it's hard to see the difference.
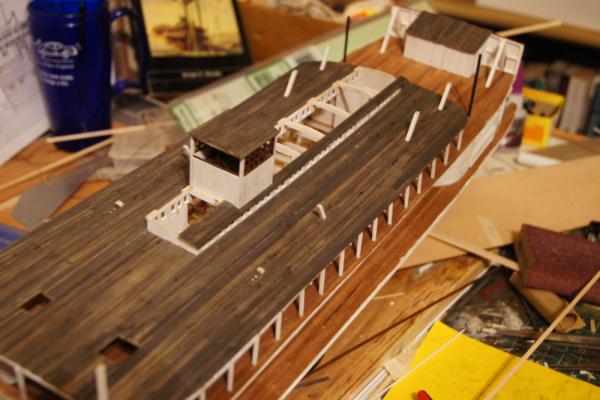
Here's the pilot house installed, with a beginning to the clerestory roof. I carved a series of roof braces with a gentle curve to support this area, instead of bothering with full rafters, as this can't be seen from any angle. Much easier. Then I just planked in both roof areas as I'd done the hurricane deck, using the same pre-coloring technique with pastels. If you look real close, you can see the wheel, which I made by cutting a hoop from the styrene tube soon to be used for the chimneys, and gluing thin styrene rods radially. I thought I took pictures of this process, but can't find them now. Oops.
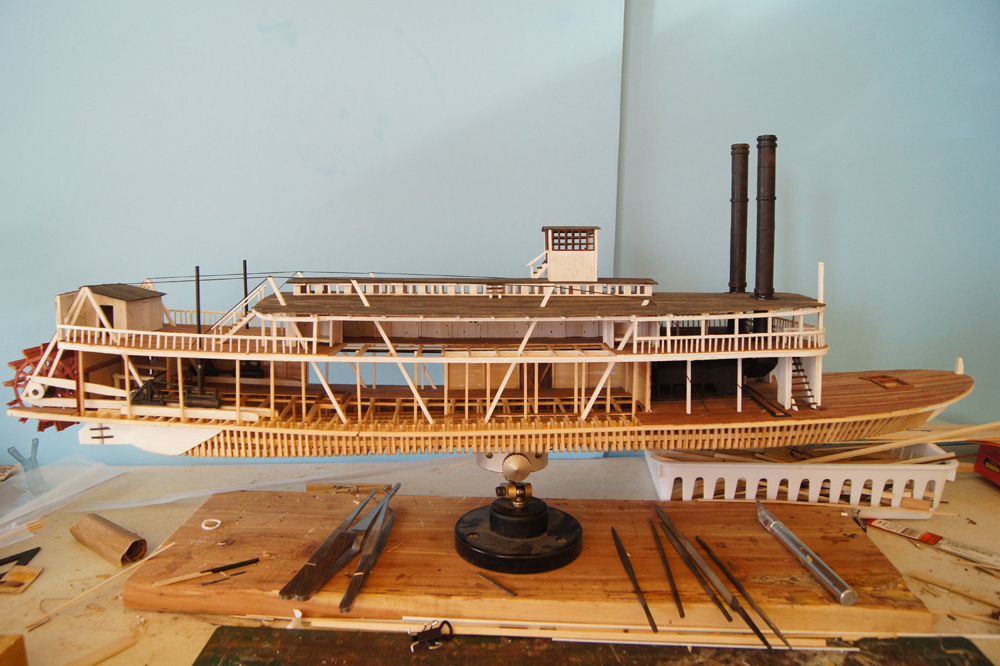
Chimneys

Though the model railroader in me wants to call these smokestacks, apparently the steamboat world generally called them chimneys. In any case, these were built from two diameters of styrene tubing, one of which slides neatly into the other. I cut a series of hoops from the thicker diameter, and drilled holes in styrene sheet to create a kind of cover plate for where the chimneys cross the hurricane deck.
Middle photo shows the assembled chimneys. The thicker, lower section simulates the heat shields such chimneys used to protect passengers on the boiler deck from the hot chimney pipes. The various hoops simulate thicker iron bands on the chimneys, placed approximately where various plans and period illustrations suggest they should be. As styrene is too smooth and shiny to really simulate rough iron to my eye, I used a past trick of mine and wrapped the chimneys in layers of strong masking tape, making each seem a quarter turn from the layer below. These seams simulate the chimneys' construction from tubes of iron, and produce a nice rough texture.
On the right, you see the painted and installed chimneys, weathered with rust-colored pastels. I think they look convincingly like frontier iron work.
Stairs

Three sets of stairs are needed to reach the pilot house from the boiler deck; one from boiler deck to hurricane deck (right), one from hurricane deck to clerestory roof (not shown), and one from clerestory to pilot house (left). I built these in the same manner as the main staircase from main deck to boiler deck, described before in this build. In the background, you see some hog chains, which I'll discuss soon.
Boiler deck railing
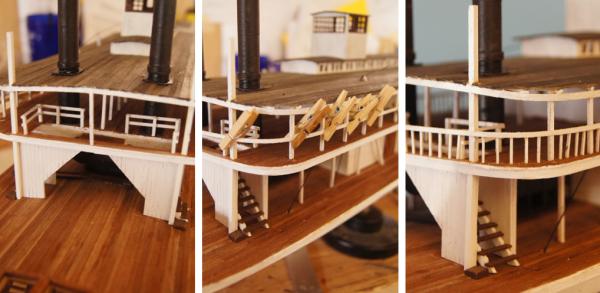
Probably the most fiddly part of this build. I'm not entirely happy with how these came out, but they look fine from more than a foot away. I started by building the internal railing that keep passengers from falling down the main stairwell (left). Then I glued a long, painted strip wrapped around all the stanchions on the boiler deck, as the upper rail (center). Then I hand-cut a whole whoppin' mess of little railing posts to line the railing with, and carefully levered each one into place with tweezers and a dab of glue. Once again, step back a foot and it looks great. Up close, it looks like the work of someone still developing his fine-woodworking skills.
(Almost) completed steamboat
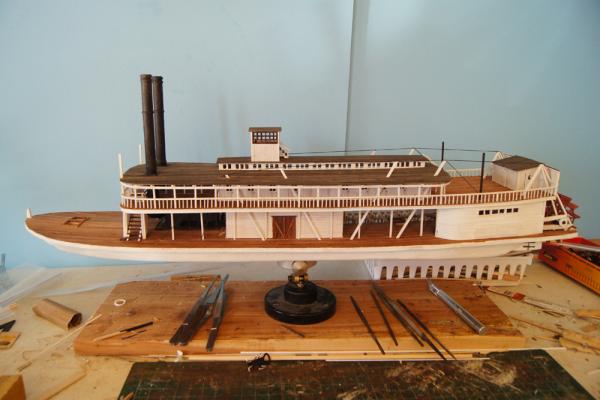
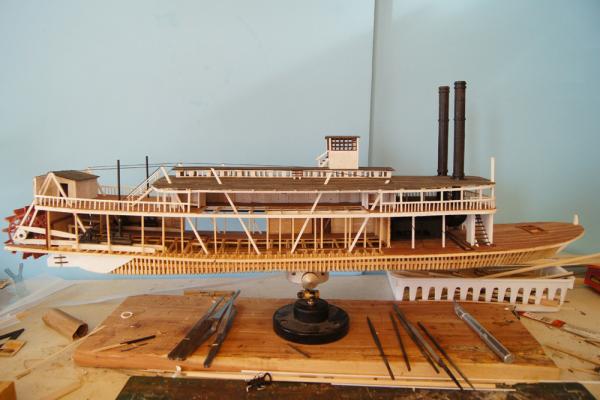
And here she is, very close to done. This is the best view of the hog chain system, the longitudinal iron trusses that keep the bow and stern from sagging in a ong, thin boat with no keel and lots of stern-weight. These I simulated with fine rigging thread painted black, run through holes drilled in the decks and stretched tight. They should have turnbuckles on them for tensioning, which I haven't decided how to simulate yet.
All that remains is the "rigging", which in this case means a few support cables for the chimneys, and the various cables and tackles for the grasshopper spars, which I'll discuss when they're done. There are a few other details, such as hoists and tackles for two launches, and splitting some 1:87 firewood for the main deck. But she's close.
One question for you all: how would you go about lettering the name, which should go in large black letters on the engine-room wall just forward of the wheel? I've never done lettering before.
Hopefully within two weeks I'll post the absolutely completed Bertrand. In the meantime, just two days late, here's Dave Hum playing the Eighth of January, an old tune named for the British defeat at New Orleans that closed the War of 1812, just over 201 years ago:
-
No, although that could be a nice detail to experiment with. Instead, it means I used a chisel to gently smooth some of the rougher joints. From my log, just above the section you quoted:
However, it seems I was too liberal with the wood putty and it would have taken a week to sand it all off. Misfortune turned to opportunity, though, when I hit upon using a sharp, broad chisel to plane off much of the hardened putty. This worked beautifully for smoothing edges where planks had not sat quite properly against each other; again the pre-staining guided this marvelously. If I could run a broad chisel along a seam and not produce white wood on both sides, it needed more work.
I am very happy with the extra shaping allowed by the chisel, though I was a mite aggressive in a few places and left a few gouges. The instructions remind us that the launch was a working boat, and I will leave these to appear as various scars of a working life.
In other words, I used a chisel as a plane, to gently plane down any rough spots or plank edges sticking up at a seam, moving the chisel blade parallel to the seams. This could be done with lots of sanding, but the chisel/plane goes much faster and produces a nice smooth surface. You can see a few of these rough spots in the original photo I posted here, especially between the planks below the stealer (toward the top of the boat), where their edges don't quite meet properly and leave a ridge.
From this build, I learned that wood filler absolves many sins!
- Canute, PAnderson and CaptainSteve
-
3
-
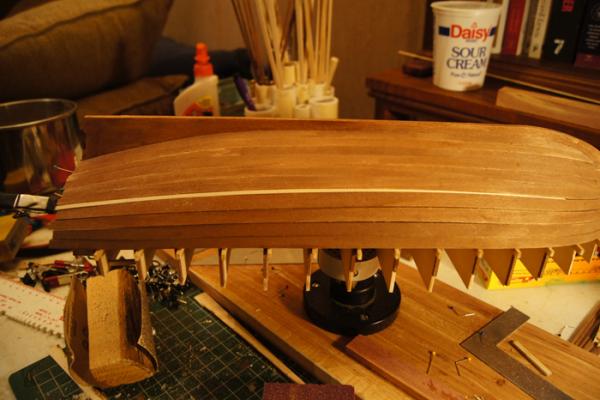
When I built this last year, I ended up with a thin gap at the shutter plank. Rather than remake the plank, I just made a thin stealer to fit, as described in this post and shown in this image:
- CaptainSteve, Canute and PAnderson
-
3


Heroine 1838 by ggrieco - FINISHED - Scale 1:24 - Western River Steamboat as she appeared before hitting a snag in the Red River
in - Build logs for subjects built 1801 - 1850
Posted
Nice update. Interesting research on the boilers, that's something I hadn't considered either. Thanks for keeping us informed and learning. Looking at a couple paintings of Yellowstone, it does appear that the boilers (if represented accurately) stretch across the entire width of deck above the main hull, contrary to my concern that such an arrangement would take up too much of the narrow deck space available.
I, for one, heartily approve of including the repair. Whether or not it's literally accurate, it's highly representative of the boat and its times, and isn't that the core function of an educational model? People will learn more by seeing that repair represented, and will not be misled in any meaningful way.
Question: looking at the two flywheels, do you know if the spokes lined up or not? Was there any reason to arrange them that way, versus to not care? In what I assume is a test-fit in the photo, they're not quite aligned, and it made me wonder if it mattered one way or another.