


Cathead
-
Posts
3,352 -
Joined
-
Last visited
Content Type
Profiles
Forums
Gallery
Events
Posts posted by Cathead
-
-
Glenn,
Louis C. Hunter's Steamboats on the Western Rivers discusses to the superior maneuverability of side-wheelers over sternwheelers, in part, by referring to "The ability to stop one of the wheels independently of the other and, on two-engine boats, to run the two paddle wheels in opposite directions..." which implies what you suggest, that wheels can be stopped while in motion but not re-engaged. Also, obviously, Heroine couldn't have run her wheels in opposing fashion unlike later boats, so some of the turning ability is negated. Certainly, this makes mechanical sense to me, I don't see any way you could safely or practically slip that clutch into place while the shaft is turning, especially with water pressure holding the wheel in place. And the implicit reference to single-engine boats strongly implies that this all applies to Heroine, since two-engine boats became the standard not long after her time.
-
-
-
What's important to understand is that someone saying "I want this awesome thing made out of the best possible components which are all expensive, but I want it to cost a dollar" isn't necessarily insisting that all three of those things be true all the time, they're just telling you that those three things are important to them, just as a market customer is telling me that they care about cost, quality, and growing method.
It's not breaking news, but this collection of comments tells us that majority of people here like 17-18th ocean-going ships, they have a budget they feel is appropriate, and they value good materials and instructions. Any given designer may not be able to meet all three goals, but they can make an educated decision about which of them to focus on.
Again, this thread asked people what they thought in general, as if I handed out a survey of farmers market shoppers. People giving their ideal ideas to a survey is not the same as people specifically criticizing a given vendor. Consumers that challenge my market prices directly and personally are annoying if they don't try to understand the business model. Consumers who tell a survey that they want organic, affordable, nice-looking produce are just telling me in general what's important to them. Respondents to this thread are, by and large, saying what matters to them in general; they're not saying "X company is too expensive or Y company doesn't make models I like".
For example, when I say I want a kit to be $250-$400, I'm saying that's as much as I can possibly justify spending. If the only way to make a kit I'd otherwise like is for it to be $600, then I don't want that kit made for me because I won't be able to buy it no matter how nice it is. That's important information for a manufacturer. I'm not insisting they lose money making me a $600 kit for $400, I'm saying that's my budgetary limit, period. We chose not to grow some things on our farm because we couldn't sell them at a price consumers would accept. I'd like to grow them, but I accept that people won't pay me to do so. They can grow them in their home garden if they want those items, or scratchbuild that model, or just do without if that's what life dictates. Again, don't misinterpret what's being said in this forum.
-
-
I feel for you Chuck and Dave, as I've noticed the same thing, and I have to think that these people are being completely unreasonable and not really thinking through what they are asking for.
People aren't being unreasonable, they're doing exactly what they were asked to do by the topic, sharing what they'd like to see. Most of us don't know anything about the business side of kit development (which is why I tried to ask about it earlier), so how do you expect respondents to magically produce only practical answers?
Look, no one understands businesses they aren't engaged in. Among other things, I'm a vegetable farmer, and farmers market customers always want their produce organic, perfect, and cheap. Well, you can't have all three. Organic and perfect, it won't be cheap. Organic and cheap, it's going to have bug damage. Perfect and cheap, it ain't going to be chemical-free. But people who have never grown a vegetable in their life, or even people who have a home garden, have no mental structure for evaluating the actual business of vegetable production.
So there's no need to get huffy about modellers saying what they'd "like" to see, especially when that's what was asked for. If we can get a nice explanation from the developers of what actually goes into the business model of kit development, maybe then we can give more "realistic" answers. Until then, just take the feedback here at face value as a narrow sampling of a limited community of dedicated modellers and get what value you can from it.
-
If you want a specific prototype of a working steamboat, look into Bertrand or Cairo. Cairo's frame is on display in Vicksburg, Bertrand has a nice museum and very thorough archeological documentation of its structure and construction. Both are great examples of non-showboat working boats that have a good story to them.
You are also correct that many (most?) American riverboats weren't built with plans. There were dedicated boatyards along the upper Ohio churning out boats, but they generally didn't go by blueprint. They weren't backwoods-built, exactly, more like individual custom-builds on an assembly line. So in some ways the best topics are the boats that have been excavated and studied after the fact, like Bertrand or Arabia or Cairo.
- Gerhardvienna and Canute
-
 2
2
-
Daves,
http://www.steamboats.org/modelplans/paddlewheelers.html
has a lot of plans offered. I bought the plans for my Far West scratchbuild there and was pleased. The site also has a long list of other resources for research.
For Bertrand, I mostly relied on archeological drawings from the National Park Service excavation of the wreck (see my log). I'd purchased a set of private plans, too, but found that they conflicted with the NPS drawings so mostly used the latter.
- Gerhardvienna, mtaylor and Canute
-
3
-
-
-
Wow, I'm jealous. Bertrand had hog trusses, sheer, AND camber to her main & boiler decks. I eliminated the camber on the boiler deck for sanity's sake, but still felt I had to build it in place. I cannot wait to see how your deck drops in. Having the CAD skills is a really nice piece of your toolkit. Good luck, if that's the right phrase!
-
Another interesting question is how to judge responses. Does a post with X likes show the same level of interest as X different people saying the same thing? I know I agree with several other suggestions here and have "liked" them, without wanting to clutter up the thread by saying so out loud (so to speak). If the thread is read in a linear fashion, lots of similar posts will feel like they have more weight as opposed to an older post that piles up likes that aren't noticed unless one goes back and looks.
For example, I love the idea of more exploration ships (especially Beagle and Endurance) but felt that liking the initial suggestion was sufficient. Is that how it's read by those who want the input?
- EJ_L, Canute, Captain Slog and 6 others
-
9
-
-
So here's a question for the kit designers reading this. How do you judge what will sell or be popular? All of us can advocate for our little niches (riverboats, transitional craft, merchant ships, etc) but you professionals have to actually assess and decide what will be a good product. What does that R&D process look like? How much is guided by your own hunches and interests versus outside research into trends, etc.?
-
Frankie, I've considered pitching that service to kit makers before, having had the same thoughts as yourself. No idea if it's a sensible plan or not.
- Seventynet, EJ_L and mtaylor
-
3
-
I love the raw wood. That cherry almost looks like copper. Beautifully done.
- CaptainSteve, src, Elijah and 5 others
-
8
-
-
In general, I'd say that good riverboats are underrepresented. Most of the kits I see look out of proportion and toylike, even if finely crafted, and they all follow the same "gingerbread castle" prototype of a generic lower Mississippi palace boat. Model Shipway's Chaperon is a rare exception. There are a number of fascinating prototypes and possibilities among American riverboats alone, much less international ones.
- Bertrand, Arabia, and Cairo all have museums dedicated to or featuring them and/or their remains
- Far West has a fantastic story (the boat that carried Custer's men to and from Little Big Horn)
The golden age of steamboating extended into the photographic era, meaning there are good resources for any number of protoypes. And I'd like to think that plenty of American consumers, at least, would connect to a Mark-Twain era Midwestern steamboat as to a sailing ship.
I love sailing ships, but also feel that there are SO. MANY. age of sail models out there already. Branch out!
My specific answers to your questions:
Name: Arabia, Bertrand, Cairo, or Far West, as those are readily researchable and can tie into museums and known American history.
Country/date: USA, 1850s-1860s.
Material/style: Any hull form could work. Solid hull is likely a good choice for steamboats with their flat-bottomed, low-slung hulls, though an open-framed steamboat looks pretty good too. I assume solid would keep the price down? Wood could be relatively simple, as most boats would be painted and weathered.
Price: I'd say $250-$400. Scale is an interesting question. My 1:87 Bertrand ended up about 2 feet long, I don't think you'd want it to be too much larger than that.
Time: I can't envision tackling a project much over two years right now. Scratchbuilding Bertrand took me about a year, including lots of R&D. A kit would speed that up, but I also put a lot of time into it. Still,I have to imagine that more people would buy (and commit to) a kit that could reasonably take them a year or so. Much beyond that and life is just too uncertain unless you're a REALLY dedicated builder. For me, at least, I'd rather enjoy a number of different projects over time than one all-consuming one.Level: Beginner to moderate. A small steamboat could easily be a beginner kit, there's less planking and rigging than a sailing vessel, but enough interesting superstructure detail to keep it interesting. A moderate kit would include more detail, better castings maybe, or interior?
Above all, a really good steamboat kit with well-presented historical background and context seems to me like a very different offering to the model market, and one that could capture the imagination of many Americans who don't have much connection to the ocean anymore, but do to their rivers and their history. Don't know how they'd sell outside the US, but only so many Americans care about British or foreign ships either.
I'm being selfish here, but as a history buff and freelance writer, it sounds like great fun to help a kit designer develop a backstory and interpretive materials for an American steamboat model. Anyone interested?
- dcicero, EJ_L, skipper1947 and 3 others
-
6
-
Stay sail is rigged:
For the halyard, I rigged a single block at the mast rather than pass the line through the mast sheave. It made the rigging easier to handle, rather than tangling it with the other lines behind the mast (this also seems more functional for the real-life craft as well). The tack is hooked to a ring bolt at the bow. The sheet is belayed to a pin. The sail ends up looking smaller than I expected, I think because I measured it hanging dead from the stay, rather than billowed out, but I think the jib will balance it nicely.
You may have noticed the missing bowsprit. I broke that off with an errant wrist while rigging the stay sail. Turned out to be a blessing in disguise, as the reason I bumped it was that it was really in the way in the first place. I just left it off until I was done with the staysail. Fortunately, it came off cleanly and I think I can just glue it back on when I'm ready to work on the jib. It would have worked great to not even install the bowsprit until I'd finished the rigging to this point; something to keep in mind if I end up in a future situation on another build.
Anyway, I like the way it's shaping up. One more sail to go, then the final standing rigging.
-
-
-
Mark,
What color palette do you think aged sails should have? To my eye, the cloth especially was too orange/yellow. I could see darkening what I have, but as you note, since the rest of the model is pretty crisp, I could also stick with what I have. I appreciate your input.
Ken,
Thanks for the tip. I'll look into it the next time I'm in a settlement.
- mtaylor, Canute and mattsayers148
-
3
-
I've been experimenting with sail-making (special thanks to samueljr, who PMed me to offer advice). I tried three materials: sail cloth, basic index-card cardstock, and nice bond paper (conveniently left over from Mrs. Cathead's graduate thesis many years ago). I made a pattern from tracing paper, and used that to make equivalent sails from all these materials.
For all three materials, I followed several similar steps:
- Cut out core sail shape from intended material.
- Cut, score, & fold paper strips to serve as edge reinforcements (even for the cloth sail, as I was quickly convinced I couldn't sew hems or seams remotely to scale for this model).
- Make corner rope loops by clamping a folded-over length of rigging line in a clothespin, twisting the two ends until they tightened up into the right-size loop, securing the twist with another clothespin, then applying CA to the twist. When dry, I cut most of the tail end off and had a nice stable loop with enough tail to hold it within the sail's hem.
- Glue rope loops into pre-cut paper strips, along the creased center line.
- Spread wood glue thinly along the interior of each paper strip, then fold over the sail and clamp tight with a series of clothespins.
I also tested coloration, using artist's pastels that have long been a staple of my weathering toolkit for models. Both paper and cloth take pastels nicely without need for adhesives. In the photo below, you see three completed tests; all-cardstock (top), cloth with cardstock hems (lower right), and bond paper with cardstock hems (lower left).
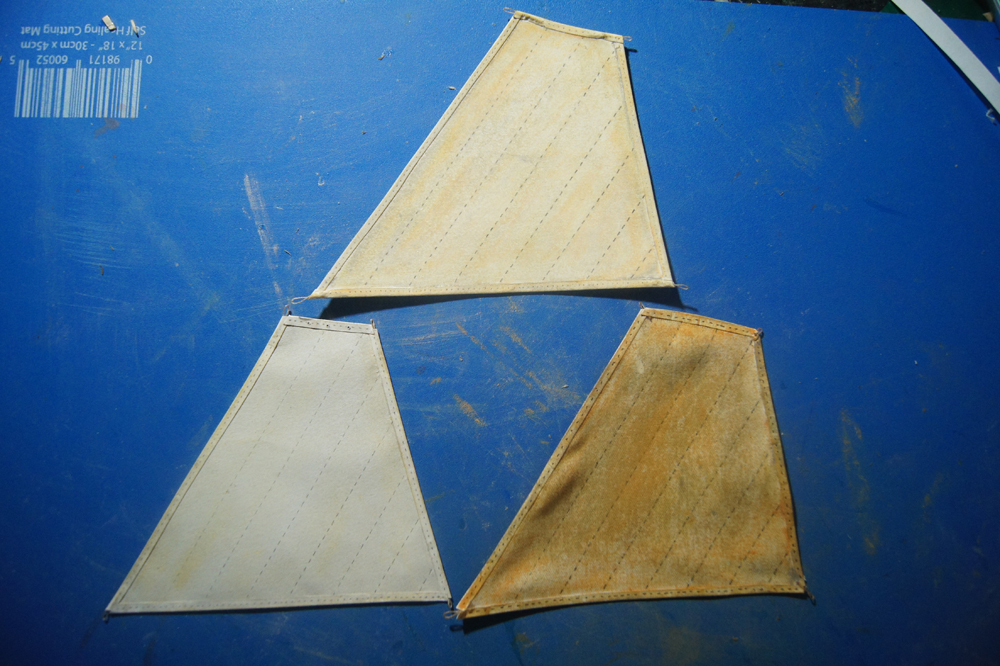
I overcolored the cloth sail to get a sense of when to stop, and tested two different lighter colorations on the paper sails. I had already been convinced I didn't want to use cloth sails, the materials didn't play well together, the sail was too floppy, and the weave too coarse. I also tested a bond paper sail with bond paper hem, but found that the material was too soft to hold well as a hem; it crumpled with the moisture of the glue and didn't stiffen the sail well. The cardstock hems worked great, really stiffening the sail and allowing me to impart a nice curve to it without needing to treat the whole sail.
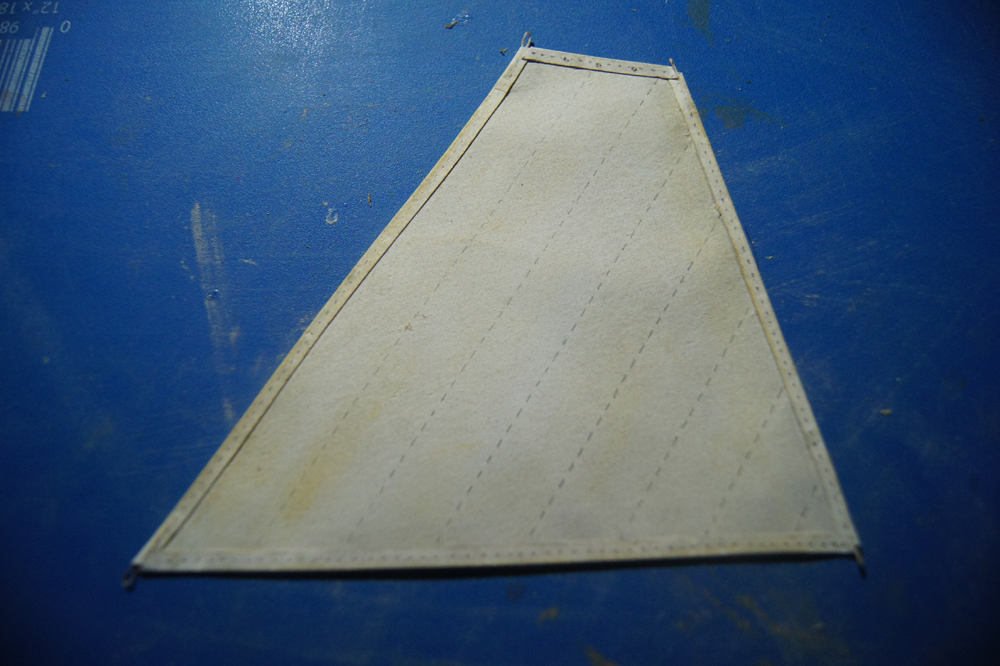
I liked the bond paper sail best, the finer quality of the paper made a nice sail, while the cardstock hem didn't stand out as different while being much stiffer and easier to work with. I carefully traced stitching onto all of these with a ruler and pencil to check how detail would stand out. I learned that it's best not to do the pencil work until you're otherwise done, as it can smudge as you adjust the pastels or otherwise handle the sail. In every way I liked the sail at lower left best (bond paper with cardstock hem and very light weathering/coloration); here's a closer look:
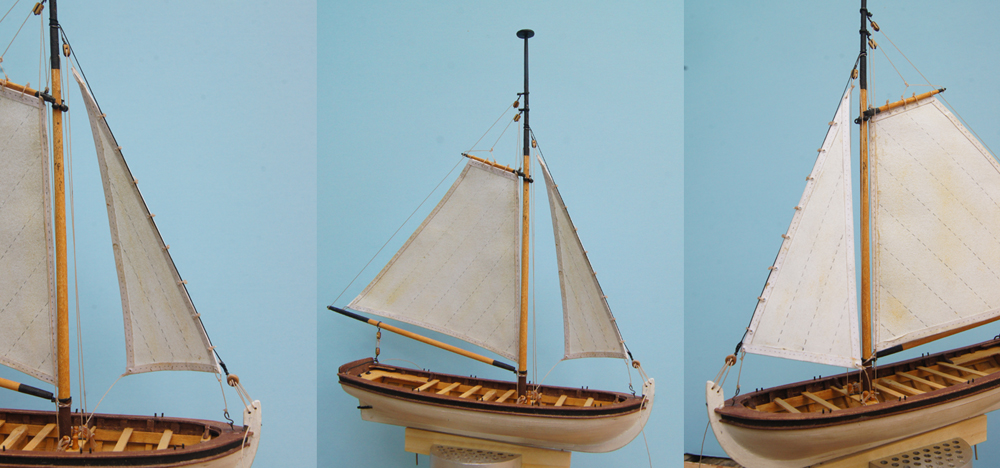
Satisfied with this attempt, I decided to see how it looked on the model. Here it is, fully rigged but not permanently. Most lines are still loose, held in tension by a series of clamps hanging from the lines (hidden behind the model).

What do you all think? Now's the time for me to make changes or try a different approach, before I rig the mailsail permanently and move on to the stay sail and jib (note that there's still a temporary line run to the masthead from the bowsprit traveler, to help me shape the jib properly even though that line won't be there on the final model).
-

18th Century Longboat by Cathead - FINISHED - Model Shipways - 1:48
in - Kit build logs for subjects built from 1751 - 1800
Posted
And here she is with the jib. I couldn't find a clear reference for how to shape each sail, so I defaulted to the size & shape they've have if they hung limp within the rigging (as shown on my drawings). I don't know if the jib is actually supposed to be larger than the stay sail, but correct or not, I'm pleased with the outcome from a visual display perspective.
The jib is hooked to the bowsprit traveller, allowing it to be hauled out, with a halyard run through a block on the mast just like the stay sail. Seems like it would work in real life.
Now it's on to the standing rigging.