


Cathead
-
Posts
3,065 -
Joined
-
Last visited
Content Type
Profiles
Forums
Gallery
Events
Posts posted by Cathead
-
-
-
-
I would like to learn to blacken metal properly, and have read through many threads on MWS regarding various blackening agents. A few references have been made, that Bluejacket sells their own version, but I haven't found any reviews or clear experiences stated. How does their product compare to the other options like Casey's or Jax?
The Bluejacket website is not very helpful, as it doesn't include any information beyond a title:
PN0051 Pewter Blk (blackens Britannia)$8.50 PN0052 Brass Black (copper,too) $8.50It says "directions included", but I wouldn't mind knowing what I'm getting into before ordering blind. Are these for soaking or brushing on? How toxic or fume-producing? I do my modelling in my living room, so would like to minimize the nastiness used.
If there is a thread or clear report on Bluejacket that I missed, I'm sorry. I searched both the Paint and Metal forums for "blacken" and read all the results as far as I know.
- thibaultron, reilly and Seventynet
-
 3
3
-
Instead of drilling a hole, which sounds scary, what if you filed a groove down the side, so you could set a thin rod into it, and hold it with wood glue? That way, it'd be stronger in the meantime, but wouldn't have a hole in the middle, and you could release the glue when you're ready to remove the rod. And the groove would presumably be hidden once the model's done if you put it on the proper side. Am I crazy?
- mattsayers148, Canute, mtaylor and 2 others
-
5
-
-
-
-
-
Hah! I've been thinking about this very idea, and wrote up a whole post explaining the concept, only to find that it's already been suggested. Well, here's my expanded proposal anyway, for whatever it's worth. I also created an index for my steamboat Bertrand log.
A proposal for improving build logs: table of contents or index
Problem
Build logs on MSW serve two very different and somewhat conflicting purposes: a dynamic account of the build and a static reference for later builders. The problem arises when the interactive community and comment thread (that makes a live log such a worthwhile experience) becomes a hindrance to later readers trying to research or learn from the build (after the fact). It can be very frustrating to wade through tens or even hundreds of pages of comments looking for certain information, techniques, or stages of a build, and a search function will only go so far.
Solution
I propose a partial solution: the introduction of a Table of Contents, or Index, to build logs. A builder can plan ahead and include a nascent Index in a very early post of their log, and use the edit function to add to it as the build progresses. This way, a reader arriving at the build later has some sense right away of where in the build different stages happened, and can jump to them without slogging through the entire comment thread.
Now, this will be easier for some builders than others. I don’t propose linking to every post by a builder in the index. My style of logging tends to be a periodic update of specific steps taken, including many photos and discussions in one post, making it easier to produce an Index. Others take a more stream-of-consciousness approach, with many short posts dealing with small steps individually, producing many hundreds (thousands?) of update comments in a long, complex build log. I suggest that builders link to general parts of the build, or any other topic of specific interest; for a very broad example:
· Hull framing (link to first post starting this process)
· Hull planking (link to first post starting this process)
· Decking (link to first post starting this process)
· Discussion of a unique way of shaping masts (link to first post starting this process)
And so on. There could be many comments within those sections, but at least a reader looking for a certain part of the build will know where to start. And a builder can be as detailed in this index as they care to be; the more detail, the more helpful the build log to later readers.
Retrofitting logs
For those who like this idea but already have a log started or completed, there are two options. One, just go back to your first post and use the edit function to build in an Index. Two, especially for finished logs, post an Index at the end of the log, then simply link to it prominently by editing your initial post, i.e. “Here is an index of this build (link to post at end of thread)”. I’m certainly not saying this should be required or expected, but for those who like the idea it’s a way to implement it. For example, I had this idea when I was about 2/3 done with my steamboat Bertrand build, and at that point went back through and created a draft index in a Word file that I kept updated from then on. Now that my build is finished, I just posted that index at the end and linked to it in the beginning. On my next build, I’ll leave space at the beginning, or create a separate comment just for the index, making it easy to maintain as I go.
Feedback
I’m curious what you all think. Is this crazy? Worthwhile? Discuss.
-
Index of this build
This is an idea I had partway through this build. The idea is to provide an outline of the build so future readers can find information more easily without wading through the entire comment thread or trying to find the right search terms. It's now linked in the opening post of this log.
Edit: I wrote up a whole post about this, intending to post it as a new idea, only to find that it had already been proposed last year. But I added my original idea writeup anyway, in case it's of interest to anyone.
Laying out hull frames, first attempt
Reconsidering hull framing with new information
Laying out hull frames, second attempt
Hull framing continued, starting on bow & stern
Correcting stern framing, continuing stern & bow framing
Planking the bow (following some excellent suggestions/discussion)
Planking, sanding, and painting hull; starting deck planking
Building the rudders; continuing deck planking
Images & information from re-visiting the Bertrand museum at DeSoto National Wildlife Refuge, Iowa
Discussion of steamboat wrecks on the Missouri
Main deck structures, framing in the boiler deck, hog chain braces
Boilers, main deck staircase, beginning boiler deck planking
Boiler deck completed, building main cabin structure with stateroom interiors
Framing & planking the hurricane deck, building the outhouses
Discussion of paddlewheel color
Pilot house, chimneys, railings, and the nearly completed model
- Canute, Tadeusz43, Keith Simmons and 10 others
-
13
-
Looks just right. Nice crisp paint job. It's a great little kit for practicing skills.
- Canute and CaptainSteve
-
2
-
David, yes, right now my long-term dream is to scratchbuild the HMS Ontario, was was recently discovered in its eponymous lake not very far from where I grew up. My mother attended a talk by the team who found the ship, and gave me a signed copy of the updated book about its contruction, history, and re-discovery, including sets of plans based on the Admiralty originals. I just need to build up the skills required.
- wyz, Canute, avsjerome2003 and 5 others
-
8
-
Kurt, I don't know of plans, either. Whenever I decided to get started, I'd just have to contact the museum and see what information I could glean from their archives of the dig, and go from there. It would be a representative, if not accurate, model, as you say.
Sorry, Crackers, it'll have to wait a little while. All steamboats and no sailing ships makes Cathead a dull boy. I wouldn't be motivated to do another steamboat right away, I like diversity in my life.
wyzwyk, I sure hope you're right! My father didn't make it to 50, so you never know.
-
I'm setting aside river craft for now, and embarking on a self-designed tutorial in regular ship-building. First the two Model Shipways naval gun kits for a lightweight treat after scratchbuilding (and to learn more about guns), then Chuck's longboat to reimmerse myself in planking, rigging, and other such skills, then tackling the Corel Ranger as Mrs. Cathead really likes the look of topsail schooners and I want to build a real sailing craft. I grew up along the Great Lakes and sailed a lot as a youngster, as well as spending a lot of time along the mid-Atlantic coast, so am looking forward to rediscovering that part of my past and interests.
If/when I return to river craft, I want to build the Arabia, the Missouri River sidewheeler that's now the focus of an excellent museum in downtown Kansas City.
- mtaylor, dgbot, CaptainSteve and 4 others
-
7
-
Thanks, all. Just to clarify one point, Bertrand won't be living on the layout, it doesn't fit. I don't want it hanging off the edge like that. If I want a steamboat there, I'll either use the Far West or build another one. Someday.
It's now proudly on a bookshelf near our front door. Conveniently, it's just lower than the natural height of a normal book. One advantage to steamboats over sailing ships, a better height/width ratio for display!
chborgm, I was thinking about starting a "general riverboat discussion" topic, your mention of the same idea encourages me to do so.
- CaptainSteve, mattsayers148, Elijah and 2 others
-
5
-
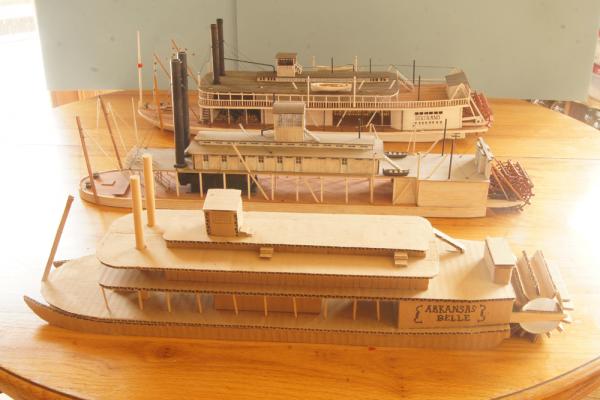
And now the special photos. I initially got started in this whole wooden model adventure because I am also a model railroader. My layout is centered on a Missouri River port town during the Civil War, roughly based on St. Joseph, MO, where the first railroad across Missouri connected the Mississippi and Missouri Rivers in 1859. Abraham Lincoln rode this railroad, the Hannibal & St. Joseph RR, while considering different options for the route of the first American transcontinental route. In any case, I knew I wanted a steamboat at the levee in my railroad town, to capture the feel of many fascinating images of railroads and steamboats interacting during this era.
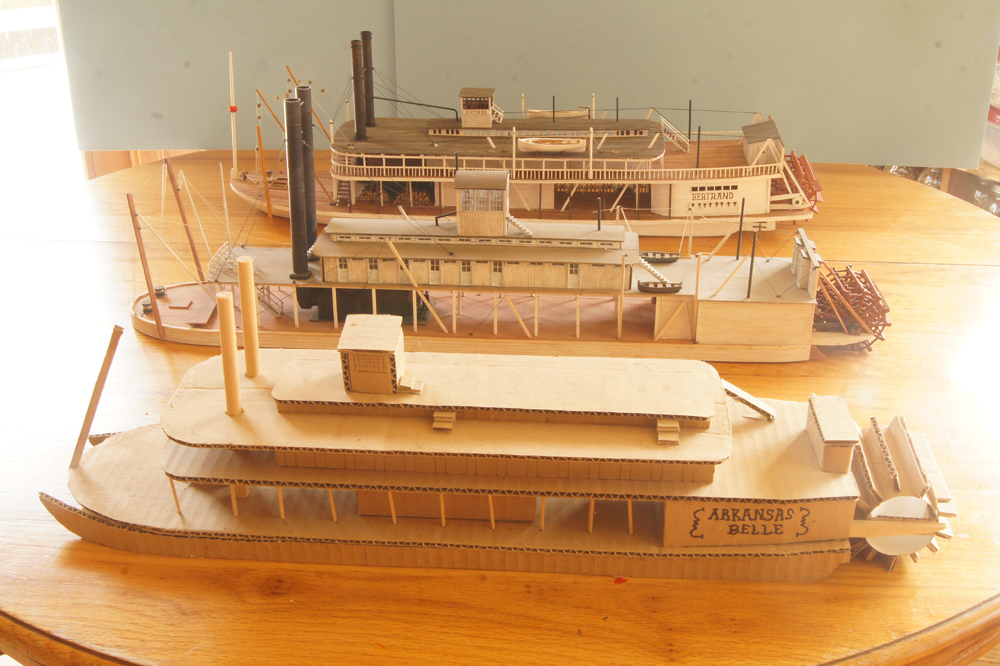
So my first-ever wooden ship/boat model was a primitive scratchbuild of the famous sternwheeler Far West, which among other things carried Custer's troops to and from the Battle of Little Big Horn. To get ready for that project, several years ago, I built a cardboard mockup of Far West to have something three-dimensional to refer to as I built the real model. I enjoyed the project so much, I built two more Missouri River craft from scratch (see my signature) and was so addicted I ordered a kit, and so on. That's about when I found MSW and the infection spread.
In any case, I put together a lineup of these three models, to show the evolution of my still-quite-amateur skills. I think it's neat to see them side-by-side; I named the cardboard mockup after my wife, though there really was a steamboat called Arkansas Belle:
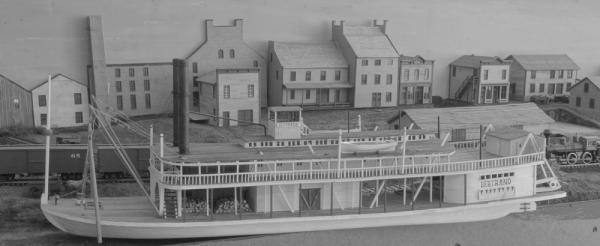
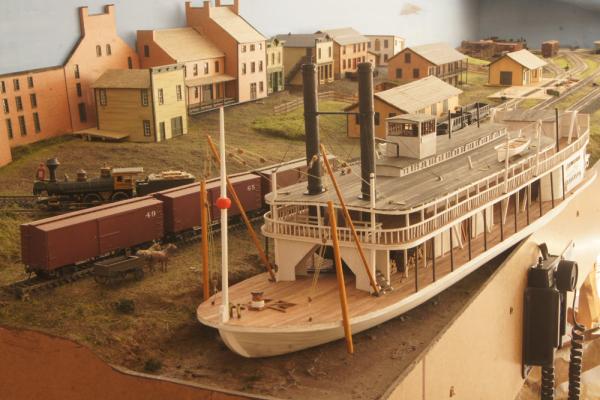
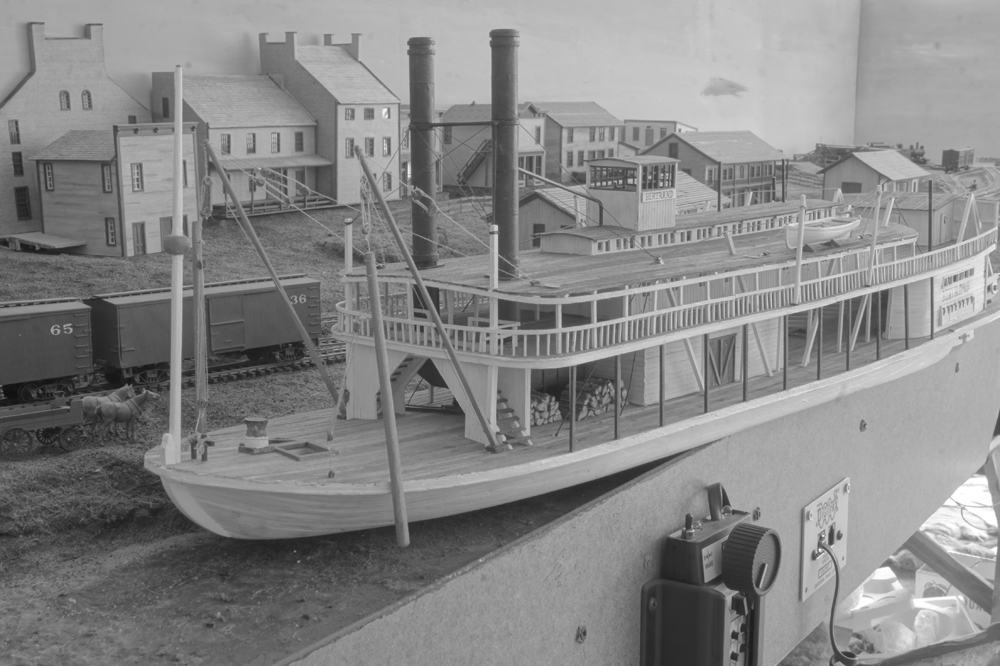
Today, for the first time, I placed Bertrand on my layout. It's larger than Far West, for which the river portion was designed, so it hangs out over the edge. But it's also period-accurate; Bertrand was built in 1864 and certainly stopped in St. Joseph on its final trip upriver in 1865. Most of the buildings on the layout are scratchbuilt, including several based on real period buildings which remain today. When Bertrand left St. Joseph, her crew and passengers had no way of knowing she'd soon be a wreck, buried beneath the ever-shifting river sediment for over 100 years, until being rediscovered and excavated as a rare time capsule into this pivotal period of American history. At least this model will help preserve her memory in some small way.
So here are three photos of Bertrand in her natural habitat, at a Missouri River port town where all period modes of transportation came together. The western-most railhead in the country was here for a short time, wagon trains left from here for the West (including many Mormons), and steamboats lined the levee on their way too and from Montana. Here's one vision of how that scene might have looked:

My deepest thanks again to all of you. It's been a pleasure.
- wyz, Keith Simmons, tadheus and 22 others
-
25
-
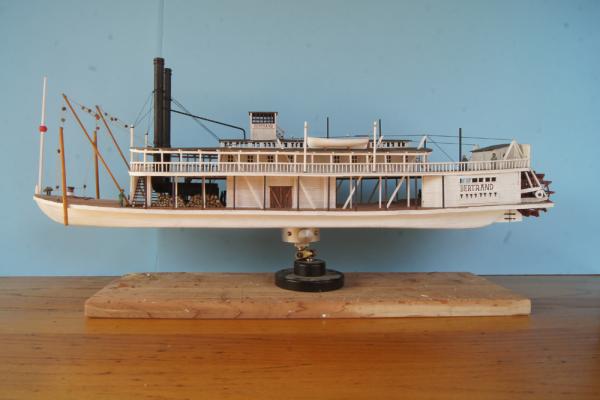
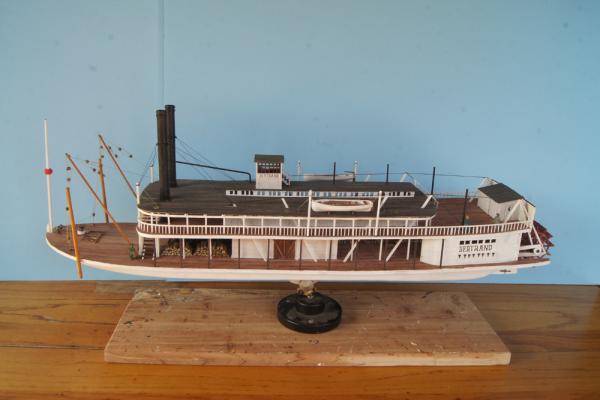
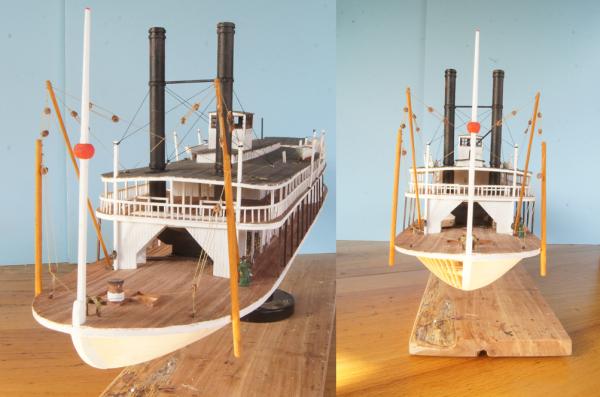
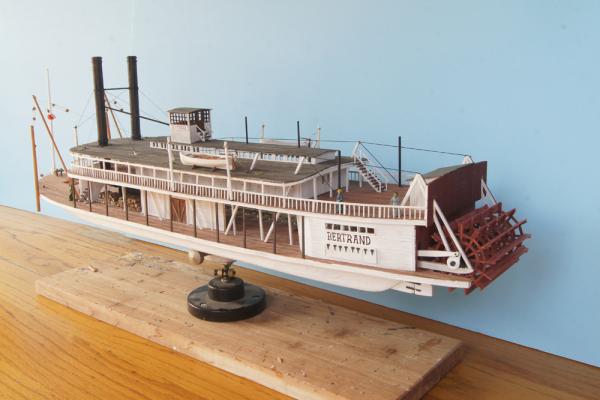
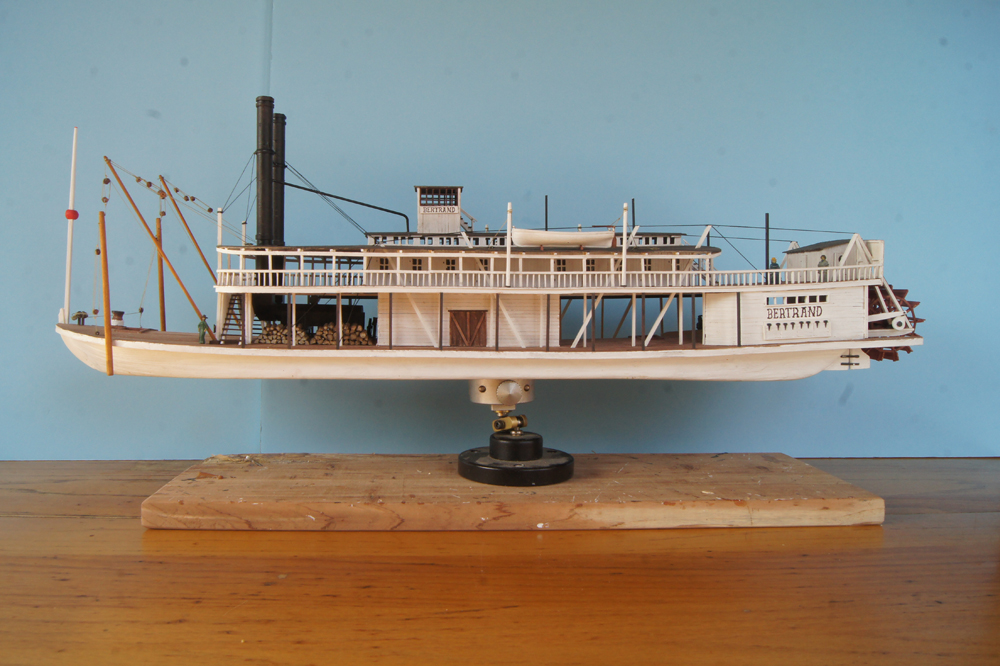
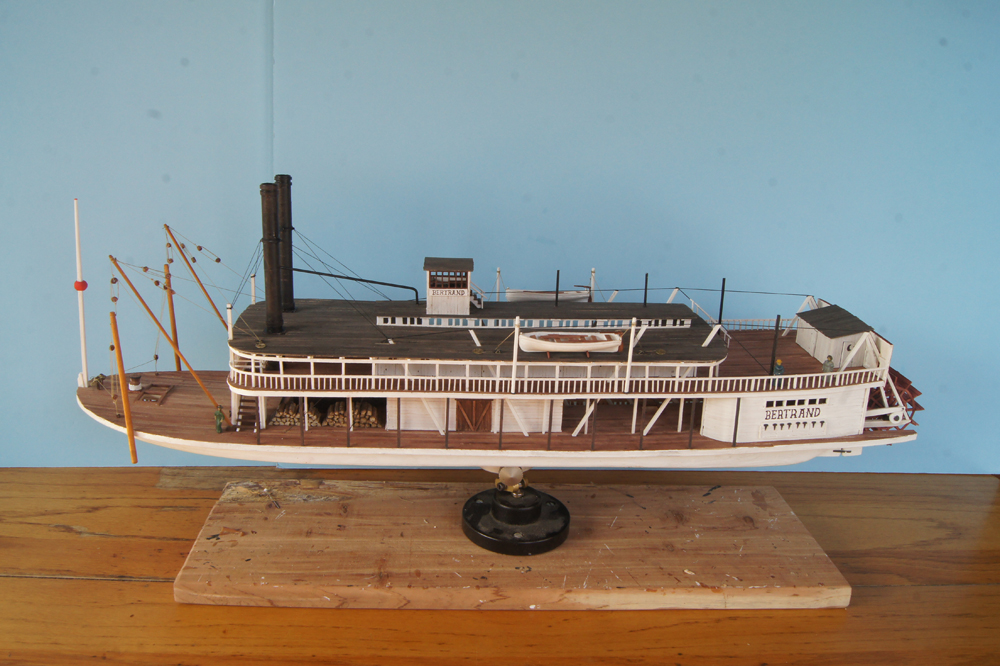
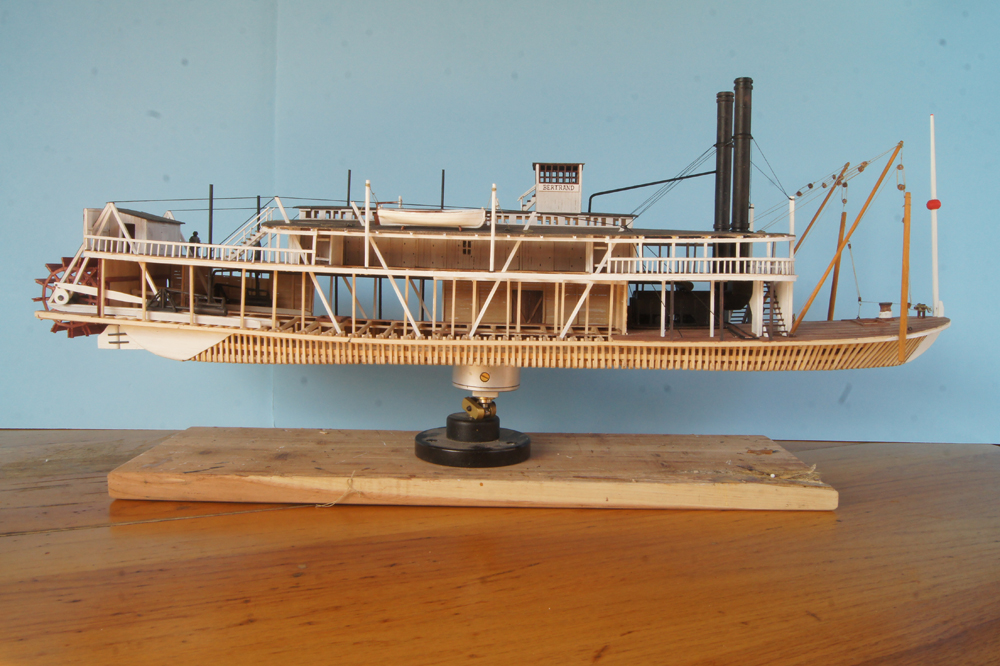
Below are final photos of the completed Bertrand. In this post are basic shots from different angles, then another post follows with a few special photos.
I am incredibly grateful for the interest and support shown by all of you for this rather obscure project. I don't think I could or would have undertaken this without the motivation and community of a build log to keep me focused. So thank you.


-
Here are the final details added to Bertrand.
Yawls
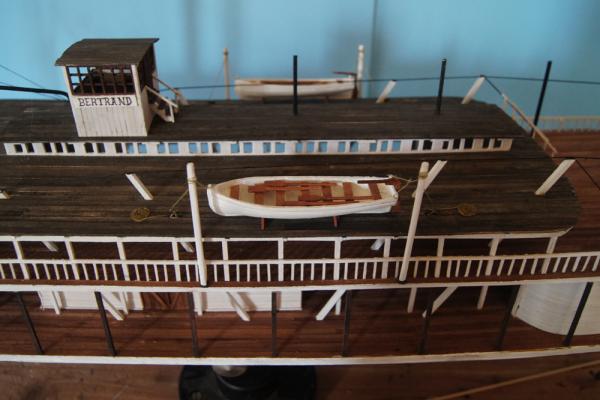
Bertrand likely carried two small boats (called yawls in my sources), based on comparable boats of the time. These weren't lifeboats, but served a similar role as in sailing ships, like a small car towed behind a recreational vehicle for light-duty use. My understanding is that these weren't lowered from davits, as on a whaling ship, but rather lashed to davits that themselves were lowered. Thus the two white spars seen here were actually hinged at the bottom; to lower the boat, the crew loosened the lines holding the davits to the deck and rotated them 180 degrees until the yawl hit the water. The length and position of these davits matches this procedure perfectly.
I had considered trying to make these small boats from scratch, but also had two castings in my scrap box that were the perfect size and scale, so just went with that. I painted them white, then gussied them up with hand-carved benches, oars, and rudders. Then I just glued them to the hurricane deck and lashed them to the davits, using the same method to coil the rope ends as described for the grasshopper spars. Pretty straightforward, really.
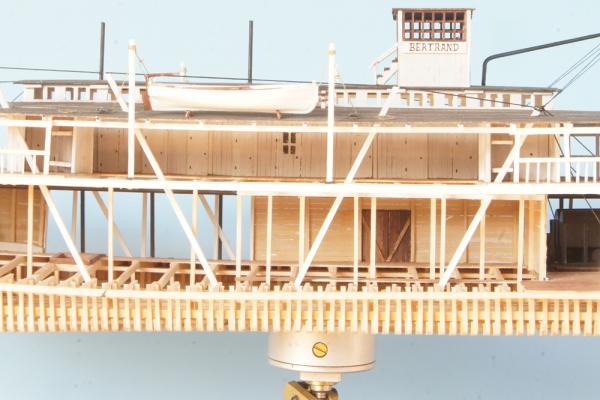
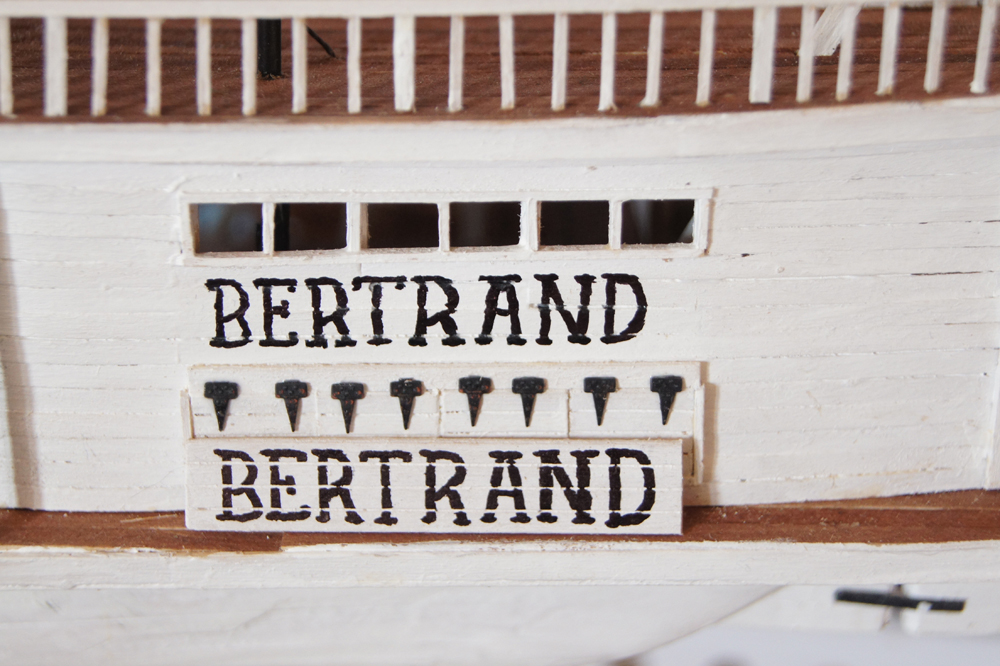
Lettering the name
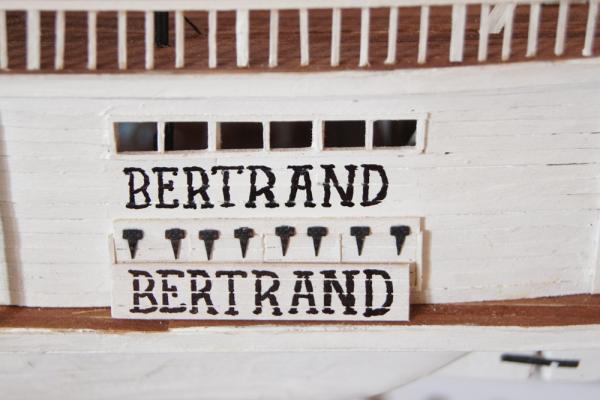
In the previous photo you can see the lettered name on the pilot house; I also had to add the name to the engine room wall. I decided to use a fine-tipped marker to do this, and practiced multiple times on pieces of painted scrap wood. For the pilot house, I just went ahead and made the sign on a separate plank before attaching it, which looks good to me. For the engine room, it was a bit trickier, as the real boat had the name painted on the side, and I wasn't at all sure I was up for that. So, again, I made several practice letterings on painted scrap, reasoning that I would choose the best one and glue it in place, sacrificing a bit of realism for a better overall look.
Then Mrs Cathead pointed out that, if I was going to glue something over the place anyway, I might as well give a shot to lettering it in place, since if I messed up it could be covered anyway with my initial plan. So that's what I did.
In the photo above, you see my best lettering attempt on a separate plank (better wrist angle and control) and my attempt actually on the model. The separate one is definitely a bit better, but the in-place version does have a more authentic feel. I'm not thrilled with any of them, they're all a bit shaky in a really close-up view, but as with so many things, when you step back just a little it blends right in. So I'm going to leave the on-model version, and save the plank version in case I change my mind. This is a case where photography really highlights flaws which don't really show up in an overall view. You can judge for yourselves when I post photos of the finished model.
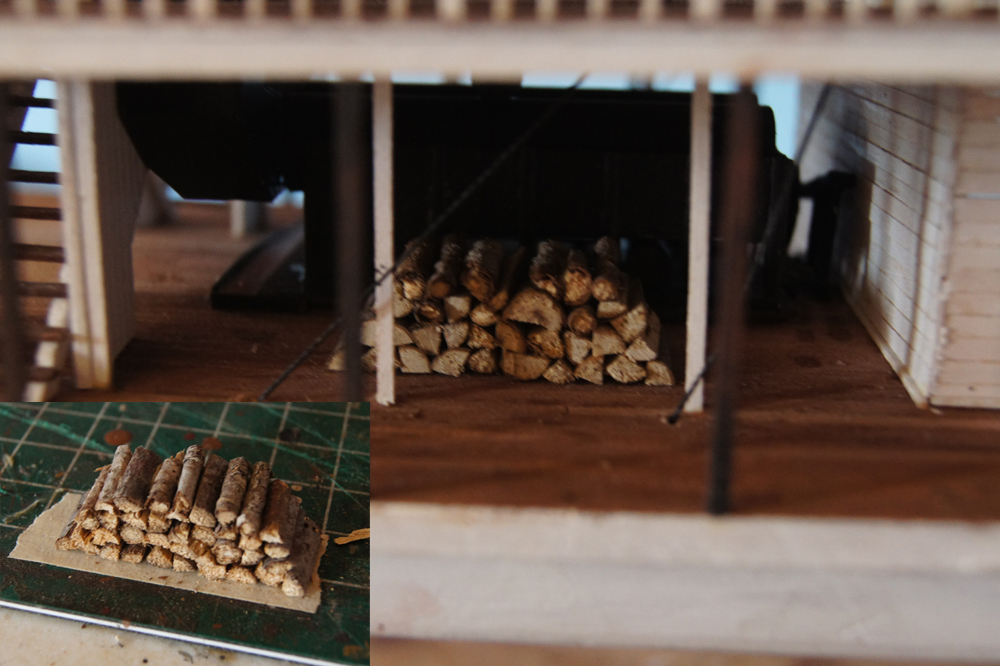
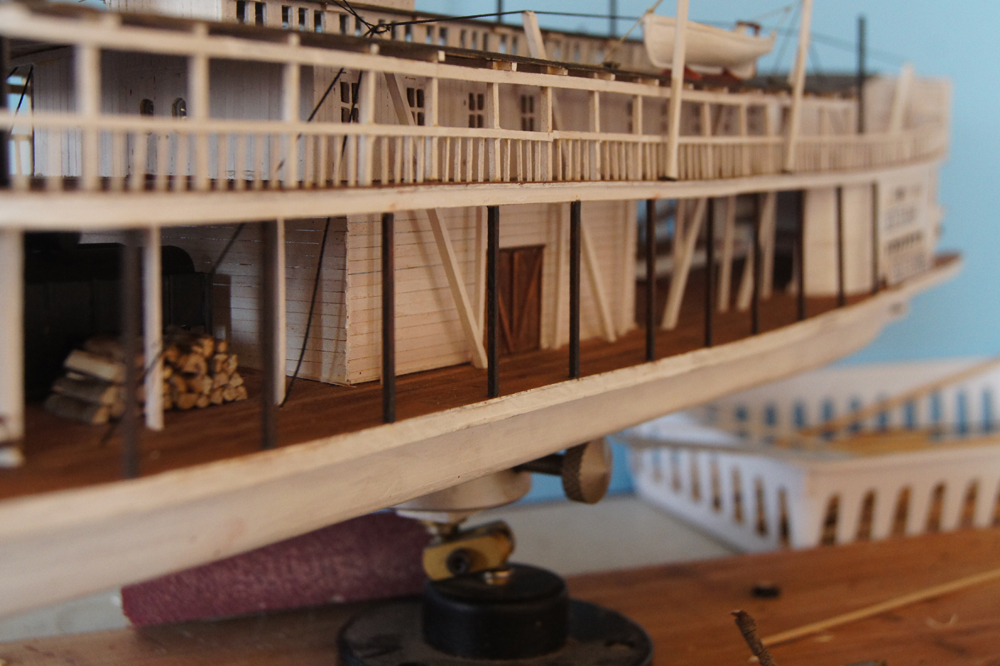
Firewood

Western river boats were voracious users of fuel, burning anywhere from twelve to 75 cords of firewood DAILY. Wood was plentiful along the rivers, and quickly became a cash crop for farmers or dedicated woodcutters who stocked landing places with piles of firewood for sale. Boats took on fuel once or even twice daily, sometimes having to stop and cut their own if no sale point could be found.
I wanted to display firewood on Bertrand, but wasn't up for hand-cutting and splitting 75 cords of 1:87 firewood. So I settled on just a few small stacks to give the idea; apparently Bertrand is actively looking for wood to buy! To make these, I just rummaged in the kindling box next to my wood stove and selected a variety of straight, smooth twigs that looked about right for scale tree trunks. I cut them to length with a small saw, then split them with a hobby knife. I laid out piece of double-sided tape and put down a first layer of wood, then a layer of wood glue, then a layer of wood, and so on until I'd built up a proper pile. Two of these line the area next to the boilers nicely and get the idea across.
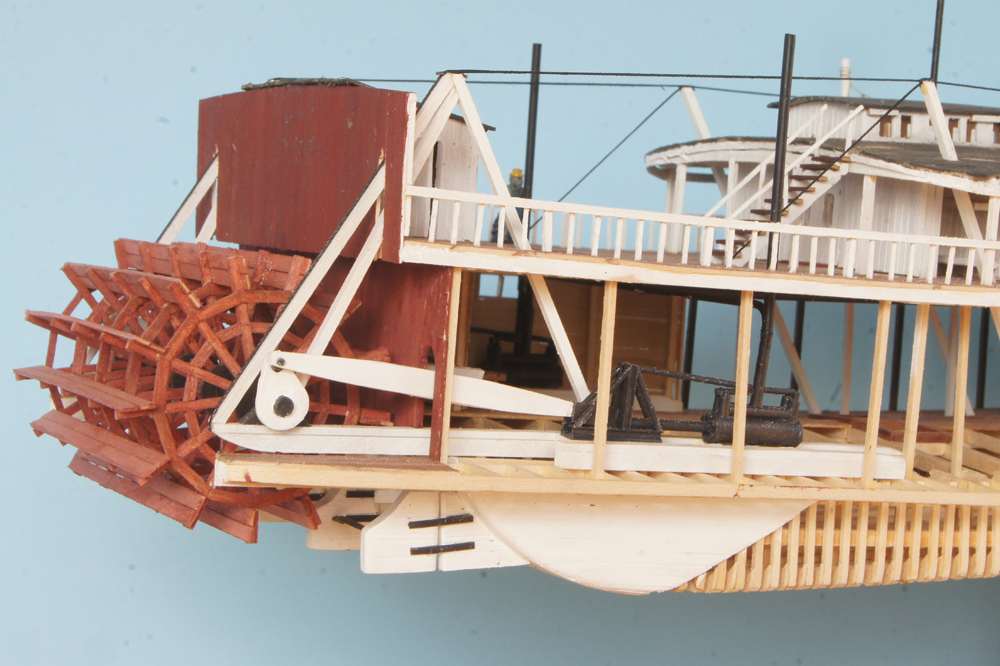
Stanchions

Just how Bertrand's boiler deck was supported from the main deck is apparently an issue of slight disagreement. The archeology reports clearly document finding sockets along the outer edge of the main deck guards, into which stanchions would have been placed, leading up to the boiler deck. They also found one of these iron stanchions during the dig. Yet the large-scale model the museum, and several other illustrations, show Bertrand without stanchions, but with knee-like braces curving outward from interior posts; see photos here. I decided to follow the archeologists' reconstruction, and installed stanchions all along the outer guards. These are wooden strips, painted black and rubbed with pastels to hint at a little rust, making them more metal-like. I saved this detail until the very end, to ensure access into the deck in case I needed it.
Cargo
Bertrand was loaded heavily with cargo, probably piled to the full height of the main deck along every square foot it could be stored. One successful run to Ft. Benton in western Montana could pay the entire cost of the boat's construction. But I decided to forgo that detail for now, for two reasons. One, I like the open view of the full structure, and two, right now it would be cost- and time-prohibitive to either buy or make the sheer numbers of scale crates, barrels, sacks, and more I'd need to do this. I think at some point, I'd like to go back and add some cargo detail, but right now I actually like the fully open deck really showing the boat's structure and layout. So that's where that stands for now.
This evening I hope to post a variety of photos of the now-completed model.
- gjdale, Mike Dowling, Canute and 14 others
-
17
-
And the Missouri is very different from the upper and lower Mississippi. The Missouri is sediment-dominated for most of its length; hardly any bedrock in channel anywhere. Whereas the Mississippi north of the Ohio has a lot of bedrock; there are (or were) numerous choke points and rock-reef rapids as you go north; one major reef is just north of St. Louis (look up Chain of Rocks). This is one reason why there's a lock-and-dam system on the Mississippi from St. Louis north, to flood the reefs and let river traffic cross them safely. But it also means the upper Mississippi is now effectively a set of lakes, not a river. The Mississippi south of the Ohio is also sediment-dominated, but was so big by that point that it didn't affect river navigation as much, since the channel was generally deep enough year-round, which is why there aren't dams down there.
Of course, today the Corps of Engineers has dramatically changed these rivers by constraining them to a single, deep, dredged, sometime dammed (damned?) channel completely different from their natural ecology, but that's another story. People should understand, though, that none of these rivers looks much like they did during the steamboat era.
-
-
Thanks, Jim. I sure don't know anything about Australian river craft. The most obscure steamboat reference I remember came while reading a history of the Ottoman Empire. The author, in passing, mentioned the British using shallow-draft steamboats both as gunboats and troop transports on the Tigris and Euphrates Rivers during their WWI Mesopotamian campaigns against the Ottomans.
Crackers, I've never heard that, and a quick internet search didn't turn up anything, so can neither confirm nor deny.
- mtaylor, avsjerome2003, Elijah and 2 others
-
5
-
Kurt, that's a good point, I should probably coat my lines anyway to help them hold up. Redoing them would be...distressing.
- mattsayers148, mtaylor, Canute and 2 others
-
5
-
Crackers, no, the two are very different riggings and incompatible. Any landing stage (hoisted gangplank) would interfere with the grasshopper rigging. Louis Hunter states that landing stages only came into use in the 1870s, and Bertrand was built in 1864. Also, I've only ever seen such stages on lower-river boats, where they probably partially served as an accomodation to fancy passengers. Most boats heading up the Missouri probably had grasshoppers.
It is an interesting question whether Bertrand was initially built with grasshoppers, as it was originally intended for the Ohio River trade. It was later purchased by a new owner and placed into the Missouri trade, so it's possible it was refitted with grasshoppers at St. Louis before heading up the Missouri. I've found no discussion of that anywhere in literature about Bertrand, so we'll never know. In any case, my model represents Bertrand as she might have appeared on her final voyage in 1865, so the grasshoppers are certainly accurate for that.
As stated above, most steamboat model kits focus on lower Mississippi or Ohio River boats, from a later era when photographs and records make designing the model easier, and so those are far more likely to have landing stages, like Chaperon does.
- Elijah, mtaylor, CaptainSteve and 3 others
-
6
-
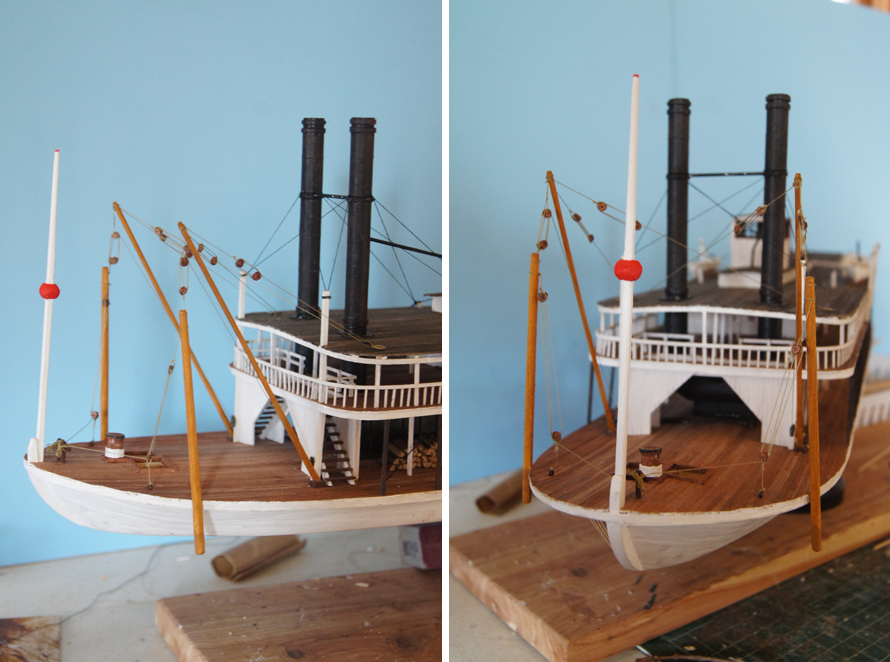
Grasshopper spars
Western river boats often dealt with very low water conditions. The upper Missouri River, in particular, was characterized by shallow, ever-shifting channels among myriad islands and bars. Running aground was a fact of life, even for boats like the Bertrand with less than 5' draft even fully loaded. Boats needed to be able to cross bars, not just back off them, as the water simply wasn't deep enough for regular navigation. Thus, specialized equipment was developed for upper-river boats to handle these conditions. Louis C. Hunter provides a good general description of grasshopper spars, so-called because of their appearance like grasshopper legs on the boat:
...the customary practice was to place spars on either side of the vessel by means of which the bow the bow was lifted as on crutches. The wheels were then put in forward motion and the boat driven ahead for a short distance, perhaps no more than a few feet. Then the vessel would be allowed to settle on the bar while the spars were reset...this operation was repeated as often as necessary to enable the boat partly to hobble over, partly to dig its way through the bar into the deeper pool beyond. - from Steamboats on the Western RiversAlso, at times, the wheel would be reversed, sending a strong current of water forward under the bow, in hopes of washing away some of the bar and freeing the boat that way. Grasshopper spars could also be used to push a boat backward off a bar if desired. Hunter also notes that:
Sparring was a tour de force of navigation, to be classed with the moving of entire buildings as an early example of Americna ingenuity in handling large masses; both practices (freeing grounded boats and crossing bars) aroused astonishment and admiration from foreign engineers.The hull shape of western river boats helped here, too, as the flat bottom slid more easily over bars and the long, flexible hull could actually slither over them in a way that would break a strong-keeled ocean vessel.
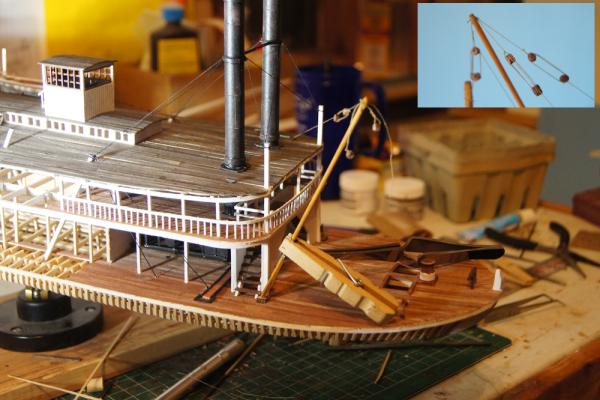
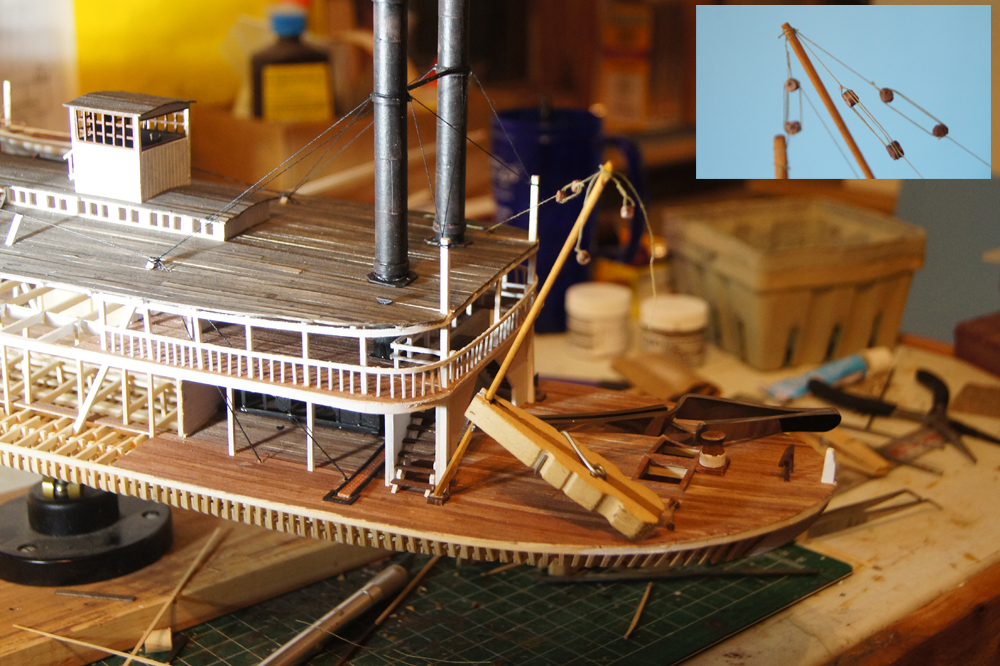
Here are the grasshopper spars I built for Bertrand. No one knows exactly how hers were rigged, but these are based on contemporary examples:

Each spar is suspended from a boom, which in turn is supported by two lines to the hurricane deck. These lines, with blocks and tackle, could be adjusted horizontally and vertically to place the spar as needed. A separate line with blocks connects the spar to the boom; this line runs back to cleats near the chimneys and is used raise and lower the spar. Finally, a fourth line runs from the spar down to a block on the deck; this line is used to raise the boat on the spar. There is a steam-driven capstan at the bow, whose engine is below-decks, connected to the boilers, used to run these various lines. So to use the spars, one would:
· Position the booms away from the hull, with the spars suspended over the bar.
· Lower the spars until they rest firmly in the river sediment.
· Connect the lowest lines to the capstan, and haul in to hoist the boat up onto the spars, while driving forward with the wheel.
· Lower the boat, then use the capstan to raise the spars again, repositioning them manually, going back to step one.
· Repeat as often as needed to get over the bar. Repeat for however many bars you strike on the way to Montana.
Rigging these spars was really tricky, as both the booms and the spars essentially hang in mid-air from their lines. I used a few clamp to balance the booms in place, as shown below, until I could get their lines tightened. Once I hung the spars, I attached clothespins to their base to add more weight and ensure they hung down properly (the wood is pretty light). All of these were shaped from square stock and stained.
I also hand-made the blocks, the first time I’ve tried this. They’re not real pretty, but they get the job done and have about the same optical accuracy as the rest of the model; within 6” you can tell things are hand-made, beyond that it looks great. Good enough for my purposes. Doing this took forever, though, lots of fussy adjusting of blocks and lines to get the two dangling booms and spars into comparable orientations. At the end, I glued the spars to the side of the deck for more stability; I just don’t trust them dangling out there on their own, and they’re not heavy enough to hand properly anyway.
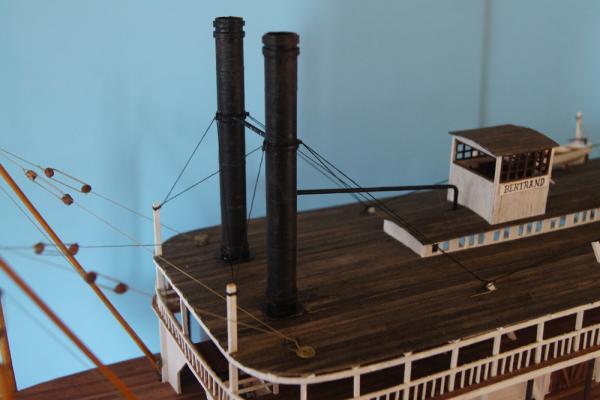
I’ll include the chimney braces in this chapter, too, as they’re pretty straightforward and the photo also shows the coils I made on the hurricane deck for the boom lines. I did these by carefully coiling line onto double-sided tape, which held each loop in place until I got the diameter I wanted. Then I brushed each coil with wood glue and let it dry before peeling the coil off the tape and gluing it in place. You’ll see another example of this when I write about rigging the yawls.
Grasshopper spars are a pain, but they really add visual interest to the model. And it’s something that makes this kind of upper-river boat unique; I haven't seen any steamboat kits out there based on boats with these spars; they’re all lower-river packets that didn’t have to worry about shallow-river navigation. But grasshopper spars were essential to the river traffic between St. Louis and western Montana, so they’re a fun detail to add and understand.
One other detail to discuss here: the jackstaff. Seen in the first photo, this is the large white pole mounted at the bow, with a ball partway up it. I’ll let Louis C. Hunter explain this, too, as I can’t improve upon his words:
The function of the jackstaff was not, as illustrations of many steamboats might suggest, to support a flag or pennant but to provide the pilot with a sight which served as an indispensible aid in steering. Seen against the background of riverbank and landscape, the jackstaff enabled the pilot to gauge his position and the direction of the boat’s movement.If you look carefully, you’ll see that the red ball is at about the same height as the pilot house. I made the jackstaff by shaping a long square piece of stock, rounding it at the top and middle, while leaving a square section at the ball’s location, and at the base. Then I glued chunks of wood all around the ball’s location, creating a big box, from which I carved and sanded the final ball.
In the next update, I'll add the yawls, letter the name, cut & stack some firewood, and so on.


Mississippi Riverboat by chborgm - Mantua - Scale 1:50
in - Kit build logs for subjects built from 1851 - 1900
Posted
Thanks for that photo, I can see the structure planking now. And I agree that I like the look of decks done that way, though I'm hardly unbiased.
Adding lighting is very neat.