


AndrewNaylor
-
Posts
239 -
Joined
-
Last visited
Content Type
Profiles
Forums
Gallery
Events
Posts posted by AndrewNaylor
-
-
Go through the build logs
Find a small single masted ship you like, that way you will have a lot of advise and pictures ready to help you through
The learning curve is not to steep your last plank will be your best as you have got over the gluing your fingers together stage hopefully
Rigging is frustrating but very rewarding
Just enjoy and you will be well rewarded
I sold my 4th model for $2800 dollars it cost me around $800 in kit, paints, tools, and display case plus a hundreds of hour of my spare time but I still have a smile on my face
-
Now that is a good looking well made very useful tool
- Keith Black, Scottish Guy, James H and 3 others
-
 6
6
-
-
Two words
MAN DROLICS as everything was done back then MAN DROLICS to raise and lower the sails MAN DROLICS where used to tack and jibe the ship MAN DROLICS to steer and MAN DROLICS to launch the ships boats
Maybe not the answer you where looking for but in reality the real answer with a little help from a few block and tackles
Andy
-
Sandor
If you use a small vice, smooth jaws are a must as knurled faced jaws will mark your brass. A light flat faced hammer will easily bend the brass over and will create a sharp 90' bend for you Cut the pieces to length before bending as cutting after the bend is in will not work well at all even drilling any holes is much easier while the material is flat. If you are making a few of the same item's make a jig in the vice jaws to ensure the parts all fold at the same point.
Andy
-
-
Try SS welding rod used for Tig welding It comes in many diameters and hardnesses A local wedding shop should be able to help
Micro Dies for cutting threads will enable you to make turn buckles etc
SS work hardens so you have to be careful about the number of times you bend or work it
Andy
- mtaylor and Mark Pearse
-
2
-
What ever you choose, practice, practice, practice. My preference is for a small point on the iron as most model parts are "Small and Fiddly" The parts must be clean yet again another hard job as the parts are "Small and Fiddly" and thirdly you have to hold the parts together, as you want them with alligator clips or the likes so when you touch them with the soldering iron tip or flame they do not move from how you set them.
Quenching hot parts in cold water helps bring of any flux that might still be around after the job is done
a damp sponge helps keep the irons tip clean and a good stand to hold the hoy iron in is essential
When you master the art it's another box you can tick in your model building career.
Andy
-
-
Look on YouTube for "Keith Appleton" he makes wonderful videos about building small steam engines many play lists and a great sense of Yorkshire humor
and has built many steam launches etc well worth many hours of viewing on cold damp winter evenings
Andy
- Canute, mtaylor, thibaultron and 3 others
-
6
-
80 grit ir ROUGH !!! you can destroy your hard work in seconds We are by nature on this website as Modelers making small things so we need to be very careful
using 80 grit can be a bit like "The Bull in the China shop" not quite sure it has to be a china shop I am sure a Bull would make a mess in any shop, except perhaps a butchers shop, but back to the point 80 grit is very very ROUGH so be careful Pick your fight Hard wood 100 grain soft wood 220 grit or just spend more time cutting closer to the mark so you do not need to sand so much off remember the more you sand the more stress you put into the wood so more likely to snap
Happy sanding
Andy
-
Hi
I am still waiting for my replacement kit due to the wing size issue been waiting 3 months now. Any how I have followed your build with great interest as Inhiope the start my kit soon How did you make the front engine cowl? I have just seen it on your last posting but can not recall seeing you talk about how you formed it the kit I received has a flat round sheet and requires some serious work!!!!!
great build
Andy
-
-
Thank you
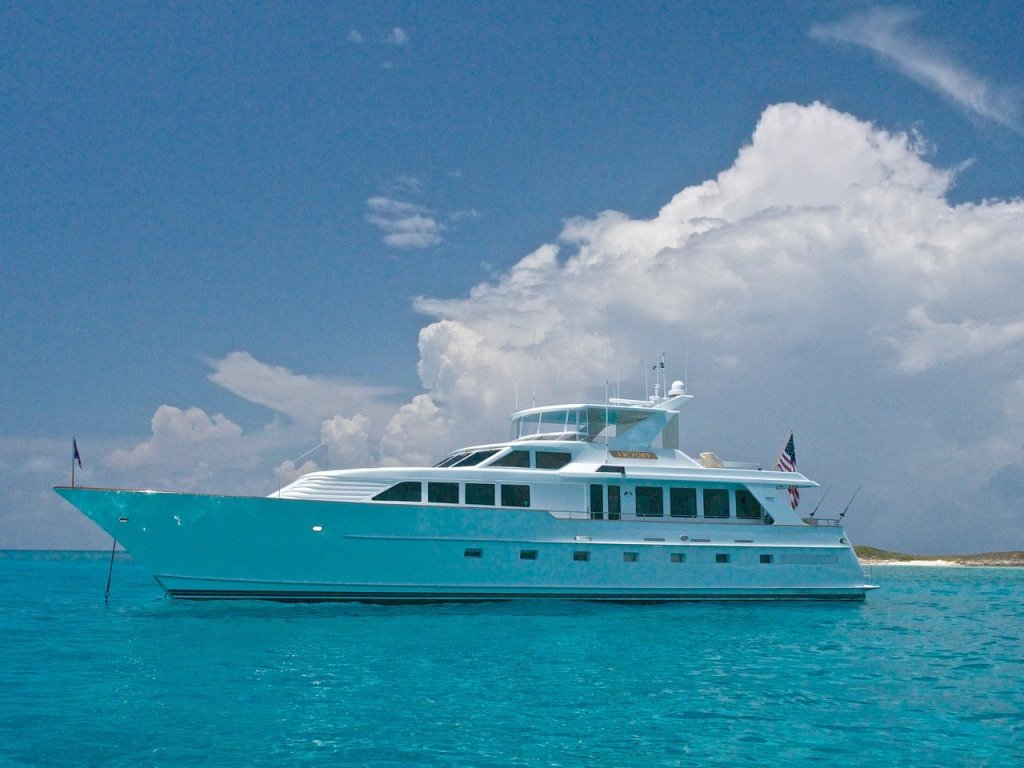
and Happy building attached is a picture of my current Office in the Bahamas last year
- Canute, CaptainSteve, Dilbert55 and 2 others
-
5
-
Messis
I would love to help you but I am away from my shipyard for another 5 weeks ( I am a yacht captain ) But I am sure that if you take 1 of the Halyards attached to either the Crutch of the Gaff or the peak of the Gaff Lead it down through one of the 5 blocks a hole might need drilling through then lead back up to pin rack
I see that you are working on the fore mast so you will not have gaffs but yard arms possibly 3 as it looks like a t least a 2 deck ship The one I built had a set of 3 shine blocks 1 attached to the yard arm the other attached just below the crows nest and then lead down to the Turning block on the deck and then on to the pin rack
I have attached a drawing that I have just done I hope this helps
- CaptainSteve, Canute and mtaylor
-
3
-
I think you will find in the rigging diagram that halyards will run down to it and then up to the belay rack helping produce a mechanical advantage for the crew when lifting or lowering heavy loads. They have pulleys built into them to allow the rope to travel smoothly and would have been well built into the structure of the ship due to the large loads imposed on it Your Rigging plan will also show blocks attached to other rigging on the ship, same purpose different attachment The one on the deck has five blocks two is about the biggest up in the rigging.
I hope this helps
Andy
- mtaylor, CaptainSteve and Canute
-
3
-
Tecko
Fantastic news on the test front Its funny what a little exercise and a new diet can do I lost 20lb and dropped certain levels just by walking nothing hard about that !!
the build is coming on famously I think one of these bridges in the UK has "Listed building status" so with any luck the scrap man will never get to wild his cutting torch on it
All the best
Andy
-
It is the nature of the Beast on which we live, and in most cases try and encourage, "Free Trade". Driven by profit which pays share holders premiums and then things like pensions
I am not saying small model companies making the things we relay on to do our ART are these massive Share holding companies BUT they work on the same principle They have to pay the wages of there employees and other business costs then hopefully make a little profit to make the whole endeavor worth while. (I gave up working for free 45 years ago) There is a long list of companies that are banned from this forum for stealing peoples hard work and paying there workers RICE money so they can produce very very low quality kits. Other people make there clothing lines abroad using Rice money then bring the product back to where they live and sell for a fortune
I can not always afford to buy Filet Mignon, but how ever hungry I am I will never buy Horse meat (Sorry French and Belgium's)
Andy
-
The Interior is one thing but I think on this yacht there are only 2 sky lights through which to view and they are round and oval shaped with lots of triangular fasets your hard work my well be hidden from all to see That been said some of the Bone ships built by the French prisoners of war have full interiors only visible with modern fiber optic scopes
Good luck with your project
Andy
-
Thanks for all your support in this But unfortunately my very brief time at home is over and back on the yacht tonight heading to Maine/ Nova Scotia/Newfound land for the summer early Fall so I closed the shipyard/Hanger down for a few months
I can watch but no more building
Andy
- thibaultron, Torbogdan, MWerth and 4 others
-
7
-
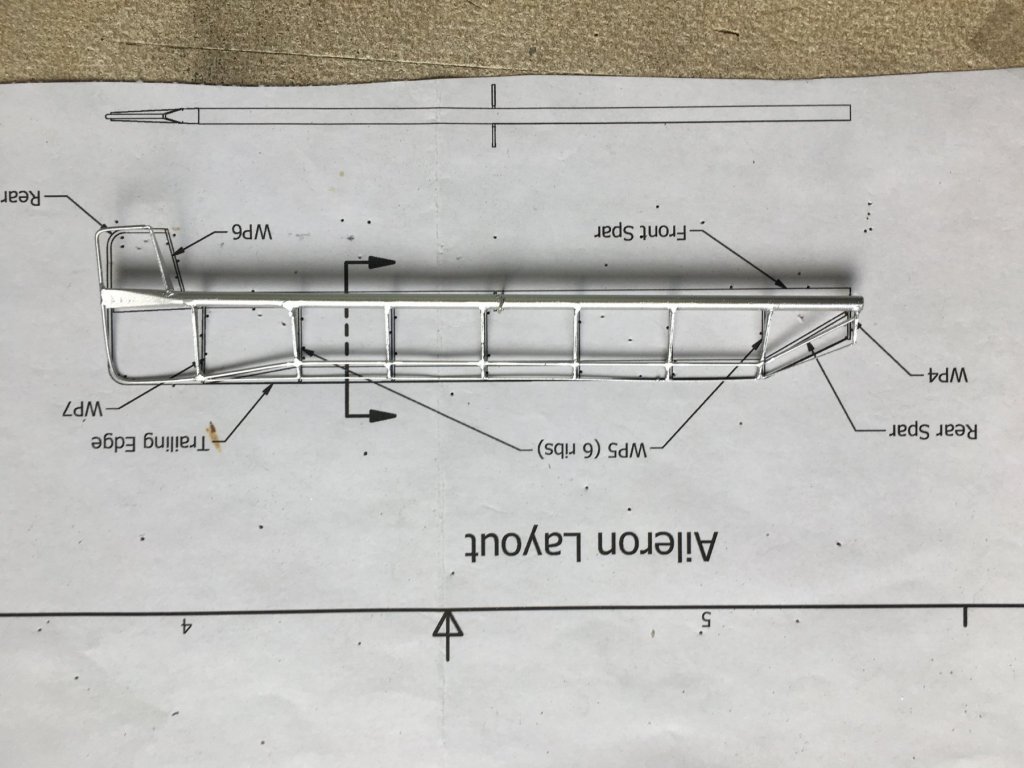
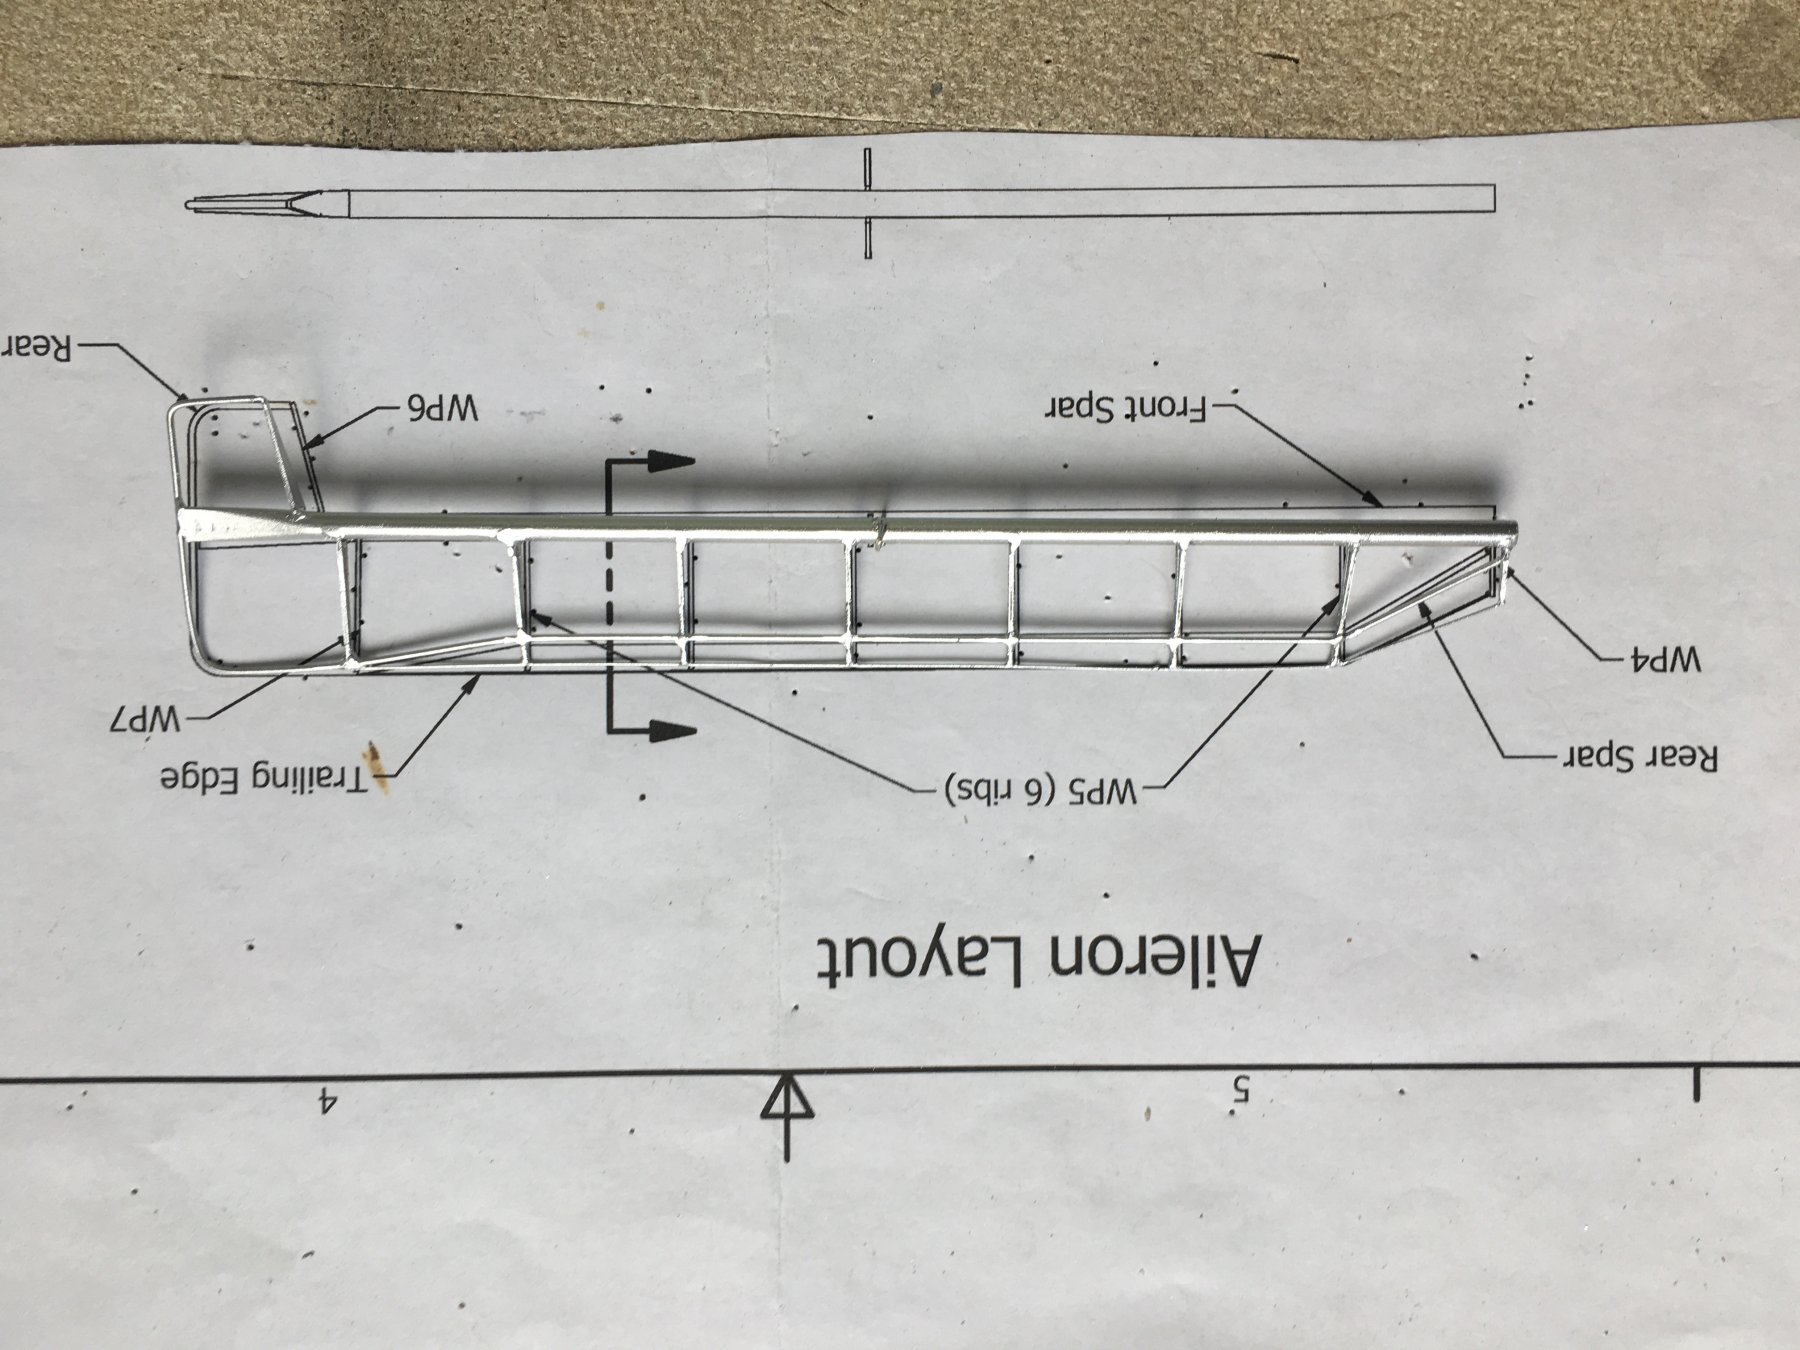
I have 3 wings of decreeing size from the bottom up All 3 wings are short That is why after checking they where all going to be short I assumed that I was not to build off the drawings and then built the aileron off a different drawing thats when I discovered my problem
Oh well all good practice for the next try !!!!!
- Canute, Nirvana, thibaultron and 1 other
-
4
-
Thank you both for your help and support
Not trying to hijack this fantastic build
The parts where to small to build over the drawings, as I had on the Wright flyer years ago
All 3 wings are equally short so that is why i thought it was an of drawing build as the 3rd picture show's
ME have received an email with Pics and waiting for a reply, which I am sure is coming They have served me well in the past
Torbogdan did you build your wings off the drawing and did they fit?
I feel the Lazer cutter had the wrong input when it started burning !!!
But I do love these kits and have started the Sopworth Camel to fill my time
Great kits and hanging from s thin wire from the ceiling a fantastic talking point
-
Good Afternoon Torbogdan
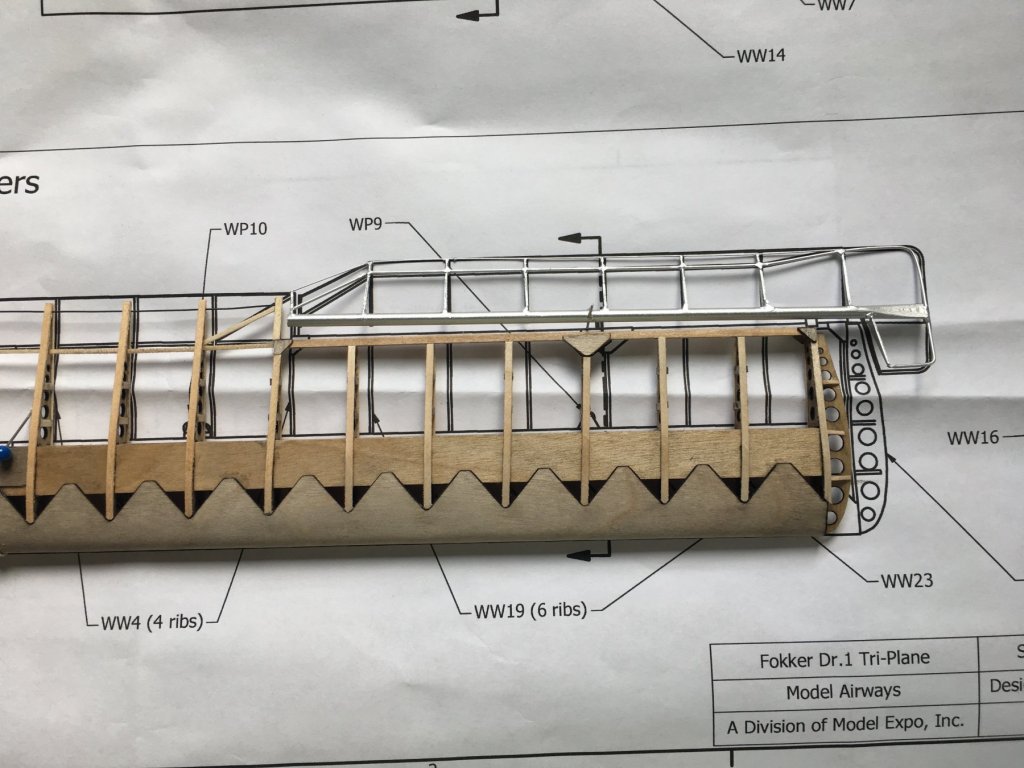
I am also building the Dr1 but not as far ahead as you are . I have just finished 1 of the Aileron and held it up to the wing It appears to over hang the wing by 1/2 an inch
The completed wing is an 1 inch shorter than the drawing shows but the aileron is the correct size Does your wing Aileron fit as the plan shows?
I have attached some pictures
any help would be greatly received
Thanks Andy
.thumb.jpg.57e55604b63c56e5ab08f4aa5465308d.jpg)
-
Danny
You Sir are a man of many talents, From wood to paper, ships to coaches and hundreds if not thousands of encouraging and helpful posts to many of us on the site.
I for one would like to thank you for al your hard work and Entertainment by way of your skill
Thanks
Andy
- Captain Slog, Canute, Eddie and 2 others
-
5

.jpg.cbff58ef59547306f1e4bf4e767c90df.jpg)
Queen Anne Barge by JpR62 - FINISHED - Syren Ship Model - 1:24
in - Kit build logs for subjects built from 1501 - 1750
Posted
A beautifully detailed build log from start to finish, It just goes to show what a gorgeous model a little skill and a fantastic kit can produce
very well done.