


kurtvd19
-
Posts
3,048 -
Joined
-
Last visited
Content Type
Profiles
Forums
Gallery
Events
Everything posted by kurtvd19
-
 We can now take orders for a limited number of the Half Hull Planking Kits Go to the NRG News topic area for details.
 -
Half Hull Planking Project
kurtvd19 replied to tlevine's topic in NAUTICAL RESEARCH GUILD - News & Information
We can now take orders for the Half Hull Planking Kit The number of kits on hand is limited due to the lead time for the laser cut parts. We will only take orders for the number of kits on hand. We are awaiting the basswood sheet material that is due very soon – everything else is in stock now. The kit is not yet listed at the NRG Store, and when it is, we will update this, but we can now take orders through the NRG Office. Payments by credit card or PayPal can be accepted now. Call the office directly or send an email. See the NRG web site for the phone and email. (Not listed here to thwart robots/spammers) The price is $65.00 for non-NRG members. NRG members get the member’s 20% discount price of $52.00. Prices are plus shipping. US shipping is $10.00. Canada shipping is $20.00. Other non-US shipping is $26.00. Shipments will be made as soon as the wood sheets are in stock – expected shipping is the week of 10-22-19. -
The State of MA has strict tax laws and vendors must have a MA Tax account to sell there that the Museum is enforcing so there will only be Train Troll a kit mfg. who has a lot of waterline boats meant for RR layouts - I am currently building my second such kit - they are excellent. Bluejacket will be there showing their products bet can not sell at the conference. There will be attending member's models on display. Kurt
-
Hydraulic Dredge by Steve Harvath
kurtvd19 replied to Steve Harvath's topic in - Build logs for subjects built 1851 - 1900
I wouldn't try to wood burn plank seams - unless you are a true artist with the tool. Plank the hull with individual planks. Kurt -
Eric: That's what I meant. No need for the box to be any wider than adequate clearance for the wheels/buckets. I think the artist might have used photos of other boats as reference for the painting and the referenced boats had wider wheels. Kurt
- 599 replies
-
- 3
-

-
- sidewheeler
- arabia
- (and 4 more)
-
Eric: Unless I am seeing something wrong, the painting shows a wide box but it only comes to the side of the boiler deck cabin. I think it might be a matter of the visual perspective as to how wide the box appears in the painting. You have made the paddle wheels and buckets per the wreck and the box should be sized accordingly. There is nothing gained by making them wider than is needed for clearance of the wheels/buckets. With the photos of the other boats, I think they had wider wheels - thus the wider box. Kurt
- 599 replies
-
- 4
-
-
- sidewheeler
- arabia
- (and 4 more)
-
Ordinary solder does not accept blackening agents - one of the reasons many say to silver solder. Stay-Brite does accept blackening well at least if the joints are neat. Have used Birchwood Casey Brass Black on soldered joint w/o there being any difference over the solder vs the brass - not excessive amounts of solder. Kurt
-
HMS Winchelsea - Special Offer
kurtvd19 replied to kurtvd19's topic in NAUTICAL RESEARCH GUILD - News & Information
Peter: First, welcome to the NRG. Thanks for your support. Send an email to Mary at the office nrghomeoffice - at - gmail.com - substitute @ for the -at- (keep the robots from snagging the email address) and provide your correct email address to her. She will get it taken care of. Take care, Kurt -
Here are two places that sell some hardwood strips and sheets Balsa Wood Shop - www.balsawoodshop.com - they sell Black Walnut, Cherry, Mahogany, Maple, Oak and Bass besides balsa. National Balsa - www.nationalbalsa.com - they sell Cherry, Mahogany, Maple, Walnut, Bass and balsa. Kurt
-
MagEyes anybody use them ? Which ones and Y
kurtvd19 replied to NovaStorm's topic in Modeling tools and Workshop Equipment
I used plastic lens Optivisors and the lenses were clean and not scratched. Absolutely no comparison to the quality of the glass lenses in Optivisors. Whatever focal length/magnification the glass is far superior to the plastic. After I got the glass lens set some local club members tried my plastic and my glass Optivisors and went out and got glass. Plastic might be perfectly acceptable for some but not for me after trying the glass. This product looks like an exact copy of the brand-name Optivisor - wonder what the origin of the product is - China maybe? At the price I would bet on it! Kurt -
The props were not part of the kit. I have a like new yellow box kit with plans and all, with the fittings bag unopened - no props. The vintage of the COP when it was stem propelled would have used two bladed props. Kurt
-
Is there a Beginner’s Guide to Metal Work?
kurtvd19 replied to VTHokiEE's topic in Metal Work, Soldering and Metal Fittings
You are right - it's not as complicated as some would make it - or think it is. Remember to keep it clean, always use flux and solder flows to the heat. Kurt -
Is there a Beginner’s Guide to Metal Work?
kurtvd19 replied to VTHokiEE's topic in Metal Work, Soldering and Metal Fittings
Silver soldering, in my opinion and I have used it extensively in the past, isn't needed for the strength of the joint in our ship models. The only need I have for it now is when doing multiple soldering operations in very close proximity to one another. Using a high melting point first and then using progressively lower melting points for adjacent joints allows one to not have too much worry about loosening earlier joints. If you read Foran's book you will see that in our usual applications joints in close proximity can be made w/o resorting to silver soldering. He's a big advocate for Stay-Brite solder - it is a high silver content solder but not a true silver solder as the melting point is lower than silver solder. Techniques he describes allow adjacent joints to be made easily using Stay-Brite. I made several presentations on silver soldering at NRG seminars and conferences and used it extensively, but over time I have moved away from it and find myself using Stay-Brite almost exclusively. Regular soft solder doesn't blacken but the Stay-Brite does, just like silver solder which was my primary reason for using silver soldering. There isn't a joint on a scale model that requires the strength of silver solder - R/C boaters need it for rudders and control levers but I think one is doing something wrong if silver solder is needed for any joint on a scale model - the strength just isn't needed. My suggestion is to get the Foran book and follow his techniques and later on investigate silver soldering. And yes, the second edition of the Foran book has a section devoted to ship modeling. Much of the material in that section can be seen in his USS Constitution build log here on MSW Kurt -
Is there a Beginner’s Guide to Metal Work?
kurtvd19 replied to VTHokiEE's topic in Metal Work, Soldering and Metal Fittings
I second the recommendation for Ken Foran's Model Building with Brass - I learned a lot from it that I never heard or saw elsewhere. More than worth the cost. Another book is The Complete Metalsmith by Tim McCreight. If you are going to be working with brass Ken's book is a must have. If you are going to delve into other metals or might consider casting then you will want the McCreight book too. Kurt -
MagEyes anybody use them ? Which ones and Y
kurtvd19 replied to NovaStorm's topic in Modeling tools and Workshop Equipment
The use of the Optivisor and other magnification aids has been discussed here at length. Do a search for magnification or Optivisor. Kurt -
Sounds like it's a Passaro designed longboat - extra keel pieces the clue. Check out build logs here - whichever kit it is there will be multiple build logs. Kurt
-
Hydraulic Dredge by Steve Harvath
kurtvd19 replied to Steve Harvath's topic in - Build logs for subjects built 1851 - 1900
It floats - it's a nautical vessel. An important one too. I wonder just where it was used as most of the canal is cut through solid stone. Looking at the drawing I think the vertical pole at the stern was a "spud" that could be lowered to hold the dredge in place and as you said it could pivot on the spud. However spuds could only go up and down. The piece of equipment that angles down off the stern (from what I can see of the photo) is probably part of the discharge tube for the material picked up by the dredge machinery and pumped to the stern and then deposited ashore or into hopper barges. Sometimes dredges had discharge tubes that reached several hundred feet. I will follow your build with great interest. I am very interested in the canal and its history and have been on many tugs, towboats and barges on it. I have done many models of tugs and towboats that operate on the canal. I have 7 tons of stone from the building of the canal in my fireplace. There were still piles of flagstone free for the taking n Lemont all the way to Lockport when my Father and uncle built this house in the early 50's. Also have retaining landscaping walls of the flagstone. Kurt- 69 replies
-
- 12
-
-
There are spray adhesives similar to rubber cement that work great. Elmer's makes one - Hobby Lobby, Michael's, and art stores have it. Any water based glue or such will distort the paper. This has been discussed at length here - a search might yield specifics. Kurt
-
In Memorium Mitch Michelson July 12, 1953 to August 28, 2019 This week, we lost a passionate member of the ship modeling community. Mitch Michelson died on Wednesday, August 28 from a massive heart attack. He was 66 years old. His funeral was held on August 30 in his hometown of San Antonio, Texas. Mitch joined the Nautical Research Guild in 1989. He had been a Director since 2009 and served as Chairman of the Board in 2017. Those members who have attended the annual Conference recently will remember Mitch as our humorous emcee. In addition to his contributions to the Guild, he was actively involved in Boy Scouts and mentored many young men to achieve Eagle Scout status. He was an avid pipe collector and served on the boards of several business organizations and his synagogue. He is survived by three children and three grandchildren. Most of all, he was my friend. Kurt Van Dahm Chairman of the Board Nautical Research Guild

- 16 replies
-
- 17
-
-
Shop Fire Extinguisher
kurtvd19 replied to Roger Pellett's topic in Modeling tools and Workshop Equipment
Every fire starts small - that is the time to tackle it. The fire extinguisher is the tool - just like the rest of your shop has specialized tools - the extinguisher is your first line of defense after prevention. A fire doubles in size every minute. Having an extinguisher at hand can avert a disaster. Call 911 and THEN grab the extinguisher and aim it at the base of the fire, not at the flames. If you have the fire extinguisher and get to the fire in the first minute you will have a small issue. If however, you call 911 and then stand there watching the fire grow because you don't have the extinguisher to use, know that the fire is going to double in size every minute. How far away is the FD from your home? Remember the fire is doubling in size every minute, when you had the chance to pull the pin on a fire extinguisher and put out the fire before the FD even got the fire truck's engine started. A club member had left his shop at about 11 PM to go upstairs to see the news and go to bed. His invalid wife was in bed on the second floor. He got to the first floor closed the basement door and went to the kitchen for a glass of water and heard a noise he didn't recognize. Started to investigate and as he neared the stairs to the basement heard the sound and identified it a the basement smoke detector. He opened the door and saw a small fire on his workbench and started down the stairs. He kept a small tea candle burning on his bench to flash off the C/A from the C/A applicator and had forgotten to blow it out. It had somehow ignited a sprue of plastic from the kit he was working on. He said he was truly shocked and scared at how fast the small fire he saw upon opening the door had grown by the time he got to the fire extinguisher by the bench - it had grown to take over the entire top of the bench and all the kit pieces, box and plans before he could get the extinguisher and put out the fire. As it involved a plastic kit the entire basement was filled with black smoke and floating plastic that clung to every inch of the ceiling and covered the floor. He called me the next morning and told me of the fire and asked me to advise him on how to avoid a repeat. After looking over the mess I pointed out his extinguisher was located so he had to go past the burning workbench to get it - I had him locate the extinguisher by the stairs so it is close to the exit - and it would have been right at hand as he came down the stairs and he could have used it quicker than having to go past the fire to the other side of the room before he could grab it. I also encouraged him to have smoke detectors on each level of the house and to have them interconnected so that the basement detector would have made each detector sound an alarm and he would have heard it sooner. More importantly, if he had not extinguished it quickly his invalid wife was asleep on the 2nd floor w/o any alarm on her level. If he didn't have the extinguisher he would have been waiting for the FD to show up with his wife on the second floor - and heat and smoke rise. The chance of her getting out would not have been good with the proximity of the stairs to one another. I have had guys ask why my fire extinguisher is so far away from my work benches and I point out that it's near the phone to call 911 and near the stairs to get out. You never want the fire to be between you and the exit without an extinguisher in hand. I have a propane torch and several containers of solvents (all in metal cans) near my bench. If I have a fire and go for the extinguisher my back will be to the exit if it grew to involve any of the hazards by the time I have it in hand to fight the fire and I can bail out and direct the FD to the right area. I have the advantage of being confident I can probably extinguish any fire I might have in my shop with my 30+ years of experience and the fire extinguisher at hand. Remember, call 911 and aim at the base of the fire not at the flames. Kurt- 11 replies
-
- 10
-
-
Shop Fire Extinguisher
kurtvd19 replied to Roger Pellett's topic in Modeling tools and Workshop Equipment
Roger: Any UL listed extinguisher with the minimum rating of 2A-10BC - can do the job. Anything smaller just isn't big enough to do the job in the hands of the average person. Avoid any with plastic handles - stick with metal. Kidde is a good brand name and is readily available. If not buying one with a brand name make sure it has the UL label and the 2A-10BC rating.. Kurt -
They are good - very similar to the crock pot liner.
-
It is important that the Sparex doesn't boil (can't remember the exact hazard that results) but the crock pot can't get hot enough to boil the liquid. So any heat source that doesn't boil it is OK. The crock pot is perfect because it's got no metal - remember Greg's warning about using copper tongs - Sparex can't be stored or used in a metal container. Kurt
-
Greg: I have used the same technique and steps for several years - except I use Birchwood Casey Brass Black - and the heated Sparex is a world changer. One place to get the little croc pots cheaply is the local Goodwill or similar store. They always seem to have one or more for $3-$5. I have 2 spares on hand in case the current one burns out. Kurt
-
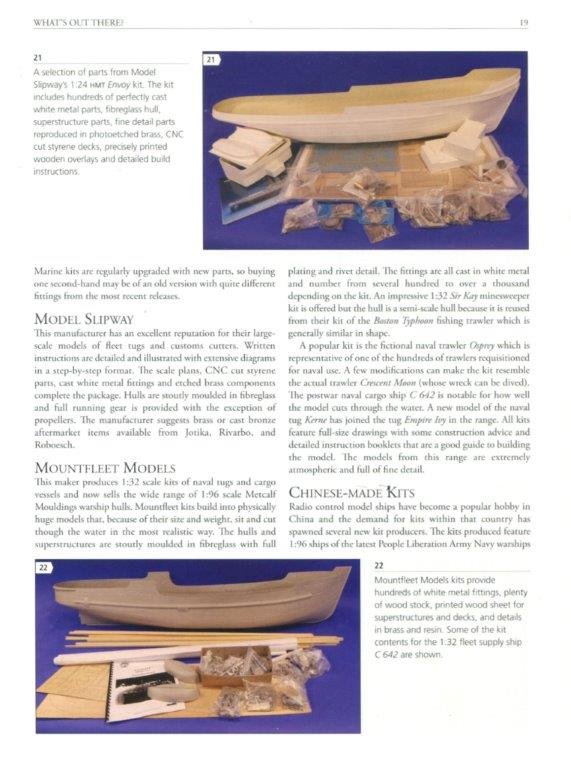
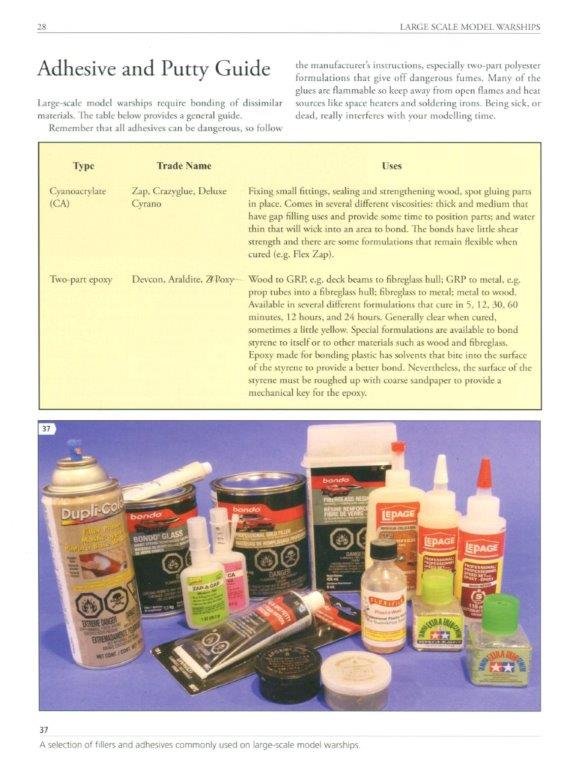
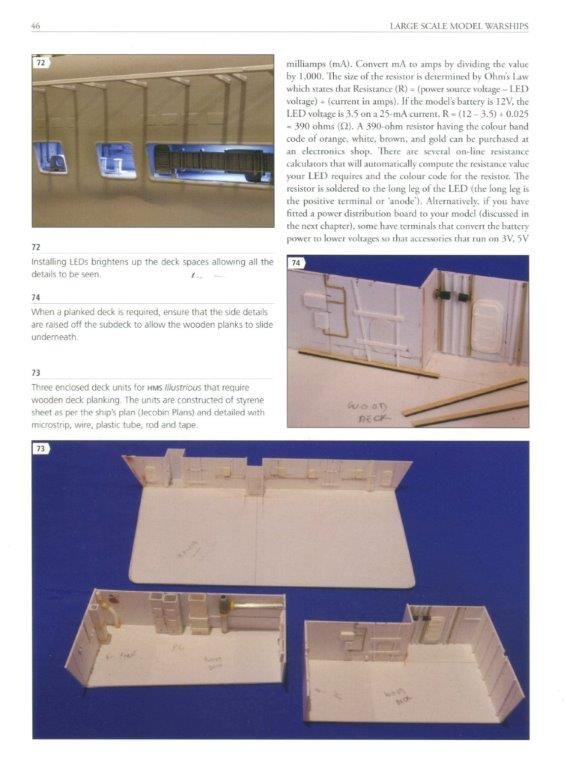
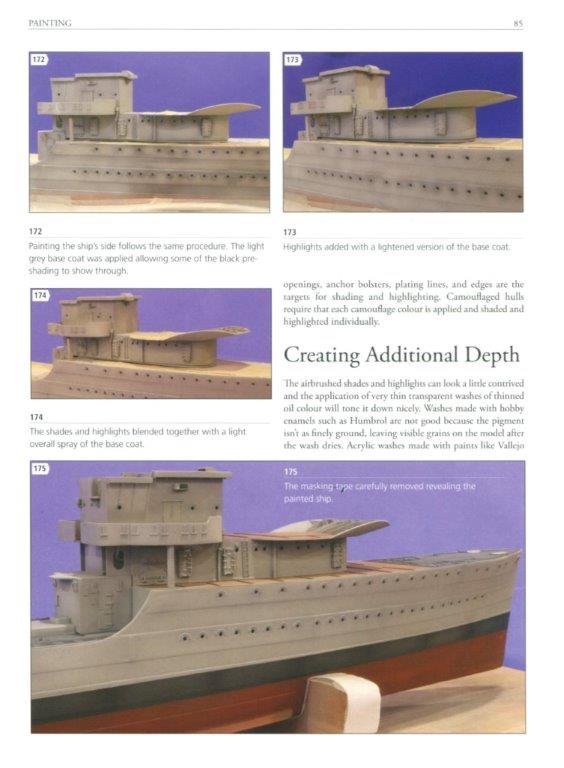
Large Scale Warship Models From Kits to Scratch Building By Kerry Jang Pen & Sword Books Ltd. 7 1/2" x 10”, Hard Cover, 110 pages Photographs, drawings, resources, references. £25.00 - $30.50 ISBN: 9781526730961 This book is aimed at the steel Navy warship modeler who wants to build larger and more detailed models than the common plastic kit scales of 1/350, 1/700 and 1/1200. Whether the approach to larger scale models is to build kits or to scratch build this book does a good job of laying out just what is involved and how to go about it. Large scale isn’t defined by the author as the subject determines what is a large scale. Many ship modelers would say a large scale model would be larger than 1:48. However, an American Battleship in 1:96 is considered a large-scale model at over 9 feet long while a 1:96 model of an 18 ft. Chris Craft runabout at only 2 1/4-inches long is considered a miniature. The models show in in this book are in many scales; 1:100, 1:96, 1:72, 1:48, 1:32, 1:32 and 1:24. These scales can certainly be considered large scale when modeling large warships. The book is profusely illustrated with 187 sharp color photographs and some good line drawings. The photographs are very specific to the task being shown. It is obvious that the author planned the photographs rather than picking a photograph that was “close enough”. The book is divided into 10 chapters with the first three chapters being background information and some workshop and tool information. The first chapter is an explanation of large scales and the benefits of modeling in large scales. The next chapter is a comprehensive evaluation and listing of the various suppliers of large-scale kits, semi-kits, hulls and fittings with each of the major manufacturers having a section listing the types and scales of their offerings. The third chapter covers tools needed and desired tools and some good workshop tips. Basic hand tools; both modeling and full size are discussed. Power tools covered are limited to modeling size table saws and full-size band saws. There is a good amount of information on soldering and the use of a variable temperature soldering iron. Glues and fillers are covered well with a comprehensive listing of the various glues and fillers and their main uses are explained. The book goes a step further than most as the author covers safety in the shop with eye, lung protection emphasized. Workshop lighting is discussed with natural light spectrum bulbs being highly recommended. Finally sharpening and cleaning of tools is discussed. The rest of the chapters deal with the methods and a logical progression of building a warship model. The hull and running gear are the logical starting point. The models and modeling techniques shown and explained deal with fiberglass or plastic hulls as these are the most common materials for model warship hulls. Cutting the openings into the hull for prop shafts and rudders can be the most intimidating aspect of building a fiberglass or plastic hull for the first time. Few kits or hulls come with these openings pre-made or even marked for locating. The author’s thorough explanation of the process and his clear photographs should alleviate any anxieties of doing these operations. The main decks and the supporting structures for the decks is covered extensively. Making templates to fit the decks is a critical step with a fiberglass hull as there is often some differences in the hull wall thickness and possibly some distortion that a good deck structure can correct. Regardless, the deck must fit into the hull with precision. Deck hatches and openings to access radio control components must be carefully planned and the deck supporting structure must be made to accommodate these openings, the deck shear and camber and be strong enough to support the deck and the superstructures that will be added. Deck materials and the deck beam installations are thoroughly covered. There is a section on enclosed decks and how to finish them before the main deck is finished. Radio control equipment is covered in Chapter 6. This part can be skipped if not doing a R/C model. But it is a complete how to on installing the equipment and also covers the need to distribute the equipment with the trim of the model in mind. Ballasting the hull is covered in this section. The attaching of the main deck and how to plank a deck are covered in this section. I personally think the deck planking should have been its own chapter, but the info is provided and that’s the important thing. The superstructure construction and attaching it is covered next. The author provides a good guide to what types of superstructure components that are provided in kits and some tips on how to work with the various types of materials used. Fittings and detail parts are covered in Chapter 8. While the text and photos provide a good overview of the ways to make various fittings there will be the need for additional information on soldering, mold making and resin casting if one doesn’t already have extensive experience in these operations because the information provided is not meant to provide more than an overview. Lots of good ideas on jigs and fixtures are provided to aid assembly. Painting is covered next and all the basics are covered. There is a very good discussion on detail painting to bring out details and how to detail paint the hull to show the hull plating and show depth and shadows by using pre-shading at the plating lines. This itself could be the subject of a small book but the photos and text give a very good explanation of the process which is shown to achieve a realistic appearance. Final assembly and the finishing touches to complete the model is the final chapter. Decals, porthole glazing, figures and navigation lighting as well as how to display the model are covered in this final chapter. I think some of this material should have been covered much earlier in the book because it might be very difficult to go back to do some of these items that would have been easy earlier in the construction process or at least planned for doing at the end. A twelve-page gallery of models is the concluding section of the book. Photographs of several finished models show off the benefits of modeling in large scales. The degree that the photographs look like photos of real ships just isn’t possible to achieve in smaller scales. All in all, I think this book is a very good guide to what goes into making large scale warship models. While there are a few things that might have been covered in different sections of the book, overall the information is provided and, as it isn’t an instructional guide to building a model, the order of the data presented doesn’t detract from the book’s usefulness at all. I thoroughly enjoyed the book and recommend it for the modeler considering larger scale warships. Review by: Kurt Van Dahm


-
- 11
-