kurtvd19
-
Posts
3,043 -
Joined
-
Last visited
Content Type
Profiles
Forums
Gallery
Events
Everything posted by kurtvd19
-
 Russel: There is a very good capstan model on the Institute for Nautical Archeology (INA) web site listed below. This is a very good model of the main capstan on HMS Victory. The model was made by Glen Grieco and is used in a class at the University by Dr. Kevin Chrisman. Both of these gentlemen were featured speakers at this year's NRG Conference last month in St. Louis. This should give you a good start. Kurt http://nautarch.tamu.edu/model/report2/
 -
Chuck: Yeah, you are right about the lower plank having the other joints. I did follow the planking diagram and each plank is the length shown on the diagram. I was able to fit every plank onto a plank furnished in the kit and there were plenty extra even when I did use some of the wider planks for some that the instructions said could be made with narrower planks. Once you have the plank we have been discussing fit place please show us the bare plank as shaped. I just don't remember any plank causing a problem or not fitting on the planks furnished. Take care, Kurt
-
Storing Wipe-on-Poly
kurtvd19 replied to ortho85's topic in Painting, finishing and weathering products and techniques
MARBLES. Use cheap easily obtained marbles to keep air out of the can. As the liquid is used up drop marbles into the can to keep the fluid right up to the top of the can. As to ease of use I would suggest a smaller container like the plastic or glass jars sold for airbrush use - they come with caps. Dispense a small amount into the small jar and add marbles to the big can. I use a cheap soft plastic pipette to transfer liquids out of bigger containers into smaller containers - no need to worry about the marbles pouring out. Kurt- 6 replies
-
- 10
-

-
Chuck: You are correct. This is actually the longest plank other than the very lowest which is the same length to frame 9. I didn't measure it but I am sure you are right on the 13". I just do not remember that plank having such a curve. Unfortunately, my last shop clean up I looked at the planking templates I had cut from the file folders and said "Dump these - you are never going to do another of this model" and for a change I actually discarded them. Bummer. I am positive that each plank was able to be spiled from at most the widest planking strips w/o having to cut any wider strips. The plank that you showed yesterday seemed to curve a lot more than I remember. The photo attached shows the plank directly below the plank in question being fit to the model and it does show that plank going to frame 9. I just do not remember the plank having such a curve to it. I have probably just confused the issue. But if you got it to fit cutting it from another width piece I guess the problem is solved. Sorry that I don't have the answer. Maybe I should have paid more attention? Kurt

-
Has the ShipWright Software been discussed here? Is anybody using it? I bought this in early 2008 or so and the manual says that I was to receive a free version 2.0 when it was released but I never got it. Had installed this on an older computer and never used it beyond just a quick try of the program and got way too busy to explore it further. Just installed it onto my new unit and while looking in the manual decided to check on the updates. The URL www.shipwright.biz on the cover of the manual leads to a engineering firm. The software was purchased from Robert Furstenberger of Brentwod, MD. No listing is shown for him currently. Kurt
-
Chuck: I think it will work better if you follow the planking diagram and do not use planks the full length of the boat - or close to the full length as it appears you are doing by mentioning that the fold of the file folder is a problem. The problem you are having with the spiled plank running off the width of the plank can be eliminated by using planks the length as shown on the planking diagram and cocking the plank of the strip as you thought. Of course, you need to make the rough plank a bit longer than the final plank just to allow a bit of trimming at either or both ends as you do the final fitting. Also, get a good fit to the bottom of the plank above w/o tearing your hair out, trim the bottom of the plank to a rough width using the marks on the frames for the proper width and then wet the plank, clamp it in place, making as good a fit to the underside of the plank above and when dry do final fitting of the top edge to the plank above. Then,, do the final trimming of the lower edge of the plank to the marks from the frames, fair the edge and it should be a perfect fit. With the top edge a close fit and then soaking the plank, a bit of edge bending to make a real tight fit can be done w/o a problem. Take care, Kurt
- 259 replies
-
- 2
-
-
- Gunboat
- Philadelphia
- (and 1 more)
-
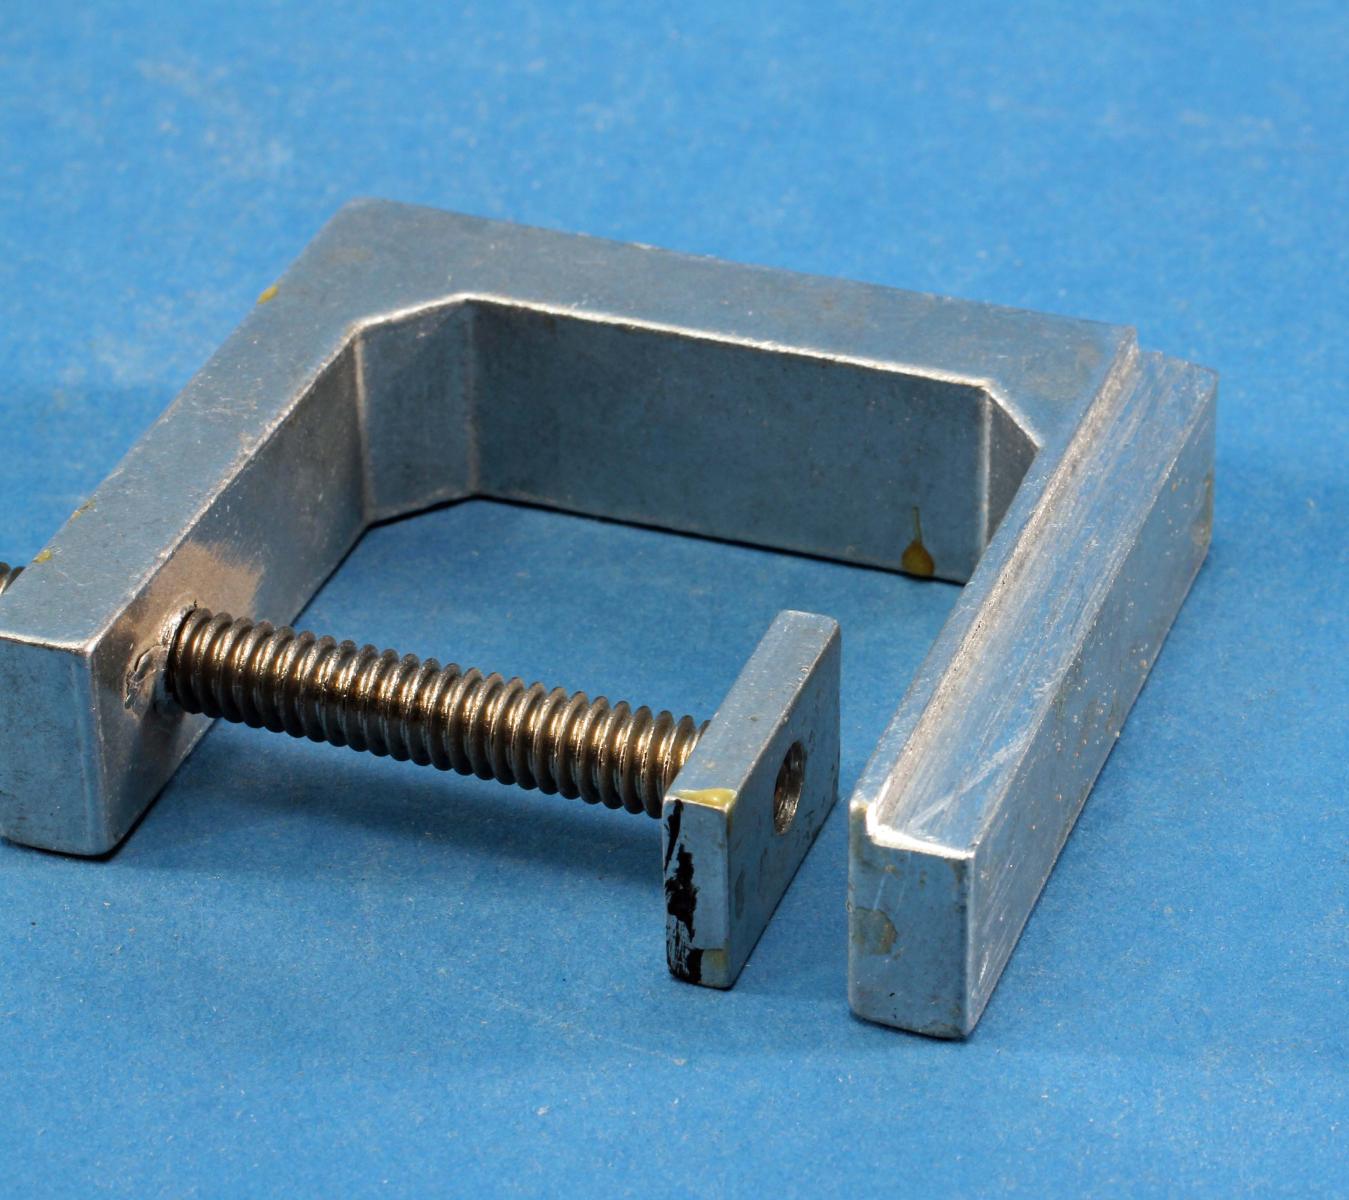
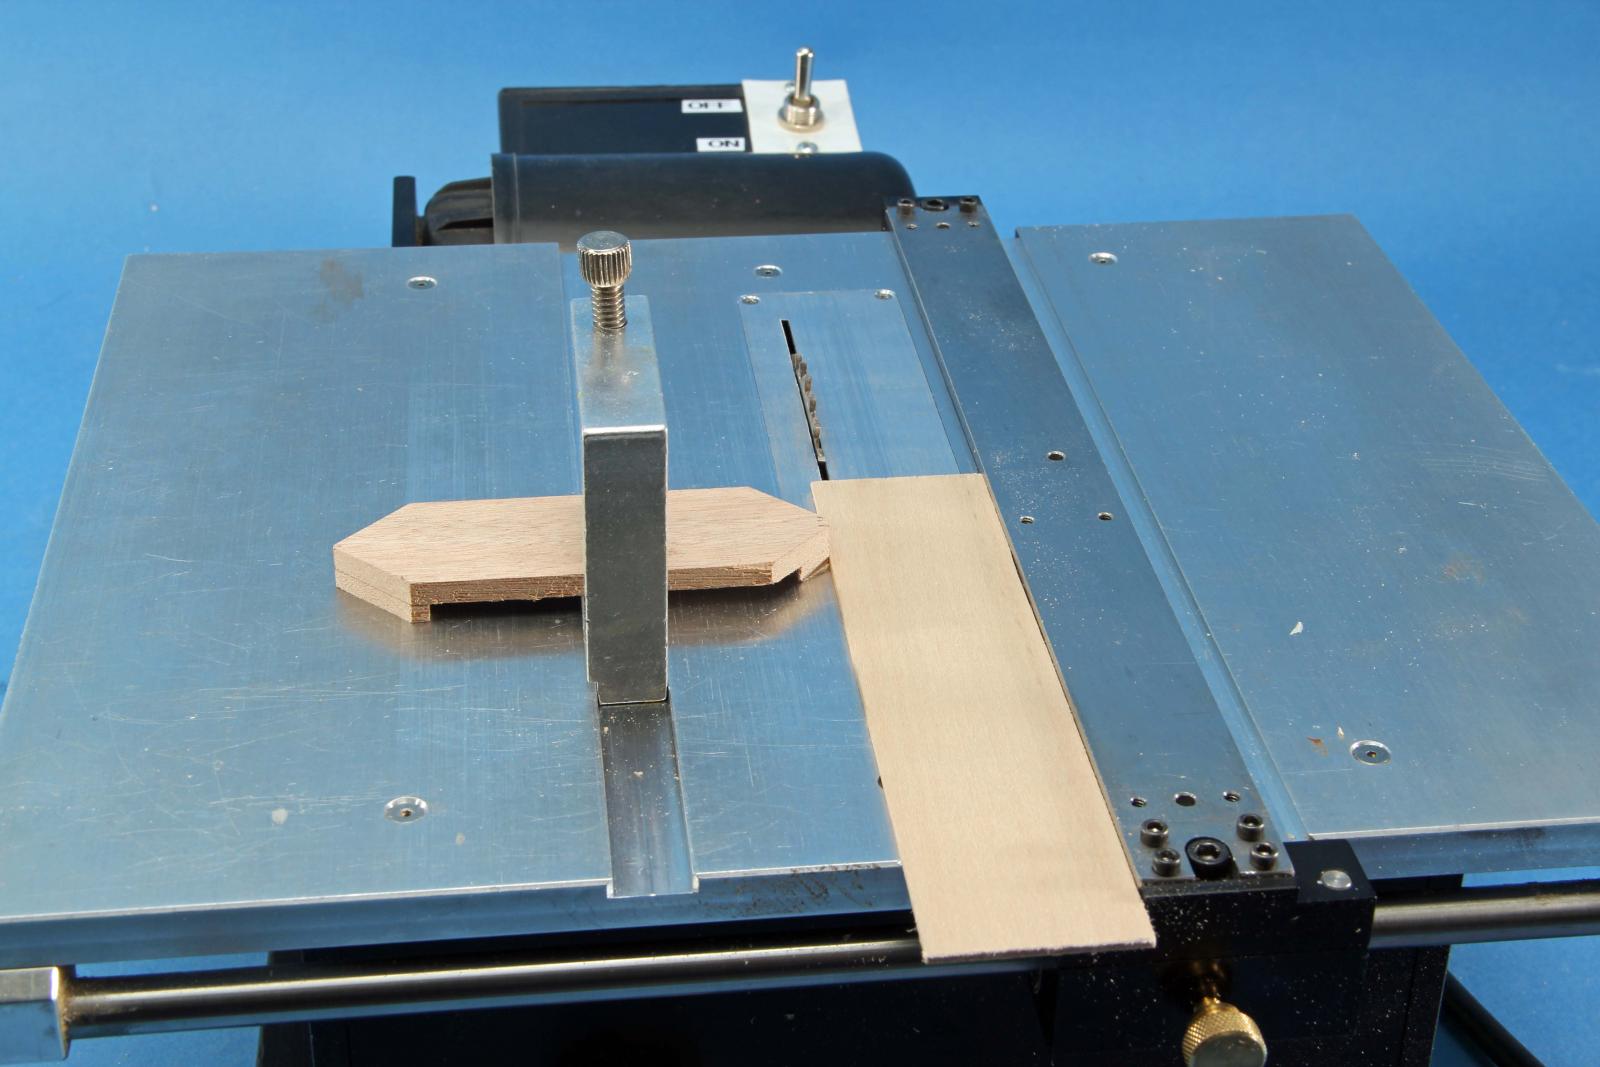
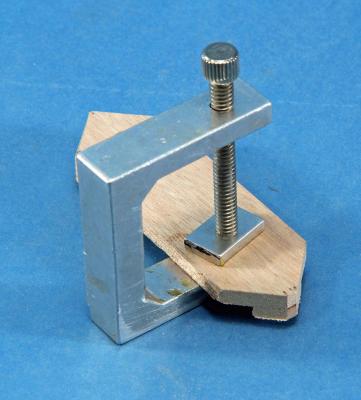
I use a shop made jig/fixture to cut repeated widths of thin stock. The clamp is an old Xacto clamp that has been narrowed to fit into the slot of the Byrnes saw. A mill is not needed - I used the carbide blade on the Byrnes saw to make the rabbet a close fit to the saw's miter groove. The wooden jig piece needs to have the ends thicker then the center area to fit to the clamp. I will be remaking the wooden piece from Plexiglas as this was just a test jig to get a job done. Now that I know it works for me the upgrade to Plexiglas will follow. The fixture is moved back, closer to the operator, when making cuts. Kurt


-
Don't need a cap for the top of the tube - just use a small plastic clamp at the top end of the plank to weight it down and to grab it. Will hold it submerged and you have a hany handle on the end too. Kurt
-
Looking good Chuck. Off to the NRG Conference this AM - preliminary stuff to do for the registration when the crowd starts to arrive tomorrow. Will catch up on your build next week. Take care, Kurt
- 259 replies
-
- 1
-
-
- Gunboat
- Philadelphia
- (and 1 more)
-
I too am just speculating on the effects of alcohol on wood, but there is no need to use it for bending as water or water plus heat is all that is needed to bend wood and the wood returns to equilibrium leaving the original structure and strength. If Marc wades in on the effects I will be all ears, but in my opinion, it's probably doing something to the wood that isn't going to make things better than before it was used. I do use regular Isopropyl Alcohol to soften yellow carpenters glue (Elmers & Titebond)glue to undo joints. Some say that the 90% stuff that needs to be obtained by special order is needed but I have never needed anything more than common and cheap Isopropyl. I have never had the occasion to soak a glued piece of wood. I apply the alcohol to the joint with a "Q" Tip or a syringe depending on how large the joint is - the more glue that was used the more alcohol that will be needed. I saturate the area of the glue joint and wait a bit but I keep an eye on it so the alcohol doesn't dry our before I apply more. I test the joint and as soon as it wiggles loose I remove the piece and I try to scrape any of the softened glue off the pieces. I let them dry before re-gluing the joint. Kurt
-
I have never used ammonia to bend wood - it just isn't needed. The bit below is a reprint of part of my article on building the Gunboat Philadelphia kit in Ships in Scale. I doubt anybody who attended the NRG Conference I reference has ever used ammonia since hearing it. Kurt AVOID AMMONIA SOAKING At the 2007 Nautical Research Guild Conference in Manitowoc, Wisconsin Alex C. Wiendenhoeft of the U S Department of Agriculture Forest Services Center for Wood Anatomy Research at the Forest Products Laboratory in Madison, Wisconsin explained how and why this damages the wood. After this length of time I do not remember all of the details of his talk, but the point was well made and I don’t think that any of the modelers who listened to his talk that day has ever used Ammonia again. The very non-scientific points I remember is that soaking in Ammonia breaks down and liquefies the Lignin in the cells making the wood more bendable. When the Ammonia evaporates while the wood is clamped in place to the desired bend, the Lignin solidifies in a somewhat degrade state weakening the wood. Ammonia also causes some woods to discolor when they dry out. This might not be critical when the wood is to be painted but if it is being stained or clear finished the discoloration would not be acceptable. Concentrated Ammonia fumes are used commercially to darken some woods with oak being very susceptible to this process. Mr. Wiendenhoeft explained how and why soaking in water or steaming wood made it bendable while not damaging the cellular structure of the wood. Again, a non-scientific explanation is that there is a chemical bond with water in the cellular structure of wood that varies between 0% and 30%. Soaking or steaming wood with water raises the percentage of water within the wood, called “free water”, above the amount bonded within the cells temporarily. This makes the wood swell and more easily bent. When the wood dries out and the bonded water stabilizes back to 30% or less, the wood retains the shape it was formed to by the clamping while it dried while retaining its strength. I have only mentioned drying the wood while clamped in place but the application of heat using some sort of plank bending tool or other heat source works the same way as clamping just at an accelerated rate.
-
Steve: The lack of a rabbet is probably due to the fact that the boats were built by carpenters who were lured to the project by some high wages and supervised by only a couple of shipwrights rather than being built by experienced ship builders. Also, the boats were not built for long term use. An interesting somewhat related point: When touring the Maine Maritime Museum in Bath a few years ago during the NRG Conference we were in the original workshops and noted that the buildings had certainly been built by the shipwrights rather than carpenters as they used knees at the top of the walls to support the roof construction. Carpenters would not have used knees. Kurt
- 259 replies
-
- 2
-
-
- Gunboat
- Philadelphia
- (and 1 more)
-
The NRG annual Conference in St Louis 2014.
kurtvd19 replied to Chuck's topic in NAUTICAL RESEARCH GUILD - News & Information
Clare: When you see Gus Agustin at the NRG Conference ask to see his carry case for his small models that he brings along as carry-on. Makes them from cardboard with a carry strap and drop down front so they can be seen by the TSA dudes. Anybody who wishes to add their MSW identity onto their name badge can certainly do so - I will have markers for that purpose. Kurt -
The NRG annual Conference in St Louis 2014.
kurtvd19 replied to Chuck's topic in NAUTICAL RESEARCH GUILD - News & Information
Clare: Anybody checking in mention you are a MSW member and we will mark your name badge with MSW and we can recognize each other by the MSW. There are no formal events for any evening except Saturday. We traditionally get together in the bar after the Friday events to make arrangements for who to go with and where to go for dinner. We can make a sign for the registration table area that the MSW members who desire can meet there or Thursday evening to have a drink or more. Let us know at check in you are MSW too and we can see about an informal get together. Next year we can make a set time and place. Kurt -
Can i live without a BYRNES TABLE SAW
kurtvd19 replied to shihawk's topic in Modeling tools and Workshop Equipment
The Byrnes saw is by far the best and I would urge anybody in the market to save up for one. Don't settle for the others as you will always be wanting the Byrnes saw and you will be forever wishing you had not wasted the money on the other saw. However, I wouldn't part with my Preac saw either. Both the Byrnes and Preac sit on my saw station all the time and I use them bot - a lot. The Preac saw can be made to work better than the day it was new by sharpening the blades with an alternating bevel to the face of the teeth. There is no set to the teeth of the slitting blades used on the Preac and simply putting a bevel onto the face of the teeth will greatly improve the ability of the saw to cut wood. Also, depending on the blade, removing every other tooth on the blade and then sharpening the faces of the teeth, alternating the bevel on each tooth will make a blade that cuts wood like you increased the HP of the saw by a factor of 3. Lloyd Warner of Warner Woods West showed this technique at a NRG Modeler's Seminar and I know several guys who swore at their Preac saws just love them with the altered blades. Of course, nothing will help the 1/4" limit of the thickness the Preac can cut, but with the altered blade one can cut through 1/4" boxwood like it turned into basswood. So, can you live w/o a Byrnes saw? Yes, but you will wind up wishing you had one. And, heaven on Earth is having both a Byrnes saw and a Preac saw on your bench. Kurt -
Micro Combo Saw, from Unique Master Models
kurtvd19 replied to Mahuna's topic in Modeling tools and Workshop Equipment
Frank: I like your holding fixture for the miter box and I am going to copy it for my shop. Thanks for the great tip. John Vojtech of UMM is going to be a vendor at the upcoming NRG Conference in St. Louis (October 16-18) and he's told me he has some new tools not yet in his web site catalog that he's bringing to the show. Kurt -
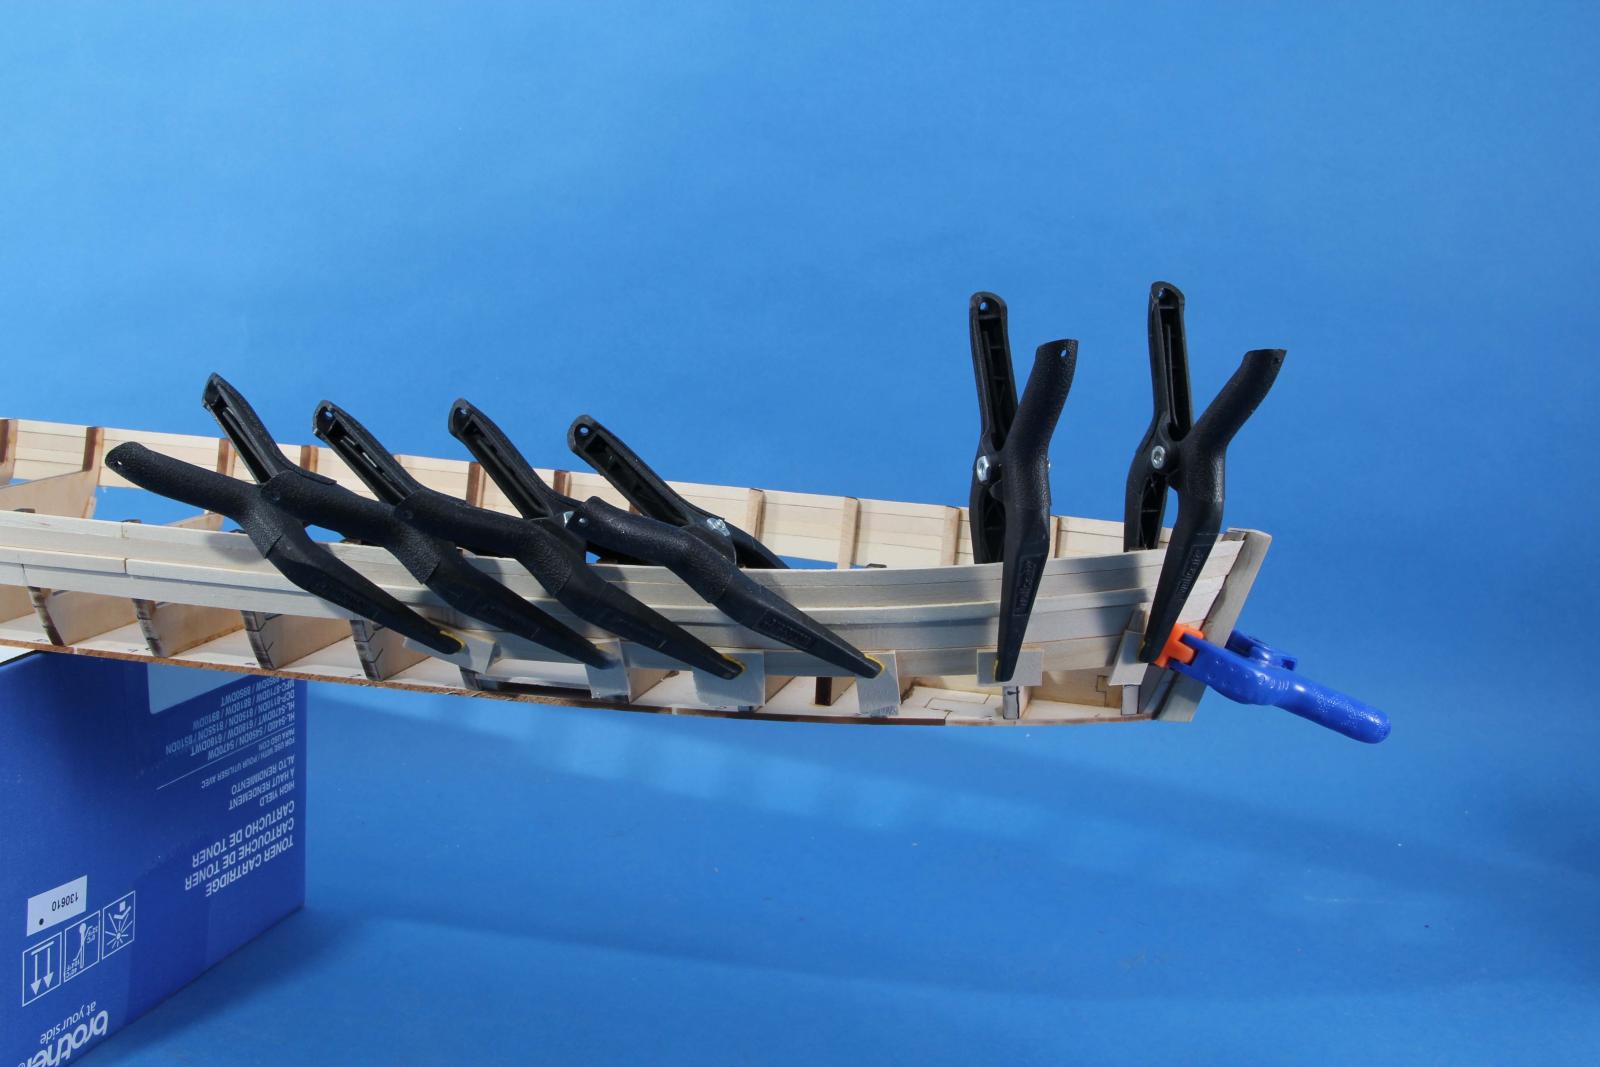
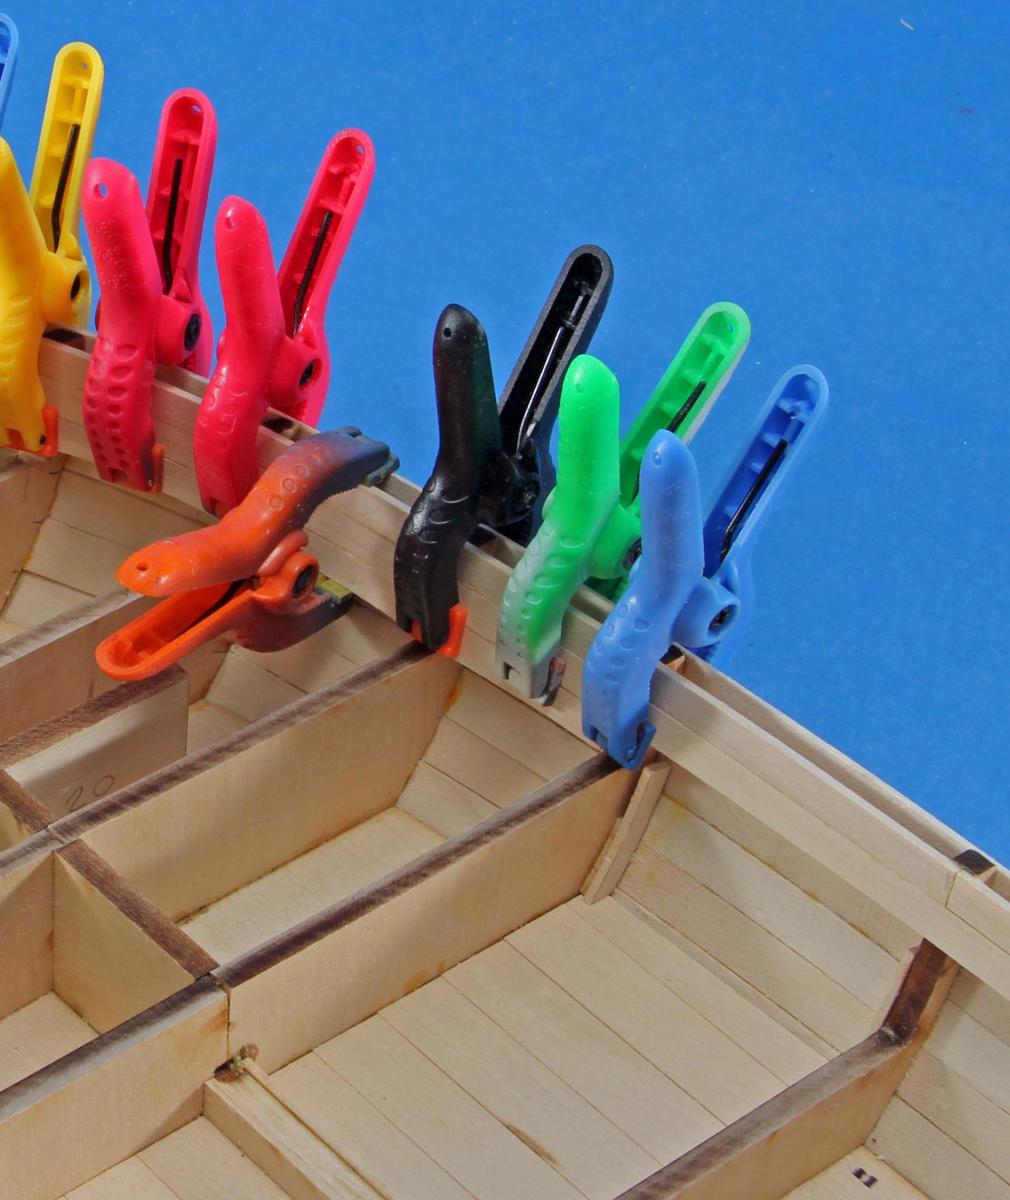
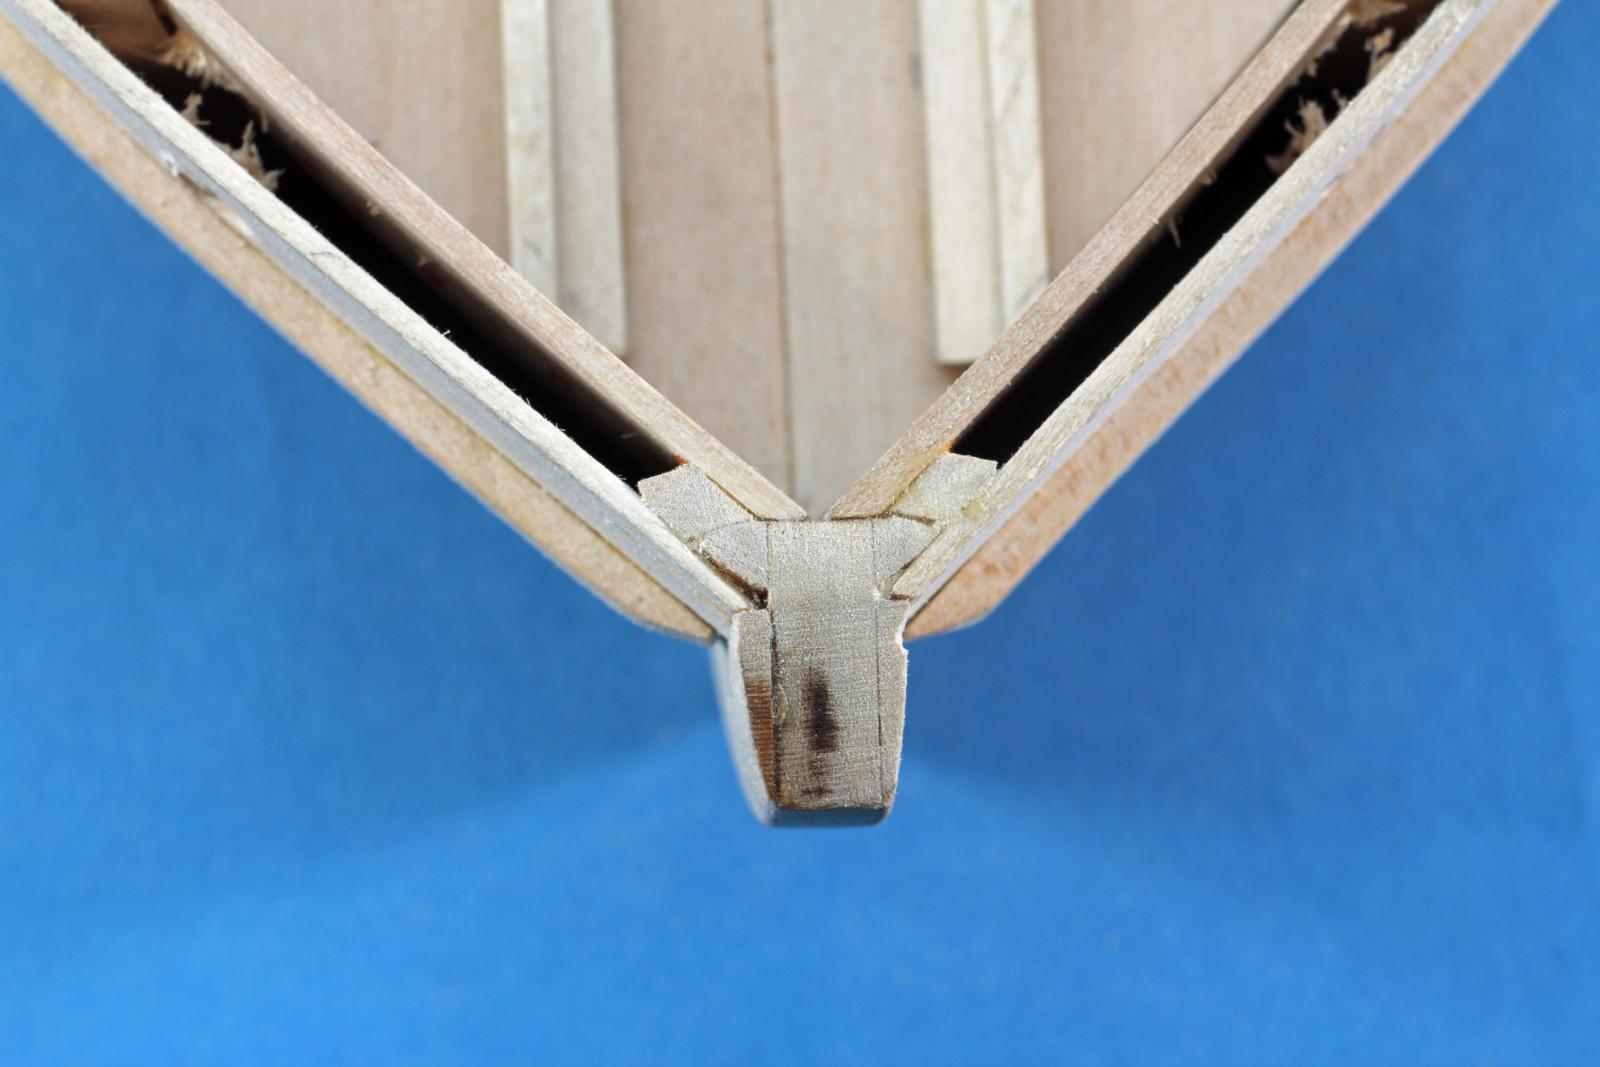
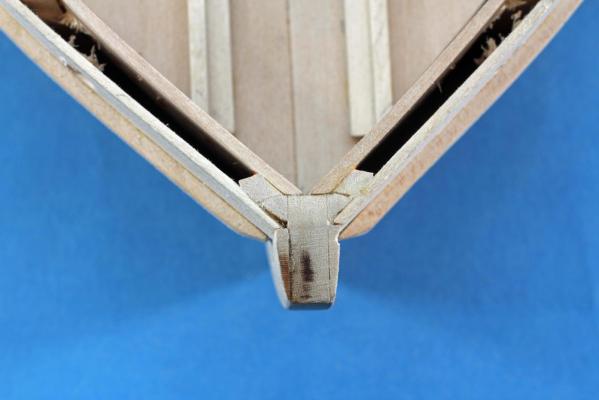
Parts 29/29A are a good fix for the lack of an attachment piece for the interior ceiling adjacent to the frame. If you haven't put them in yet, use some of the carrier sheet for the laser cut parts and make another piece of each to double them up so you have a decent width for the planking to attach to. The kit pieces will work but wider is better in this case. Do the same in the stern area by frames 5 and 6 with parts 5A and 6A - double them up. In the photos attached I used a shorter backer to space the kit piece out - if I was doing it again I would have used duplicate parts for more gluing area rather than the way shown. Kurt

- 259 replies
-
- 3
-
-
- Gunboat
- Philadelphia
- (and 1 more)
-
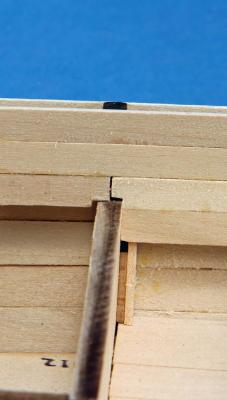
I would urge that the exterior planking be done first - at least the starting planking at the shear line as these plank runs are marked on the outside of the frames. Starting the interior ceiling planking you are guessing as to there to start. Once you are started on the exterior planking the interior can be started but be sure to make the inner planks level port to starboard with the exterior planking - there is a tendency for these interior planks to rise up and be higher in places that the exterior planks causing one to have t trim them level by sanding. The added filler strips to support the inner planking at the bow area that I added are shown in the photo on either side of the keel piece. I forgot about this area being visible in the finished model so I had to do some cleaning up and filling of the small voids alongside the outer planking. These pieces I added actually show in the plans and some photos of the original boat in the Smithsonian and Bratten. Kurt
- 259 replies
-
- 2
-
-
- Gunboat
- Philadelphia
- (and 1 more)
-
Marc: If you follow the planking diagram for the exterior of the hull you will have plenty of planking from the kit. As to the interior planking there is adequate stock to do it w/o worry. As to following the same pattern for the interior as the exterior, I would say to avoid that for the same reason you don't want adjacent plank butts on the exterior for stability/strength. In this type of boat the ceiling planking reinforces the exterior planking so you would want to avoid the duplication of butt joints from the exterior to the interior. Kurt
-
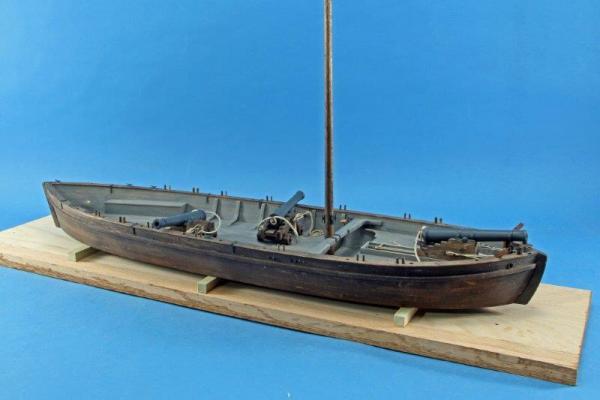
Chuck: Have not been able to check the progress for a bit so I am late in responding. Yep, you qualify for a NRG research ninja pin I decided that doing the nails was not for me on this build - to each his own. Your model is looking great. I attached a photo of my Philadelphia as of the other day - I had decided to replicate the museum's replica boat that floats in Lake Champlain. Got some of Chuck's blocks yesterday for the project. Wish he had the right size blocks for the guns - they are coming but I couldn't wait with the magazine schedule. Kurt
- 259 replies
-
- 9
-
-
- Gunboat
- Philadelphia
- (and 1 more)
-
CA glue question
kurtvd19 replied to MikeB4's topic in Building, Framing, Planking and plating a ships hull and deck
The tips on using a combination of C/A and TiteBond is good though I tend to clamp rather than using the C/A on wood. When I sit at my work bench I have a small fan going at all times because of my overhead halogen lights and the heat they put out - but it is real important when using C/A and doing soldering to make sure the fumes are blown away and not inhaled. Kurt -
I too have used the Westleys on resin parts with great success. I usually give new resin parts a bath in the Westleys stuff to remove all traces of mold release. The same as with styrene plastic - wash the parts thoroughly in dish washing detergent after being in the Westleys. I find it best to air dry parts to be painted to avoid lint from a towel. Kurt
-
The NRG annual Conference in St Louis 2014.
kurtvd19 replied to Chuck's topic in NAUTICAL RESEARCH GUILD - News & Information
The time is running out for the special room rates for the conference. The cut off date for the special room rate of $119 is 9-15-14 - after that it is full price. I just got an update from the hotel and the rooms set aside for the NRG are filling up and any open rooms will be released to general sales on the 16th. The hotel is currently sold out except for the rooms we have remaining in our block of rooms so anybody who delays might have to stay elsewhere or pay a lot more. Kurt -
The Westley's stuff works on both enamel and acrylics and it comes from auto parts stores. Kurt
-
I use Westley's Bleche-Wite (yes that's the correct spelling) meant for cleaning car tires. It's safe for the styrene - and it's not as hazardous as oven cleaner - and can go down the drain OK. Kurt