kurtvd19
-
Posts
3,048 -
Joined
-
Last visited
Content Type
Profiles
Forums
Gallery
Events
Everything posted by kurtvd19
-

adapt this idea for a small spray both?
kurtvd19 replied to Bob Blarney's topic in Modeling tools and Workshop Equipment
Bob; I agree that it does reduce the danger by providing extraction of the hazardous fumes. However I take exception with the rest of your statement that "fire/explosion hazards are probably not a relevant issue in hobby installations." I say this a retired Chief of Fire Prevention with a lot of experience with spray painting. If the air to fuel mix in and around a spray area - regardless of hobby or big scale - reaches the lower explosive limit, the hazard is at least equal and possibly more in the hobby use just because in most home areas there are absolutely no safety features found in large scale painting areas such as proper electrical connections, sealed conduits, etc. Just because one only sprays occasionally doesn't make them immune to the laws of nature. If the area has a fuel/air mix that falls between the lower and upper explosive limits of a flammable liquid and any source of ignition is within the area, a fire/explosion is very likely to happen. I have seen the results of thinking this isn't an issue for the small or infrequent use as well as by the frequent users with big spray booths with all the safety features who do spraying outside the booth because it was only a little job. Auto body shops are prime examples of this - and a source of significant numbers of fires. Please don't ignore the warnings on the paint containers to use in a well ventilated area as there are also health concerns about breathing the same fumes. Kurt -
Ala-Kart by CDW - FINISHED - AMT - 1:25 Scale - PLASTIC
kurtvd19 replied to CDW's topic in Non-ship/categorised builds
I routinely use rattle can paints in my airbrushes. The trick is getting the paint into a jar w/o getting paint all over the shop. Usually a tin foil sort of closed shield can be formed around the top of the jar and the spray nozzle of the spray can. Use exam gloves and push down the nozzle through the tin foil and 90%+ gets into the jar. Let it outgas for a few minutes and then use in the airbrush. Get to use some colors that just are not available except in a rattle can but with the ultimate control in application - the airbrush. Kurt -
Expanded information on the 2019 conference has been posted to the NRG Web Site. https://www.thenrg.org/nrg-2019-conference.php The downloadable registration form is also now posted. More than half of the rooms have been reserved so make hotel reservations ASAP. The tour numbers are limited by both museums so sign up early to assure you will be able to participate. Kurt
-
Eric: I doubt there is anybody there that isn't following the Arabia build. I think you are 100% on track. Kurt
- 599 replies
-
- 5
-

-
- sidewheeler
- arabia
- (and 4 more)
-
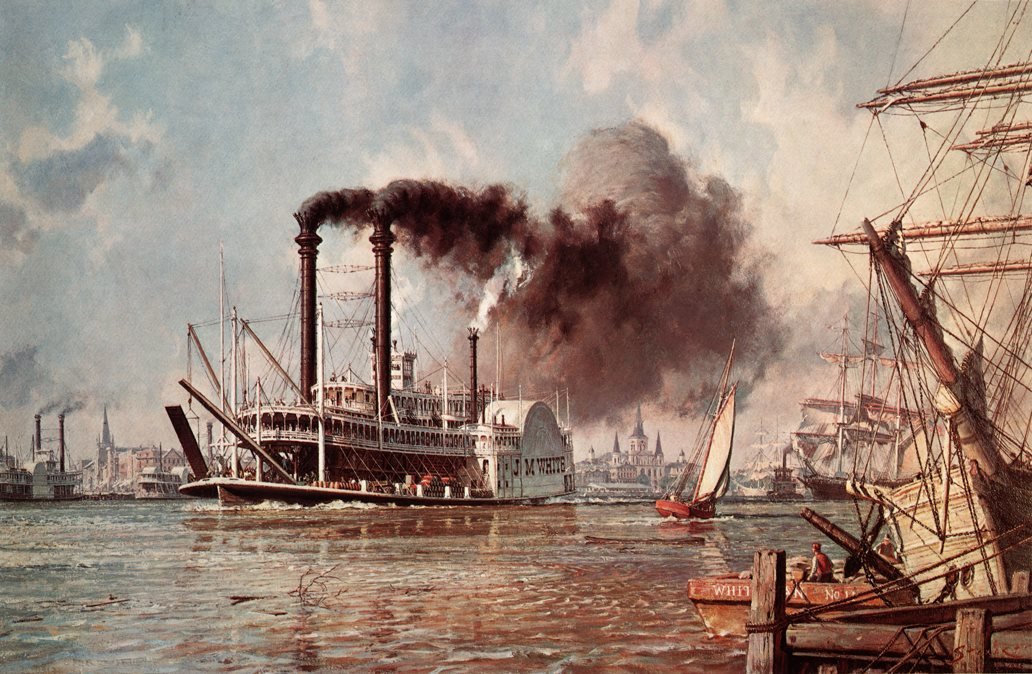
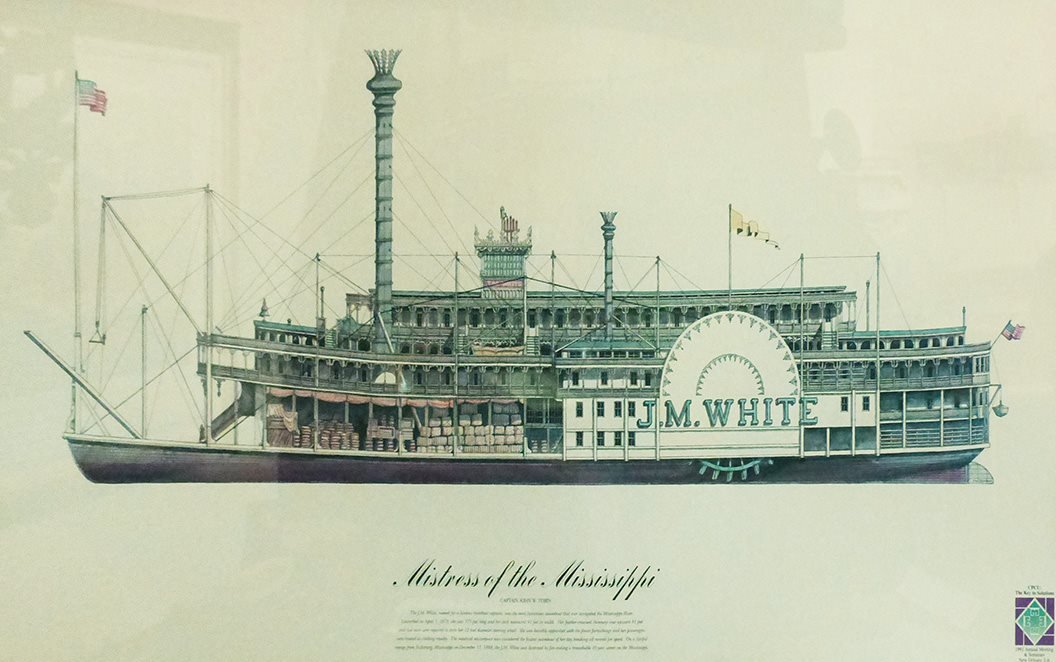
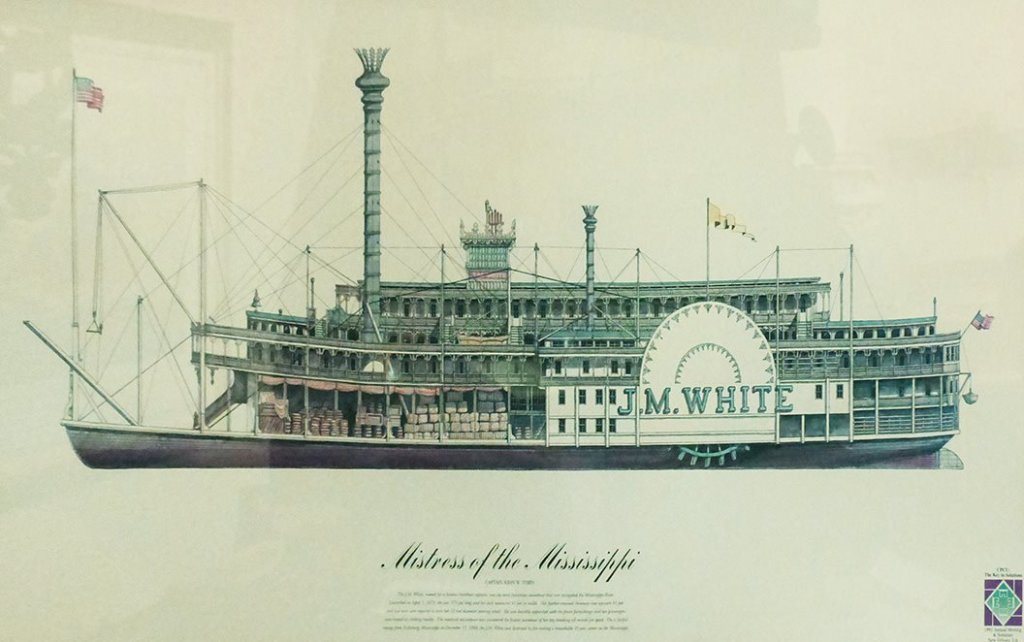
Eric: I wouldn't show transverse hog chains except by the wheels. The writings after Figs 43 and 44 say that there were two sets, just ahead and just behind the wheels. The only evidence I saw of fore to aft hogging chains on a sidewheeler are on the J.M. WHITE. This was a Mississippi River boat. And was quite elegant inside and out. I can't find it but I have a photo of the interior of the J.M. WHITE showing the transverse hog chains in the dining room and how the passengers and crew had to be aware of them so they didn't hit their heads on them. As to fore to aft hogging chains I think there would have been two sets as shown in fig 7 going to the lower hull as shown in fig 30. Kurt

- 599 replies
-
- 9
-
-
- sidewheeler
- arabia
- (and 4 more)
-
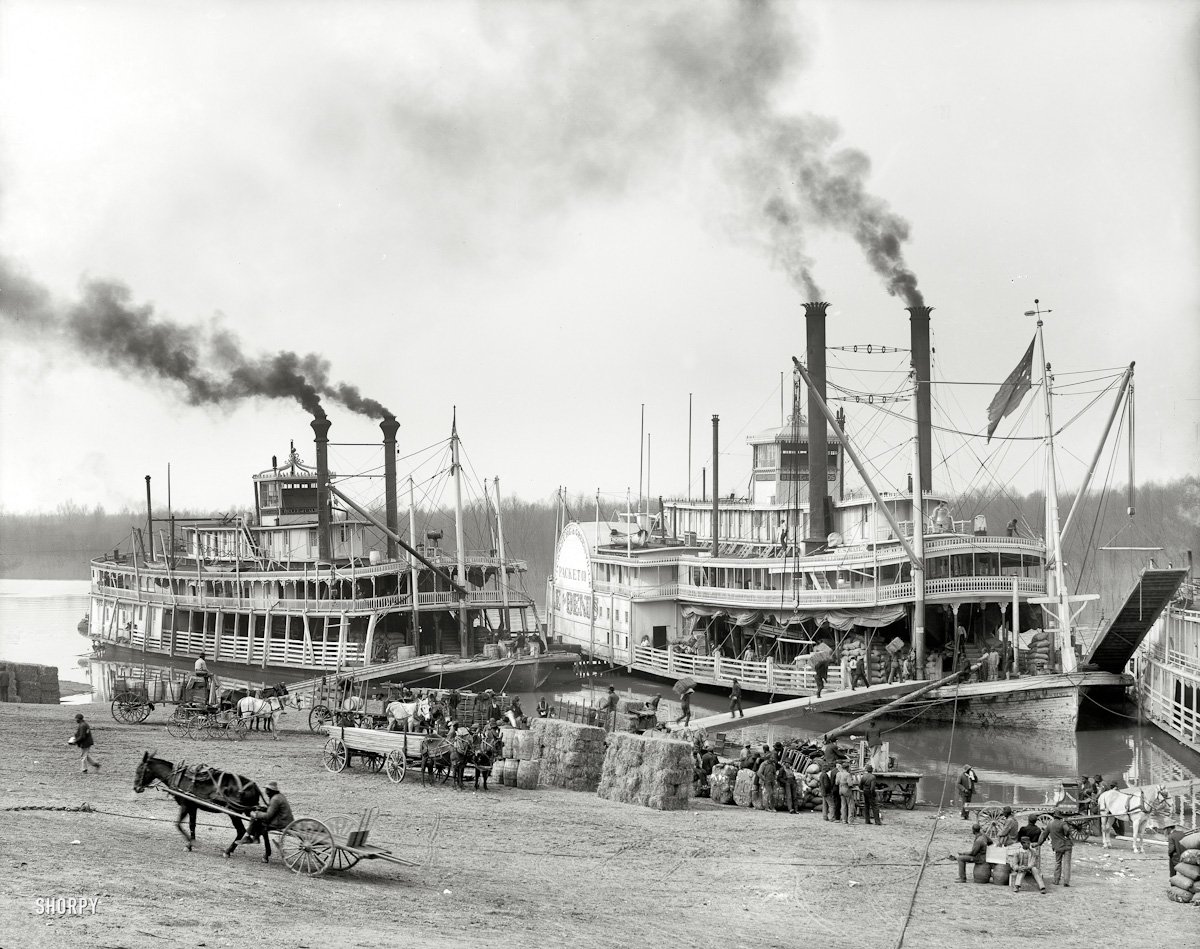
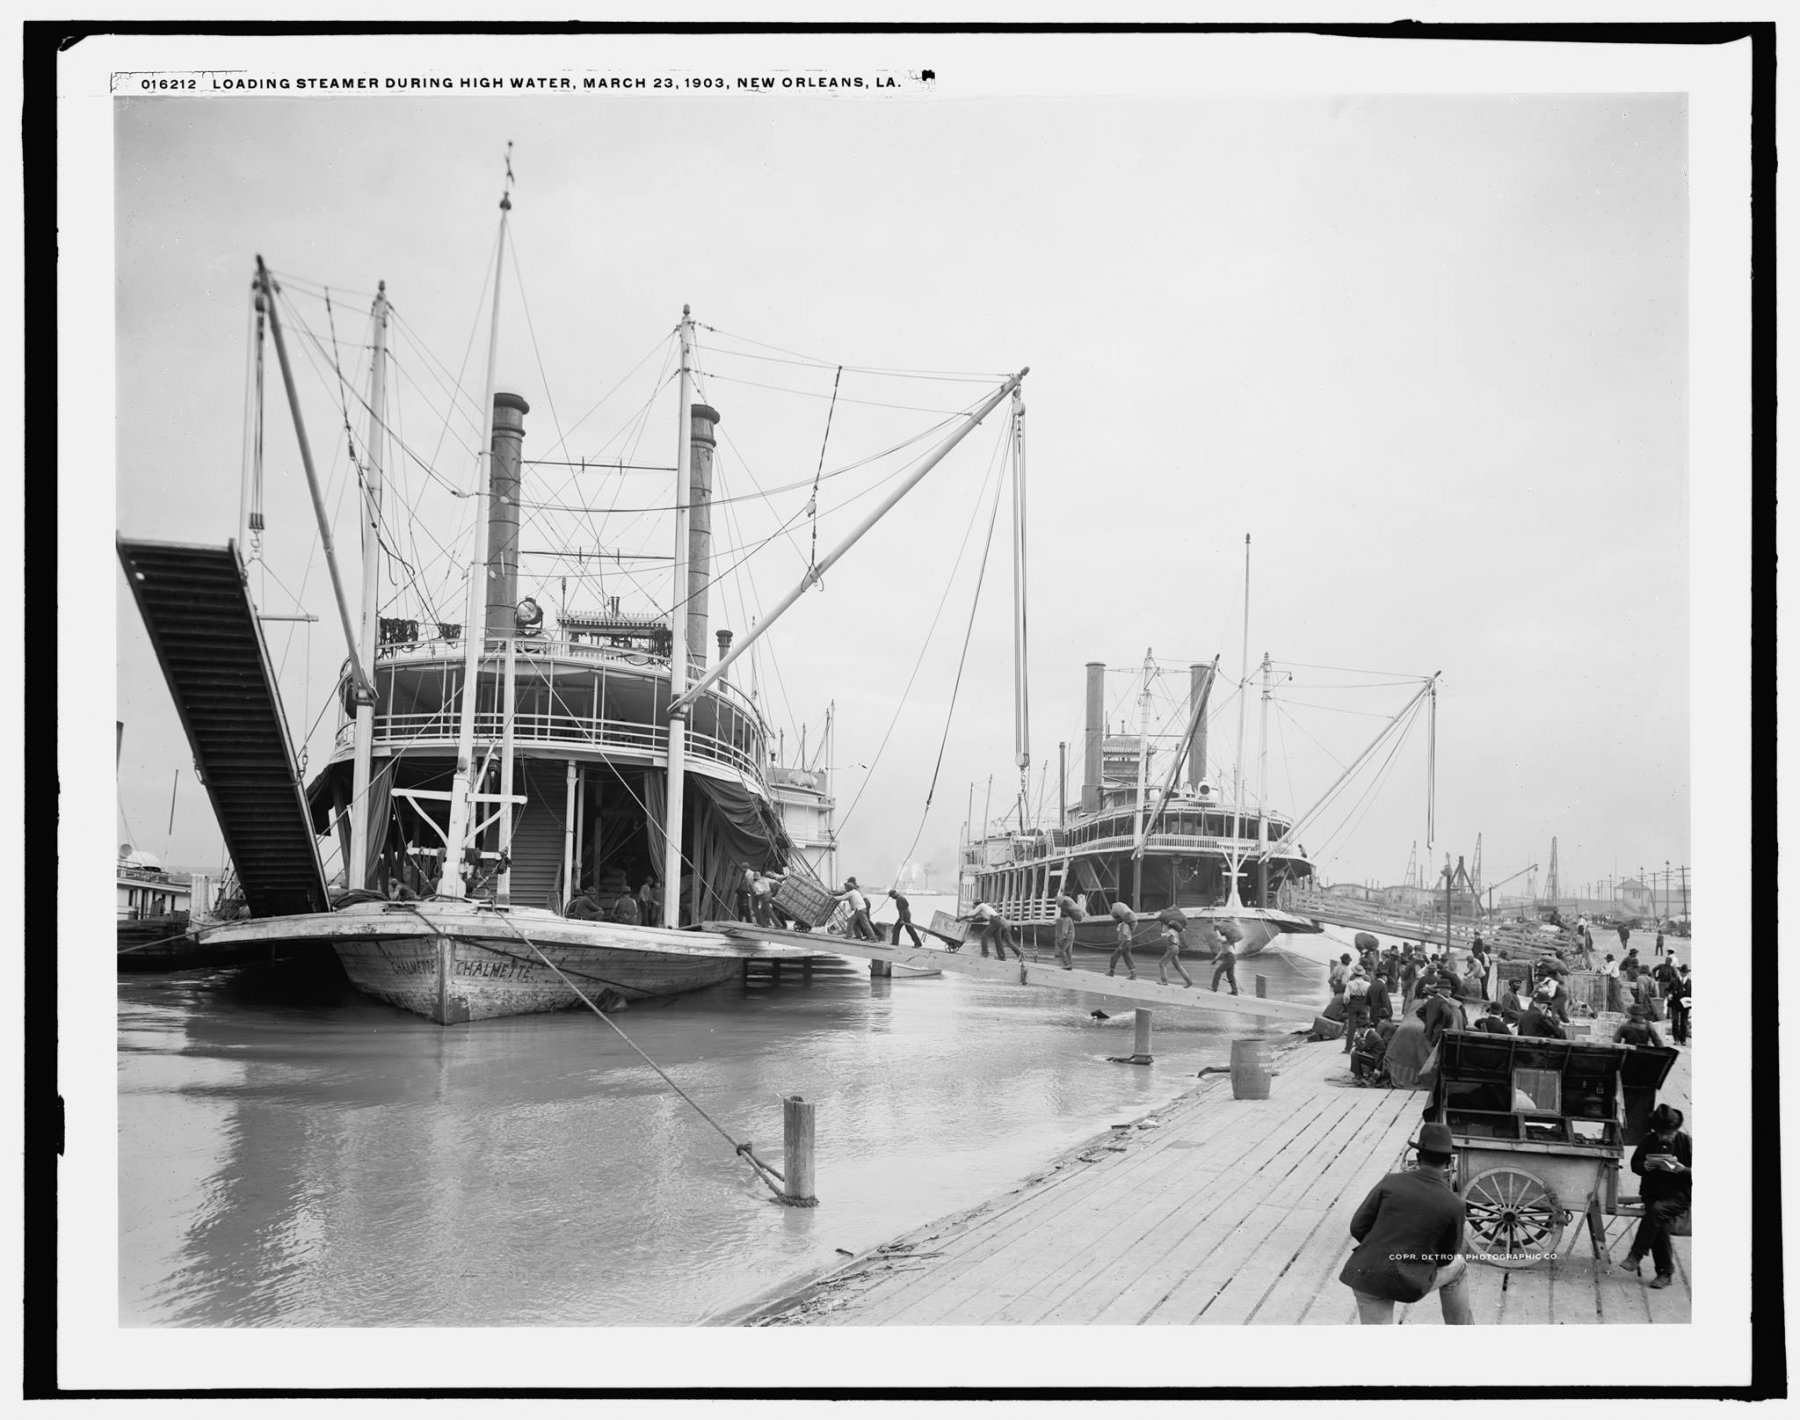
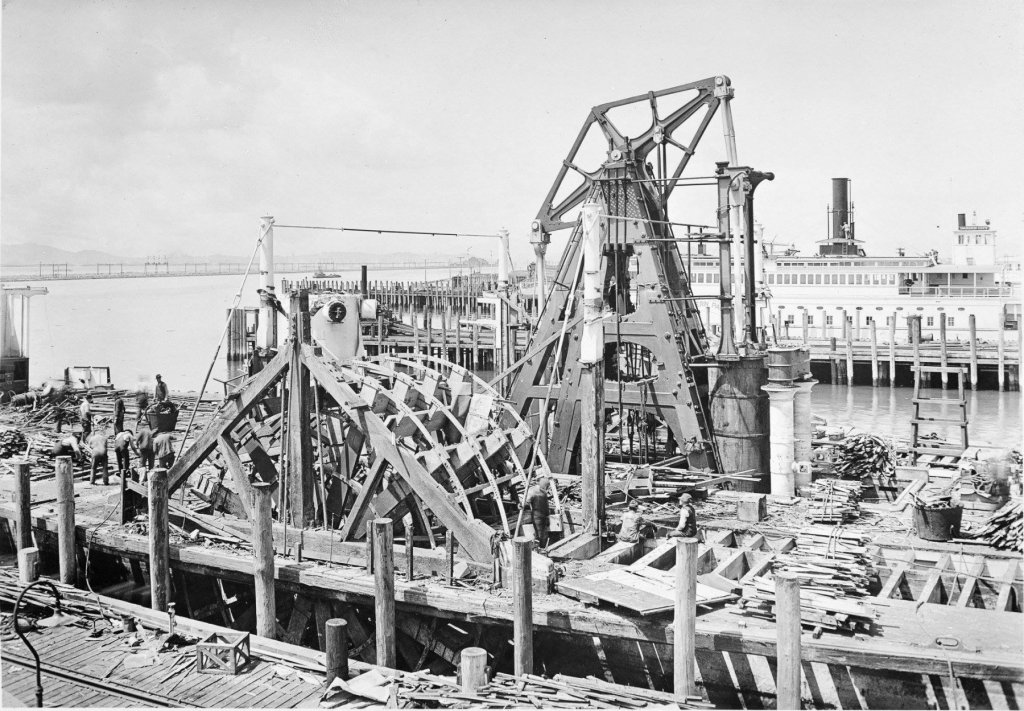
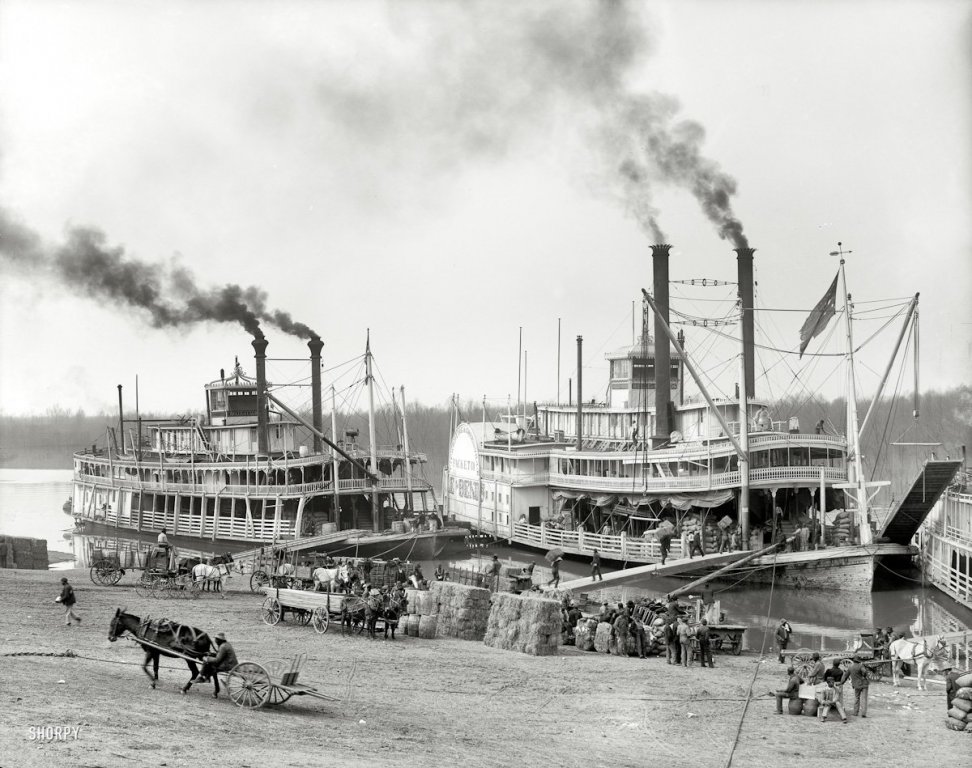
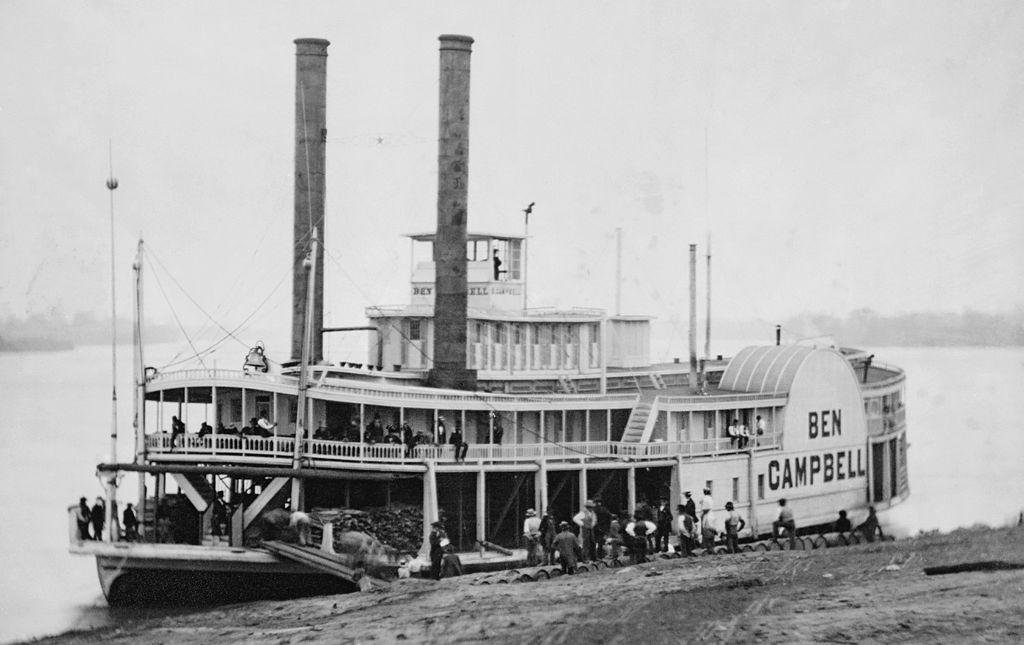
Eric: I have talked extensively with Jack Custer (owner and Editor of the now defunct Egregious Steamboat Journal and expert on riverboats) about hogging chains. Jack said that while fore to aft hogging chains have been well documented - because they are very visible) there was actually not all that much written about the transverse hogging chains. He spent quite a bit of time encouraging me to model a cross section to show how transverse hogging chains were used. This is something I can't do w/o a lot more information from guys like Jack. Looking at the drawings and writing on pages 23 - 30 of the Engineroom Cyclopedium and Figure 3 on page 7 and remembering that ARABIA was not a cotton transporting boat - I don't think the transverse hogging chains on ARABIA would have been located anyplace other than close to the sidewheels. The photo of the SF Museum's steamboat EUREKA being rebuilt in 1924 shows the hogging chains in front of and behind the sidewheels. It's not a riverboat as such but it does show the transverse hogging chains only by the wheels. The typical "cotton" boat shows the transverse hogging chains clearly in this photo of the large sidewheel boat - note the cotton waiting to be loaded. The next photo of the BEN CAMPBELL shows a boat of similar configuration to the ARABIA and there are no visible transverse hogging chains in the forward section of the boat. In the last photo note there are visible transverse hog chains on the CHALAMETTE and the boat in the background - but both are "cotton" boats. I hope this helps a bit Kurt

- 599 replies
-
- 12
-
-
- sidewheeler
- arabia
- (and 4 more)
-
Nailed in place. The builders were not shipwrights. In the period of the Chaperon the nails would have been cut nails. Kurt
- 133 replies
-
- 2
-
-
- chaperon
- model shipways
- (and 2 more)
-
Welcome to MSW Kurt
-
Smoke damaged ship
kurtvd19 replied to Karen's topic in Painting, finishing and weathering products and techniques
It is strong and I don't think I would use it on bare wood as you point out - I have only used it on painted surfaces. -
Cleaning Small parts prior to blackening
kurtvd19 replied to src's topic in Metal Work, Soldering and Metal Fittings
I use Sparex #2 heated in a small crock pot for cleaning anything I will blacken - using Birchwood Casey Brass Black. Heated Sparex works great on cleaning up soldered parts - but if there is a big build up of crud from the soldering I often use the fiberglass etching pen before the Sparex. After about 10 minutes in the heated Sparex I rinse the parts in water, then a rinse in Acetone that is then rinsed again with distilled water and then air dried. I routinely blacken brass eye bolts. I had issues with them not blackening consistently. Brass w/o a coating of some sort will dull and darken so with all brass eye bolts being shiny I concluded they are coated. I lay them out on my fire block at my silver soldering table and hit them with the mini torch and then clean in Sparex as above. Doing this makes sure they all blacken nicely. As any brass shapes (K&S type) that I blacken have been soldered - the coating is burned off and treating in the Sparex as above assures even blackening. Sparex should not be boiled! The crock pot can't boil water so it's a good way to heat the Sparex. Jeweler's supply places sell these little crock pots for $35 or so but I have found several at Goodwill or other similar places for less than $5. I have some on hand as replacements but have supplied local club members with them also. As Sparex is acid based the parts are thoroughly cleaned and etched in one step. Sparex is available from Jeweler's supply places and welding shops. Don't use metal baskets or tweezers to hold the parts as the continued use in Sparex will eat them away - plastic tea strainers work great. Jeweler's supply place sell copper tweezers to take pieces in and out as the use of metal can cause a build up of metal in the fluid that can coat the pieces and interfere with plating the parts. As I do plating too I stay away from the metal tweezers and baskets. Never had a problem with blackening parts when I previously used metal baskets and tweezers in the Sparex but after investigating plating and being forewarned about the use of metal in the Sparex I just use the plastic baskets and copper pliers all the time. Kurt -
Firedog: Ouch! Sounds like the back is a problem - probably can't sit too long, stand too long or walk too long. I am a retired Chief of Fire Prevention. I was given the option of duty disability retirement or taking over the Fire Prevention Bureau following my getting my back and neck totally screwed up when a commercial garage door came down on my shoulders and back of my neck and compacted me into an 18-inch space. The hospital staff couldn't believe that I didn't have any broken bones when the ambulance crew told them what happened - I swear I glowed in the dark from so many xrays! All muscle and nerve damage. After two years of therapy they ruled no more firefighting. So I served another 12 years as Bureau Chief and retired two days short of my 50th birthday. 3rd generation Chief - my mothers Father and my Dad were both Chief of the Volunteer department where I still live. I went next town over as it was full time and there are still only a handful of full timers here in town. What broke my cycle of pain was acupuncture. Had a bad headache and severe neck and back pain - almost constant. If was several years after the injury but the city insurance admin (a duty disabled cop) told me to try the acupuncturist who helped him. It wasn't overnight relief, but it eventually got so that I can get through most days w/o too much pain - it can't fix the underlying problems, but it sure helps. I hope you continue to mend and time helps with the discomfort/pain. Take care, Kurt
-
Welcome to MSW Firedog. This is the place to be to learn modeling. Hard to ask a question that somebody doesn't have the answer to. You say you got hurt on the job - with your user name Firedog are you a firefighter? Kurt
-
Question about table saw technique
kurtvd19 replied to jdbondy's topic in Modeling tools and Workshop Equipment
If you are cutting 3/4-inch wood use a carbide blade and it will cut it in one pass w/o any problem. I trimmed out my whole house/shop addition with red oak trim up to 3/4-inch thick w/o any problems using my Byrnes saw - easier to carry from room to room than my chop saw. Cutting 3/4-inch wood isn't (in my opinion) a job for a slitting saw blade - just asking for problems like overheating the blade and warping it, clogging, uneven cuts..... Kurt -
Floyd: I think Badger is closed today. I was copied in an email by Jesus - their repair tech - and I don't think he sent it from work. But give it a try if they are closed just call on Monday. Kurt
- 133 replies
-
- 4
-
-
- alert class
- tugboat
- (and 1 more)
-
Harvey: Yes it was added later so one dooesn't have to insert the "T" portion of the back lever and then turn it 90 degrees. Something like that would never get past QC at Badger. Floyd; Ron's right - every airbrush gets water shot through it as a test before it's passed as OK. I'm not sure if they still do it but the Sotar 20-20 airbrush even had a certificate that was signed by the 3 testers. Kurt
- 133 replies
-
- 5
-
-
- alert class
- tugboat
- (and 1 more)
-
Brian: The Cyclopedium book is available from the Howard Steamboat Museum in Jeffersonville, IN. Alan also wrote the The Western Rivers Engineroom Cyclopedium - both are must have books for the steamboat modeler. Not expensive. Kurt
- 133 replies
-
- 3
-
-
- chaperon
- model shipways
- (and 2 more)
-
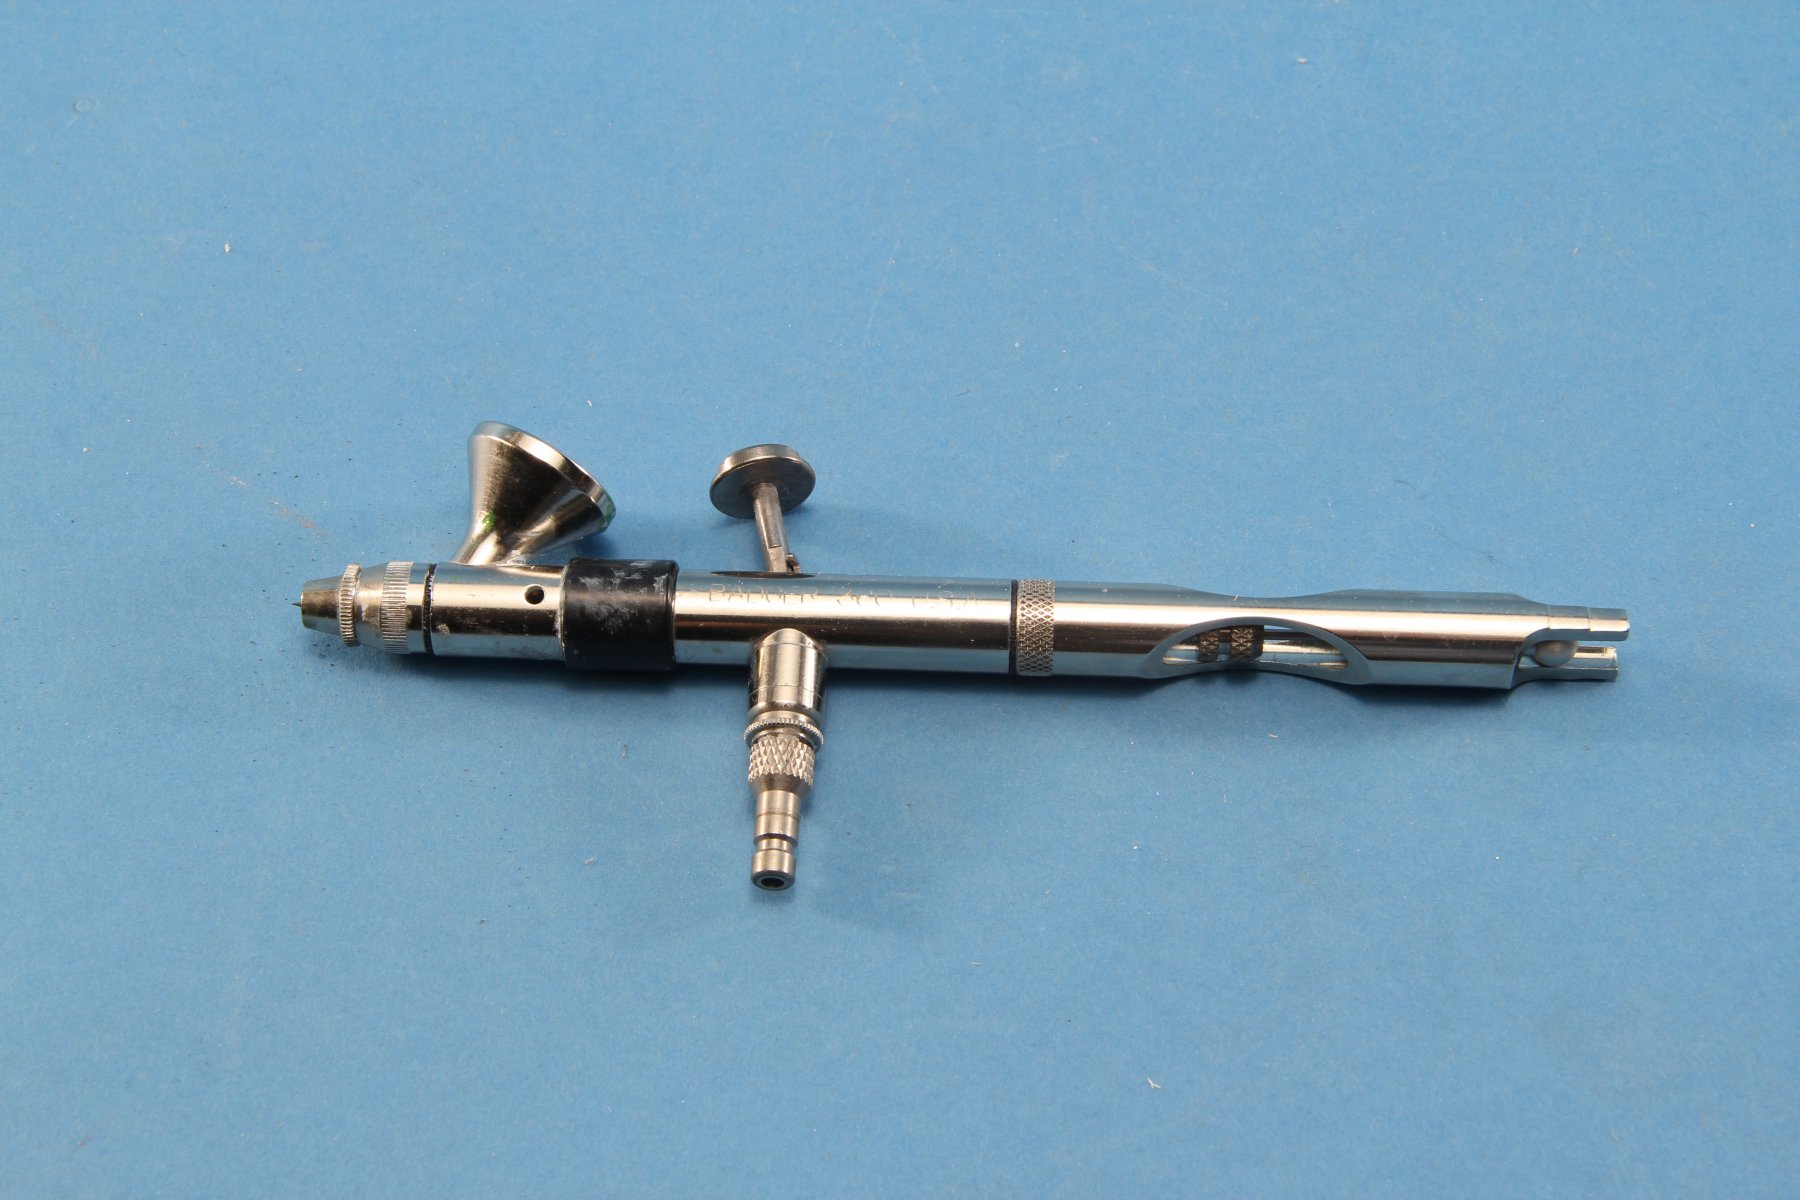
Floyd: Go ahead and try Badger on Friday afternoon but being good Friday they may close early or not be open. But if Jesus (that is their repair techs name - not a play on Good Friday) is working he will get to the bottom of it. Bubbles mean you have to tighten up the fittings - but they are delicate. Use some beeswax (a staple in all airbrush users tools) on the threads of the air regulator and nozzles pieces up front. As shown in the boxed area to the left side of the drawing there are three parts with threads that can use the beeswax. Also, make sure the tiny little tip (50-0391, 2 or 3) is in place. This gets lost by many. Be sure the needle moves freely and that it is fully forward - do not force it as the tip can split or deform if force is used. Try turning the airbrush upside down and use an eyedropper or pipette to drop some water into the siphon tube connection and spray. It should spray just fine if the internals are ok. If it doesn't spray then I am stumped. Kurt

- 133 replies
-
- 5
-
-
- alert class
- tugboat
- (and 1 more)
-
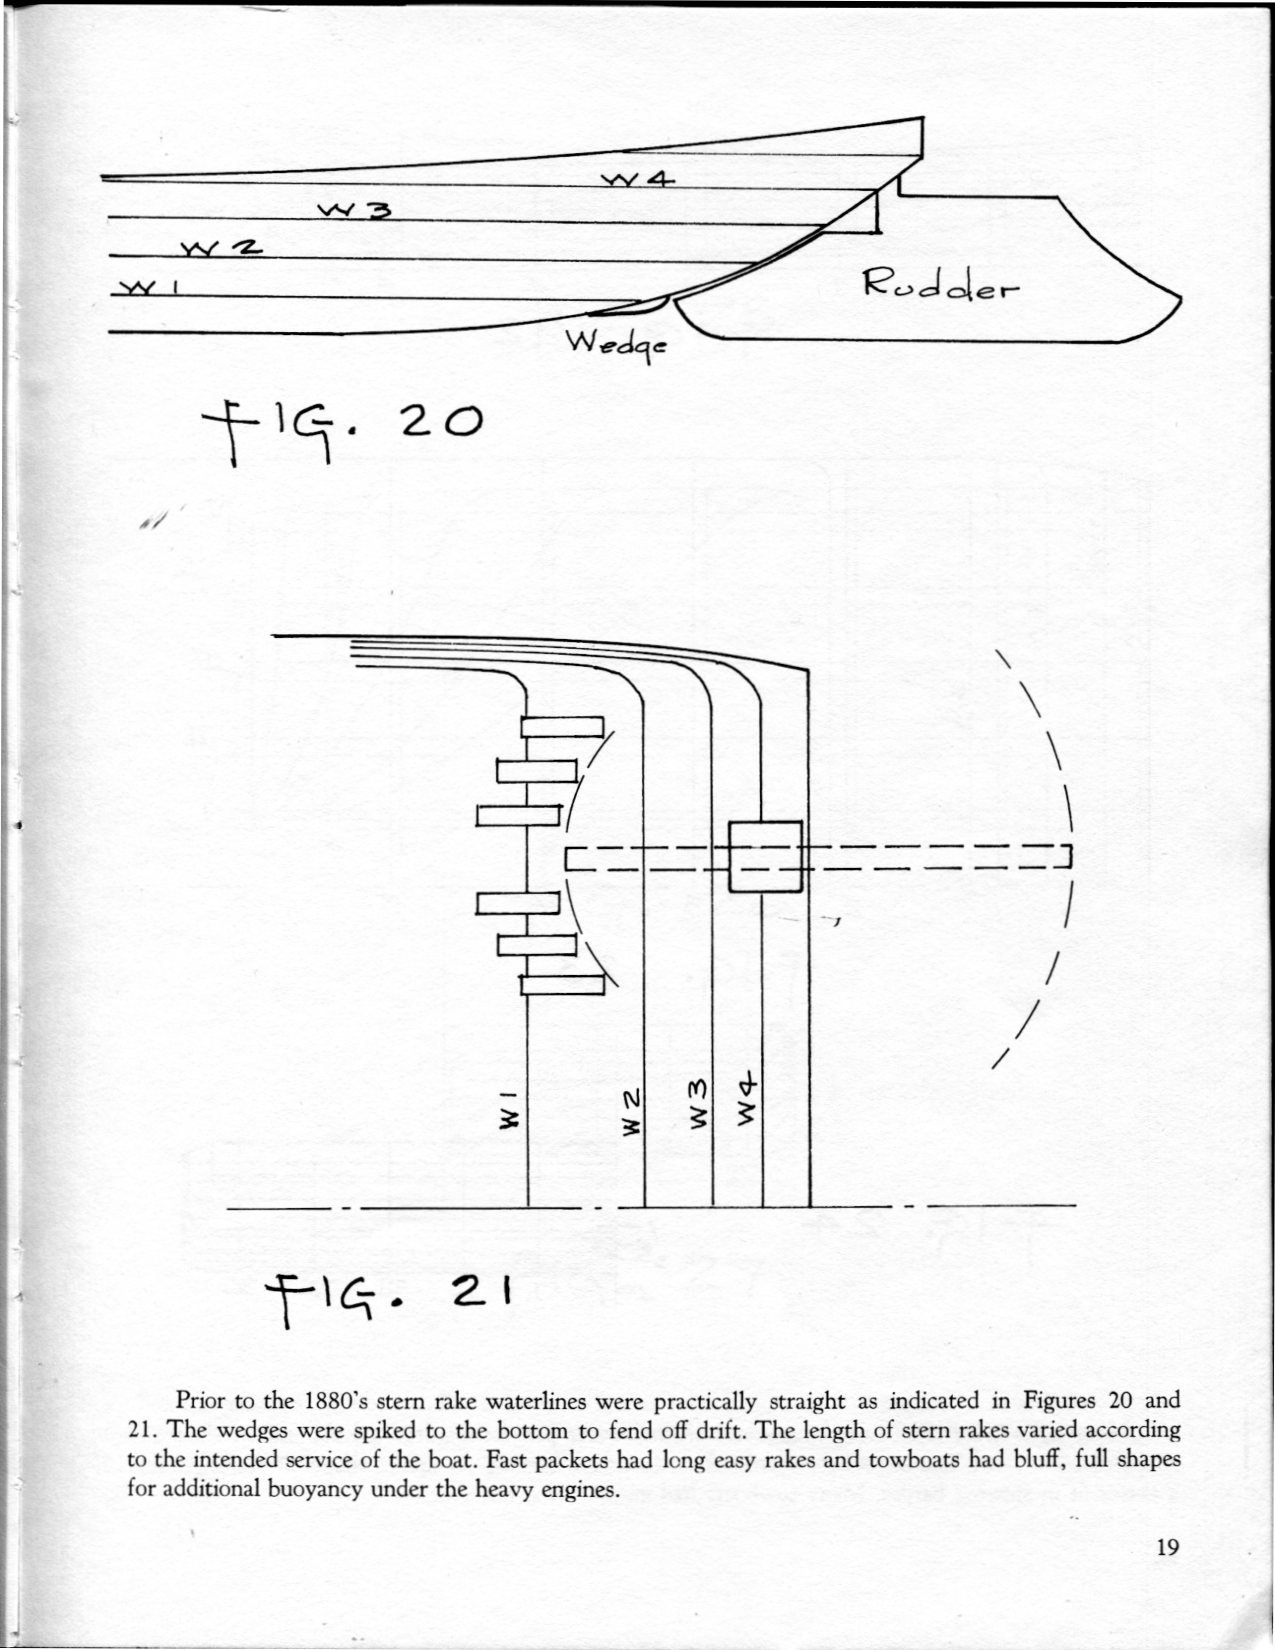
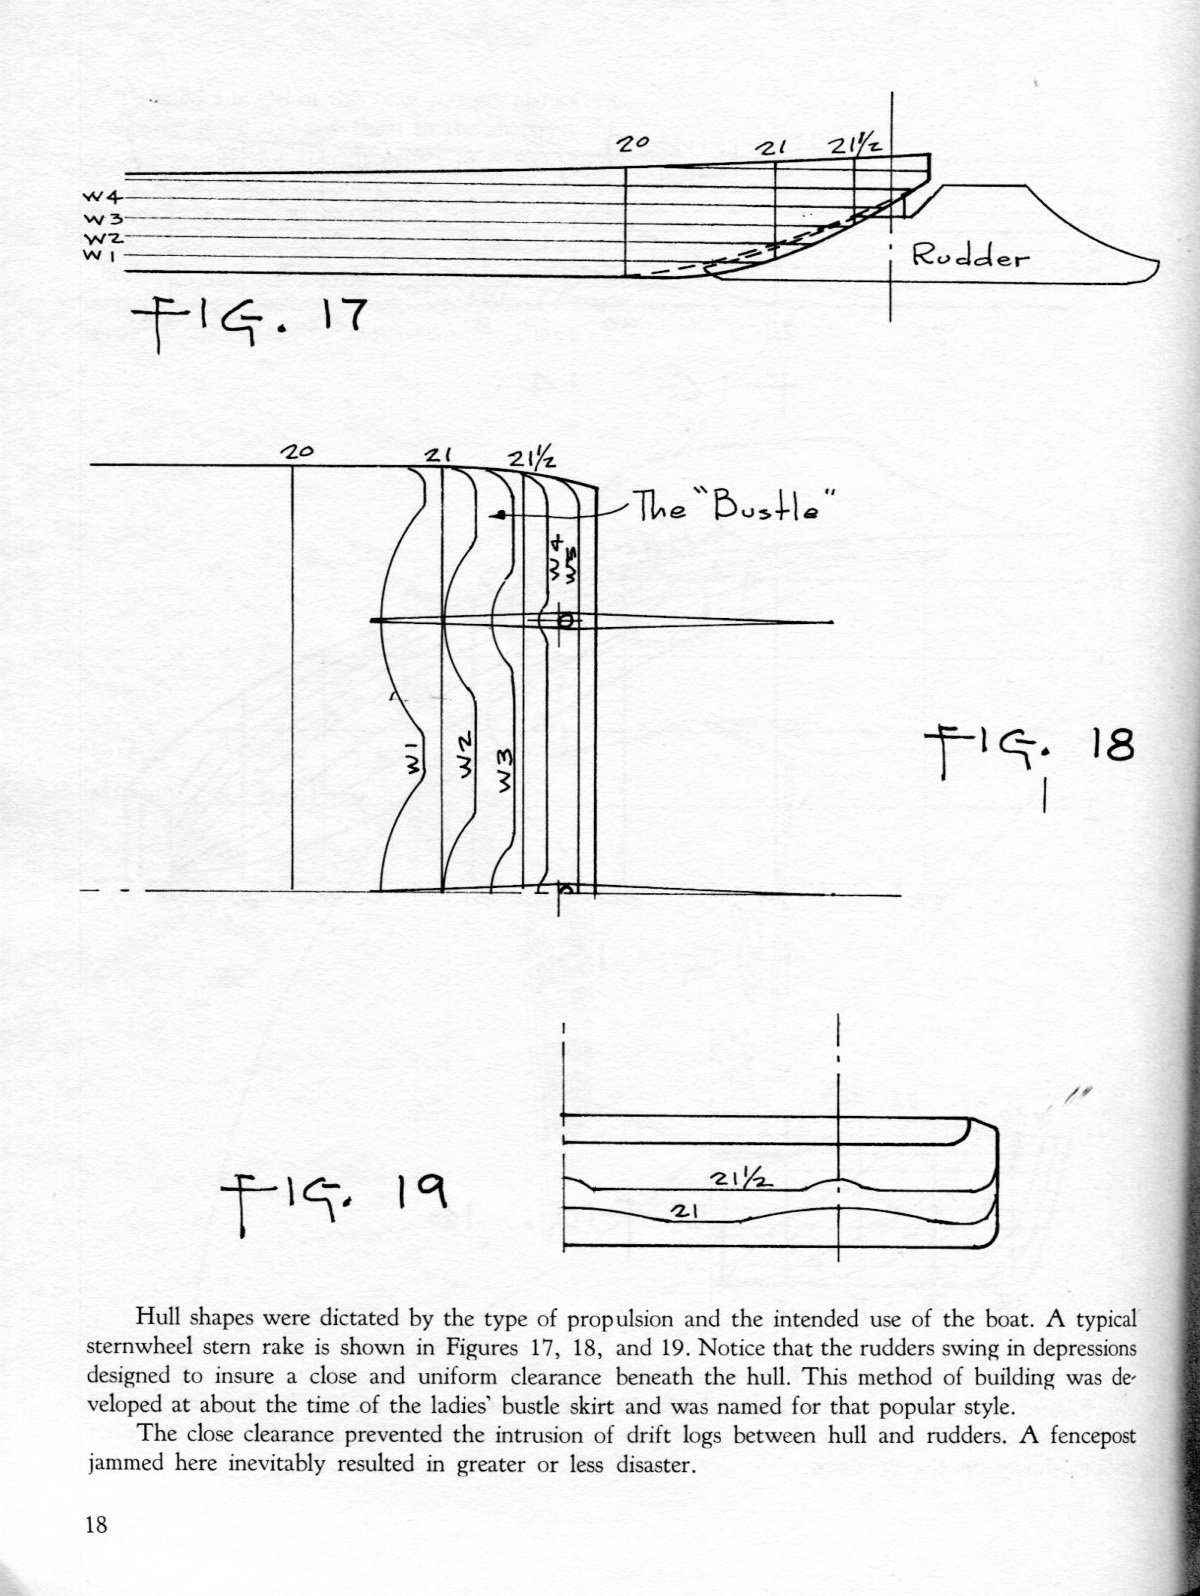
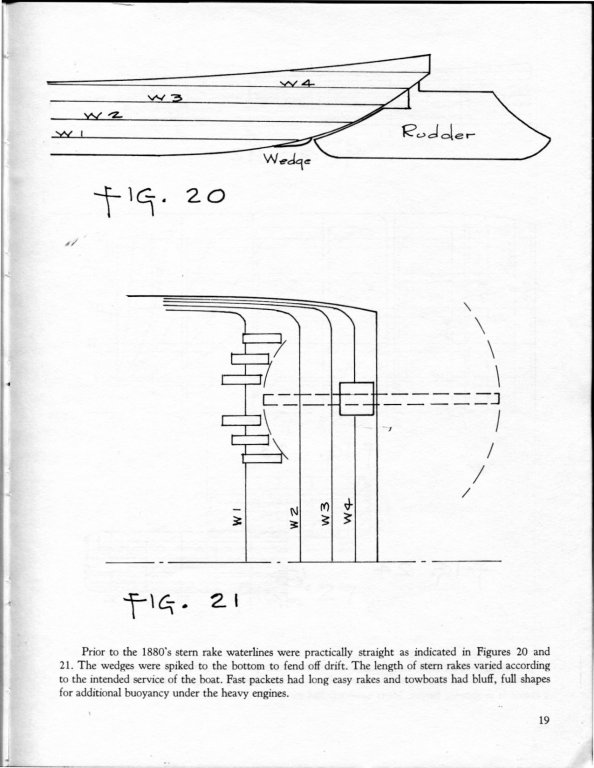
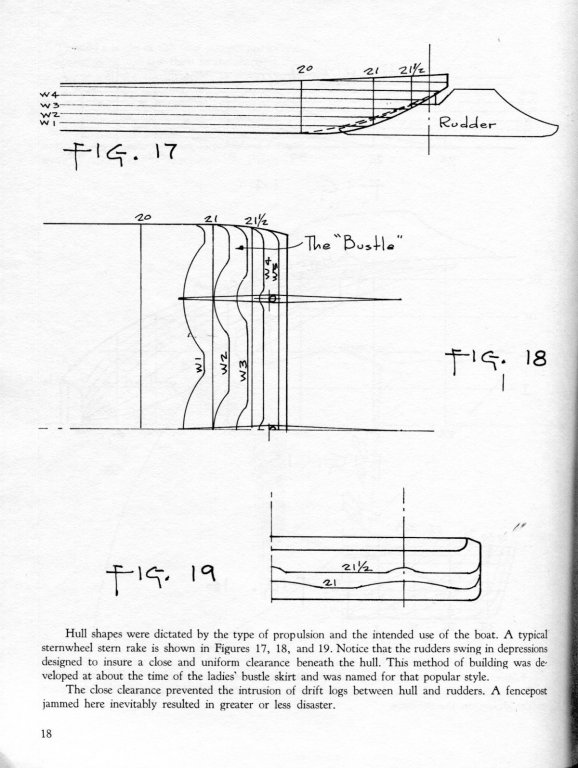
Rudder construction is shown and explained in The Western Rivers Steamboat Cyclopedium by Alan Bates on pages 18 & 19. Note the amount of rudder ahead of the rudder shaft. They fit closely to the hull and in both Fig 17 & 18 there is an attempt to shield/protect the rudders from floating debris. They were tucked up tight to the hull and didn't extend below the bottom of the hull. The rudder as shown in Fig 17 is very close to the Chaperon's rudder configuration. The text on the bottom of page 18 reads "Hull shapes were dictated by the type of propulsion and the intended use of the boat. A typical sternwheel stern rake is shown in Figures 17, 18, and 19. Notice that the rudders swing in depressions designed to insure a close and uniform clearance beneath the hull. This method of building was developed at about the time of the ladies' bustle skirt and was named for that popular style. The close clearance prevented the intrusion of drift logs between hull and rudders. A fencepost jammed here inevitably resulted in greater or less disaster" The rudder configuration in Fig 20 with the Wedges ahead of the rudders to offer some protection was also common. The text at the bottom of page 19 reads "Prior to the 1880's stem rake waterlines were practically straight as indicated in Figures 20 and 21. The wedges were spiked to the bottom to fend off drift. The length of stern rakes varied according to the intended service of the boat. Fast packets had long easy rakes and towboats had bluff, full shapes for additional buoyancy under the heavy engines." I hope this helps a bit. The above is all copyrighted by Bates but I have blanket permission from Alan to use his materials. Kurt .
- 133 replies
-
- 3
-
-
- chaperon
- model shipways
- (and 2 more)
-
Floyd: Gravity feed is great but meant for detail painting. If the size of the tug is larger than your usual paint jobs then check out the Badger 360. It's a double action brush that works as both a gravity feed and as a siphon feed. This is possible due to the front end of the brush being able to rotate 360 degrees. As a gravity feed the paint is put into the color cup with it facing up (duh..) and detail painting can be done w/o having the paint bottle attached to the airbrush. For larger areas or multiple parts where you want more paint the airbrush head is rotated so the color cup points downward and the paint bottle with adapter cap is inserted into the color cup. The 360 is my everyday brush. The 360 is very versatile and serves as two airbrushes in one package. I do use the 350 I mentioned the other day for large areas and have several other brushes for specialized work, but the 360 is what I recommend to those wanting one airbrush that will do detail and general coverage. Kurt https://usaairbrushsupply.com/products/360-1-universal-basic-set

- 133 replies
-
- 4
-
-
- alert class
- tugboat
- (and 1 more)
-
Sounds like a plan. Let us know if you solve the problem. Kurt
- 133 replies
-
- 3
-
-
- alert class
- tugboat
- (and 1 more)
-
Floyd: What pressure do you have from the compressor? If the brush blows air before connecting to the paint jar that tells you the air works - but you must have adequate pressure. 15-20 psi should be adequate. I don't remember what paint you are using. Is it thinned properly? Properly thinned paint with adequate air pressure should mean you get paint onto the model. Let me know what paint you are using and how much you are thinning it and what your air pressure is. It might need checking/repair by Badger - it will cost you shipping charges only unless you did internal damage that would require a new body. But let's try to solve your problem before resorting to going to the shop. Ron is right that you might want to use a different brush for doing the hull and larger surfaces. The link below to the Badger 350 is the best price you will see for this neat little single action brush. It's good enough that I used it for many years as my only brush and still use it today for larger surfaces. It is capable of laying down an award winning paint job. It will work much better for larger surfaces than the 150 which isn't meant for doing a model the size you are doing. https://usaairbrushsupply.com/products/350-1m-single-action-medium-head-airbrush
- 133 replies
-
- 4
-
-
- alert class
- tugboat
- (and 1 more)
-
Smoke damaged ship
kurtvd19 replied to Karen's topic in Painting, finishing and weathering products and techniques
I used Simple Green on a model that I think spent years in the engine room of the full size boat. Nothing was cleaning it and with the permission of the museum I tried the Simple Green. Applied with a swab and then wiped off with another and then rinsed with distilled water and dried. Came out great - and clean - and still looking good almost 20 years later. Kurt- 8 replies
-
- 13
-
-
Hello and welcome to MSW Kurt