kurtvd19
-
Posts
3,048 -
Joined
-
Last visited
Content Type
Profiles
Forums
Gallery
Events
Everything posted by kurtvd19
-
 Stay-brite requires close fits - a bit looser than silver solder but not much. I have used it with a small torch - the Smith Little torch as well as a butane torch. I have also used it with resistance soldering - which I am coming to love. I haven't used it with a soldering iron but for smaller stuff it would probably work OK.
 -
I meant to say that the idea of baking to solder isn't so far off base. Airbrushes are assembled using an industrial process of baking the parts withe the solder and flux in place - but it's not something you can do at home.
-
Do a search for previous discussions on soldering. Lots of great tips to be found. I have found that actual silver soldering is not really needed in our hobby for any issue of strength. I have used stay-brite a high silver content solder that melts at lower temps than silver solder and it can be blackened unlike regular soft solders. To get small flakes one can hammer solder flat and snip it off in small flakes. Much easier to do this with stay-brite than silver solders but that's the way to do it for them too. I have demonstrated and talked on silver soldering at several NRG Conferences or seminars and used to do it all the time but I have since switched to using stay-brite except when doing joints in close proximity to each other.
-
tool review Perma-Grit tools
kurtvd19 replied to James H's topic in REVIEWS: Model Shipwrighting Tools, Parts and fittings
I have used these tools for years and they are great for what I use them for - rough quick flattening or shaping of wood - and fiberglass. I have a flat 1.5 inch wide by 8 inches long piece that I keep real handy for making sure bases of parts are flat. Touch up with a sanding stick to smooth the parts I use the perma-grit tools on. I am not sure if the tools I have are by this company but the tools I have come in several different "grits" for coarse or finer work.- 17 replies
-
- 3
-

-
- permagrit
- perma-grit
- (and 3 more)
-
Pat: Check with Bob but I just checked my list and he has a CD of one of our programs - Copper Plate Coloration that shows this if I am not mistaken. Doc did a whaler using the flame technique that made an outstanding example of a coppered hull.
-
It's not holding up the motor - the bungee goes under the base aluminum plate. Maybe to keep the rotating assembly from freewheeling? I am sure it's not to fix something.
-
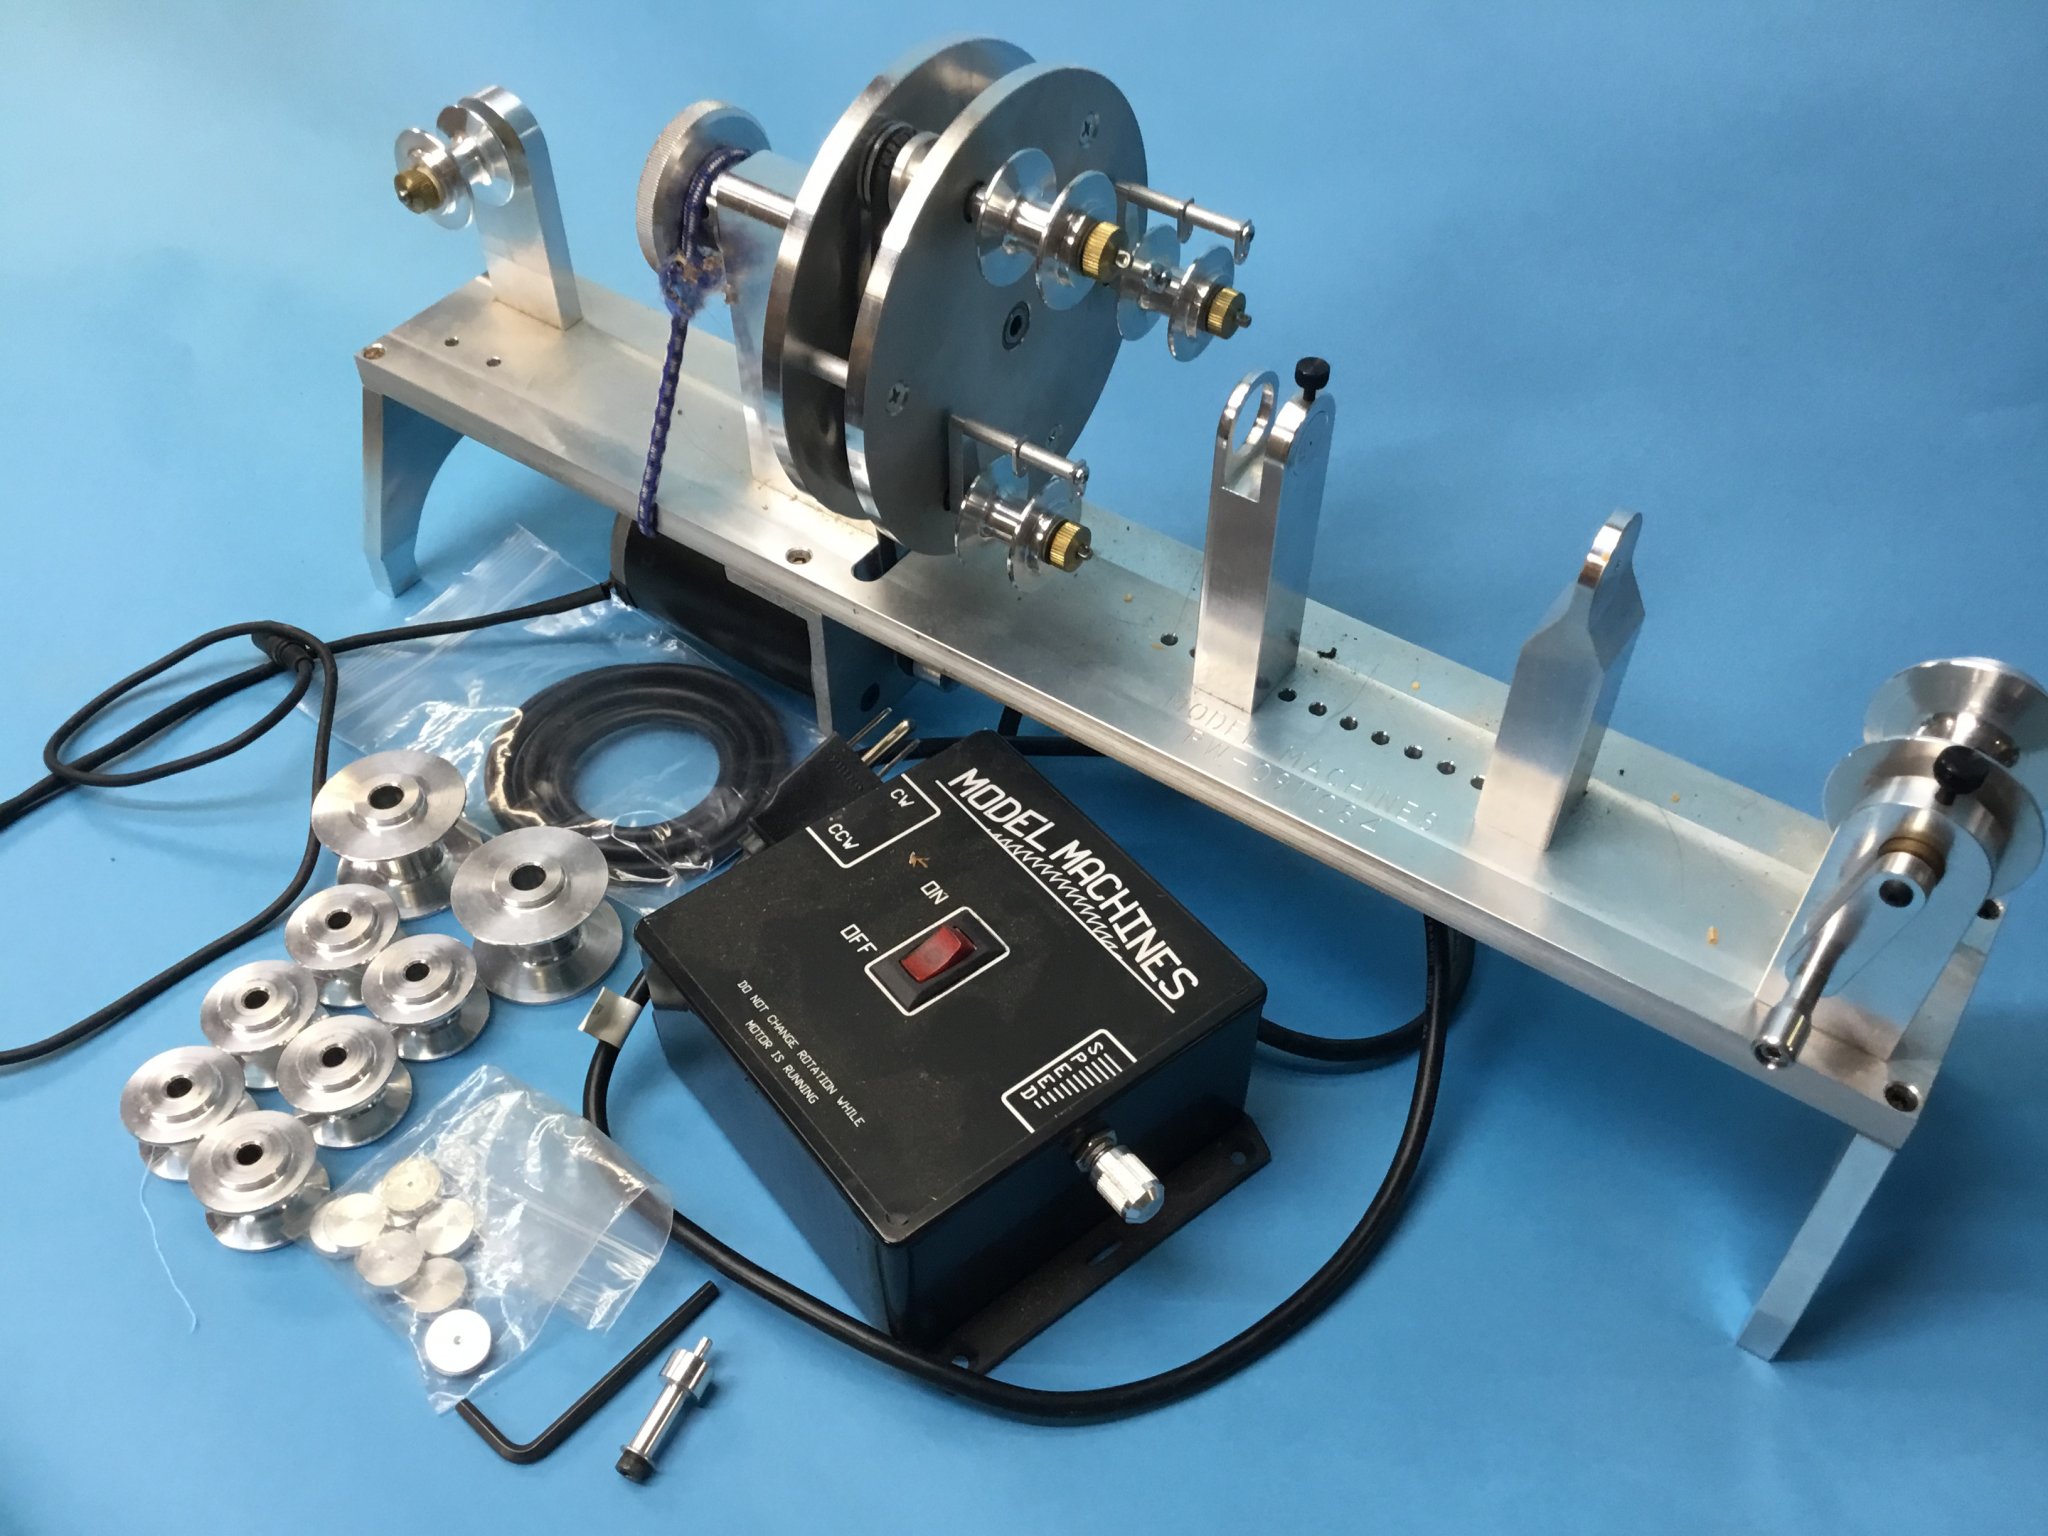
I am making this available from a good friend and local modeler from our area. I will personally vouch for him being 100% trustworthy and the product being as advertised. Asking price is $400 plus actual shipping costs. Reply with PM to me and I will provide contact info for the seller. I vouch for him 100% - and I will be helping him to get it properly packed and shipped. Shown in the photo: The machine Power unit Extra O rings Two extra take up reels Six extra “bobbins” Multiple inserts for line size Allen wrench Extra axle for four strand line

-
Chuck Time flies when you are having fun (my Mothers favorite saying) - Vegas was 2018. But yes he did attend that conference.
-
Pat: Doc used C/A and we used C/A in Manila. Allows for some adjustment unlike contact adhesive. As to the adhesive burning off - use forceps over a flame at the stove - with the exhaust fan going. Vary the time in the flame to vary the appearance. Know that you will get glue on your fingers that will need to be removed before appearing in public.😄
-
Bob: Badger Airbrush makes a primer paint especially for 3D parts - Called 3D Prime. Compatible and it evens the small steps out. It's available from our MSW Sponsor USA Airbrush Supply. i haven't shot any of this myself but I have seen parts that it was used on. https://usaairbrushsupply.com/t/new--featured-products
-
Pat: When we get back to meetings I know Bob is planning in the ongoing coppering series to show how Doc and some others have used fire to make the individual plates look weathered. The paper backing burns off either in the oven or the BBQ. Don't laugh the results are very nice - unless you are looking to have the bottom look like a brand new penny. I don't know if Bob's got this on CD from an earlier presentation but it wouldn't hurt to call him. Kurt
-
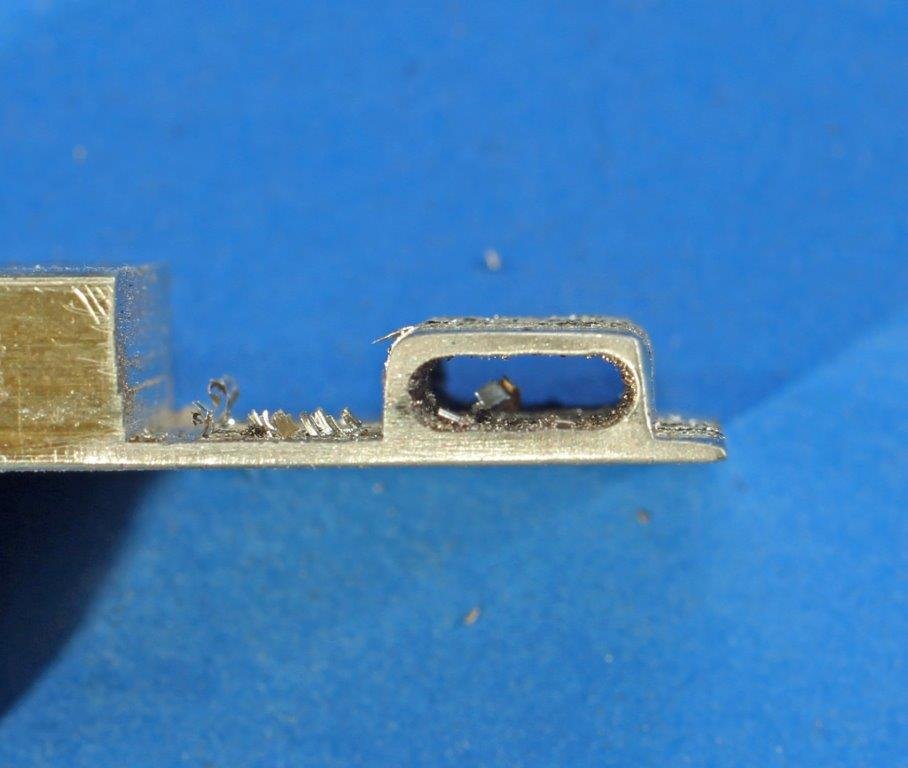
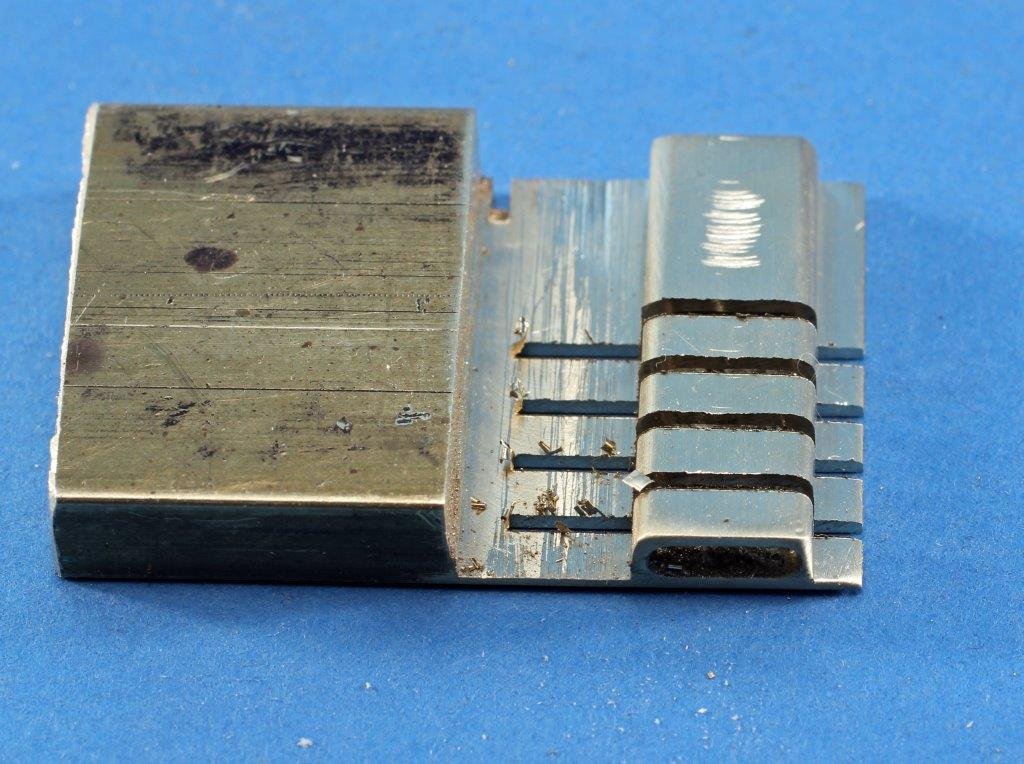
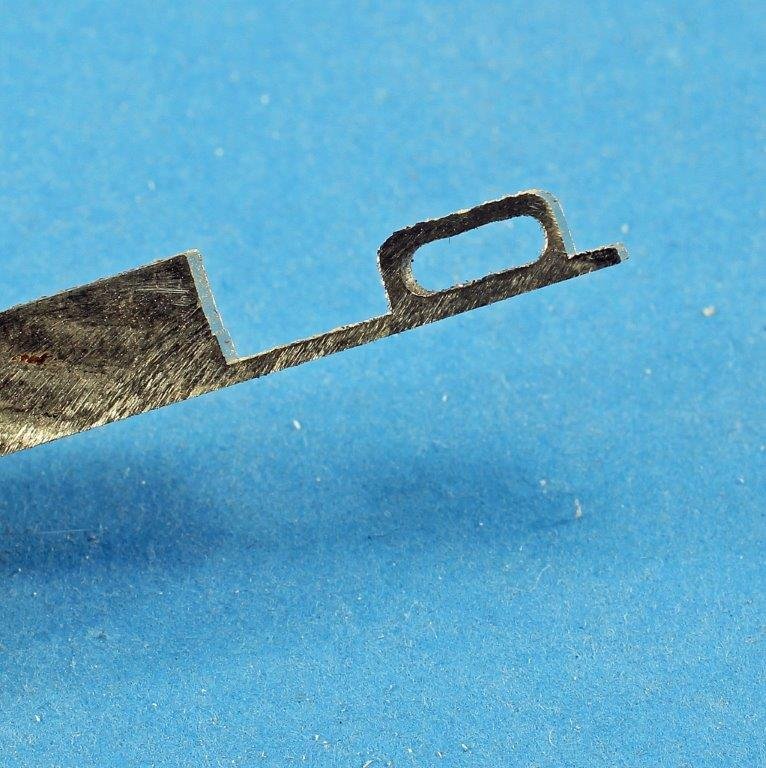
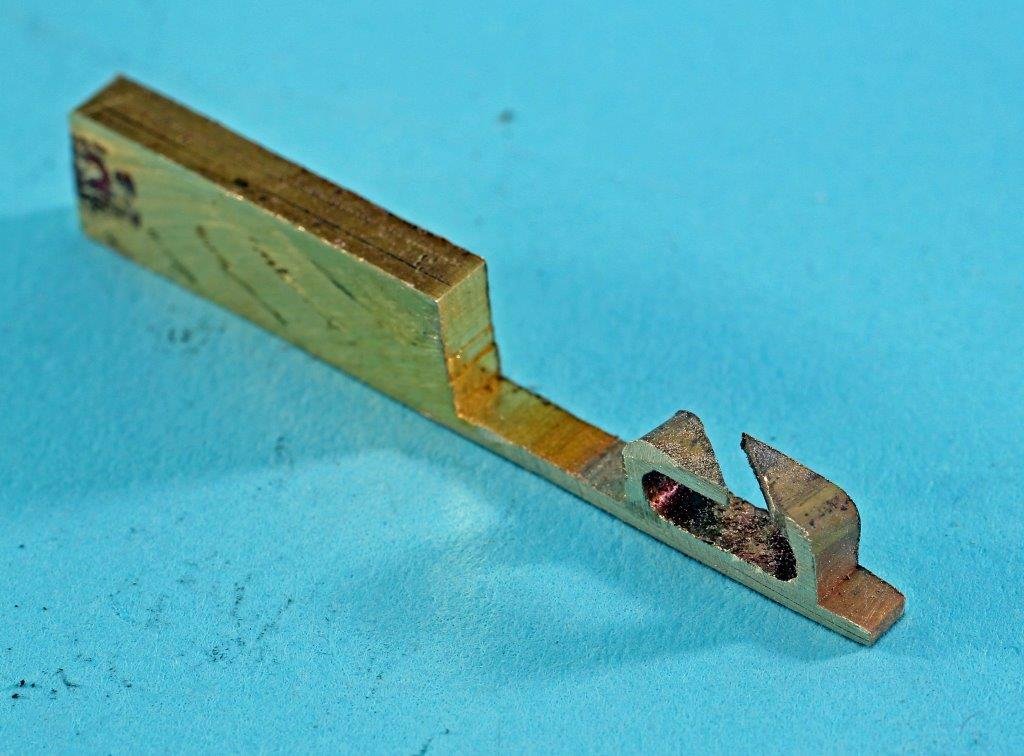
Making extremely tiny fittings
kurtvd19 replied to BETAQDAVE's topic in Metal Work, Soldering and Metal Fittings
I had to make this same kind if fitting. The steps I used are shown in the photos. Small files were used to round off the square edges. Polished and then plated.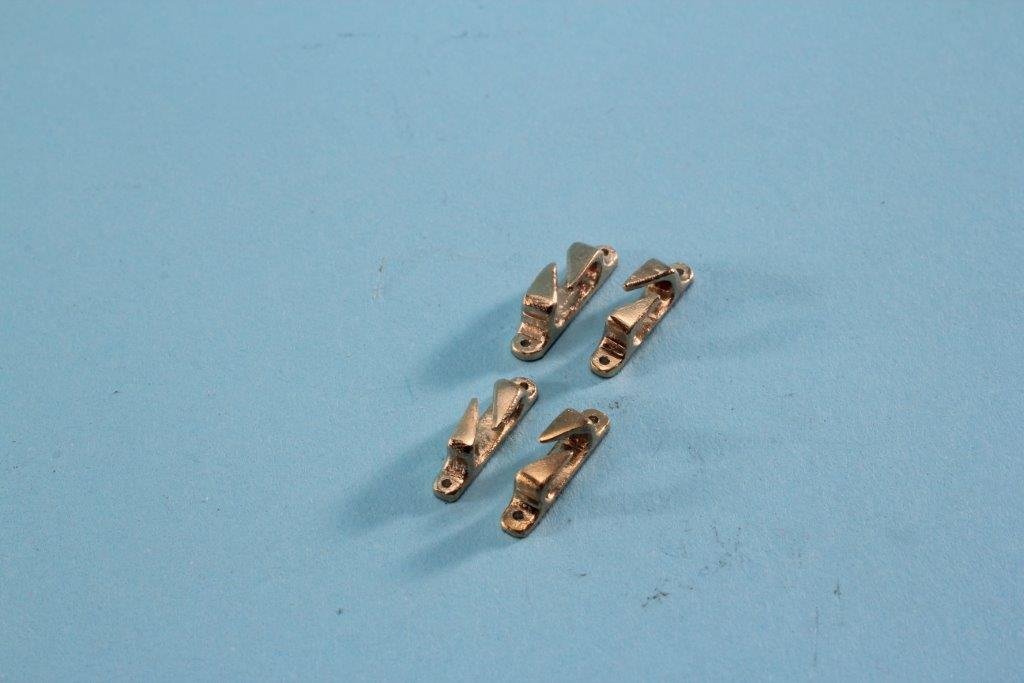
- 12 replies
-
- 20
-
-
Jim: Thanks. Another member has a copy and offered it too. I need to check with our Editor about him checking with the library that provided the initial permission to see if we can reprint it. I will get back to you - and the other offer - ASAP. If we can do it we would want to copy the best copy. Thanks for the offer. Kurt
-
Welcome to MSW
-
I have extracted the reprints of The Complete Ship-Wright and they are now available from the NRG Office. There are 80 pages of information. The cost is $5.00 (US) Kurt The Complete Ship-Wright, Edmund Bushnell, third edition, London, 1669. This book is considered the first known printed English book dealing with the topic of naval architecture and was initially published in 1664 by W. Leyburn for George Hurlock. Reprint from Journals 29.3, 30.1, 30.2 and 30.3 69 Pages – Includes Tables 3, 4, 5 and Size of Small Cordage Also included is Books as a Key to Ship Modeling Success, by Charles O. McDonald from NRJ 31.1 This article includes Table of Size of Small Cordage from The Complete Ship-Wright. For now, the PDF files are available from the NRG Office only. The cost is $5.00 (US), and the PDFs will be emailed to you upon payment. Call the NRG Office at 585-968-8111 with your credit card information or to get our PayPal address to pay using PayPal. This information will be available for purchase from the NRG Website Store in the near future. Added: Anyone who owns the NRG's First 40 Years CD set has this information on their discs.
-
Alan: Thanks for asking but these issues are still under copyright so please don't copy them for others. Parts of the issues mentioned by Allan are available from the NRG Store but I am unable to say exactly what is contained in the articles available due to the description in the store (we will get these better identified in the near future). However, due to the interest that has been expressed here about the book and it being unavailable, I have checked out our back issue discs and while looking up the articles mentioned by Alan found that the previous year the Complete Shipwright was reprinted in 4 parts. I will be extracting these articles plus the tables in Alan's post and we will make them all available from the NRG Office shortly - within a week for a modest cost. Don't bother the office until after I announce here that the copy's are available - they will be pdf's. Kurt
-
I also contacted our Journal Editor who said the only copies he is aware of are the ones already mentioned. If anybody has a copy of the NRG reprint that they would make available to us we can investigate what would be needed to reprint it in some manner. Kurt
-
Basic but Good kit recommendations for granddaughter and I
kurtvd19 replied to glbarlow's topic in Wood ship model kits
You might also look at the Skiff kit from Bluejacket. They also make an Optimist Dinghy kit. -
44th ANNUAL MIDWESTERN MODEL SHIPS & BOATS CONTEST & DISPLAY MAY 15-17, 2020 A Nautical Research Guild Associated Contest The Wisconsin Maritime Museum is proud to host the 44th Annual Midwest Model Ships & Boats Contest & Display. You can download the registration form here. https://www.wisconsinmaritime.org/event/44th-annual-model-ships-boats-contest-display/ Schedule of Activities Friday, May 15th 9am-5pm: Models accepted 10 am-1:00pm: Research appointments in the library/archives. Please email Hannah Patten (hpatten@wisconsinmaritime.org) or call 920-684-0218 x 111 to set up your request and appointment time. Requests must be made no later than May 1st. 2-430pm: Hamilton Wood Type Museum Join us for a special tour of the Hamilton Wood Type Museum in Two Rivers, Wisconsin. This local gem has thousands of examples of wood craftsmanship and tools. Every tour participant also gets to make their own 44th Annual Model Ship & Boat Contest print to take home with them. $15/person with guests and spouses welcome. 5-6:30pm: Dinner with Friends at the Harborside Restaurant Pay on your own – separate checks. 6:30-8:30pm: Friday Night Social Enjoy an evening visiting with friends. Ice cream donated by Beerntsen’s Confectionary and other treats will be available at the museum. This is free of charge Saturday, May 16th 9am: Museum Opens Museum opens, arrival of models up until noon. Judging takes place throughout the day. Outdoor pond featuring r/c modelers, hosted by WSBA throughout the day, weather permitting. 10am-1pm: Research appointments in library/archives 12pm: All models must be in place. 1pm: Symposium This year’s Symposium speakers are Alex Deery and John Fox III. Derry will be speaking on his research and the building of his model, the steamer Wanda. Fox will discuss his experiments in miniature models. 6-8:30pm: Dinner, Program and Awards Ceremony Dinner will be at City Limits Bar and Banquets. Greg Goodchild, Executive Director of Rogers Street Fishing Village will be our after-dinner presenter. He will be presenting on the maritime history and industry of Two Rivers, Wisconsin. Sunday, May 17th 9am: Museum Opens Museum opens. Outdoor pond available for r/c modelers until mid-afternoon, weather permitting. 10am: Modeler’s Morning Mash-Up Topics and speakers TBA. 2pm: People’s Choice Award presented Following this award presentation, models may be removed from the museum. Photographs of event participants and award recipients will be taken at this time.
-
We had Al Ross the kit designer at Bluejacket talk to the NRG conference on the development of a kit. Truly a fascinating subject and a lot more moving parts than most would think. Kurt
-
Kent: Send an email to info@thenauticalresearchguild.org Our emails are working and Mary does return emails promptly. She will get you hooked up - if there is some technical issue we will have our technical expert look at it. Kurt
-
Bob: First show clear, sharp photographs of the kit in this area. Both the unopened box (so it can be shown it's not crushed, water damaged, etc.) and the contents laid out so one can see what's included. Show several photos to clearly show the condition of the parts. Be sure to indicate if anything is missing or started. As to be contacted by PM - not here in the topic area. Keep all dealing off the public pages. You need to weigh the package as it will be shipped so you can calculate a price. The USPS web site https://postcalc.usps.com/ can give you exact costs when you have the weight, the size of the package and where it is going. It's best to tell the purchaser that shipping will be at cost added to the purchase price. Once you know where it's going and the dimensions and weight you can give the purchaser the total. They then send you the $$ via PayPal. When you get the payment from PayPal ship the package ASAP. PayPal is real good to use because it protects both the buyer and seller - if you don't ship the product the money isn't released to you the seller. Kurt
-
You don't want to get caught doing that. I mixed up a couple of packages I was mailing for the NRG office and mistakenly sent one at the media mail rate and it was returned with postage due at the regular rate and I had to re mail it at the regular postal rate. So it cost double the regular rate plus the original media rate.
-
Not having used that brush I can't say for 100% certainty, but I routinely spray the Badger acrylics through my Sotar 20/20 and a couple of the Extreme brushes w/o any problems. The extra fine needle may require a bit of thinning for the Badger paints. I never thin them for my use but Badger paints are as finely ground as the old Floquil paints so I wouldn't expect any problem if thinned. I would try w/o thinning first. Kurt
-
Moab: I am a Badger user and highly recommend Badgers. Especially for somebody in this area with Badger located in Franklin Park. If you ever have an issue take it to the factory and they will most likely fix it while you wait. That said the only repairs I have ever needed were caused by "students". Any compressor will work. If you have need of a compressor for other things in addition to airbrushing small quiet units are available from Home Depot, Menards, auto parts stores for less or the same as a small airbrush compressor and they can inflate tires, etc. while the small AB compressor can't. As to the brush - what do you plan to paint? How often? How big or small? Answers on what brush to get depend on what you plan to do with the brush. Single actions are easier to use and if you don't do a lot are maybe a better choice than a dual action brush. Lot's of choices. Provide some details and I can give you advice - but what's good for me might not be good for you. Kurt