DONATION DRIVE - SUPPORT MSW - DO YOUR PART TO KEEP THIS GREAT FORUM GOING!
×


trippwj
-
Posts
3,156 -
Joined
-
Last visited
Content Type
Profiles
Forums
Gallery
Events
Everything posted by trippwj
-
 The rate to be built determined the intended number of guns, decks, size etc. or did the desired number of guns determine the rate to be built based on the establishment in effect at the time? Sort of a chicken and egg paradox!
 -
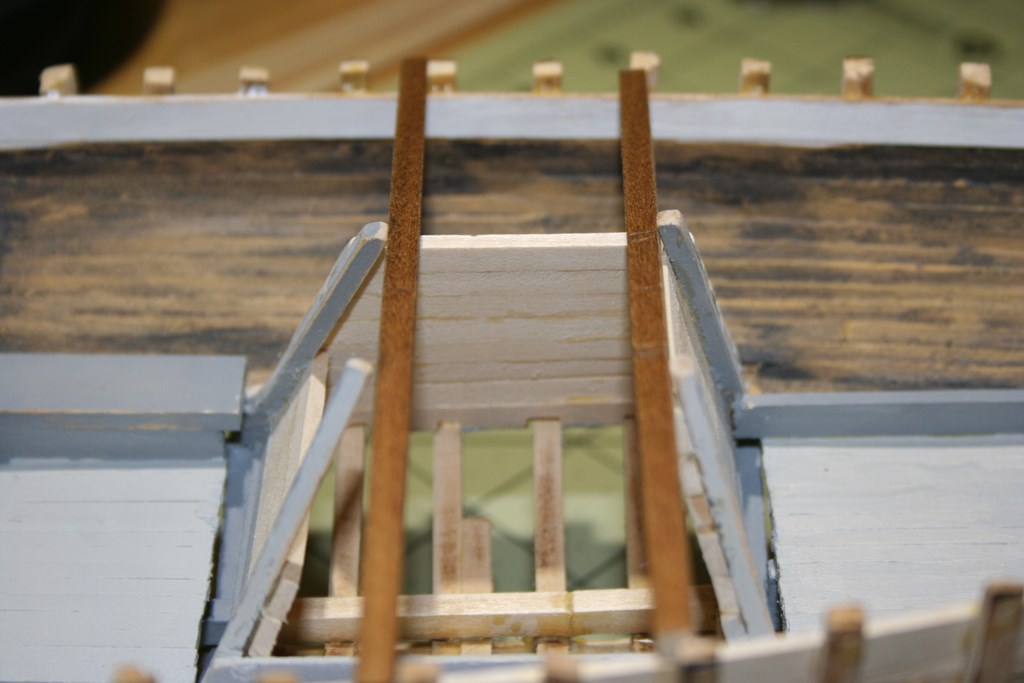
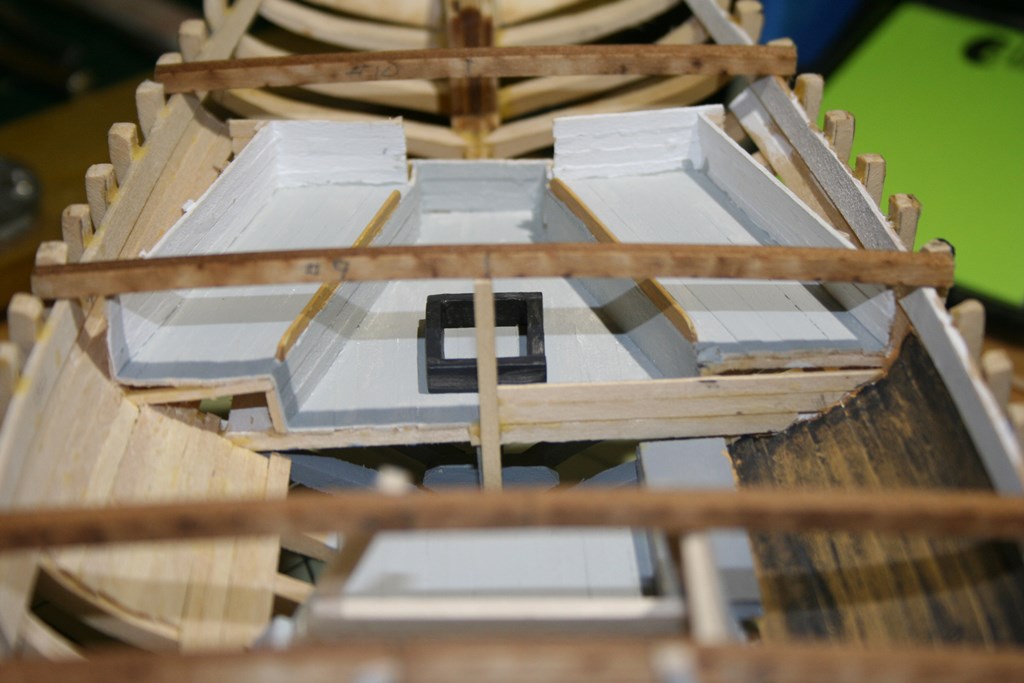
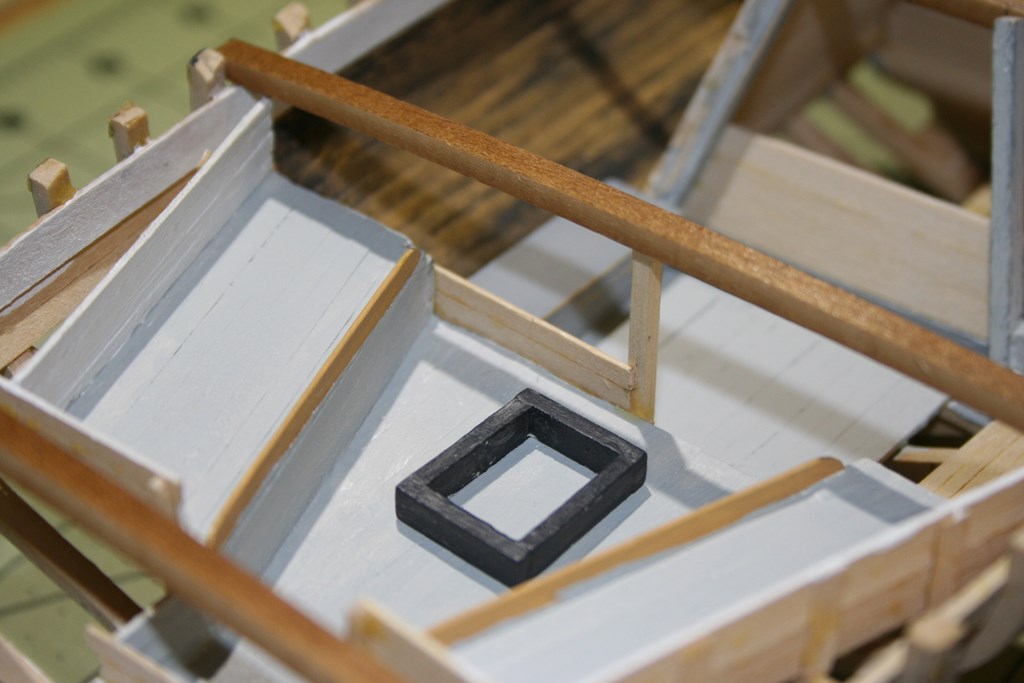
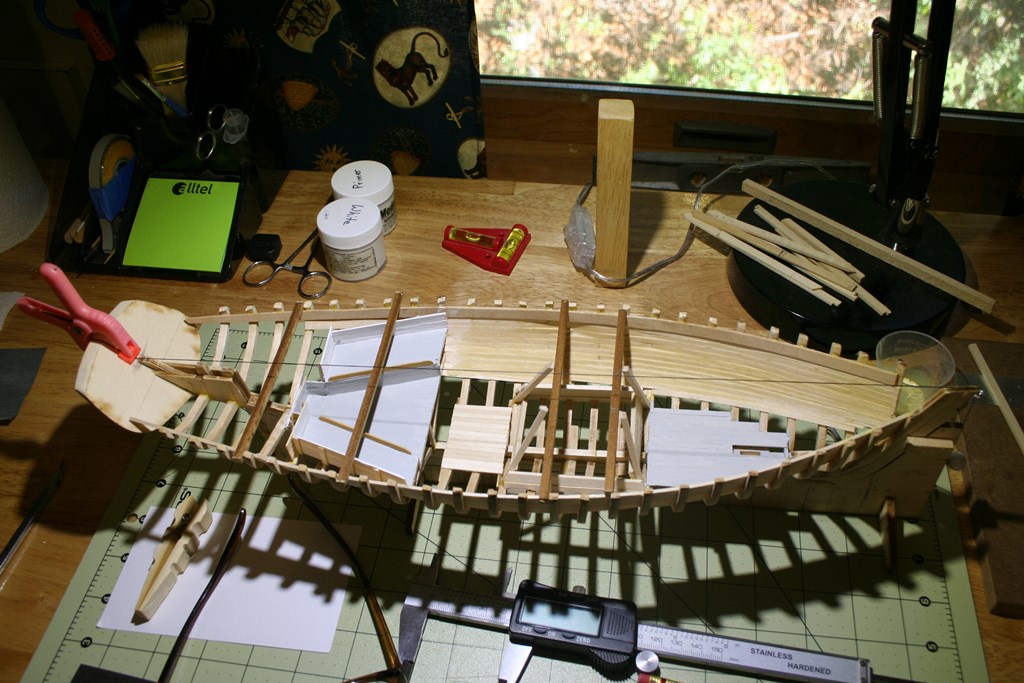
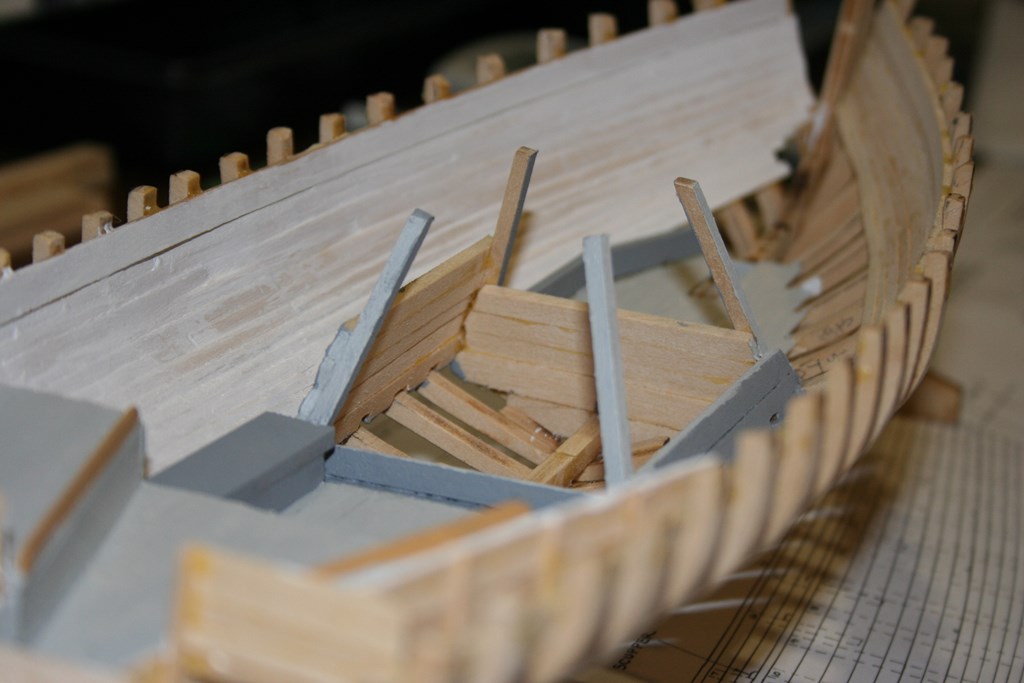
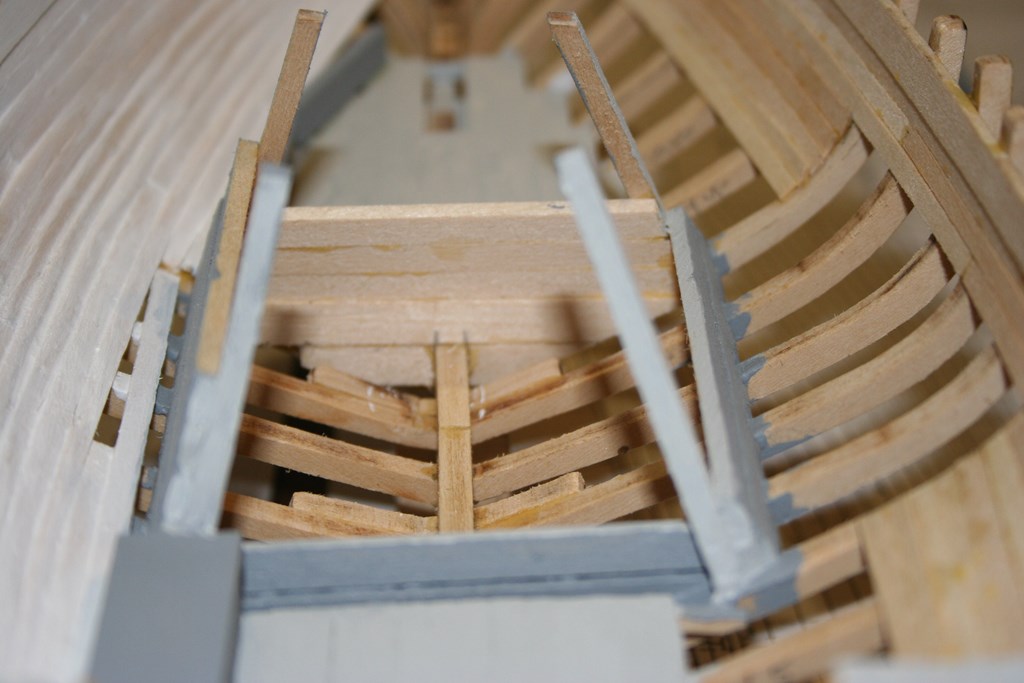
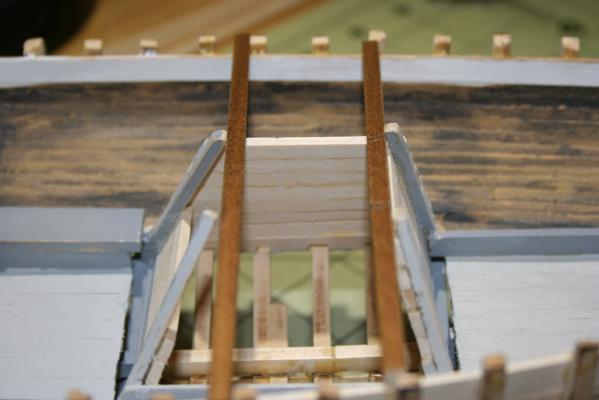
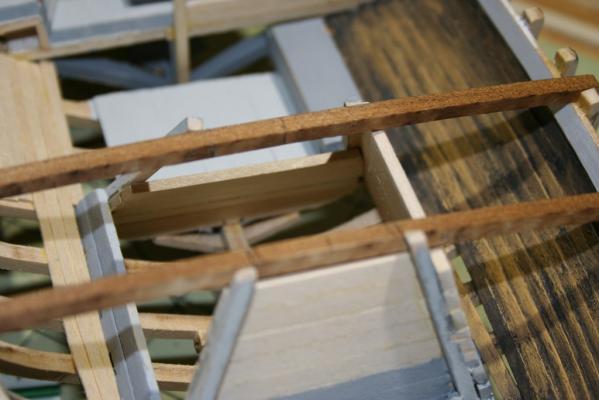
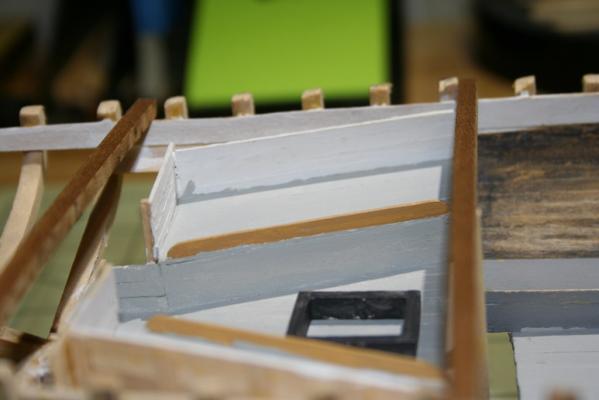
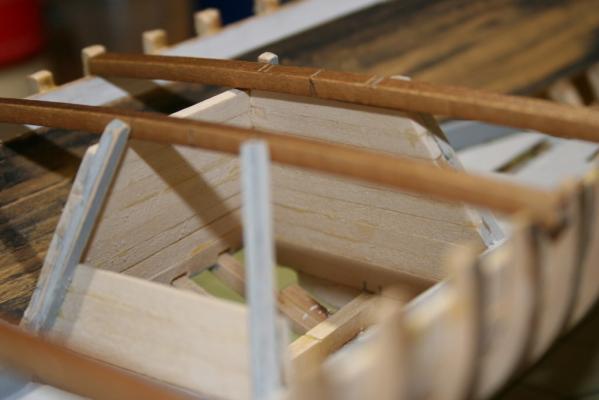
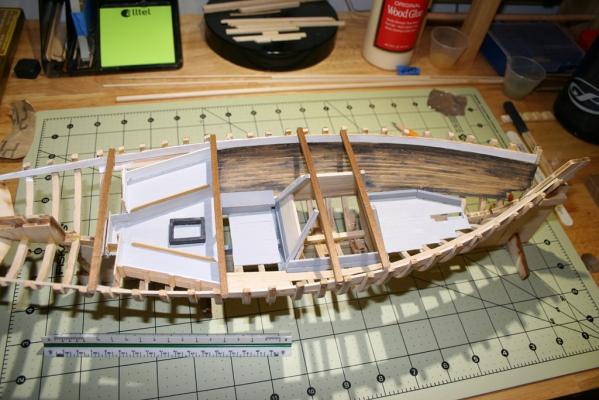
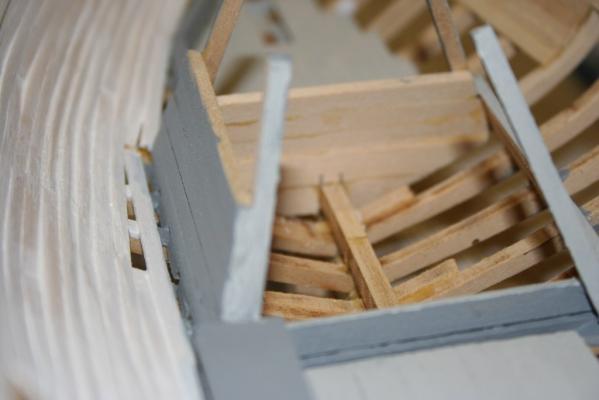
Good evening, one and all. It has been quite some time since my last update - but here at last is one! After spending more than a month not even picking up a piece of sandpaper or fitting a plank to the Essex, I have brought the Emma C. Berry back to the build table - being able to actually see the progress on her is quite rewarding. Have been continuing my work on the interior details. Continued fitting out the cabin, installed the rest of the ceiling on the port side and most of the ceiling on the starboard side as well - leaving a gap for a peep hole from the outside. My biggest sense of accomplishment, though, is the progress on the wet well. I intend to leave it at this stage - will be painting the interior in a red bottom paint color, but leaving a couple of planks bare to simulate repairs underway. Will also be finishing the bulkhead at the forward end of the cabin (in progress) - that will extend all the way to the deck beams (they are only dry-fitted for now to aid in the wet well construction and cabin bulkhead installation). The black square will have a sand base inside and then I will be making a small stove for the cabin - that may take a bit of trial and error! Since I intend to display her as a working vessel undergoing some minor replanking (both deck and hull), I opted for somewhat of a "stained" or "tarnished" look for the ceiling. Will also be distressing some of the other paint as well when the time gets closer. At any rate, here are the latest set of photos - ENJOY!!!


-
I hate to mention this, but your dishwasher is broken, Sjors... I figured that, with Fonzie wrapping up, and the Aggie well along as well, you would be starting something new to keep busy!!!
- 1,873 replies
-
- 1
-

-
- occre
- san ildefonso
- (and 1 more)
-
Beautiful work, Sjors - it took me a bit to find a gap in the crowd to look over your shoulder and see what was going on (thanks for the step stool - I am far too short to see over you unassisted!). So as you move down the home stretch, what is next - or did I miss that announcement somewhere?
- 1,873 replies
-
- 1
-
-
- occre
- san ildefonso
- (and 1 more)
-
Another manufacturer in the US with a good reputation for accurate designs is Bluejacket Shipcrafters (http://www.bluejacketinc.com/ ) - can't vouch for all of their model kits, but the Constitution and Jefferson Davis have good reputations, as do the schooner kits they make. The Constellation has been a long-time controversial ship. While Fouled Anchors (as well as Howard Chapelle in The Constellation Question) really seemed to close the chapter on the controversy, it seems to rise back up of it's own accord - most recently in Geoffrey Footner's book, USS Constellation: From Frigate to Sloop. The rebuttals, of course, continue by Dana Wegner (of Fouled Anchors fame). While the veracity of the claims made by those who claim the Constellation was stripped to her keel, 12 feet inserted, and then rebuilt with mainly timbers from the old frigate is beyond my pay grade to assess - I will note, however, that inserting a 12 foot keel section would require a much longer piece of inserted material - the original specifications by Humphreys specified that each scarph was to be: Keel of good sound white oak in 3 pieces. The middle piece to be not less than 80 feet if to be had. Scarphs not less than 12 feet to be kept clear of the main and fore steps sided in the midships 19 inches at the stem & post 17 inches and as deep as can be had. The scarphs all to be tabled and bolted with 5 bolts 1 1/8 inch diameter. False keel 6 inches thick but not to be put on until after the floor & keelson bolts are drove and riveted. Those 12 foot scarphs would necessitate a new section of keel that was at lest 36 feet in length, and that center 80 foot section would then be cut in half, resulting in two sections of only 40 feet, with but 16 feet not used in the scarphing. Having those additional joints in a longer keel would likely seriously detract from the structural integrity!
-
Good to see her moving forward, Adriann. The bowsprit and foremast are looking nice.
-
Dang - been wicked busy and almost missed this one! Nice looking "practice" work, Tony!!! I think I see a seat in the 3rd row near Sjors I'll grab so I can follow along as well.
- 255 replies
-
- 1
-
-
- granado
- bomb ketch
- (and 2 more)
-
Tony - Words fail me. She is absolutely amazing - CONGRATULATIONS!!!!! You have every reason to feel proud of this "slab sided beast". You, sir, have done well!!!
- 1,279 replies
-
- 7
-
-
- agamemnon
- caldercraft
- (and 1 more)
-
Looking like a ship now, Sjors! What is this "snow" of which you speak????
- 1,873 replies
-
- 2
-
-
- occre
- san ildefonso
- (and 1 more)
-
Thought I would update the list - I still have many of the PDF documents to add to the list, as well as the links to where they are online. Enjoy! Waynes Nautical Resource v-7 25Oct2014.pdf
-
Lt. Col. McClellan was a very prolific author and historian for the Marine Corps. Among his publications are The USMC in the World War (1920, reprinted 1968), Uniforms of the American Marines, 1775 to 1829 (1932, reprinted 1974), and dozens of others. He also has a number of publications under the name of Ned North.
-
Interesting stuff, Frolick. Thanks for sharing this! As far as "marines" go, I have not seen anything where actual marines were assigned to any privateers - just naval vessels. I think, as in many things, the terminology is used to describe the role not the actual source in this case.
-
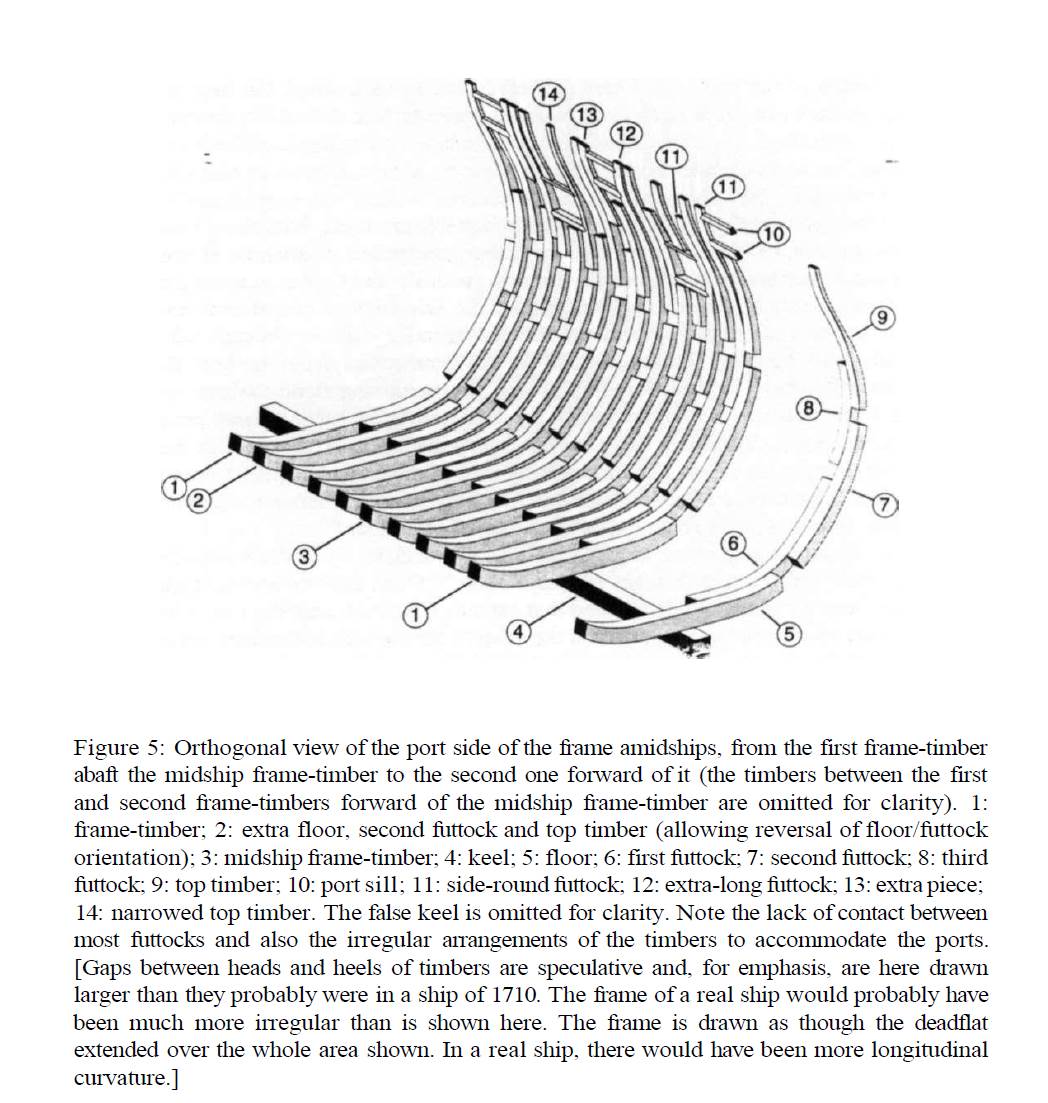
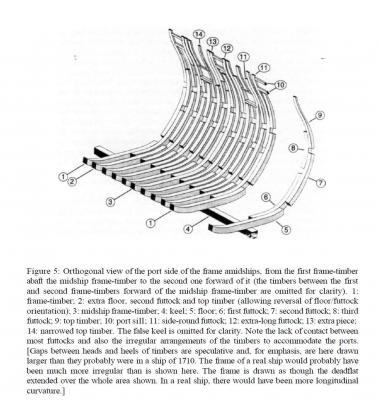
Larry - Which ship are you building? The nation, era and type of ship can change the correct answer. From your description, it sounds like you are building a double framed ship. here is one example of what the framing in about 1711 for a British warship would look like - based on Sutherland (source is Kenchington, Trevor, 1993. The Structures of English Wooden Ships: William Sutherland's Ship, circa 1710 The Northern Mariner 3(1): 1-43).
-
Agree on the Underhill book. You also can't go wrong with various books by David MacGregor such as Merchant Sailing Ships 1850-1875: Heyday of Sail (a tad before the period of interest, but a good reference) and also Sir Alan Moore's Last Days of Mast and Sail: an essay in nautical comparative anatomy (1925). There may also be something is some of the works by Basil Lubbock, but would depend upon the ship (Tea Clipper, Down Easter, Western Ocean packet etc.) May also find some relevant information in Chapelle's Search for Speed Under Sail. Good luck!
-
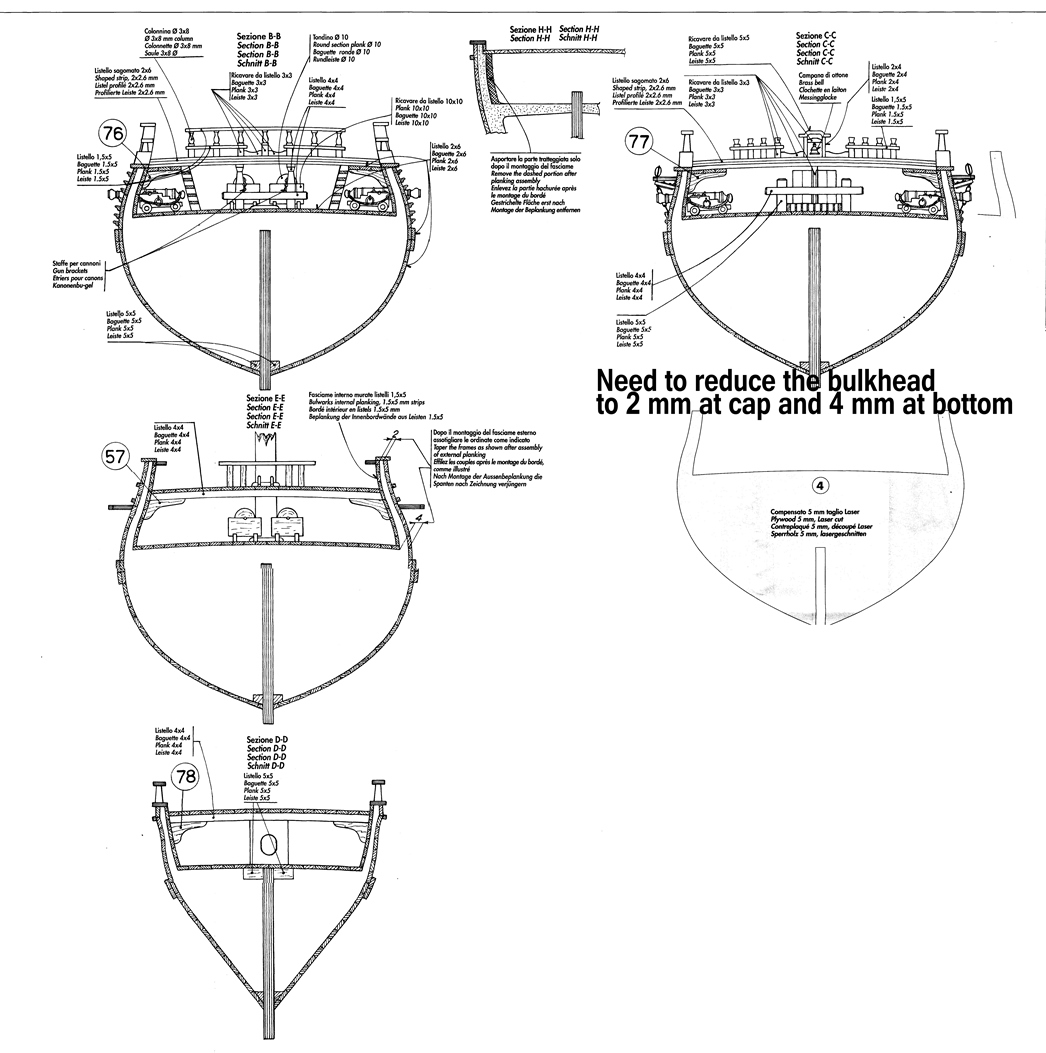
Good afternoon. Hope you have all had a pleasant weekend. Have finished the workshop reorganization to transition from the EC Berry to the Essex and, wouldn't you know it, before I even start generating saw dust I have a challenge I need some help with. Based on the plans, I need to reduce the thickness of the upper parts of the bulkheads by about 50% (not positive on all of them yet!) There are only a few bulkheads shown in the cross section to pull dimensions from. Bulkeads 4 and 8 will need to be reduced fairly substantially (see plan extracts below). The problem, for me at least, is 2 fold. How do I do it? How do I determine the dimensions for the remaining bulkheads? One thing I am considering, and I can hardly believe that I am saying this, is to remove the tops of the bulkheads (cut them flush with the deck level) and scratch build bulwark stanchions to replace them. I would be using information in the AOTS and other POF plans for the Essex to do this. Is that a viable option (I only have a 16 inch scroll saw and a dremel - everything else is hand tools)? Is there a better way to do this?

-
Brian - I missed this entirely as you were moving through the build. Beautiful work - should look quite sharp in your office
- 119 replies
-
- 1
-
-
- carmen
- constructo
- (and 2 more)
-
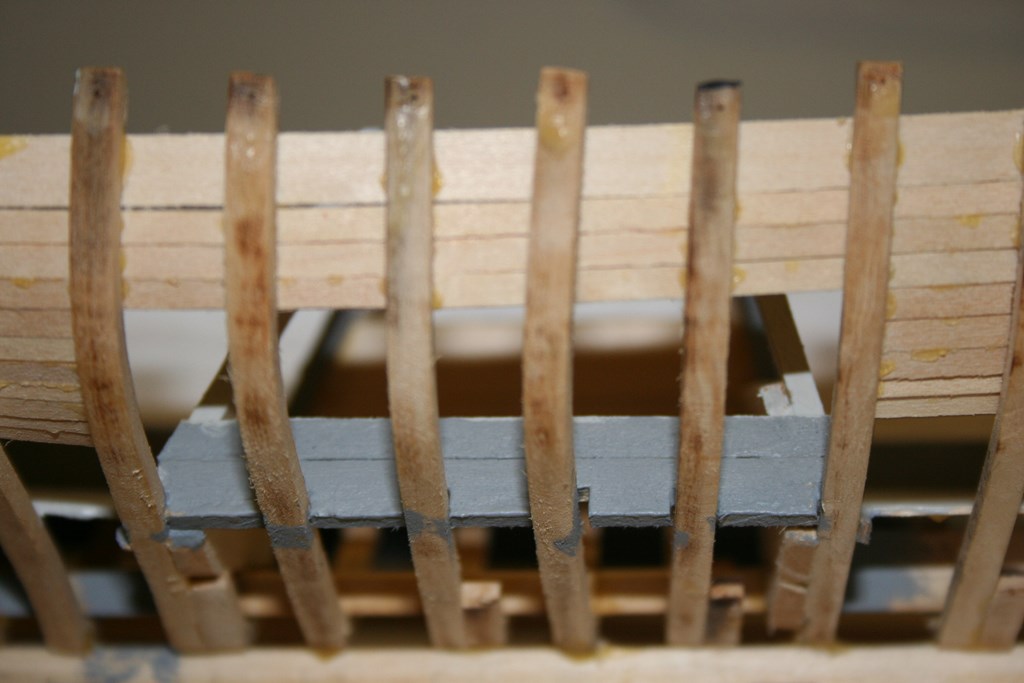
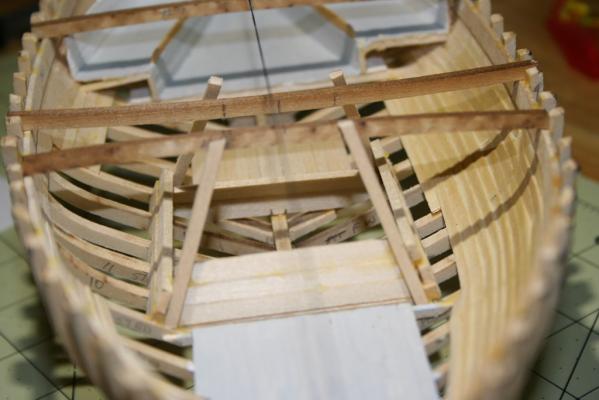
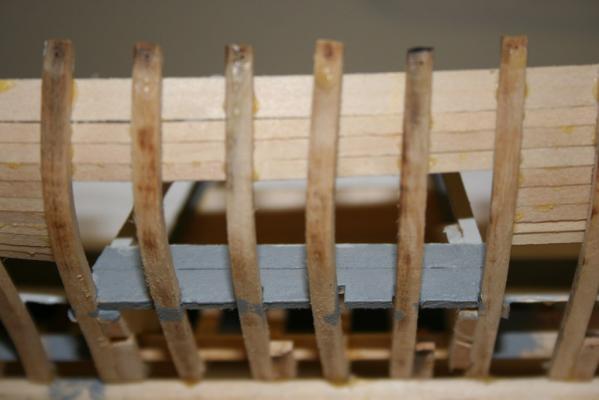
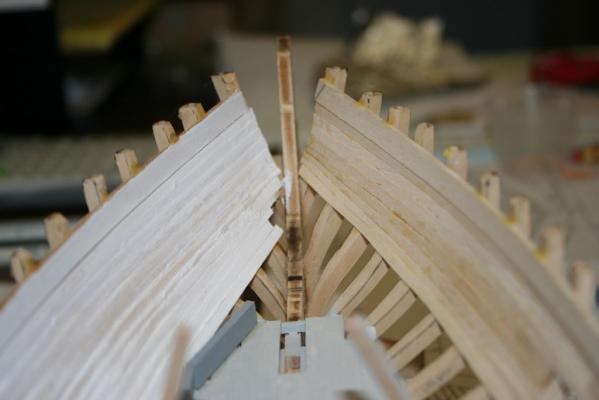
So, then - a detailed update for you. I am still working on the interior - this takes a good bit of careful measurement, cutting, sanding, throw it away and do it again. But, I am learning as I go, and more importantly, having fun! So - since last we chatted, I have nearly completed the ceiling along the port side. Have one small piece to fit in that I pulled after applying primer (just didn't look right). Photo the first - a view of the interior work in-progress. As you can see, I have started fitting the wet well as it serves as a guide (sort of) for the ceiling. I temporarily fit the deck beams that the corner posts will terminate on as a clamping (and measuring) point for the corner posts. Over the next few evenings I began to add planking for the wet well. I am foing to plank the port and forward sides to the top (deck beams) and leave the starboard and aft sides at least partly unplanked to allow a view inside the wet well. The frames at the bottom remain exposed - will be painted with simulated waterproofing. The hull planking will serve as the actual bottom for the wet well with 130 some odd small holes drilled to through to allow water to circulate (at least on the real vessel. I will probably only do a couple of dozen). This gives a nice view from the starboard side of the bedlogs and frames. I need to do a bit of cleanup on the painting here. Another view of the ceiling on the port side showing the missing piece I need to replace And a final view of the ceiling on both sides forward. Well, no gratuitious pictures at the bay today - been a wet, rainy day. Maybe next time! For now, though, the ECB moves back to the storage shaelf and the Essex comes back down for a bit of work. Look forward to any recommendations on how I can make the ECB look better - and thanks for stopping by!


-
Brian - I did use something similar. Please leave the pictures up - I will need the reference when I get to the deck!
-
Holy cow - looks sweet, mobbsie! Now, if you have concerns about space in the loft, I could certainly put that redundant Proxon sander to good use for you - just to free up some space, mind you.
- 1,279 replies
-
- 1
-
-
- agamemnon
- caldercraft
- (and 1 more)
-
Sjors - nice looking sails, dear sir. I will second what Mark said (as if you need my permission to move forward!!!) :im Not Worthy:
- 1,873 replies
-
- 1
-
-
- occre
- san ildefonso
- (and 1 more)
-
Outstanding work, Sal - very nicely finished!
-
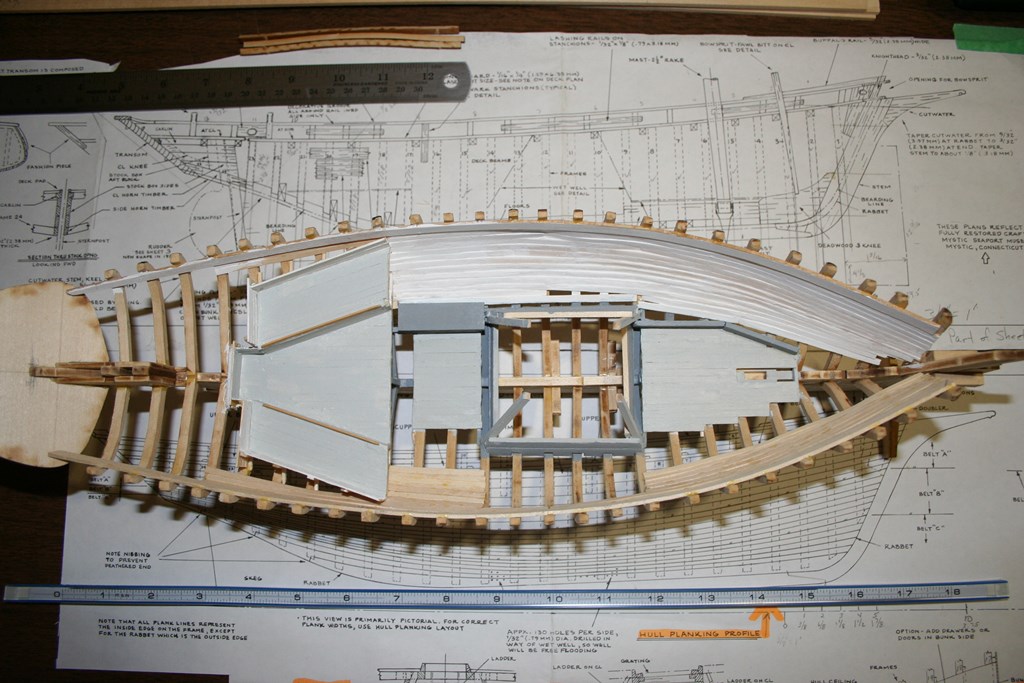
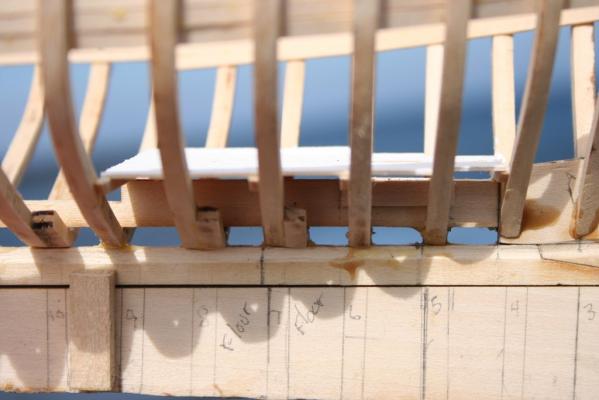
So - not quite ready for pictures yet, but have gotten quite a bit done on the old girl this month. About 2/3 of the way through installing the ceiling, have started framing the wet well, and have the cabing bunks and sole all installed. Once I get the mid-ship sole installed and finish installing the ceiling I will post some photo's. Right now, I am struggling with how to clamp the ceiling planks at the curve of the bilge. No room from below, clamps are too short to come from above. The area that is giving me fits is right along the sole shown in this picture. Given my mechanical skills are minimal (I can change a light bulb, but no metal working talent or experience) and my tools are limited to simple hand tools, any ideas on a good clamping technique that I can devise without having to hire a machinist? Will post a full update with pictures later this week. Thanks, all!
-
Thank you - that looks fantastic! Hopefully I can come up with a stove that looks half that good!