HOLIDAY DONATION DRIVE - SUPPORT MSW - DO YOUR PART TO KEEP THIS GREAT FORUM GOING!
×


dafi
-
Posts
2,419 -
Joined
-
Last visited
Content Type
Profiles
Forums
Gallery
Events
Everything posted by dafi
-
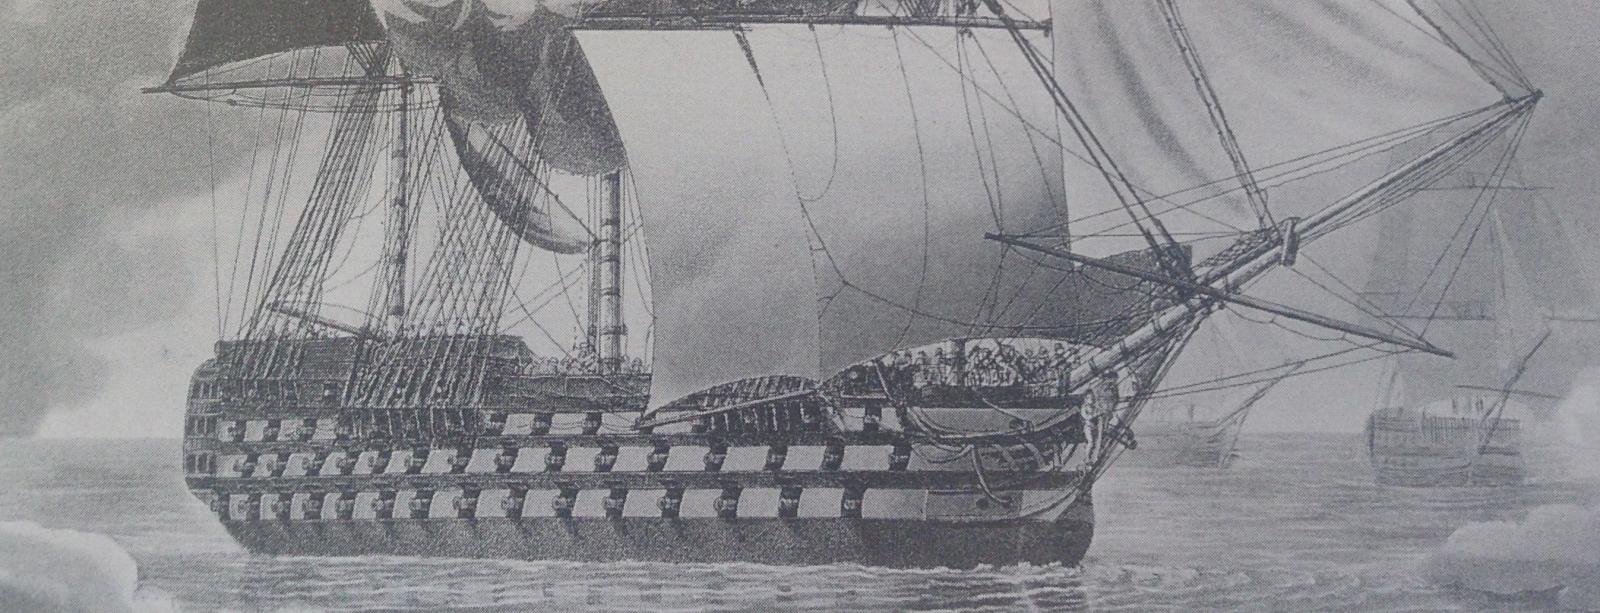
 Stansfield was 12 in 1805 :-) Here the contemporary work. Turner: The ‘Victory’, Starboard View towards the Stern 1805 http://www.tate.org.uk/art/artworks/turn...s-of-the-d05482 Livesay Dezember 1806 Robert Dodd 1807 And with it :-) Schetky, John Christian, 27 April 1827 [sic: 1924?!?] http://collections.rmg.co.uk/collections/objects/150849.html PAI0909 And to be seen on all pictures happily after. Personal conclusion, the davits were fitted with the round bow. XXXDAn
-
PS Robin you are right I exchanged the last two numbers, it was 1836 :-) But still not in the early days after Trafalgar. https://en.wikipedia.org/wiki/Clarkson_Frederick_Stanfield XXXDAn
-
Sorry Druxey, I forgot, for stupid german legal reasons one has to register there first ... Please be our guest, if ever someone needs help please contact me. XXXDAn
-
The Stanfield painting is from 1863 as far as I know, and thus anachronistical. I just had a small collection of the original sources in the german forum, not alwaysed getting too confused ... http://www.segelschiffsmodellbau.com/t4729f198-Victory-im-Wandel-der-Zeit-in-zeitgenoessischen-Dokumenten.html Cheers, Daniel
-
Thank you Robin, any referenece is welcome! Will have a look, for further details I am thankful! Druxey, in my understanding those were intended for balancing and swinging the ship while warping and anchoring. So it makes some sense to have them on the other end of the ship. As they are not that heavy some yards or spars could have done the job to hoist, and the aft capstan is not that far if laid out by the stern ports or aft gunports. XXXDAn
-
Did too some homework and not only the kedge on the mizzen channel is doubtful, also the davits are ;-) Checked all drawings from Turner, Pocock, Livesay and Dodd from 1805 to 1807 and no davits displayed. All drawings from 1824 onwards show them quite prominently ... As I said, some people worry about the 50 shades of pink, but there are bigger things awaiting ;-) XXXDan
-
This is McKays hint for the research to start. So far my "authorities" in the german forum claiming not having heard from the kedge in the mizzen channel so far. Are there any clues from the english savants? And another surprising hint came about the davits´ introduction: When was this claimed to be? No traces to be seen from all the drawings from 1805, 1806 and 1807 and from 1824 on they are very very prominent in all the drawings ;-) XXXDAn PS: Research can sometimes take funny turns ...
-
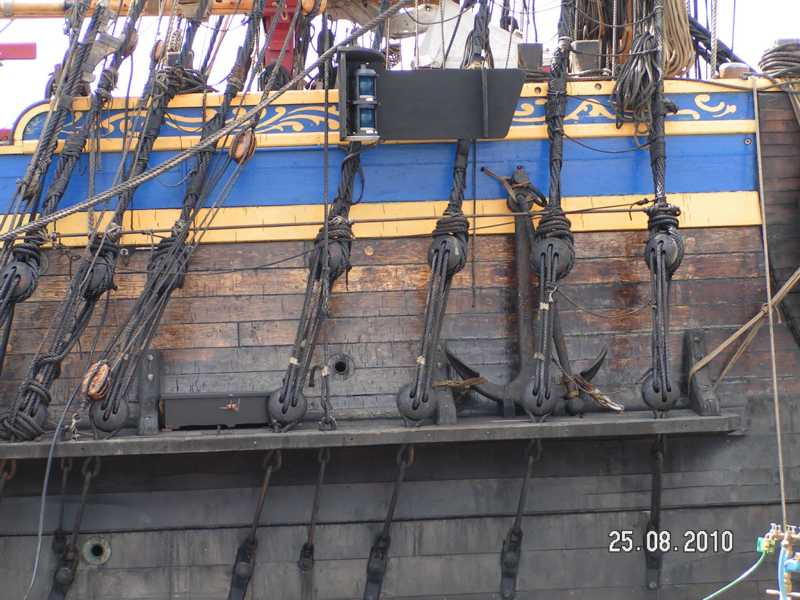
Great archives are great but sometimes it takes time to find the right stuff ... Here a similar solution to BE´s from a wonderful japanese 1:48 Vic. And here is the solution from the Götheburg :-) Not historical, not the mizzen, but real life ;-) XXXDAn
-
Thank you Maurice! Nice to see your beauty again :-) That was my first thought too, but the arm avoids the boat to come near the channels to climb in and the palm is not that compatible with the boats side ... I believe I once saw one lashed vertically to the shrouds but no idea if on a contemporary source or where ever. XXXDAn
-
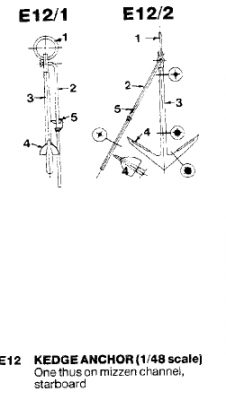
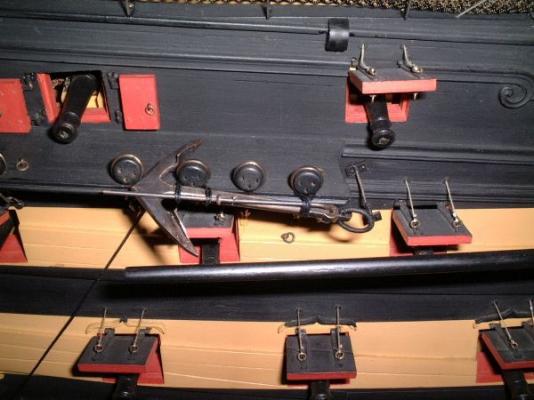
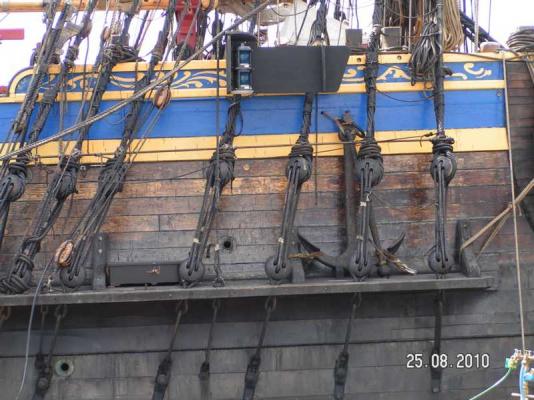
McKay talks about a kedge anchor in the mizzen channel for the Victory. Also Steel describes one of them. So far so good :-) For the journey it could have been place in the hold. But how was it stowed up there in the channels? For that I am missing contemporary sources. Sometimes the stream anchor can be seen lashed onto the bower in paintings, drawings or models. But I am missing evidence of the kedge ... Just to try things I hooked a boat unto the davits. If you lift it up to the level of the channels, one see that nothing should protrude, especially no palms. Lashed to the "shrouds" tried some variations ... ... upright does not work ... ... covers the gunport ... ... laid down the shaft is in the way of the gunport ... ... easy to be seen ... ... but also the davit is obstructed. The only way I see is ... ... is one of those two ways. Or am I blind and there is something else? XXXDAn
-
Even though the picture of the red ensign is heraldically correct, in practice the diagonal cross was usually off set ... http://collections.rmg.co.uk/collections/objects/937.html To be seen on almost all the examples I know. XXXDAn
-
Druxey, Popeye and avs, thank you for the feedback! Also very nice picture avs - waiting for the ceremonial diorama ;-) And also thanks for all the likes and happy new year to all of of you, Daniel
- 33 replies
-
- 2
-

-
- trinkstein
- frigate
- (and 2 more)
-
Nice picture haven´t realised this yet. Thank you! These cranes appear shorter in this setup. My reference was McKay where the fore and main channels have almost the same width and the cranes are higher. Cheers, Daniel
-
Thank you Kevin, Dirk, Robin, Mark and avs for the nice comments and all the others for the many likes! And for all of you only the best new year wishes, DAniel
-
And now todays last part. Still working on the deck. Here are the correct lengths of the gratings as seen today ... ... the pikes of the fore ... ... and the main ... ... and the belfry. So that´s it, more from one of my many working areas soon after returning home from my holiday :-) XXXDAn
-
As the deadeyes vary a tad in diameter open up the irons as necessary ... ... and place the deadeyes the right way round. The complete plate looks like this. To avoid bending the parts always cut the complete set of an iron ... ... place it in the slots, fix with the needle and put some superglue ... ... onto the backside of the iron underneath the board ... ... and use a string to pull the deadeye in place in the right direction and hold still until the glue sets. And finished it looks like this:
-
Highly discussed is the side entry port. If one do not want to miss it there is an option :-) Saw an opening, line it with sheet ... ... prepare the distance of the steps onto a tape and place it, transfer ... ... and glue the steps on. And done - ok looks easier than actually doing it ;-) Most changes were done in the channels. The middle one of the irons changed, instead of a small gap the part is bent out and has a overlap, so that the parts can be more neatly closed. As I now always deliver the needles I omitted the old alternative fixing helps and got space for more spare parts. Here is the standard build with the Heller deadeyes, the use of wooden ones will be shown too later on. First starting with the main channel boards. The missing fifth iron support is there as it is meant to be. The main and mizzen channels should have the width of their holes reduced by half by placing some 0,5 x 1 mm Evergreen on the hull´s side ... ... while the fore ones need more attention. Close the old holes completely and enlarge the width of the channel using 2 layers of 1 x 1 mm Evergreen - it is easier than doing it with one bar of 1 x 2 mm :-). File in new slots deep 0,5 mm , the first ones vertical ... ... and the last ones more angeled fitting direction towards the maintop. Close it with a bar of 0,5 x 1 mm Evergreen ... ... and the boards are finally large enough to avoid the deadeyes to interfere with the hammock cranes.
-
And on we go :-) Important for the Big Gunz are the gun port lids. Sandet even and fixed with double sided tape the fittings are easy to place. Here the adaption for the doubling of the whales ... ... and in place with the rigols. New ist that the hinges for the stern ports come in the right lengths ... ... and the fittings for the beakhead bulkhead are now included :-) Here the right scheme for the openings for the mariners walk ... ... the old holes are closed with the cut outs. The bar for the netting of the heads ... ... and timberheads in place ... ... even though I forgot to put the butluvs. For drilling the hammock crane holders I used some left overs as template ... ... and the cranes can be positioned easily ... ... even if different sizes come together like in the start of the poopdeck.
-
As we are already underneath the poop ... ... we have wheel and binnacle ... ... and a closed lid. The handles for the buckets are already provided. The highlight is of course the skylight. Just add the missing deck beams ... ... and place the light. Of course the skylight should be some 3 feet more aback, but this as skilled modeler always will be able to do :-) XXXDAn
-
**** happens - when I wanted to order more etch in summer, I realised having lost the original film pockets. ... Big ****! But as one says, make an opportunity out of it I used the chance to rearrange some parts from one plate to another as it made more sense an to add one or two goodies. Nothing big, almost the same, but next it made me aware to update the instructions too. So I took a spare hull and went sticking all golden parts onto it :-) Here are the first pictures of the basic version, the more elaborate work out will come on the other side after the holidays. Best place to start? Big Boyz - Big Gunz!!! If the etch still are too thick, one can use a soldering iron ... ... and sink one specimen into some sheet to get a nice template for the rest ... ... to file down the back from 0,2 mm thickness to something like 0,12 mm. Then still adding the flaps ... ... and Big Gunz are in place ... ... and the smaller ones along the hull.
-
Thank you Jan, all the best greetings for you too and the rest of the board!!! Cheers, Daniel
-
I do strongly believe that since the age of twelve at my first putty-trials I never again applied that much material ... XXXDAn
-
Backpack? Yes it is each time a 2 and a half hour trip to more than 1800 Meters altitude to get there :-) That is why the first time I thought I was haluzinating ;-) And another 1,5 hours to return ... ... if the Jagertee isn´t taking his toll ... XXXDAn
- 33 replies
-
- 4
-
-
- trinkstein
- frigate
- (and 2 more)
-
Greetings from the my Christmas-Eve-walkies to my favorite stonefrigate. My heart will go on ! Just see and feel the spume:-) It looks like the old girl got battered a bit by the harsh elements up there :-) Just look at the foremast! Cheers and all the best, Daniel
- 33 replies
-
- 9
-
-
- trinkstein
- frigate
- (and 2 more)
-
YES Mark - SMS-Trinkstein, the stone frigate :-) (drink + stone = trink + Stein = Trinkstein) My heart will go on! http://modelshipworld.com/index.php/topic/349-sms-trinkstein-by-dafi-sos-stone-on-soil-flush-deck-frigate-of-the-austrian-mountain-navy/page-2#entry374670 Merry X-Mess, XXXDAn