HOLIDAY DONATION DRIVE - SUPPORT MSW - DO YOUR PART TO KEEP THIS GREAT FORUM GOING!
×


dafi
-
Posts
2,419 -
Joined
-
Last visited
Content Type
Profiles
Forums
Gallery
Events
Everything posted by dafi
-
 No, your first guess was better :-) Good spot with the square hole, that is an essential feature of these parts. They do usually not come in pairs ;-) XXXDAn
 -
Most wonderful work as always! XXXDAn
-
Careful young tiger, this is serious model making! We are not laughing, we are suffering our arses off! XXXDAn
-
If a debutante is meant to be introduced to society, she will have to pass the official procedure. Beforehand one was trying to make her look as great and big as possible ... ... but from near the austern comment was "oh... how cute" ... ... but even though the small one was appearently wort a closer investigation ... ... and had to reveal her most inner secrets and turn all her intimate inside out ... ... also the family tree was checked ... ... everything was well documented ... ... and afterwards the jury went into seclusion. The stern question was arised "Pauli, what do you think? Do you think she is good enough for my boy?" ... ... and the incorruptibly voice of the truth spoke "Fiiiits - fiiiiits" ... ... and by then even Robert was able to burst into a a liberating laughter ... ... and dafi was happy that he finally was able to present his lil´girl with the funny stripes to him, him the handsome 74 from 1798 after Stalkartt :-) What a nice couple they give :-) And while the kids were palying, it was dafi´s night out with sweet Caoline :-) They had a wunderful night, the gent of course is not telling details, but it was an experience, but you know, first night out together, there is of course no touching allowed, that is why stern papa Robert kept the display case closed. XXXDAn http://modelshipworld.com/index.php/topic/1749-hmy-royal-caroline-1749-by-tarjack-made-from-bone-m-1-50/page-10
-
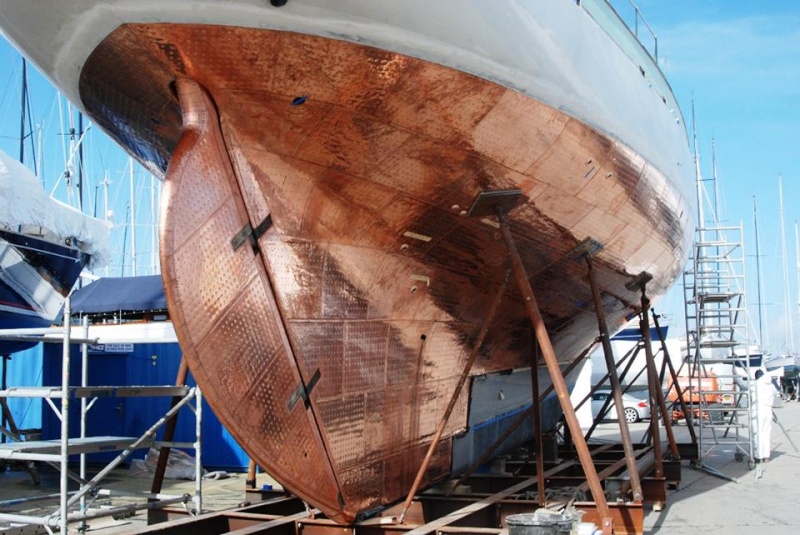
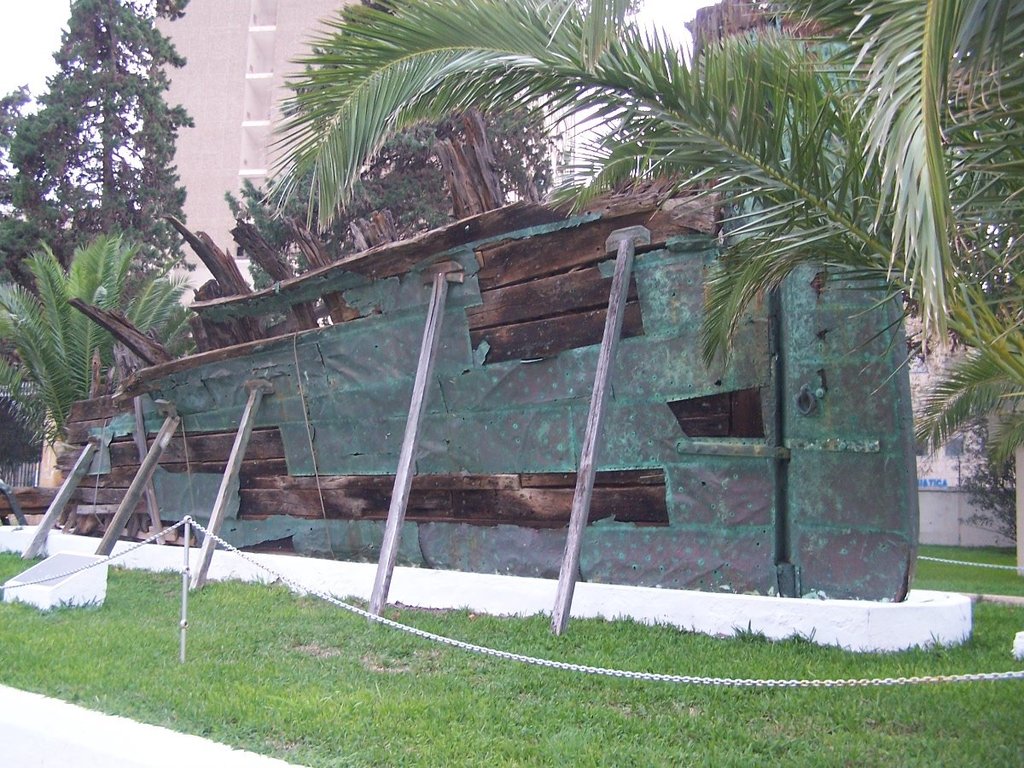
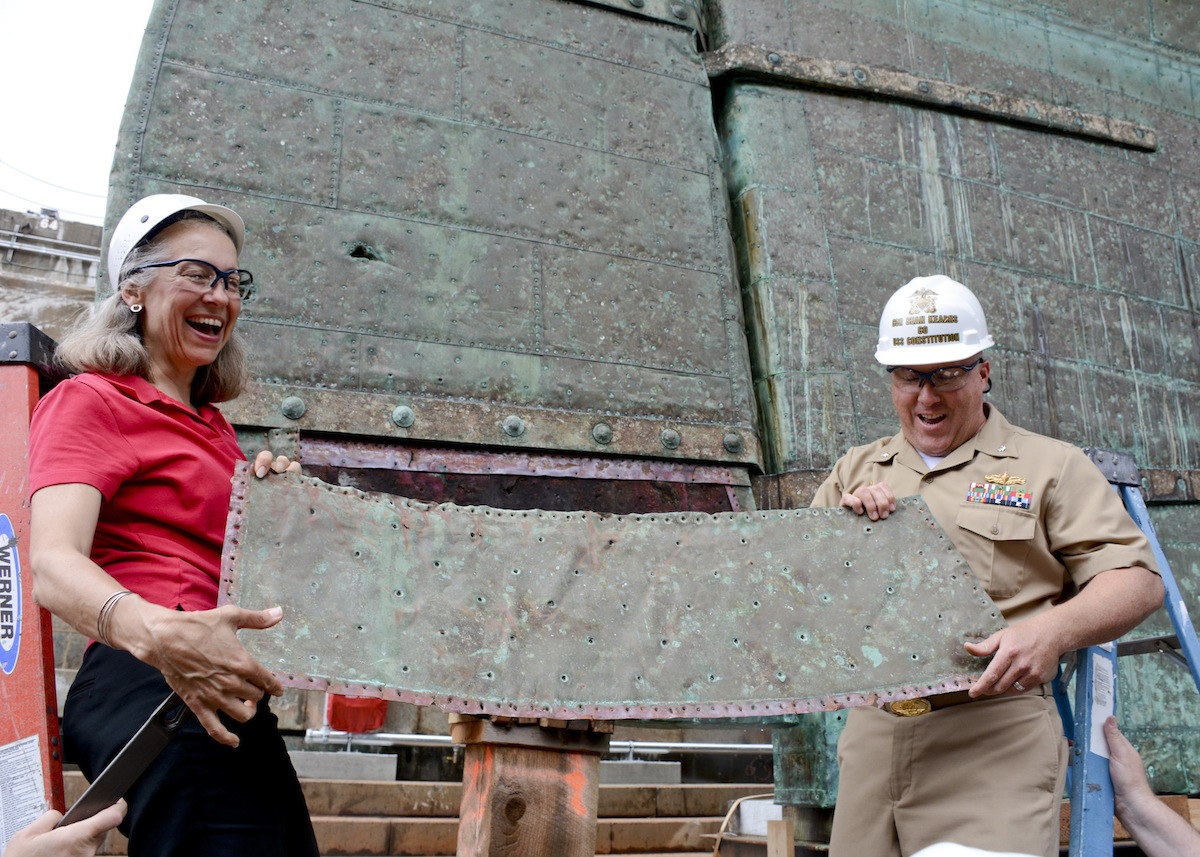
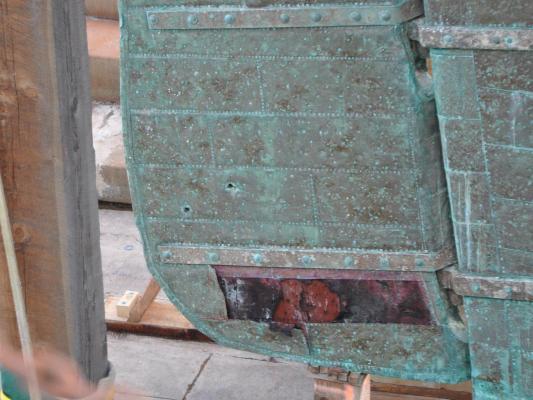
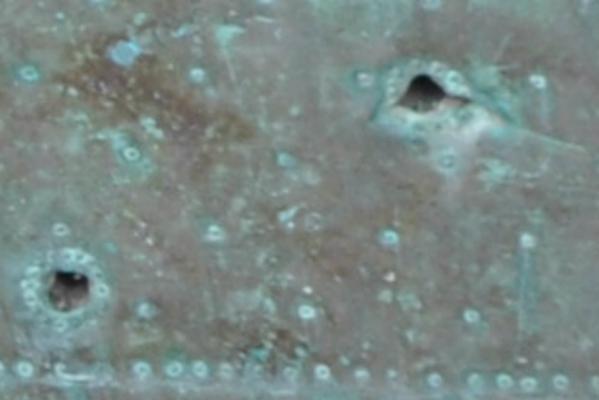
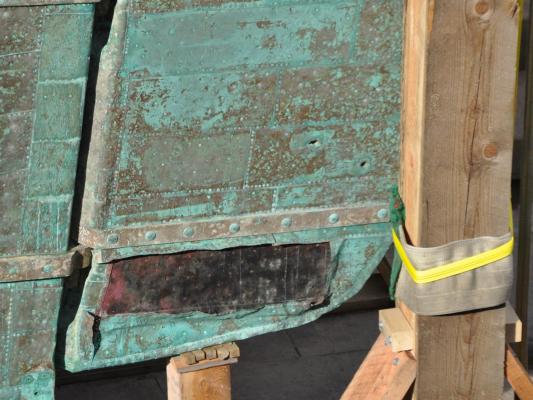
At least we agree it is a hole :-) For me it does not look like a pike as the hole goes completely perpendicular with the same diameter on each side. Normal damagees also would get a square patch, seen on several other places, not neatly riveted around. But on the other side, I found some more interesting bits: A picture of a recent restoration shows also a hole going through on the bottom of the rudder. And the most intriguing find is a wreck apparently in front of a spanish navy school and could possibly reveal the sense of the hole ... ... and on the other side bolt and ring missing but the setup is predictable. This makes sense as clearly there was a bolt attached for each side. The ring attached also could explain the horizontal marks that can be seen in one of the Constitutions holes :-) So the riddle continues in a sense of what or why the rings were for. XXXDAn


-
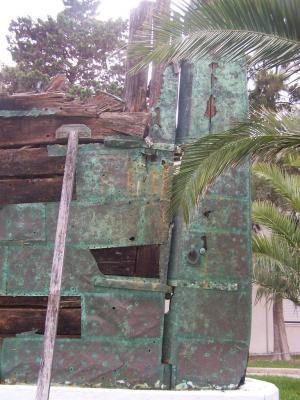
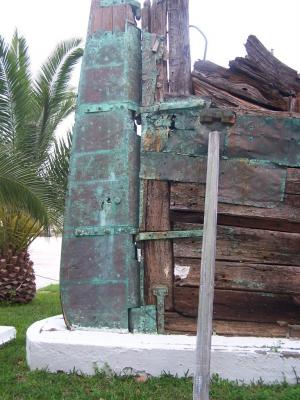
Mike from our german forum just provided a picture of St. Georges rudder, lost in start of December 1811 and now on display in Thorsminde. It shows the same kind of holes as the Constitution, even in the same places and the aft hole lower. To much findings about this item to be a sheer coincidence imho :-) XXXDAn
-
Thank you Tar and Kevin :-) No Tar, even though you are on the right track, not just quite. Your statement is correct for bigger wheels/trucks, but these halfs are not meant to become "wheels". Interesting is that some artifacts in Thorsminde and from other wrecks show usually trucks made from a single piece. Perhaps just for the smaller guns? XXXDAn
-
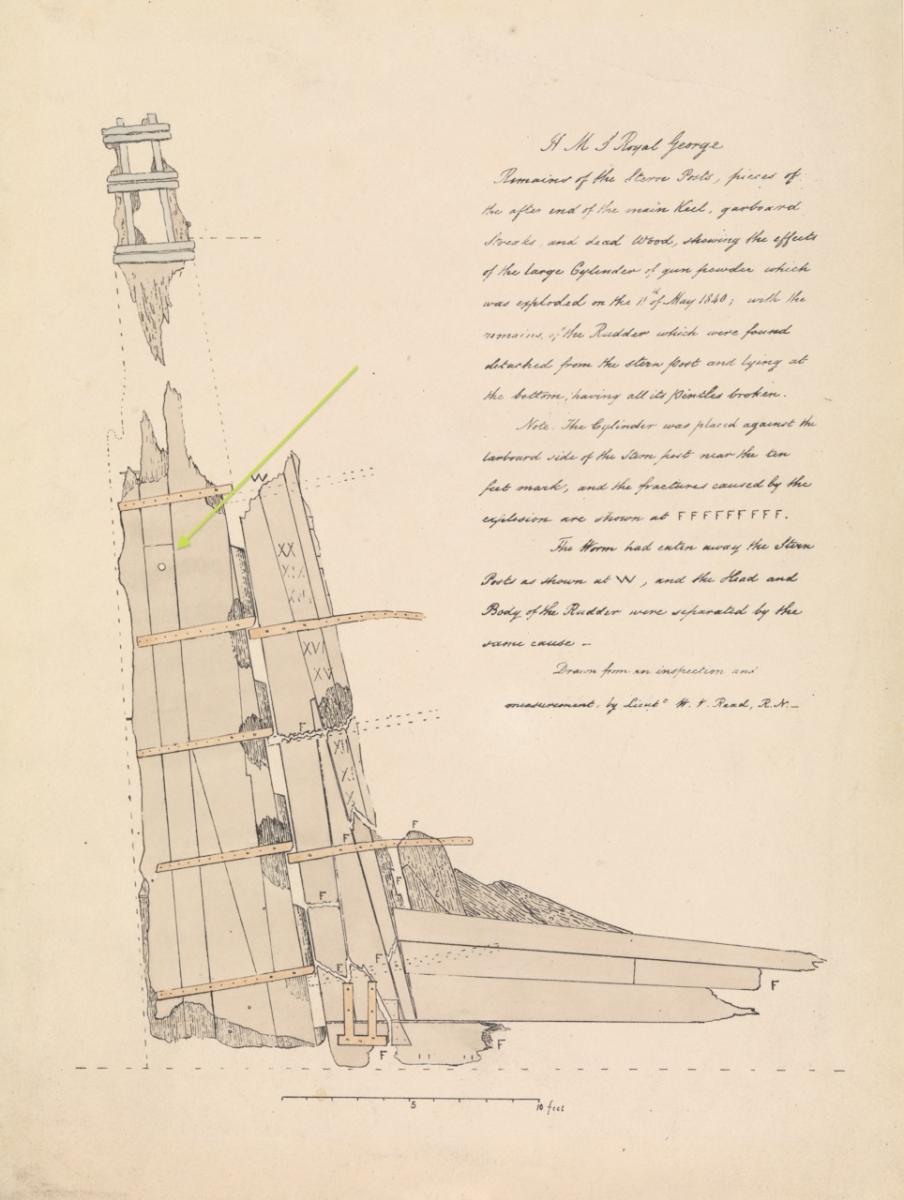
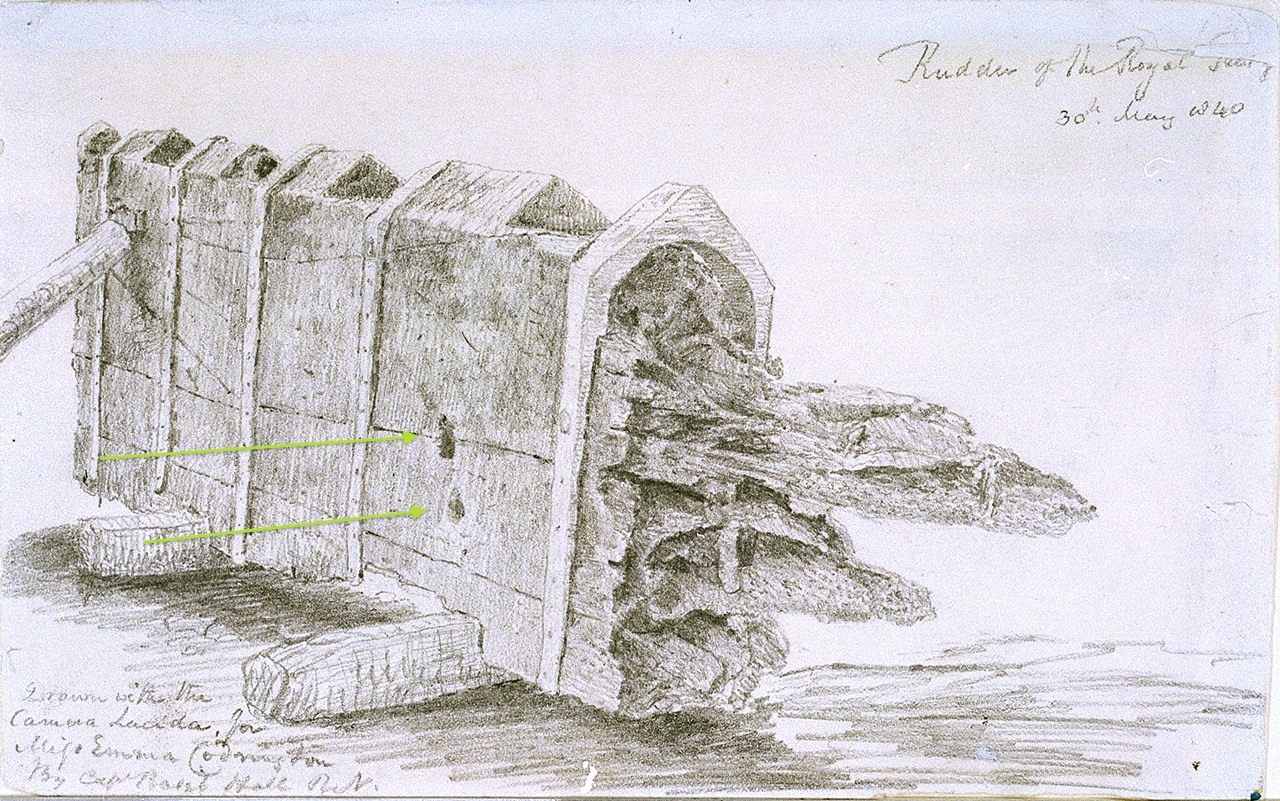
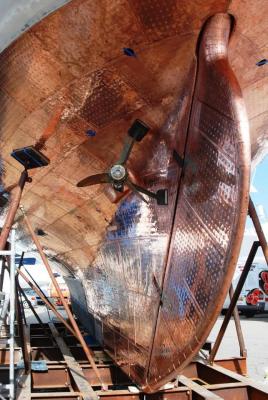
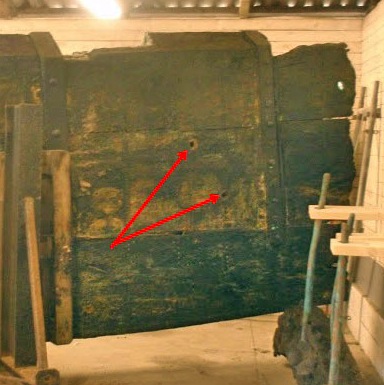
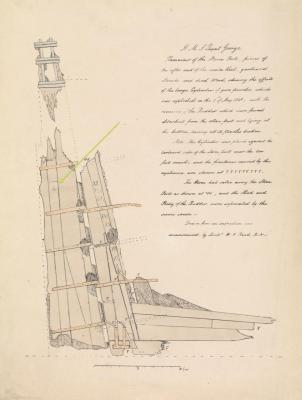
A while ago we had a nice discussion about sone holes in Constitution´s rudder. #131 popeye2sea gave some nice detail shots: Best guess for the holes was so far to be for heaving in and out the rudder, also to be able to relieve the pintles. In the Deutschen Museum in Munich I discovered a small detail ... ... and found it too on the Ewer Maria :-) There was a roll included as the rudder had to be lifted more frequently. Looking deeper in NMM ... ... the pictures of the remains of the rudder of the wreck of the Royal George, with the holes on similar places as Constitution. PAD7942 und PAD 5957 On the pictures that I know of the rudder of St. George in Thorsminde it is not to be seen due to the quality, does anybody has good pictures of this rudder? Cheers, Daniel


-
Thank you all fot the nice comments and likes! And ... ...hihihihihi... ... at least ONE that pays attentien ;-) The Minions did not brake it, the "wheels" are meant to be like that. So what did Jan spot? Wahthefookisit? XXXDan
-
How I make Clue (Clew) Blocks by Dan Vadas
dafi replied to Dan Vadas's topic in Masting, rigging and sails
Nicely shown, as always a big thank you!!! Daniel -
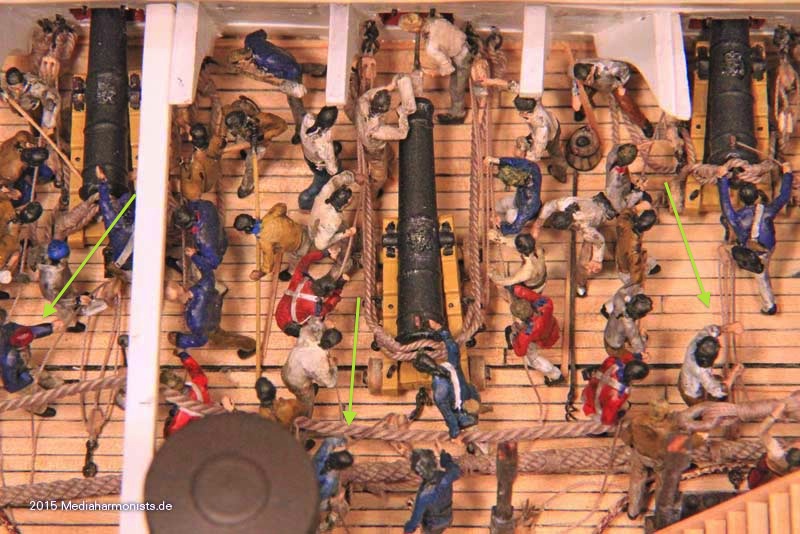
Thank you Sirs, very appreciated! And just to round off the topic a small overview :-) Just compare the side with the crews handling the guns with the fire lee. If the pictures are merged, one gets a nice impression of the crowded decks while battle. Also nice is the view more from deck height :-) XXXDAn
-
And they finally gave me the time to finish the show off of the gun crews :-) Charging For orientation positions by the clock (seen from the top): 06 o`clock gun captain, covering the vent hole with a leather thump protector, for that while sponging the barrel no ashes or embers are pushed into the vent hole from the inside by the pressure 12 o`clock sponging the barrel 11 o`clock the cartridge is passed 01 o`clock afterwards the wad 10 o`clock the bullet is handed 09, 08, 07 und 03, 04, 05 o`clock the crew holds tight the tackles 6:30 o`clock the inhaul tackle is secured 03 o`clock second row the sponges, rammers, bars and crowbars are handled aiming 06 o`clock the gun captain is directing by hand signs 11 und 01 o`clock leveling the horizontal elevation by the bars 10, 09, 08, 07 und 02, 03, 04, 05 o`clock the crew holds tight the tackles 6:30 o`clock the second gun captain holds ready the lead apron to protect the vent 6:30 o`clock second row the inhaul tackle is secured 03 o`clock second row the sponges, rammers, bars and crowbars are handled (and almost the eye of the black sailor is pierced by the worm ...) prior the shot 06 o`clock gun captain has to bow down a lot to aim properly 11 und 01 o`clock two crew membres crouch against the hull, ready to jump after the shot to jam the wheels of the carriage in the backward position, as in that moment the tackles are laying still on deck not being manned, to avoid the gun to run out again 10, 09, 08, 07 und 02, 03, 04, 05 o`clock the crew holds tight the tackles, correcting the side orientation - if necessary helped by the gents with the bars. Just prior the shot they put down the tackle onto the deck without disturbing the recoil of the gun and gather in the center line of the ship 02 o`clock second row the sponge is already waiting for after the shot 03 o`clock second row the sponges, rammers, bars and crowbars are handled As the sea is calsm, the gun port tackle is not manned - in rough seas one man has to secure it to be able to close it fast in emergencies. Supplies Also some other had to be done. The cartridges were to be transported by a chain of people from the magazine up the companionway to the decks and ... ... hurry-hurry-hurry, from there distributed towards the guns. By the regulations this was not to be done by the boys for safety reasons. Their duty was much more to clear loose powder with a wet mop. Was this the origin for the powder monkey? And one crew member was to servey the lint stocks, necessary in case one of the flintlocks does not work. XXXDAn
-
After I did not manage to do much due to dailies work, I decided to get some auxiliaries workers for the ship yard ... ... they were described as very dedicated ... ... I immediately made them do some trial work ... ... but what did he do there?!? XXXDAn
-
Just realised I never really congratulated for the great result ... Wonderfully done, DAniel ... and for nostalgic reasons I repeat the first picture you showed - what a marvel you did!
- 237 replies
-
- 2
-

-
- cutty sark
- revell
- (and 2 more)
-
The Proxxon 0,5 mm are good, much better than the same kind of 0,5 drills from the DIY departments (at least in Germany) On modeling fairs one can also find the 0,3 mm with shaft :-) XXXDAn
-
Lovely work as usual! Daniel
-
Lovely work, especially on rudder and screws :-) XXXDAn
- 2,625 replies
-
- 1
-
-
- kaiser wilhelm der grosse
- passenger steamer
- (and 1 more)
-
PS: As the sea is rather calm at the moment, I omitted one duty: In rough seas one man was to hold the lanyard for the gunport lid for emergency closing. XXXDAn
-
Thank you guys, doing the best to make them move! And yes Evan, there would be :-) XXXDAn

-
All the best!!! Cheers, Daniel
-
Here a picture to show the system: The wooden stock is in two halves and squeezes the shaft of the anchor. The 4 iron loops hold the system. If the shaft gets loose, the loops only have to be hammered inwards, and because of the conical form of the stock and the shaft will be held tight again. Ingenious design :-) I doubt that it was ever replaced by rope, but hey its your model, do something like the woolings on the masts, if you do not like the paper version :-) XXXDan
-
Both of them ... ... a bit more like free style ;-) XXXDAn
-
Thank you Frank! And for that the gang looks lifelike comes some ink and a nice wash. See the before and after pictures - let there be life :-) XXXDAn
-
Hello Jan, yes they were usually strictly separated :-) But the battle was different. As long as the Marines were not needed on deck, they were used as auxiliaries to handle the guns. There are some contemporary pictures and drawings showing it, also the Trafalgar Companion shows up to two marines per gun. The pictures show the full gun compliment of over a thirteen per two guns. But half the gun crew was assigned for second duties and had to leave if necessairy. Standard duties were cases of fire, water/leak/pumps, handling of sails and repel boarders or boarding the enemy. So in the height of the battle it could happen that some 6 men had to deal with two big guns. This is not even counting the casualties. So fire rate could drop dramatically at this stage. Cheers, Daniel