HOLIDAY DONATION DRIVE - SUPPORT MSW - DO YOUR PART TO KEEP THIS GREAT FORUM GOING!
×


dafi
-
Posts
2,419 -
Joined
-
Last visited
Content Type
Profiles
Forums
Gallery
Events
Everything posted by dafi
-

Loving your model...
dafi replied to Senior ole salt's topic in Building, Framing, Planking and plating a ships hull and deck
Loving your model means MUCH more than only pampering it on ones lap ... Even though it can be difficult to be on holidays with the small ones. - Are we already there? - I have to do pipi! - I am Hungry! - I am bored! *bitchingaround* But this has not to be like this! The trick is to get the small ones interested into the trip and get them enthusiastic about it. With a little bit of commitment it is not that tricky ... ... so I showed my small one the landcape ... ...explained where I was the day before ... ... and promised to take her there the day she will be big enough. Also zoos are a winner ... ... she especially liked the two rheas. Or just doing a bit of sport together ... ... ping-pong was the favorite ... ... but the most important ... ... was ... ... just to spend time together ... ... telling stories ... ... about god the universe and everything ... ... and both of us already found a good and relaxing sleep together :-) It is a tough and responsible job to be a good ship-dad, but I hope that I am on the right way, are you too? Cheers, Daniel- 14 replies
-
- 20
-

-
Horatio: So my dear Hardy, this is the place I ought to fall? Thomas Mastermann: Yes Sir, we thought that a brass plate would help you to identify the right spot. Horatio: Oh, that is so kind of you all. Thomas Mastermann: Your humble servant. Horatio: Oh my Hardy!
-
Mass Production? No problem. Here you can see my minion Kevin producing the barrels and buckets. Next he had to pack the chests. On this Vic, they were not for the personal belongings of the sailors but belonged for the gear of the mess: spare parts for the guns, cleaning and mending, coocking and dining, short everything that could be needed on short notice without having to go to the stores in the orlop. Then my yellow ones distributed the barrels and buckets. The barrels were for the already distributed rations of the mess, one had a convenient size to sit on. The buckets were for catching food from the galley, for cleaning and for the shitting in bad weather - please guys make sure not to mix them up! Here able seaman George is checking if the chest with the spare equipment of the guns is properly packed - the surplus tackles and the slide trucks in case the axxis of the carriage is shot of - everything looks fine :-) And what is in the kits? There were the personal belongings of the sailors, look, here someone is searching for something inside ... Cheers, Daniel
-
No good picture as it shows several ships that never encountered each other in those outfits: It is a commemorative picture of some of Nelsons ships, painted without being there, hence the anachronisms in Vic´s stern. But BE is quite right. Me too I never saw the color from the research in any of the contemporary pictures apart from Santissima Trinidad. Would like to know more about the way, that they used to get to this result. The piece of mast - said to be original - shows almost nato olive/drab if still authentic. Funnily, the pictures of my second visit of the Vic show a color like this, but i think the white balance was wrong then. Or was it premonitory?!? XXXDAn

-
Too much "Hello Kitty" That was Nelsons biggest trick: The paint: The french lying on the decks of laughter and could not fight any more properly ´cos of the tears in their eyes ;-) XXXDAn See also: http://modelshipworld.com/index.php/topic/11229-hms-victory-re-paint/#entry341339
-
"... whon knows were this will end ..." This will end straight in the heart of the year 2525 ... ... or sooner ... ... or later ... XXXDAn
-
Hello Kitty ;-) No wonder the french got irritated ... XXXDAn
-
And now, wittness a moment of historical grandeur: It is finally invented, the WIMMELMODEL! Look for the 3 minions ... ... papagena ... ... banana ... ... bunda ... ...hihihihihihi... XXXDAn
-
Hello Jan perfectly right. This is is a replacement "slide" in case the original axis is damaged and no spare wheel could be fixed. I think with the adrenalin up the crew would manage to somehow lift the gun by the means of jacks or levers to replace the missing wheel. The half wheel has the square hole to fit the original axxis and the missing "wings" are no problem if the nails go in at an angle of 45°, anyway much easier to hammer ;-) Röding was a tea merchant that published his work in between 1793 and 1798, so being contemporary to Steel. His work even went straight into the first german Deutsches Wörterbuch (English: The German Dictionary) from Brothers Grimm in 1838 (also known for their fairy tales collection). XXXDAn
-
Just found tome 4 :-) https://ia902700.us.archive.org/2/items/bub_gb_SOZWAAAAcAAJ/bub_gb_SOZWAAAAcAAJ.pdf XXXDAn
-
Figure 321 if that helps :-) You have a link for the online edition of the text books? Cheers, Daniel
-
@ Henry: Wonderful catch at the Encyclopedia Britannica ! Are there any pictures from the act of shipping Constitution´s rudder? That would be the confirming piece. Cheers, Daniel
-
... an´now comes Röding :-) Allgemeines Worterbuch der Marine – 1798 by Johann Hinrich Roding https://de.wikipedia.org/wiki/Johann_Hinrich_Röding http://www.lot-tissimo.com/de/i/9163564/roeding-woerterbuch-der-marine-3-bde-schiffahrt-roeding-j-h-allgemeines-woerterbuch-der-marine-in http://www.zvab.com/buch-suchen/titel/allgemeines-woerterbuch-der-marine/autor/roeding XXXDAn
-
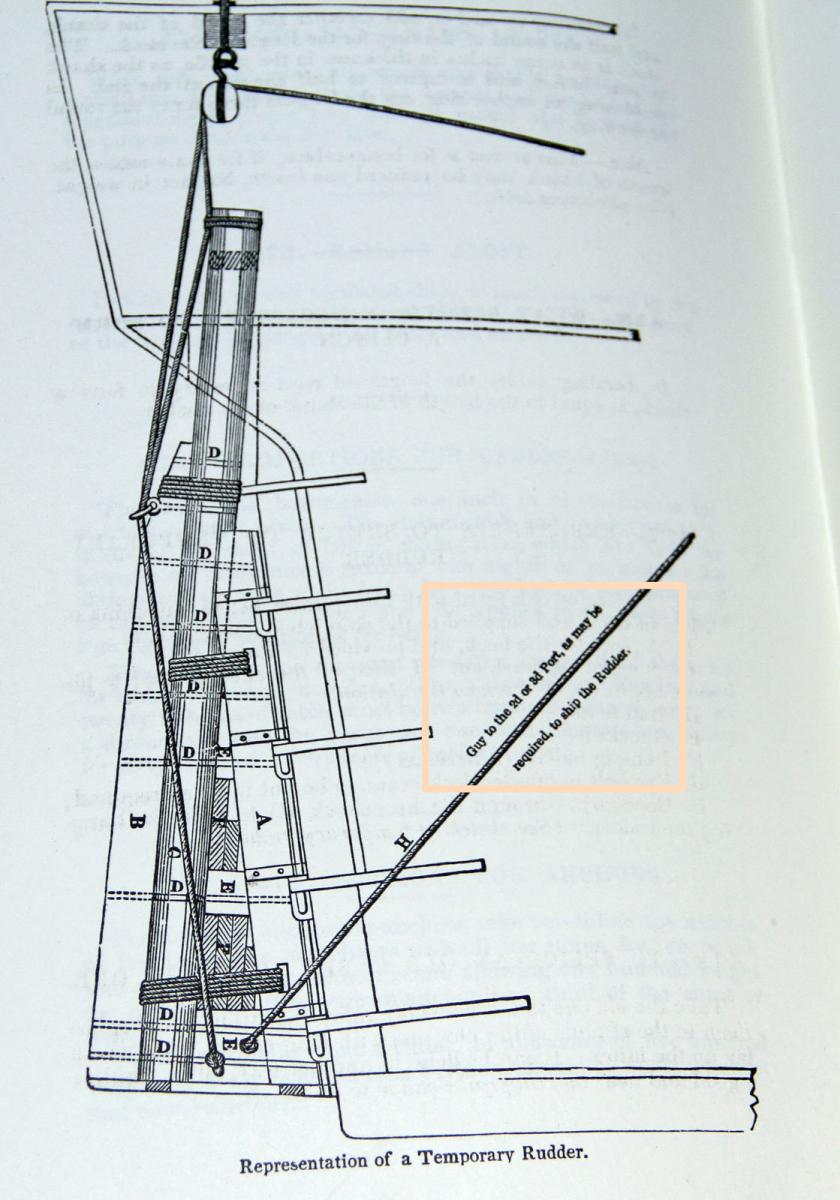
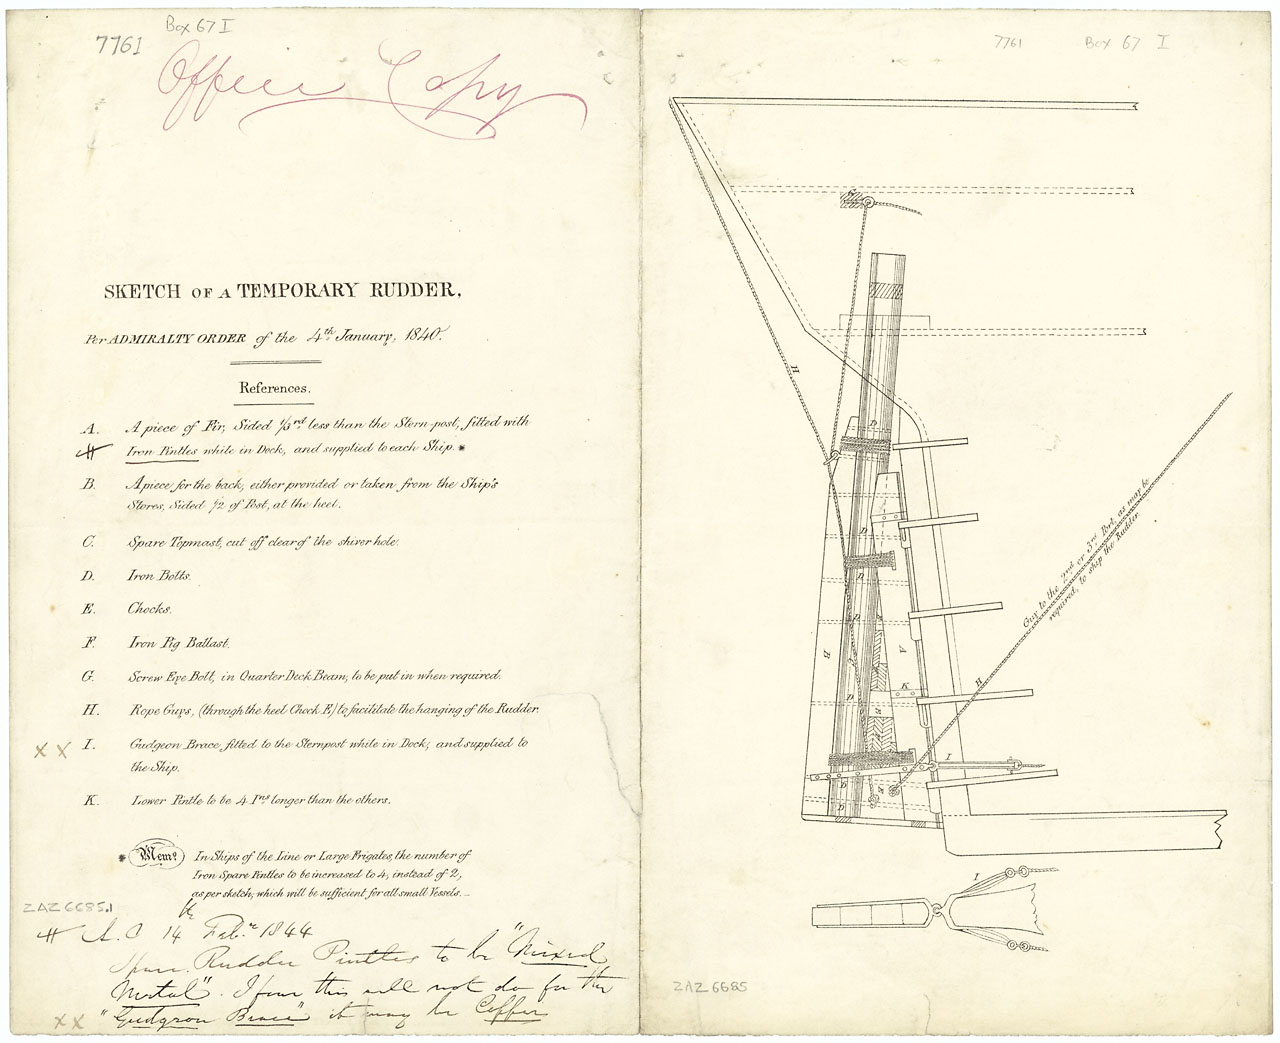
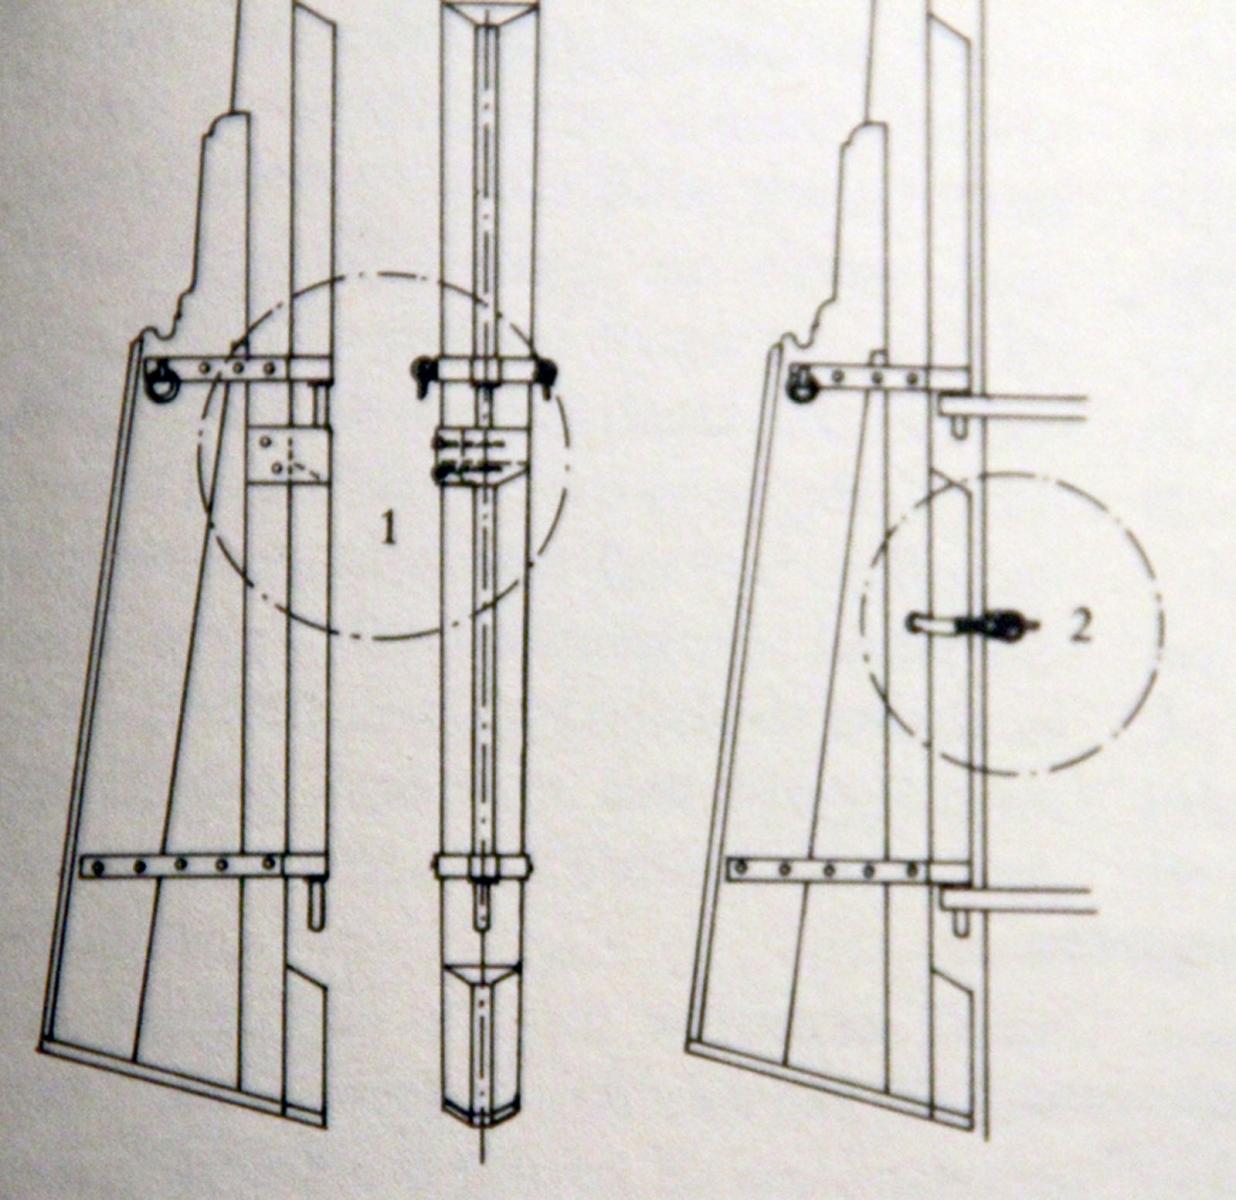
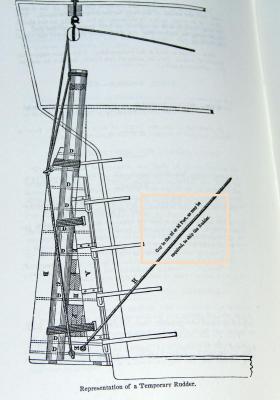
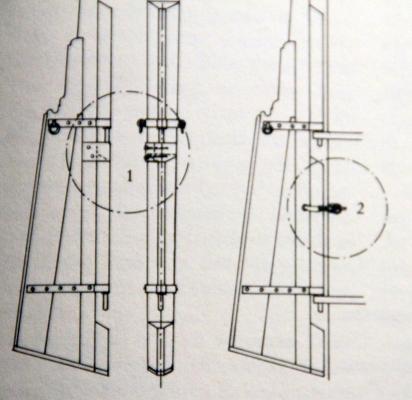
Some more hints is Nares (I hope as it was late when I found it ... :-) Eventhough it is an emergency rudder it states the same purpose: shipping the rudder :-) There is a quite similar drawing in NMM ZAZ. "... to facilitate the hanging of the rudder." Not to be mistaken: Marquardt shows in Schoners a hole as part of a lock, but placed far more inside See N#2. Cheers, Daniel
-
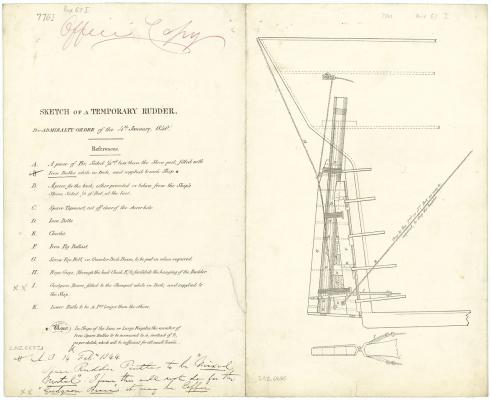
Thank you popeye, this is like I was guessing in first place Just getting together facts. - The holes are on purpose and go though and are - in case of the Constitution - even lined with lead - the placement appears well chosen and is even recorded in official plans - the lead usually points to a rope passing through as it avoids chafing If I understand the description well, it is like the sketch I did some time ago for the original discussion in the makeover thread: - If the rudder is hanging over the guedons, it can be directed into the right position by two ropes - The red rope can pull the rudder into the starboard direction and can be released by pulling port, the green vica-versa. - Once the rudder is in place, noboby has to dive to undo the fixing of the ropes, one just pulls them out
-
Yes - Röding :-) XXXDAn
-
There should be no iron work if the rudder is coppered :-) But you are right, mostly wood, one would suggest the rudder to float. But still it was found on the seabed after 200 years. XXXDAn
-
You are on the right track :-) XXXDan
-
The search machinery is working full sail, no safety to the masts ;-) Got two hints in our german forum: - Dom Fernando als shows reinforced holes on the rudder - Constitution´s plans from the 1930ies show apparently the holes as 2 inch lead bushings. XXXDAn