


Roger Pellett
-
Posts
4,519 -
Joined
-
Last visited
Content Type
Profiles
Forums
Gallery
Events
Everything posted by Roger Pellett
-
Festool shop vacuums - a quieter option
Roger Pellett replied to druxey's topic in Modeling tools and Workshop Equipment
Unless you own stock in a shop vacuum filter company, if you plan to hook your vacuum up to a major woodworking tool, a cyclone installed between the tool and vacuum is a good idea. The cyclone separates the “big chunks” that would ordinarily plug up your vacuum’s filter and dumps them into a dedicated container. These cyclones have no motors or moving parts. Roger -
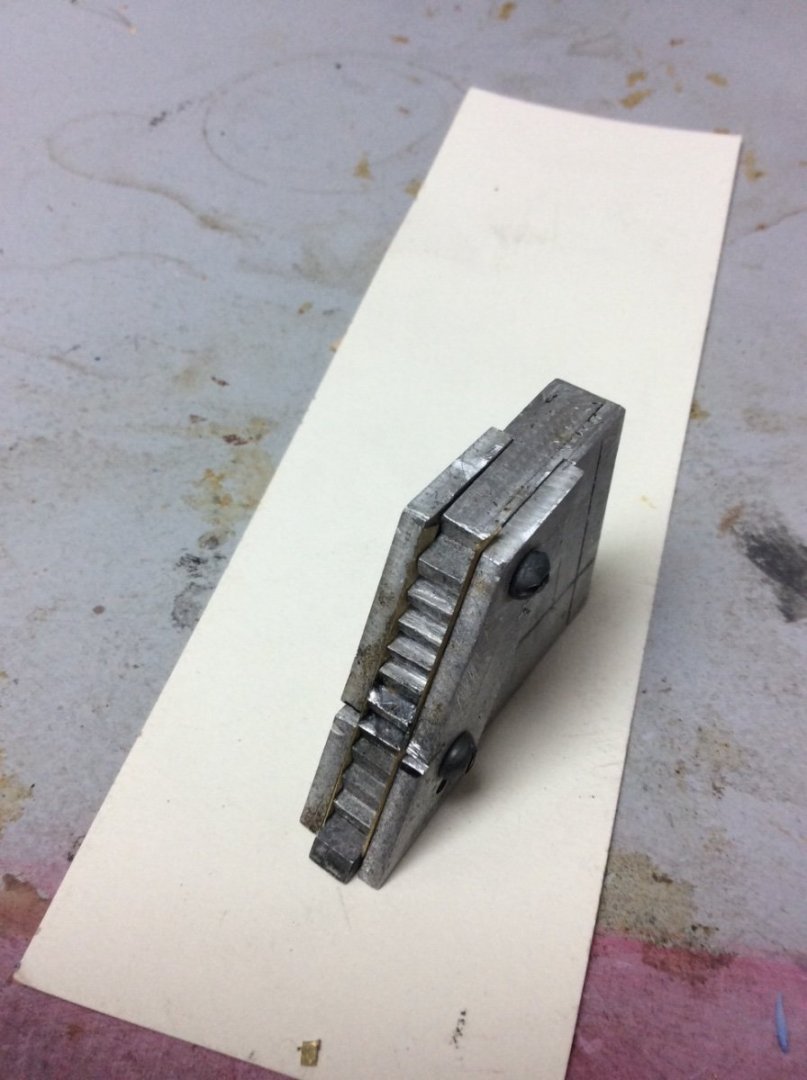
Here’s an example of a specialized homemade fixture machined on my Sherline lathe fitted with its milling column. The fixture holds brass parts for ladders while being soldered. It’s made from aluminum. Aluminum is easily machined and solder does not bond to it. Aluminum is cheap and readily available from hardware and home improvement stores. Most of the jigs and fixtures that I make do not require higher strength materials.
-
Steamships burning solid fuel have existed on the Great Lakes into recent times. One still sails; SS Badger on Lake Michigan. For the past 130 years or so, fuel of choice has been coal. Therefore, Great Lakes experience may differ from your river boats if they burned wood. A typical Great Lakes marine boiler was fitted with three cylindrical furnaces. Each of these furnaces was cleaned once per four hour shift. This involved raking the fire from the furnace onto the fire plates in front of the boiler and raking the clinkers aside. The clinkers were hosed down and shoveled into the ash gun. The ash gun used high pressure water to lift the clinkers over the side. If the gunboats burned wood exclusively it is certainly possible that crews did not have to deal with clinkers that would plug furnace grates. Also, the boats that Alan Bates wrote about, unlike the gunboats, carried their boilers at or above main deck level so that the pipe through the bottom of the hull could work. On the other hand, ash guns were simple machines without moving parts, and the doctor would have supplied high pressure water. The ash gun was nothing more than a receptacle with a high pressure water pipe and a discharge pipe over the side. The discharge was above the waterline to prevent water from being siphoned aboard. Roger
-
Major Sherline components: Lathe bed, mill table, mill column, motor and spindle assembly are modular. This means that they can be interchanged to build a lathe or mill as the need arises. I own a Sherline lathe with a detachable milling column. For milling, this makes use of the lathe cross slide as a milling table. This is entirely adequate for milling small metal parts for models and for milling homemade jigs, fixtures, and tools. The lathe cross-slide would probably be too small and would not have enough travel to mill the deadwood for a large POF model. In that case, I can buy a separate milling table to use with my existing column and motor spindle assembly. The reverse should be true. If you buy a stand alone Sherline Mill, the motor spindle assembly should be able to be used with a separate bed to make a lathe as needed. Sherline tools and accessories are beautifully made and well engineered instructions are well written and actually tell you how to use the equipment. All are available in either Imperial or metric calibrations. Roger
-
Welcome to MSW! Sunfish sailors are especially welcome here. My first 1:1 scale sailboat was a wooden Sunfish, built with my father in our basement in 1957 from an Alcort Kit. The kit cost $300. Great boats! A couple of years ago, I read Nathaniel Philbrick’s book about rediscovering his passion for sailing by resurrecting an old Sunfish and eventually competing in the Nationals. Roger
-
MCB, These Lakers were a bit like Liberty Ships post WWII. A lot of them were available at bargain prices. They would have shown up in any trade where they could be competitive. The Poker Fleet, sailing on the Great Lakes used these ships. They were named Ace, King, Queen, and Jack. Some were also used in the West Coast redwood lumber trade. There certainly is no reason why they would not have been used in trades to and from Cuba. Roger
-
Tom, I agree, particularly in modern sailing yachts where much weight is concentrated in outside ballast (lead keel).
-
Steven, I wonder if the strange downward extension of the after castle is the side view of a box for a toilet. Later versions of Medieval ships show these separate “thunder boxes.” It would have been a feature more familiar to the artist than more technical details.
-
A couple of random thoughts: David, “Back in the day,” Model Shipways kits were packaged in distinctive bright yellow boxes. These Yellow Box kits all featured precarved solid pine hulls. If your friend’s father’s model is 60 years old it is probably one of these MS yellow box kits. Dave E. Another option would be to scratch build a Rattlesnake model using Harold Hahn’s method. Readers of my posts will suspect that I get a commission for selling Hahn Plans.🤣. I don’t! I simply believe that this is the method guaranteeing neophyte model builders and more experienced builders like myself the best possibility for success. In Rattlesnake’s case, Hahn modeled her back in the 1980’s and published an article, and plans in the Nautical Research Journal. Back articles emailed to you are only $2.50. If this looks like a good option, you can buy the full sized set. Roger
-
These DIY oil stains are nothing more than an oil pigment mixed in linseed oil thinned with mineral spirits or similar. My father, who In later years enjoyed refinishing antique furniture used to mix up his own from the exact same ingredients. It has been many years since I have bought any of these so maybe Minwax now sells a water based product with lower volatile organic pollutants, but in either case, the principle is the same. These are really thin translucent paints. A true stain needs to penetrate the wood’s surface. Otherwise, when you wipe off the excess it leaves hard to stain areas bare. Different woods “take” these stains differently. They are particularly ineffective at staining hard dense woods. I would assume that your kit material is basswood, a soft and porous wood. which should be easy to stain. It would, therefore appear that the splotchy areas result from glue sealing the surface. While you may think that you have removed the glue, there is probably a very thin layer that remains. What to do? 1. Scrape the area where the stain did not penetrate to thoroughly remove residual glue and re-stain those areas. You can make a tiny scraper from a piece of a single edged razor blade or box cutter blade. In this case, scraping is better than sanding. 2. Paint affected areas. Dig some pigment from the bottom of the can. With a fine brush carefully paint affected areas. Depending on the “vehicle” in the stain, linseed oil or water, with some of this clear material on a clean brush blend the painted area into the stained background. Let things dry throughly. 3. A more elegant solution is the same as 2. except using artist pigments. 4. Nuclear Option: The stain should be easily removed with commercial paint removers allowing you to start over. Roger
-
My metal ruler was wrong.
Roger Pellett replied to modeller_masa's topic in Modeling tools and Workshop Equipment
British Model Builder Brian King, published a book several years ago describing his modeling techniques. He specializes in Early 20th Century Warships. He prefers to use scales graduated in 1/16ths of an inch. It is his opinion that it is more accurate to interpolate by eyeball between these than to try to pick off 1/32nds or 1/64ths. -
The boat in question appears to be one of the 40’ standard steam cutters of 1900. The cover is an awning to shelter passengers from the weather. These launches burned coal stored in closed metal bunkers so keeping fuel dry was not much of a problem. Canvas covers like these were still used by US Navy boats in the mid 1960’s when transporting personnel. I spent a 1964 summer Midshipman cruise aboard a US Navy Minesweeper In coastal Japanese waters and the squadron often anchored at night. Upon anchoring, our 26’ motor whaleboat was launched and used to visit other ships, trade movies, deliver mail, etc. in the cold waters of Northern Japan the canvas awning was much appreciated. The 1900 date is loose. The Navy began seriously investigating standardization of Boats about 1890. A paper describing this effort appeared in the Naval Institute Proceedings In 1892. The paper discusses rowed, sailed, and steam propelled boats. The 1892 steam boats are different from the ones shown in your post. By the late 1890’s the Navy had developed a complete system of standardized boats and a paper describing this was read at the 1898 SNAME Convention. Detailed drawings of these boats were published in the 1898 SNAME transactions, available at many large libraries. A photo of USS Maine taken prior to her 1898 destruction shows her carrying one the “1900” standardized boats. In 1900, the Navy formally published complete drawings for the entire series of boats in a Boat Book. It is apparent that the purpose of this book was to allow forces afloat and naval shipyards to build and to repair these boats. A very high quality edition of this book was reprinted by Marino Press about 2007. Copies can still be found on used book sites. The book includes resources for several lifetimes of ship model building. I would, therefore, guesstimate that your photos were taken in the second half of the 1890’s or later. Roger
-
My metal ruler was wrong.
Roger Pellett replied to modeller_masa's topic in Modeling tools and Workshop Equipment
In heavy metal fabricating trades, structural steel, piping, ship fitting, etc. Work was generally done to a tolerance if 1/8in. In building riveted ships, closer tolerances were required as a 1/8in misalignment in a riveted hole was unacceptable. In British yards, the practice was to punch holes in one plate erect it on the building ways and then temporarily hang the mating plate, using a paint stick through the punched holes to mark the mating holes. The mating plate would then have to be taken back to the plate shop to be punched. An expensive process. In the 1890’s an American shipbuilder named Washington I. Babcock building Great Lakes ships in Chicago, developed a system where all rivet holes, for both mating plates, could be layed out on the mould loft floor. This system allowed Great Lakes Shipyards at the time to be the most productive in the World. -
My metal ruler was wrong.
Roger Pellett replied to modeller_masa's topic in Modeling tools and Workshop Equipment
An old trick from the pipe fitter trades where wooden folding rules were still used. Pipe fitters seldom used the first inch of the rule as the end was likely to worn. No, everything was not built one inch short.😀. They just moved everything over one inch. I too like using triangular architect ‘s scale as I like to build directly in scale dimensions. As this scales have 10 different scales and one regular inch scale, there is a possibility of measuring with the wrong scale. To minimize this, a spring paper at least assures that the scale is laid down with the correct side up. Roger -
BTW, your freighter model is not just any freighter. It’s a “Laker,” one of the ships built in Great Lakes shipyards during World War I to the Norwegian Fredrickstad design. These ships were only 240’ long; the maximum length for transiting the Welland and Saint Lawrence River to get to salt water. 50 or so of these ships were built by Alexander McDougall, the inventor of the whaleback ship, in Duluth, Minnesota. With Government financing he build a shipyard, machine and fabrication shops, and housing and recreational facilities for workers. Very few of these and ships built in other yards were completed before the war ended. The shipyard closed in the 1920’s or ‘30s but the Riverside community founded to support the yard remains. Roger
-
USCG Harriet Lane - 1:96 1/8" = 1' Model Shipways
Roger Pellett replied to kurtvd19's topic in REVIEWS: Model kits
Whether it’s worth £240 is up to you but I would like to comment. I received a smaller scale version (1:144) version of this kit in the mid 1960’s as a Christmas gift. It resulted in a handsome model. Many years later I still thought enough of it to replace the shabby plexiglass case that it resided in with a new glass case. It still sits atop my bookcase. Prior to the arrival of European POB kits imported into the US in the1970’s there were three main American producers of ship model kits; A.J. Fisher, Model Shipways, and Bluejacket. These models were based on solid research, much from the Historic American Merchant Marine Survey of the 1930’s. These kits build into models of real ships not fantasy “pirate ships,” or river boats like “King of the Mississippi.” Even the few kits like the imaginary Baltimore Clipper Dapper Dan are based on solid period documentation of similar vessels. After spending 100’s of your time working on a model it should be worth something to know that it accurately represents a real ship. The present Harriett Lane Kit is a redo of my 1960’s kit and includes some notable improvements. The larger scale allows finer detail. The photoetch paddle box sides are a major improvement over the decals provided with my model. The laser cut paper is a nice way to simulate paneling on deck structures. My 1960’s model features cast metal half paddle wheels glued to the underside of solid wood paddle boxes. The treatment of the paddle wheels and boxes for the present model is much more realistic. With the switch to POB construction, all model kits today are basically collections of wood “sticks and sheets. “ With some effort you could find plans of a similar vessel (Hint: William H. Webb’s Portfolio of Wooden Ship Drawings) and build the model from scratch. With the kit, a skilled model maker has translated drawings into parts and detailed instructions for assembling them. This is really what you are paying for. The question to be answered is whether the finished ship model is worth the time spent building it. I believe that in this case it is. Note: I better finish this before I sell the kit to myself! 😆 Roger -
Waterslide Decal Paper
Roger Pellett replied to hof00's topic in Painting, finishing and weathering products and techniques
Thanks, very nice models. -
Thanks for making my point!😆 That’s exactly when tiller extensions are useful, and sometimes necessary. You were racing in 28kts of wind. The two of you were skilled, and were squeezing maximum performance from a boat sensitive to weight distribution. The boat in question is a sharpie designed for home building on a limited budget. It would presumably be used as a family day sailer/ cruiser. A tiller extension on this boat would just be in the way. During the 1930’s and 1940’s several designers including Chapelle and L. Francis Herreshoff promoted “family friendly” boats as an alternative to expensive racing yachts. Mystic Seaport maintains Herreshoff’s voluminous collection of correspondence. Much of it is on line. There is at least one letter from a soldier in a military hospital recovering from the war. He wants to buy a set of plans for Herreshoff’s classic H-28 ketch. Something to look forward to. I hope that he was able to build it. Roger
-
I supposedly had a great great uncle, who served on the Baron De Kalb. If you have a crew muster, his last name was Speer. He was from Cincinnati, Ohio. His brother, my great grandfather served in the 7th Ohio Cavalry.
-
Dugout canoe build
Roger Pellett replied to reklein's topic in NAUTICAL RESEARCH GUILD - News & Information
Adzes and broadaxes always looked to me like a good way to remove your foot! Roger -
Waterslide Decal Paper
Roger Pellett replied to hof00's topic in Painting, finishing and weathering products and techniques
I think that I read somewhere that white waterslide decal paper is available. To use this you print the background black, or whatever color you need and the letters remain white. Has anyone done this? -
How about impregnating them with shellac or clear lacquer based natural l polish. Either one is nicer to work with than UGH! CA glue.
- 740 replies
-
- 2
-

-

-
- Tudor
- restoration
- (and 4 more)
-
You need to “spile” the plank. Spiling, is nothing more than shaping the width of the plank so that it fits tightly against its neighbor. As the plank is curving around the hull in three dimensions, it is impossible for you, thinking in two dimensions to understand the shape required. As your photos demonstrate, trying to edge bend the plank while bending it around the frames doesn’t work either. If you visualize the plank with X the longitudinal dimension Y the plank width and Z the dimension perpendicular the model’s centerline, the idea is to vary the width of the plank (Y) as you move in the X direction. If this is done properly it will lay flat against the frames and butt tightly against its neighbor. The planking tutorials referenced by Allan and Gregory will show you how to do this. Roger
-
I’m afraid that building the model per the kit specs produces something akin to the notorious Jackalope. The thread title describes this as a Small Working Vessel but the accommodations point towards a yacht. Howard Chapelle was an admirer of the sharpie hull form, especially as an economical, simple boat for home builders. His career was heavily influenced by the depression. He, therefore, designed a number of yachts around the sharpie hull form. So, if you are building a work boat, rigging should be simple, and easily handled by a small crew. Often one man would sail the boat while others handled, fish lines, crab traps, etc. Rigging could be dependent on the particular job that the boat was expected to perform. In some cases, the boat would sail on a reach under shortened sail along a line to haul crab traps. At other times the boat would work while drifting or at anchor tonging for oysters. A lightly built boat like this would not haul an oyster dredge. The boat’s finish would also reflect her work- no bright work, everything painted, hardware store colors; think “floor and deck enamel”. If you are building a yacht, you’re the owner. Remember that this is not a racing yacht. No high tech “go fasters.” Rigging should be easily operated by a family out for a day sail or cruise on semi protected waters. Rig it the way that you would want to sail it. I agree with Wefalck. No tiller extension. While necessary for racing dinghy’s where hiking out is the norm. Otherwise, figuratively and literally they are pain in the a**.😆. I have capsized at least one boat by the skinny tiller extension slipping out of my hand. Roger
