Seventynet
-
Posts
797 -
Joined
-
Last visited
Content Type
Profiles
Forums
Gallery
Events
Everything posted by Seventynet
-
 Rob, yet another solution from the innovation master! Best, Ian
 -
Robert, that's exactly what I meant - but you did a better job than I did! I like your solution for the jig. I might just borrow that idea. I toyed with the idea of attaching a mini level to a jig but when I think about it your approach is better because you don't have to worry about the boat itself shifting out of true - if I understand your method correctly. Keep up the brilliant work. Ian
- 527 replies
-
- 1
-

-
- caldercraft
- victory
- (and 1 more)
-
Just beautiful Nick. Keep the pictures coming. Best, Ian
-
Well if you kept the narrowest planks at 2 mm that means you stayed within the no less that one half the normal plank width rule. Your ship's planking will be very happy and mar-free to be sitting on that foam.
-
That's one fine planking job Chris. It looks like you even added the drop planks in the same place as the replica. Tell me did you end up doing any spiling or much edge bending? I know we had a discussion on that earlier. Either way you sure mated everything up well. I was going to ask how you joined your noodles but noticed you already answered that in response to someone else asking the same question. Best, Ian
-
Lovely work Paul. I'm well in your wake. Best, Ian
-
I second Rob's suggestion. But I'll add another must, if you don't already have one - a proportional divider. Although others may argue with me I stand firm on the benefit of one. It accelerates the process and, arguably, it also affords more accuracy. By the way, is that a variegated philodendron growing out of the starboard side of the Victory?
-
Is the Caldercraft HMS Victory still the best?
Seventynet replied to yangliyuan's topic in Wood ship model kits
yangliyuan, The CC Victory is a massive kit requiring a long time to complete. It is my first model, a choice many would advise against, but I am enjoying it and am able to build it (so far) because of the collective experience and examples on this site. However, you have said you don't like the coppering. Then you should buy different wood than that supplied (African walnut, aka mansonia) because it is not intended to be a final surface, or think of a different model. Good luck with your decision. Ian -
Waspy, Thanks. I went ahead and did it and am left wondering why the instructions wouldn't say to do it. Life is so much simpler. Ian
- 191 replies
-
- 4
-
-
- victory
- caldercraft
- (and 1 more)
-
Looks phenomenal Rob! it brings the ship to life. I'm really going to have to learn how to paint those glittle guys. Best, Ian
- 295 replies
-
- 1
-
-
- victory
- caldercraft
- (and 1 more)
-
CC Victory builders, Given the contortions I have to put the upper gundeck through to get it through the upper bulkhead works and the obvious risk of it snapping during said process, I think I see the wisdom of cutting the upper gundeck down the middle. I know some of you have done this. Aside from accounting for the missing area from the blade kerf, is there anything I need to consider if I take this approach? I think I would simply leave the blade cut gap open when I glue down the halves and just plank over it. Comments from anyone who has gone through this? Thanks, Ian
- 191 replies
-
- 3
-
-
- victory
- caldercraft
- (and 1 more)
-
Hi Robert, thanks for the encouragement and for looking in. I saw others using the waxing technique and decided to give it a shot, it can't hurt anyway. Good luck with your starboard side, but it doesn't look like you need any. Hi Heinz, Thanks for the compliment and for following my build. I have been thinking about how I'm going to line the gun ports (the ones with lids). I'm probably going to try a few different approaches because it looks like they all have some advantages. I will have to discover what works best for me. Part of Vasileios' approach appeals to me. He created a box channel of the exact dimension of the gunports (I know others have done this to varying degrees), inserted it into each gun port then marked it thereby transcribing the curve of the hull, removed it, cut it, then reinstalled it flush with the unplanked hull. I do note that he put his liners in before his second planking but that would not work unless you were very careful to end your second planking at the edge of the plywood gunport because as you say, the liners need to be inset. So that part of his approach is too risky for me. My modification would be to push the liner in to be flush with the plywood surface. Anyway his link is: http://modelshipworld.com/index.php/topic/3704-hms-victory-by-vasileios-caldercraft-172/#entry334081 Many others installed balsa supports before they installed their liners - which doesn't directly address your concern about the curve of the hull, but most seem to have done a pretty good job to me. I like the jig that Gil Middleton used to insert his liners - with the small level: http://modelshipworld.com/index.php/topic/485-hms-victory-by-gil-middleton-caldercraft-172/page-1#entry8176 Anyway, the main thing for me is that it isn't planking! Best, Ian
- 191 replies
-
- 4
-
-
- victory
- caldercraft
- (and 1 more)
-
Don, With that kind of blade, at 0.1mm, it makes all the difference. The first cm of the blade isn't supported so unless it has a smooth run it will fold and potentially ruin the blade. Hey thanks for looking in and leaving the compliment. Best, Ian
- 191 replies
-
- 3
-
-
- victory
- caldercraft
- (and 1 more)
-
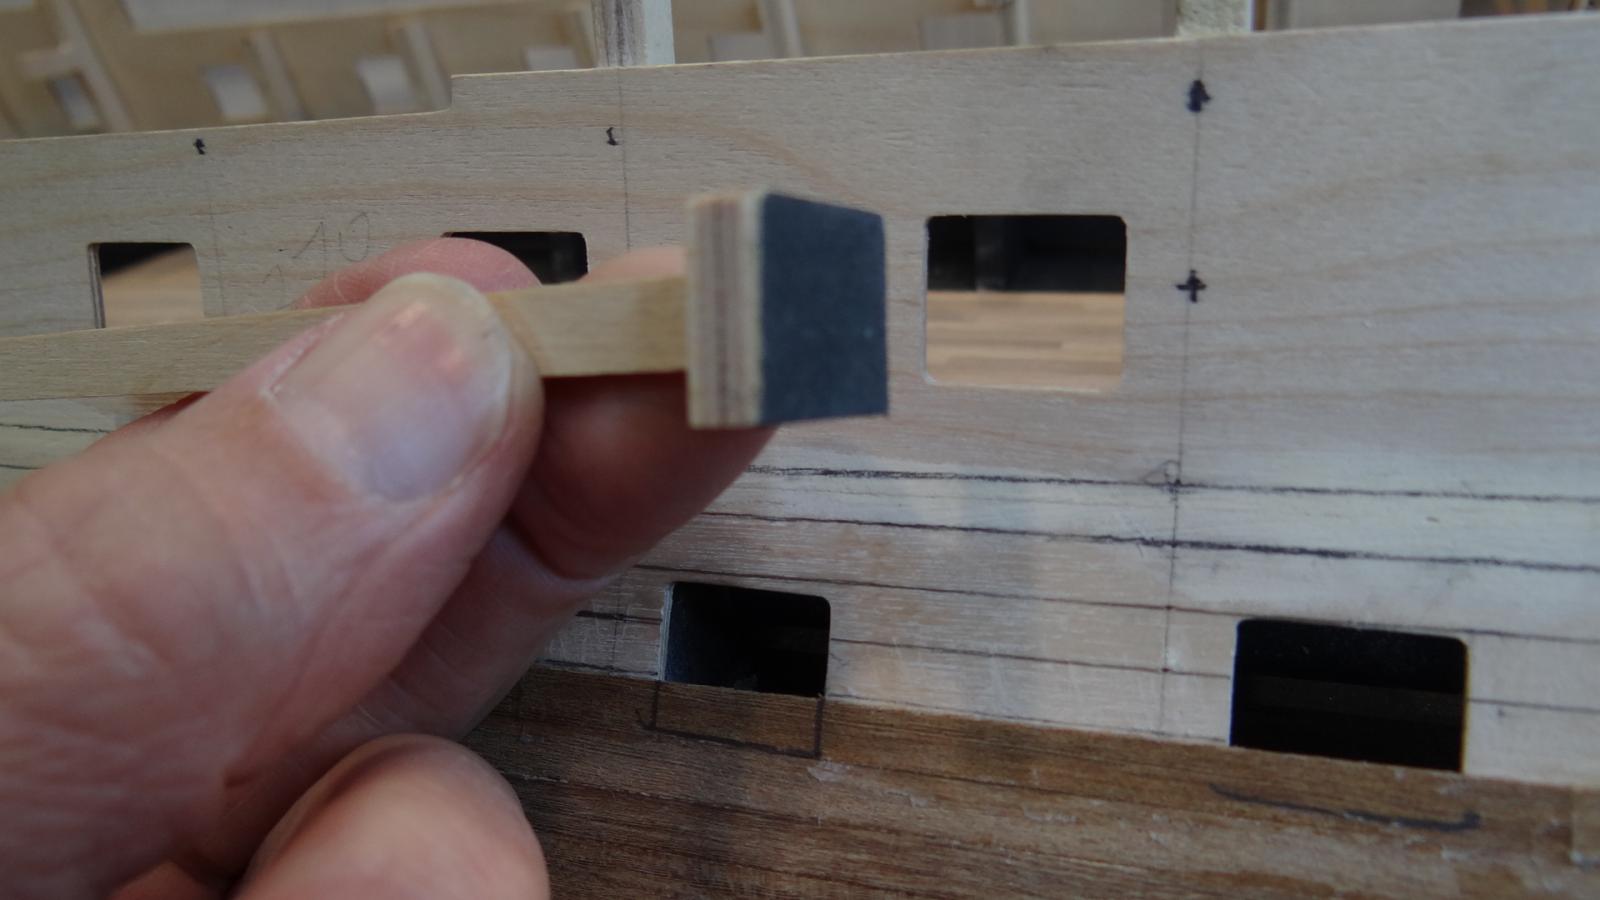
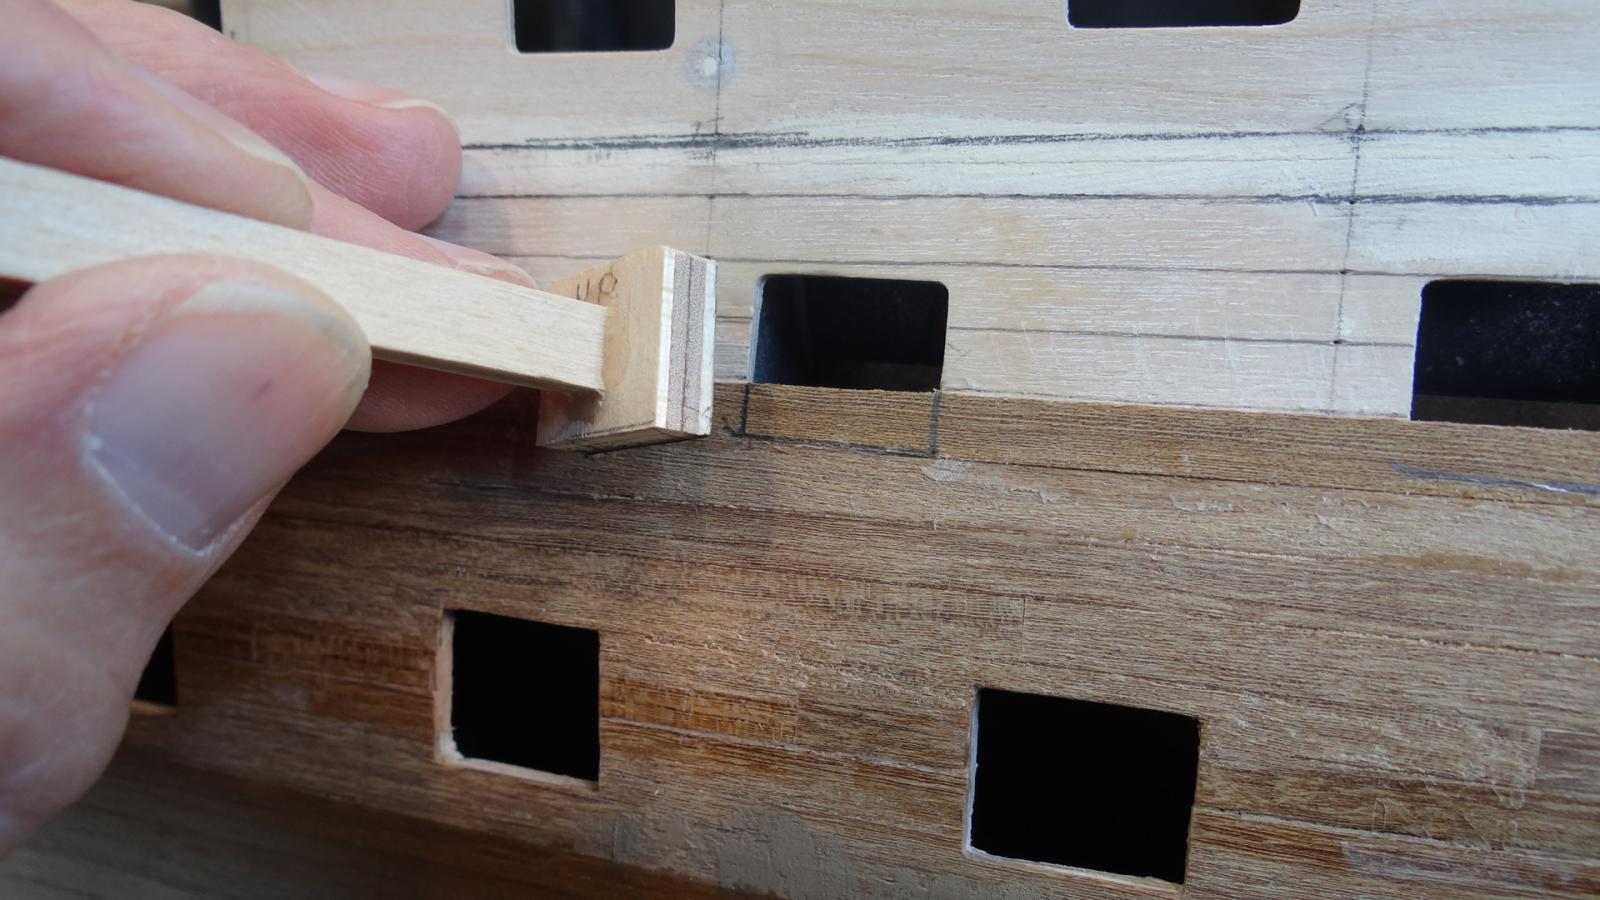
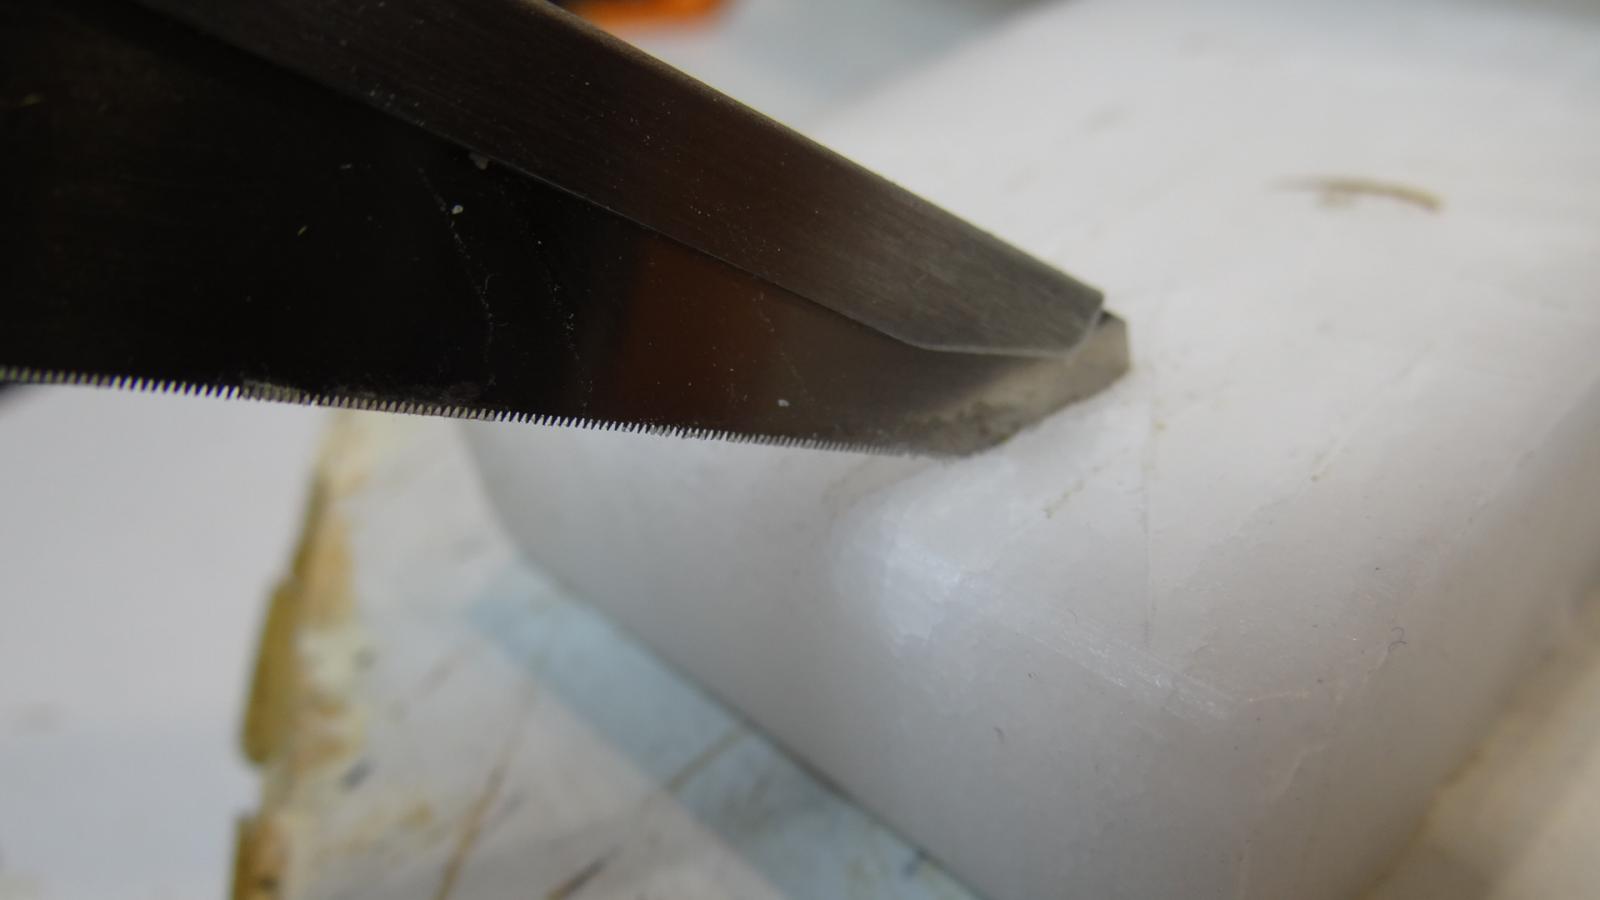
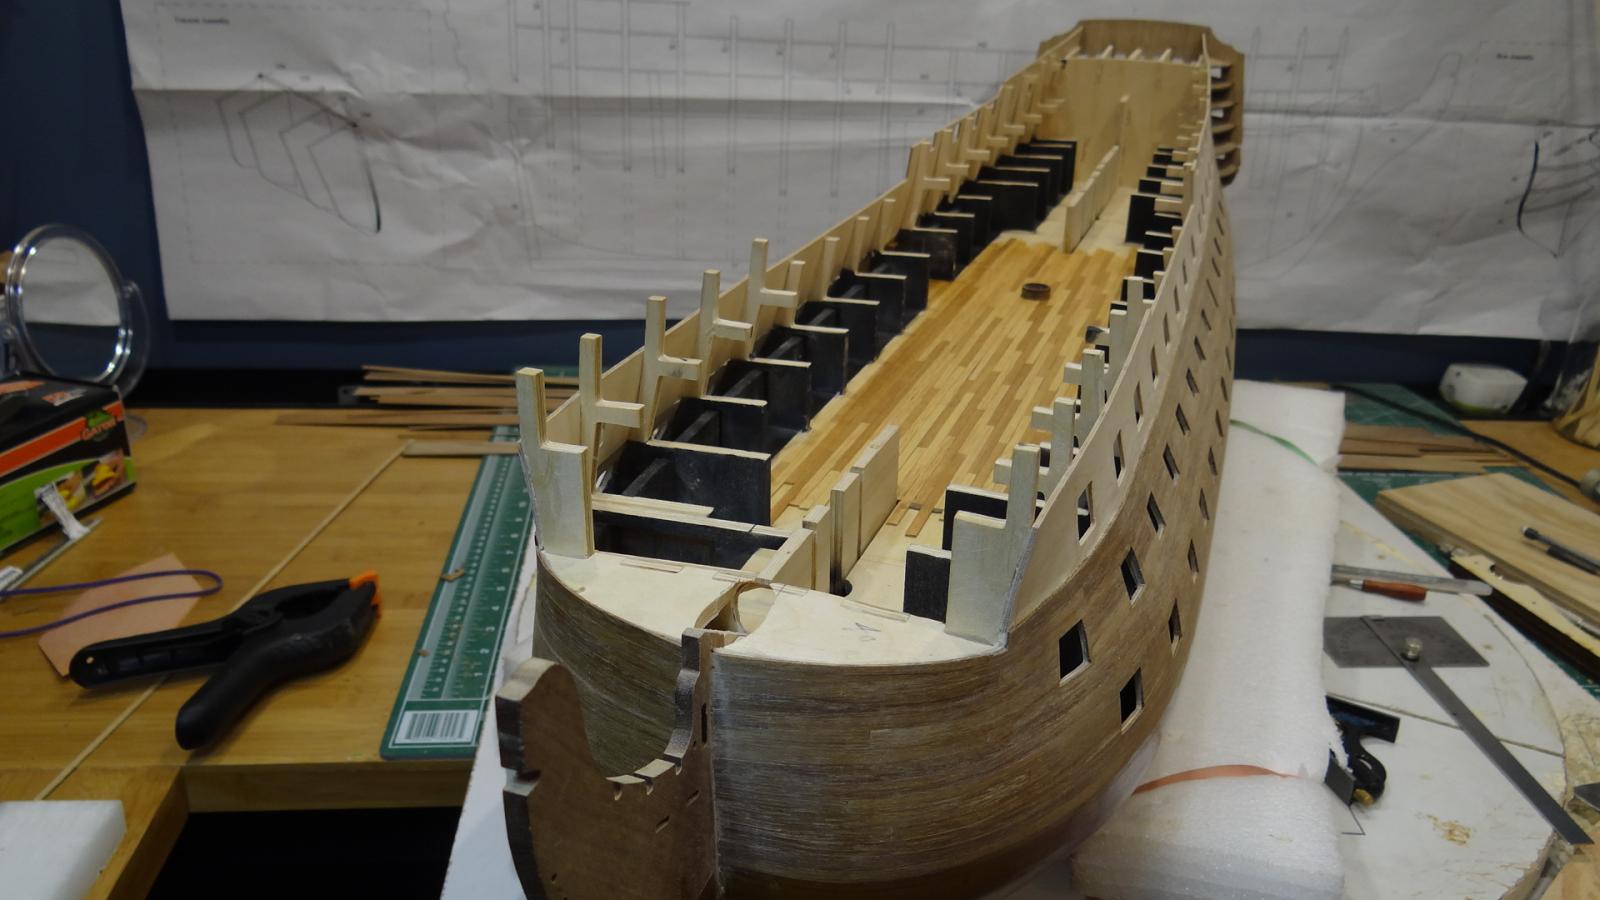
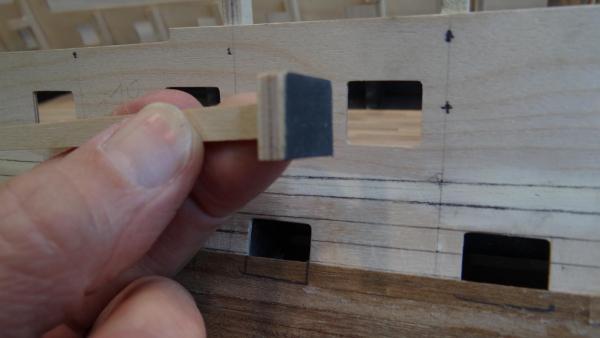
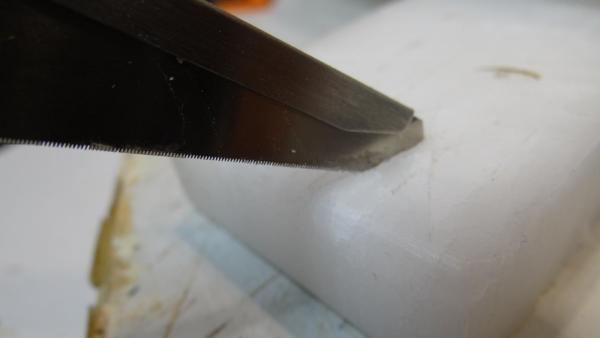
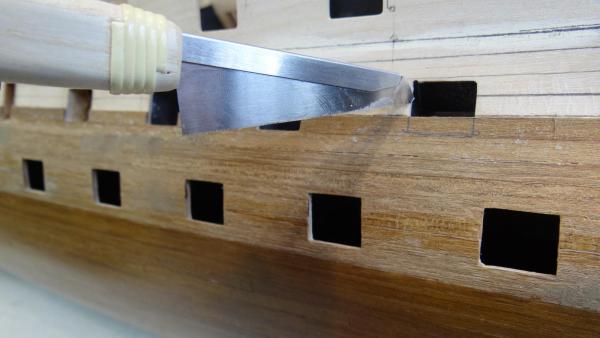
Hi Folks, I have completed planking up to the bottom of the upper gun ports, cut out the gun ports as I planked, installed the main mast partner and applied two coats of wipe-on-poly to the middle gun deck. Now I think I'm ready to start the installation of the upper gun deck, bulwarks and lining the lidless gun ports. I wanted to show the technique I used for cutting out the gun ports - which for this model means cutting out the second planking. An option I did not follow was to cut the planks to the edge of the ports before I glued them. This seemed like too much work and would result in more mistakes. I cut the planks a day after I glued each row. I marked them with a jig exactly matching the openings. Sandpaper on the bottom of the jig so it wouldn't slip as I penciled in the line. I cut the planks using a ninja hyper saw which I waxed before each vertical cut. Horizontal cuts were mostly with a sharp chisel. I sanded the edges with a sanding stick, leaving fat where I could for when it comes time to fit the lids. The results were generally ok. Best, Ian Jig used to mark the ports: Marking the port: Waxing the saw: Cutting the port: Main mast partner: Middle gun deck wipe-on-poly:


- 191 replies
-
- 11
-
-
- victory
- caldercraft
- (and 1 more)
-
Robert, Believe me with your job on the first planking your second will be a breeze. Thanks for the compliment and for looking in. Best, Ian
- 191 replies
-
- 3
-
-
- victory
- caldercraft
- (and 1 more)
-
It looks like you accomplished a magnificant fit! I could not avoid a a few bulkheads peeking out of some of the gun ports, but you seem to have done this. Very good. I can't give you any advice regarding leaving or removing the nails because I didn't use any. But I can't see any reason that they couldn't be pounded in either. Best, Ian
- 527 replies
-
- 1
-
-
- caldercraft
- victory
- (and 1 more)
-
Folks, I don't know whether you knew about these saws, they look exactly the same but with more options - and ridiculously expensive! http://www.flex-i-file.com/hyper-cut-saws-blades.php I purchased the Ninja Hyper Cut Saw - Angled fine cut. I reckon it has at least 3 teeth per mm. I use it to cut out my gun ports. One has to be very careful to not be too eager with the stroke or the blade will fold and I'm sure make you curse your investment. I wax the blade before every cut. Best, Ian
-
Facinating build Charlie, thanks for detailing all the steps. Best, Ian
-
Hi Mark, thanks for looking in and for your advice. The sheen is kind of growing on me, it's mainly its effect on pictures. Once I've made more progress maybe I'll try the indirect lighting approach. By the way I am thoroughly enjoying the Licorne build. I learn something every time I look at it. Best, Ian
- 191 replies
-
- 3
-
-
- victory
- caldercraft
- (and 1 more)
-
Thank you for the kind words Chris, Robert and Rob and for the likes Mark. I've just finished, this minute, planking up to the bottom of the upper wales on both sides, as per instructions. Just a few gun ports to clear and some minor cleanup and I can move on to the upper gun deck, inner bulwarks and lining the lidless gun ports. Best, Ian
- 191 replies
-
- 3
-
-
- victory
- caldercraft
- (and 1 more)
-
Those masts look straight and right in line. Keep up the great job! Best, Ian
-
Looking very sharp waspy. Looks like you might be having some fun soon cutting out one or two gunports . Best, Ian
-
What a super job Robert! I really felt spoiled by using filler blocks - and if I had any regrets it's that I didn't use more. There's one area between bulkheads 2 and 3 and the stem/keel that you may want to test ahead of time to see if an abbreviated filler block would be helpful. It's an area where the garboard plank(s) come to a sharp taper and might benefit from some support. You may decide that it's not necessary I just remember finding it useful - but that was also my first planking job so take it with a grain of salt. Best, Ian
- 527 replies
-
- 1
-
-
- caldercraft
- victory
- (and 1 more)
-
Hello Robert, nice to see another Calgarian in the Victory club. Nice job! Have fun with the gun ports. What method will you use to cut them out? Best, Ian
-
You have been doing a great job and really ripping along. You've certainly left me in the dust! I really like the run of the planks and how you tapered them up to the bow. Best, Ian